

1.Introduction
Vtiger AI Extension Documentation
This manual provides practical instructions for using the Vtiger AI Extension in your CRM.
It explains how AI Chat, AI Assistant, and AI Agent help users interact with CRM data,
prepare content, update records, and automate selected CRM processes.
The documentation is focused on setup, usage, permissions, and examples.
For the full product overview, benefits, and commercial information, please visit the main Vtiger AI Extension page.
Main features of Vtiger AI Extension:
• Summarize CRM records
• Generate emails and replies
• Analyze sales pipeline
• Suggest next actions
• Prepare meeting insights
• Find relevant CRM data
• Create and update CRM data
• Automate repetitive tasks
• Generate and save activities
• Manage leads and opportunities
• Automate follow ups
• Execute multi step workflows

2.How to Activate License Key
License Activation
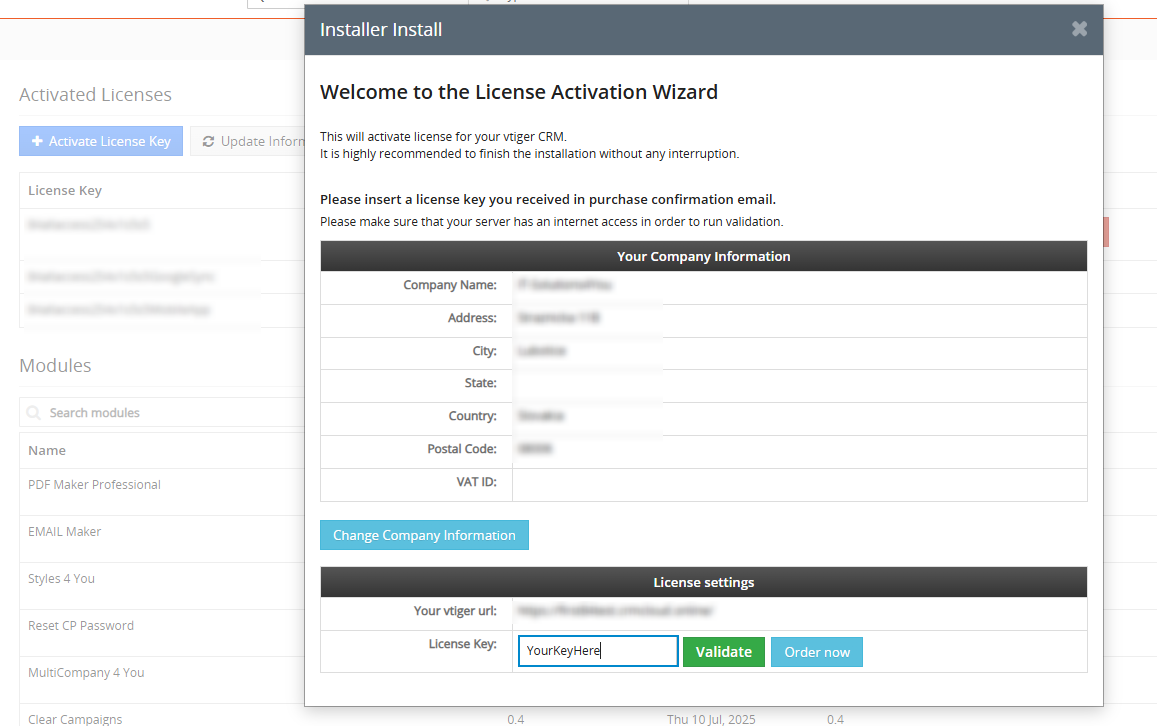
After purchasing a license, you need to validate it through the Installer.
If you do not have the Installer installed yet, please follow the instructions in the Installer Installation section first.
Then follow next steps to validate license key:
In the Installer, click the  button and enter your license key and confirm via Validate button.
After successful activation, the AI Extension will appear in the list of available extensions.
2.1.License Settings
All our modules are using Installer to manage licenses. Please check our Installer pages for more information.
You can access the License settings like its shown below:
(there can be more options from the pick-list, depends on the module)
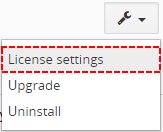
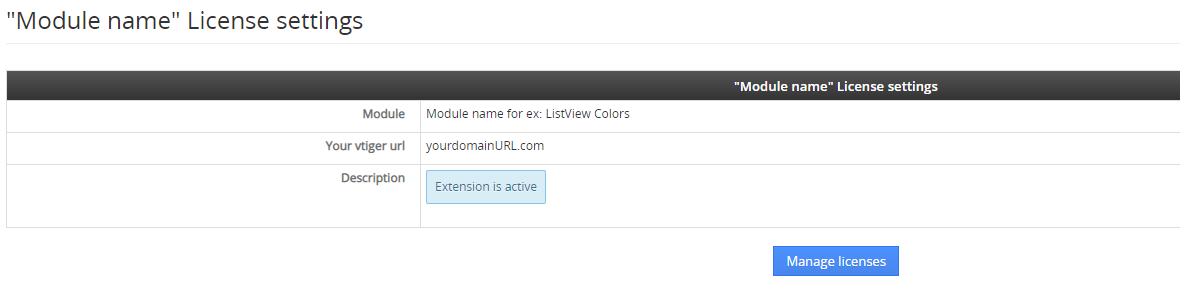
After accessing the License window you can see screen bellow with following information:
- Module name, Your Vtiger domain URL
- Description, if license is activate or not:
 – your license is currently active,
 – your license is not active and you need active it via Installer.
 – the Installer FREE extension is missing on your CRM.
To activate or manage license, click on the  button.
2.2.Deactivate license
If you want to deactivate your license, please provide following steps:
- Go to your Installer, by a click on Notifications Icon
 and then on the button
or via Main Menu – Settings – CRM Settings – Extensions – ITS4YouInstaller - The following screen will appear (see below):

Installer – deactivation of license You can deactivate license by click on the button

 Note: The module will be deactivated but not uninstalled and license will be removed from the Activated Licenses tab.
2.3.Reactivate license
To reactivate a license after deactivation, you need to follow the same process as you activated it first time:
- Click on the button and enter your license key.

- Confirm with
 button.
When the license was activated you can see module available in the List of Modules below.
3.How to install Vtiger AI
There are currently two options how to install extension:
- (Recommended) Using our Free extension Installer
(Please visit the Installer page for more info) - Manually installation using a .zip file
(You still need to have Installer in order to activate license)
The Installer is required for the proper operation and license validation of our extensions.
After purchasing a license, you can find the Installer in your order email or download it from your My Account portal.
If you are an existing customer and already have the Installer installed, you only need to activate your license.
After that, Vtiger AI will appear in the list of available extensions for installation.
⚠️ Uninstalling Vtiger AI Extension will remove all saved Settings!
3.1.Installation via Installer (default)
Make sure you have Installer installed, you can download Installer via My Acount Dashboard after purchasing License Key, or it will be send to your Email.
To install extension, click the  button next to the AI Extension and confirm the installation process. During the installation, and also during future updates, the Changelog may be displayed so you can review the latest changes before continuing.

After the license is successfully activated and the AI Extension is installed, you can continue with the next step in the documentation: AI Model API Key Configuration.
3.2.Manual installation
There is also a way to install / update the extension manually in some scenarios:
- Manual installation or update of the extension can be requested if you contact our support because you are facing some issues with extension.
- Standard way of installation and update is using our Installer. In some rare cases we can send you .zip file to update the extension manually.
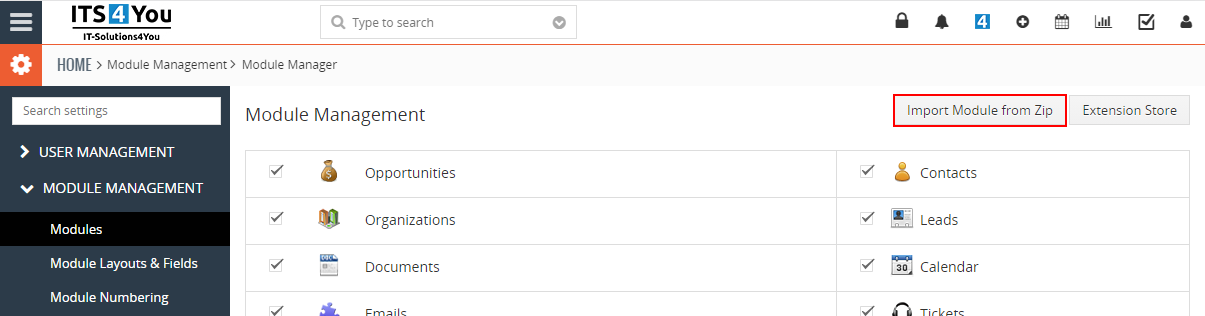
Installation can be done via Module Manager by clicking on the button  and selecting the .zip file.
4.How to add own API Key
AI API Key Activation
After successful license validation, the AI icon will be added to the top panel of your Vtiger CRM. Click this icon to open the Vtiger AI Extension window.

As the first step, you need to add your API key.
Note: Currently, only an OpenAI API key is supported.
You can create and manage your API key in the OpenAI Platform. The OpenAI API uses API keys for authentication, and the key should be kept private and not shared publicly.
Note: Make sure that your OpenAI API key is active and has available usage credit. Without a valid API key, the Vtiger AI Extension cannot communicate with the AI model.
When the AI window shows the message No API key found. Please add it in Settings., it means that no API key has been saved yet.
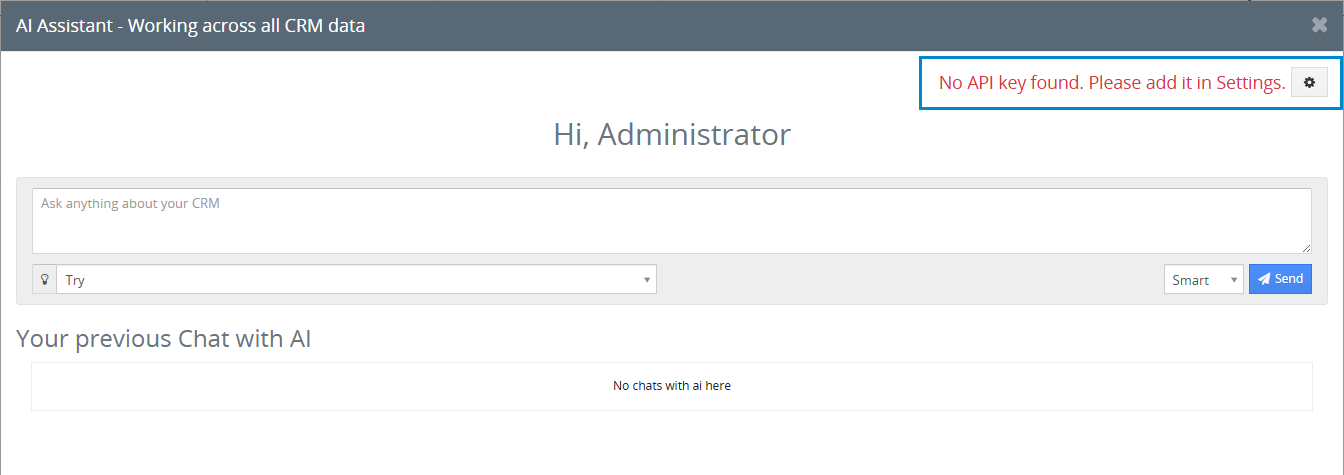
To add your API key:
- Click the Settings icon in the AI window

- Paste your OpenAI API key into the Enter your API Key field.
- Click Save.
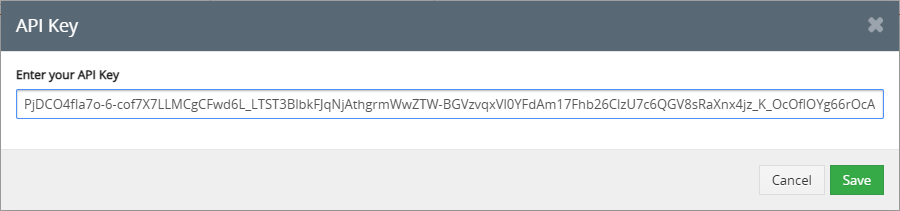
- After saving the key, you can start using the AI Extension.
5.AI Extension Levels
The Vtiger AI Extension is available in three levels. Each level provides a different depth of AI support, from simple CRM assistance to advanced automation.
| Level | Purpose | Main Capabilities | Data Access |
|---|---|---|---|
| AI Chat | Basic AI assistance for everyday CRM work. | Ask questions, search CRM data, draft comments, compose emails, and summarize information. | Read only access. |
| AI Assistant | AI support that can help users perform actions directly in CRM. | Create tasks, update records, add comments, generate emails, and prepare record summaries. | Read and write access on request. |
| AI Agent | Advanced AI automation for CRM processes and workflows. | Automate workflows, monitor pipelines, detect risks, manage follow ups, and execute multi step processes. | Full automation based on configured permissions. |
Each level builds on the previous one. AI Chat helps users understand and work with CRM data, AI Assistant can perform selected actions, and AI Agent is designed for advanced workflow automation.
5.1.AI Chat Overview
Vtiger AI Chat is the basic AI level designed for users who need quick help with CRM data and everyday CRM work. It allows users to ask simple questions, search for relevant information, prepare text, summarize records, and get support directly inside Vtiger CRM.
AI Chat is useful for sales teams, support users, managers, and administrators who want to work faster without manually searching through multiple CRM modules.
Main purpose
AI Chat helps users understand and use CRM data more efficiently. It is focused on assistance, searching, writing, and summarizing information.
Typical use cases
• Show the last 10 invoices
• Show unpaid invoices
• Show invoices due this week
• Show invoices for a specific account
• Summarize a customer record
• Draft a comment for a ticket
• Compose an email reply
• Find relevant CRM information
• Prepare a short summary before contacting a customer
• Ask simple questions about CRM records
Limitations
AI Chat is designed as a safe, read focused assistant. It can help users find, understand, and prepare information, but it does not automatically change CRM data.
This means that AI Chat can assist with searching, summaries, and text generation, but actions such as creating tasks, updating records, or saving data directly into CRM are available only in higher AI levels, such as AI Assistant or AI Agent.
5.1.1.How it works
AI Chat works as a conversational assistant inside Vtiger CRM. The user enters a question or selects a predefined prompt, and AI Chat processes the request based on available CRM data and the user permissions.
Basic workflow:
• Open the AI Chat window from the AI icon in the top panel
• Type your question or select one of the predefined prompts
• AI Chat reads the available CRM context based on your access rights
• The answer is displayed directly in the chat window
• You can continue the conversation or refine your question
Important: AI Chat is focused on reading, searching, summarizing, and text preparation. It does not automatically create, update, or delete CRM records.
5.1.2.Example prompts
Prompts are short instructions or questions that users enter into the AI Chat window. They help AI understand what information the user wants to find, summarize, or prepare.
Prompts can be used in two ways:
1/ Manual prompt input
Users can type their own question directly into the AI Chat window.
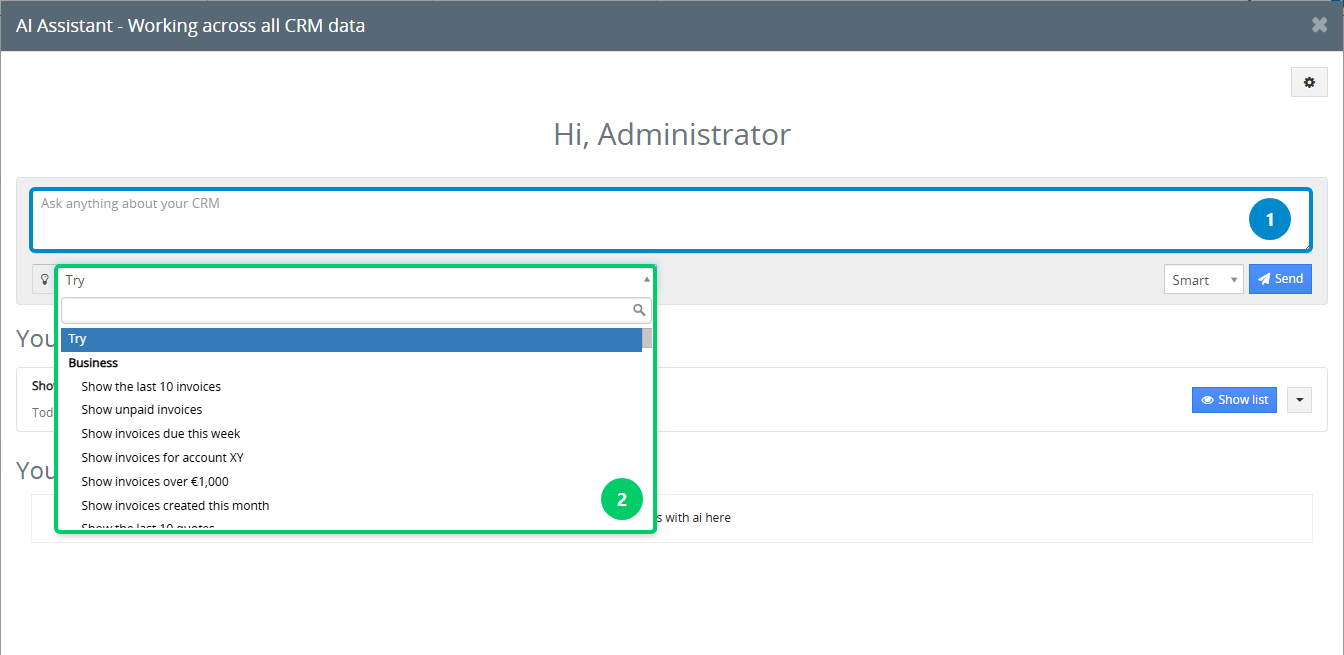
2/ Preconfigured prompts
Users can select one of the predefined prompts from the prompt list. These prompts are grouped by common CRM areas such as Business, Tickets, Leads, Customers, and Opportunities.
AI prompts can be used from the AI window anywhere in CRM. They can also be used while working with specific CRM records, where AI can use the current record context to provide more relevant answers.
Example prompts
Below are examples of useful prompts that can help users work faster with CRM data:
• Show unpaid invoices
• Show invoices due this week
• Show quotes created this month
• Show open tickets
• Show unresolved tickets
• Show leads assigned to me
• Show accounts created this month
• Show opportunities over €10,000
• Show deals expected to close this month
• Show deals in the Negotiation stage
These prompts are only examples. Users can adjust them based on their own CRM data, modules, filters, and daily work needs.
For example, instead of using a predefined prompt such as Show unpaid invoices, the user can type a more specific request such as:
Show unpaid invoices for account ABC Company
or
Show open opportunities assigned to me that are expected to close this month.
5.1.3.Available actions
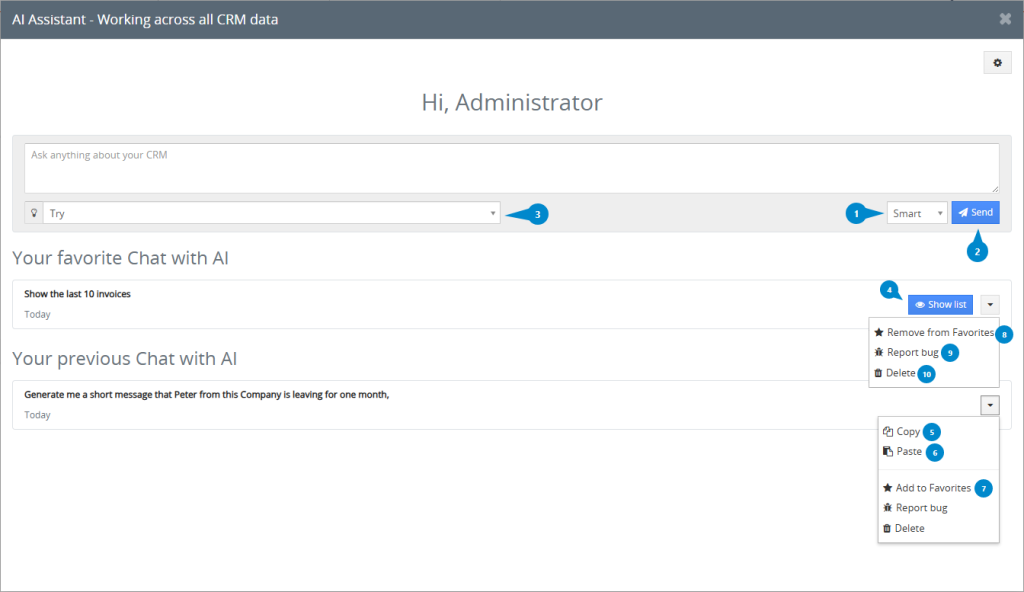
The AI Chat window provides several actions for working with prompts, AI responses, favorite items, and CRM record lists. The numbered actions below correspond to the elements that can be marked in the screenshot.
| No. | Action | Description |
|---|---|---|
| 1 | AI Mode | Allows the user to switch between Quick, Smart, and Thinking modes. Quick is used for faster answers, Smart for standard CRM requests, and Thinking for more complex questions. |
| 2 | Send | Sends the entered prompt to AI. The user can type a question manually or select a predefined prompt before sending it. |
| 3 | Try prompts | Opens a list of predefined prompts in the search field. The user can search, select, and use ready made prompts for common CRM tasks. Selected prompts can also be added to Favorites, so they remain visible at the top of the AI Chat window for faster access. |
| 4 | Show list | Opens a list of CRM records based on the selected prompt. For example, a prompt such as Show the last 10 invoices opens the matching invoice records. |
| 5 | Copy | Copies the selected prompt or AI output so it can be reused elsewhere. |
| 6 | Paste | Inserts copied text into the AI input field. This is useful when reusing or editing an existing prompt. |
| 7 | Add to Favorites | Saves the selected prompt to the favorite prompts section. Favorite prompts are displayed at the top of the AI Chat window for quick repeated use. |
| 8 | Remove from Favorites | Removes the selected prompt from the favorite prompts section. |
| 9 | Report bug | Sends information about a problem to our support team by email. Use this option when the AI response is incorrect or when the selected prompt does not work as expected. |
| 10 | Delete | Deletes the selected prompt from the list or history, depending on where the action is used. |
5.1.4.Using AI in Records
AI can also be used directly inside CRM records, including the record detail view and Summary View.
In this context, the AI window is simplified and focused on quick work with the currently opened record. It contains a prompt input area where the user can type a question or instruction, and basic actions such as Copy and Paste.
Next to the Comments section, there is also an AI icon. Clicking this icon opens the main AI window directly from the record, so the user can work with AI while staying in the current CRM context.
This allows users to generate useful text based on the current record without leaving the record page.
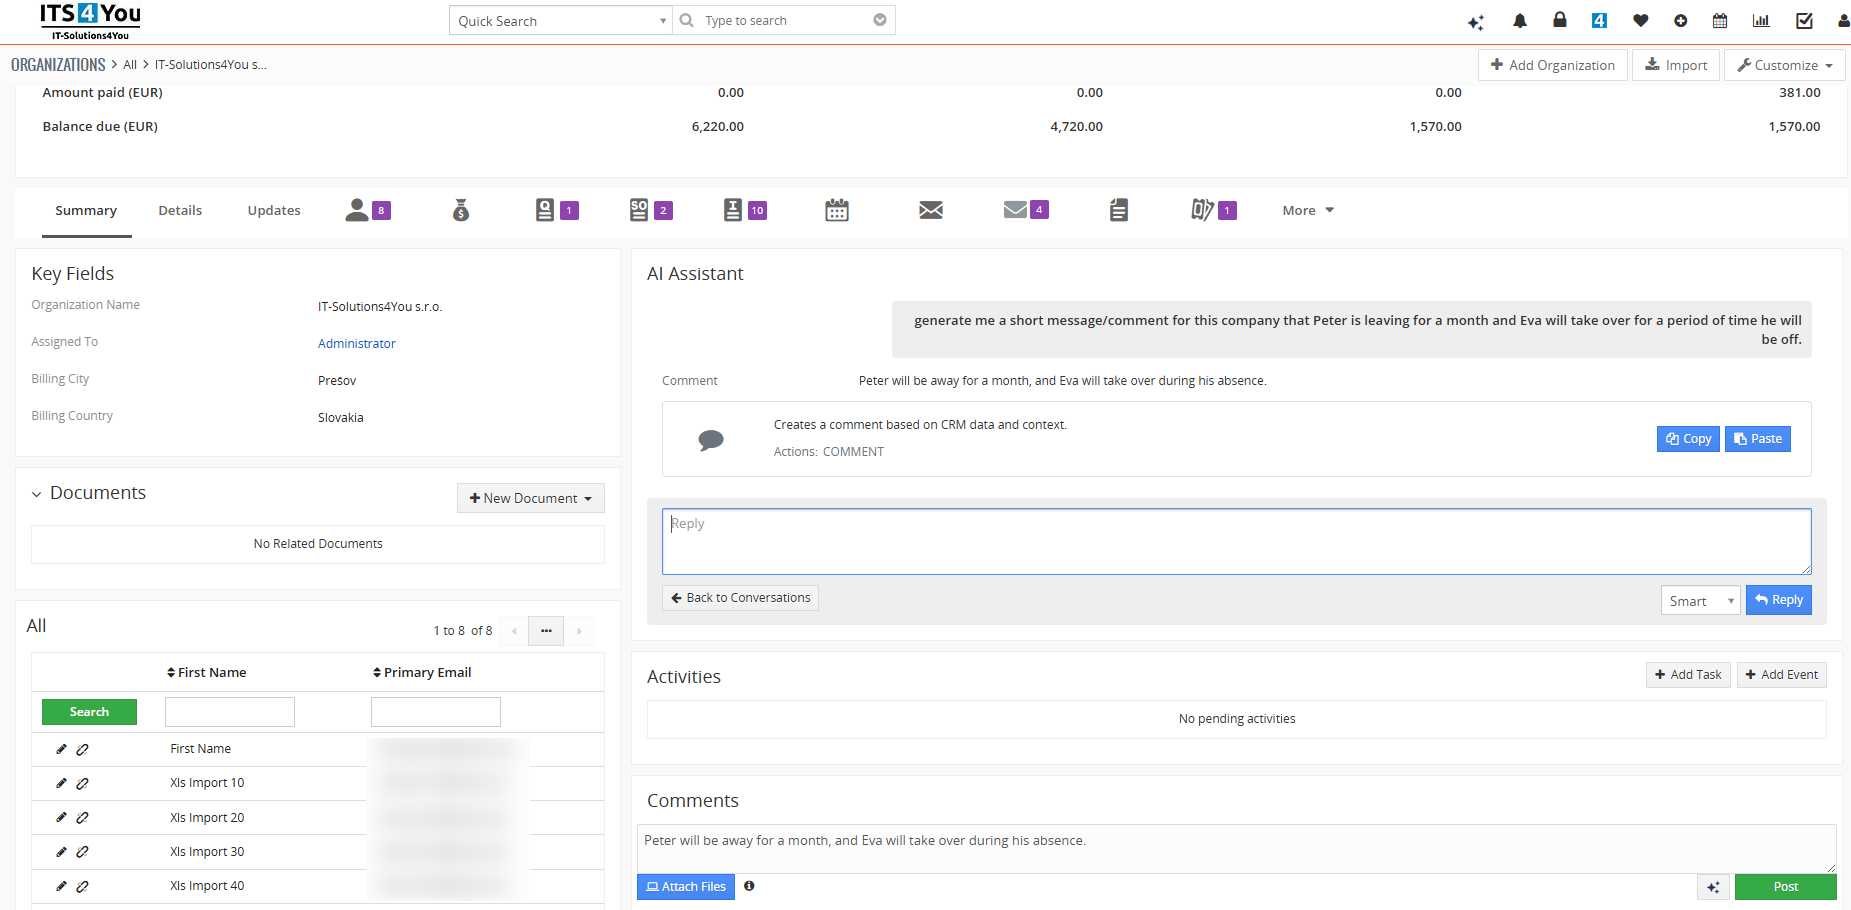
Example use case
In the example below, the user opened an Organization record and entered a prompt asking AI to generate a comment.
AI generated the comment based on the request. The user then copied the generated text and inserted it into the comment field using Paste.
After the text is inserted, the user only needs to review it and confirm it by clicking Post.
Typical examples
• Generate a customer comment
• Prepare a follow up note
• Summarize the current record
• Draft an internal update
• Create text for a support reply
• Prepare a short sales note
• Rewrite or improve existing text before saving it
Important note
AI in records helps users prepare content faster, but the final action is still controlled by the user. The generated text is not saved automatically. The user can review, edit, paste, and confirm the content manually.
5.1.5.Email Compose with AI Chat Bot
Email Compose with AI Assistant
AI Chat Bot for Vtiger CRM helps users create, improve and send professional emails directly from CRM. Instead of writing every message manually, users can generate a complete email from a short instruction, adjust the result, translate it, shorten it, improve the tone, or use it inside the standard Compose Email window.
This feature is useful for everyday communication with customers, partners and internal users. It helps reduce repetitive writing, improves consistency and allows users to prepare better emails faster.
Available from AI for Vtiger CRM version 4.1.
Main benefits
Create professional emails faster
Reduce manual writing
Improve consistency in customer communication
Use AI directly inside Compose Email
Generate emails from short instructions
Improve, shorten or translate existing email content
Create reusable templates when EMAILMaker is available
Keep user control before sending
Work safely within the Read Only AI security level
Requirements
To use AI assisted email compose features, the Emails extension must be installed and active.
The Emails extension is installed automatically together with Vtiger AI. If the system detects that the required email functionality is missing, AI Assistant can show a recommendation to install or activate the EMAILMaker module to fully enable email related features.

Recommended note for users
AI generated content should always be reviewed before sending. AI Assistant helps prepare the email, but the final responsibility for the message, recipient and content stays with the CRM user.
Security and AI access level
Email Compose functionality is currently limited to the Read Only security level.
This means that AI Assistant can help generate, improve, shorten, translate and suggest email content, but the final action remains controlled by the user. The user reviews the result and decides whether to use it, send it or create a template.
This approach keeps AI assistance safe and predictable while still providing practical value in everyday CRM communication.
5.1.5.1.Generating Emails
Generate an email from the main AI Chat Bot window
Users can create a new email directly from the main AI Chat Bot conversation window.
For example, the user can enter a simple instruction such as:
Draft a professional meeting email for June 15, 2026, addressed to Peter and Abbie.
AI Assistant will generate:
Subject
Upcoming Meeting on June 15, 2026Body
Dear Peter and Abbie,I hope you are both doing well. I wanted to reach out regarding our upcoming meeting on June 15, 2026.
Please let me know if there are any topics you would like to add to the agenda ahead of time. I look forward to speaking with you and discussing everything in detail.
Best regards,
[Your Name]
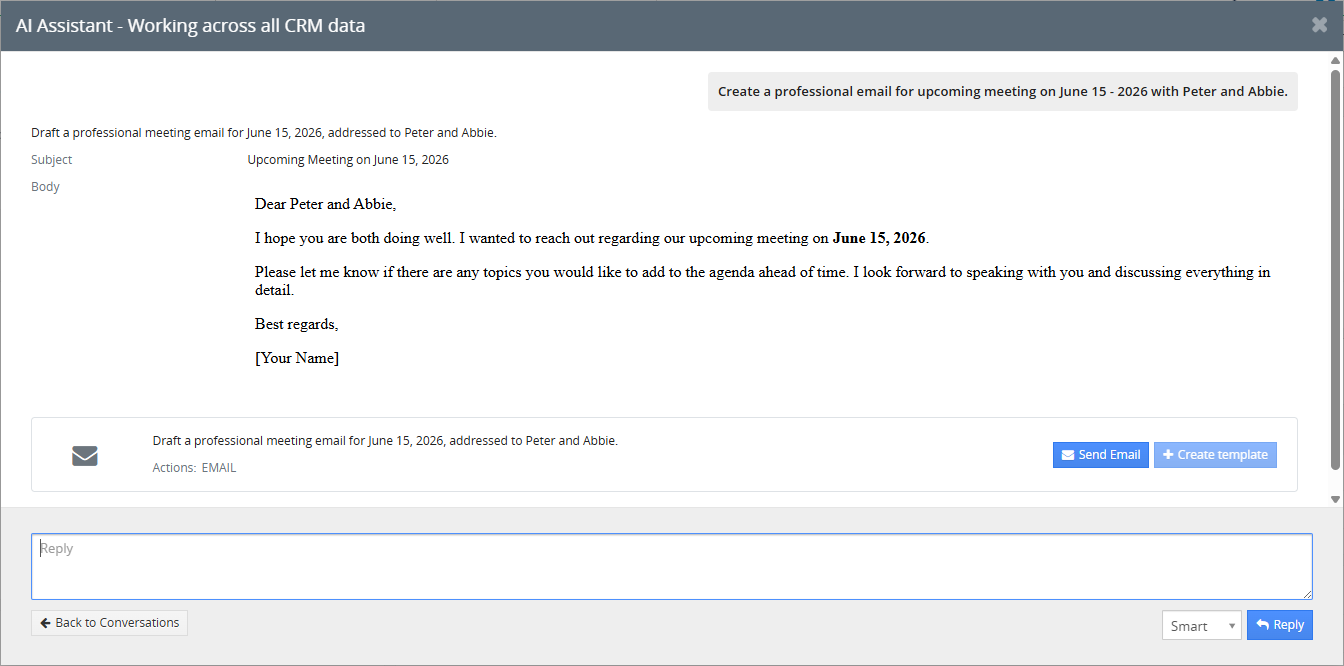
After the email is generated, users can continue with one of the available actions.
Send the generated email
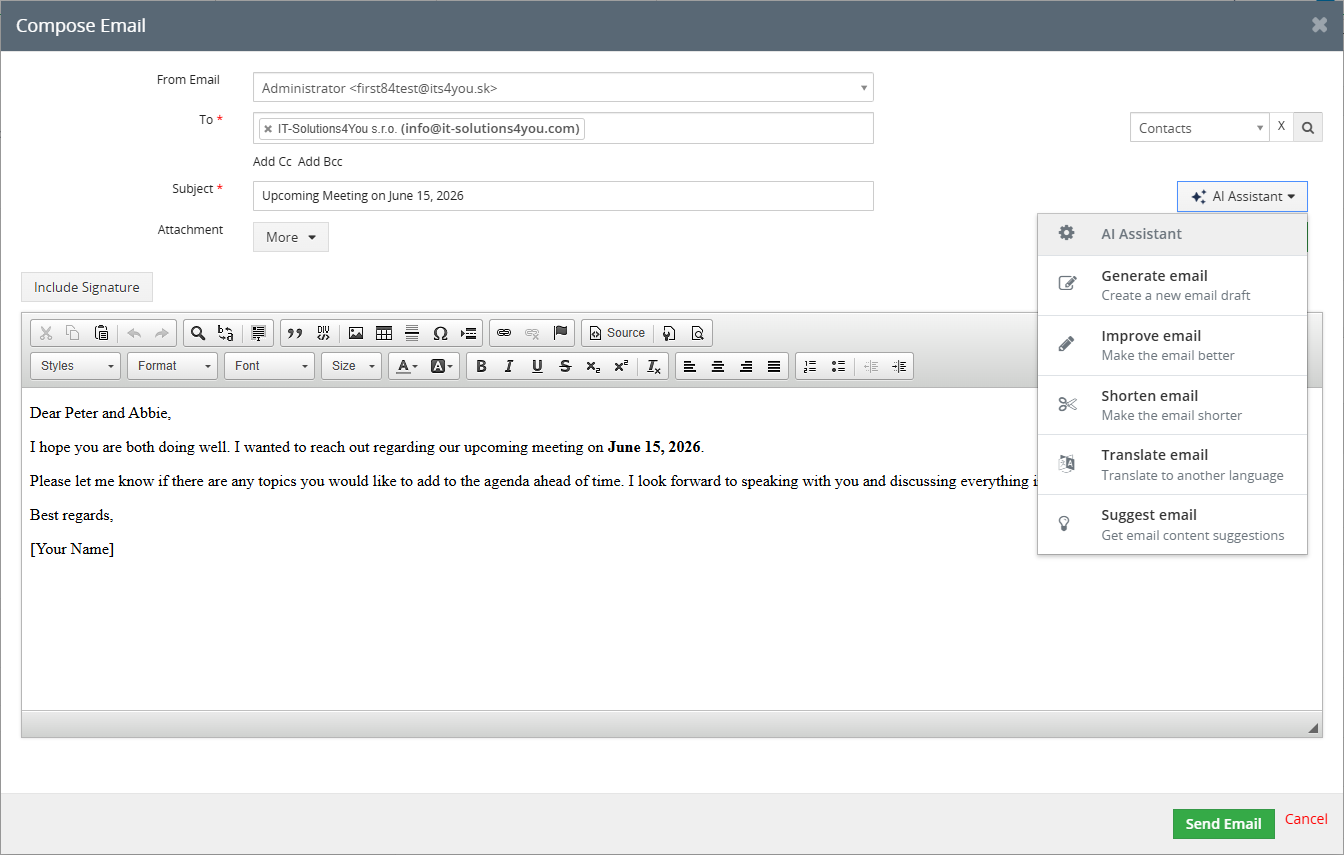
When the generated email is ready, users can click Send Email. The email content is then transferred into the Compose Email window, where the user can review the recipient, subject and message body before sending.
This keeps the user in control. AI prepares the content, but the final email is still reviewed and sent by the CRM user.
Create an email template
If EMAILMaker is installed and active, users can also create an email template from the generated content.
This is useful when the same type of communication is used repeatedly, for example:
Meeting confirmations
Follow up emails
Reminder emails
Apology emails
Thank you emails
Holiday greetings
Internal notifications
Instead of writing similar emails again, users can save the AI generated result as a reusable template and use it later inside EMAILMaker.
5.1.5.2.Additional Actions
AI Chat Bot inside the Compose Email window
AI Chat Bot is also available directly inside the Compose Email window. This is useful when users are already preparing an email from modules such as EMAILMaker, PDF Maker or other CRM email actions.
Inside the Compose Email window, users can open the AI Assistant menu and use actions such as:
Generate email
Improve email
Shorten email
Translate email
Suggest email
Generate email content from subject or instructions
If the subject or body is empty, the user can use AI Assistant to generate the missing email content.
Typical usage:
- Open the Compose Email window.
- Enter a simple subject or instruction.
- Click AI Assistant.
- Choose Generate email or Suggest email.
- Review the generated result.
- Click Use this email to insert it into the email body.
This helps users start from a simple idea and quickly receive a complete professional email draft.
Suggest Email and Quick Prompts
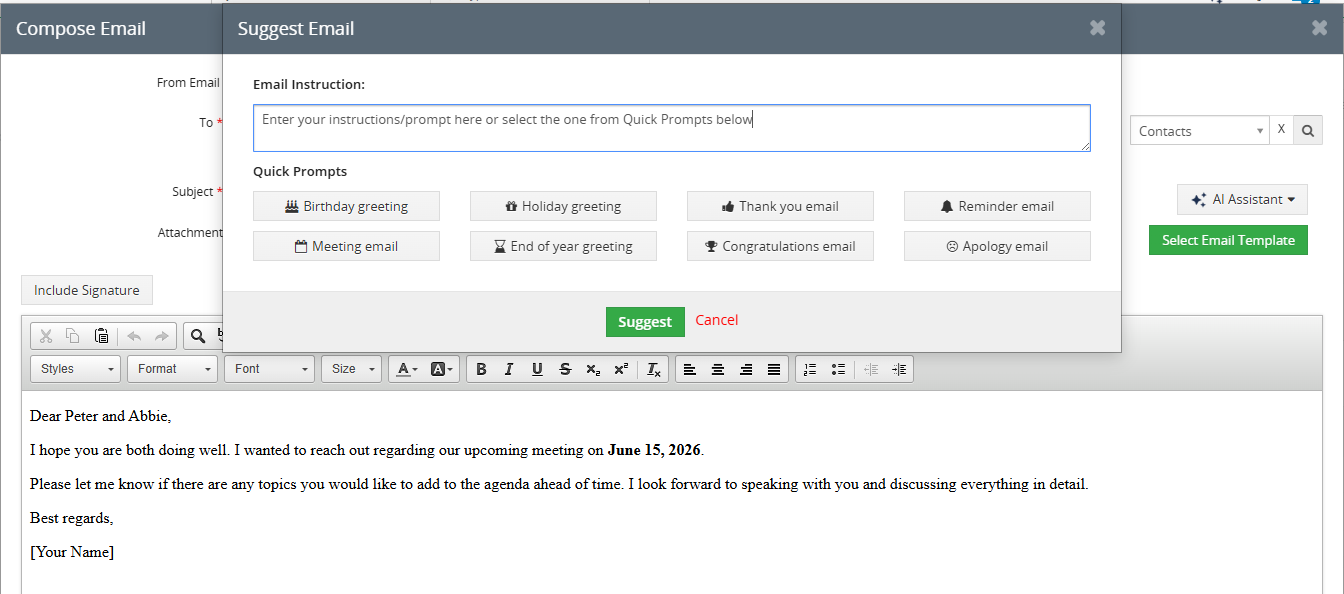
The Suggest Email option allows users to enter custom instructions or select one of the predefined Quick Prompts.
Available Quick Prompts can include:
Birthday greeting
Holiday greeting
Thank you email
Reminder email
Meeting email
End of year greeting
Congratulations email
Apology email
This is useful when the user does not want to write a full prompt manually. They can choose the communication type and let AI Assistant prepare the first draft.
Improve an existing email
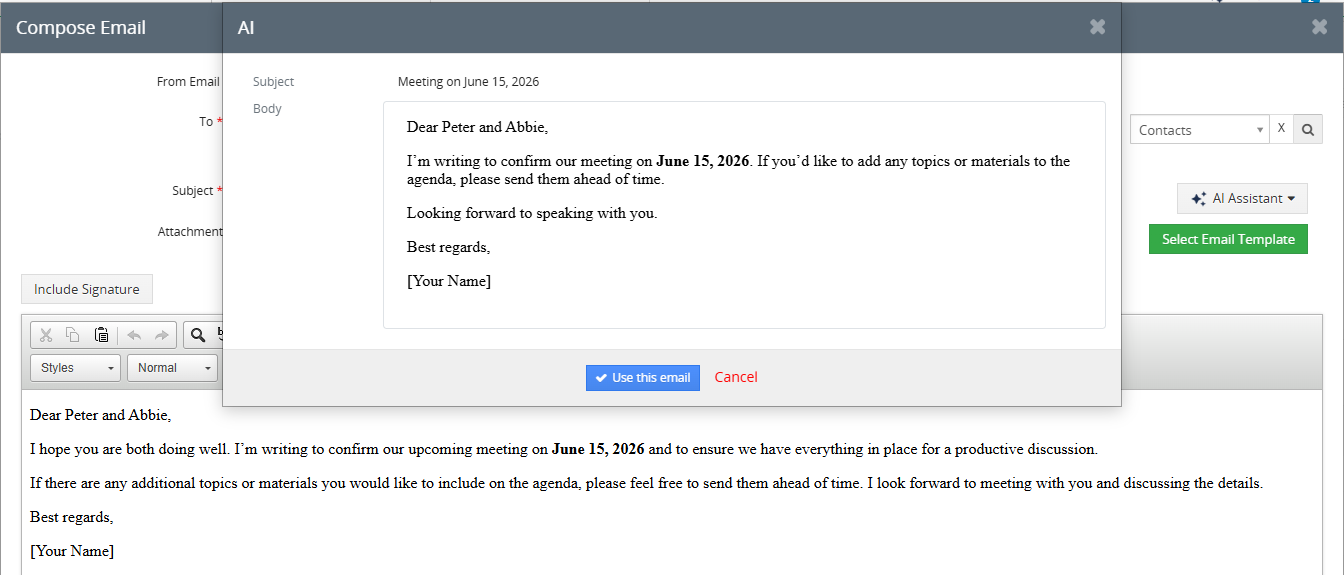
If an email is already written, AI Assistant can improve it. This can help make the message more professional, clearer or better structured.
Typical use cases:
Improve wording
Make the email more professional
Make the message clearer
Improve grammar and tone
Rewrite the message for business communication
The improved version is shown first, so the user can review it before inserting it into the email body.
Shorten an email
The Shorten email action helps reduce long messages while keeping the main meaning. This is useful when the email is too detailed or when the user wants a shorter and more direct version.
Translate an email
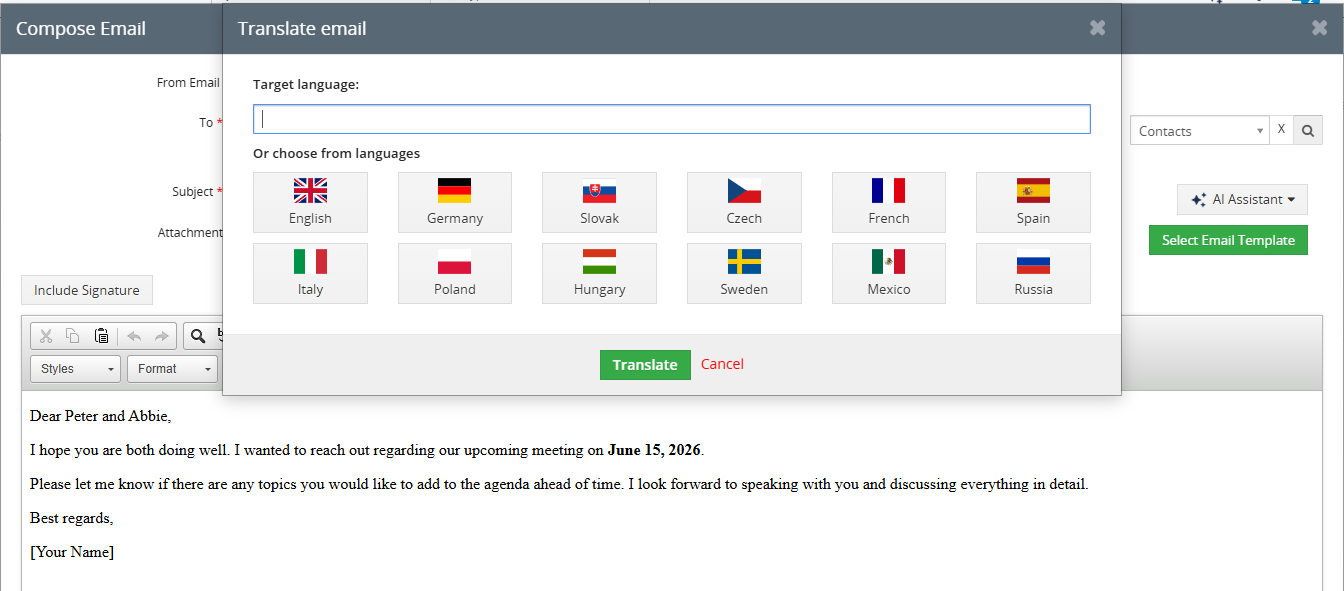
The Translate email action allows users to translate the email into another language.
The user can type the target language manually or choose one of the available language buttons, for example:
English
German
Slovak
Czech
French
Spain
Italy
Poland
Hungary
Sweden
Mexico
Russia
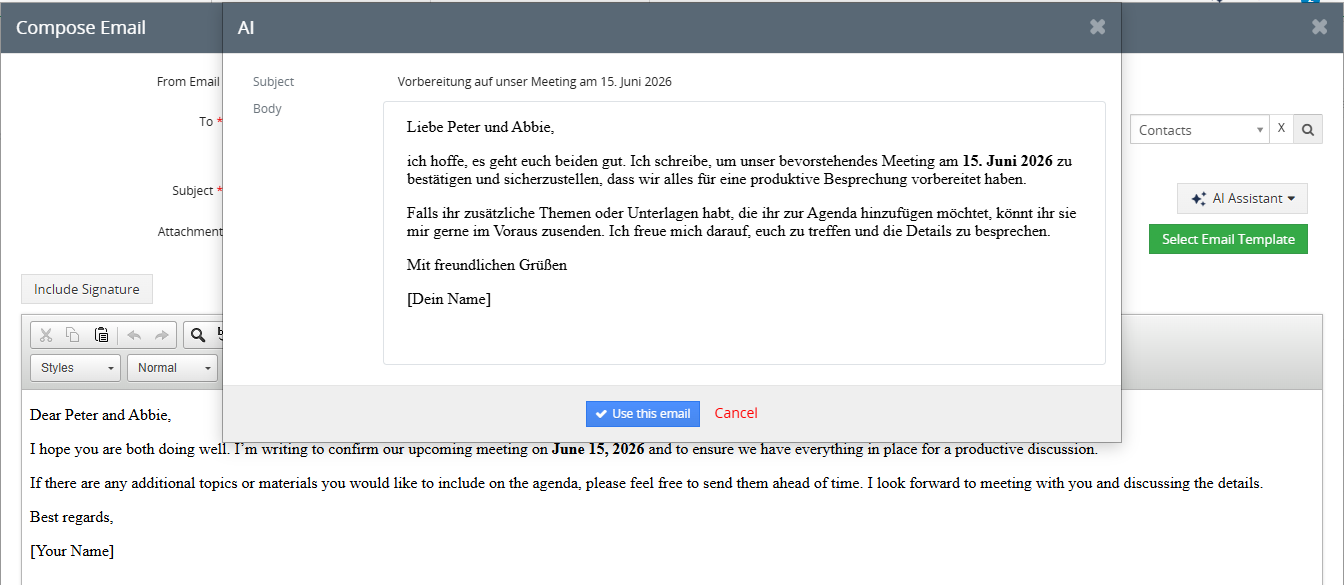
After translation, AI Assistant shows the translated subject and body. The user can review the result and click Use this email to insert the translated version into the Compose Email window.
5.1.6.Permissions and limitations
AI Chat is designed as a safe, read only AI assistant for working with CRM data. It can help users search, understand, summarize, and prepare text, but it does not create, update, delete, or send any CRM data automatically.
AI Chat only works with data that the current CRM user is allowed to access. If a user does not have permission to view a record, module, or field in Vtiger CRM, AI Chat cannot use that information in its response.
Main security principles
• AI Chat respects CRM user permissions
• Users can only access data they are allowed to see
• AI Chat is read only
• It does not create new CRM records
• It does not update existing CRM records
• It does not delete CRM records
• It does not send emails or messages automatically
• It does not perform actions in CRM without the user
• Write actions are available only in AI Assistant or AI Agent, depending on configuration and permissions
What AI Chat can do
AI Chat can read available CRM context and provide answers based on the user request. It can summarize records, help find information, prepare draft text, suggest wording, or explain CRM data in a simple way.
For example, AI Chat can help answer questions such as:
• Which invoices are unpaid?
• What is the summary of this customer?
• What opportunities are open for this account?
• Can you prepare a draft reply for this customer?
• What are the most important notes from this record?
What AI Chat cannot do
AI Chat cannot directly change CRM data. It will not save a new task, update an opportunity, modify an invoice, create a ticket, send an email, or trigger a workflow.
This makes AI Chat suitable for users who need AI support while keeping full control over CRM data. Any prepared text or suggested output must be reviewed and used by the user manually.
5.2.AI Assistant
AI Assistant lets you create reusable assistants for specific CRM modules. Each assistant has its own purpose, AI model, response language, instructions, and permitted CRM data.
For example, you can create a customer overview assistant for Organizations, an opportunity assessment assistant for Opportunities, or a support assistant for Tickets.
Administrators and users with the required permissions configure assistants in the AI Assistant module. Other users select the configured assistants in the AI window when working with CRM records.
Once configured, an assistant applies its saved settings whenever a user submits a request with that assistant selected.
5.2.1.How AI Assistant works
The AI Assistant module stores the assistant configuration. The AI extension provides the conversation window and processes requests using the selected assistant.
- An administrator creates an assistant for a specific CRM module.
- The administrator defines its instructions, model, response language, and permitted data.
- A user opens the relevant module or record and selects the assistant in AI.
- The user sends a request and reviews the response or proposed action.
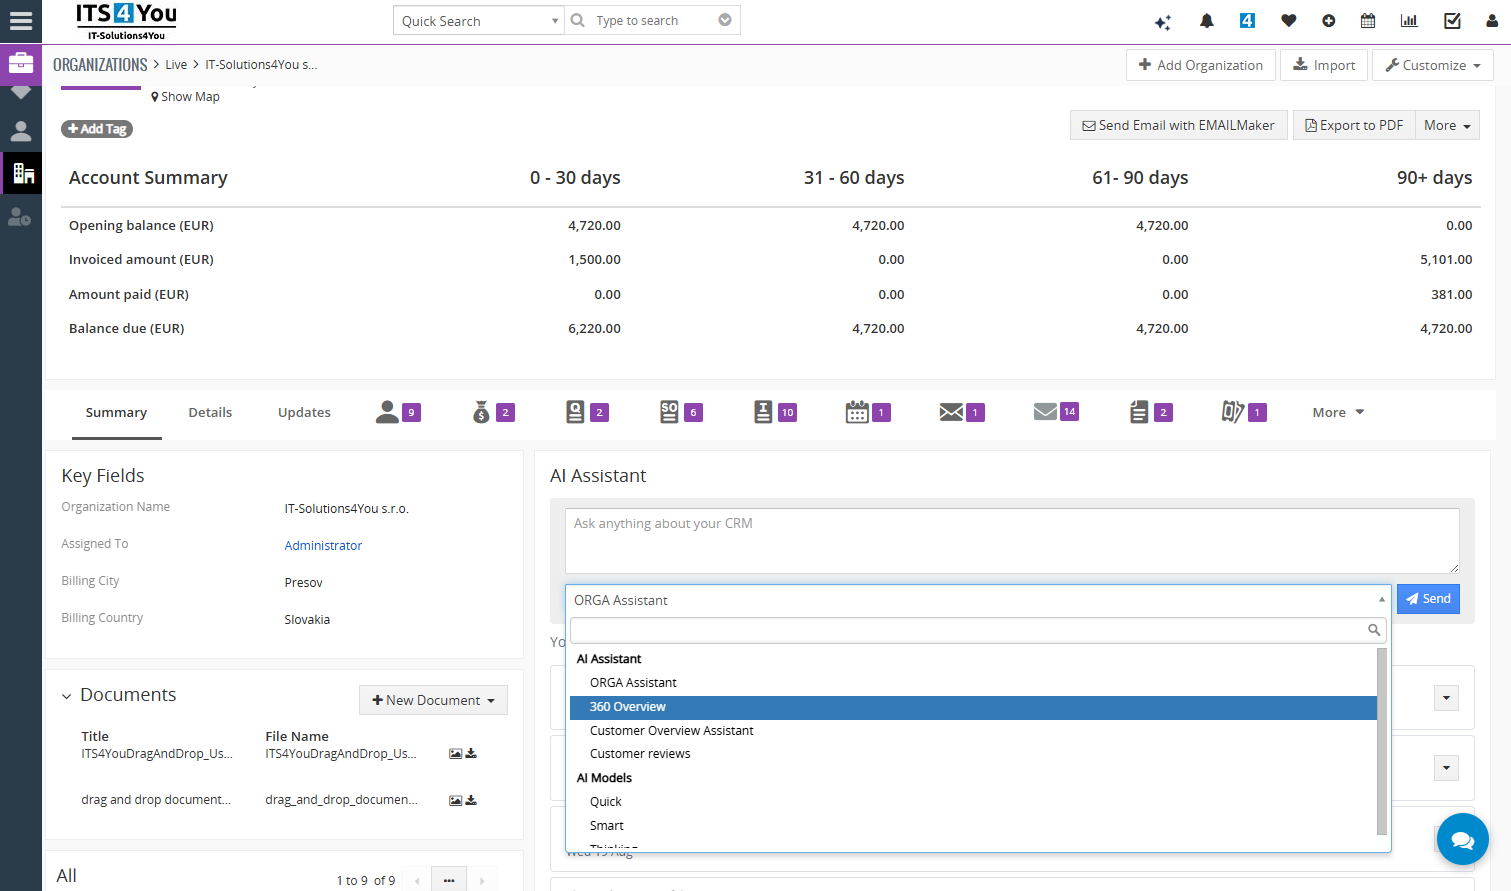
For example, a Customer Overview assistant can use permitted organization details and related records to summarize the customer relationship and suggest next steps.
Creating or activating an assistant does not start processing CRM data. Processing begins when a request is submitted through AI.
All assistants use the API key configured in the AI extension. You do not need to enter a separate API key for each assistant.
5.2.2.Getting started
Before creating or using an assistant, make sure the following requirements are met:
- AI and AI Assistant are installed, enabled, and have the required active licenses.
- A working API key is configured in AI.
- The CRM server can connect to the AI service.
- The applicable module and any required related modules are active.
- You have permission to access the required modules, records, and fields.
- To configure assistants, you also need permission to view, create, or edit AI Assistant records.
Open AI Assistant from the CRM menu. Depending on your menu layout, it may appear under Tools.
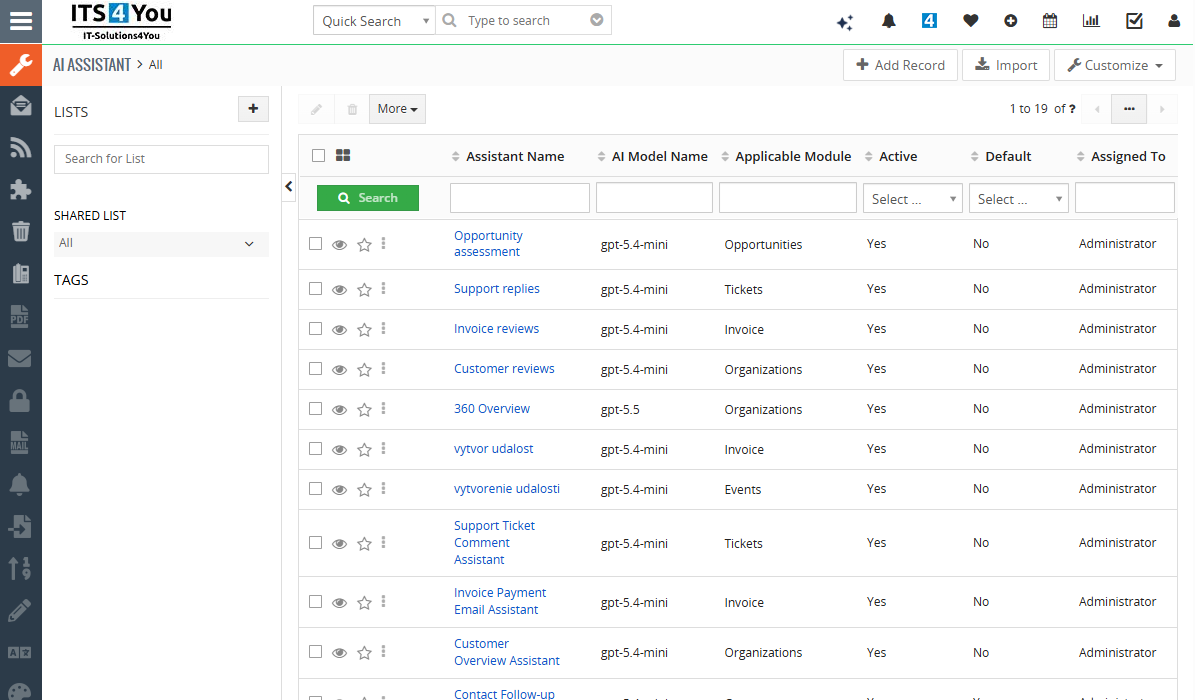
If the module is not listed in your menu, you can open it by appending index.php?module=ITS4YouAIAssistant&view=List to your CRM installation’s base address. Your normal access permissions still apply.
Your administrator manages installation and licensing through ITS4YouInstaller and the extension settings.
The shared API key is configured in the AI window settings. If AI requests a key or cannot produce a response, contact your administrator before continuing.
5.2.2.1.Creating an assistant
Create an assistant for a specific task and CRM module. This example uses an assistant named 360 Overview for Organizations.
Organizations is used as an example. Select the module that matches the records your assistant will work with.
Select the applicable module
- Open the AI Assistant list.
- Select Add Record.
- Choose Organizations in Applicable Module.
- Select Next to continue.
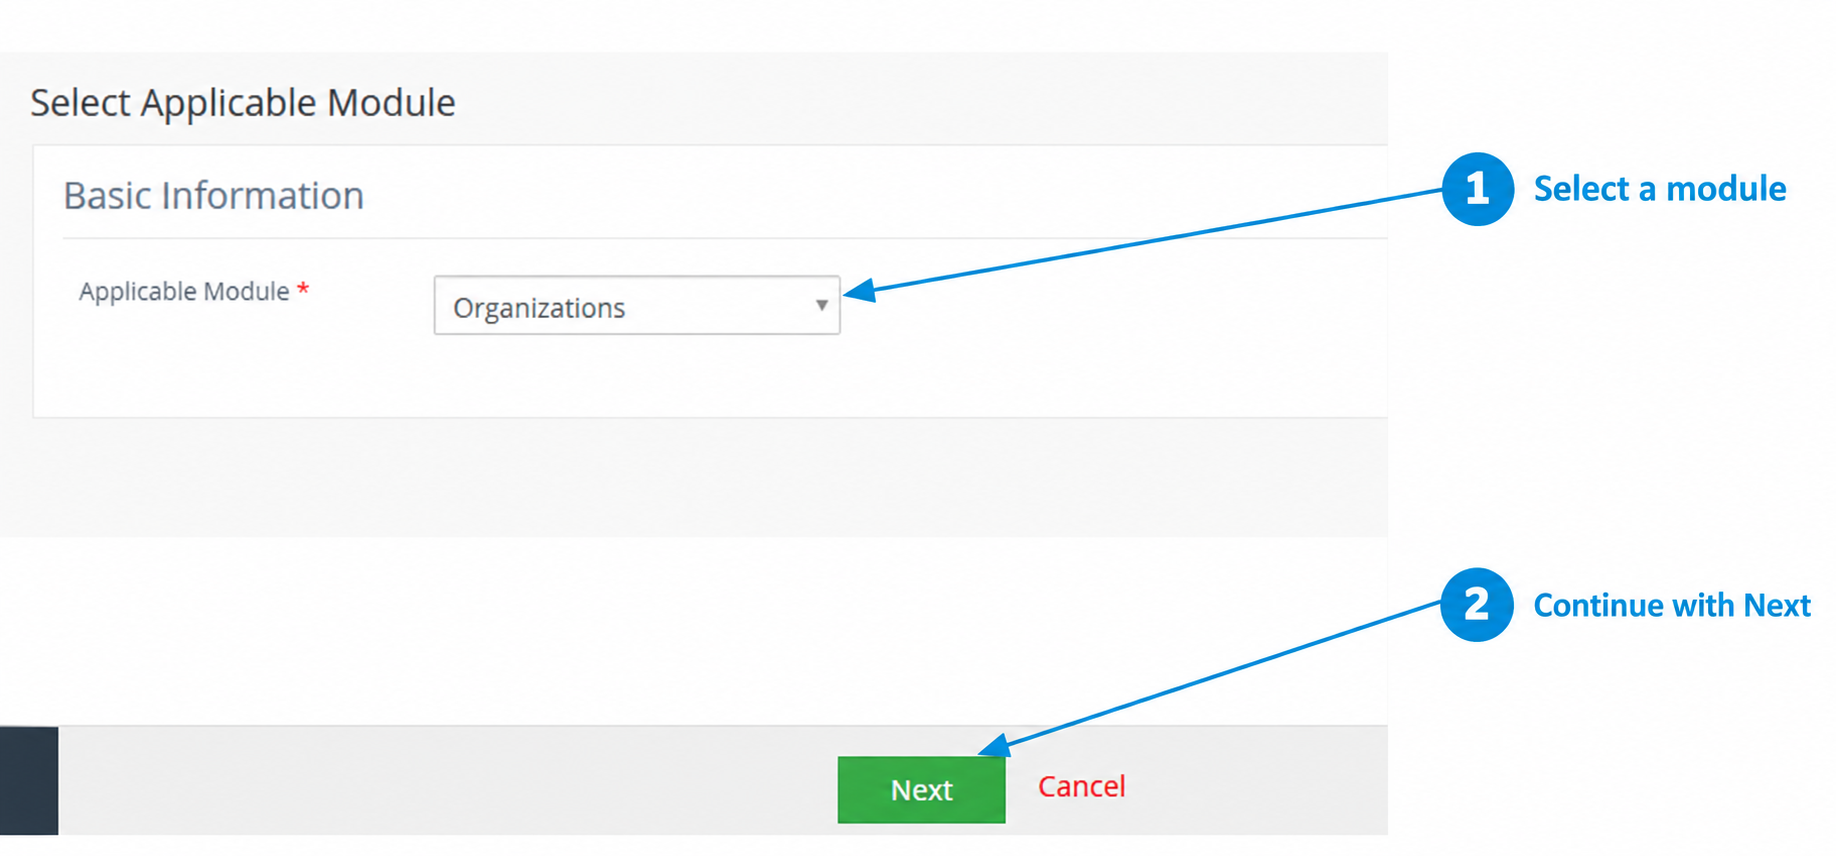
Screenshot controls:
- Select a module: choose the source module for the assistant. This determines its available source fields and where it can be used.
- Continue with Next: proceed to the assistant configuration form.
Important: Applicable Module cannot be changed through normal editing after creation. To configure an assistant for another module, create a new assistant record.
Configure the assistant
- Enter 360 Overview in Assistant Name.
- Select an AI Model Name from the available options.
- Enable Active so the assistant can be used.
- Review Assigned To.
- Enable Default if this should be the usual assistant for new conversations in Organizations.
- Select the source record data in Allowed Fields.
- Choose the appropriate Assistant Action and Response Language.
- If related data is needed, select Related Modules and their specific Related Fields.
- Set Related Records Days Back and Related Records Limit as needed.
- Complete Assistant Instructions and Output Style.
- Optionally enter a Description explaining the assistant’s purpose.
- Review the configuration and select Save.
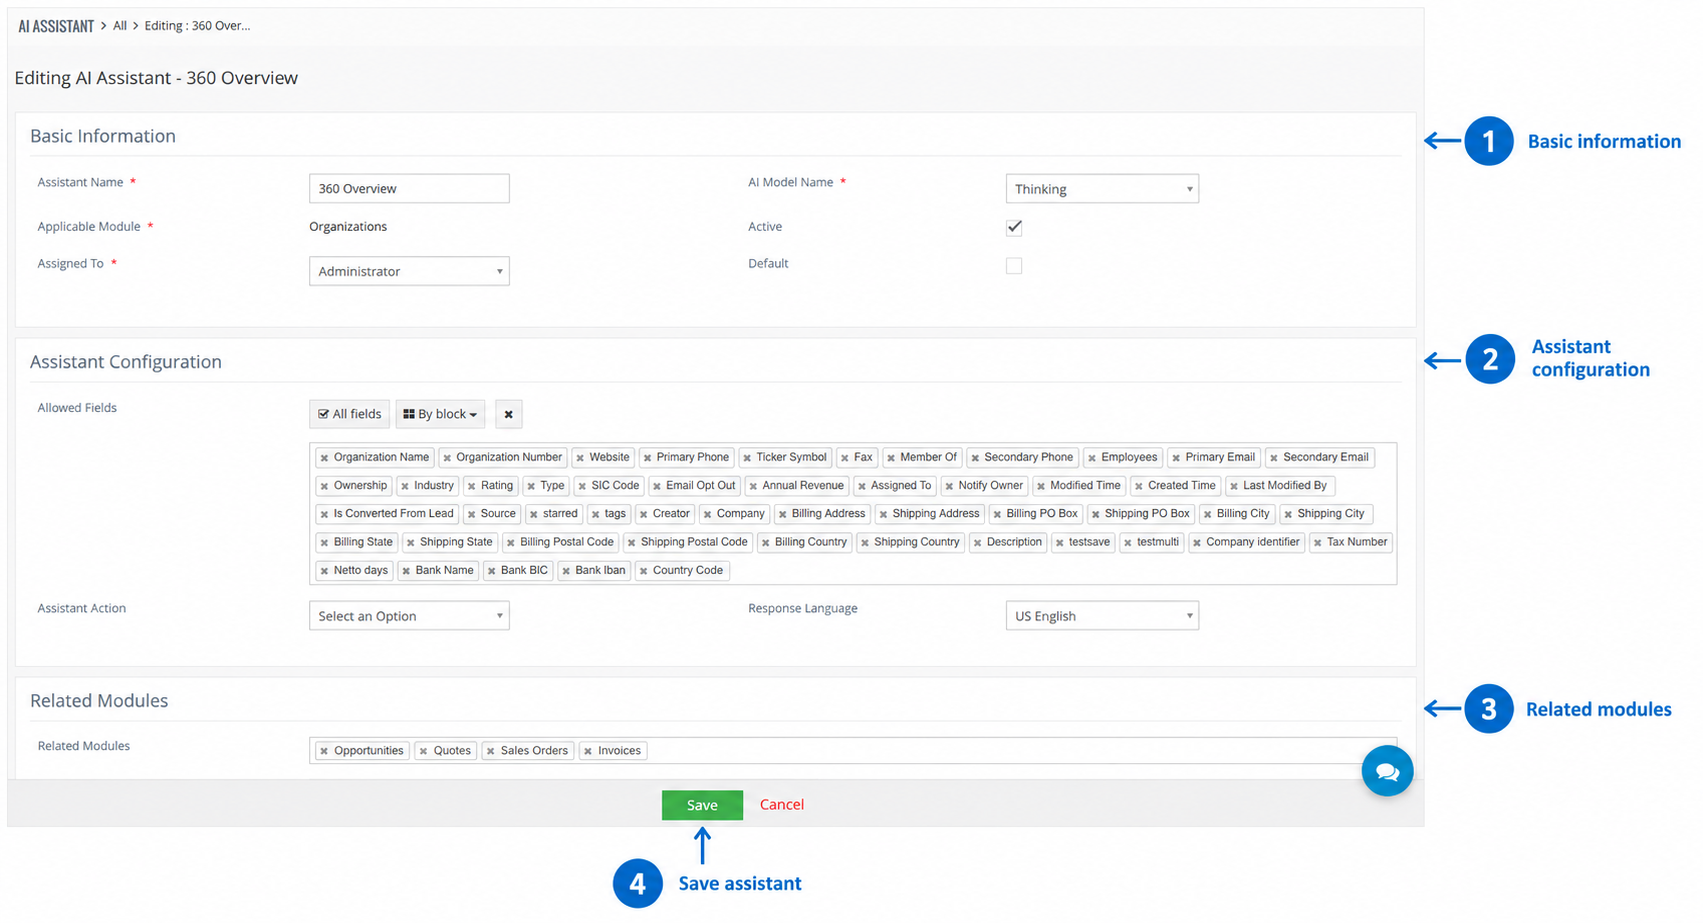
The screenshot shows an existing 360 Overview assistant open for editing as an example of the configuration fields. Its heading therefore displays Editing AI Assistant.
The numbered areas show where to configure the main settings:
- Basic information: enter the assistant name, select a model, review ownership, and configure Active and Default.
- Assistant configuration: select permitted source fields and configure the action and response language.
- Related modules: choose which related modules may provide additional context. Select their specific fields further down the form.
- Save assistant: save the configuration after completing all required settings.
Scroll through the remaining form before saving. The screenshot does not show all related data settings, Assistant Instructions, or Output Style.
The example shows Thinking as the model, US English as the response language, Active enabled, and Default disabled. Choose the values appropriate for your assistant; the available options may differ in your installation.
The broad Allowed Fields selection demonstrates the interface. Select only the data your assistant needs. The Assistant Action field in the screenshot still shows Select an Option; review this setting when completing your configuration.
Field reference
Use the table below to understand what each field controls.
| Field | Purpose and behavior |
|---|---|
| Assistant Name | The name users see in the AI selector. Choose a descriptive name, such as 360 Overview, that makes the assistant’s purpose easy to recognize. |
| AI Model Name | The AI model used to process requests with this assistant. Select one of the models available through the AI extension. |
| Applicable Module | The CRM module the assistant serves. It determines the available source fields and where the assistant can be used. Selected in the first creation step, it cannot be changed through normal editing after creation. |
| Active | Makes the assistant available for selection and use, subject to permissions and availability in the current AI feature. Turn it off to temporarily disable the assistant. |
| Default | Selects this assistant by default for new conversations in its applicable module. Each module can have one default assistant. Saving another assistant for the same module as default clears the previous default flag. Existing conversations retain their previous available assistant or model. |
| Assigned To | The owner of the assistant’s CRM record. Access also follows standard CRM permissions. |
| Description | An explanation of the assistant’s purpose for people managing its configuration. This text is not sent to the AI model as an instruction. Put behavioral instructions in Assistant Instructions. |
| Allowed Fields | The fields from the applicable module that the assistant may use as source data. Select the information needed for its task. Mentioning an excluded field in the instructions does not make it available. |
| Assistant Action | A fallback action for requests that do not clearly specify another supported activity. It does not restrict the assistant to one activity or replace CRM permissions for creating and editing records. |
| Response Language | Automatic follows the latest request written by the user, or the CRM user’s language if no user request is available yet. A fixed language takes precedence over the request language and language instructions in Assistant Instructions or Output Style. |
| Related Modules | The modules from which the assistant may load context related to the source record. The screenshot includes Opportunities, Quotes, Sales Orders, and Invoices. |
| Related Fields | The specific permitted fields from the selected related modules. Selecting a related module alone is not enough. Wait for the field options to refresh, select the required fields, and review them whenever you change Related Modules. |
| Related Records Days Back | A time window for related data. Leave it blank for no time restriction. For ordinary related CRM records, this uses the record’s last modification time, not its due date, issue date, or closing date. |
| Related Records Limit | The maximum number of individual records loaded from each related module. A blank value uses 100; processing is capped at 1,000. This limit is separate from aggregate calculations used for total counts and financial sums. |
| Assistant Instructions | Defines what the assistant should do, what to focus on, and how to handle missing information. For example, instruct it to summarize an organization’s opportunities and financial situation using only available data. |
| Output Style | Defines the structure, length, and tone of responses. For example, request concise sections, a financial summary, and no more than three practical next steps. |
Document items: For supported documents, the special LineItems related group provides product and service details. Select the required item fields there and select document header fields separately.
Data scope: In regular assistant chat, the configured source and related data scope is used automatically without the separate field sharing confirmation shown for a standalone model. User permissions continue to apply.
Test before use
- Save the assistant.
- Open an Organization record with known data.
- Open AI and start a new conversation.
- Select 360 Overview.
- Submit a request and compare the response with CRM data.
Prepare an overview of this organization. Summarize the available opportunities and financial information, and suggest three practical next steps.
If information is missing, review Allowed Fields, Related Modules, Related Fields, the time window, and user permissions.
For detailed configuration instructions and examples, continue with the subsections Basic settings, Actions and language, Allowed fields, Related records, and Instructions and output.
5.2.2.2.Basic settings
These settings identify the assistant and control its availability in CRM.
- Assistant Name
-
The name users see in the AI selector. Choose a short name that describes the purpose, such as Customer Overview or Opportunity Review.
- AI Model Name
-
The model used for requests with this assistant. Available models come from the AI extension.
- Applicable Module
-
The module the assistant serves. It determines the available source fields and where the assistant can be used.
- Active
-
Controls whether the assistant is available for selection and use. Permissions and availability in the current AI feature still apply.
- Default
-
Selects this assistant by default for new conversations in its applicable module.
- Assigned To
-
The owner of the assistant’s CRM record. Access also follows standard CRM permissions.
- Description
-
An explanation of the assistant’s purpose for people managing the configuration. This field is not sent to the AI model as an instruction.
Each applicable module can have one default assistant. Saving another assistant for the same module as default clears the previous assistant’s default flag. An assistant must also be active to be usable.
The default setting applies to new conversations. An existing conversation continues with its most recently used available assistant or standalone model.
5.2.2.3.Actions and language
Assistant Action defines a fallback action for requests that do not clearly specify another supported activity.
This setting does not restrict the assistant to a single activity. For example, an assistant configured for informational responses may prepare a supported record update for review when the user explicitly requests a change.
Use CRM permissions to control whether users can create or edit records.
Response Language determines the language of generated responses:
- Automatic: follows the latest request written by the user. If no user request is available yet, it uses the CRM user’s language.
- A fixed language: responses use the selected language, even when the user’s request is written in another language.
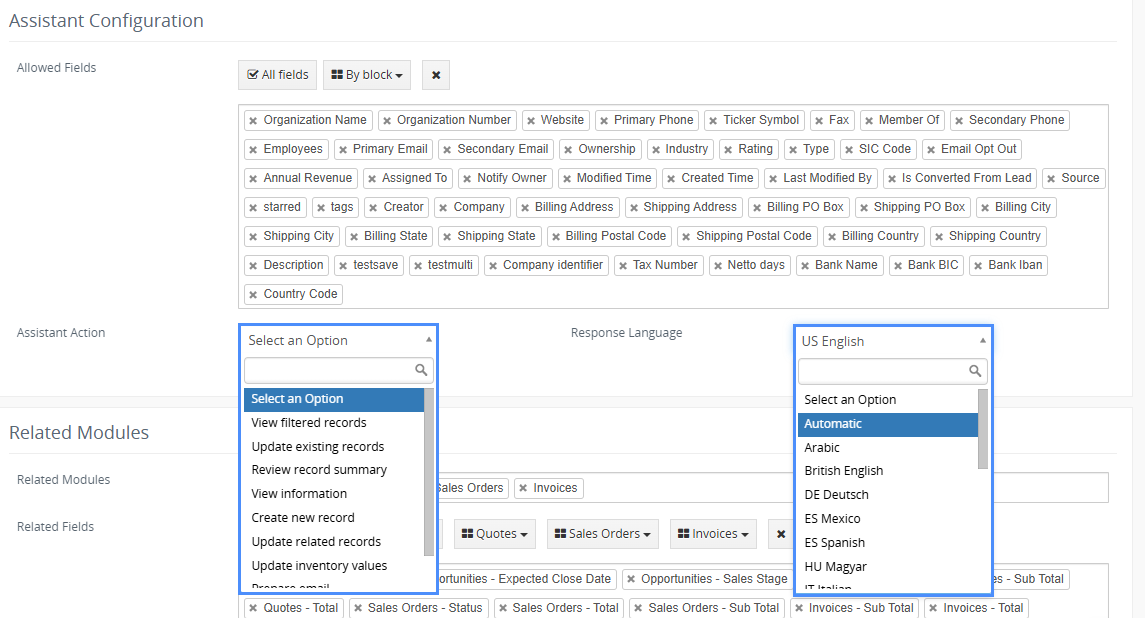
A fixed Response Language takes precedence over language instructions entered in Assistant Instructions or Output Style.
You can write the assistant configuration in your preferred language. Set the required response language using the dedicated field.
5.2.2.4.Allowed fields
Allowed Fields defines which fields from the applicable module the assistant may use as source data.
To configure this selection, open an assistant for editing and find Allowed Fields in the Assistant Configuration section.
The example below shows fields from Organizations. Available fields and blocks depend on the assistant’s Applicable Module and your CRM configuration.
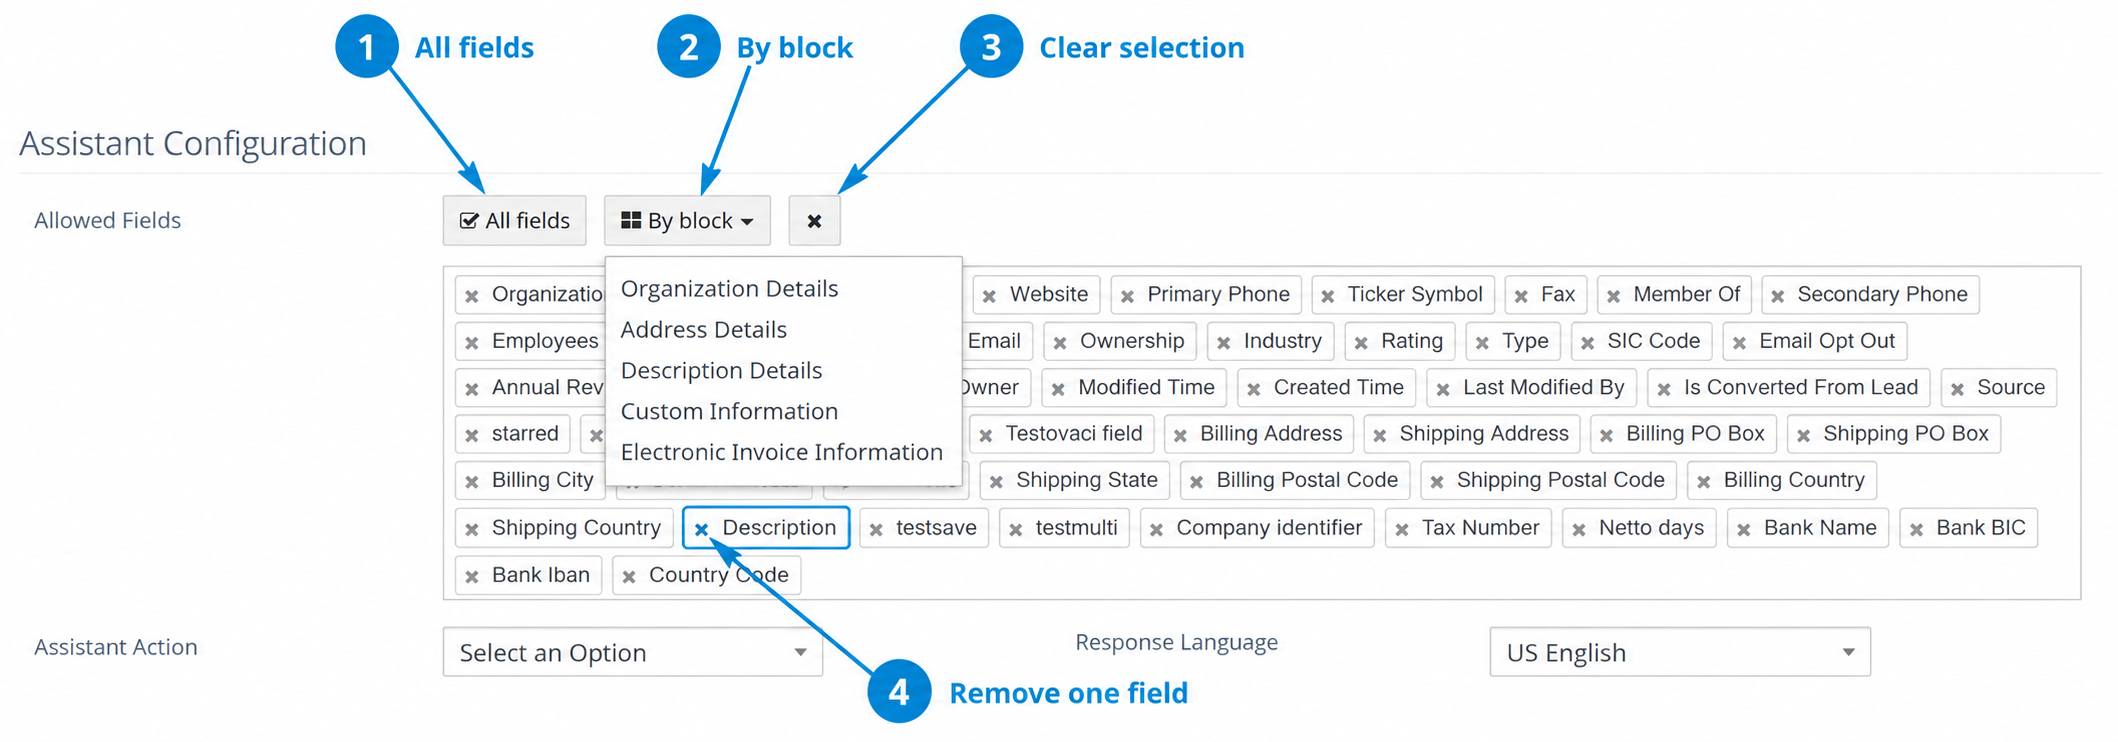
The numbers in the screenshot identify these controls:
| No. | Control | How to use it |
|---|---|---|
| 1 | All fields | Select all available source fields. Use this when the assistant needs broad record context, then review the selection and remove unnecessary fields. |
| 2 | By block | Open the menu and choose a block to select its fields. In this example, the available blocks include Organization Details, Address Details, Description Details, Custom Information, and Electronic Invoice Information. |
| 3 | Clear selection | Click the separate cross button beside By block to clear all selected fields. Use it when you want to rebuild the selection. |
| 4 | Remove one field | Click the small cross beside a selected field’s name to remove only that field. The screenshot highlights the cross beside Description as an example. |
The field labels displayed inside the selection area represent the currently selected fields.
Removing a field here only changes the assistant’s permitted source data. It does not delete the CRM field or its stored values.
Choosing fields for your assistant
- Decide which information the assistant needs for its task.
- Select the required fields individually or use By block for a larger selection.
- Remove fields that are not relevant using the cross beside each field name.
- Save the assistant.
- Check the saved field groups in the assistant’s detail view.
- Open a record in the applicable module and test the assistant in a new AI conversation.
Example: A Customer Overview assistant may need the organization name, industry, website, primary phone, and description. It may not need bank details or other information unrelated to its task.
The screenshot shows a broad selection to demonstrate the controls. It is not a recommendation to enable every field for every assistant.
Source fields and related fields
Allowed Fields covers data from the assistant’s Applicable Module. To include information from related Contacts, Opportunities, or Invoices, configure Related Modules and Related Fields separately.
If information is missing from a response
- Check that the required field is included in Allowed Fields.
- Check that the source record contains a value in that field.
- Check that the user has permission to access the field and record.
- For related information, check Related Modules and Related Fields.
Mentioning a field in Assistant Instructions does not make excluded data available.
In regular assistant chat, the configured data scope is used automatically without the separate field sharing confirmation shown for a standalone model. Select only the data needed for the assistant’s purpose.
After changing the selection, save the assistant and refresh the AI window. Start a new conversation to test the updated scope without information retained from an earlier conversation.
5.2.2.5.Related records
Related records allow an assistant to use information linked to the source record, in addition to the source fields selected in Allowed Fields.
For example, an assistant working with an Organization can use permitted information from its related Opportunities, Quotes, Sales Orders, and Invoices.
Open the assistant for editing and find the Related Modules section. Select the modules first, then choose the specific fields the assistant needs.
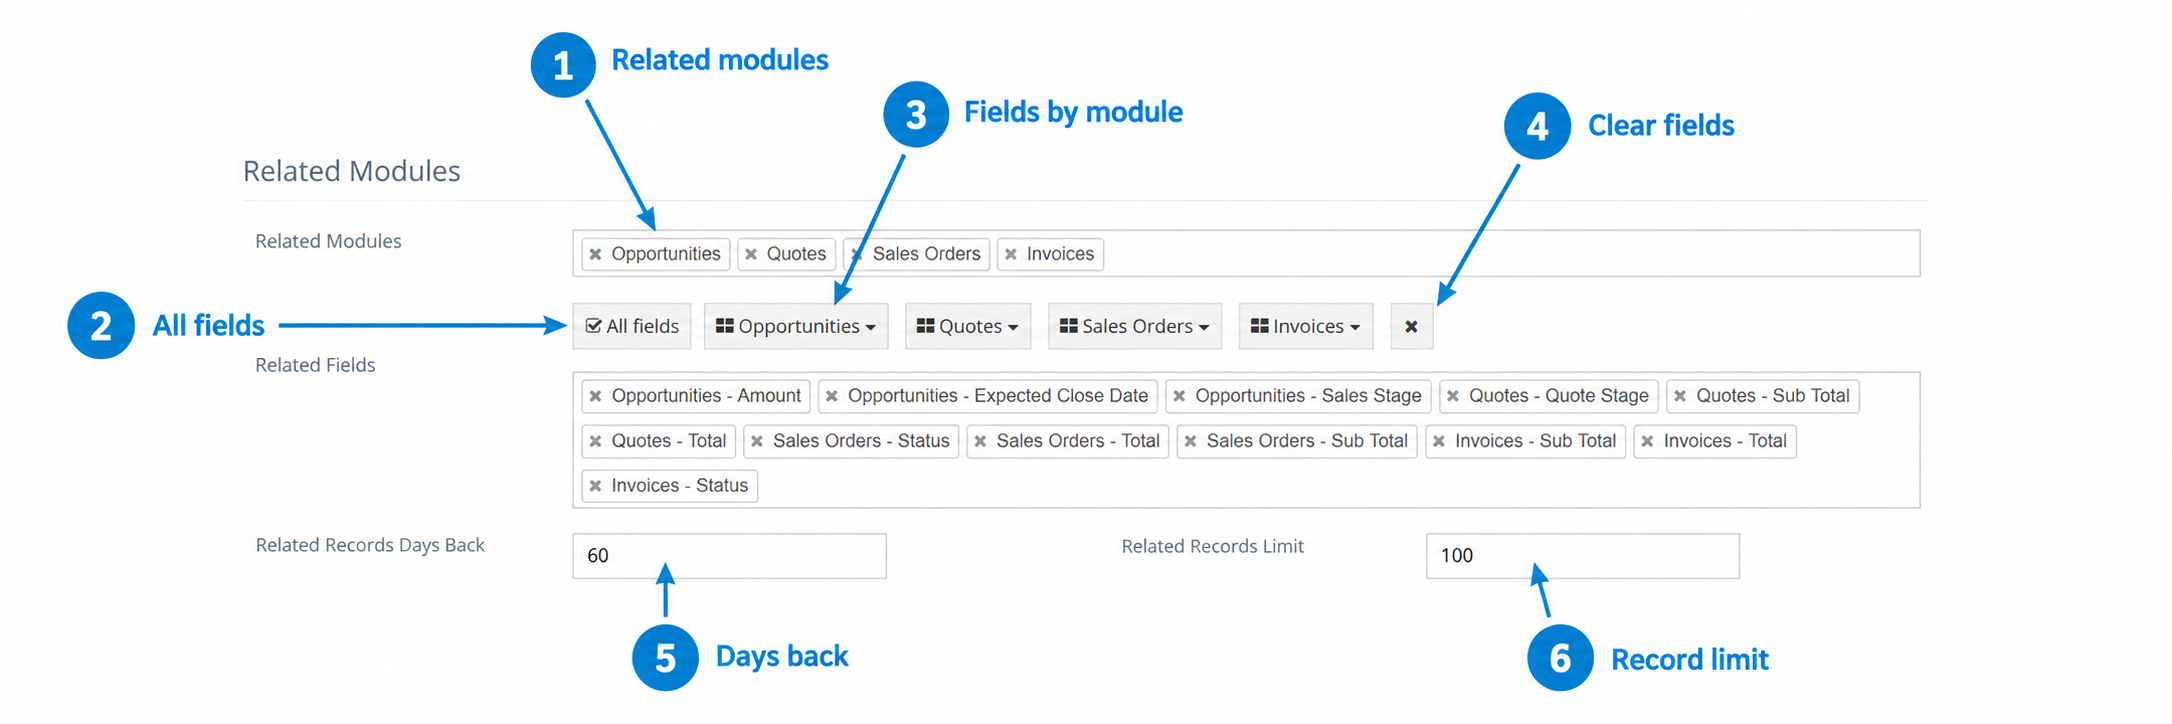
The numbers in the screenshot identify these controls:
| No. | Control | How to use it |
|---|---|---|
| 1 | Related modules | Select the modules from which the assistant may use related data. The example includes Opportunities, Quotes, Sales Orders, and Invoices. Use the small cross beside a module name to remove it, then review the related field selection. |
| 2 | All fields | Select all available related fields for the selected modules. Review the resulting selection and remove fields that are not needed for the assistant’s task. |
| 3 | Fields by module | Use the menu for the relevant module to select its fields. Separate menus are shown for Opportunities, Quotes, Sales Orders, and Invoices in this example. |
| 4 | Clear fields | Click the separate cross button beside the module menus to clear the selected related fields. To remove only one field, use the small cross beside its name in the selection area. |
| 5 | Related Records Days Back | Sets a time window for related data. The example uses 60 days. For ordinary related CRM records, this window is based on the record’s last modification time. Leave the field blank for no time restriction. |
| 6 | Related Records Limit | Sets the maximum number of individual records loaded from each related module. The example uses 100. A blank value also uses the default of 100, and processing is capped at 1,000. |
Configuring related data
- Select the required Related Modules.
- Wait for the available Related Fields to refresh.
- Select the specific fields needed from each module.
- Remove unnecessary fields using the cross beside each field name.
- Set the time window and individual record limit according to the assistant’s purpose.
- Save the assistant and review its saved configuration.
- Open a source record with known related records and test the assistant in a new AI conversation.
Selecting a related module alone is not enough. You must also select its specific fields. If no related module is selected, no related field options are available.
The labels in the selection area identify both the module and the field. This helps distinguish similar fields, such as Total or Status, from different modules.
Removing a module or field from this configuration does not delete CRM records, fields, or relationships. It changes the assistant’s configured data scope.
Understanding the example
The screenshot includes opportunity amounts, expected close dates, and sales stages, together with selected document totals and statuses.
With Related Records Days Back set to 60, ordinary related CRM records are included according to whether they were modified within the last 60 days. An older record can still qualify if it was modified during that period.
With Related Records Limit set to 100, the assistant can load up to 100 individual records from each selected related module, subject to permissions and other applicable conditions. This is not a combined limit of 100 across all four modules.
Date filters and older records
Days Back does not automatically filter by invoice due date, issue date, or opportunity closing date. To use one of those dates, select the relevant field and name it explicitly in your request.
Summarize related opportunities with an expected close date this month. Include their amounts and sales stages.
The configured time window still affects which related data is available. If you need an overview that includes older records regardless of their last modification time, leave Days Back blank.
This is particularly relevant for unpaid invoices. An older unpaid invoice may be excluded by a 60 day window if it has not been modified recently.
Counts and financial totals
The individual record limit is separate from aggregate calculations used for total counts and financial sums over permitted data. A short list of individual records should not be interpreted as the complete count of all related records.
Aggregate results still depend on permissions, selected fields, the time window, and request conditions. Increasing the record limit does not replace selecting the correct fields.
For final document amounts, select the field representing the grand total rather than relying on Sub Total. To analyze unpaid invoices, also include the relevant balance, due date, status, and currency fields where available.
The screenshot demonstrates the controls and an example selection. It does not include every field needed for every financial request.
If related information is missing
- Check that the required related module is selected.
- Check that its specific fields are included in Related Fields.
- Verify that the records are actually linked to the source record in CRM.
- Review Days Back and the individual record limit.
- Check the user’s access to the related records and fields.
- Review the conditions and date fields named in the request.
After changing the configuration, save the assistant and refresh the AI window. Start a new conversation to test the updated scope without information retained from an earlier conversation.
5.2.2.6.Instructions and output
Assistant Instructions and Output Style work together to define the assistant’s behavior and how it presents its answers.
- Assistant Instructions: what the assistant should do, which information it should focus on, and how it should handle missing data.
- Output Style: how the response should be organized, how detailed it should be, and which tone it should use.
Open the assistant for editing and find the Assistant Instructions section.
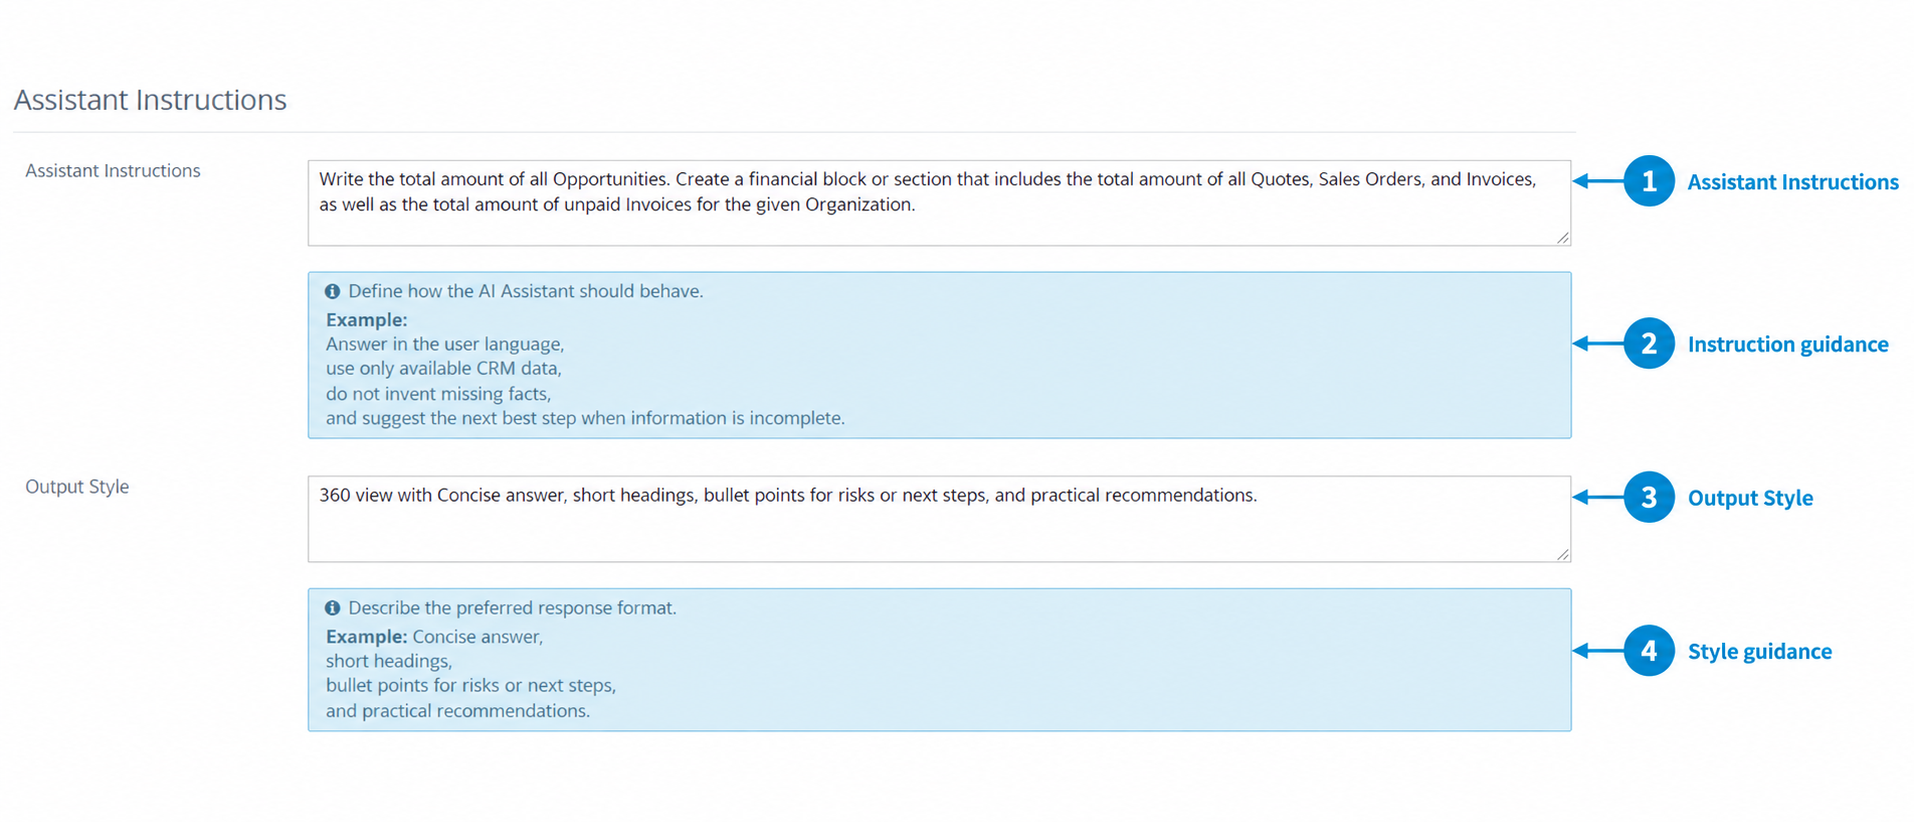
The numbers in the screenshot identify these elements:
| No. | Element | Purpose |
|---|---|---|
| 1 | Assistant Instructions | Enter the assistant’s recurring task, priorities, and rules. In the screenshot, the assistant is instructed to prepare a financial overview of the current Organization using related opportunities and sales documents. |
| 2 | Instruction guidance | The blue panel provides advice and example wording for defining the assistant’s behavior. Enter your actual instructions in the editable field above it. |
| 3 | Output Style | Describe the preferred response format, length, and tone. The screenshot requests a concise overview with short headings, bullet points for risks or next steps, and practical recommendations. |
| 4 | Style guidance | The blue panel suggests ways to describe the response format. Use it as a reference when completing the editable Output Style field above it. |
Writing effective instructions
- State the assistant’s main task clearly.
- Identify the information it should use and the topics it should prioritize.
- Define important terms, such as whether unpaid invoices means their full document totals or their remaining outstanding balances.
- Explain how to handle missing or incomplete information.
- Describe the required response structure in Output Style.
- Save the assistant and test it on a record with known data.
Use these fields for instructions that should apply repeatedly. Enter a specific question or a temporary reporting period in the AI conversation.
Understanding the screenshot example
The example asks the assistant to summarize opportunity amounts and prepare a financial section covering Quotes, Sales Orders, Invoices, and unpaid Invoices for the current Organization.
For clearer results, specify which amounts should be reported. For example, the full value of unpaid invoices is different from the remaining amount still owed on those invoices.
Report each document category separately. Adding opportunity, quote, sales order, and invoice amounts into one overall figure may count the same business more than once.
Suggested Assistant Instructions
The following is a more specific version of the financial overview instructions shown in the screenshot:
Prepare a financial overview of the current Organization using available and permitted CRM data.

Report these categories separately:
1. Total opportunity amount.
2. Total quote value.
3. Total sales order value.
4. Total invoice value.
5. Total outstanding invoice balance.

For document values, use the final document total rather than the subtotal.
For outstanding invoice balances, use the remaining balance rather than the full invoice value.

Do not add these categories together into a single overall total.
Show currencies explicitly and report different currencies separately.

Use only available and permitted data.
Do not invent missing amounts, payment statuses, or other facts.
Do not describe unavailable information as zero.
If required data is missing, explain what is missing.
Distinguish observed facts from recommendations.
Suggested Output Style
Provide a concise overview using these sections:
Summary
Financial Overview
Risks
Next Steps

Use a compact table for the financial figures.
Label each amount clearly and include its currency.
Use short bullet points for risks and recommendations.
Include no more than three practical next steps.
Clearly identify missing information and any limitations in the available data.
Use a professional, factual tone.
Match the instructions to the permitted data
Instructions do not make excluded fields or records available. Configure Allowed Fields, Related Modules, and Related Fields to support the requested task.
For the financial example, include the relevant opportunity amounts, final document totals, invoice balances, and currencies where available. Include status and date fields when the request uses those conditions.
Review Related Records Days Back as well. A time window based on recent modifications may exclude older unpaid invoices. Leave it blank when the intended overview requires available related records regardless of their last modification time.
The word all in an instruction does not override permissions, the configured data scope, or applicable filtering.
Response language
You can write your configuration in your preferred language. Use the dedicated Response Language setting to control the language of the response.
A fixed Response Language takes precedence over language instructions in Assistant Instructions or Output Style. With Automatic selected, the response follows the latest user request, or the CRM user’s language if no user request is available yet.
Save and test
- Save the assistant configuration.
- Open a suitable Organization record.
- Refresh the AI window and start a new conversation.
- Select the configured assistant.
- Submit the request below and compare the response with CRM data.
Prepare a financial overview of this organization and suggest up to three next steps.
If the response structure needs improvement, adjust Output Style. If the assistant focuses on the wrong information, revise Assistant Instructions. If information is missing, check the permitted fields, related data settings, and user permissions.
Configuration changes do not rewrite previous responses. Use a new conversation when testing changes without earlier conversation context.
5.2.3.Using an assistant
Use a configured assistant to ask questions about CRM records and receive responses based on its saved instructions and permitted data.
This example shows how to use an assistant named 360 Overview from an Organization record. The assistants available in your CRM depend on your installation, the current module, and your permissions.
Select the assistant and send a request
- Open the Organization record you want to work with.
- On the Summary tab, locate the AI Assistant panel shown in the example.
- Open the selector below the request field.
- Select 360 Overview from the AI Assistant group.
- Enter your request in the message field.
(Not needed its optional if assistant is already selected) - Check the selected assistant and click Send.
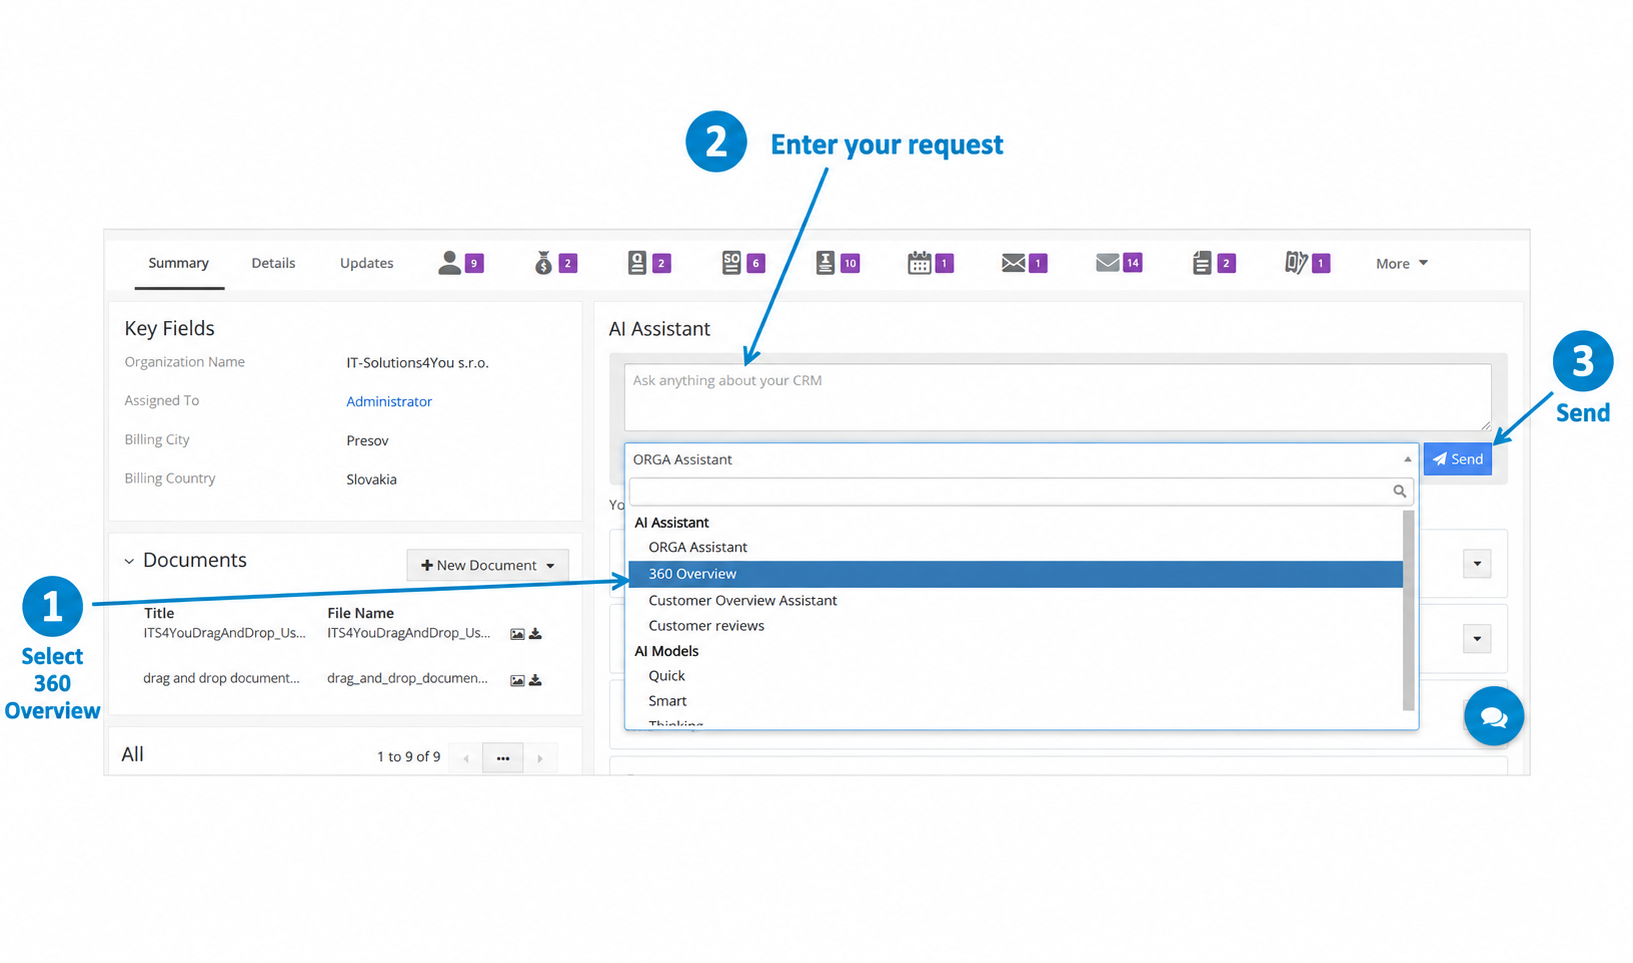
| No. | Control | How to use it |
|---|---|---|
| 1 | Select 360 Overview | Choose 360 Overview from the AI Assistant group. The screenshot shows this option highlighted in the open menu. Click it to confirm the selection and check that its name appears in the selector. |
| 2 | Enter your request | Describe what you want to know about the current record. You can request an overview, focus on a specific topic, or ask for suggested next steps. |
| 3 | Send | Submit the request using the selected assistant. AI applies its configured instructions, model, response language, and permitted data scope. |
The selector separates configured assistants under AI Assistant from standalone models under AI Models. Select 360 Overview to use that assistant’s saved configuration.
Example request:
Prepare an overview of this organization. Summarize its opportunities, quotes, sales orders, and invoices, and suggest three practical next steps.
The assistant can use only the data available through its configuration and your CRM permissions. Asking for additional information does not automatically make excluded fields or related modules available.
Review the response and continue
Read the generated response in the conversation window. In this example, the response includes an opportunity summary, a financial block, and information about the organization’s current status.
The exact headings, figures, and level of detail depend on the assistant’s instructions, Output Style, your request, and the available CRM data.
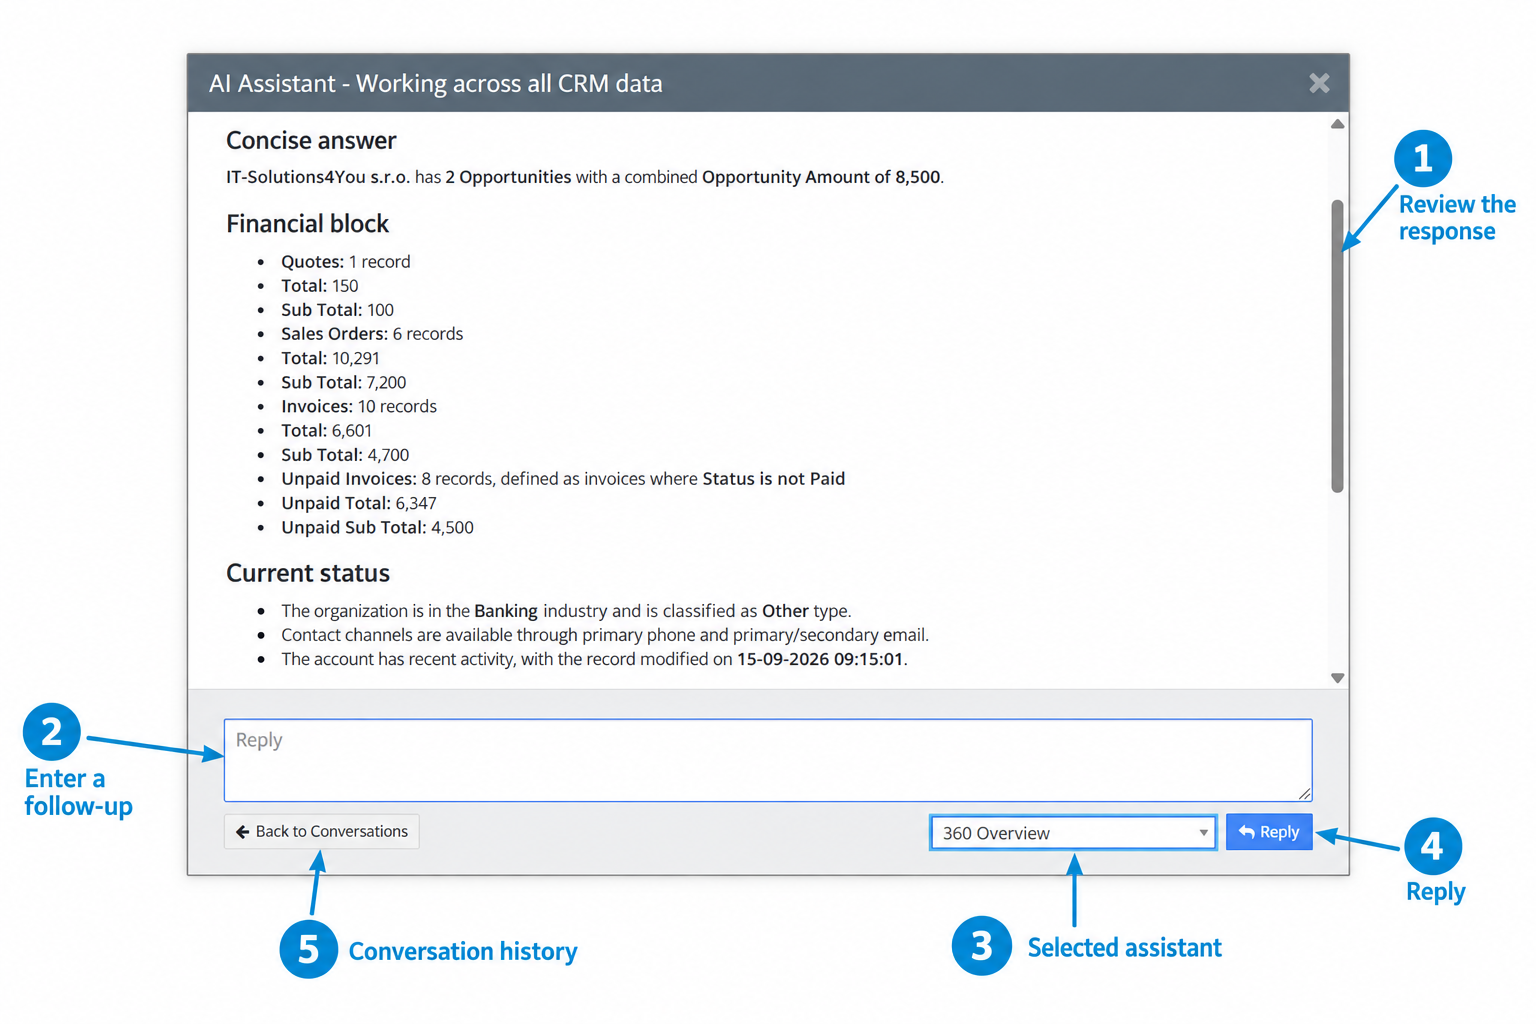
| No. | Element | How to use it |
|---|---|---|
| 1 | Review the response | Read the answer and scroll to see the remaining content. Check important facts and figures against CRM data before using them. |
| 2 | Enter another request | Use the Reply field to ask for clarification, request more detail, or refine the previous answer within the same conversation. |
| 3 | Selected assistant | Check which assistant will process your next request. The example shows 360 Overview selected. You can change the selection before replying if needed. |
| 4 | Reply | Send the text entered in the Reply field and continue the current conversation. |
| 5 | Conversation history | Select Back to Conversations to return to the conversation list, where you can reopen previous conversations. |
Example requests to continue the conversation:
Summarize the main risks from this overview and suggest the three most useful next steps.
Show the remaining outstanding invoice balance separately from the full value of invoices that are not marked as Paid. Include the currency and explain if the required balance data is unavailable.
Understanding the financial example
In the screenshot, the assistant defines unpaid invoices as invoices whose Status is not Paid. The displayed Unpaid Total is based on that definition.
This should not automatically be interpreted as the remaining amount owed. A partially paid invoice can have a remaining balance that differs from its full document total.
If you need the outstanding balance, request it explicitly and make sure the assistant has access to the relevant balance and currency fields. Also distinguish Total from Sub Total when reviewing document amounts.
How the assistant uses context
- The assistant applies its saved instructions, output style, model, and response language.
- It automatically uses its configured source and related data scope in regular chat, without the separate field sharing confirmation used with a standalone model.
- User permissions continue to apply.
- Related data can also be affected by the configured time window, record limits, and request conditions.
Default selection and new conversations
A new conversation may automatically select the module’s default assistant. An existing conversation keeps its most recently used available assistant or model.
Check the selected assistant before sending another request. Start a new conversation for an unrelated task or when testing configuration changes without earlier conversation context.
If 360 Overview is not available
Confirm that an assistant with this name has been configured for the current module. Ask your administrator to check its Active status, Applicable Module, permissions, and the required extension activation and licensing.
Generating an overview does not change CRM records. If a later request proposes creating or updating a record, review the proposed action before confirming it.
5.2.3.1.Reviewing actions
AI can prepare actions such as creating records, updating existing data, or preparing documents. Review the proposed action before confirming any changes in CRM.
Generating a response or opening an action preview does not modify records. Changes are saved when you confirm the relevant action.
Reviewing an update
The following example shows an update to one Invoice record. The proposal changes three fields: Due Date, Status, and Billing Address.
- Ask the assistant to prepare the required changes.
- Open Update existing records from the proposed action.
- Check the target module, number of affected records, and number of fields to update.
- Review the selection conditions and proposed values.
- Scroll down in the same window to compare the original and new values for each affected record.
- Select Apply edit only after completing the review.
Example request:
Prepare an update for the current invoice. Set its due date to 30 September 2026, change its status to Approved, and replace its billing address with the address I provide. Show the proposed changes for review.
Provide the actual replacement address in your request. The address shown in the screenshots is demonstration data.
Check the scope and proposed values
The upper part of the review window summarizes what the action will change.
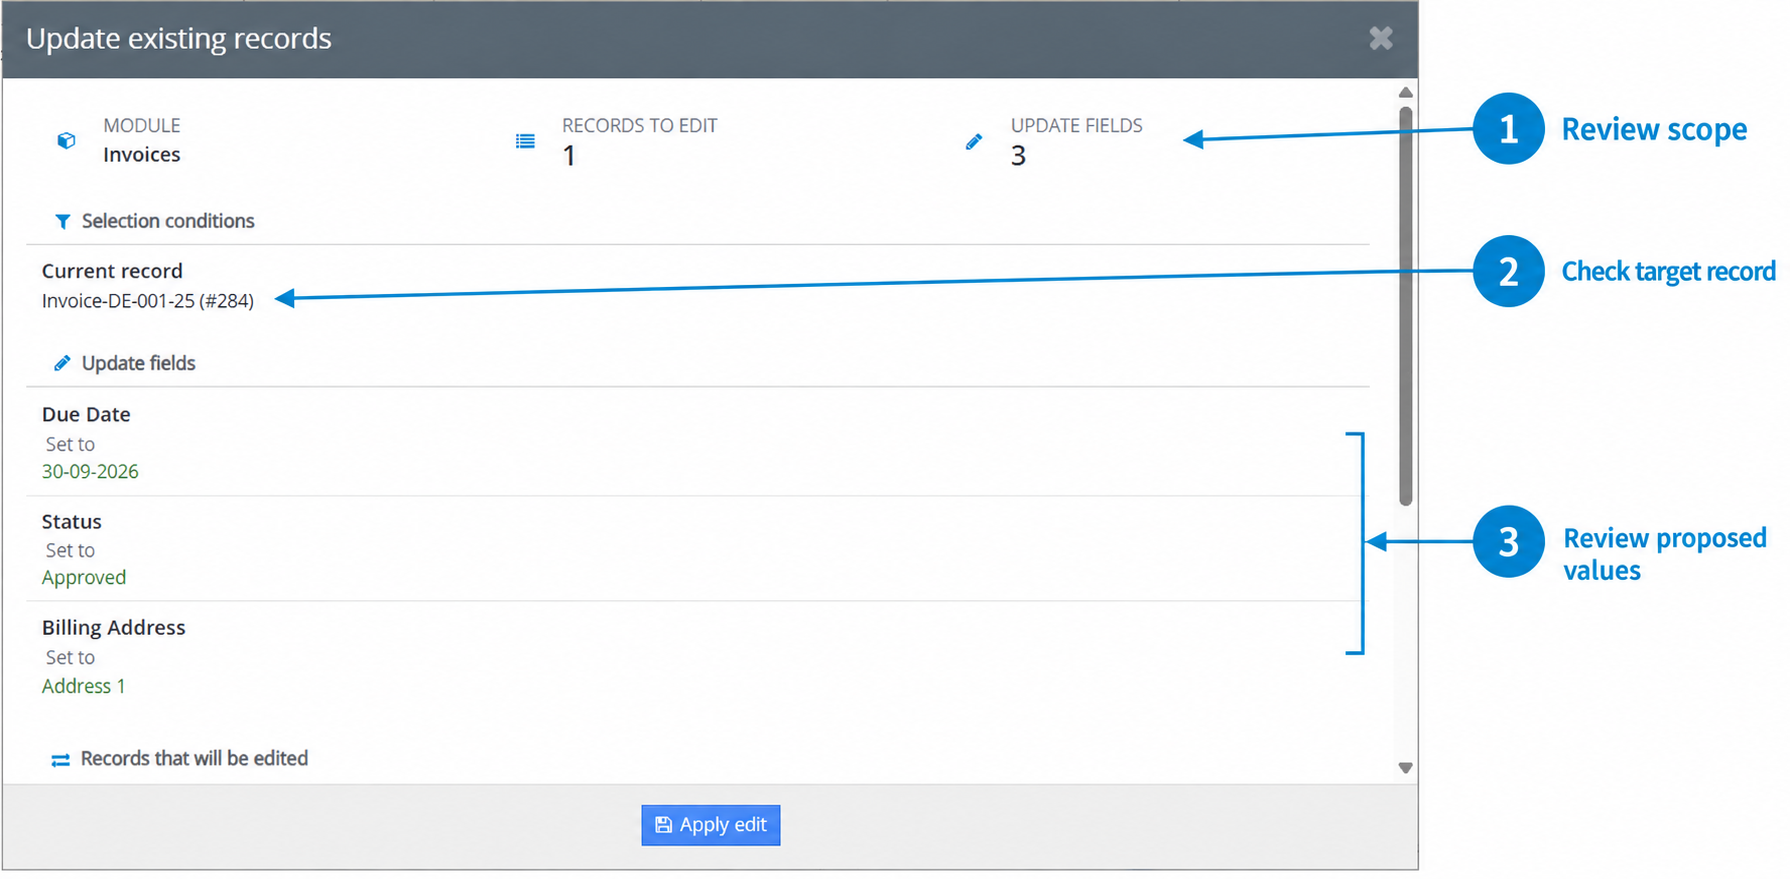
| No. | Element | What to check |
|---|---|---|
| 1 | Review scope | Check the target module, Records to edit, and Update fields. The example targets Invoices, affects one record, and proposes changes to three fields. |
| 2 | Check target record | Review Selection conditions. In this example, Current record identifies Invoice-DE-001-25 with record ID #284. Confirm that this is the intended record. |
| 3 | Review proposed values | Check every field listed under Update fields. The example proposes a due date of 30 September 2026, the status Approved, and a replacement billing address. |
Set to indicates that the field will receive the displayed value. For text fields, check whether your request should replace the existing text or add information to it.
The Apply edit button is already visible at the bottom of the window. Before using it, scroll down and review the individual record comparisons.
Compare the original and new values
The next screenshot shows the same window after scrolling down. It is not a separate confirmation step.
Under Records that will be edited, inspect the affected record and compare each Original value with its proposed New value.
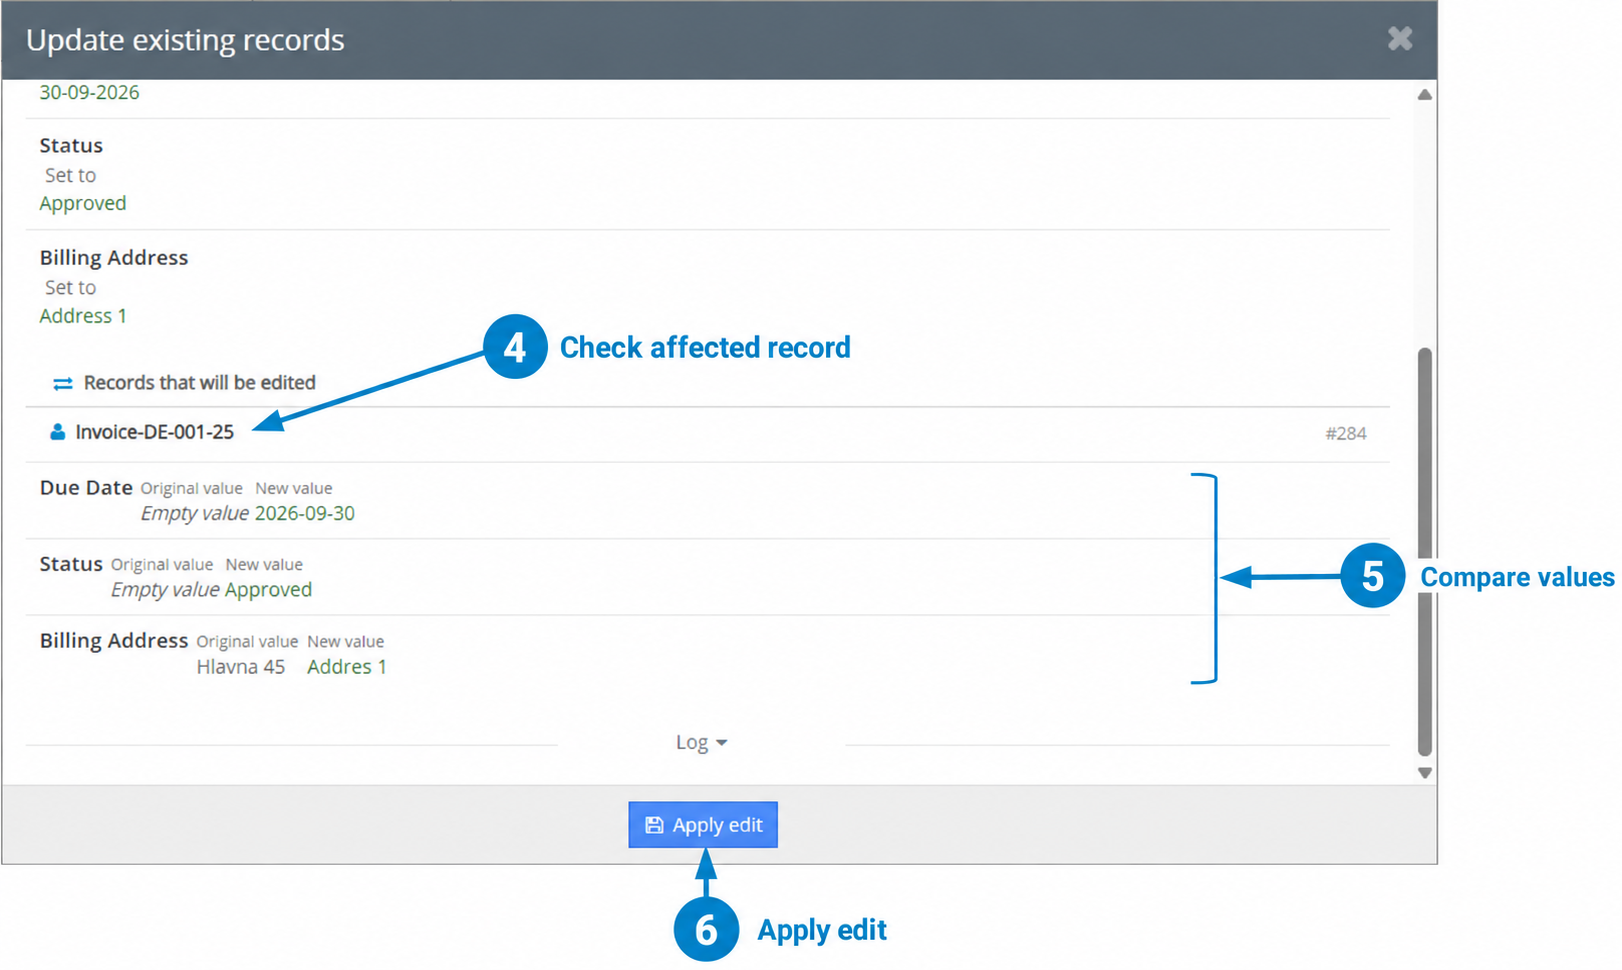
| No. | Element | What to check |
|---|---|---|
| 4 | Check affected record | Verify the record listed under Records that will be edited. If the proposal affects several records, review the full list before confirming. |
| 5 | Compare values | Compare the original and new values for every field. Empty value means the original field is blank in the displayed comparison. Check carefully when an existing value will be replaced. |
| 6 | Apply edit | Confirm and save the proposed changes to the displayed records for which you have permission. Use this button only when the scope and values are correct. |
In this example, Due Date and Status are shown with empty original values. Billing Address already contains a value, so the proposed update replaces existing information.
The date appears as 30-09-2026 in the proposal summary and 2026-09-30 in the comparison. Both represent 30 September 2026.
Confirm or revise the proposal
If any record, condition, or value is incorrect, close the review window without selecting Apply edit. Return to the conversation, clarify your request, and review the revised proposal.
If everything is correct:
- Select Apply edit.
- Check the result shown by CRM, including any reported errors.
- Open the affected record and verify the saved values.
Saving uses normal CRM mechanisms, so existing workflows or other automations may also run.
Deleting the conversation does not undo changes already saved to CRM.
Reviewing other actions
The review steps depend on the type of action proposed by AI:
- Finding records: open View filtered records to inspect the results. Use Select records when you want to confirm specific records for a later request. Viewing or selecting existing records does not modify them.
- Creating records: open Review creation or the available Quick Create form. Check the target module, proposed values, mandatory fields, and related records before confirming creation. A complete ordinary record proposal may also offer Create now, which saves the record when confirmed.
- Preparing documents: review the organization, other references, products or services, quantities, prices, taxes, currency, and totals. Documents with line items require explicit confirmation in the review form.
- Creating calendar events: verify the date, time, event type, and related record. Relative dates use the CRM user’s time zone. This creation feature supports events such as meetings and calls, not calendar tasks.
- Preparing emails or comments: review the generated text before completing the sending or posting action. See Emails and comments for the detailed procedure.
Available actions depend on the current feature, module, configuration, and user permissions. Always check the actual preview before confirming an action.
5.2.3.2.Emails and comments
Use AI to prepare emails and create, improve, or translate CRM comments. Review the generated text before sending an email or posting a comment.
Preparing an email
The example shows an email draft created with Invoice Payment Email Assistant. Available assistants depend on your configuration, the current module, and your permissions.
- Open the CRM record relevant to your email.
- Open AI and select an appropriate assistant, such as Invoice Payment Email Assistant.
- Describe the email you need and submit your request.
- Review the generated Subject and Body.
- If changes are needed, enter another request in the Reply field and select Reply.
Example request:
Draft a polite email asking the customer to review this invoice and arrange payment if it is still outstanding. Use a professional, friendly tone.
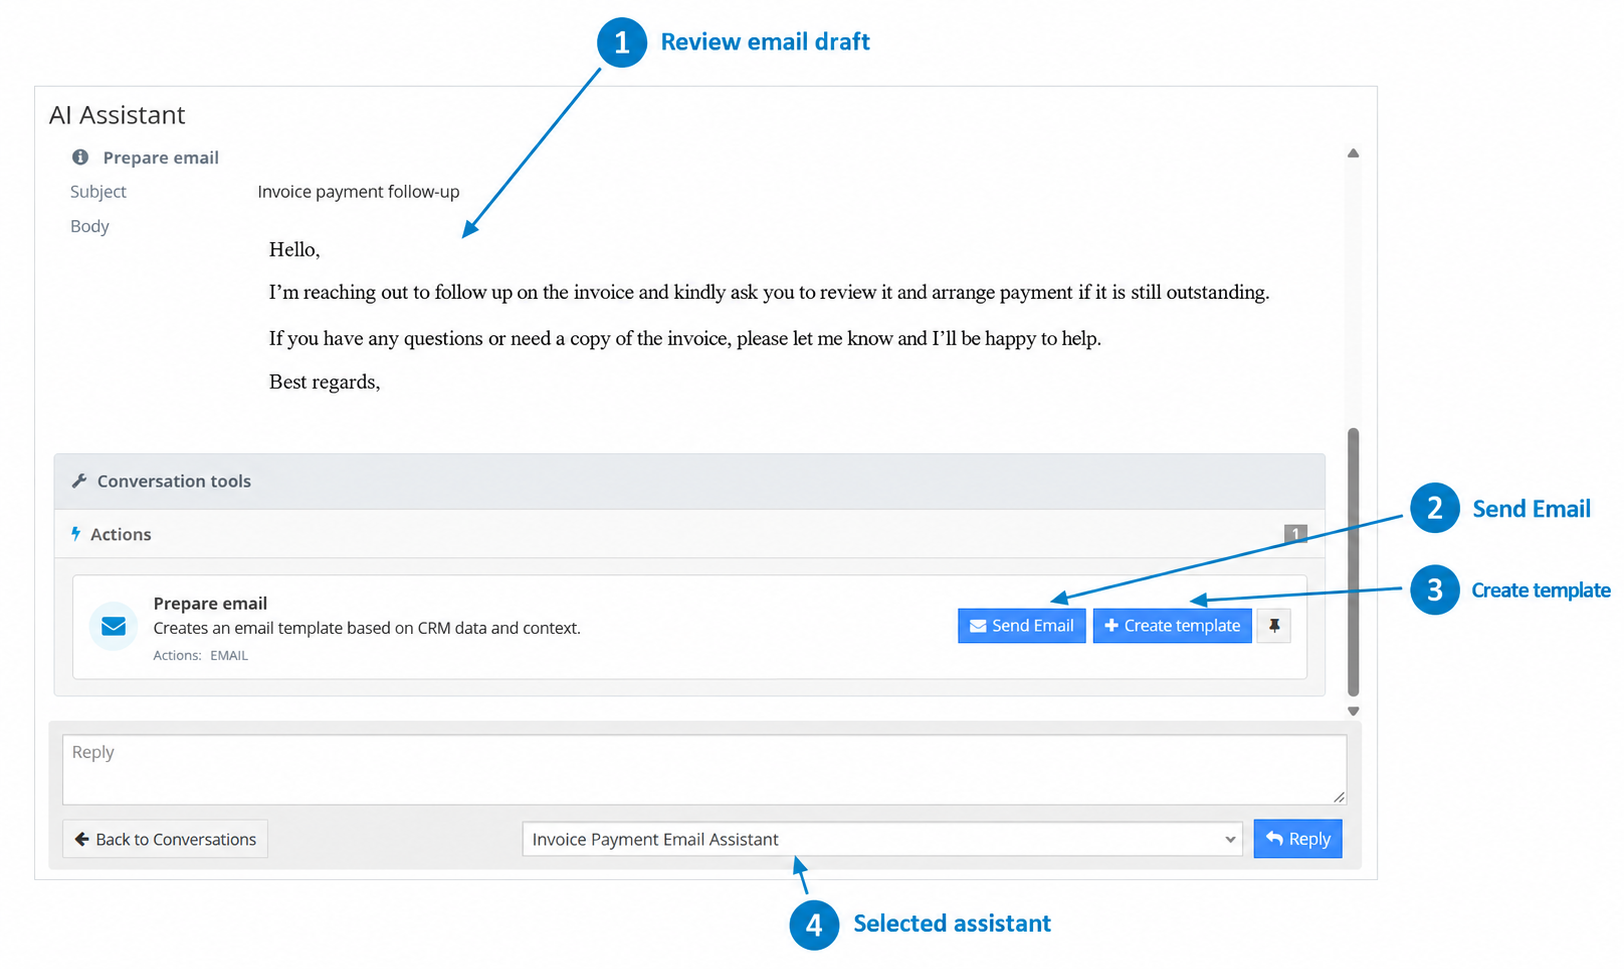
The numbers in the email screenshot identify these elements:
| No. | Element | How to use it |
|---|---|---|
| 1 | Review email draft | Check the generated subject and body. Verify customer details, invoice information, payment statements, and the tone before proceeding. |
| 2 | Send Email | Open the email composer using the prepared draft. Check recipients and content, then complete sending in the email window. |
| 3 | Create template | Use the draft as the starting point for a reusable email template. This feature requires an active EMAILMaker module. Review any customer or invoice details before saving content for reuse. |
| 4 | Selected assistant | Shows the assistant selected for the next request. In this example, Invoice Payment Email Assistant is selected. Check this setting before asking for revisions. |
The email actions appear under Conversation tools, in the Actions area of the Prepare email card.
Example revision request:
Make the email shorter and use a softer tone. Keep the request to arrange payment only if the invoice is still outstanding.
Sending the email
- Select Send Email on the prepared email action.
- Review the draft in the email composer.
- Check the recipients, subject, body, and any required attachments.
- Complete sending in the email window.
The email composer is opened through ITS4YouEmails, which must be available and configured for sending.
Generating a draft does not send an email. Selecting Send Email on the AI action opens the composer so you can review and complete the sending process.
In supported email editors, AI options may also be available directly for drafting or revising text.
Working with comments
Open a CRM record and find its Comments section. The AI menu beside the Post button provides actions for preparing and editing comment text.
- Enter a short instruction or draft in the comment field.
- Open the AI menu using the icon beside Post.
- Select Generate comment, Improve comment, or Translate comment, depending on your task.
- Review the generated result and use the available action to place it in the comment field if required.
- Check the final text in the comment field.
- Select Post when the comment is ready to be saved.
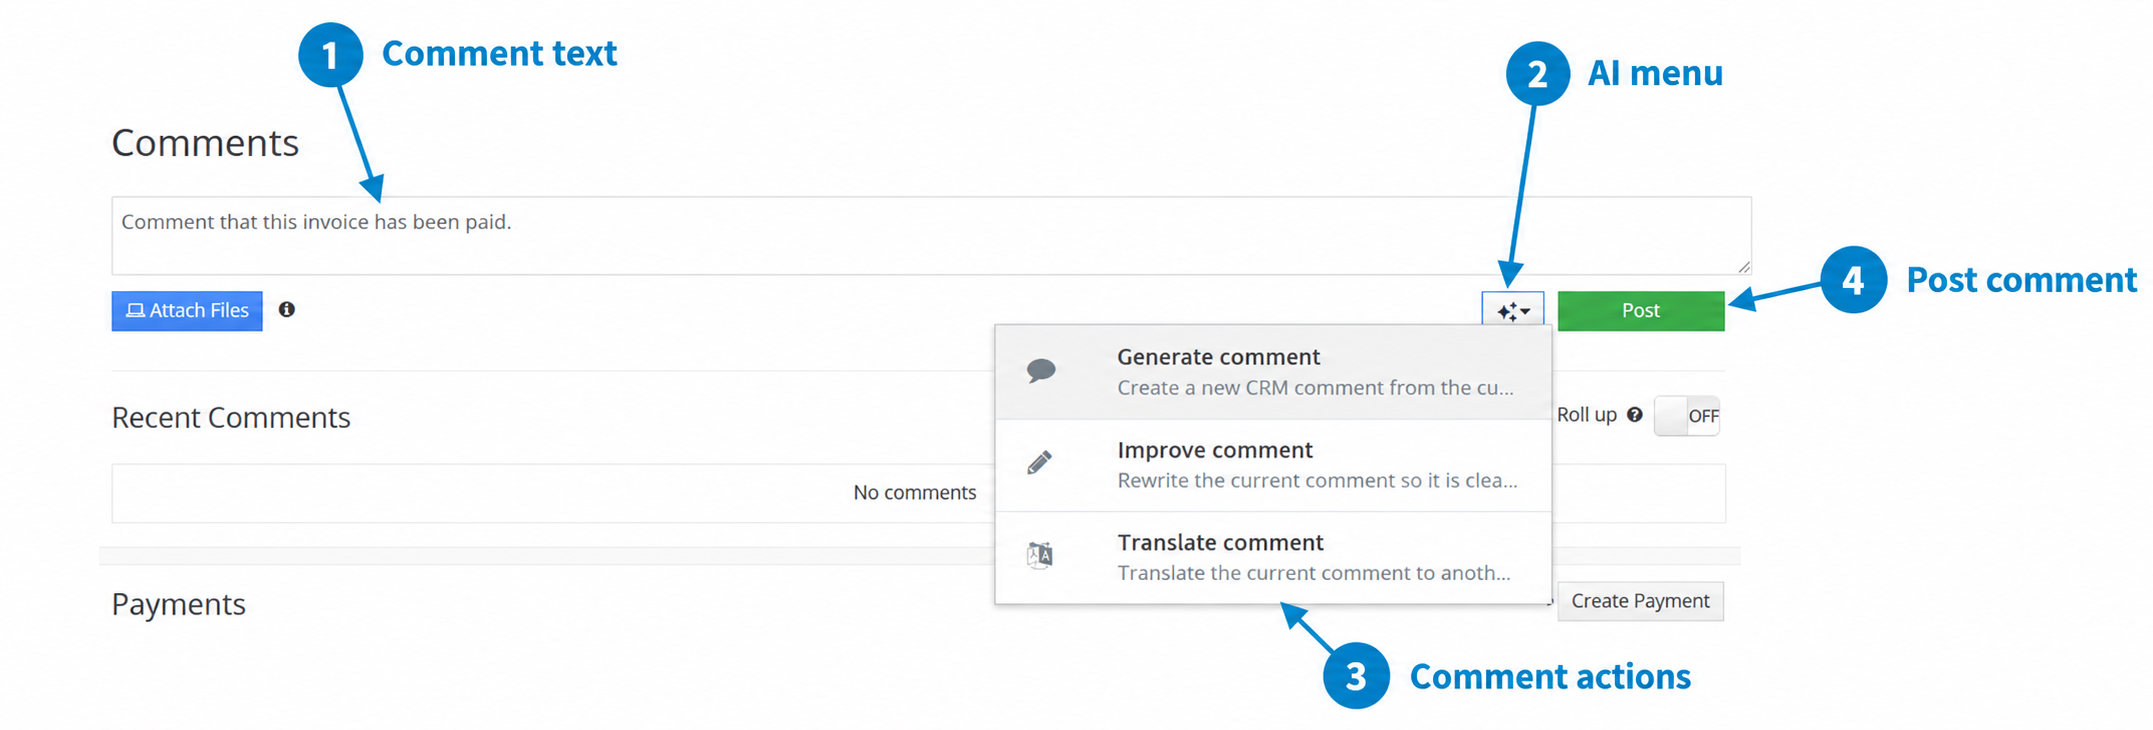
The numbers in the comments screenshot identify these elements:
| No. | Element | How to use it |
|---|---|---|
| 1 | Comment text | Enter an instruction for a new comment or the text you want to improve or translate. Before posting, make sure this field contains the final comment rather than the original instruction. |
| 2 | AI menu | Open the menu beside Post to access the available AI comment actions. |
| 3 | Comment actions | Choose Generate comment to prepare new text, Improve comment to revise the current wording, or Translate comment to translate it into another language. |
| 4 | Post comment | Save the final text as a comment on the current record. Review the content before selecting Post. |
Choosing a comment action
- Generate comment: use a short instruction and the available record context to prepare a new comment.
- Improve comment: use existing comment text as a starting point and review the revised wording before posting.
- Translate comment: translate the current text into another language using the available translation flow.
The screenshot shows this example instruction:
Comment that this invoice has been paid.
Use this instruction only after confirming the payment in CRM. Review the generated wording before posting it.
Posting a comment about payment does not itself register a payment or change the invoice’s payment status.
Availability and data access
The comments screenshot shows built-in AI actions. It does not show a named assistant selector. Available actions and assistants can differ between chat, email, and comment features.
Email and comment tools use their own data flows. Do not assume that the regular chat field sharing confirmation appears in these features. CRM permissions continue to apply.
If a required action is unavailable, ask your administrator to check the relevant modules, licensing, configuration, and permissions.
Generating text alone does not send an email or publish a comment. Complete the relevant sending or posting action after reviewing the result.
5.2.4.Managing assistants
Manage existing assistants in the AI Assistant module. Open an assistant record to review its saved configuration, change its settings, or temporarily disable it.
The example shows Invoice Payment Email Assistant configured for the Invoice module. It is active, but it is not the module’s default assistant.
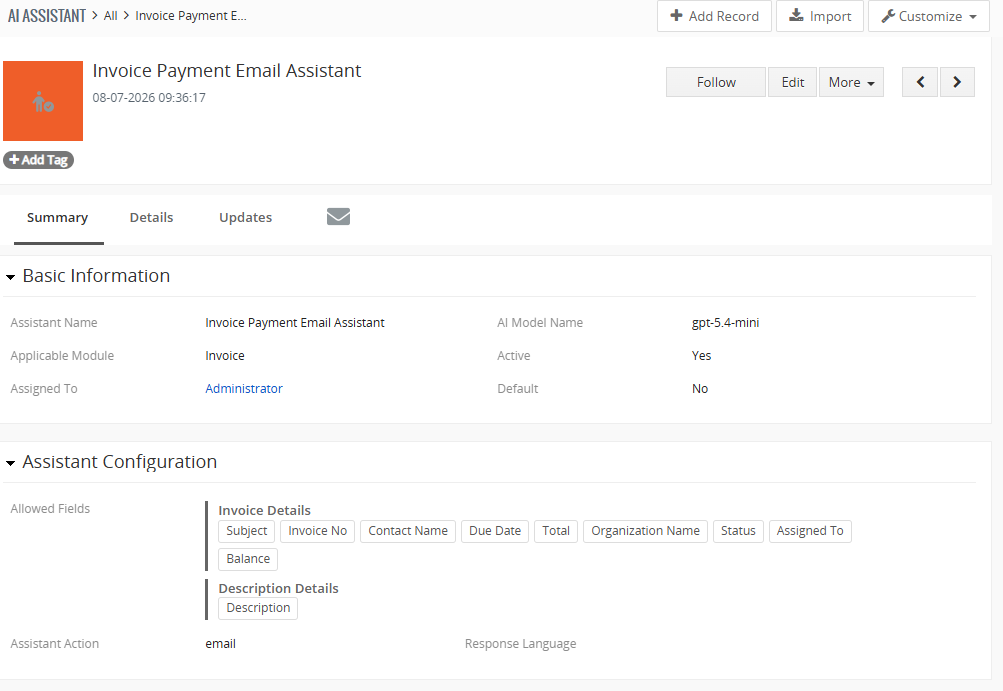
The numbers in the screenshot identify these elements:
| No. | Element | Purpose |
|---|---|---|
| 1 | Edit assistant | Select Edit to open the configuration form. Update the required settings and save your changes. |
| 2 | Active status | Shows whether the assistant is enabled. The example displays Yes. Availability also depends on the applicable module, the AI feature, permissions, and licensing. |
| 3 | Default assistant | Shows whether this assistant is selected by default for new conversations in its applicable module. The example displays No. Users can still select an available active assistant manually. |
| 4 | Allowed fields | Shows the saved source fields the assistant may use, grouped by their CRM blocks. Review this area after changing the permitted field selection. |
Reviewing the saved configuration
The Basic Information block identifies the assistant, its applicable module, selected model, owner, and Active and Default settings.
The Assistant Configuration block shows the permitted source fields and other saved settings.
In this example, the selected invoice fields include Subject, Invoice No, Contact Name, Due Date, Total, Organization Name, Status, Assigned To, Balance, and Description.
These selections define the source data available to the assistant, subject to user permissions. They do not mean that every field must appear in every generated response.
Editing an assistant
- Open the AI Assistant module.
- Select the assistant you want to update.
- Click Edit.
- Change the required settings, such as the model, response language, allowed fields, related data, instructions, or output style.
- Save the record.
- Review the saved configuration in the assistant’s detail view.
- Refresh the AI window and submit a new test request with the correct assistant selected.
Applicable Module cannot be changed through normal editing after creation. To configure an assistant for another module, create a new assistant record.
Changing the default assistant
- Open the required assistant and click Edit.
- Enable Default.
- Make sure Active is also enabled.
- Save the assistant.
- Start a new conversation in the applicable module to check the default selection.
Each applicable module can have one default assistant. Saving another assistant for the same module as default clears the previous assistant’s default flag.
This change does not replace the selection in an existing conversation. Existing conversations retain their most recently used available assistant or standalone model.
Temporarily disabling an assistant
- Open the assistant record and click Edit.
- Turn off Active.
- Save the record.
The assistant becomes unavailable for new use. To make it available again, edit the record, enable Active, and save.
If an open conversation used an assistant that is now unavailable, AI may display a warning and fall back to a standalone model. Check the current selection before sending another request.
Testing configuration changes
Use a known CRM record to verify the updated behavior. For Invoice Payment Email Assistant, open an invoice and submit a request such as:
Draft a polite email about this invoice. Use the available invoice status and balance, and do not assume that payment is outstanding if the data does not confirm it.
Check that the response uses the intended language, follows the instructions, and reflects the available CRM data.
If you changed the permitted fields or related data, start a new conversation to test without information retained from earlier requests.
Configuration changes do not rewrite previous responses or remove context already included in an existing conversation.
Preparing assistants for your team
- Use a clear name so users can recognize the assistant’s purpose.
- Select only the source and related fields needed for its task.
- Verify the model, response language, instructions, and output style.
- Test typical requests on records whose data you can check.
- Test with an account whose permissions match the intended users.
- Review any predefined assistants before making them part of your team’s workflow.
Managing assistant records requires the appropriate CRM permissions. If you cannot edit the configuration, contact your administrator.
5.2.5.Permissions and limitations
Assistant configuration and CRM permissions determine which information is available when processing requests.
- CRM permissions still apply.
An assistant does not grant access to records or fields that the user is not permitted to access. - Configuration defines the permitted context.
An external AI service processes the request and the available context needed to answer it. - Regular assistant chat uses the configured data scope automatically.
It does not request the separate dynamic field sharing confirmation used with a standalone model. - Instructions do not grant access.
Asking the assistant to use an excluded field does not make that field available. - Assistant Action is not a permission setting.
Use CRM permissions to control record creation and editing. - Results depend on available data.
Missing values, relationships, selected fields, time windows, record limits, and request conditions can affect answers. - Existing conversations retain earlier context.
Changing the configuration does not remove information already included in the conversation. - Generated content requires review.
Compare important statements with CRM data and check proposed changes before confirming them.
Before making an assistant available to users, verify both its configuration and its behavior with the permissions those users actually have.
5.2.6.Troubleshooting
If an assistant does not behave as expected, check the relevant settings below before contacting support.
- The assistant is missing from the selector
-
Check Active, Applicable Module, user permissions, AI Assistant activation, licensing, and availability in the current AI feature. Refresh the AI window.
- The default assistant is not selected
-
The default applies to new conversations. Existing conversations keep their previous available assistant or model. Start a new conversation or select the required assistant manually.
- Applicable Module cannot be changed
-
This field is fixed after creation. Create a new assistant for the required module.
- The response uses the wrong language
-
Check Response Language. A fixed language overrides the request language and language instructions in Assistant Instructions or Output Style.
- Source record information is missing
-
Check Allowed Fields, the currently open record, its actual field values, and the user’s permissions.
- Related records are missing
-
Check Related Modules, specific Related Fields, existing CRM relationships, Related Records Days Back, and user permissions.
- Older unpaid invoices are missing
-
The time window may exclude invoices that have not been modified recently. Consider leaving Related Records Days Back blank and check the permitted balance and status fields.
- A list contains fewer records than expected
-
Check Related Records Limit, the time window, and request conditions. Ask for an aggregate count or sum when you need a total rather than individual record details.
- Document items are unavailable
-
Check the LineItems related group and selected line item fields. Document header fields are selected separately.
- Changed instructions appear to have no effect
-
Save the configuration, refresh AI, verify the selected assistant, and submit a new request. Start a new conversation to test without previous context.
- An open conversation reports an unavailable assistant
-
The assistant may have been disabled or deleted. Check the current selection and choose an available assistant or model before continuing.
- No assistant produces a response
-
Ask your administrator to check the shared API key, server connection, model availability, AI service limits, and licensing.
When contacting support, include the CRM module, assistant name, steps to reproduce the issue, and the exact error message. Do not include the API key.
5.3.AI Agent
Currently in Development.
6.Additional features
7.Settings
Vtiger AI Settings can be accessed via the list view in the Installer list of Extensions.

In the Settings, you can find:
- Module Requirements – check if the all Requirements are met for your module (like Custom links, Event handlers, etc..,)
- License settings – see if a license is currently active
- Upgrade – updates extension if needed
- Uninstall – remove extension from your CRM
7.1.How to update Vtiger AI
The upgrade of the module is initiated via our Installer or manually.
Updating via Installer (recommended):
- open the Installer in the CRM
- in the Modules tab find your installed module and you should see the
 button available
 - If the new version is available, you will be notified via Installer Notifications icon
Updating manually:
Updating module manually is sometimes required when our support team sends you .zip package, if you are having some issues or there is any update or customization available.
Otherwise, we always recommend to use update via Installer.
Update can be done via Module Manager by clicking on the button and selecting the .zip file.
7.2.Uninstall
If you need to remove the module from your Vtiger you have two options:
- Uninstall via Installer.
- Manually via going to module Settings and choose Uninstall option.
⚠️ Uninstalling Vtiger AI Plugin will remove all saved Settings!
7.2.1.Uninstall via Installer
You have also option to remove the module via Installer window by accessing the Settings – Uninstall window:
- Go to your Installer, by a click on Notifications Icon and then on the button ,
or via Main Menu – Settings – CRM Settings – Extensions – ITS4YouInstaller - Find the module you need to uninstall in the Modules tab
- Via
 pick list button choose the Uninstall option, you will be redirected to the Uninstall window.
 - Click on
 button

- Confirm uninstall with
 button
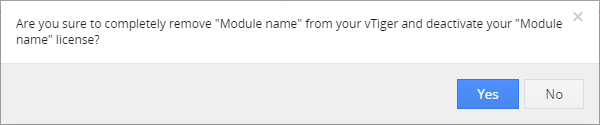
Now, the module has been removed from your Vtiger and your license has been deactivated. To use this module again, you need to provide installation and validation steps (see Installation chapter).
7.2.2.Manual Uninstall
There is also available option to remove Extension from your Vtiger manually.
To uninstall please provide following steps:
- Go to the Installer and find AI Assistant extension in list view, via button Settings select Uninstall.
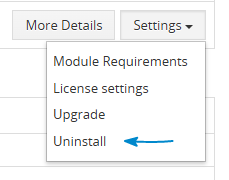
Extension Uninstall - Click on button.
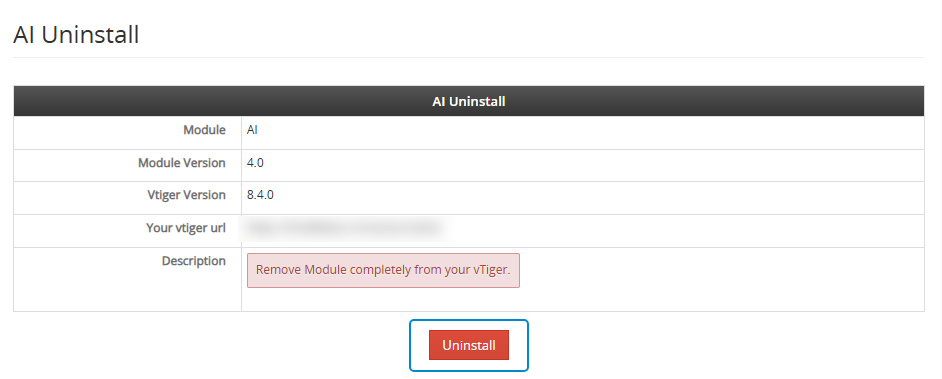
Extension Uninstall Confirm uninstall with
 button.
Now, Extension is removed from your Vtiger and your license is deactivated.
To use Vtiger AI Extension again, you need to provide installation and validation steps again.