

1.Introduction
Google Calendar Sync created is useful extension that allows you to synchronize your Vtiger and Google calendar.
Synchronization is via Cron (Scheduler) fully automatized in the Vtiger CRM.

2.How to install Google Calendar Sync
Please provide following steps in order to install Google Calendar Sync
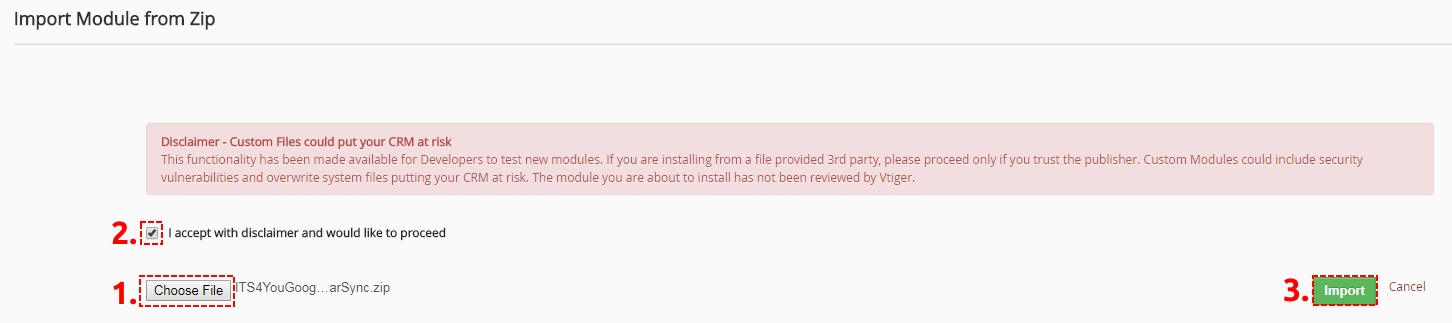
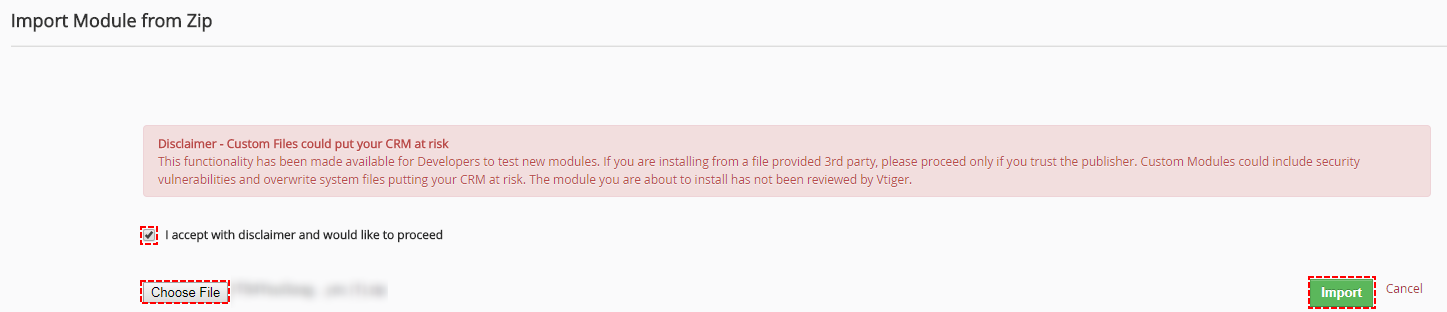
- Install the .zip (package) file of the Google Calendar Sync module via CRM Settings -> Studio -> Module Manager. Click on the Import from Zip.

How to install Google Calendar Sync - Select the .zip (package) file that you downloaded from our shop. Please check that you accepted the disclaimer and would like to proceed. Click on the
 button.
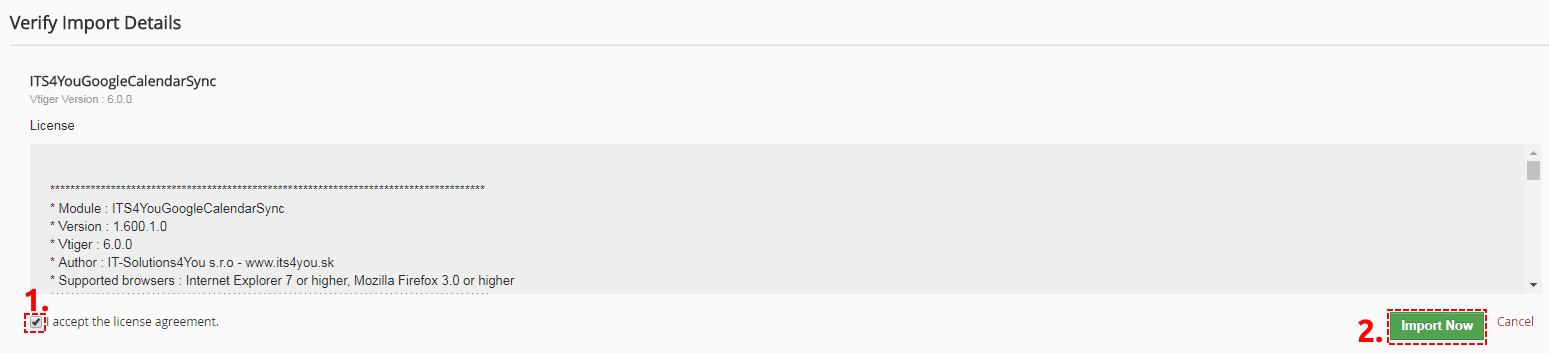
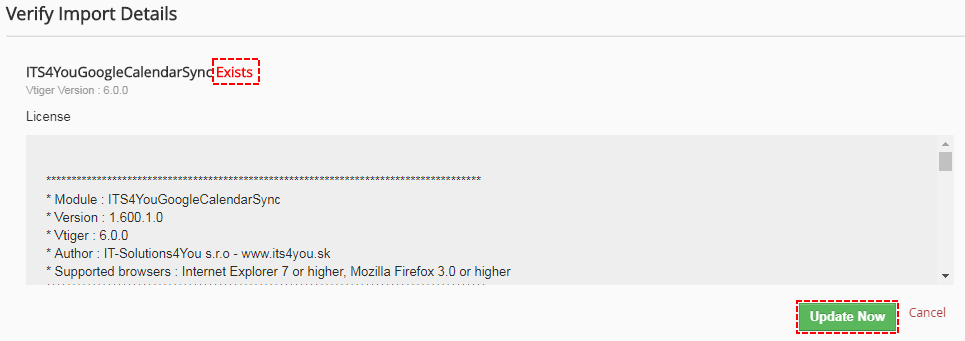
How to install Google Calendar Sync If you have after this step error message: Sorry! Attempt to access restricted file. Please check if folder test/vlib has correct write permission for browser (apache, www-data). - Verify the import details parsed from the .zip (package) file. Please check that you accepted the license agreement and click
 to proceed or Cancel to cancel.
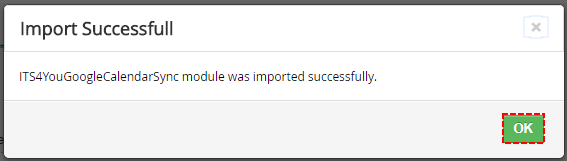
How to install Google Calendar Sync - Google Calendar Sync was imported
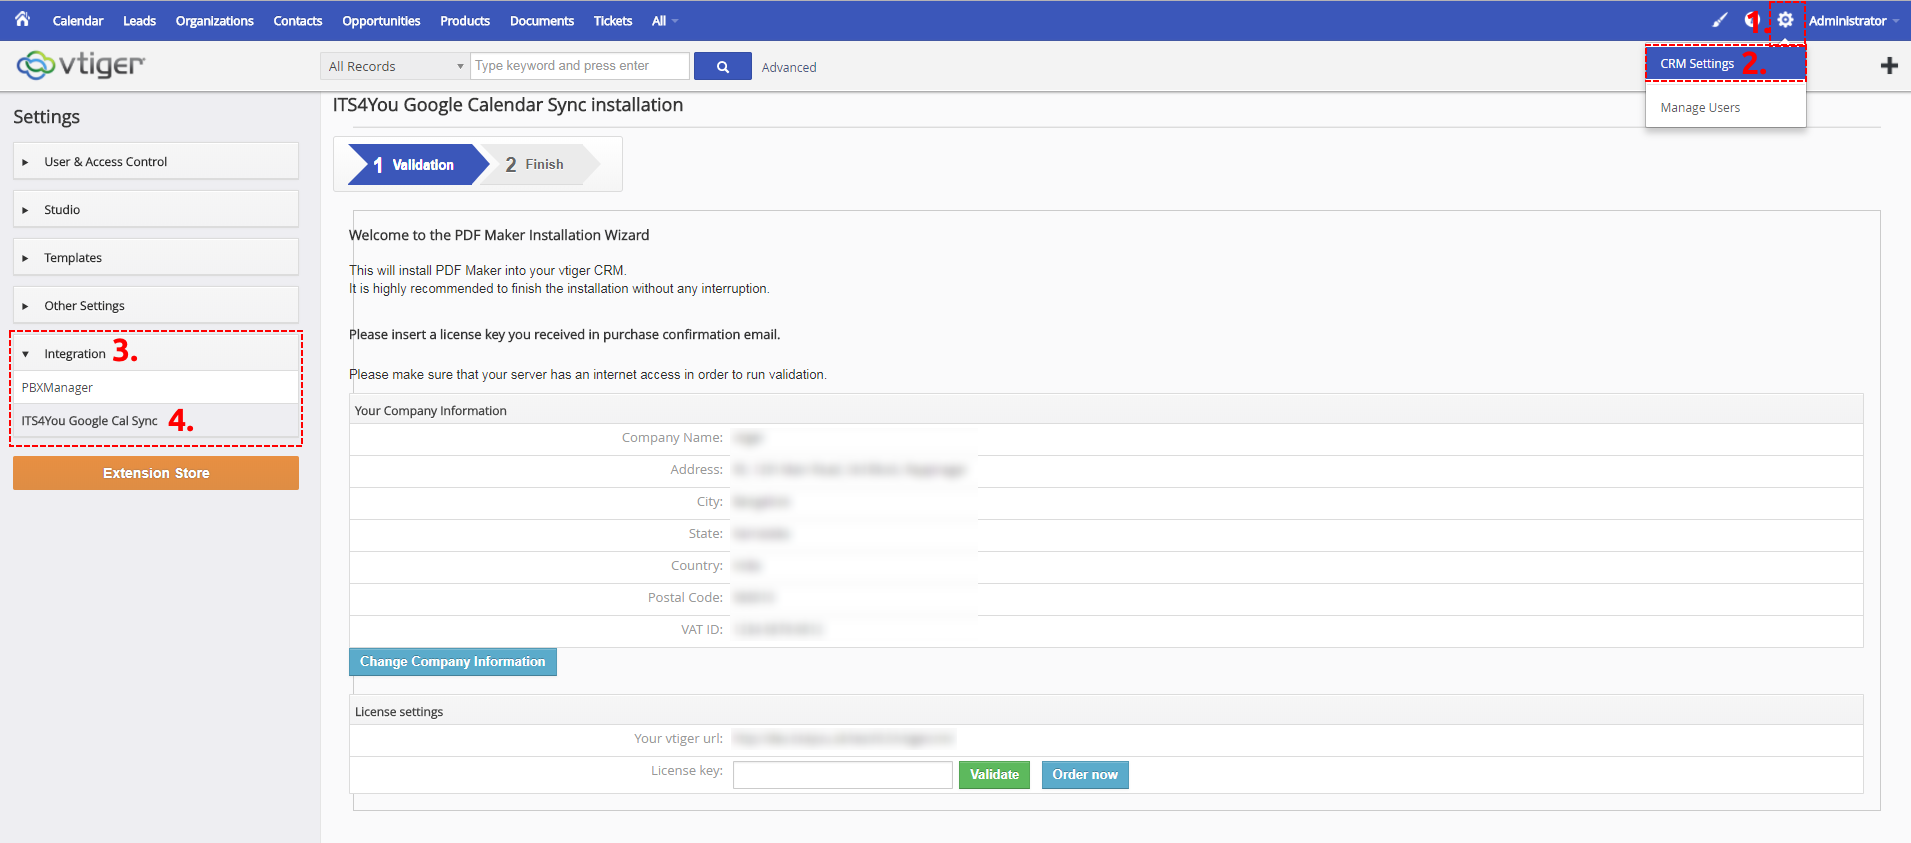
How to install Google Calendar Sync
In order to finish installation, please provide following validation steps.
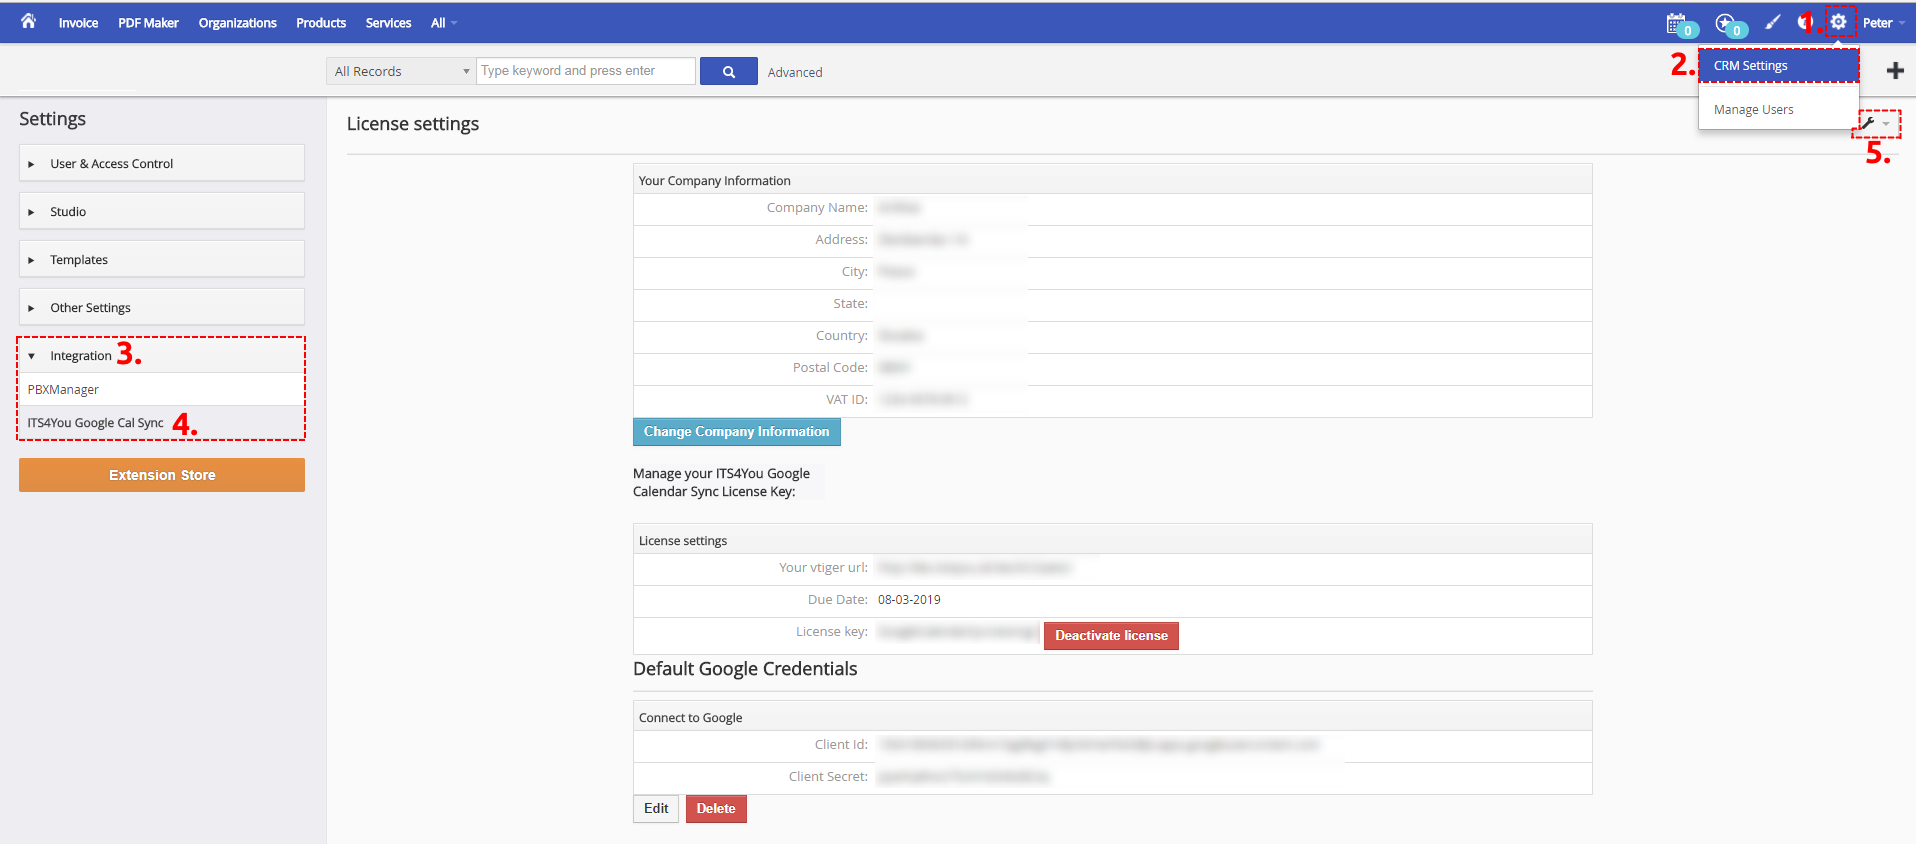
- Please find ITS4You Google Cal Sync in Integration Setting of CRM
Google Calendar Vtiger 6 Sync Validation - Please check your Company information and insert license key. Make sure that your server has Internet access. Click on button [Validate]. If you want to change your Company information, click on button [Change Company Information].

Insert License Key – Google Calendar Vtiger 6 Sync - Finish validation
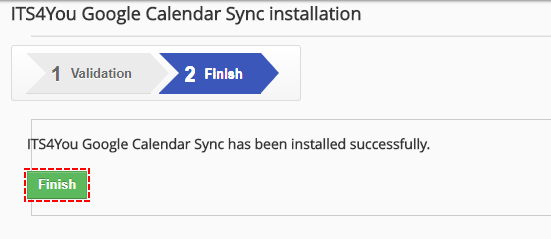
Finish validation – Google Calendar Vtiger 6 Sync
3.How to update Google Calendar Sync
The upgrade of the Google Calendar Sync is initiated in the same way as Google Calendar Sync installation so please refer to above installation part for details how to initiate the import of the module from the file.
As you can be seen on the Picture below you will be notified that the Google Calendar Sync module already exists. Confirm License agreement and upgrade will start immediately when you click on the button.
After upgrade the notification about successful upgrade is shown.
4.Before you start using Google Calendar Sync
Before you start using Google Calendar Sync for your vtiger CRM Open Source, you need to create a Project in Google get the API credentials for correct authenticate you and your Vtiger.
Also in the project settings you will be needed to validate your CRM URL, this will be explained further.
4.1.How to create Project in Google and receive credentials
In the below creating synchronization is in the 3 steps:
- A) Create Project
- B) Verify Domain
- C) Create OAuth Cliend ID
A) Creating Project:
- Please visit: https://console.developers.google.com/project, log in with your Google Apps or Google account and click on the button
 .
.

Create Project – Google Calendar Vtiger 7 Sync - A pop-up window will appear, check the Terms of Services and fill project name and click on
 button.
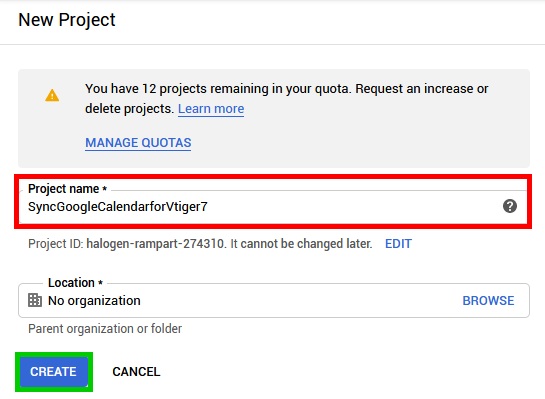
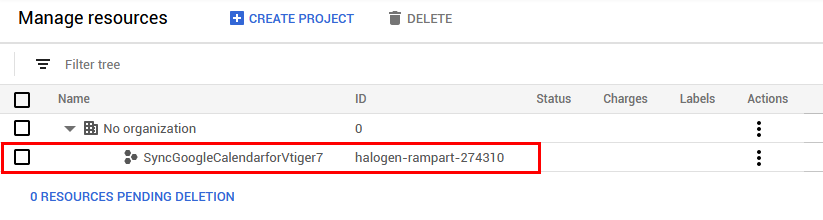
Fill Google Project Name – Google Calendar Vtiger 7 Sync - Your project has been created. It may take a few seconds until your project will be shown:
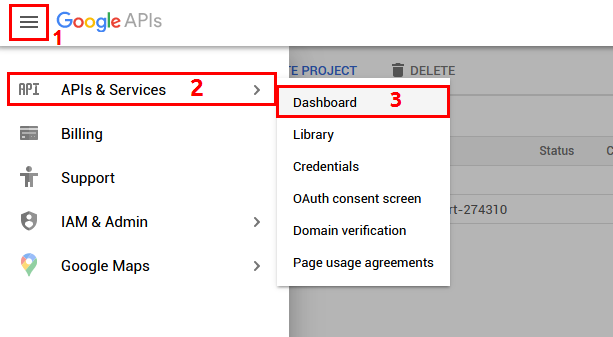
Select Google Project – Google Calendar Vtiger 7 Sync - Next, open Dashboard of Google APIs:
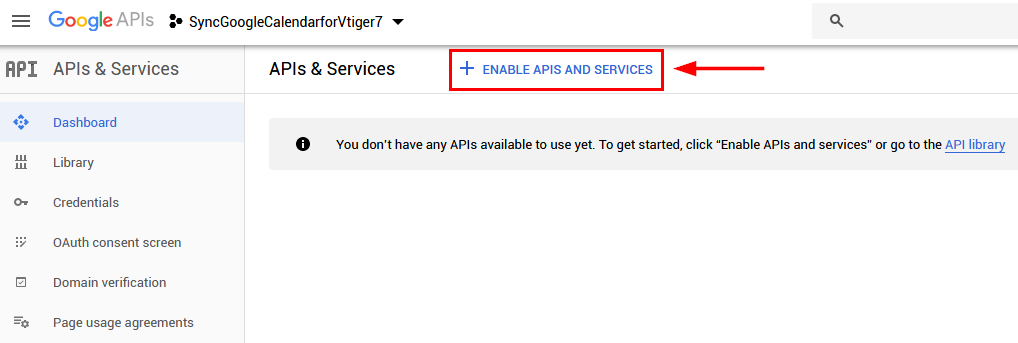
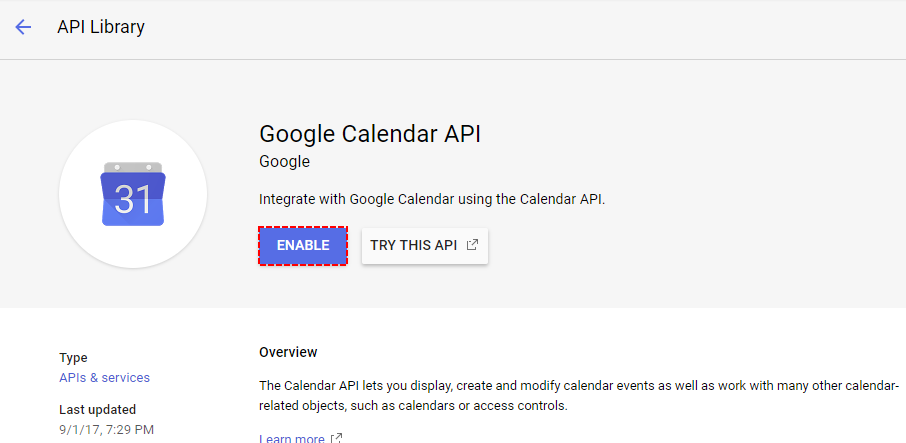
Open Dashbard of Google Project – Google Calendar Vtiger 7 Sync - Enable Calendar API by clicking on
 button:
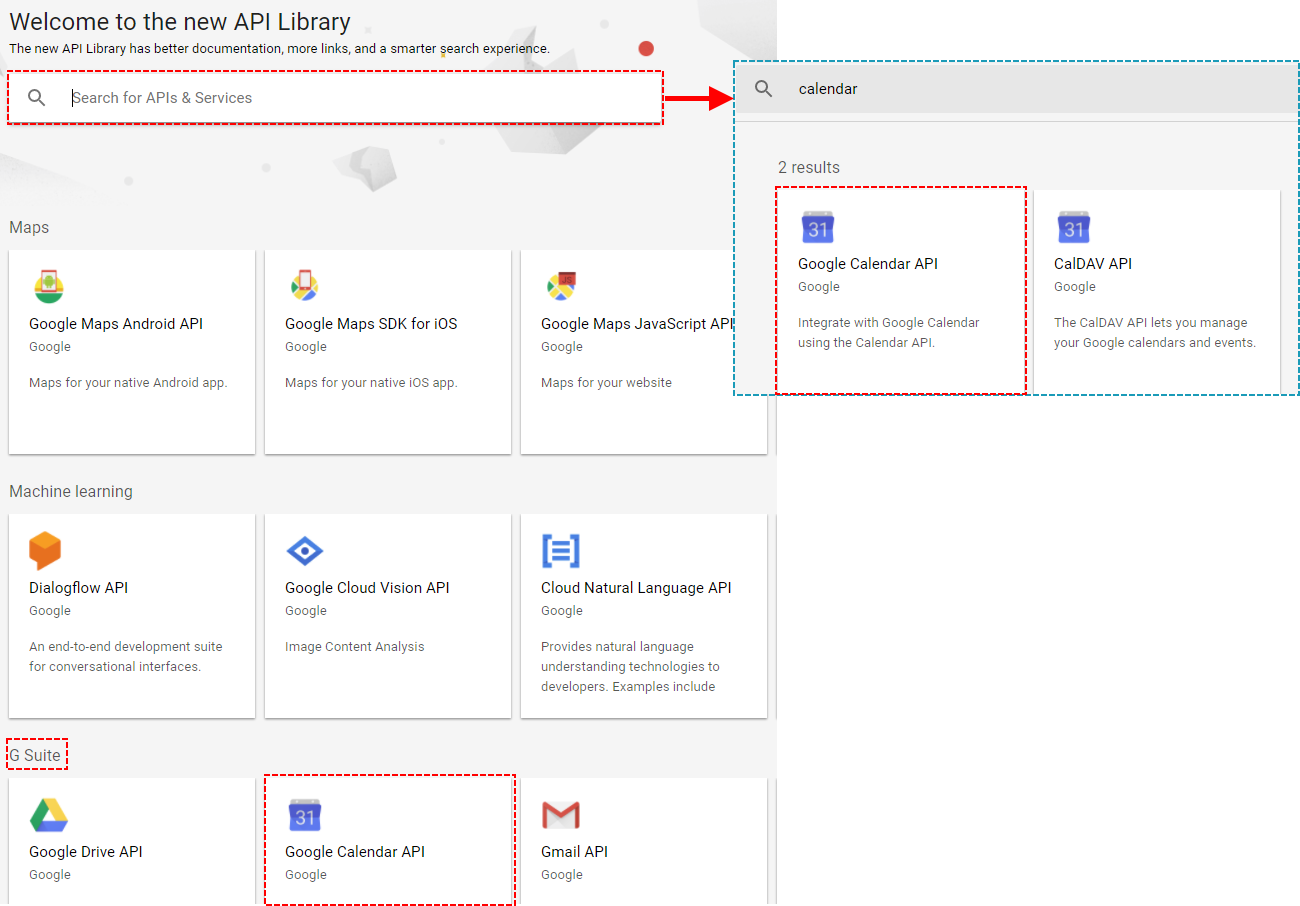
Enable APIS – Google Calendar Vtiger 7 Sync - Select or find Google Calendar API:
Find Api Google Project – Google Calendar Vtiger 7 Sync - Enable Calendar API:
Enable API Google Project – Google Calendar Vtiger 7 Sync - API has been created:
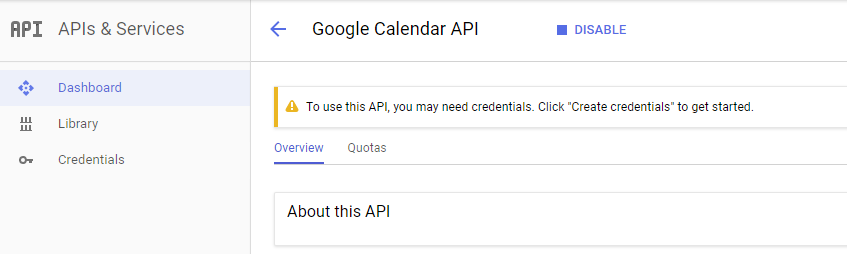
API Google Project – Google Calendar Vtiger 7 Sync - Now you need to set OAuth Credentials:
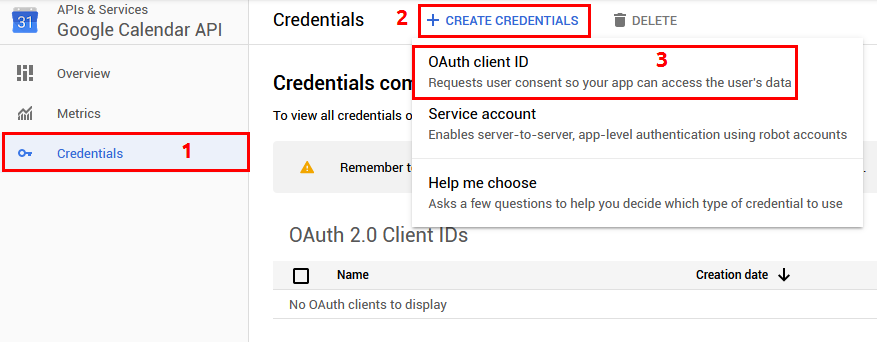
OAuth Credentials Google Project – Google Calendar Vtiger 7 Sync - You need to Configure consent screen first:
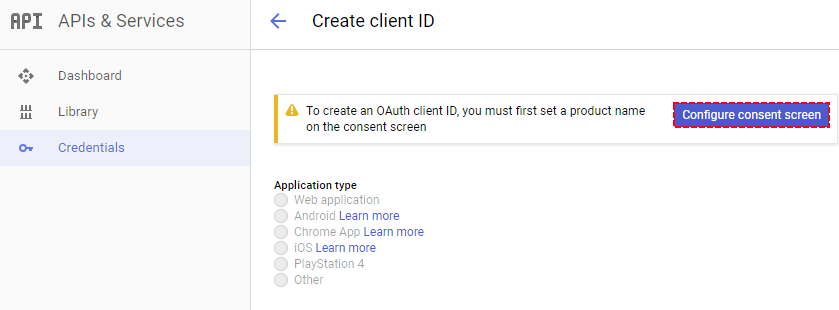
Configure consent screen Google Project – Google Calendar Vtiger 7 Sync - Select User Type:
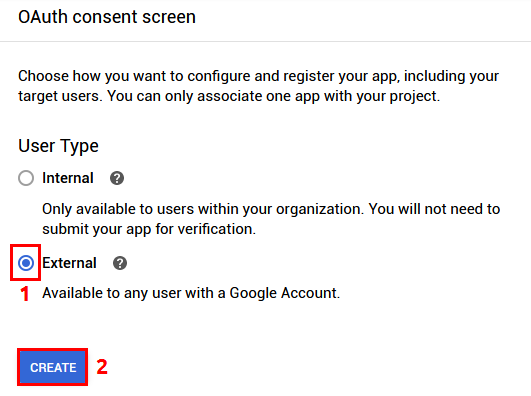
Selecting User Type – Google Calendar Vtiger 7 Sync - Next, fill up the name, then scroll down and Save:
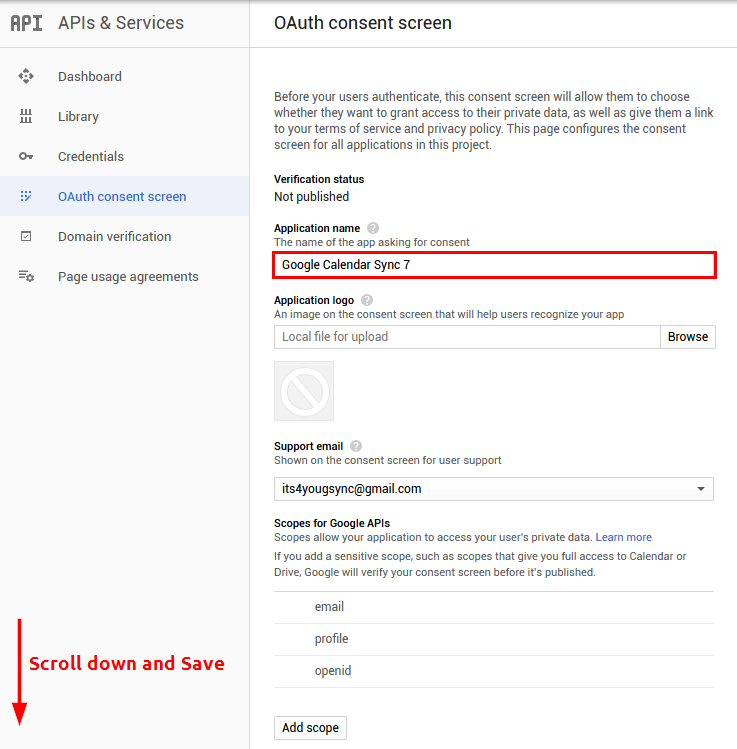
Set name of OAuth Google Project – Google Calendar Vtiger 7 Sync
B) Domain verification before creating OAuth Cliend ID:
Before we proceed to the Creating OAuth Cliend ID for Google Sync, you need to verify your domain.
Please follow next steps:
- Click on Domain verification and on
 button.
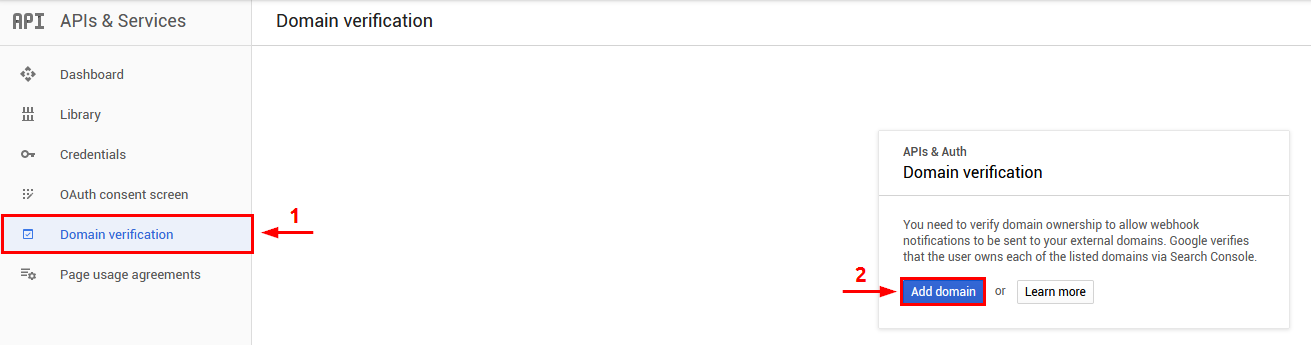
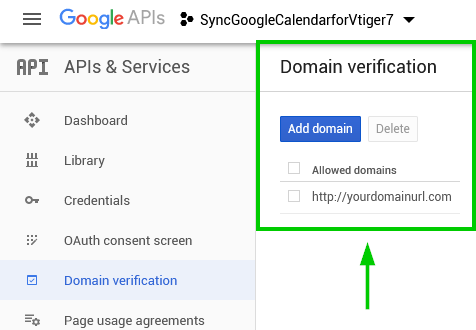
Domain verification – Google Calendar Vtiger 7 Sync - Insert your domain URL address:
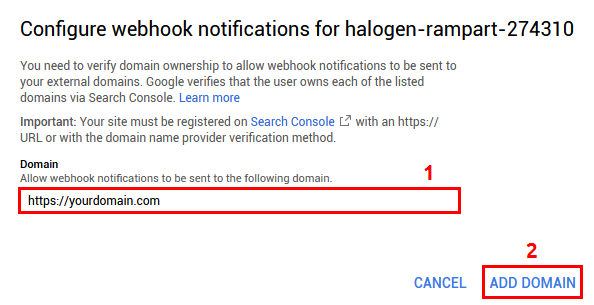
Domain verification – Google Calendar Vtiger 7 Sync - The following pop-up window will appear, click “TAKE ME THERE”:
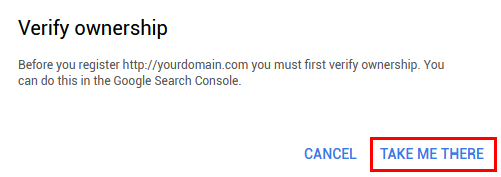
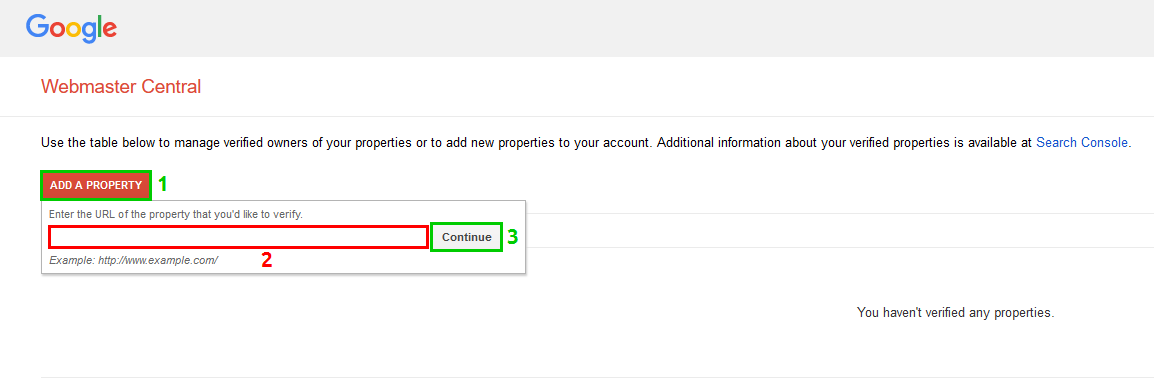
Domain verification – Google Calendar Vtiger 7 Sync - In next step click on the button
 and fill up your domain. Then click “Continue”:
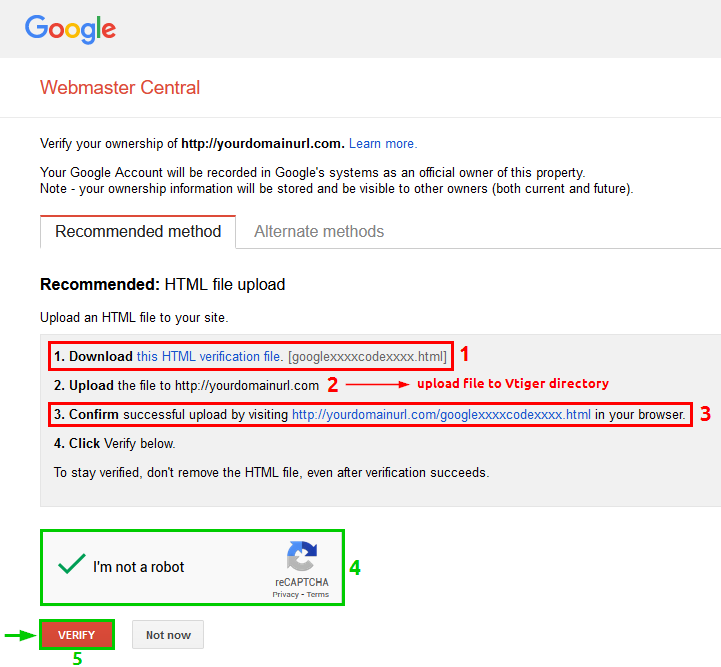
Domain verification – Google Calendar Vtiger 7 Sync - Now, the HTML verification file was generated, (1) click on the .html file to download it and (2) copy it to your Vtiger directory.
When the file is in the directory, (3) visit the page on your screen in step 3. Confirm.
(4) Check that you are not a robot and (5) click on the button
Domain verification – Google Calendar Vtiger 7 Sync - The following message will appear:
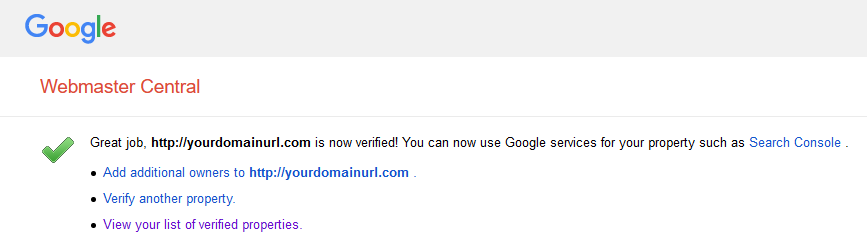
Domain verified!- Google Calendar Vtiger 7 Sync - Now again go to Domain verification and click on button.
Domain verification – Google Calendar Vtiger 7 Sync - Insert your domain URL address:
- Following window will appear with the list of verified domains:
Domain verification – Google Calendar Vtiger 7 Sync - Now add domain to your OAuth consent screen you created, by going to OAuth consent screen, then click on

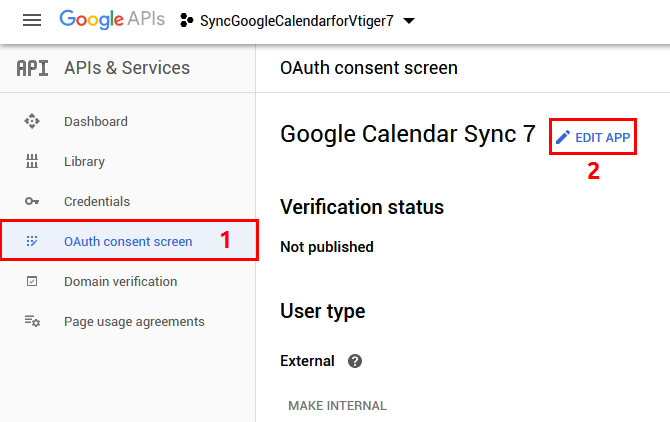
Domain verification – Google Calendar Vtiger 7 Sync - In the Edit window, scroll a bit down and look for (1) Authorised domains, (2) enter your domain url in the field and confirm with ENTER on your keyboard.
*must not specify the protocol (http:// or https://)
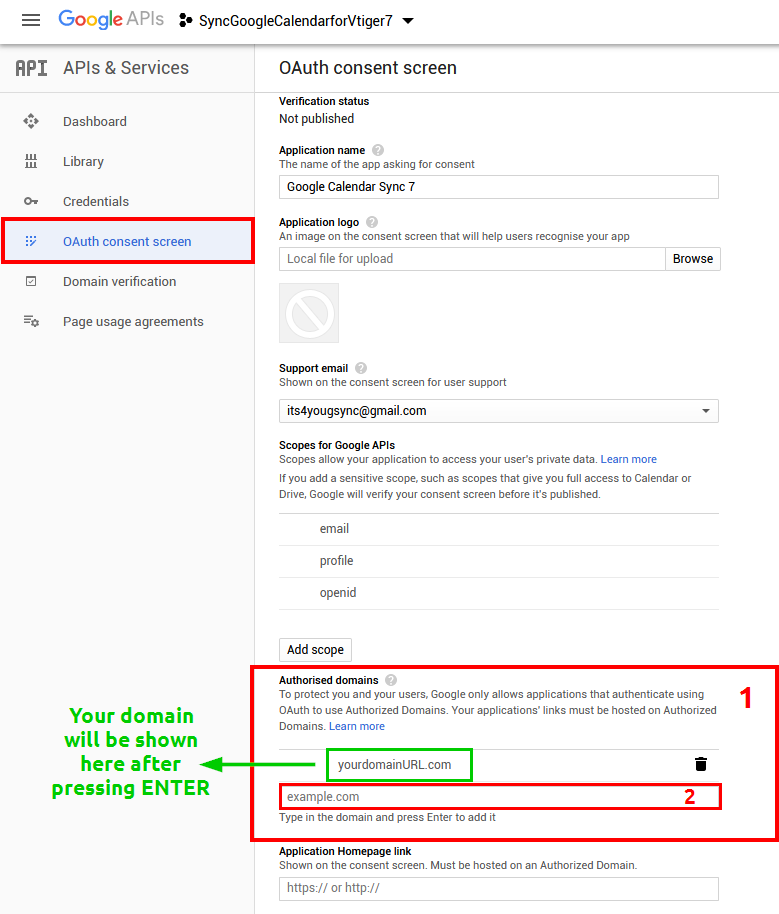
Domain verification – Google Calendar Vtiger 7 Sync - When domain is entered, confirm via
 button.
C) Creating OAuth Cliend ID
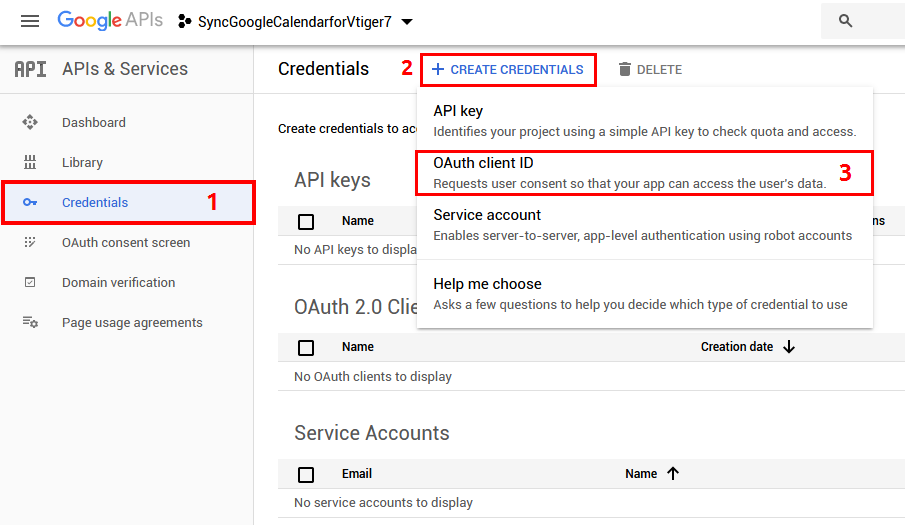
- Now we need to create OAuth client ID, go to Credentials and click on
 then on OAuth client ID
Creating OAuth client ID – Google Calendar Vtiger 7 Sync - Choose “Web application”, fill name and into Authorized redirect URls add your Vtiger site url + following link and press Enter
[yourvtigercrmurl]/index.php?module=Calendar&view=Extension&extensionModule=ITS4YouGoogleCalendarSync&extensionView=Extension&authorize=true&service=GoogleITS4YouGoogleCalendarSync
and click on the
 button.
Create ID of Google Project – Google Calendar Vtiger 7 Sync - Finally, you get your Client ID and Client Secret IDs:
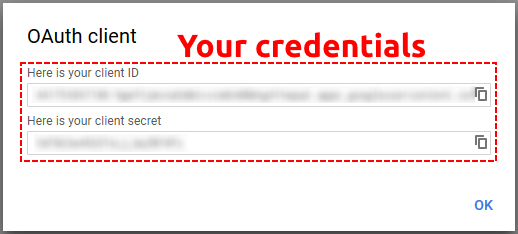
ID of Google Project – Google Calendar Vtiger 7 Sync
4.2.First configuration
Now, you need to set Synchronization in your Vtiger CRM. You have 2 options:
- like admin set one default ID of Project for whole users (we recommend this way).
- each user can set own ID of Project but it means that each user must create own Project like is above written.
How to set default Project ID for all users
- Open ITS4You Google Cal Sync in Integration settings and click on
 button.
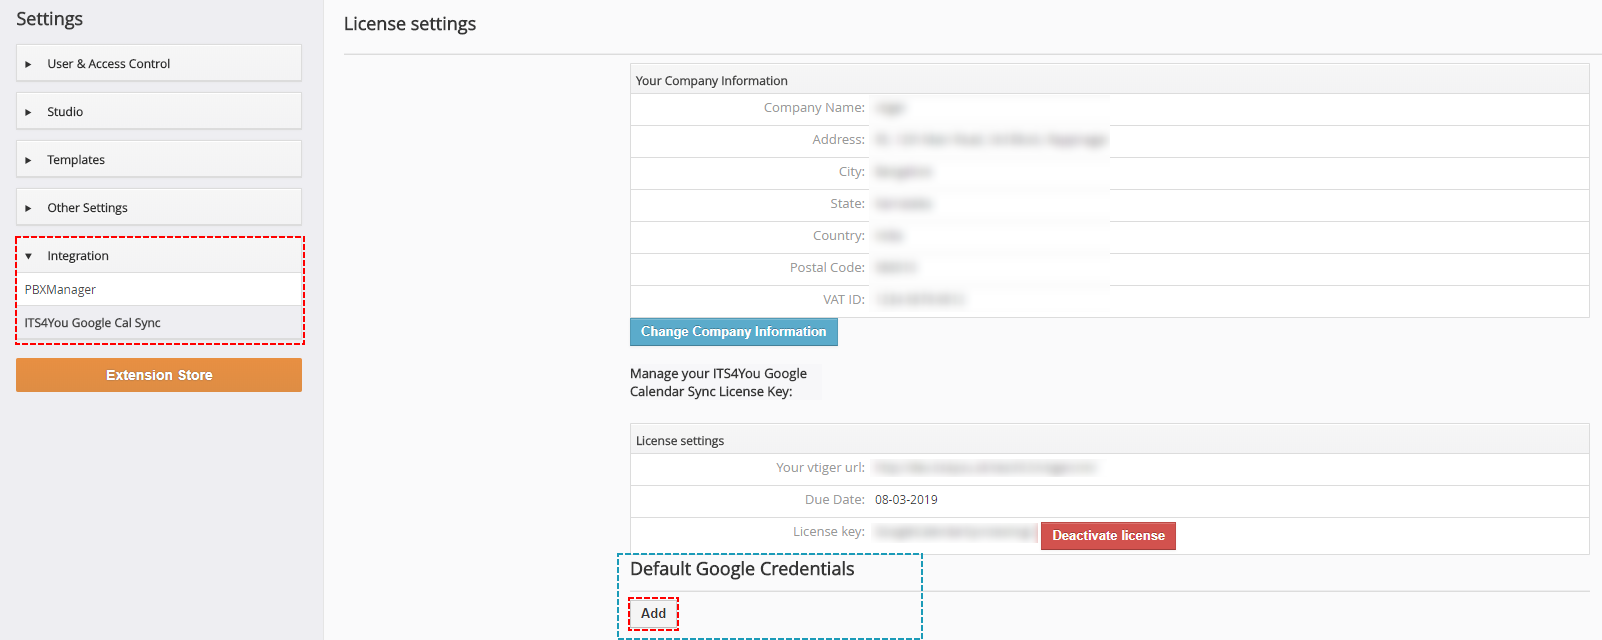
Default ID of Google Project – Google Calendar Vtiger 6 Sync - Now, fill your Credentials from Google Project and click on
 button.
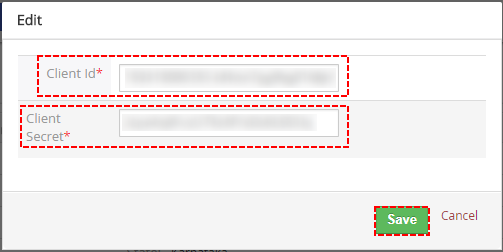
Save default ID of Google Project – Google Calendar Vtiger 6 Sync - You Credentials have been saved. If you need, you can Edit or Remove it from this tab.
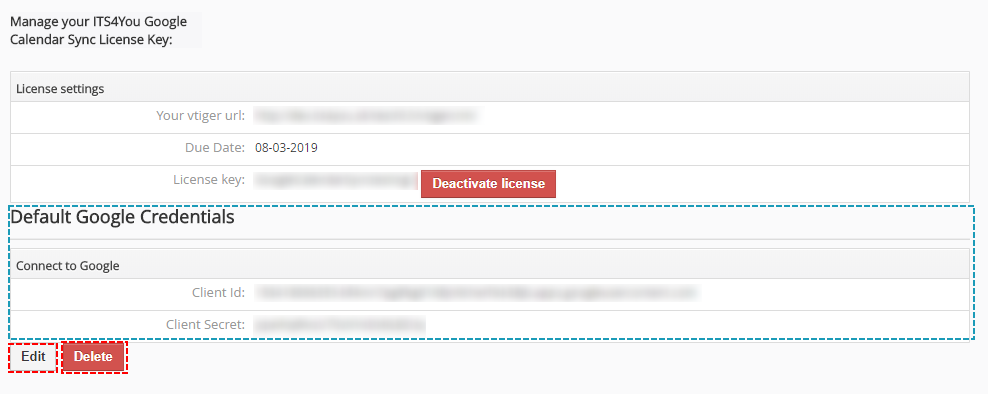
Saved default ID of Google Project – Google Calendar Vtiger 6 Sync
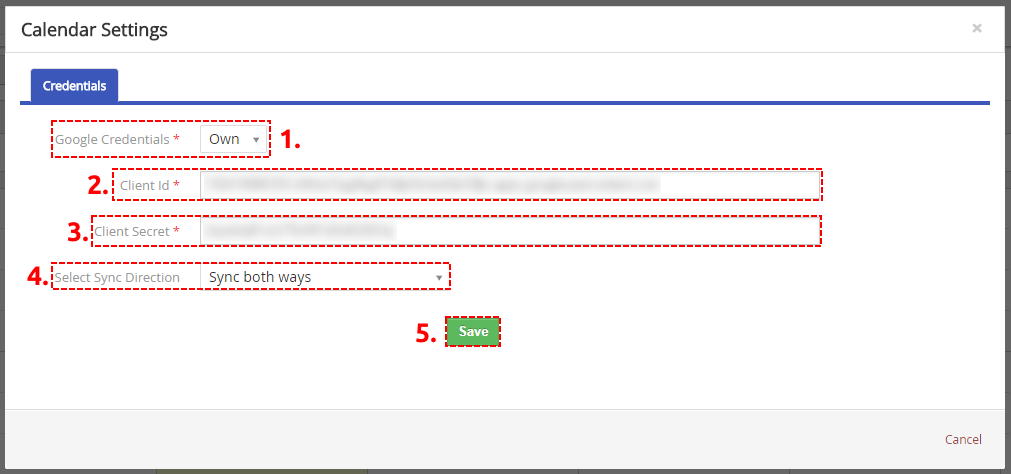
How to set ID for each user individually
- Login like user that you want to add Google Project ID
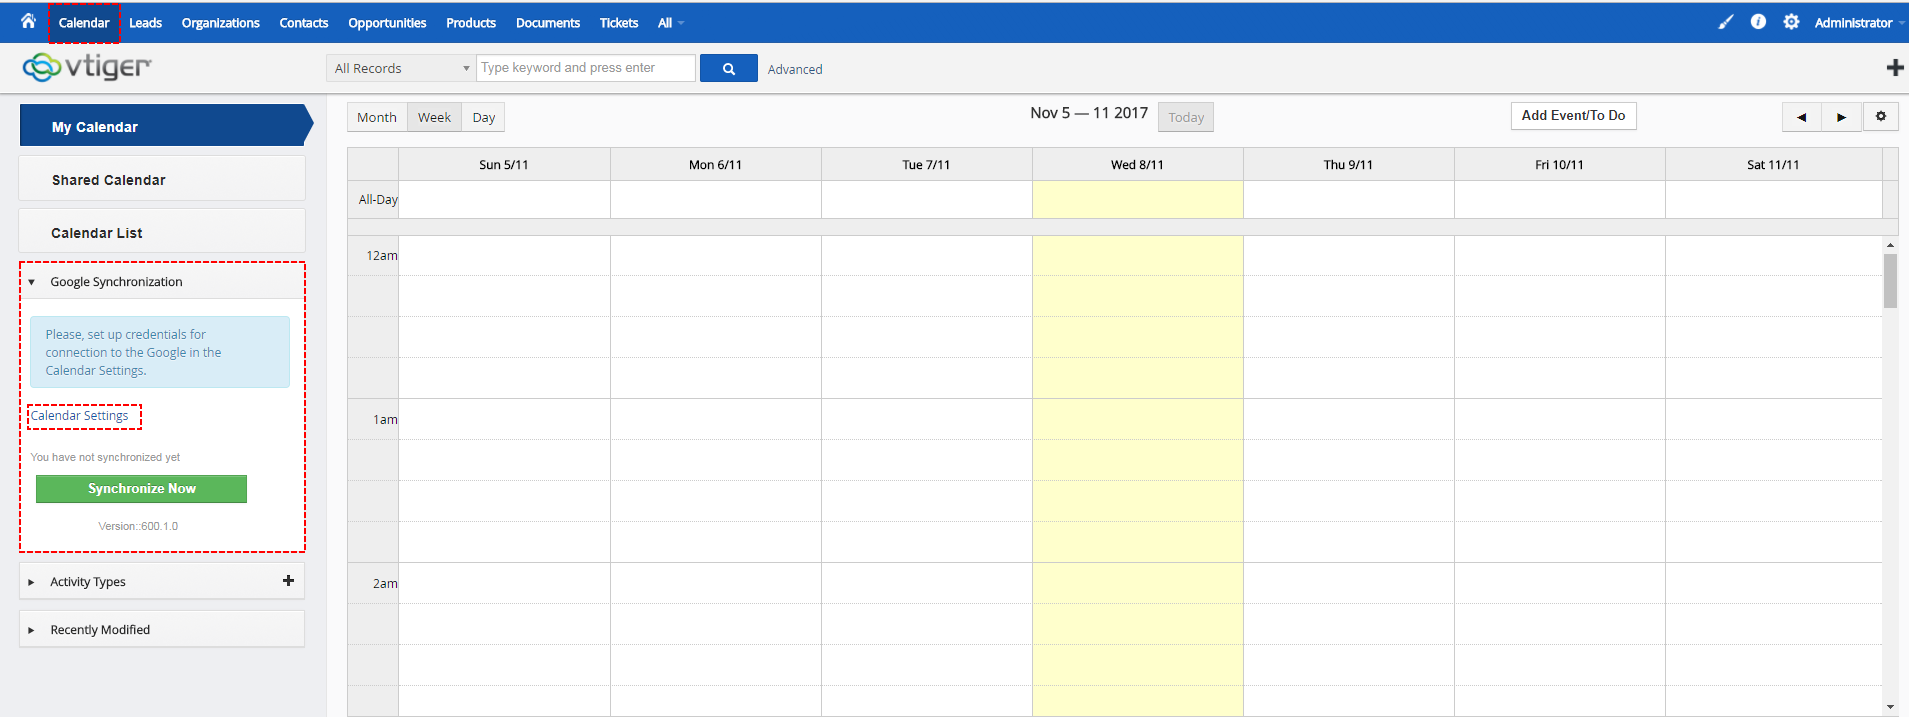
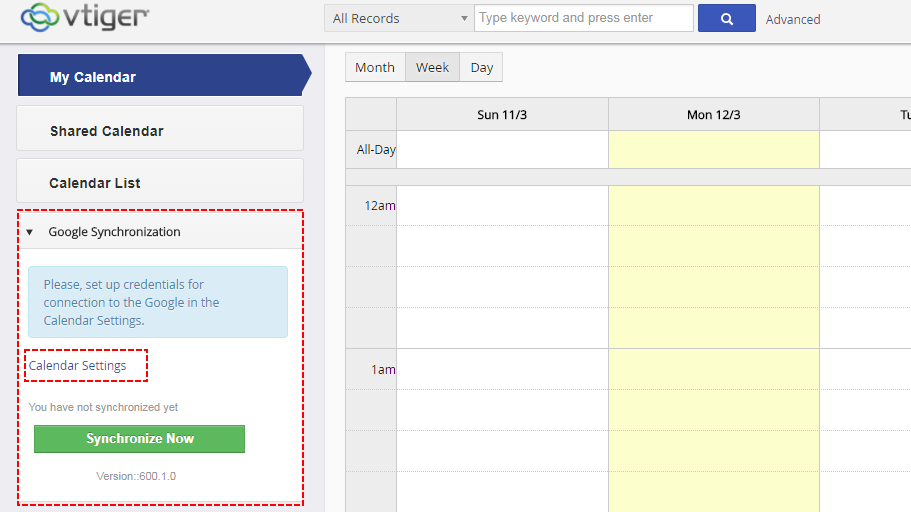
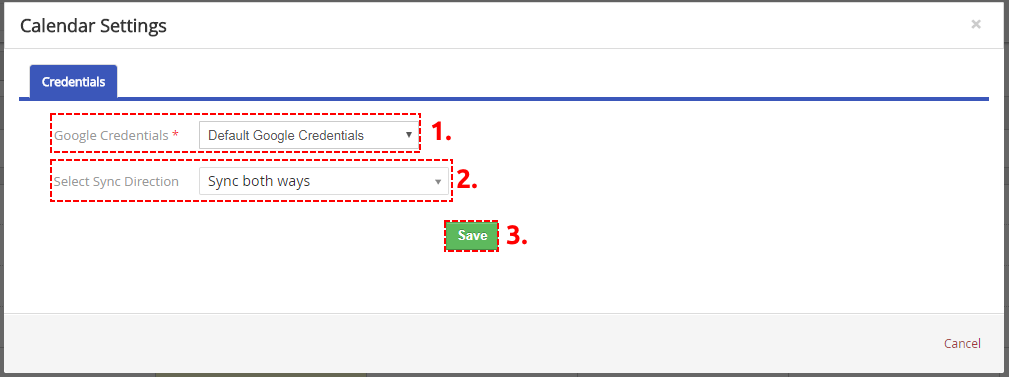
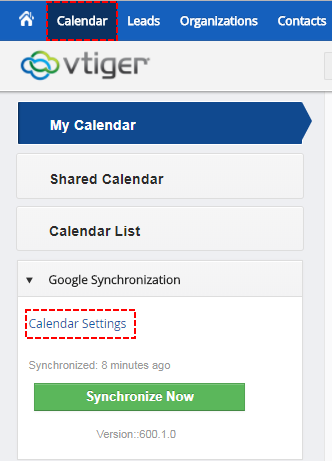
- Open please your Calendar module and you will see Google Synchronization block. Click please on Calendar Settings to open settings part
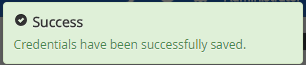
Set Google Sync – Google Calendar Vtiger 6 Sync - Select “Own” Google Credentials, fill own Credentials, choose Sync Direction and click on Save
Saved own ID of Google Project – Google Calendar Vtiger 6 Sync - Credentials have been successfully saved
How to set Google Synchronization
Now, you need to connect your Google account to Vtiger
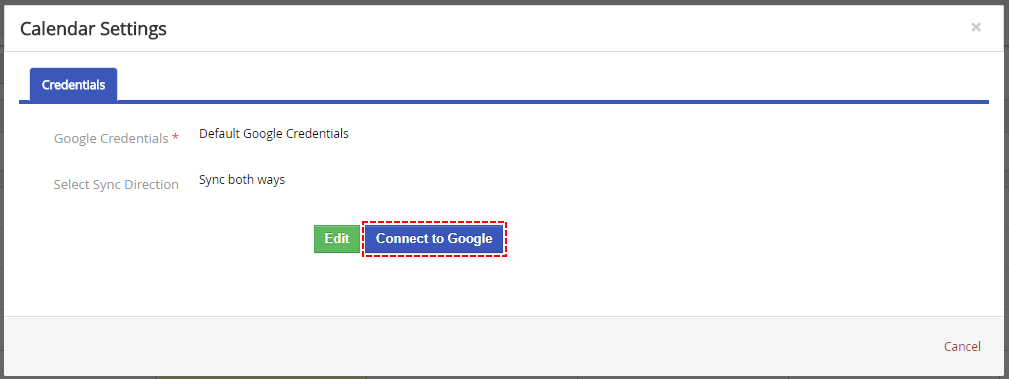
- Open please your Calendar module and you will see Google Synchronization block. Click please on Calendar Settings to open settings part
How to connect to Google Account – Google Calendar Vtiger 6 Sync - If you want to use Default Google Credentials set by Admin use “Default Google Credentials” option in other case use “Own”(written above). Select Direction of Synchronization and Save it.
How to connect to Google Account – Google Calendar Vtiger 6 Sync - Now please click on
 button.
How to connect to Google Account – Google Calendar Vtiger 6 Sync - Sign in to your Google account
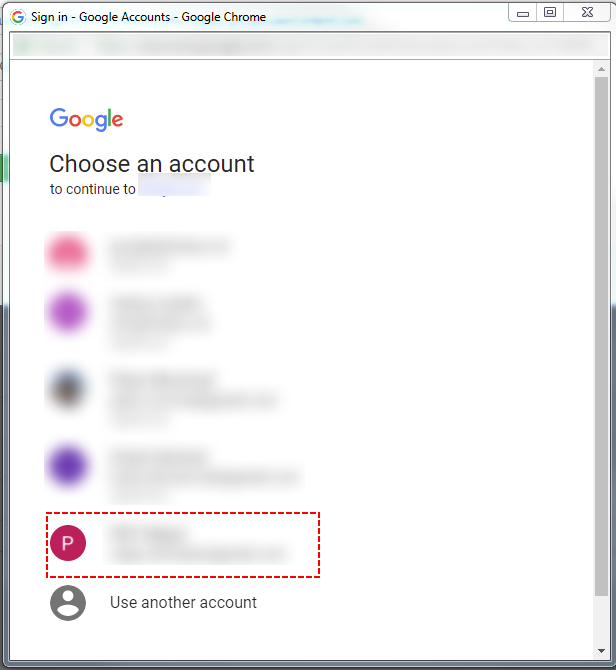
How to set Google Synchronization - Allow Vtiger to manage your Calendar

How to set Google Synchronization - You have been successfully sign in Google
Successfully connected to Google Account – Google Calendar Vtiger 6 Sync
4.3.Vtiger to Google mapping
After you have been successfully sign in Google, you need to map vtiger activity types to Google calendar.
- In Calendar settings please click on Vtiger to Google mapping. Now, you can see all your activity types. So please map it to Calendar that you want.
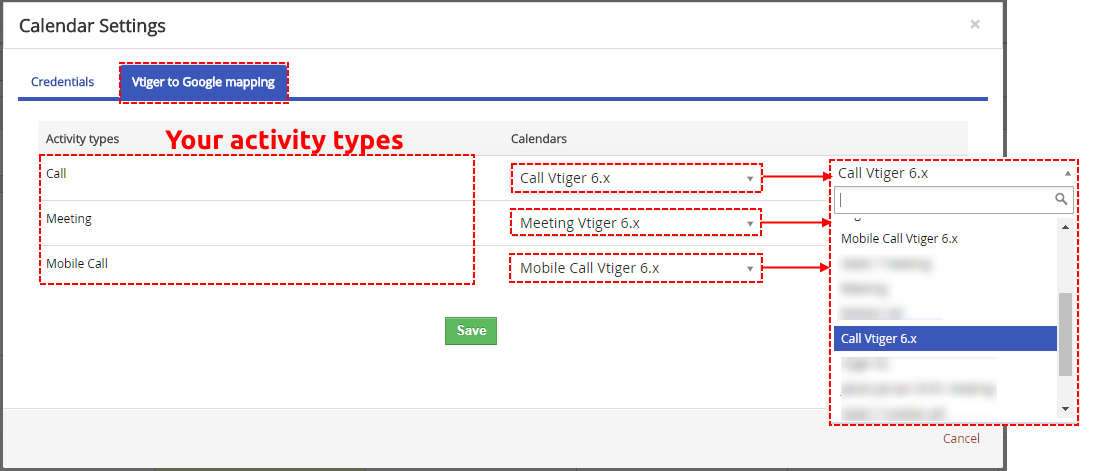
How to map Activity types to Calendar – Google Calendar Vtiger 6 Sync - If you mapped your activity types, please save it save.

Save mapping of Activity types to Calendar – Google Calendar Vtiger 6 Sync - Mapping has been saved

Saved mapping of Activity types to Calendar – Google Calendar Vtiger 6 Sync
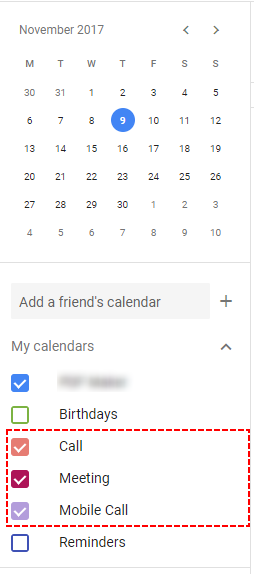
4.4.How to create new Google calendar
We recommend for each activity type create own Calendar because of correct mapping.
To create new Calendar for each Activity type please provide following steps:
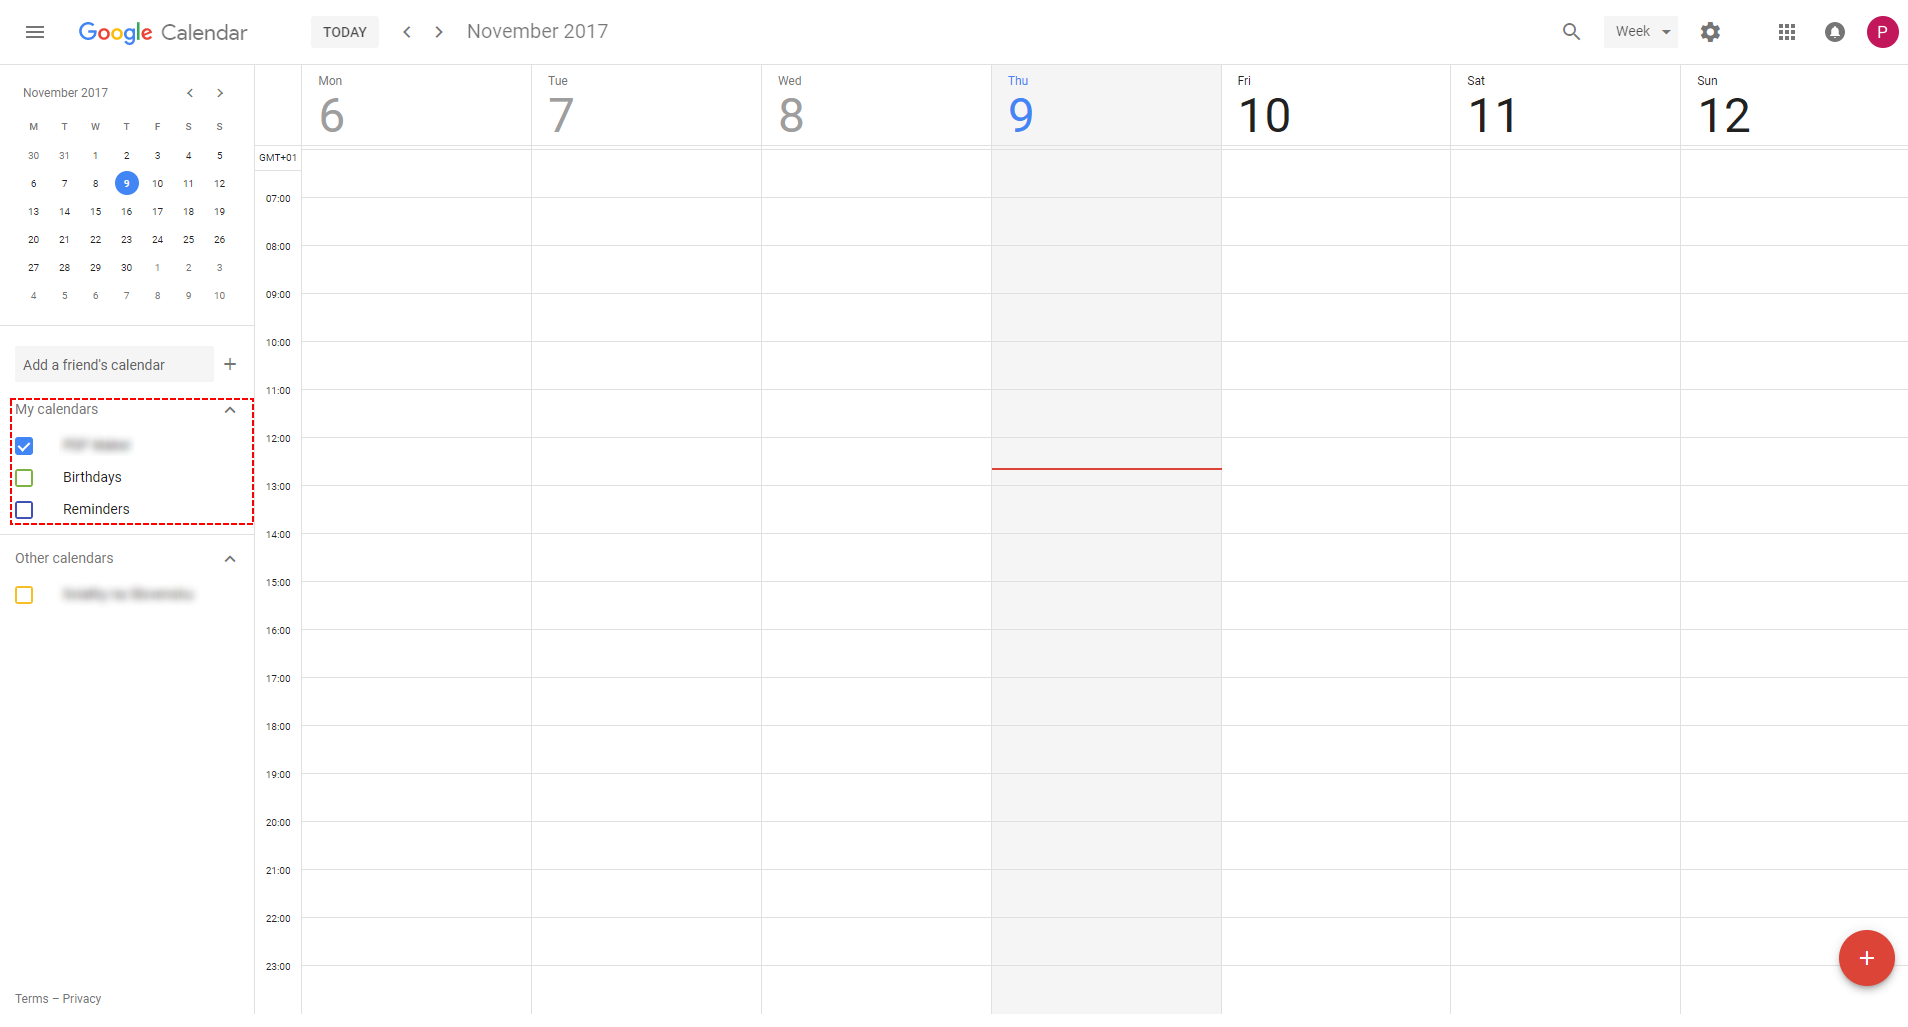
- First at all you need to open Google Calendar
- Now, you can see your Calendar(s)
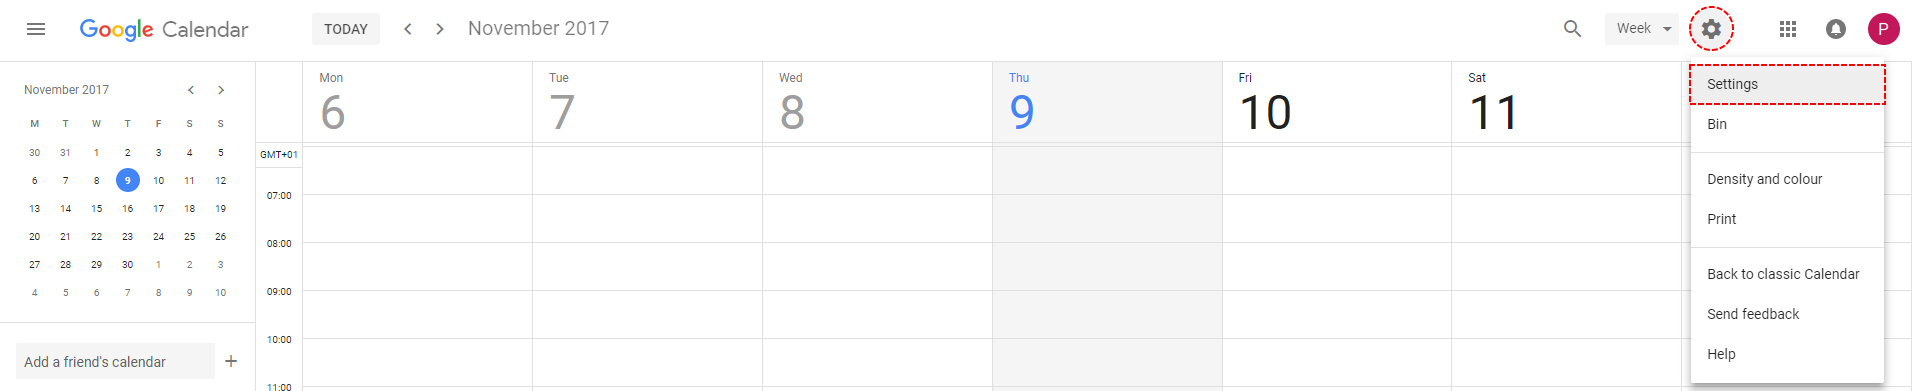
How to create new Google Calendar - Click on Settings button and select Settings
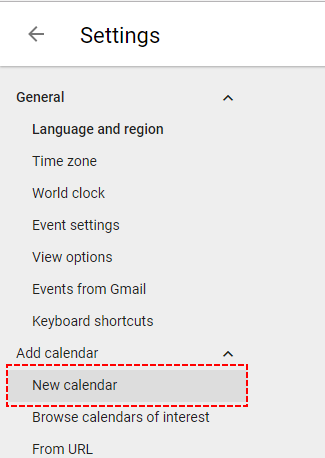
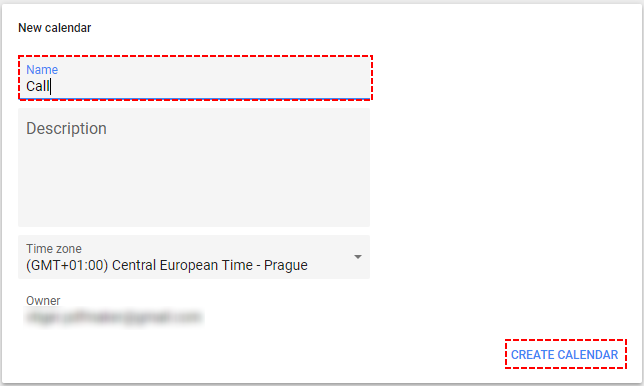
How to create new Google Calendar - Click on Add calendar and New calendar
How to create new Google Calendar - Fill name and create calendar
How to create new Google Calendar - Now you can see your new Calendars
How to create new Google Calendar
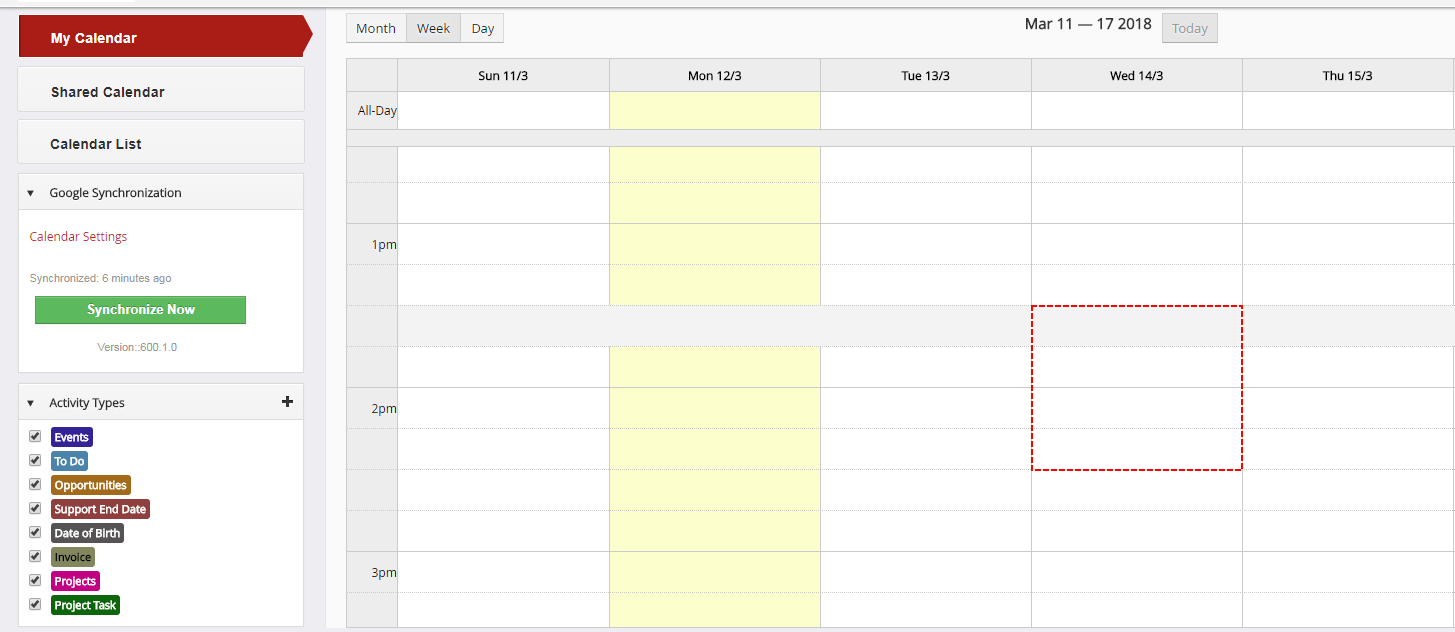
5.How synchronization works?
In following sections is described how synchronization work and how to automate Google->Vtiger CRM way.
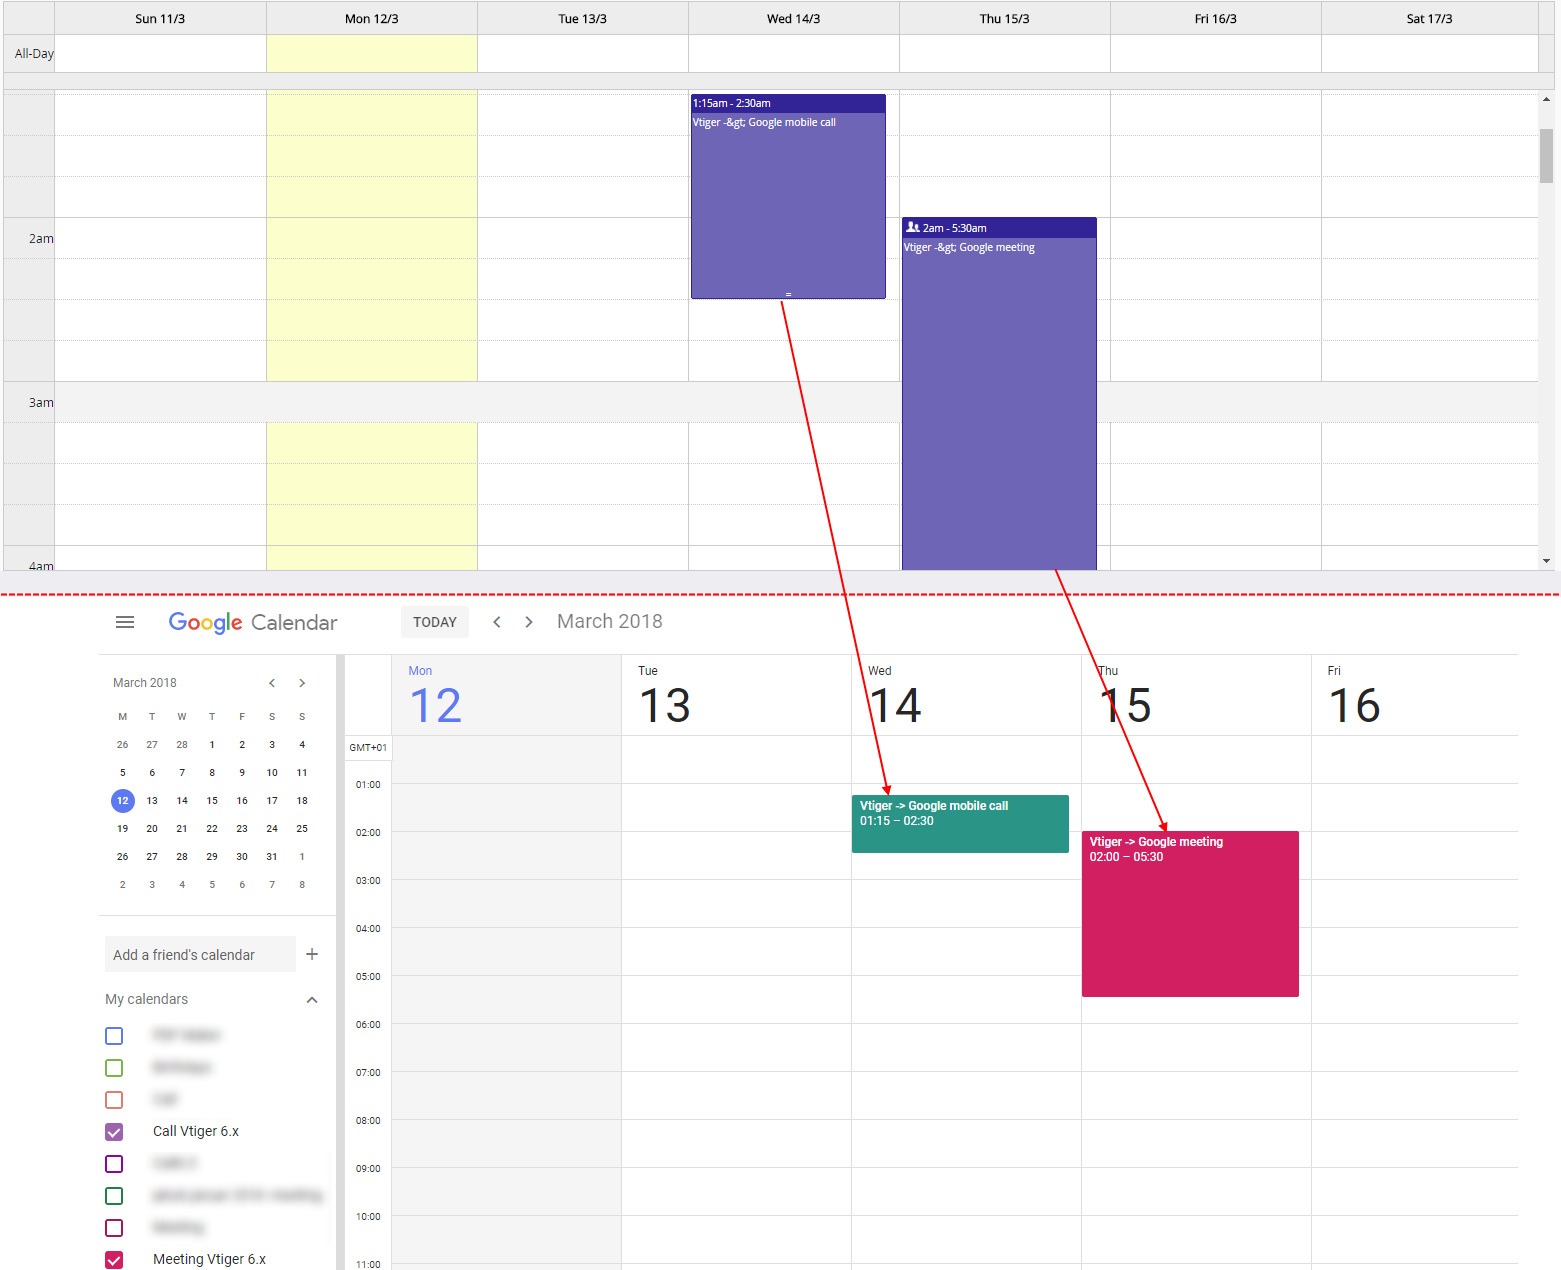
5.1.Vtiger CRM -> Google Calendar
If you create event in your Vtiger, record is immediately sent to Google calendar that you select in mapping setting.
5.2.Google Calendar -> Vtiger CRM
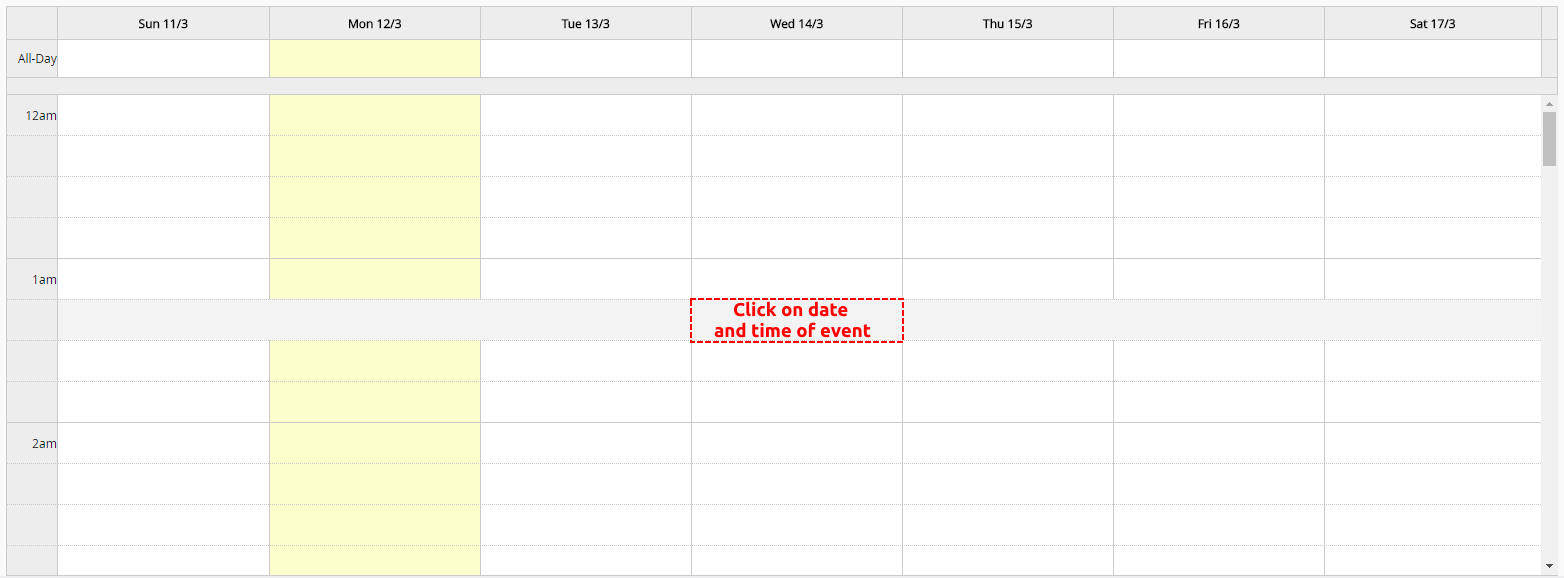
To create record in Google please provide following steps:
- In your Google Calendar please click on date and time or on
 button
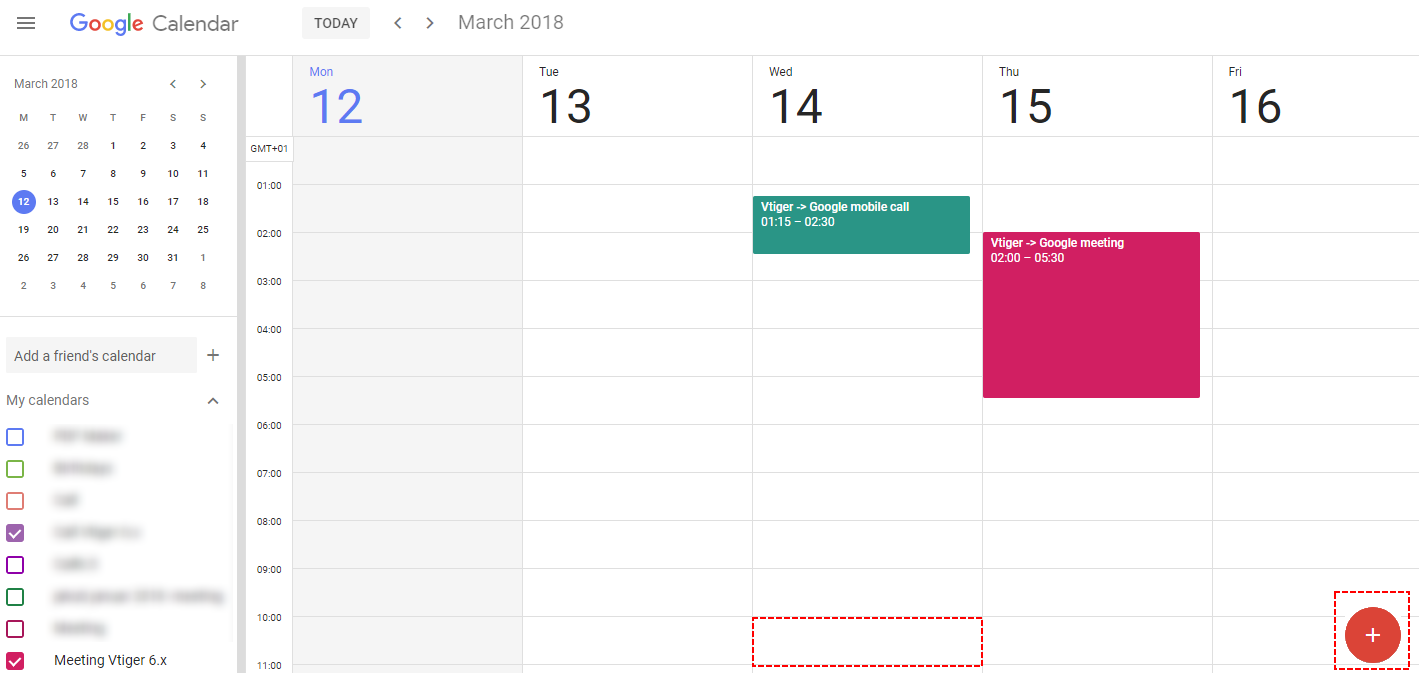
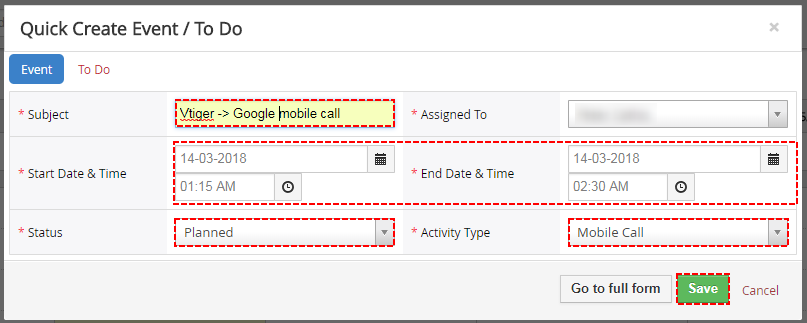
Create record within Google – Google Calendar Vtiger 6 Sync - Fill title of record, select your Calendar (in Vtiger it is “activity type”) and save it
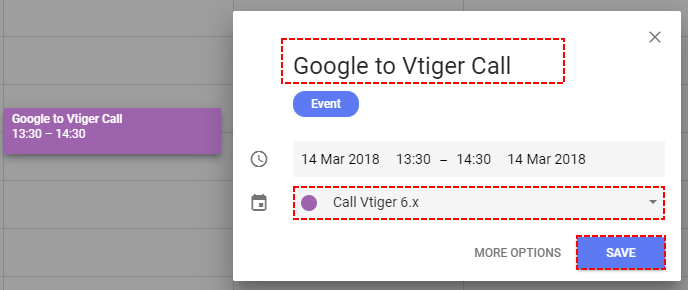
Save record within Google – Google Calendar Vtiger 6 Sync - Your records is now created within Google Calendar
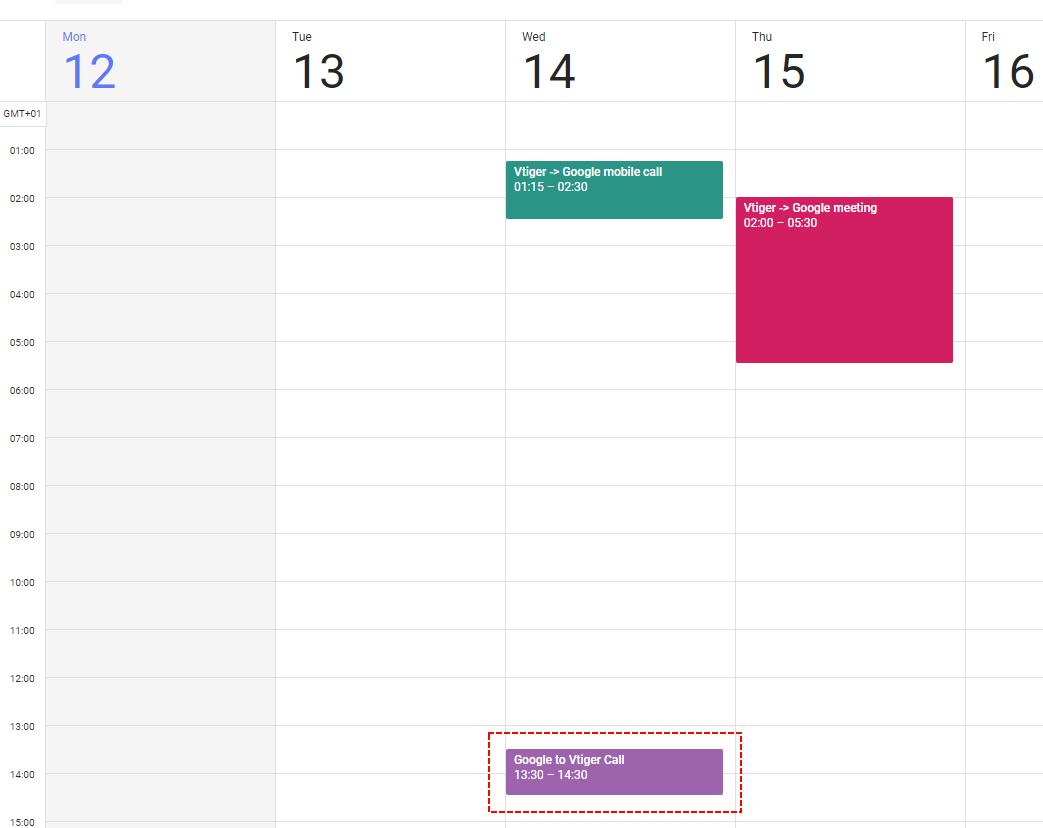
Saved record within Google – Google Calendar Vtiger 6 Sync - But, record is still missing in your Vtiger
Record from Google is not displayed – Google Calendar Vtiger 6 Sync - Please click on
 button to synchronize your vtiger Calendar manually
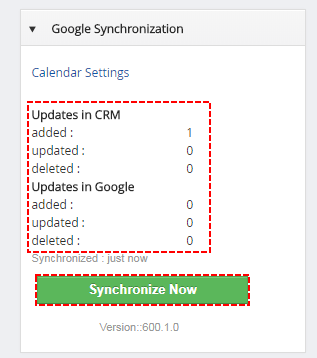
Google -> vtiger Sync - Now, you can see your record from Google Calendar in your Vtiger 6 CRM. And as you can see on previous picture you have info about changes in Vtiger as well as Google Calendar
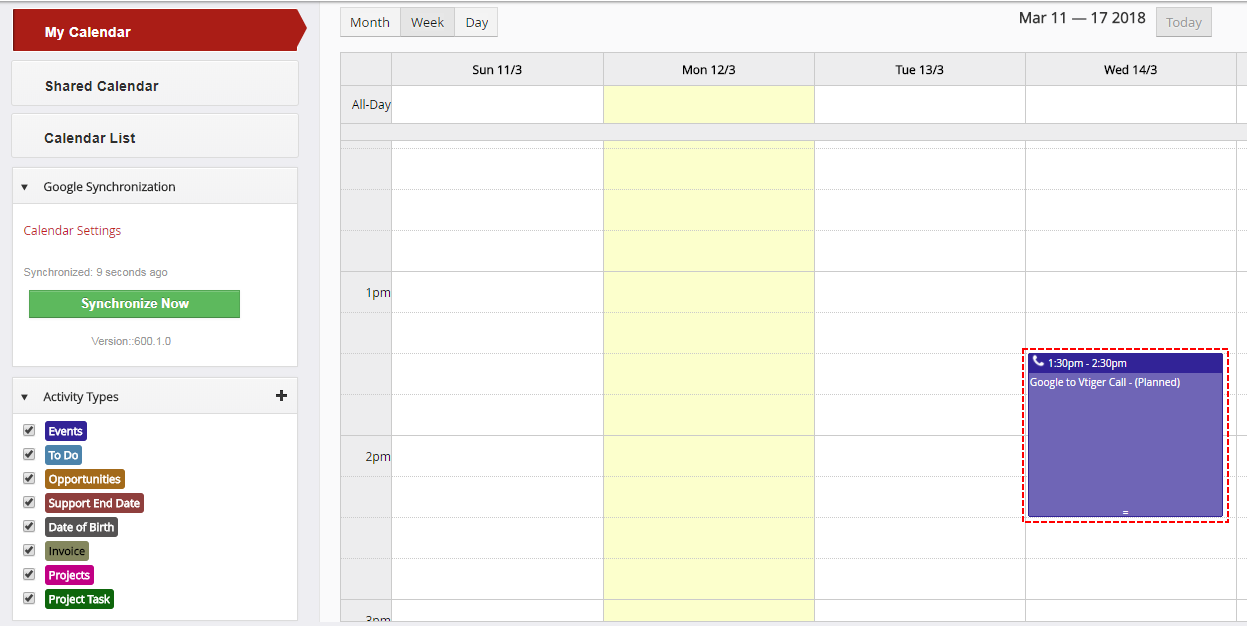
Record from Google within Vtiger – Google Calendar Vtiger 6 Sync
5.2.1.How to automate Google -> Vtiger CRM synchronization
To automate Google->Vtiger 6 CRM Sync you can use our default Cron Job. It is Active by default but you can check it.
To check and activate our Cron Job please provide like admin:
- Go please to Setting -> CRM Settings -> Other Setting -> Scheduler and check if Schedule ITS4YouGoogleCalendarSync is Active or Inactive.
- if it is Active then each 15 min (or Frequency that you set) your Vtiger synchronize recorods from Google into your Vtiger
- if it is Inactive then please provide following steps
- If no please click on
 button in our Schedule ITS4YouGoogleCalendarSync
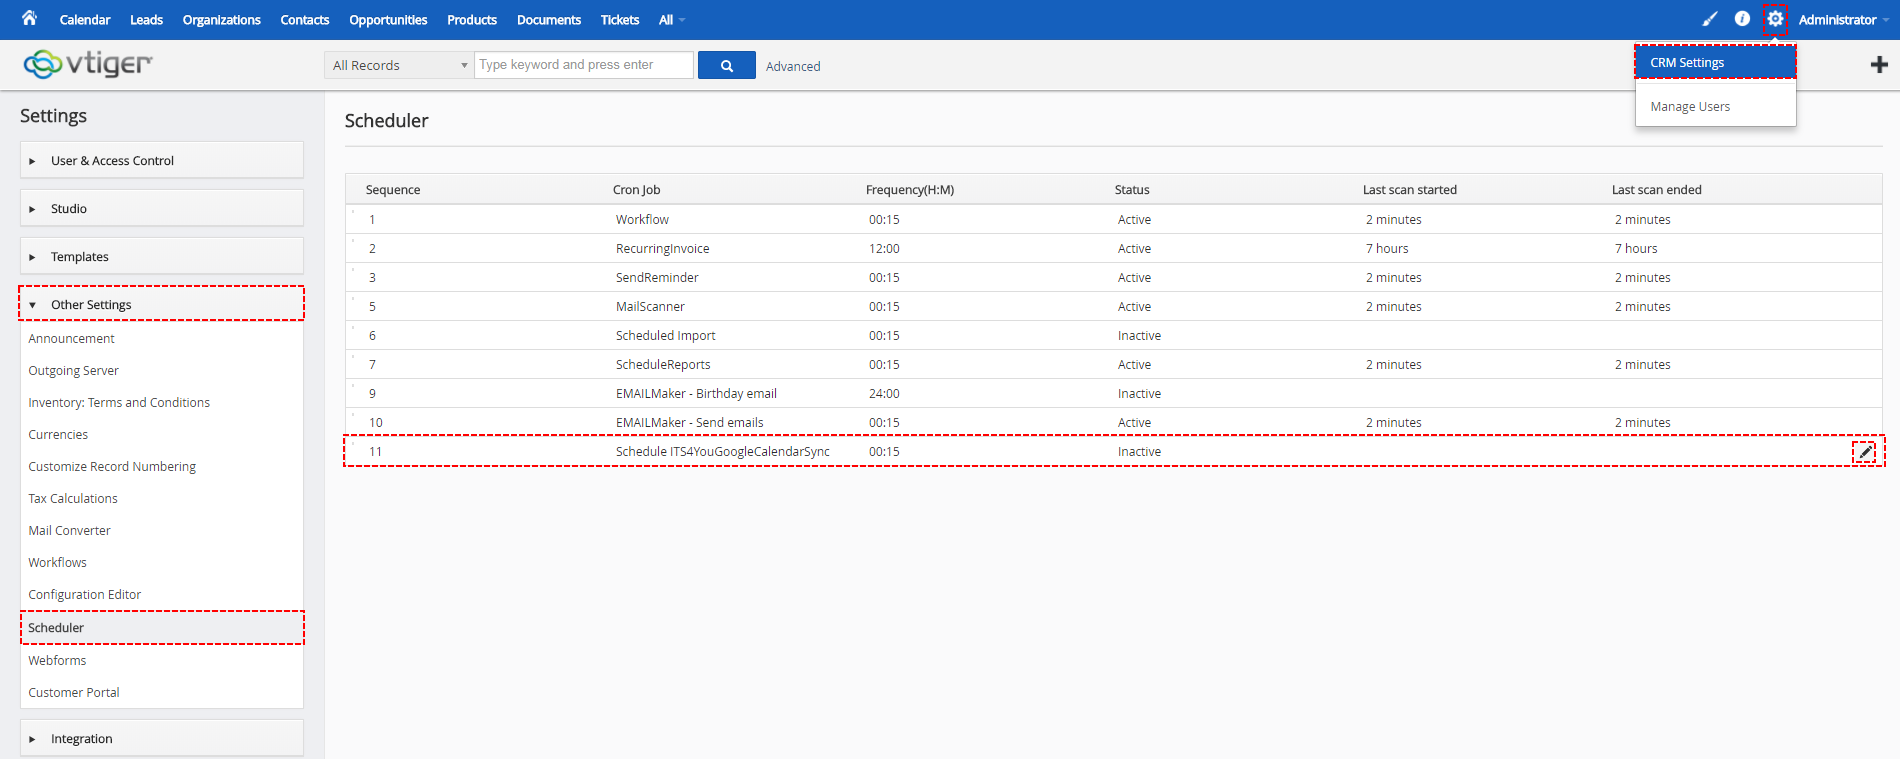
How to automate Google -> vtiger Sync - Set status to Active, set Frequency of cron job and save it
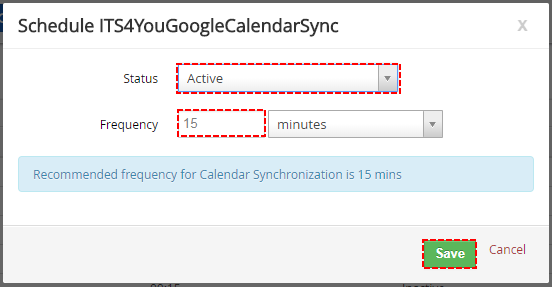
How to automate Google -> vtiger Sync - Now, your cron has been set. And depends on your frequency Synchronization be starting automatically
6.How to remove Connection
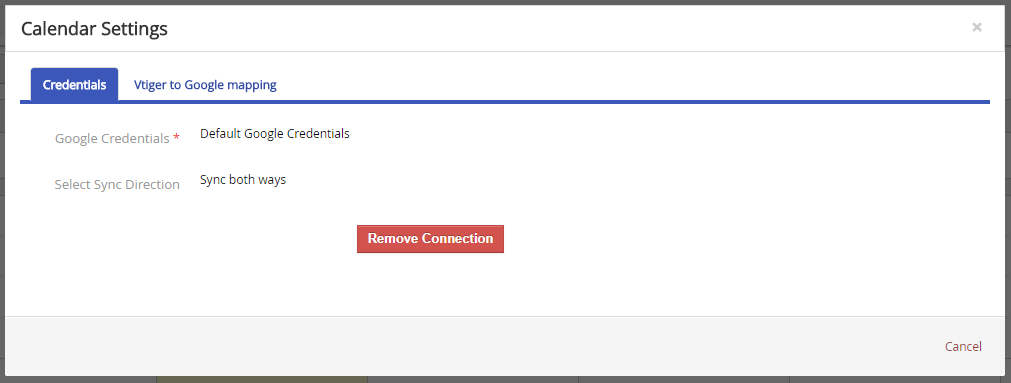
In case that you want to Remove connection please provide following steps:
- Open your Calendar module and click on Calendar Setting
How to remove Google connection - Click please on

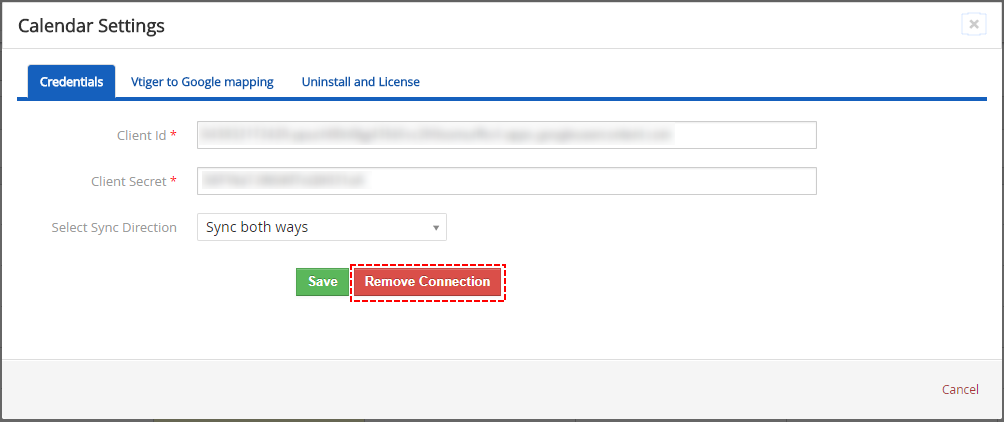
How to remove Google connection - Your connection has been removed
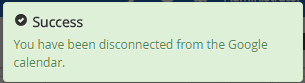
How to remove Google connection
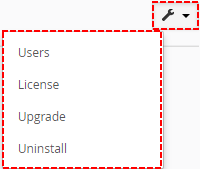
7.Settings of Google Calendar Sync for vtiger 6.x
Settings part you can find in Settings-> CRM Settings-> Integration-> ITS4You Google Cal Sync.
Settings part contains of:
- Users – list of active users of Google Calendar Sync
- License – license settings of Google Calendar Sync
- Upgrade – option to upgrade Google Calendar Sync
- Uninstall – option to uninstall Google Calendar Sync
7.1.Users
In this section you can see your users who use Google Calendar Synchronize. Also from this page you can remove Sync for any user.
User section you can find in Setting tab when you select Users.
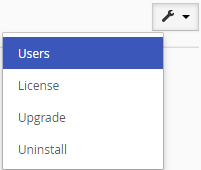
Now you can see all users who is connected to Google.

If you want to remove user please click on  .
.
And confirm removing.

7.2.License
In case you need to deactivate license for any reason (deleting Vtiger, moving to other hosting) please deactivate license first.
To deactivate license please provide following steps:
- In Setting Tab select License
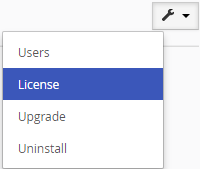
Select License – Google Calendar Vtiger 6 Sync - Click on button

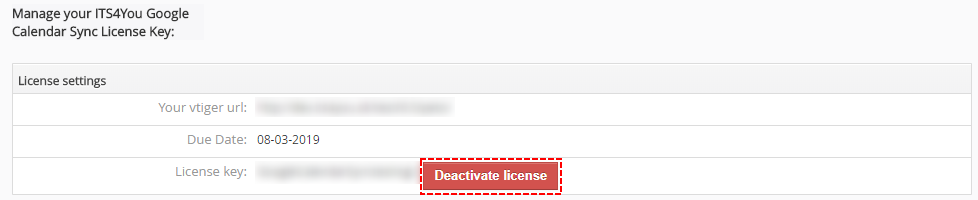
Select Deactivation – Google Calendar Vtiger 6 Sync - Confirm Deactivation

Confirm Deactivation – Google Calendar Vtiger 6 Sync
7.3.Upgrade
To upgrade our Google Calendar Sync please provide following steps:
- In Settings Part select Upgrade
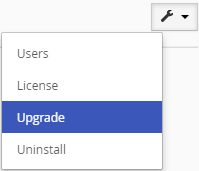
Select Upgrade – Google Calendar Vtiger 6 Sync - Choose File and accept check box and Click on Import button
How to upgrade Google Calendar Sync – Google Calendar Vtiger 6 Sync - As you can be seen on the Picture below you will be notified that the Google Calendar Sync module already exists. Confirm License agreement and upgrade will start immediately when you click on the button.
How to upgrade Google Calendar Sync – Google Calendar Vtiger 6 Sync After upgrade the notification about successful upgrade is shown.
7.4.How to uninstall Google Calendar Sync for vtiger 6.x?
To uninstall our Google Calendar Sync please provide following steps:
- In Settings Part select Uninstall
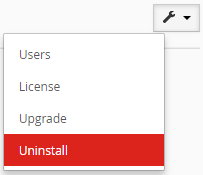
Select Uninstall – Google Calendar Vtiger 6 Sync - Please, click on
 button
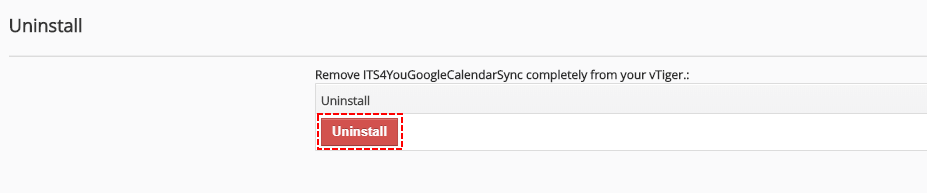
Select Uninstall – Google Calendar Vtiger 6 Sync - Confirm uninstall
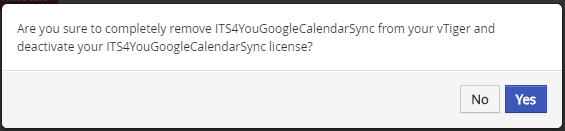
Confirm Uninstall – Google Calendar Vtiger 6 Sync
8.Change log
8.1.GoogleCalendarSync
- 16 July 2019: ITS4YouGoogleCalendarSync 3.5
- fixed issues where actualization via Cron/Scheduler was not working properly for users
*We recommend to download/update your Google Sync to this version
- fixed issues where actualization via Cron/Scheduler was not working properly for users
- 28 February 2019: ITS4YouGoogleCalendarSync 3.0-3.2
- fixed issue with licensing on domains with https protocol
- fixed issue where synchronization was not working after updating module to the versions 3.0 and 3.1
- March 2018: ITS4YouGoogleCalendarSync 1.0
- first initiate for vtiger 6.x
8.2.Manual of GoogleCalendarSync
- April 2020: manual based on ITS4YouGoogleCalendarSync 3.5
- updated chapter: 4.1.How to create Project in Google and receive credentials
- March 2018: manual based on ITS4YouGoogleCalendarSync 1.0
- first initiate for vtiger 6.x