

1.Introduction to the MultiCompany

The Multi Company module allow in easier way to manage your companies within one Vtiger CRM installation. It means you can define additional companies (name, address… and lot of additional fields) and create new records under these companies. In addition, records related to the new companies can be separately numbered with their specific prefix according to your needs. This helps you no more to mix records of different companies and gives you better overview.
The Multi Company benefits:
- supported mostly for all modules,
- no necessary extra installation for additional companies,
- save money by buying extension tools once, not per company,
- no necessary logout for switching between companies (depends on user).
Who needs Multi Company?
Please try to answer by yourself to following questions to see whether Multi Company can make your business life easier:
- Would you like to use one installation for more companies?
- Would you like to be able to define separate numbering of the records for your companies?
- Are you missing some additional fields in company details?
- Would you like to have separate numbering of the records for different users?
If you mostly answered yes it looks that you are good candidate to use our module Multi Company. Also from our experience we see that our module is required also for “one-company installation” due to their features.
 Note: For versions ITS4YouMultiCompany_4_0 and higher, you will be needing to have installed our Installer in order to activate license keys.
MultiCompany does not support Assigned to – Groups.
2.How to install MultiCompany
There are currently two options how to install extension:
- (Recommended) Using our Free extension Installer
(Please visit the Installer page for more info) - Manually installation using a .zip file
(You still need to have Installer in order to activate license)
Note: For versions ITS4YouMultiCompany_4_0 and higher, you will be needing to have installed our Installer in order to activate license keys.
Since December 2019 we launched our extended version of Installer which helps you install modules and manage extensions.
2.1.Installation via Installer
Make sure you have Installer installed, you can download Installer via our E-shop when you log in under Free Downloads section.
Next, simply install Installer via Module Management in Vtiger CRM by importing the .zip file you downloaded.
After successful installation, you can access Installer in two ways:
- by a click on Notifications Icon
 and then on the button
  ,
, - or via Main Menu – Settings – CRM Settings – Extensions – ITS4YouInstaller.
Note: To see modules and manage licenses you have to log in to our e-shop with @email and password via  button (top right screen side in Installer module).
After log in, you can activate Extensions or our Packages licenses associated to your account via  button.
When the license was activated you can see module available in the Modules tab below.
Simply hit the  button and Extension is installed now.
2.2.Manual Installation
Please provide following steps in order to install MultiCompany manually:
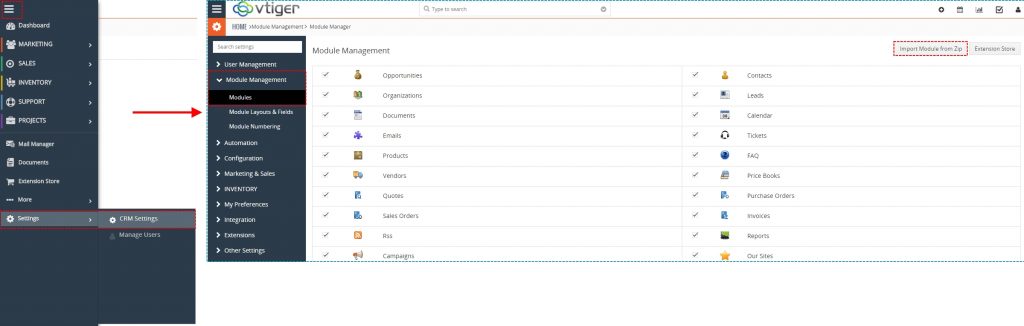
- Install the .zip (package) file of the MultiCompany module via Setting -> CRM Settings -> Module Management -> Modules. Click on the Import Module from Zip.
Installation of MultiCompany for vtiger 7 – step 1 - Select the .zip (package) file that you downloaded from our shop. Please check that you accepted the disclaimer and would like to proceed. Click on the [Import] button.
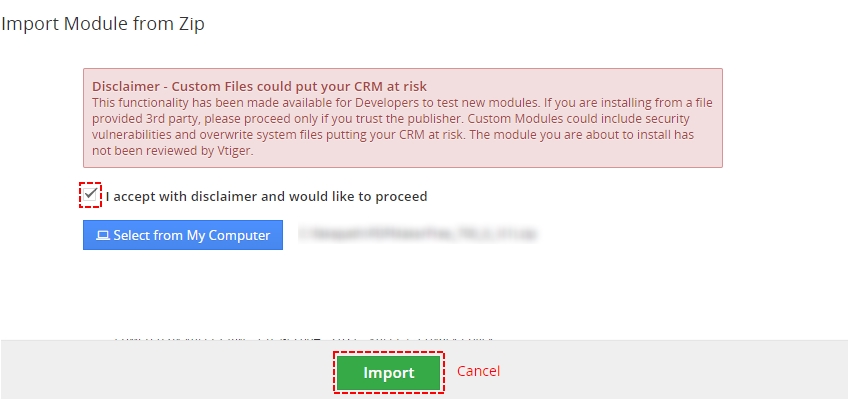
Installation of MultiCompany for vtiger 7 – step 2 Note: If you have after this step error message: Sorry! Attempt to access restricted file. Please check if folder test/vlib has correct write permission for browser (apache, www-data).
- Verify the import details parsed from the .zip (package) file. Please check that you accepted the license agreement and click [Import Now] to proceed or [Cancel] to cancel.
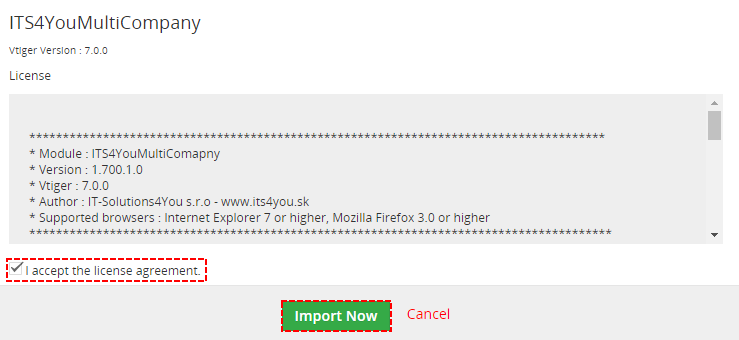
Installation of MultiCompany for vtiger 7 – step 3 - MultiCompany was imported

Installation of MultiCompany for vtiger 7 – step 4

Note: In order to finish installation, you need activate license. For that please use our Installer
3.How to update MultiCompany
The upgrade of the module is initiated manually or via our Installer.
Updating via Installer:
- open the Installer in the CRM
- in the Modules tab find your installed module and you should see the
 button available
 - If the new version is available, you will be notified via Installer Notifications icon

Updating MultiCompany manually:
Click on Upgrade Multi Company link in Customize tab of MultiCompany.

So please refer to above installation part for details how to initiate the import of the module from the file. As can be seen on following picture you will be notified that the MultiCompany module already exists. The upgrade will start immediately when you click on the  button.
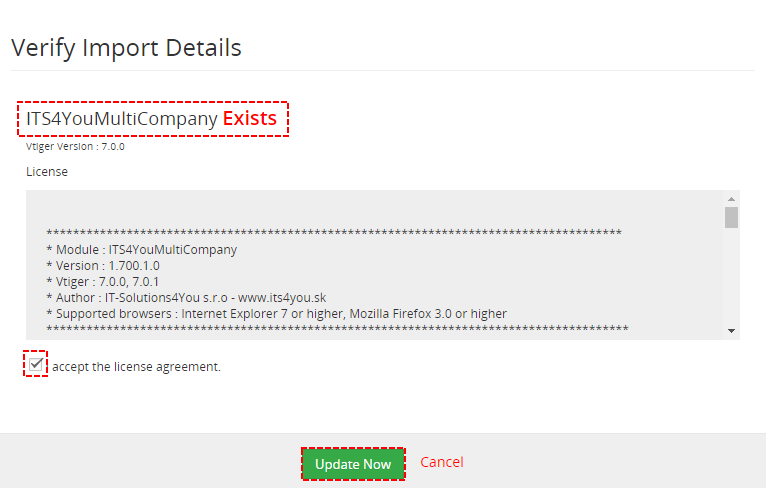
After upgrade the notification about successful upgrade is shown.

4.How MultiCompany works?
MultiCompany determines a record’s company based on the user selected in Assigned To and that user’s role.
- In MultiCompany settings, you assign a role to each company. All subordinate roles also belong to that company.
- Each user has a role that determines which company they belong to.
- When you assign a record to a user through Assigned To, MultiCompany identifies the company based on that user’s role.
Example: Peter has a role under Company A. An invoice assigned to Peter belongs to Company A and uses its configured numbering when created.
Record visibility is configured separately through roles and Sharing Rules. MultiCompany does not automatically prevent users from seeing another company’s records. Assigning records to groups is not supported.
5.How to set up Multi Company
Multi Company 4 You is module which you need to set up correctly at the beginning and let them do their work on the background. It doesn’t mean that you cannot add additional company later or change some settings related to numbering. Before you start definition of additional companies within Multi Company 4 You it is necessary to define new companies’ roles (profiles) and users. So the whole set up comprises definition of:
- roles (profile is necessary) – standard vtiger functionality (see chapter 2.1)
- users – standard vtiger functionality (see chapter 2.3)
- companies – Multi Company 4 You functionality described in chapter 2.4
- custom numbering – Multi Company 4 You functionality described in chapter 2.5
How to initialize Multi Company 4 You is shown in the below picture.
5.1.Definition roles
During definition of roles you have to assign at least one profile. In case you don’t need for new companies separate profiles, you can start definition of roles, otherwise define firstly new profiles (https://wiki.vtiger.com/vtiger6/index.php/Profiles). Definition of roles is standard vtiger CRM functionality so please refer for example to https://wiki.vtiger.com/vtiger6/index.php/Roles or other web manuals.
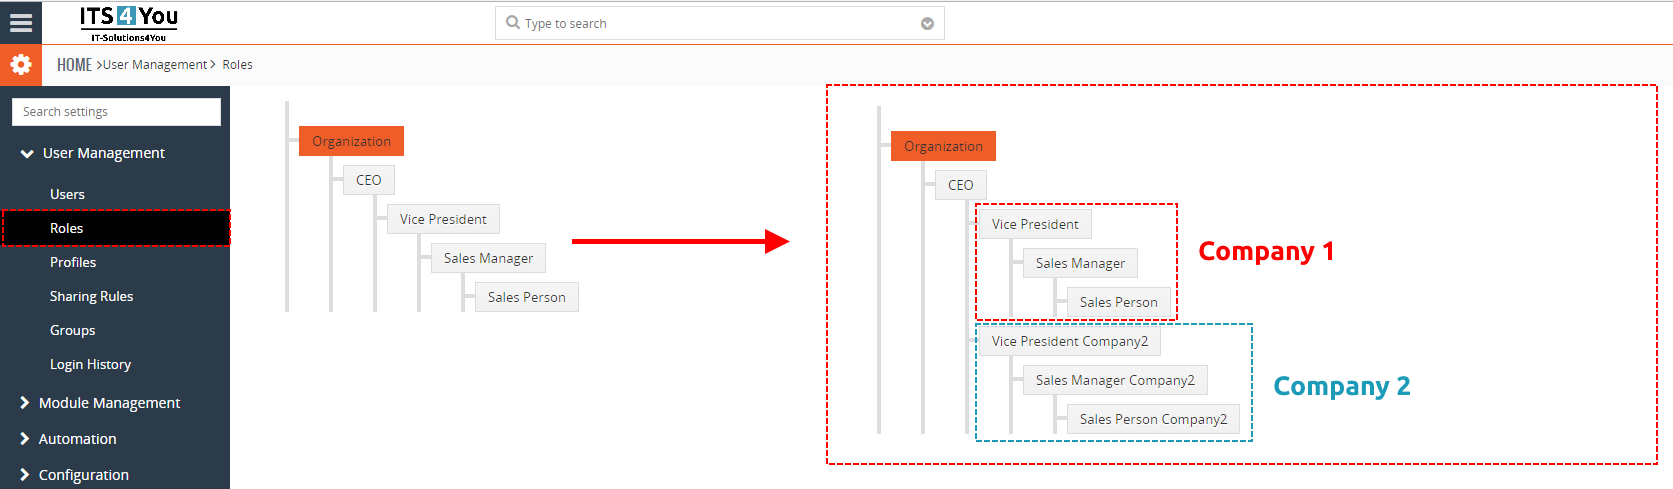
To create or change Roles please go to Settings -> CRM Settings and in the section User Management click on Roles link and set Roles according to your needs as you can see in the picture below.
5.2.Sharing rules
Installing Multi Company will NOT change Sharing rules automatically like it was in the past.
(The reason is that some users had own sharing rules and our extension overwrote their settings)
In order to set all or modules you need in Sharing Rules to Private, you need go to:
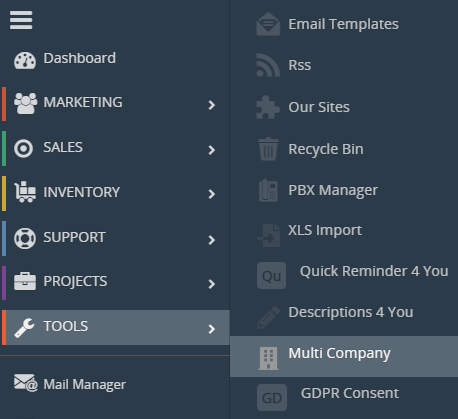
Menu – TOOLS – Multi Company – Customize – Integration
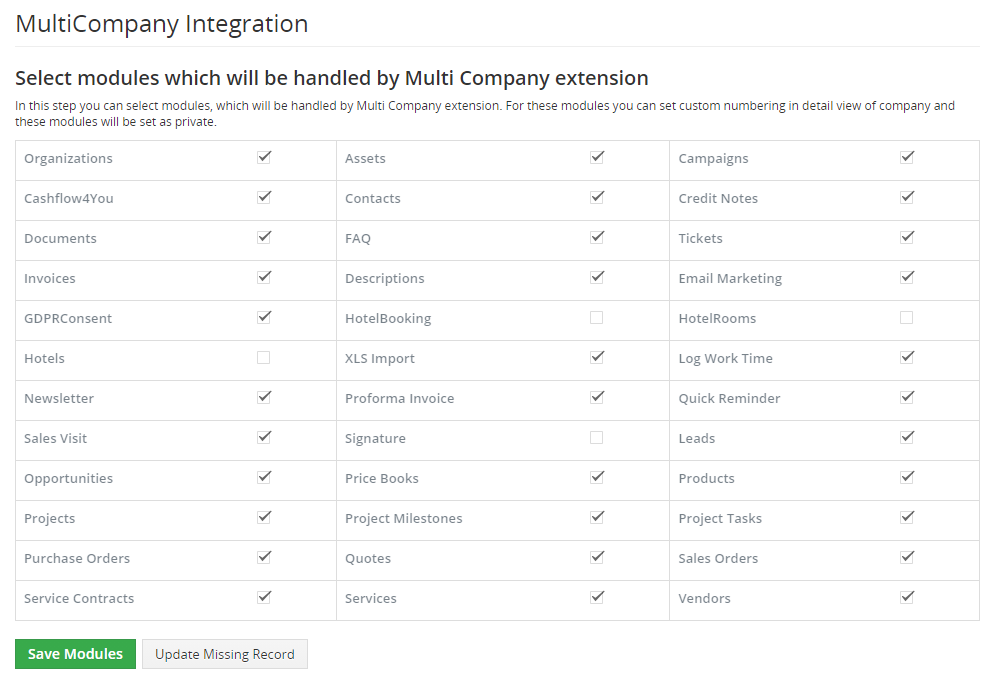
Simply select the modules you need and click on  next alert will appear. Please confirm it:

After clicking on  all selected modules Sharing Rules will be set to Private.
If you want some module set like public within one company there is option for custom rules.
For set using following step:
- Click on
 button for module you want to set custom rule

Add Custom Rule - Click on
 button

Add Custom Rule - Here choose who is owner of record
- Here choose who can access to record
- Set Read or Read and Write permission
- Click on
 button
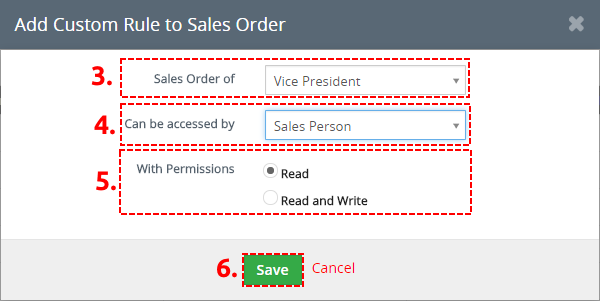
Add Custom Rule


Or for detail information see: https://wiki.vtiger.com/vtiger6/index.php/Sharing_Rules
5.3.Definition users
After definition of roles you have to assign to users their new company related roles. Because the definition of users is also standard vtiger CRM function please refer to https://wiki.vtiger.com/vtiger6/index.php/Users for details.
To assign User to company please go to CRM settings and in the section User Management click on Users link. Here you can create or edit users.
The most important is set for each user role – that mean to which company belong it (Defined in Sharing rules chapter).
MultiCompany does not support Assigned to – Groups.
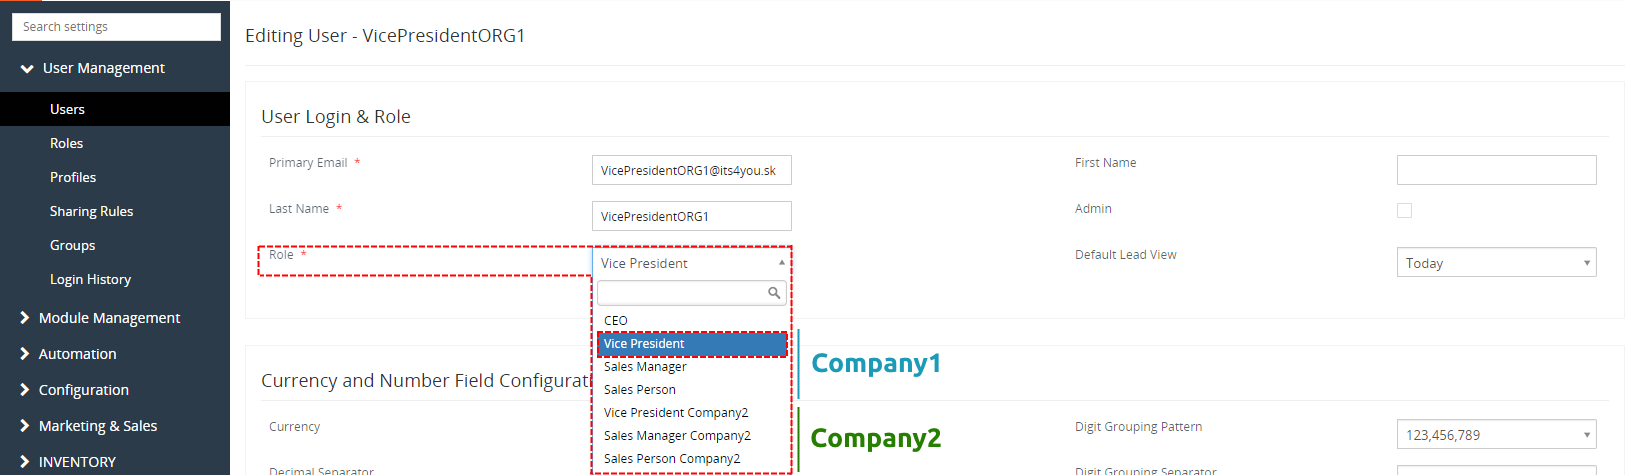
5.4.Definition new company
In case the roles are defined you can beside your original company define the additional companies. The new company can be easily defined using following steps:
- Go to Project and click on Multi Company
- Click on
 button
 - In appeared window please specify company details according to your needs
- Save a new company
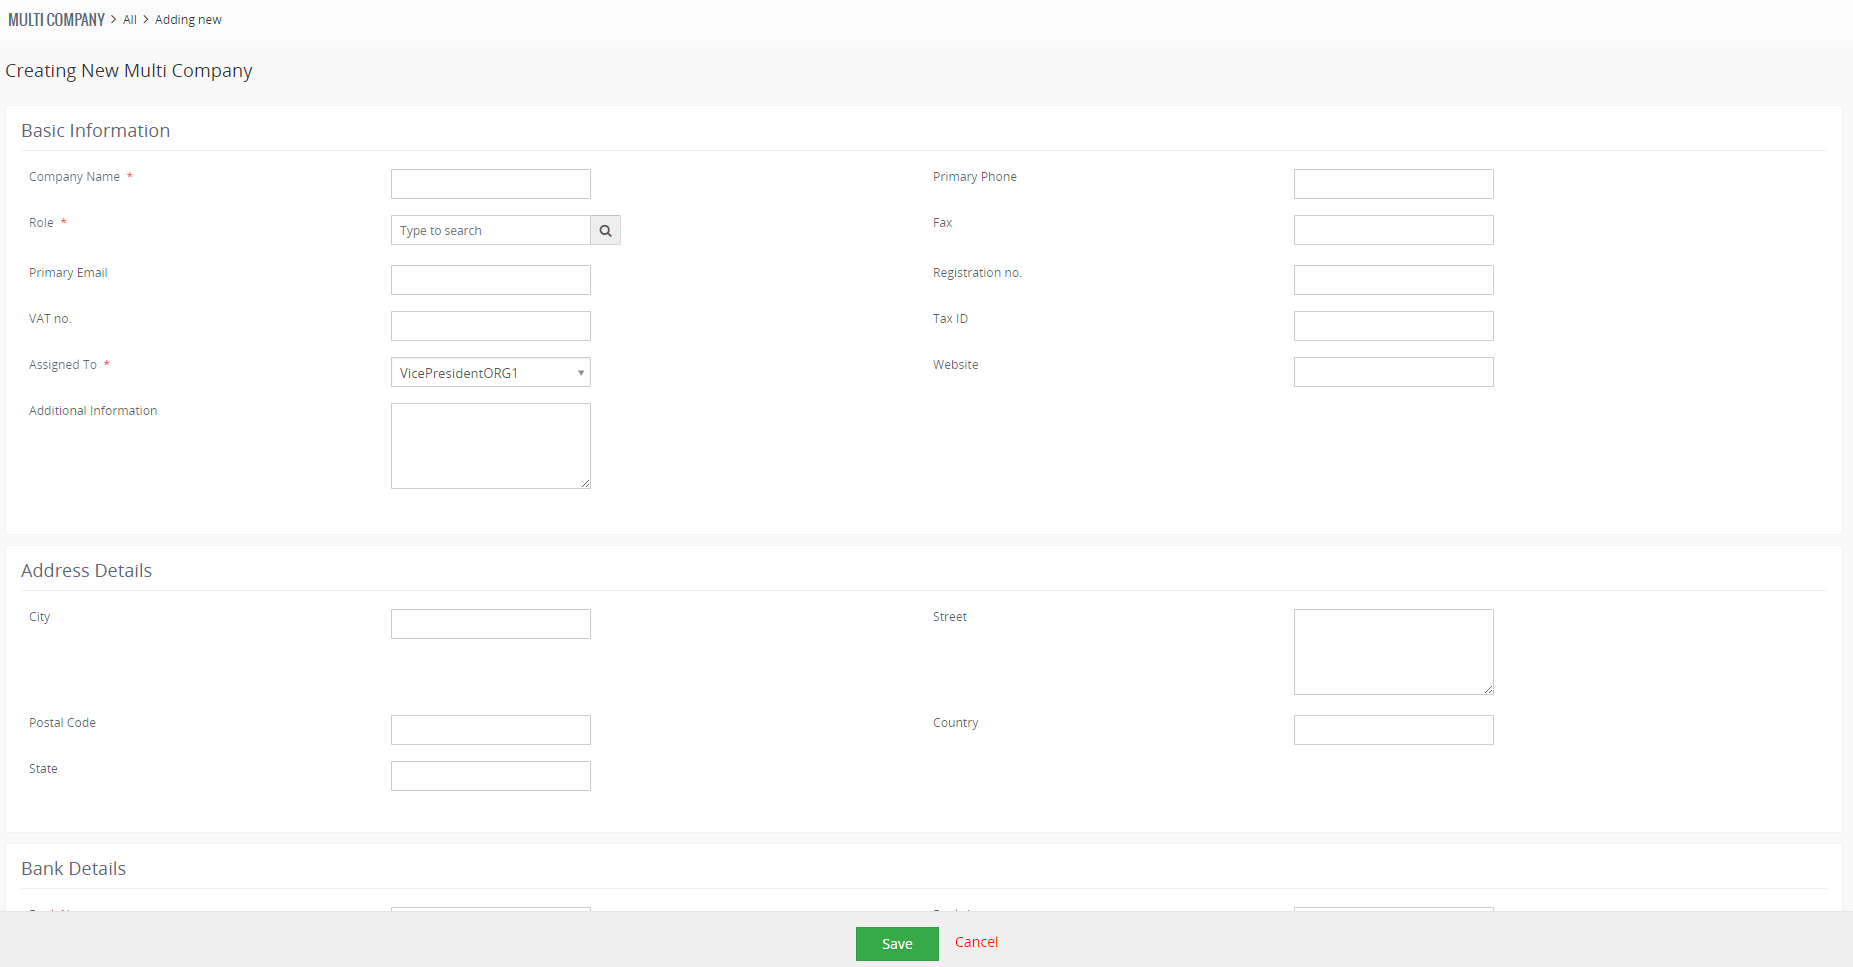
As you can see on Picture, you can find in company details also new field “Role”. It is mandatory field for correct working of the Multi Company. After selecting of role, all subroles are assigned to company. Also please check field Assigned To. It is also important field and we recommend to Assigned Company to higher user of this Company.
In the following Picture you can see relationship between Role – User – Companies
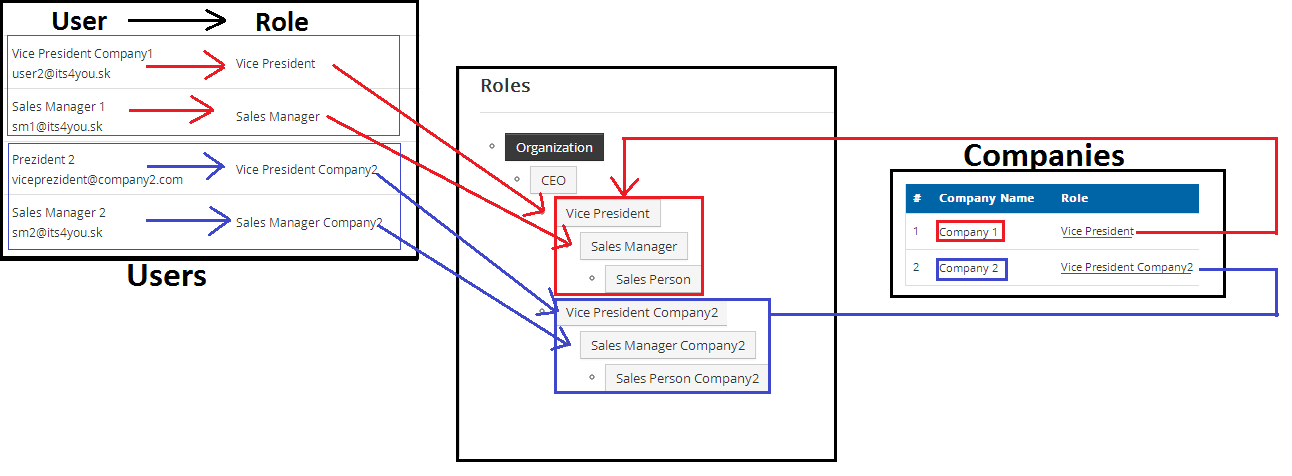
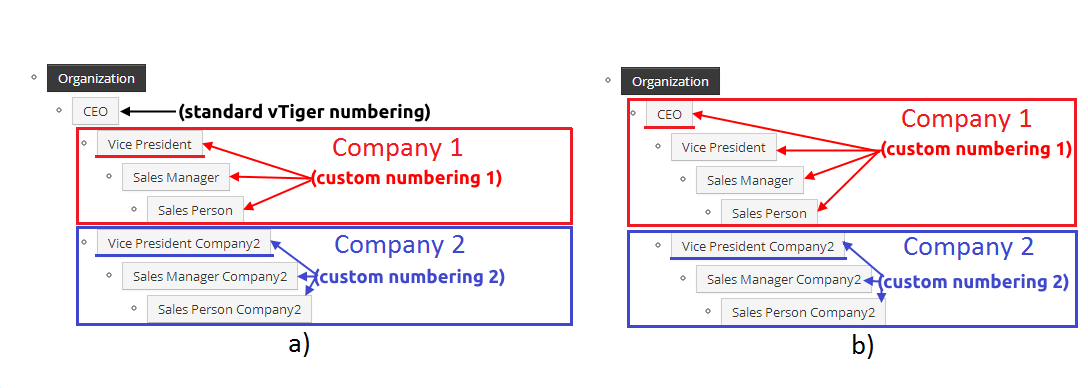
Next sections show why the role is important for correct working of the new modules. There is one common rule how the custom numbering is applicable for companies. As you can see in the following picture, the custom numbering will be applied to selected role and all subroles that fall under this role, i.e. will be inherited. Picture shows example where all users/roles belong to “Company 1” will use Custom Numbering settings and only users of Role 2.2 and its all “child” roles will use Custom Numbering settings. Role Company 2, 2.1 etc. will use original vtiger CRM Customize Record Numbering.

Based on this rule two different recommend settings of the roles for more companies are shown below:
- For each company the highest role except CEO is selected – in this scenario the custom
numbering settings is applicable for all users of separate company 1 or 2 but not for CEO - CEO is included in the first company – custom numbering is always applicable for all users
5.5.Definition the custom numbering
Within MultiCompany, you can define numbering per company and per module according to your needs.
To set which module should have custom numbering, please check the chapter
How to Enable/Disable a Module for MultiCompany.
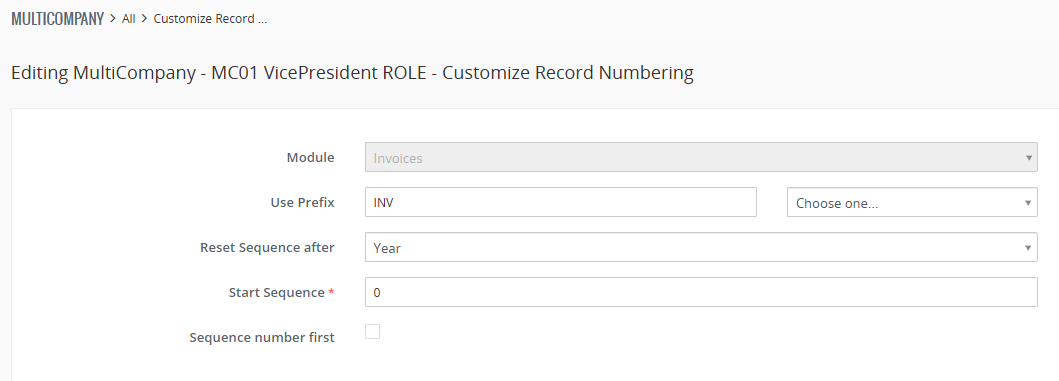
Steps to Configure Custom Numbering
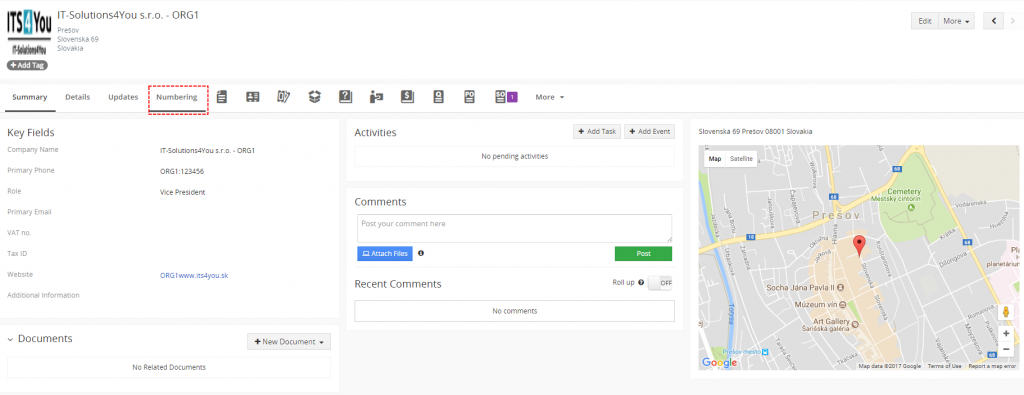
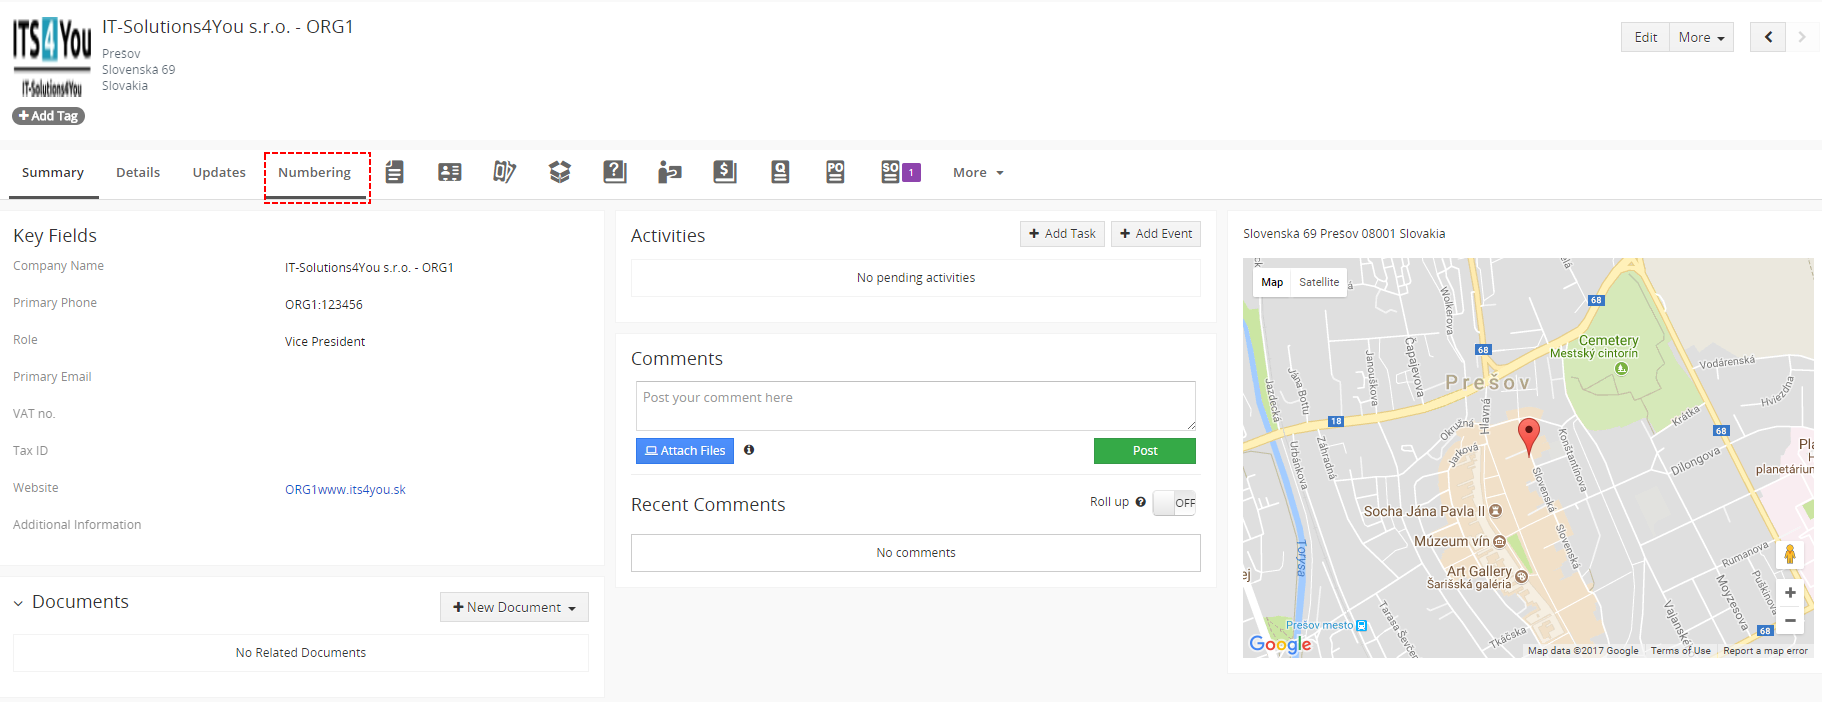
- Open the company

- Choose Numbering
- Select the Module (If the module is not listed, check the chapter How to Enable/Disable a Module for MultiCompany).
- Define the Prefix – You can combine custom text with fields like:
$year$, $yy$, $month$, $week$, $day$.
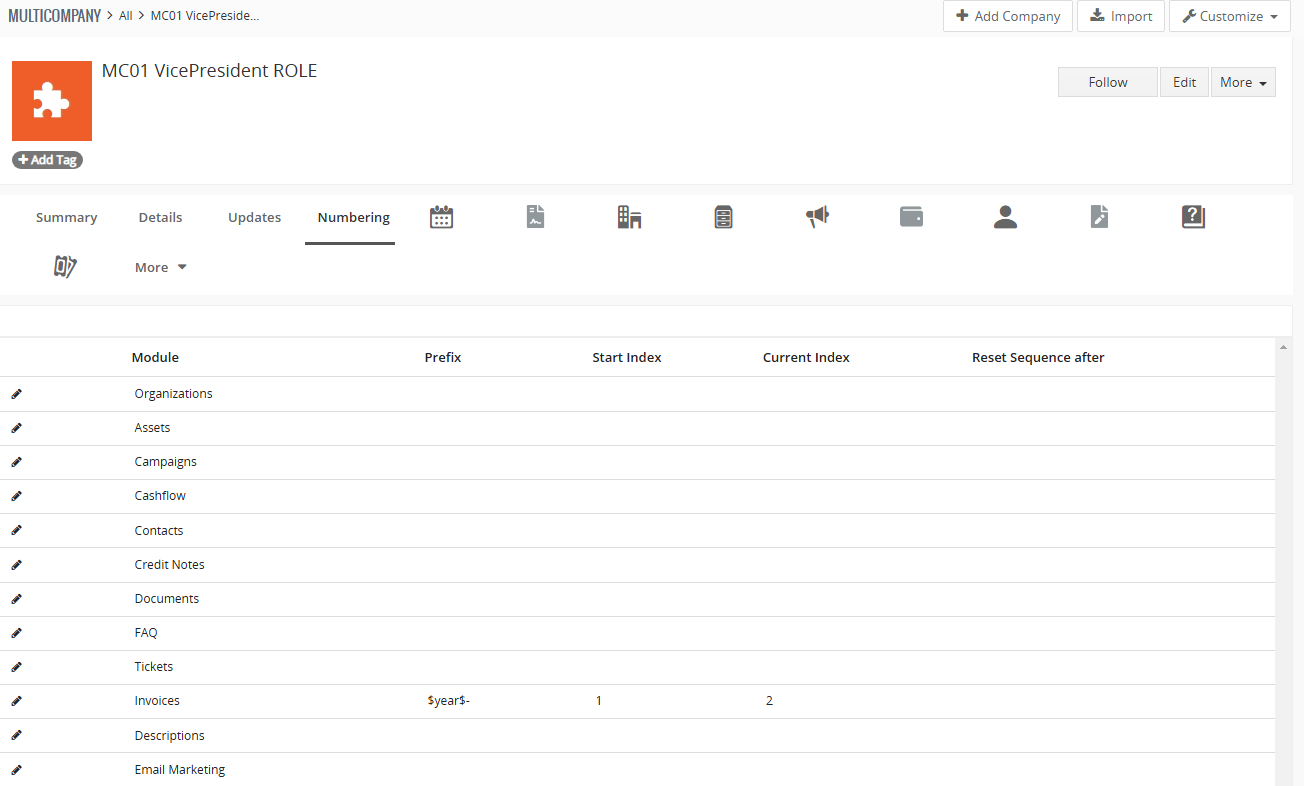
- Reset Sequence After – Set the reset frequency (e.g., yearly, monthly, etc.).
- Define Start Sequence – You can use values like
1, 01, 0020, etc. - Sequence Number First (Optional) – If the sequence should be displayed before the prefix (e.g.,
001-YEAR). - To Finish – Click on the save button.

Example of Final Settings
6.Additional features
6.1.Support of the PDF Maker
The PDF Maker is extension tool designed by ITS4You for vtiger CRM. It is powerful and flexible tool which allows users of vtiger CRM to create own pdf templates. Beside introduction of MultiCompany 4 You the PDF Maker was updated to support new module.
In case you are using PDF Maker for a longer time before you start using Multi Company, since the version for vtiger 7 it is not necessary to adapt your templates before continuing to use PDF Maker. PDF Maker with MultiCompany use stadnard variables like without Multi Company.
To add custom or other fields from MultiCompany Module into your template please see following steps:
- Open your template in PDF Maker
- In properties tab you can see Company information. Here you can find also new fields of “Multi Company”
- Choose variable and add it by
 button
 - Save the template
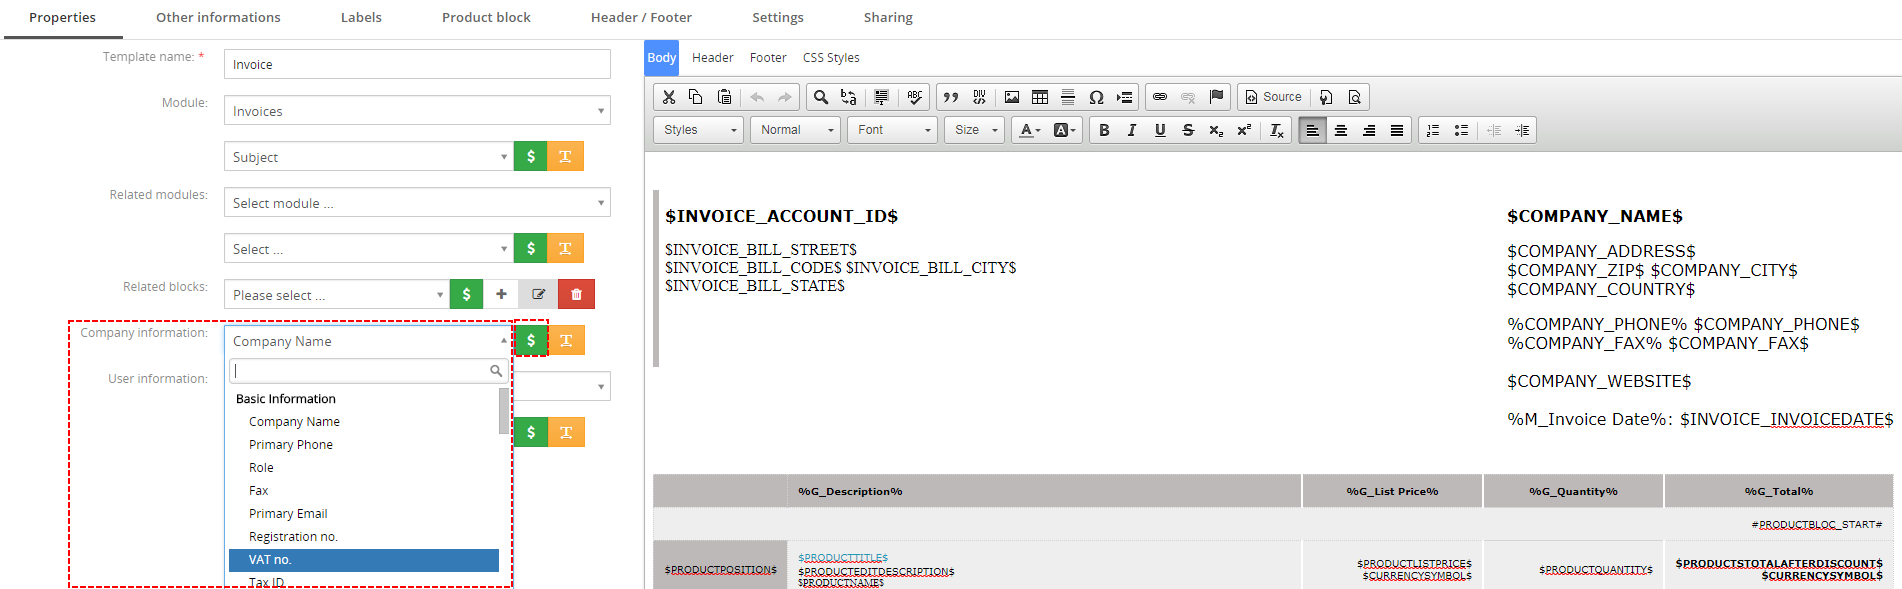
This PDF template can be used within more companies and final PDF document will always use correct data.
7.Setting
7.1.How to enable/disable module for MultiCompany
- First at all you need to choose Setting->CRM Settings
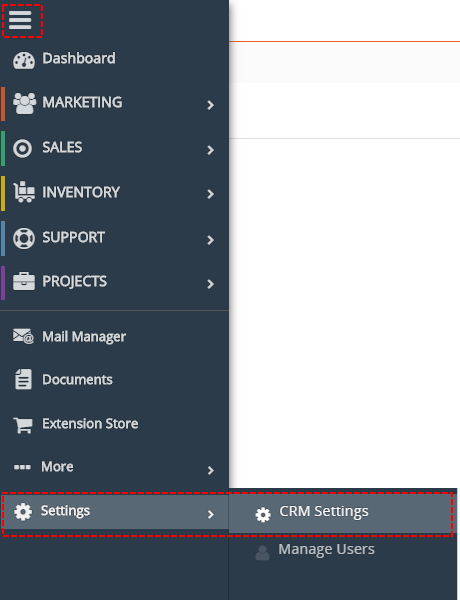
Modules for Custom Numbering - Now, in Other Settings you can see Multi Company tab. Please choose it.
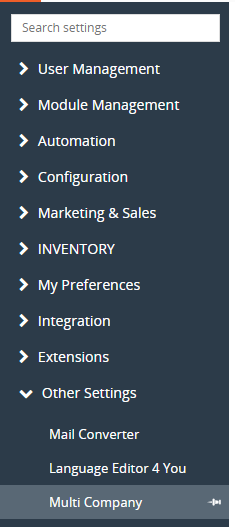
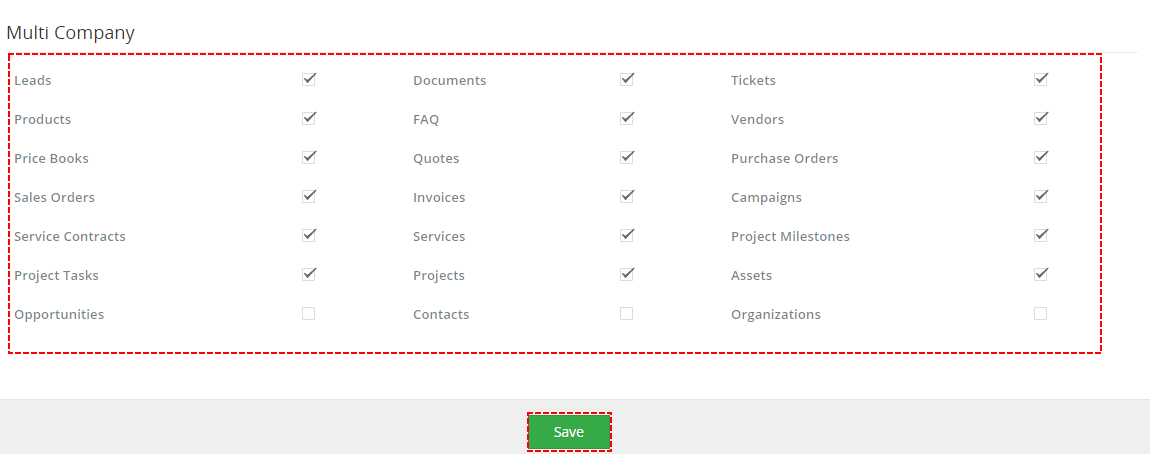
Modules for Custom Numbering - Here, you can see all your modules and also modules selected for MultiCompany. You can select or deselect what you need.
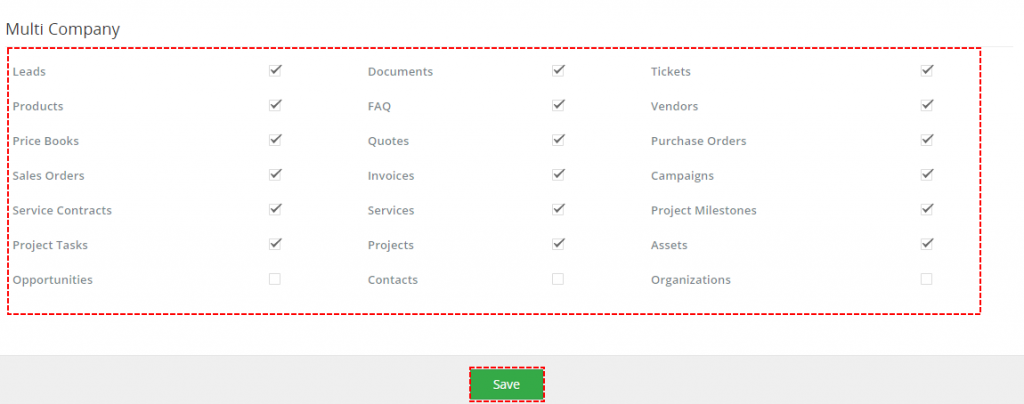
Modules for Custom Numbering
7.2.License settings
Since December 2019/January 2020 all our modules will be using Installer to manage licenses. Please check our Installer pages for more information.
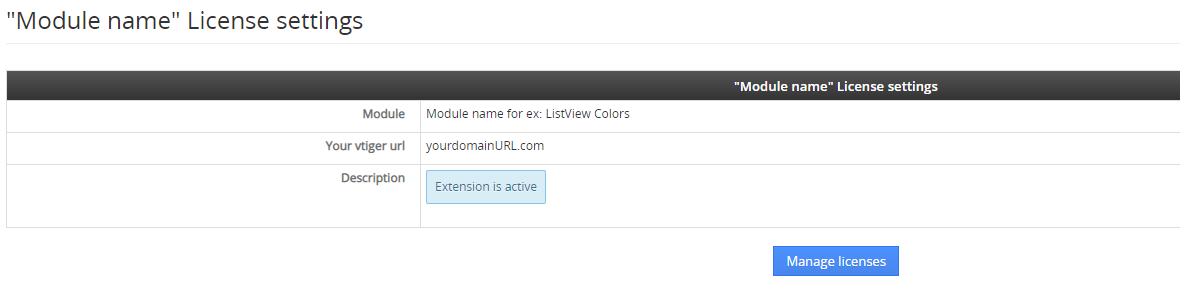
You can access the License settings like its shown below:
(there can be more options from the pick-list, depends on the module)
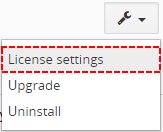
After accessing the License window you can see screen bellow with following information:
- Module name, Your Vtiger domain URL
- Description, if license is activate or not:
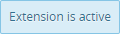 – your license is currently active,
 – your license is not active and you need active it via Installer.
To activate or manage license, click on the button.
7.2.1.Deactivate license
If you want to deactivate your license, please provide following steps:
- Go to your Installer, by a click on Notifications Icon and then on the button ,
or via Main Menu – Settings – CRM Settings – Extensions – ITS4YouInstaller - The following screen will appear (see below):

Installer – deactivation of license You can deactivate license by click on the button

Note: The module will be deactivated but not uninstalled and license will be removed from the Activated Licenses tab.
7.2.2.Reactivate license
To reactivate a license after deactivation, you need to follow the same process as you activated it first time:
- Click on the button and enter your license key.

- Confirm with
 button.
When the license was activated you can see module available in the Modules tab below.
Note: To see modules and manage licenses you have to log in to our e-shop with @email and password via button (top right screen side in Installer module).
7.3.Update Multi Company
The upgrade of the module is initiated manually or via our Installer.
Updating via Installer:
- open the Installer in the CRM
- in the Modules tab find your installed module and you should see the button available
- If the new version is available, you will be notified via Installer Notifications icon
Updating MultiCompany manually:
Click on Upgrade Multi Company link in Customize tab of MultiCompany.
So please refer to above installation part for details how to initiate the import of the module from the file. As can be seen on following picture you will be notified that the MultiCompany module already exists. The upgrade will start immediately when you click on the button.
After upgrade the notification about successful upgrade is shown.
7.4.Uninstall Multi Company
If you need to remove the module from your Vtiger you have two options:
- Uninstall via Installer.
- Manually via going to module Settings and choose Uninstall option.
7.4.1.Uninstall via Installer
You have also option to remove the module via Installer window by accessing the Settings – Uninstall window:
- Go to your Installer, by a click on Notifications Icon and then on the button ,
or via Main Menu – Settings – CRM Settings – Extensions – ITS4YouInstaller - Find the module you need to uninstall in the Modules tab
- Via
 pick list button choose the Uninstall option, you will be redirected to the Uninstall window.
 - Click on
 button

- Confirm uninstall with
 button
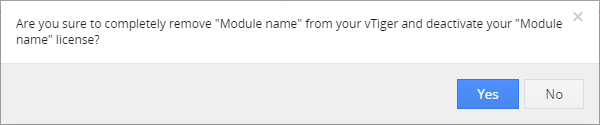
Now, the module has been removed from your Vtiger and your license has been deactivated. To use this module again, you need to provide installation and validation steps (see Installation chapter).
7.4.2.Manual Uninstall
There is also available option to remove MultiCompany from your Vtiger manually. To uninstall please provide following steps:
- Go to the list view of MultiCompany and in Customize choose option Uninstall Multi Company
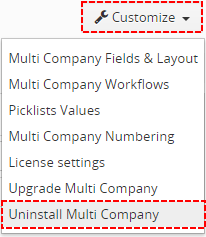
How to uninstall Multi Company
- Click on
 button
How to uninstall Multi Company

- Confirm uninstall with button
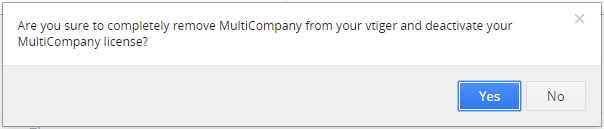
How to uninstall Multi Company
Now, Multi Company is removed from your Vtiger and your license is deactivated. To use Multi Company again you need to provide installation and validation steps (see chapter 2.How to install Multi Company).
8.Tips & tricks
8.1.Do you want to show Company logo based on login user?
Did you set MultiCompany logo for your Company but in left corner is still showing logo from standard Company Details?
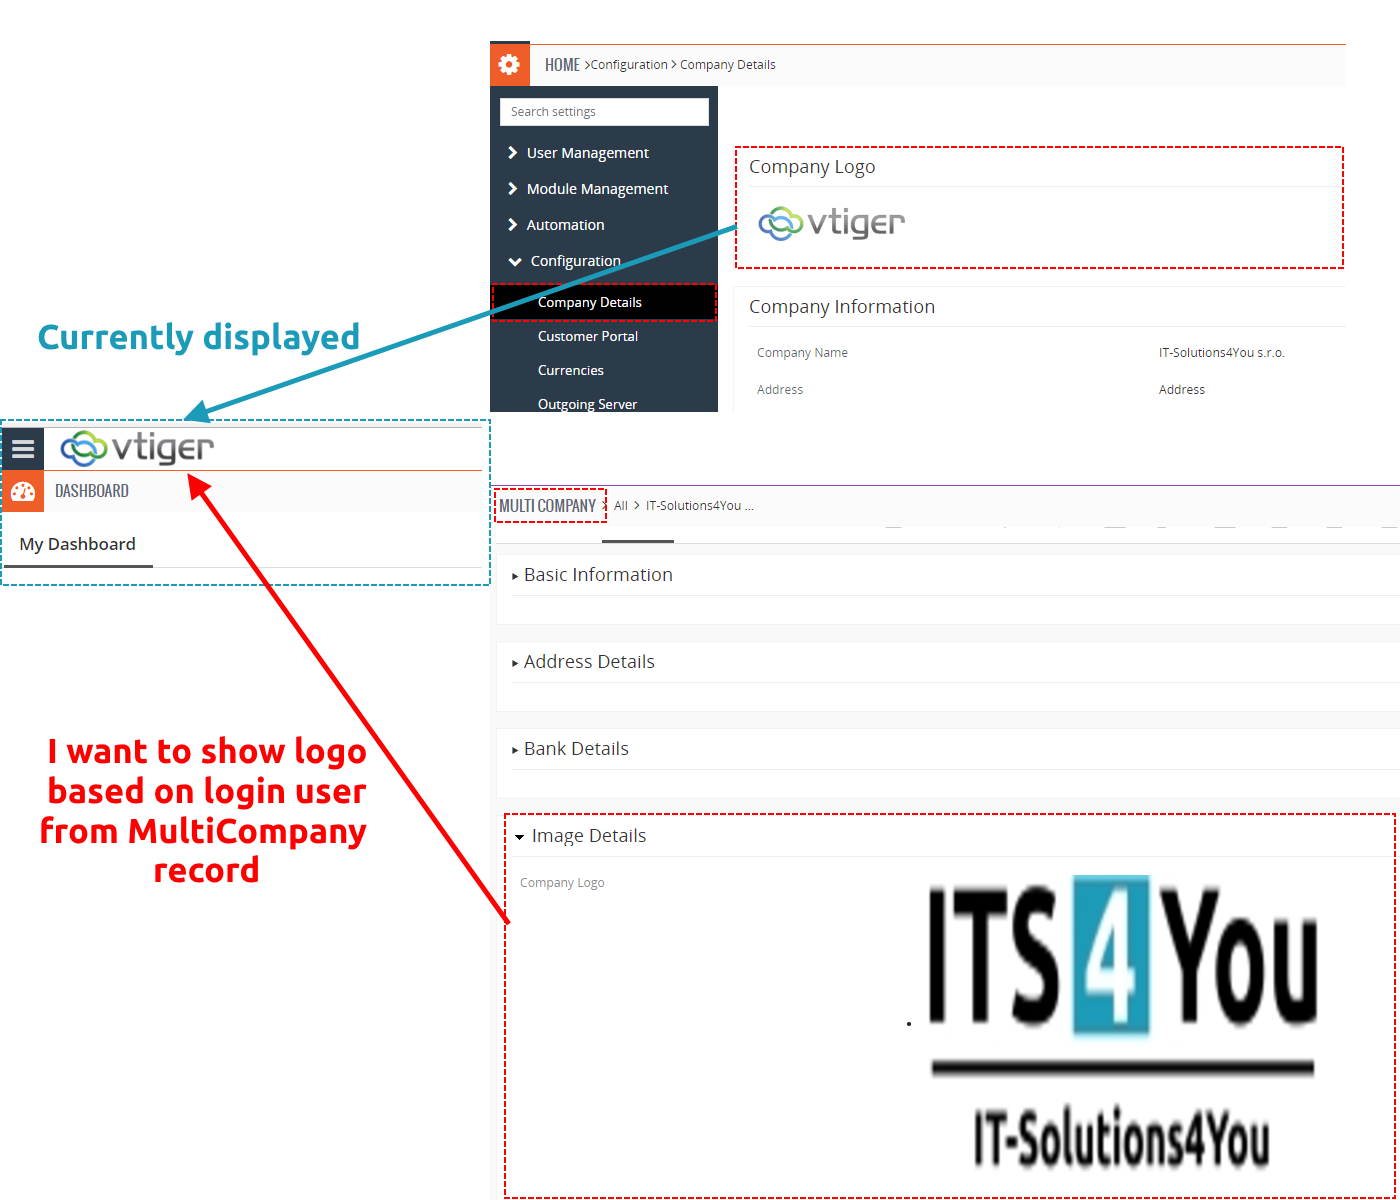
The reason is that we can not modify vtiger source code with our extension.
But you can do it.
To show logo based on login user please provide following steps:
- Please find file Basic.php (location is VTIGERPATH/modules/Vtiger/views/Basic.php)
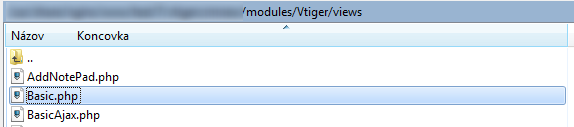
How to show Logo from MultiCompany - Go to line 34
- Change following code and save it.
$current_user = Users_Record_Model::getCurrentUserModel();$companyDetails = Vtiger_CompanyDetails_Model::getInstanceById();$companyLogo = $companyDetails->getLogo();$companyRecord = ITS4YouMultiCompany_Record_Model::getCompanyByUserId($current_user->getId());if ($companyRecord != null) {$companyModuleModel = Vtiger_Module_Model::getInstance(‘ITS4YouMultiCompany’);$logoField = Vtiger_Field_Model::getInstance(‘logo’, $companyModuleModel);$imageDetails = $companyRecord->getImageDetails($logoField);if (!empty($imageDetails)) {$imageDetails = reset($imageDetails);$companyLogo = new Vtiger_Image_Model();$companyLogo->setData(array(‘imagepath’ => $imageDetails[‘path’] . “_” . $imageDetails[‘orgname’],‘title’ => $imageDetails[‘orgname’],‘alt’ => $imageDetails[‘orgname’]));}}

How to show Logo from MultiCompany
8.2.How to make Company Details visible for all users from this Company?
Did you assigned MultiCompany to the highest role of your Company but other users/roles can’t see any info about Company?

To make Company Details visible please provide following steps:
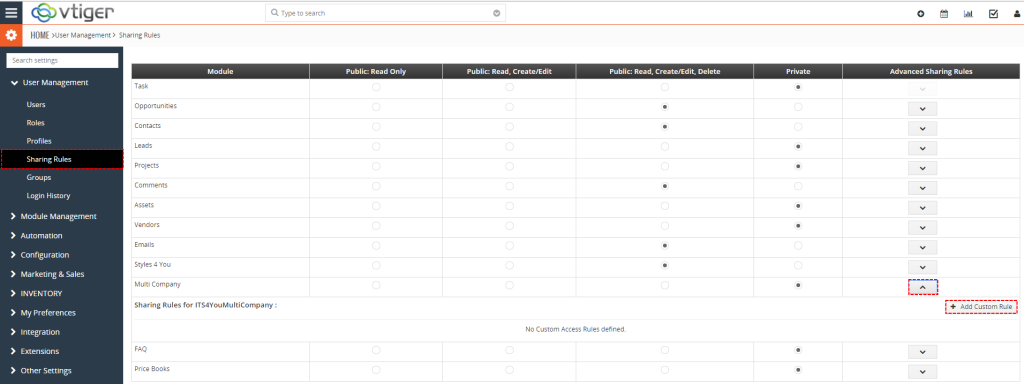
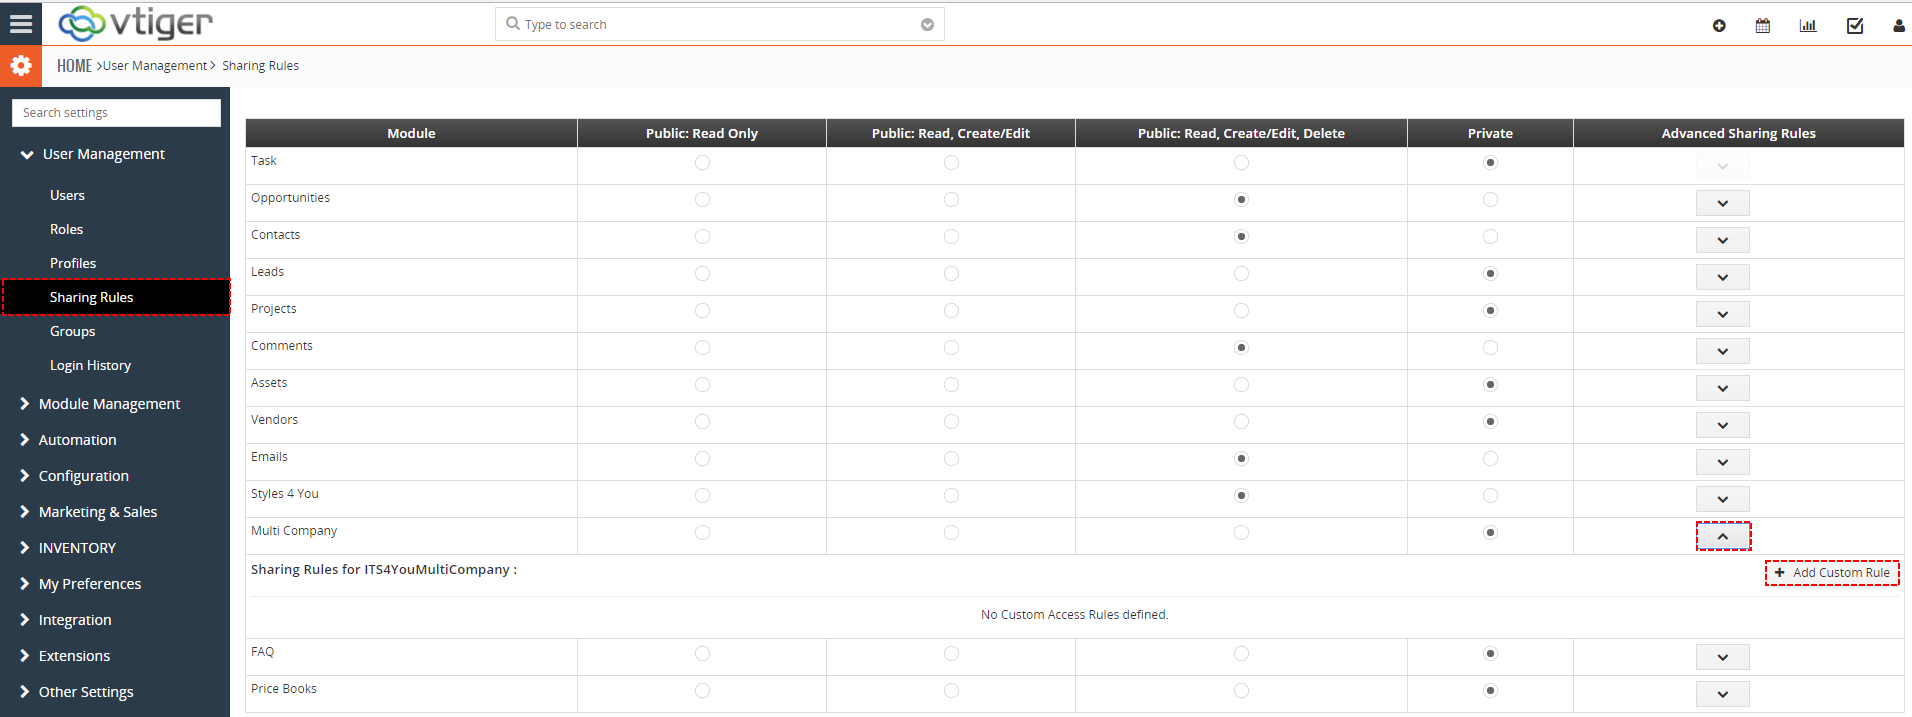
- Go to CRM Settings -> User Management -> Sharing Rules. Find MultiCompany module click on button and then Add Custom Rule
How to allow see company for all users - Add Custom Rules for rest of your Company’s roles
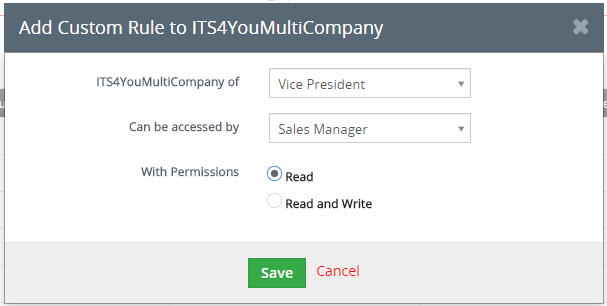
How to allow see company for all users
How to allow see company for all users

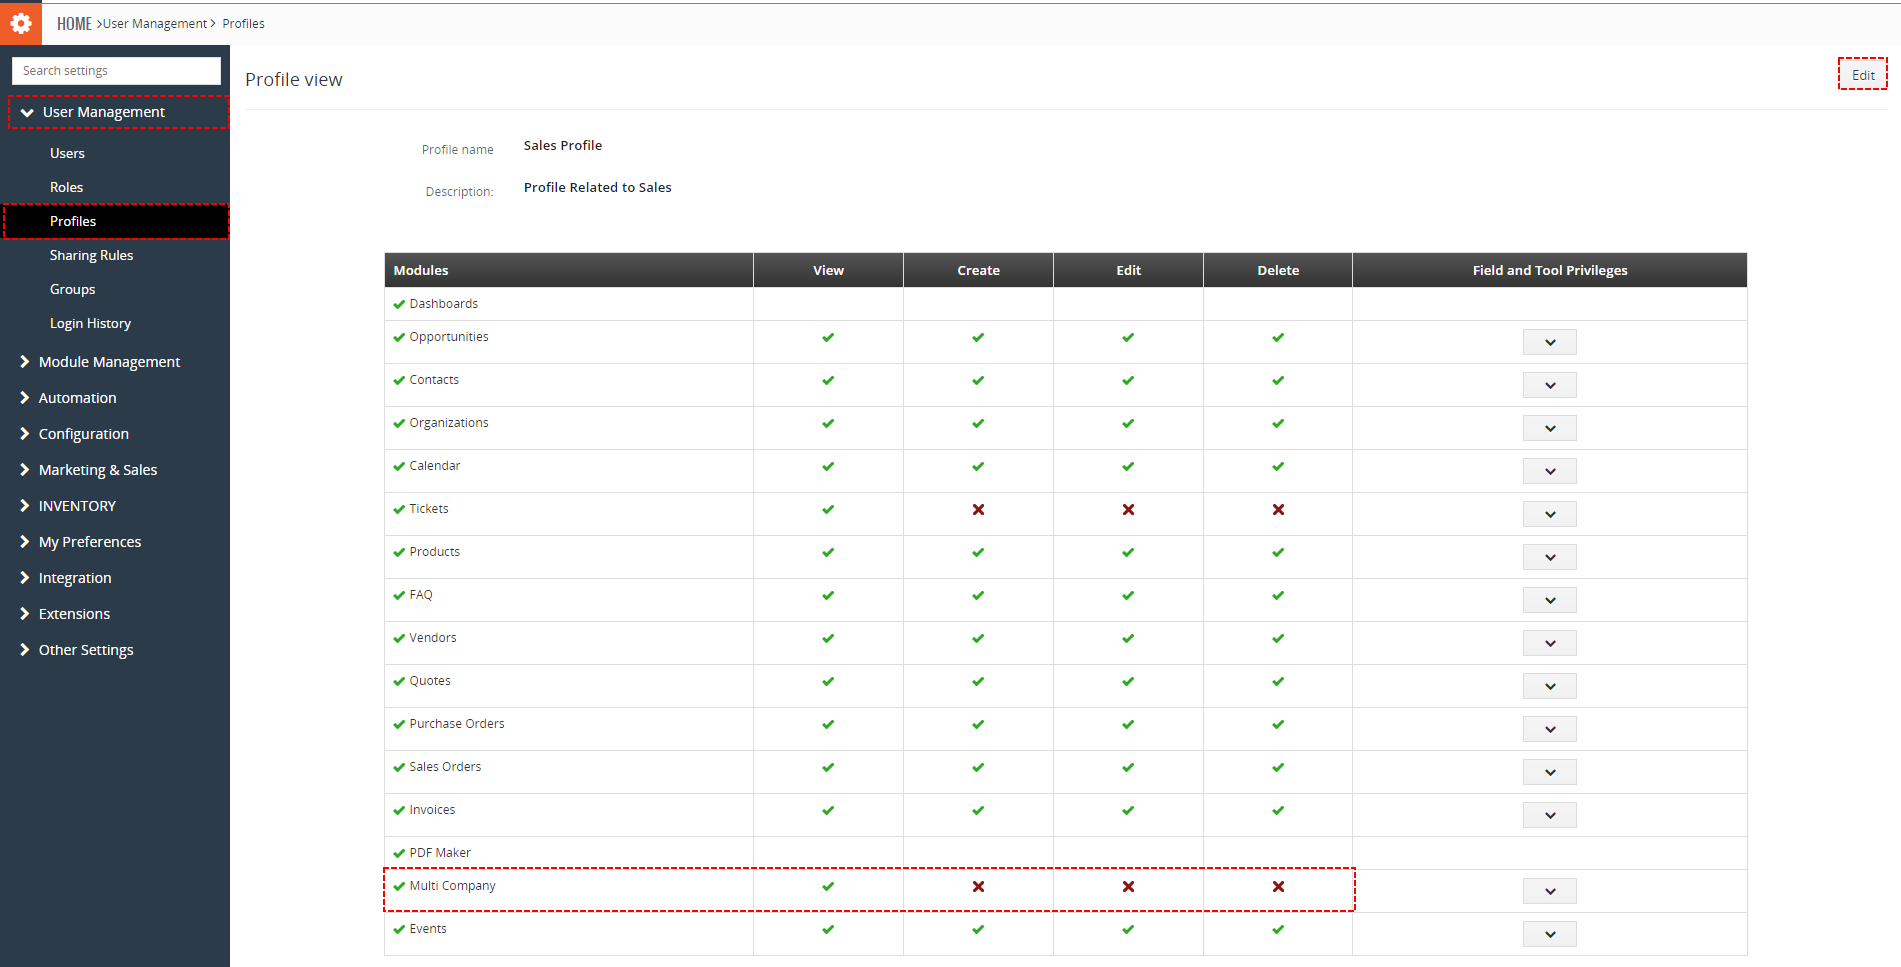
How to allow see company for all users - Now, other users can see Company details. And if you allow for other profiles only to see records then they can see Company details but they can’t change or delete your Company details.
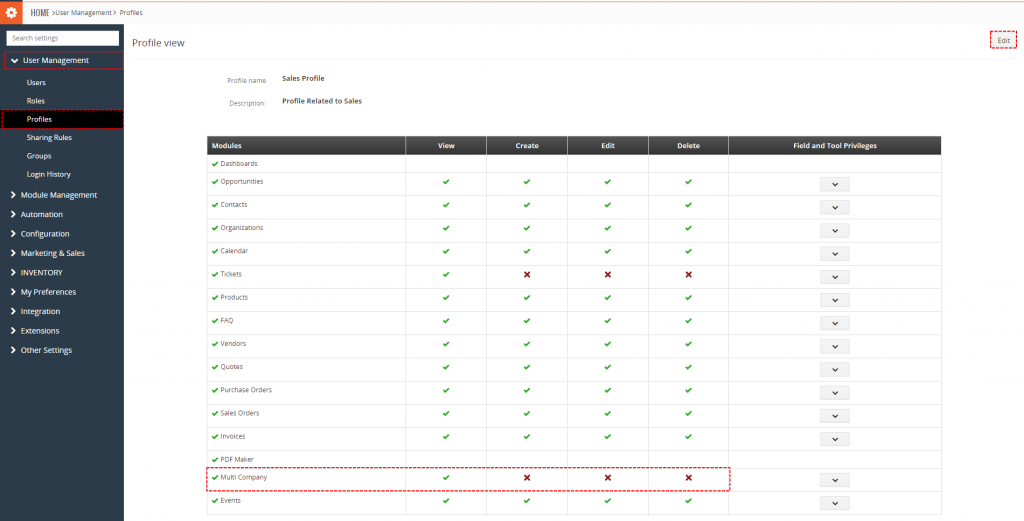
Our tip for other profiles

How to allow see company for all users


8.3.List of records based on Company
Is it possible for CEO to filter records based Company?
Yes, CEO have 2 option how to see list of records:
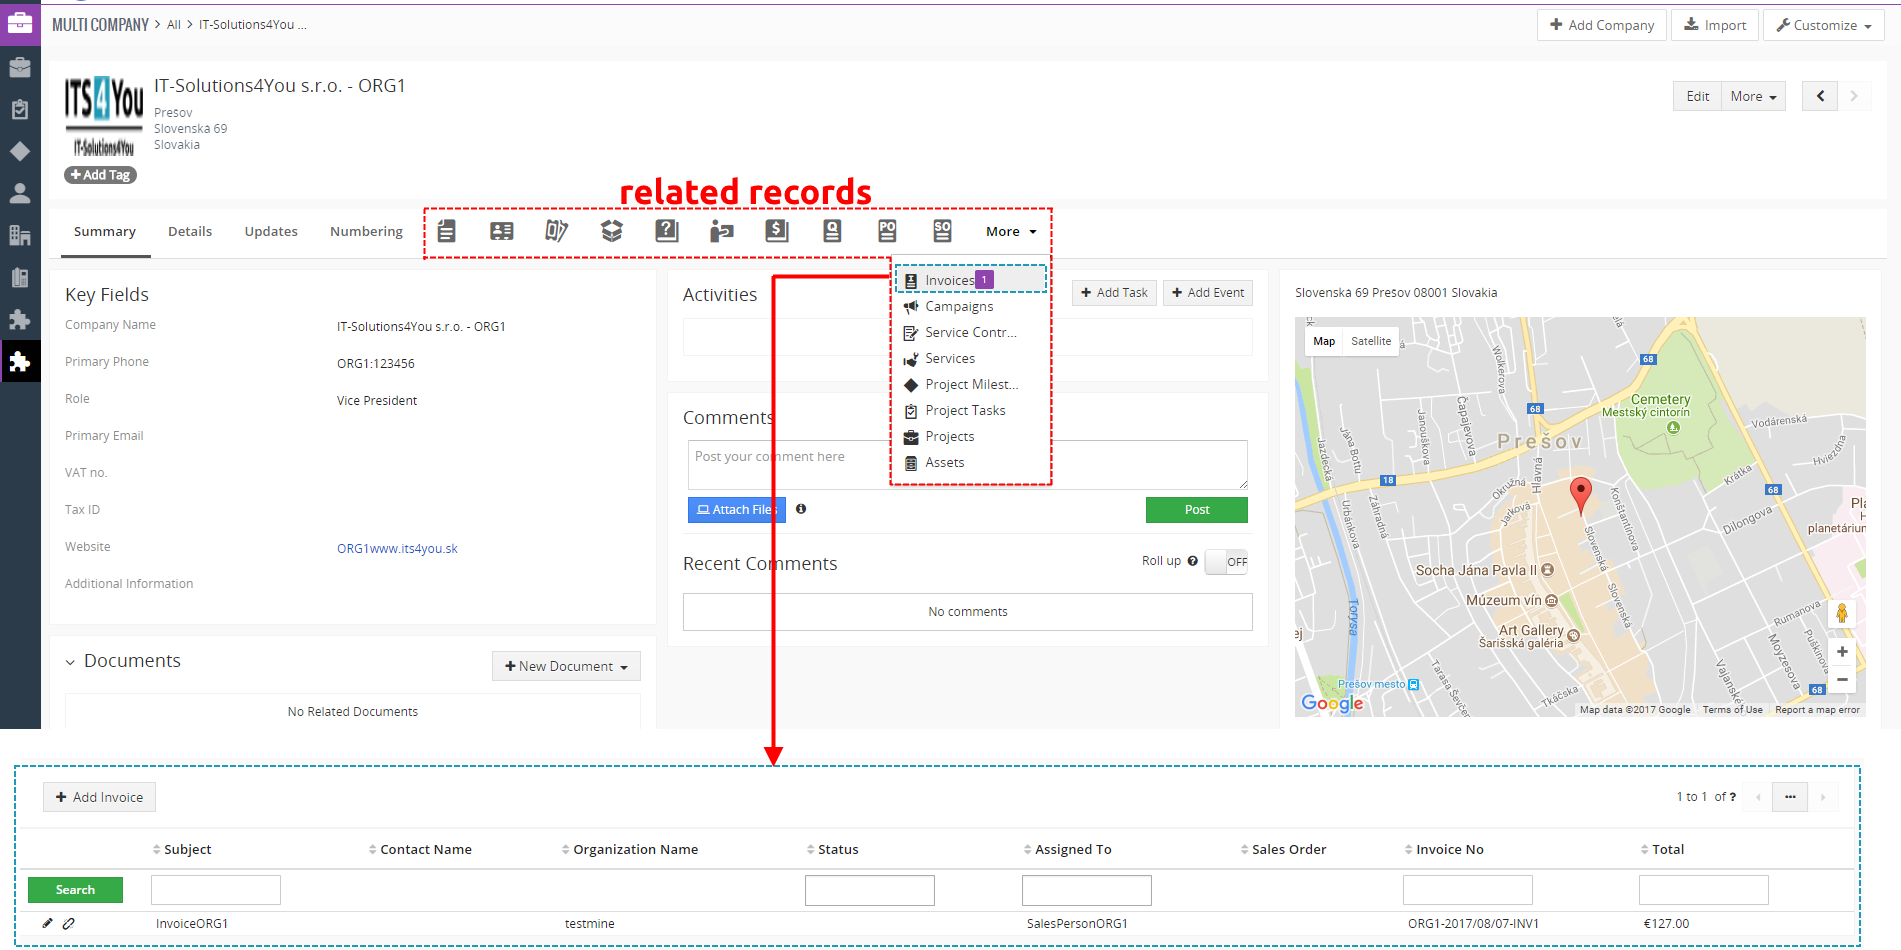
- In DetailView of Company
Here you can see All related modules for MultiCompany and when you select module you will see related records.
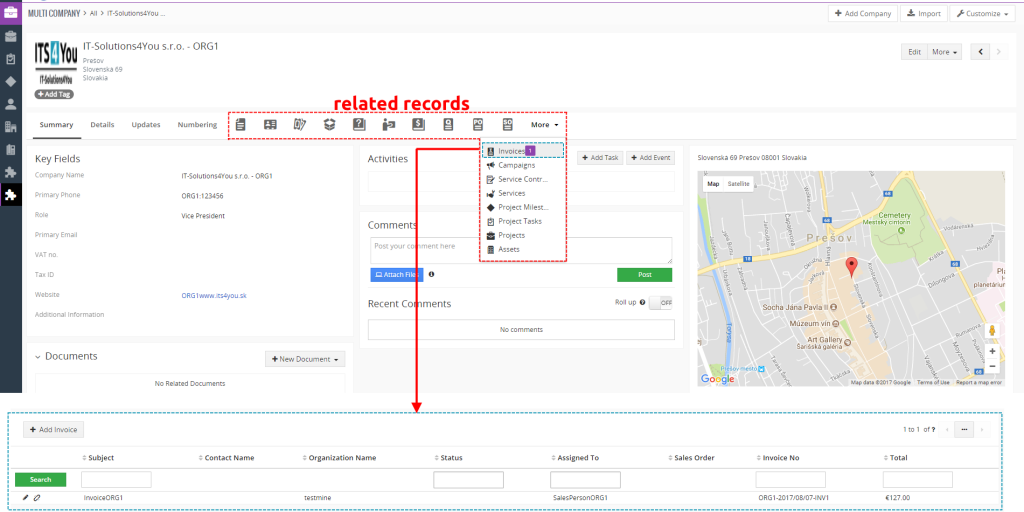
List of related Records - Create List and see records from ListView of module
With installation of Multi Company is new field Company created within all modules that use Multi Company.
Based this field “Company” you can create List (filter) to see records related to Company that you want to see.
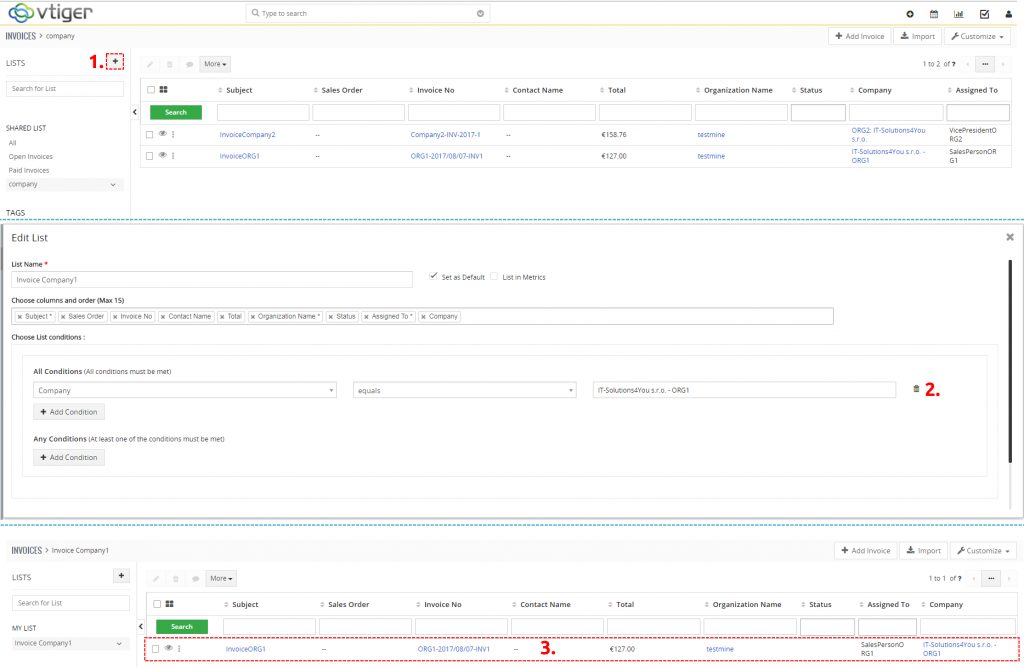
List of related Records
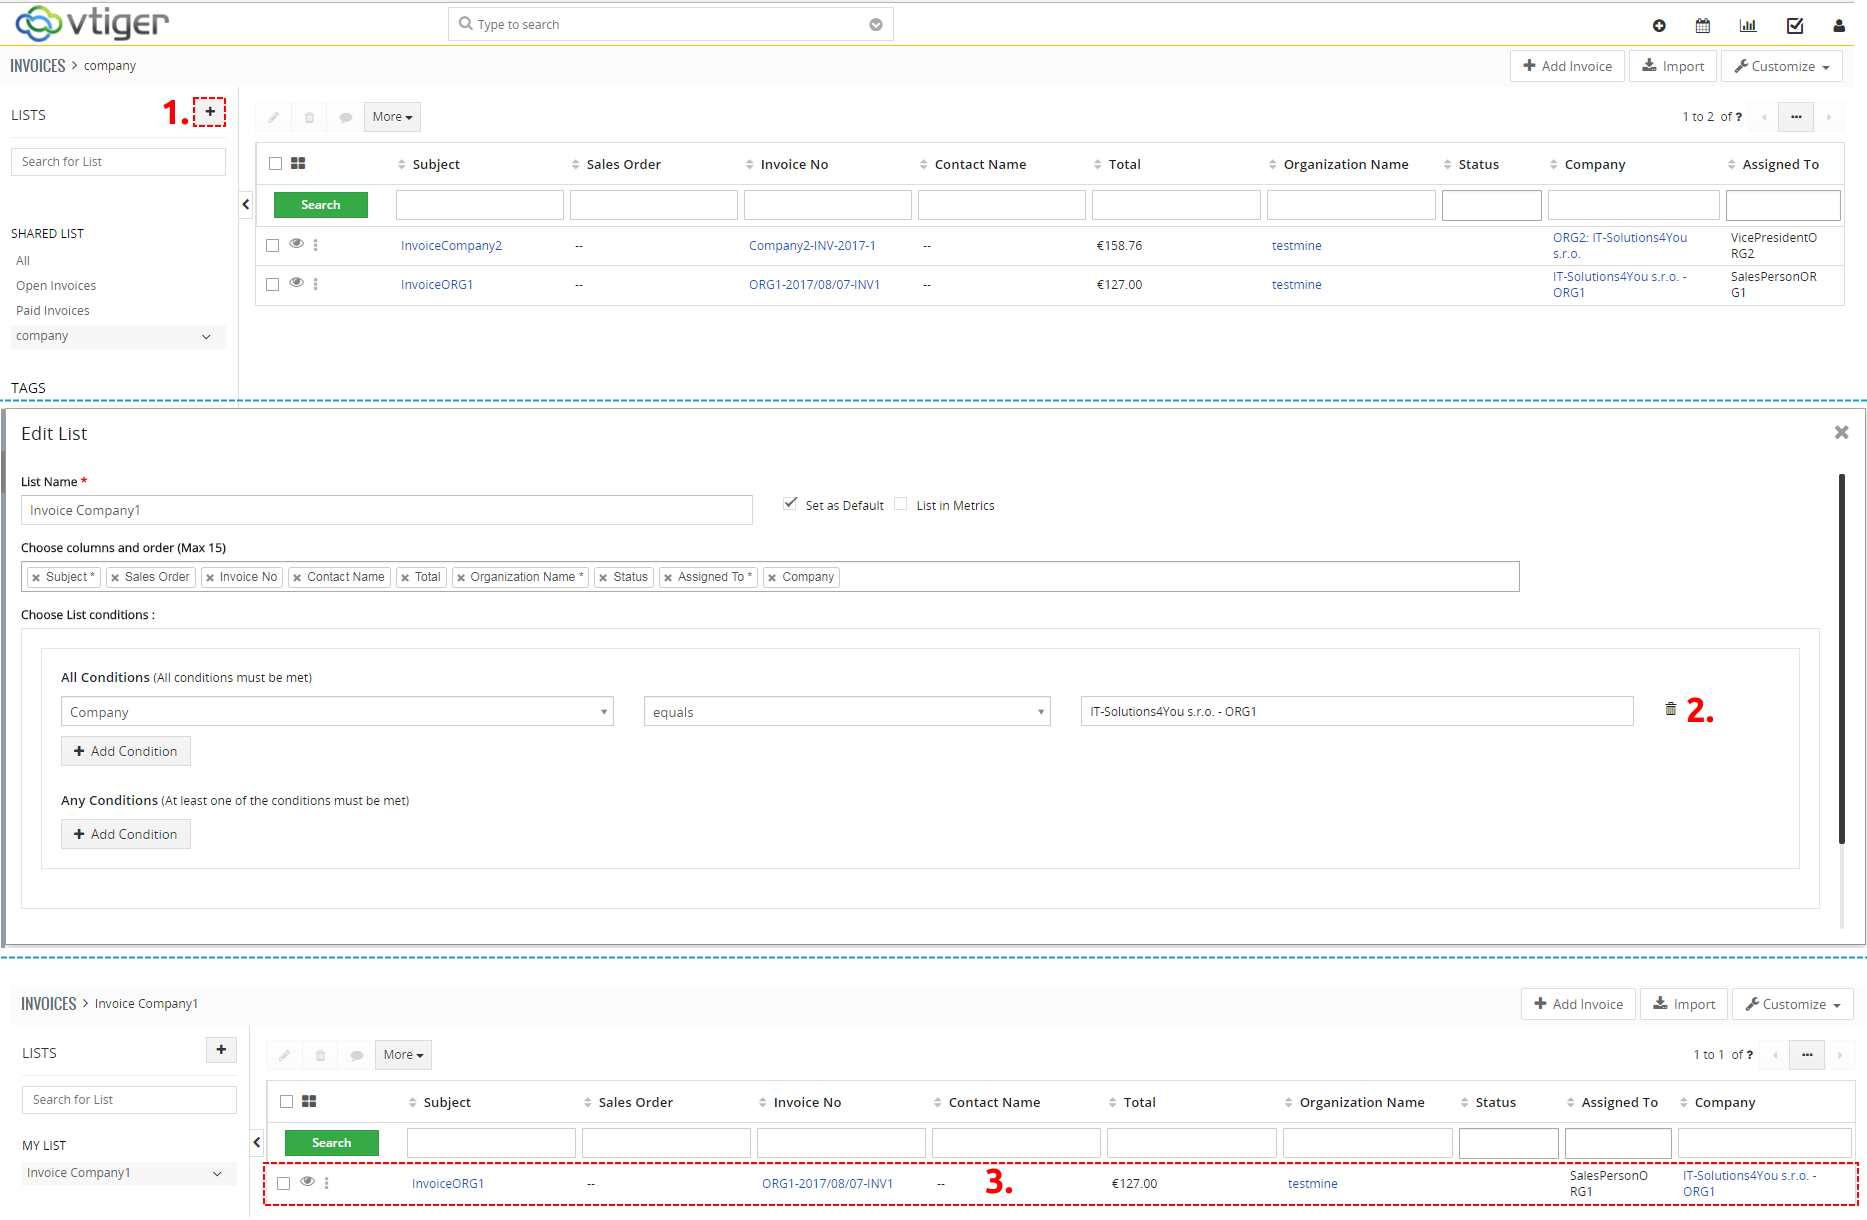
8.4.Assigning Imported Records to a Company
The Multi Company extension determines which company can access a record based on the user selected in the Assigned To field.
Important
Records are not assigned directly to a company during the import. The company is determined according to the user selected in the Assigned To field.
How the assignment works
Each company in the Multi Company extension has specific roles and users assigned to it.
When a record is assigned to one of these users, the extension identifies the company according to the role of that user and applies the corresponding company access rules.
- A company is configured in the Multi Company extension.
- A role is assigned to the company.
- Users are assigned to these roles.
- Records are imported into a selected Vtiger module.
- The Assigned To value determines which user owns each record.
- Multi Company determines the company according to the role of the assigned user.
Choosing the import method
You can import records using an XLS file or a CSV file.
For XLS files, you need our XLS Import extension. This is the recommended method because it allows you to import XLS files directly into Vtiger CRM and provides a dedicated import process.
You can find more information about the extension here: XLS Import for Vtiger CRM.
If you do not have the XLS Import extension, save the file in CSV format and use the standard Vtiger Import function.
Recommended import method
We recommend using the XLS Import extension. It allows you to work directly with XLS files without converting them to CSV format.
Preparing the import file
Before starting the import, prepare an XLS or CSV file containing the records that you want to import into Vtiger CRM.
The file can contain any fields supported by the selected module. For example, when importing Organizations, the file can contain the organization name, phone number, email address, website and other information.
The most important column for Multi Company assignment is Assigned To.
Each row must contain the user who should own the imported record. This user must have a role assigned to the required company.
| Organization Name | Primary Phone | Assigned To | |
|---|---|---|---|
| Example Company One | 421 900 111 222 | company1@example.com | Abbie Hobbs |
| Example Company Two | 421 900 333 444 | company2@example.com | Abbie Hobbs |
Make sure that the user name in the import file corresponds to an existing and active Vtiger user.
The exact value accepted during the import can depend on the Vtiger version and the selected import method. We recommend testing the import with a small number of records before importing the complete file.
Assigned To mapping
If the user from the import file is not correctly assigned to the Assigned To field, select the required user manually in the field mapping settings. The manually selected user will then be assigned to the imported records.
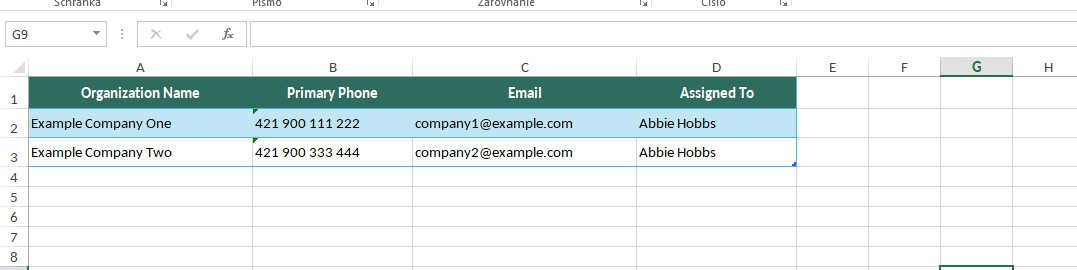
Example of an import file containing the Assigned To column.
Checking users and roles before the import
Before importing the records, verify that all users listed in the import file are assigned to the correct roles.
You should also verify that these roles are assigned to the correct company in the Multi Company configuration.
- Open the Vtiger CRM settings.
- Open the user and role management section.
- Find the user that will be used in the import file.
- Check which role is assigned to the user.
- Open the Multi Company configuration.
- Verify that the role is assigned to the required company.
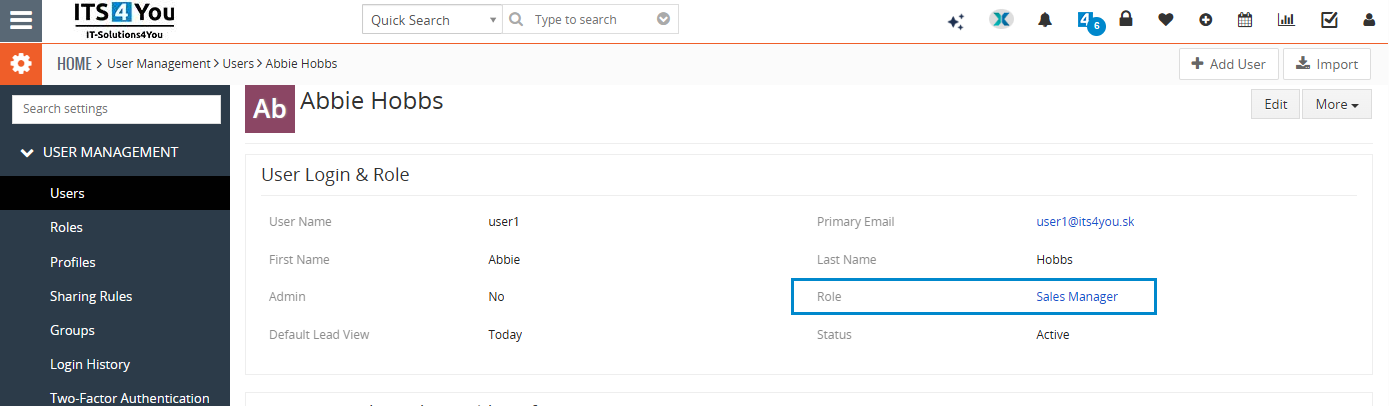
Check that the user has the correct role before starting the import.
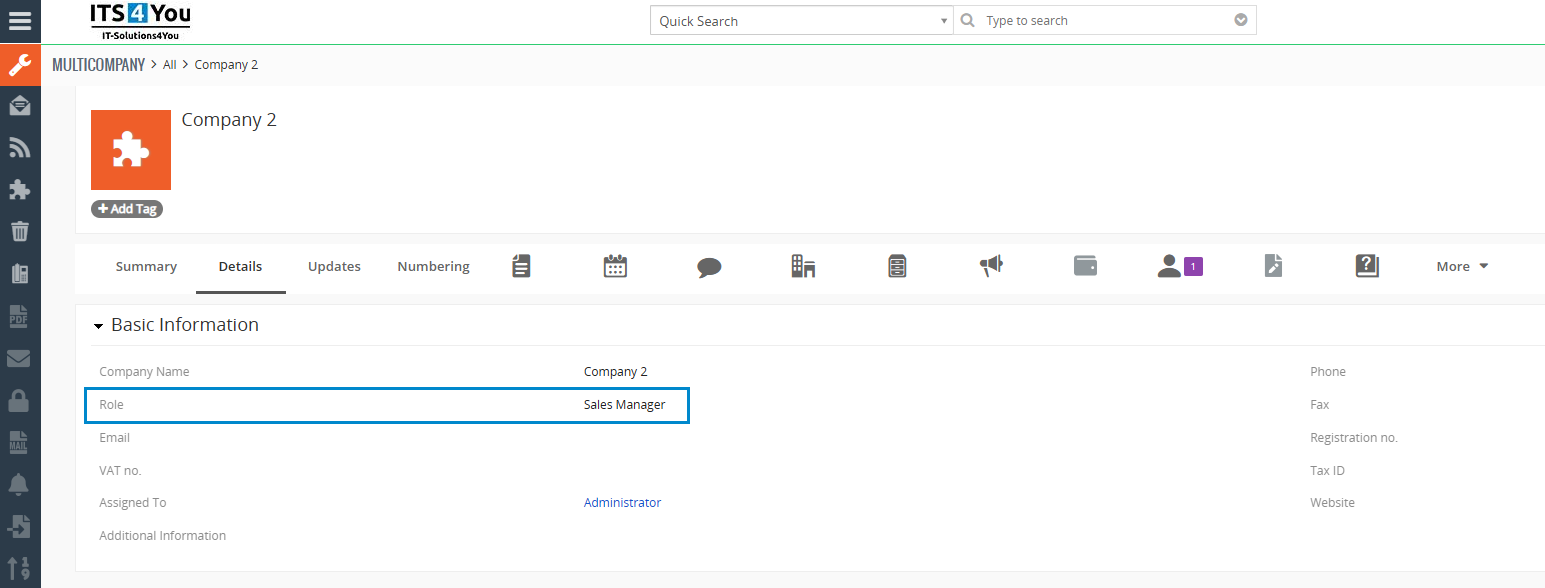
Verify that the role is assigned to the required company.
Importing records using XLS Import
To import an XLS file, the XLS Import extension must be installed and activated in your Vtiger CRM.
This is the recommended method when your data is stored in an XLS file.
Opening the XLS Import module
- Open the main Vtiger menu.
- Find and open the XLS Import module.
- Click the button to create a new import.
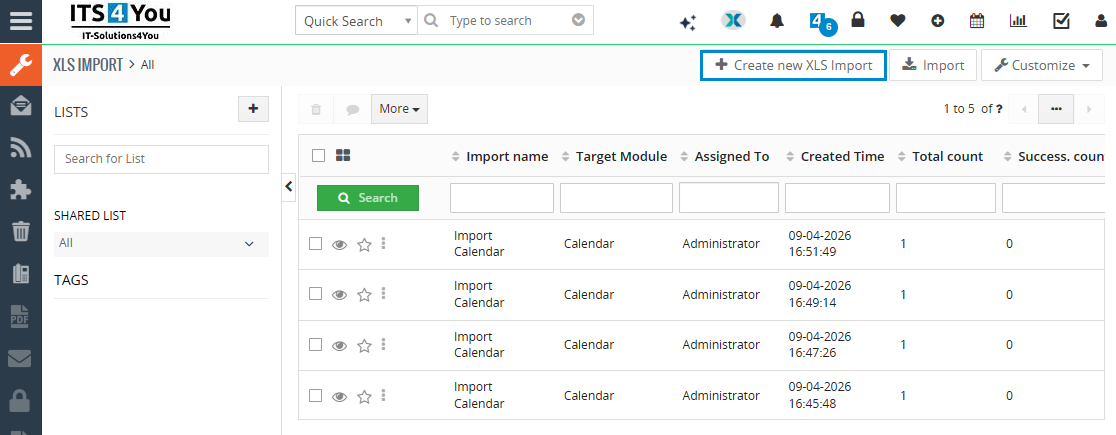
Open the XLS Import module from the main Vtiger menu and create a new import.
Selecting the module and XLS file
Select the Vtiger module where the records should be imported. For example, you can select Organizations, Contacts, Leads, Products or another supported module.
- Select the target Vtiger module.
- Select the prepared XLS file.
- Configure the available import settings.
- Continue to the field mapping step.
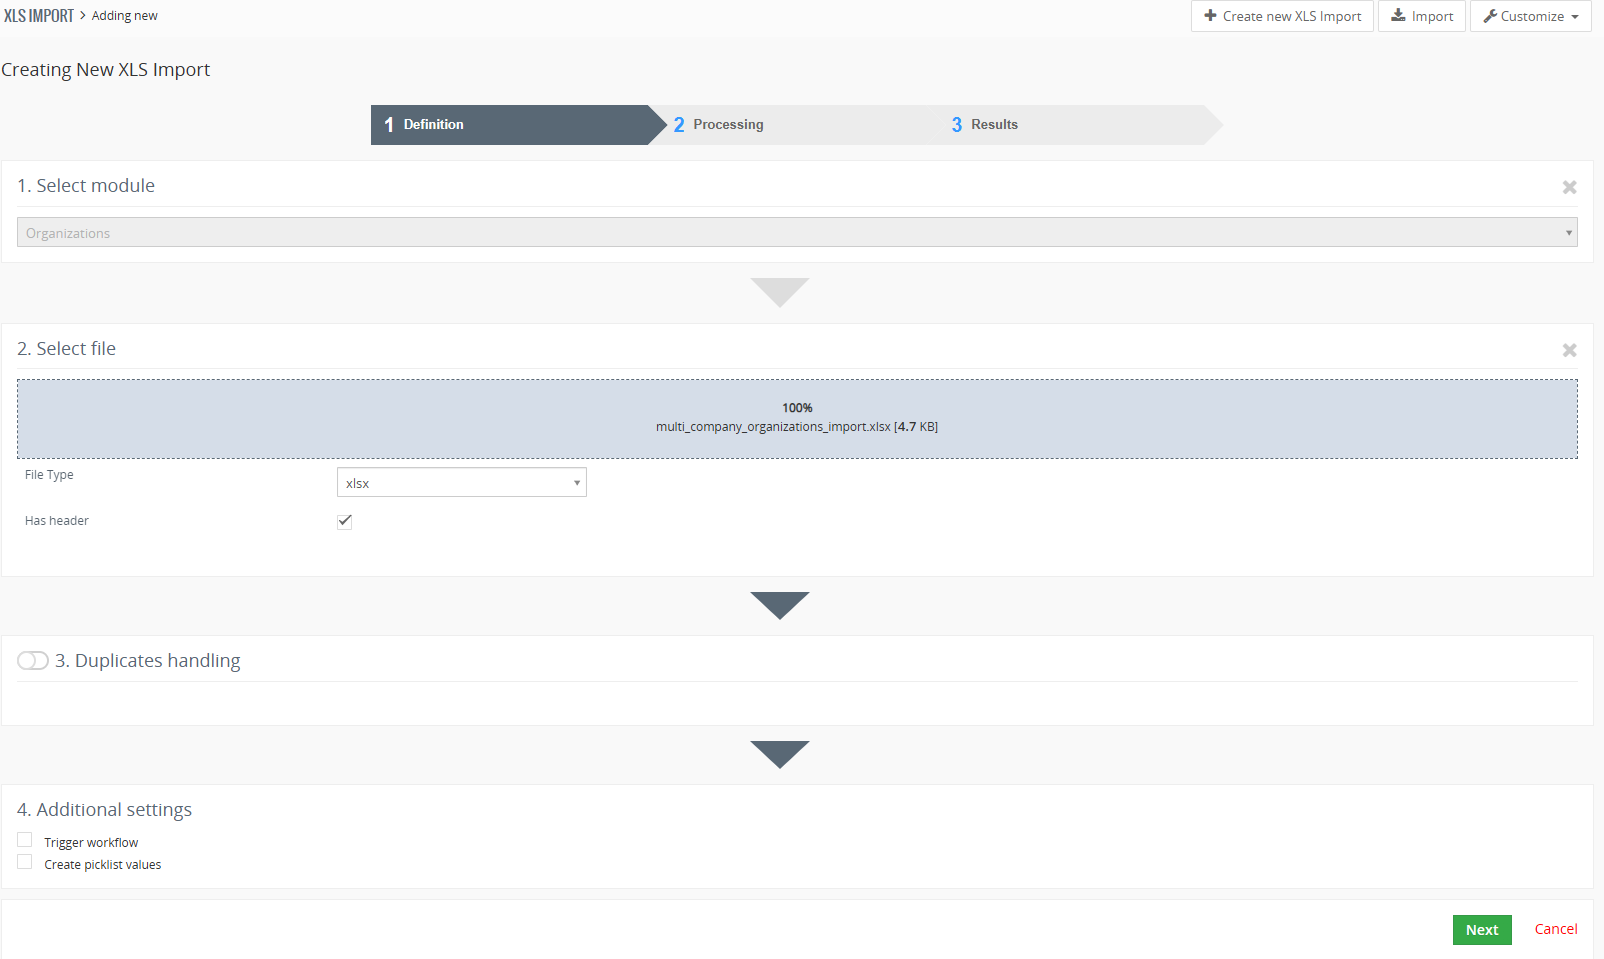
Select the target module and upload the prepared XLS file.
Mapping the XLS fields
During the field mapping step, connect each XLS column with the corresponding Vtiger field.
The column containing the responsible user must be mapped to the Assigned To field.
Required field mapping
The XLS column containing the user name must be mapped to Assigned To. Without this mapping, Multi Company cannot assign the imported record to the required company correctly.
If the user value from the XLS file is not mapped correctly, select the required user manually for the Assigned To field in the mapping settings. The manually selected user will be assigned to the imported records.
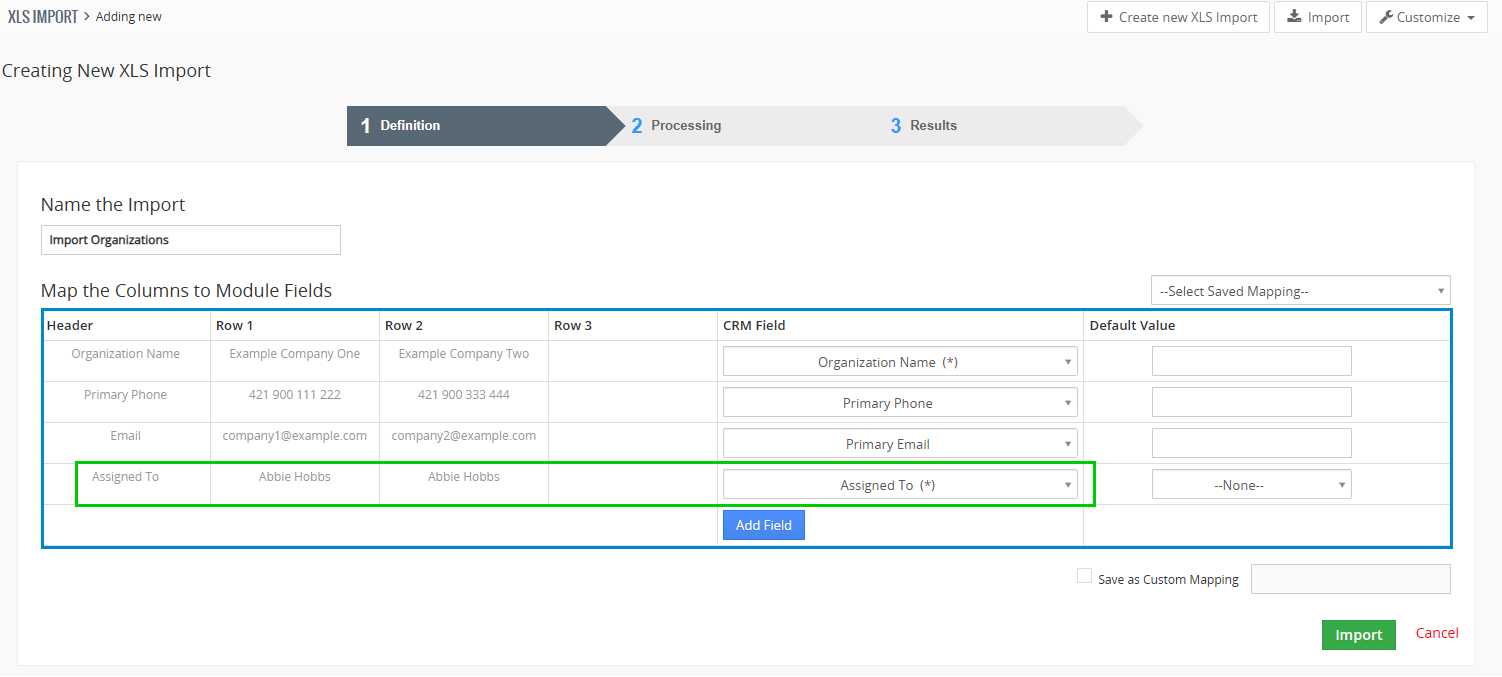
Map the user column from the XLS file to the Assigned To field. If required, select the user manually in the mapping settings.
Completing the XLS import
After all required fields are mapped, continue with the import. The XLS Import extension will create or update the records according to the selected import settings.
Each record will be assigned to the user specified in the XLS file or to the user selected manually in the mapping settings. Multi Company will then determine the appropriate company based on the role of that user.
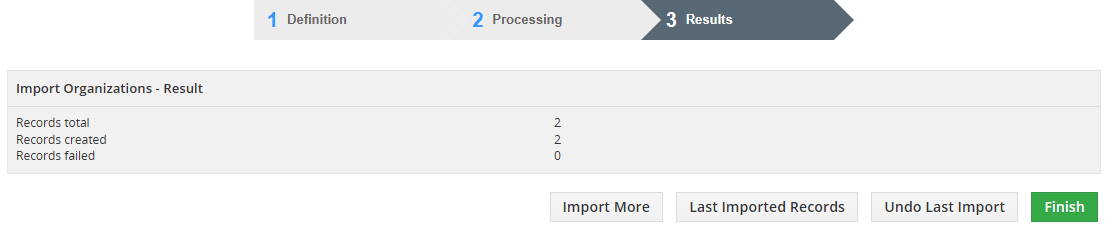
Complete the XLS import and check the import result.
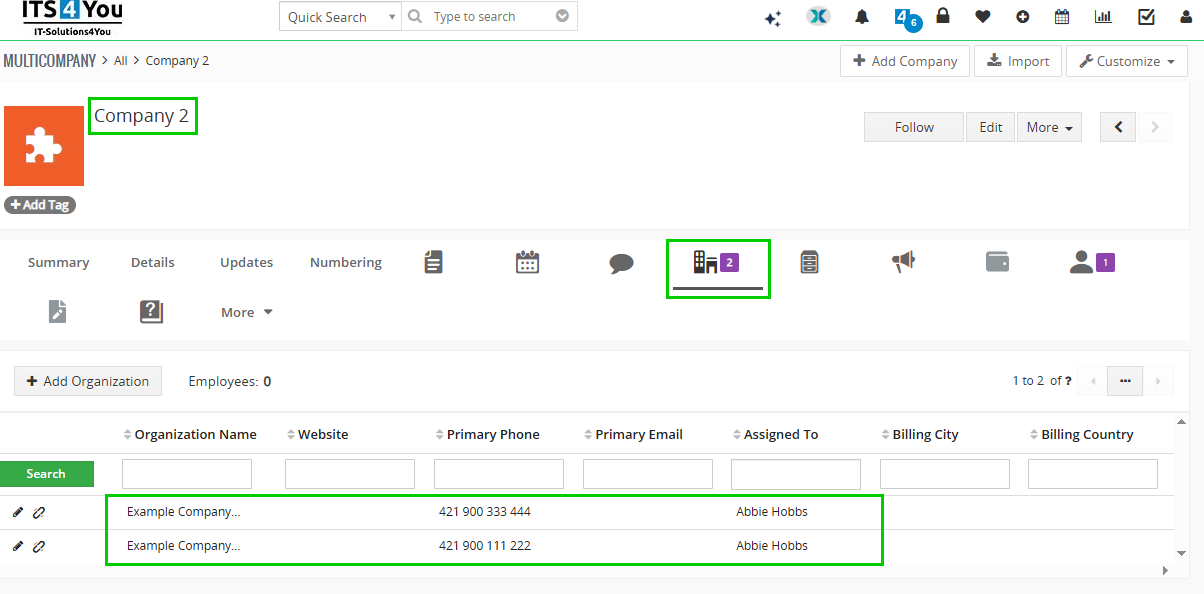
Verify that the imported records are assigned to the correct user.
Importing records using the standard Vtiger CSV Import
If you do not have the XLS Import extension, save your file in CSV format and use the standard Vtiger Import function.
CSV format required
The standard Vtiger Import function does not import XLS files directly. Convert or save the file in CSV format before starting the import.
Starting the Vtiger CSV import
Open the module where you want to import the records. For example, you can import records into Organizations, Contacts, Leads, Products or another supported module.
- Open the required Vtiger module.
- Open the module actions menu.
- Select Import.
- Select the prepared CSV file.
- Configure the available import options.
- Continue to the field mapping step.
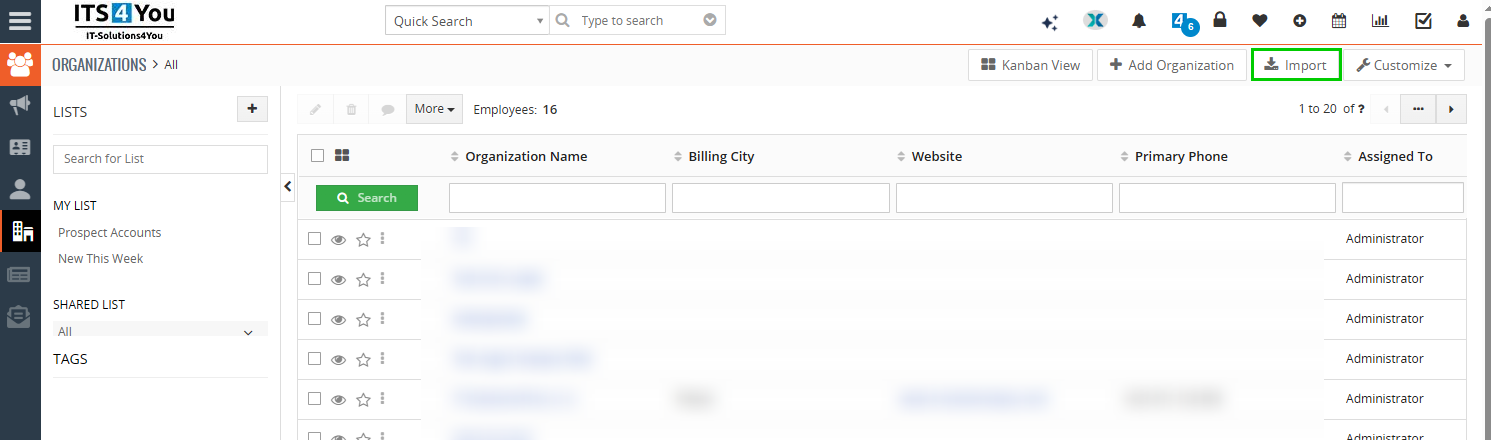
Open the required Vtiger module, select Import and upload the prepared CSV file.
Mapping the CSV fields
During the field mapping step, connect each CSV column with the corresponding Vtiger field.
The column containing the responsible user must be mapped to the Assigned To field.
Required field mapping
The CSV column containing the user name must be mapped to Assigned To. Without this mapping, Multi Company cannot assign the imported record to the required company correctly.
If Vtiger cannot assign the value from the CSV file to the correct user, select the required user manually for the Assigned To field in the import mapping settings. The manually selected user will then be used for the imported records.
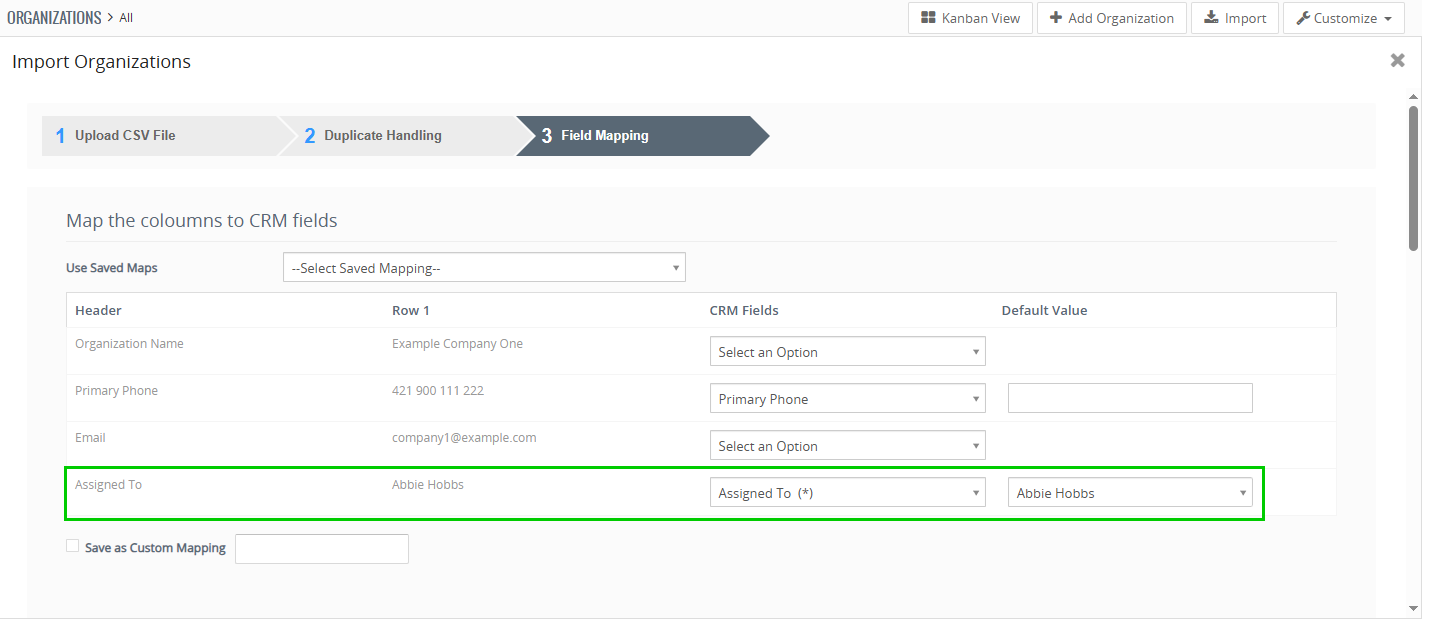
Map the CSV user column to the Assigned To field or select the required user manually.
Completing the CSV import
After all required fields are mapped, continue with the import. Vtiger will create or update the records according to the selected import options.
Each record will be assigned to the user specified in the CSV file or to the user selected manually in the mapping settings. Multi Company will then determine the appropriate company based on the role of that user.
Verifying the imported records
After completing the import, open several imported records and verify the value in the Assigned To field.
We recommend testing access with a user from the corresponding company. The user should see only the records available according to the Multi Company configuration and the selected sharing rules.
- Open an imported record.
- Check the Assigned To value.
- Verify that the selected user belongs to the correct role.
- Verify that the role belongs to the correct company.
- Log in as a user from the company and test record access.
Updating missing Multi Company records
In some cases, records may already exist in Vtiger and may already be assigned to the correct user, but they may not be visible for the expected company in Multi Company.
Multi Company includes an option that checks existing records again and updates missing Multi Company assignments.
Using Update Missing Record
- Open the Multi Company extension.
- Open Integration Settings.
- Click Update Missing Record.
- Wait until the update process is completed.
- Open the affected module and verify that the records are now displayed for the correct company.
When to use this option
Use Update Missing Record when the records already exist and have the correct user in the Assigned To field, but they are not displayed correctly in Multi Company. The function processes the existing records again and recreates any missing Multi Company assignments.
Before using this function, verify that the affected records are assigned to an active user whose role is connected to the correct company.
After the update is completed, refresh the module list and check the records using a user from the relevant company.
Example
Company A has the role Company A Sales. User Peter Novak is assigned to this role.
Company B has the role Company B Sales. User Martin Kral is assigned to this role.
When the value Peter Novak is used in the Assigned To column, the imported record will be available according to the configuration of Company A.
When the value Martin Kral is used in the Assigned To column, the imported record will be available according to the configuration of Company B.
Common import problems
| Problem | Possible cause | Solution |
|---|---|---|
| The record is assigned to the wrong company | The selected user has an incorrect role | Check the role assigned to the user and the Multi Company configuration |
| The Assigned To value is not imported | The Assigned To column was not mapped correctly | Map the user column to the Assigned To field or select the required user manually |
| Vtiger cannot find the user | The user name in the import file does not match an existing Vtiger user | Check the user value or select an existing user manually in the mapping settings |
| The XLS file cannot be imported using the standard Vtiger Import | The standard Vtiger Import requires a CSV file | Use the XLS Import extension or save the file in CSV format |
| Records have the correct user but are missing in Multi Company | The Multi Company assignment was not created or updated correctly | Open Integration Settings and run Update Missing Record |
| Users can see records from another company | Roles, sharing rules or company settings are configured incorrectly | Review the role structure, company assignment and sharing configuration |
Recommendations
- Use the XLS Import extension when working with XLS files.
- Use the standard Vtiger Import only with CSV files.
- Test the import with a small file before importing all records.
- Use only existing and active Vtiger users in the Assigned To column.
- Verify that the Assigned To value was mapped correctly.
- Select the required user manually if the value from the import file cannot be assigned correctly.
- Verify user roles before starting the import.
- Verify company role assignments in the Multi Company settings.
- Check several imported records after the import is completed.
- Use Update Missing Record if existing records have the correct user but are not displayed in Multi Company.
- Create separate import files for individual companies when this simplifies the preparation and verification process.
Summary
During an XLS or CSV import, Multi Company assignment is controlled by the Assigned To field. The imported record belongs to the company associated with the role of the selected user. Use the XLS Import extension for XLS files or the standard Vtiger Import for CSV files. If the user from the import file cannot be mapped correctly, select the required user manually in the mapping settings. If existing records have the correct user but are missing in Multi Company, run Update Missing Record from Integration Settings.
9.Change log
- Check latest versions available and fixes applied
- What was changed/added to manual
9.1.Multi Company
- 8 October 2021: 4.10
- resolved issues causing Scheduler to not run workflows because of Multi Company
- 27 August 2021: 4.9
- installing Multi Company will NOT change Sharing rules automatically like it was in the past
(reason is that some users had own sharing rules and our extension overwrote their settings)
- installing Multi Company will NOT change Sharing rules automatically like it was in the past
- 6 August 2021: 4.8
- Vtiger 7.4 compatibility
- 27 July 2021: 4.7
- uninstalling Multi Company will no longer cause issues in Custom Modules
- 7 July 2021: 4.6
- improved compatibility between XLS Import and Multi Company numbering, numbering will be now correctly recalculated
- 10 March 2021: 4.5
- fixed issue where related modules tabs were not loading properly after updating or installing Multi Company extension on Vtiger CRM system
- 18 February 2021: 4.4
- fixed issue where Documents were not assigned properly to the Multi Company
— 2020 —
- 5 October 2020: 4.3
- fixed issue where records were not re-assigned properly between companies, when Assigned to field was changed
- 18 June 2020: 4.2
- minor bug fixes (sql error)
- 02 March 2020: 4.1
- fixed issues with license validation
- January 2020: 4.0
- new validation system via our FREE extension Installer
— 2019 —
- January 2019 – MultiCompany 700.3.0
- fixed issues with licensing
— 2018 —
- December 2018 – MultiCompany 700.2.0
- bug fixes
- October 2018 – MultiCompany 700.1.2
- fixed issue with java script
- July 2018 – MultiCompany 700.1.1
- bug fixes
— 2017 —
- August 2017 – MultiCompany 700.1.0
- compatibility with vtiger 7.x
9.2.Manual of Multi Company
- January 2020: manual based on MultiCompany version: 4.0
- updated chapters: Installation, Updates, License settings, Uninstall
- new licensing via Installer – additional chapters added
- August 2017: manual based on MultiCompany 700.1.0
- first initiate for vtiger 7.x.x