

1.Introduction

Since December 2019 we launched Installer, which helps you install modules, manage modules and all licenses associated with them.
Installer is tool used to manage all our Extensions and Packages on one screen.
This guide will help you go through Installation and License Activation process.
If you have any additional questions, please contact us at: info@its4you.sk
![]() Note: All our extensions with the version 4.0 and higher are using the Installer for license validation, we suggest to update all our modules to this version or higher (if available).
Note: All our extensions with the version 4.0 and higher are using the Installer for license validation, we suggest to update all our modules to this version or higher (if available).
2.Quick Guide + direct links to chapters
Here is a quick guide for you, how to activate and install extensions with direct links to selected chapters:
- Download & Install our Installer
- Access the Installer
- Log in / License Management (Log in & Activation/Deactivation of licenses)
Enjoy!
3.Installation
Installation is simply and standard via Module manager.
- First register to our e-Shop, after login you will see Installer available under Free Downloads section
- Click on the Installer and download .zip file installation package
- Open Module Manager:
(Log in to your Vtiger CRM – Main Menu – Settings – CRM Settings – Module Management – Modules) - Import and install .zip file
- That’s all
![]() Note: When you choose our Hosting Services, Installer will be automatically installed into your CRM hosting domain.
Note: When you choose our Hosting Services, Installer will be automatically installed into your CRM hosting domain.
4.Accessibility
After successful installation of Installer you can start with validation.
You can access Installer by two ways:
- Via Main Menu – Settings – CRM Settings – Extensions – ITS4YouInstaller.
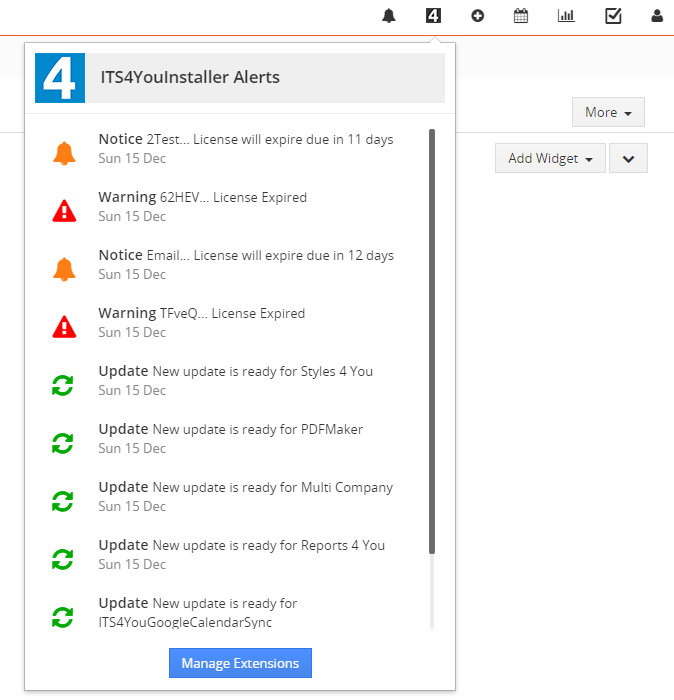
- Or by a click on Notifications Icon
 and then on the button
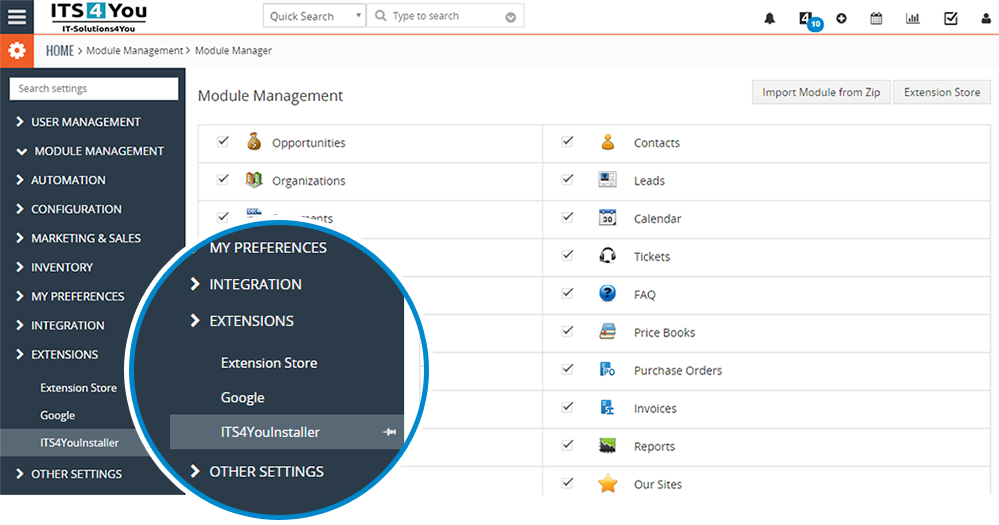
5.Log in
![]() Note: To see modules and manage purchased licenses, you have to log in to our E-shop with @email and password via
Note: To see modules and manage purchased licenses, you have to log in to our E-shop with @email and password via ![]() button (top right screen side in Installer module).
button (top right screen side in Installer module).
![]() New users: In order to install Free Extensions via Installer and fully use the Installer features, you will be needed to log in too, as a new user. (This apply mainly for new users without any license purchased).
New users: In order to install Free Extensions via Installer and fully use the Installer features, you will be needed to log in too, as a new user. (This apply mainly for new users without any license purchased).

You can also log-in via license key when you lick on the “Access Key” tab.
Then you are able to proceed with the entering license key and Installing our extensions. See next chapters.
5.1.Activation of license
After you successfully logged-in to the Installer, you can start activating the licenses for the modules you purchased:
- Click on the
 button and enter your license key you received in the email.
 - The next screen will appear, please (1.) enter your license key and confirm via (2.) “Validate” button.
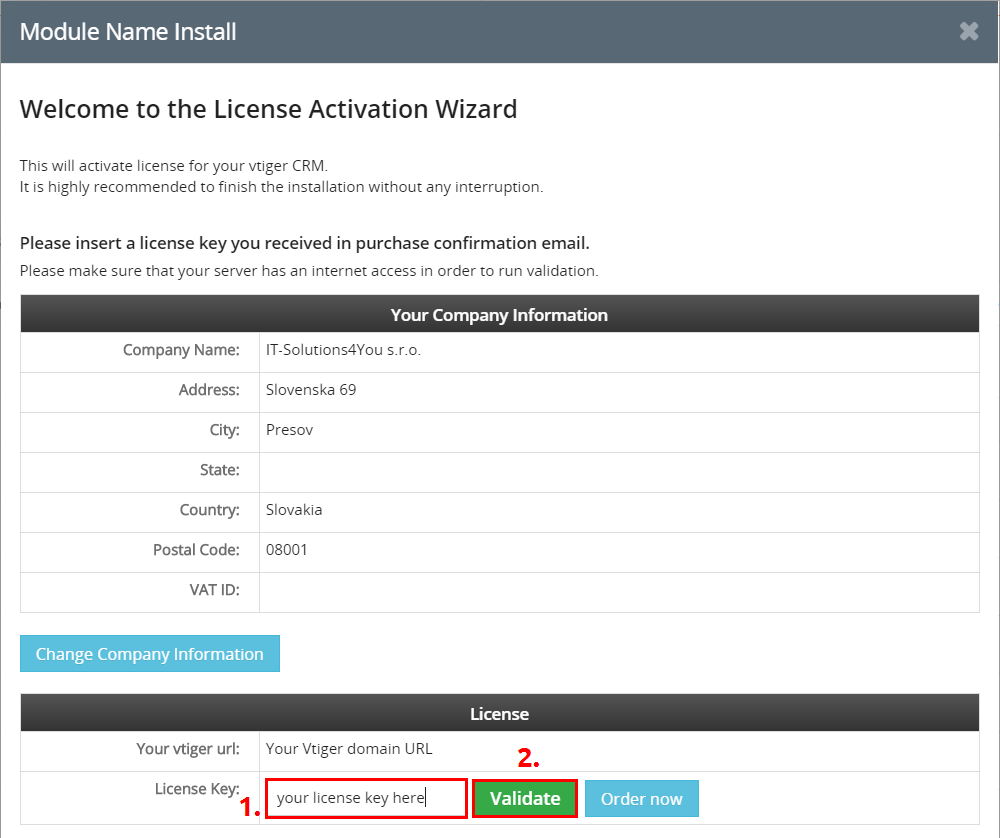
Installer – License validation window - Now the license is activated and you should see message like:

Installer – License activation success
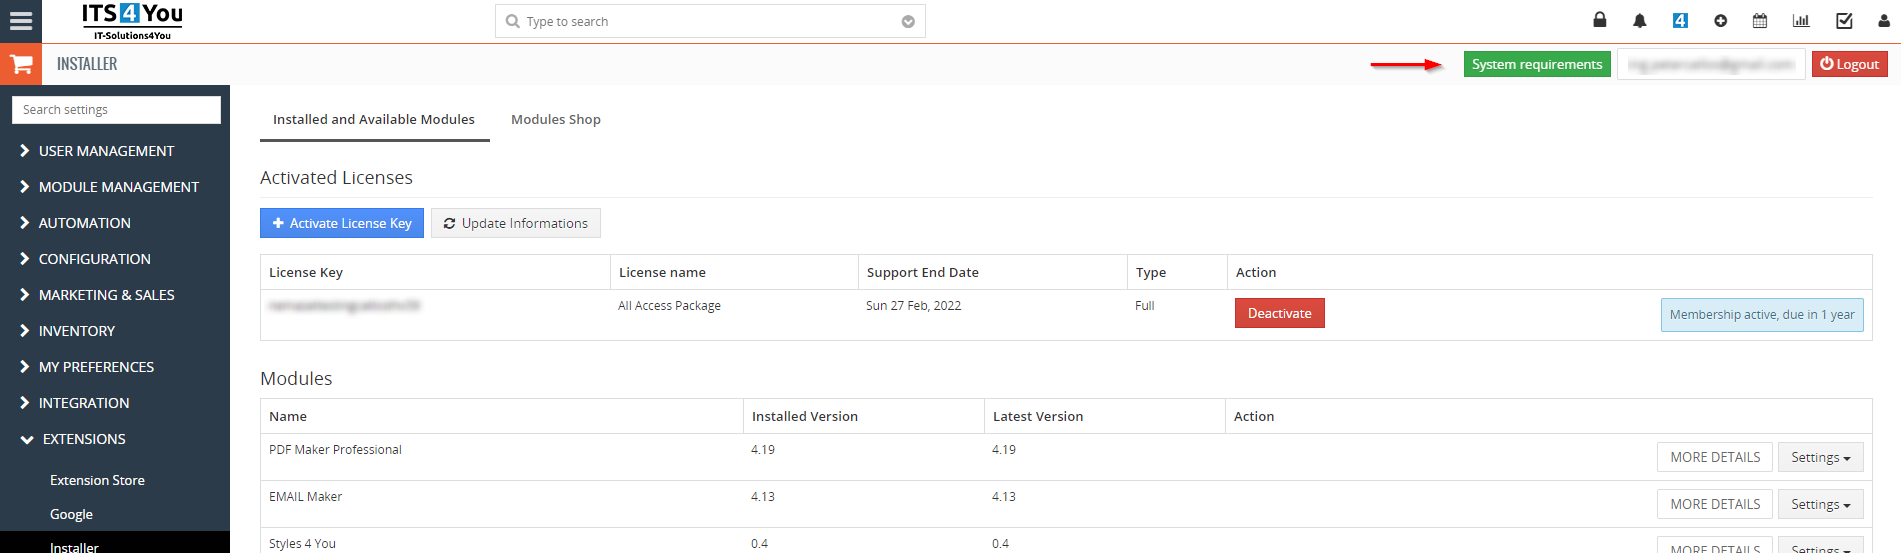
Activated extension or package will be visible under the Activated Licenses tab, see below:
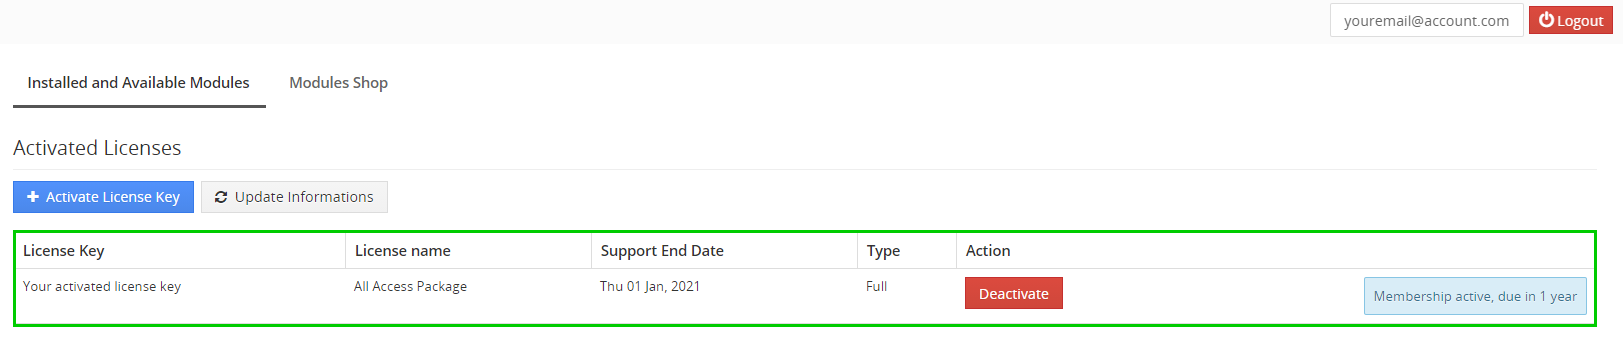
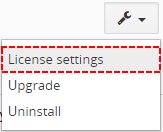
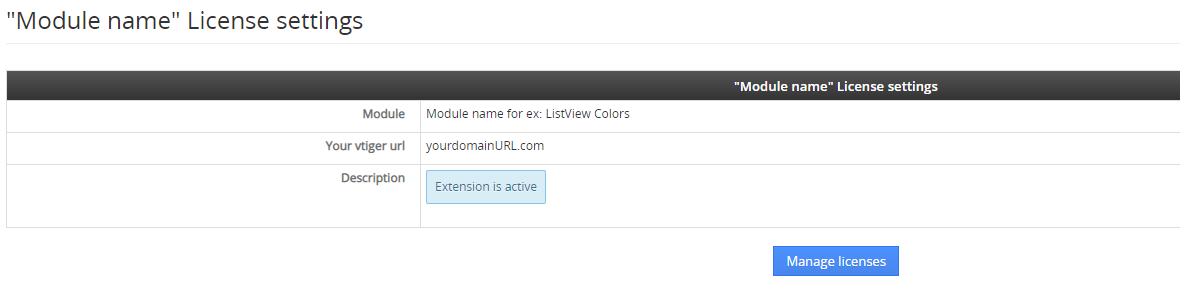
License settings for each module separately
You can also access the License settings (via list view “Customize” button in the module) like its shown below:
(there can be more options from the pick-list, depends on the module)
After accessing the License window you can see screen bellow with following information:
- Module name, Your Vtiger domain URL
- Description, if license is activate or not:
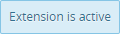 – your license is currently active,
 – your license is not active and you need active it via Installer.
To activate or manage license, click on the ![]() button.
button.
5.2.Deactivation of license
If you want to deactivate your license, please provide following steps:
- Go to your Installer, by a click on Notifications Icon
 and then on the button ,
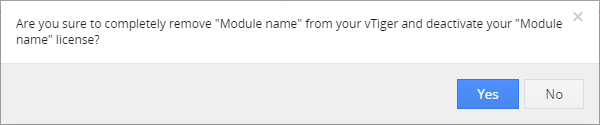
or via Main Menu – Settings – CRM Settings – Extensions – ITS4YouInstaller - The following screen will appear (see below):

Installer – deactivation of license You can deactivate license by click on the button

![]() Note: The module will be deactivated but not uninstalled and license will be removed from the Activated Licenses tab.
Note: The module will be deactivated but not uninstalled and license will be removed from the Activated Licenses tab.
5.3.Reactivation of license
To reactivate a license after deactivation, you need to follow the same process as you activated it first time:
- Click on the button and enter your license key.

- Confirm with
 button.
When the license was activated you can see module available in the Modules tab below.
6.Module Management
When you successfully activated the license key for the extension or the package, you can now proceed with the Installation.
You can see all available modules in the Modules tab.
In the Modules tab, you can manage them by following actions:
- See your current installed & latest versions.
- Via button
 you can Install the modules you purchased or free available modules.
 - If your module is outdated,
 button will appear under Actions and you can update your module to the latest version.
  button will allow you perform additional actions like: Upgrade, Uninstall, License Settings & more.
 will redirect you to the our extension page, where you can check more details about it or how to use it.

6.1.Installation
To install the module you need to perform few steps:
- Select the module from the table and via button install the module.
- Following window will appear, please confirm via
 button that you want to install the module.
- An installation Log window will appear and you should see the message: “Successful Installation”.
- Finish via
 button.
The xtension was Installed and you should NOT see the ![]() button in the Modules tab anymore. See an example:
button in the Modules tab anymore. See an example:

Installer – Extension installation
6.2.Update/Upgrade
You have also option to Upgrade the extension, the ![]() button will appear in Installer Modules tab every time the new version is available.
button will appear in Installer Modules tab every time the new version is available.
- open the Installer in the CRM
- in the Modules tab find your installed module and you should see the button available
- If the new version is available, you will be notified via Installer Notifications icon
(scanning for new version is done be Cron every 24 hours)
6.3.How to Uninstall the extension
You have also option to remove the module via Installer window by accessing the Settings – Uninstall window:
- Go to your Installer, by a click on Notifications Icon and then on the button ,
or via Main Menu – Settings – CRM Settings – Extensions – ITS4YouInstaller - Find the module you need to uninstall in the Modules tab
- Via pick list button choose the Uninstall option, you will be redirected to the Uninstall window.
- Click on
 button

- Confirm uninstall with
 button
Now, the module has been removed from your Vtiger. To use this module again, you need to provide installation steps (see Installation chapter).
7.Additional Features & Actions
The Installer has some additional features and actions you can perform see the chapters below for more information.
7.1.Free Extensions
You are able to download our Free Extensions with the Installer.
The only condition is that you need to be logged in in to your account.
You can find the extensions in the Modules tab.
Then simply via button ![]() install the extension you want/need.
install the extension you want/need.
7.2.License Renew
When your license key expired, you are able to perform Renew.
In the Activated Licenses tab you can see the license key and via button ![]() buy renew for this license key.
buy renew for this license key.
(After clicking on the button you will be redirected to the our e-shop).
7.3.Notifications
Notifications in Installer are shown via an icon ![]()
 – you are able to see available upgrade for extensions.
 – receiving notifications that your license will expire in a few days.
 – warnings, that your license already expired and renew is required.
- You can access the Installer by clicking on button.
7.4.Modules/Packages Shop
The Modules Shop tab can be used if you want to purchase our Modules or Bundle Packages.
- In the tab you see all modules which are available for you and you don’t own them yet.
- Modules which you already own aren’t shown in the Modules Shop tab.
- If you want buy module just lick on button “Buy € xx” and you will be redirected to our e-shop page to finish payment.
 Note: You must log in via Installer to our e-shop using @email and password you register with so you can see which extensions you are missing.

7.5.System requirements for our Extensions
We have added this feature in Installer version 0.24 since 20 January 2021.
- Before Installation of our Extensions, Installer will automatically check these parameters.
- If some of the parameters are not sufficient, the Installer may not allow to install our extensions until you change them to correct values.
For example: mbstring (Required for PDFMaker) – is mandatory to have, for our PDF Maker.
You can check the requirements by click on the button ![]() on the the Installer main screen:
on the the Installer main screen:
Following window will be open where you can see your Current values, Minimum requirements and Recommended value.
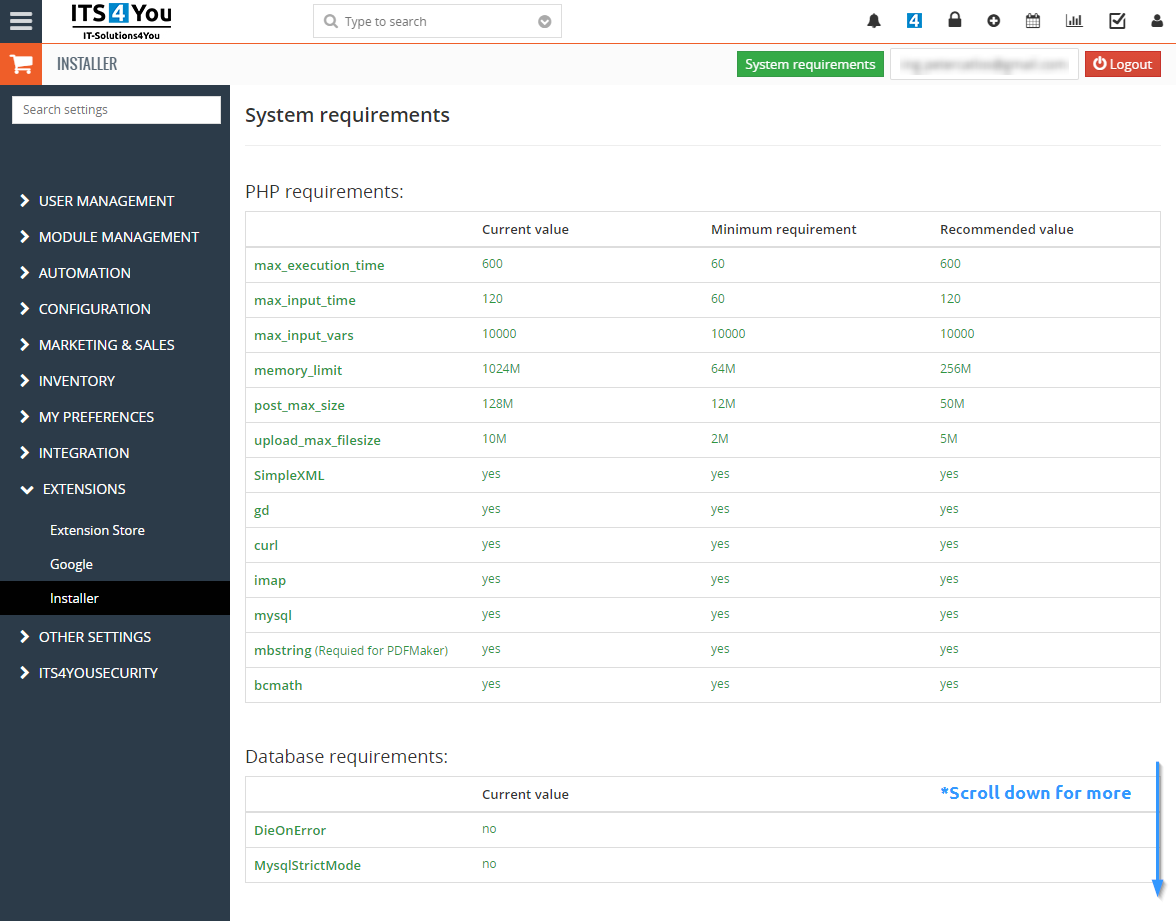
![]() Note: We always recommend to set values based on Recommended values to ensure your system will run smoothly.
Note: We always recommend to set values based on Recommended values to ensure your system will run smoothly.