

1.Introduction
The Warehouses extension, is the perfect tool to manage multi warehouses in Vtiger CRM system. This tool allows you to create some kind of “Warehouses management”.
Warehouse management is the process, control, and optimization of warehouse operations from the entry of inventory into a warehouse — or multiple warehouses — until items are moved, sold, or consumed.
Do you want to be able create a Delivery Notes, Issue Cards or Receipt Cards and even more in Vtiger but you still struggle how?
Down below you fill find a full guide for our extension.
Main features of Warehouses extension:

*This is a very detailed manual for our extension from installation to usage. Some steps may be familiar to the experienced users or users which we’re using our extension for Vtiger 6.x.
All images in this manual can be enlarged by clicking on the image.
2.How to install Warehouses
There are currently two options how to install extension:
- (Recommended) Using our Free extension Installer
(Please visit the Installer page for more info) - Manually installation using a .zip file
(You still need to have Installer in order to activate license)
![]() Note: For versions 4.0 and higher, you will be needing to have installed our Installer in order to activate license keys.
Note: For versions 4.0 and higher, you will be needing to have installed our Installer in order to activate license keys.
Since December 2019 we launched our extended version of Installer which helps you install / update modules and manage license keys.
Warehouses include following sub-modules:
- Warehouse transfers
- Receipt cards
- Issue cards
- Incoming products
- Outgoing products
- WH Delivery notes
These modules will be installed automatically with Warehouses extension.
⚠️ Uninstalling Warehouses main module will uninstall all sub-modules!
⚠️ If you uninstalled sub-module separately and you need to install it again, go to Installer and click on ![]() button.
button.
2.1.Installation via Installer
Make sure you have Installer installed, you can download Installer via our E-shop when you log in under Free Downloads section.
Next, simply install Installer via Module Management in Vtiger CRM by importing the .zip file you downloaded.
After successful installation, you can access Installer in two ways:
- by a click on Notifications Icon
 and then on the button
- or via Main Menu – Settings – CRM Settings – Extensions – ITS4YouInstaller
![]() Note:
Note:
- To see modules and manage licenses you have to log in to our Installer with @email and password via
 button (top right screen side in Installer module).
 - Login is same for Installer and for our E-Shop.
After log in, you can activate Extensions or our Packages licenses associated to your account via ![]() button.
button.
When the license was activated you can see module available in the Modules tab below.
Simply hit the ![]() button and Extension is installed now.
button and Extension is installed now.
![]() You can only Activate these licenses, which are assigned to your Email Account you made purchase with and with which you are logged to the Installer.
You can only Activate these licenses, which are assigned to your Email Account you made purchase with and with which you are logged to the Installer.
2.2.Manual installation
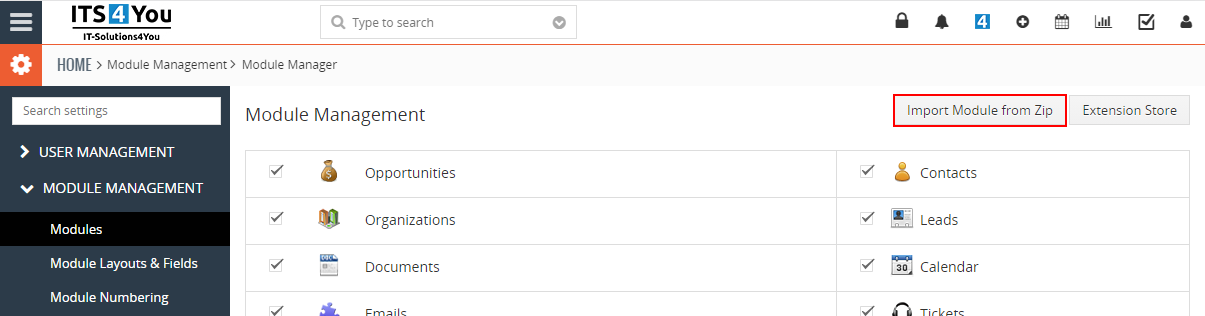
There is also a way to install / update the extension manually in some scenarios:
- Manual installation or update of the extension can be requested if you contact our support because you are facing some issues with extension.
- Standard way of installation and update is using our Installer. In some rare cases we can send you .zip file to update the extension manually.
Installation can be done via Module Manager by clicking on the button ![]() and selecting the .zip file.
and selecting the .zip file.
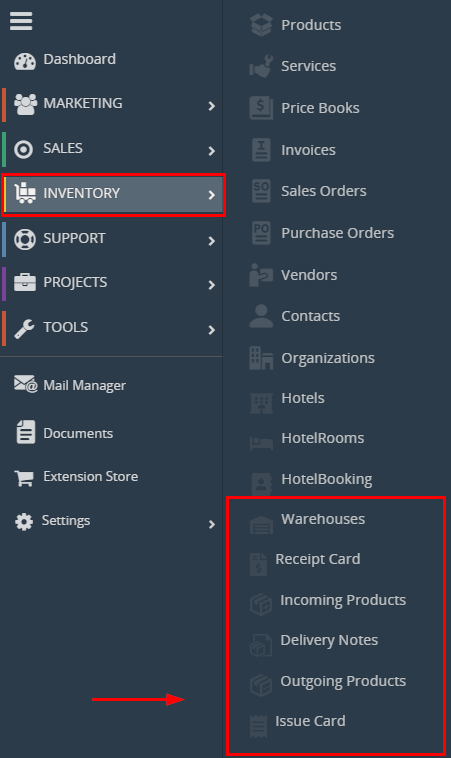
3.Modules included in Warehouses
After installation of Warehouses your Vtiger will contain these modules:
- Warehouses – add Warehouses into your Vtiger
- Warehouse Transfer – transfer Product between Warehouses
- Receipt Card – serves to add Products to your Warehouse
- Issue Card – serves to issue Product from Warehouse
- Incoming Products – evidence of incoming Products
- Outgoing Products – evidence of outgoing Products
- WH Delivery Notes – allows you to create Delivery Notes
Now, you can read a short description of these modules. Usage will be described in process of usage.
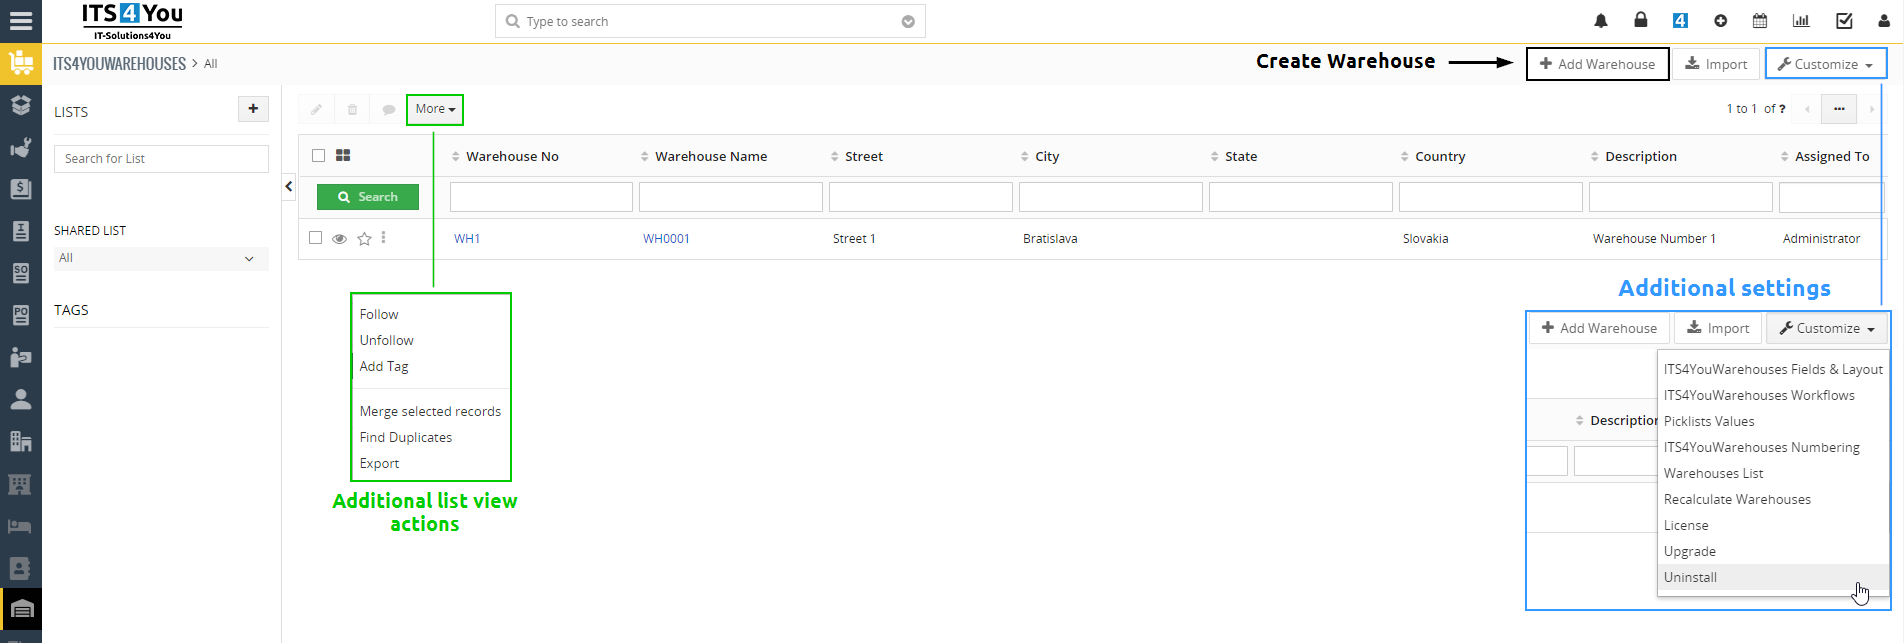
3.1.Warehouses
This is a main module, here you can create and manage your Warehouses.
In the image below you can see a list view of the module. Via ![]() button you can create/add new Warehouses.
button you can create/add new Warehouses.
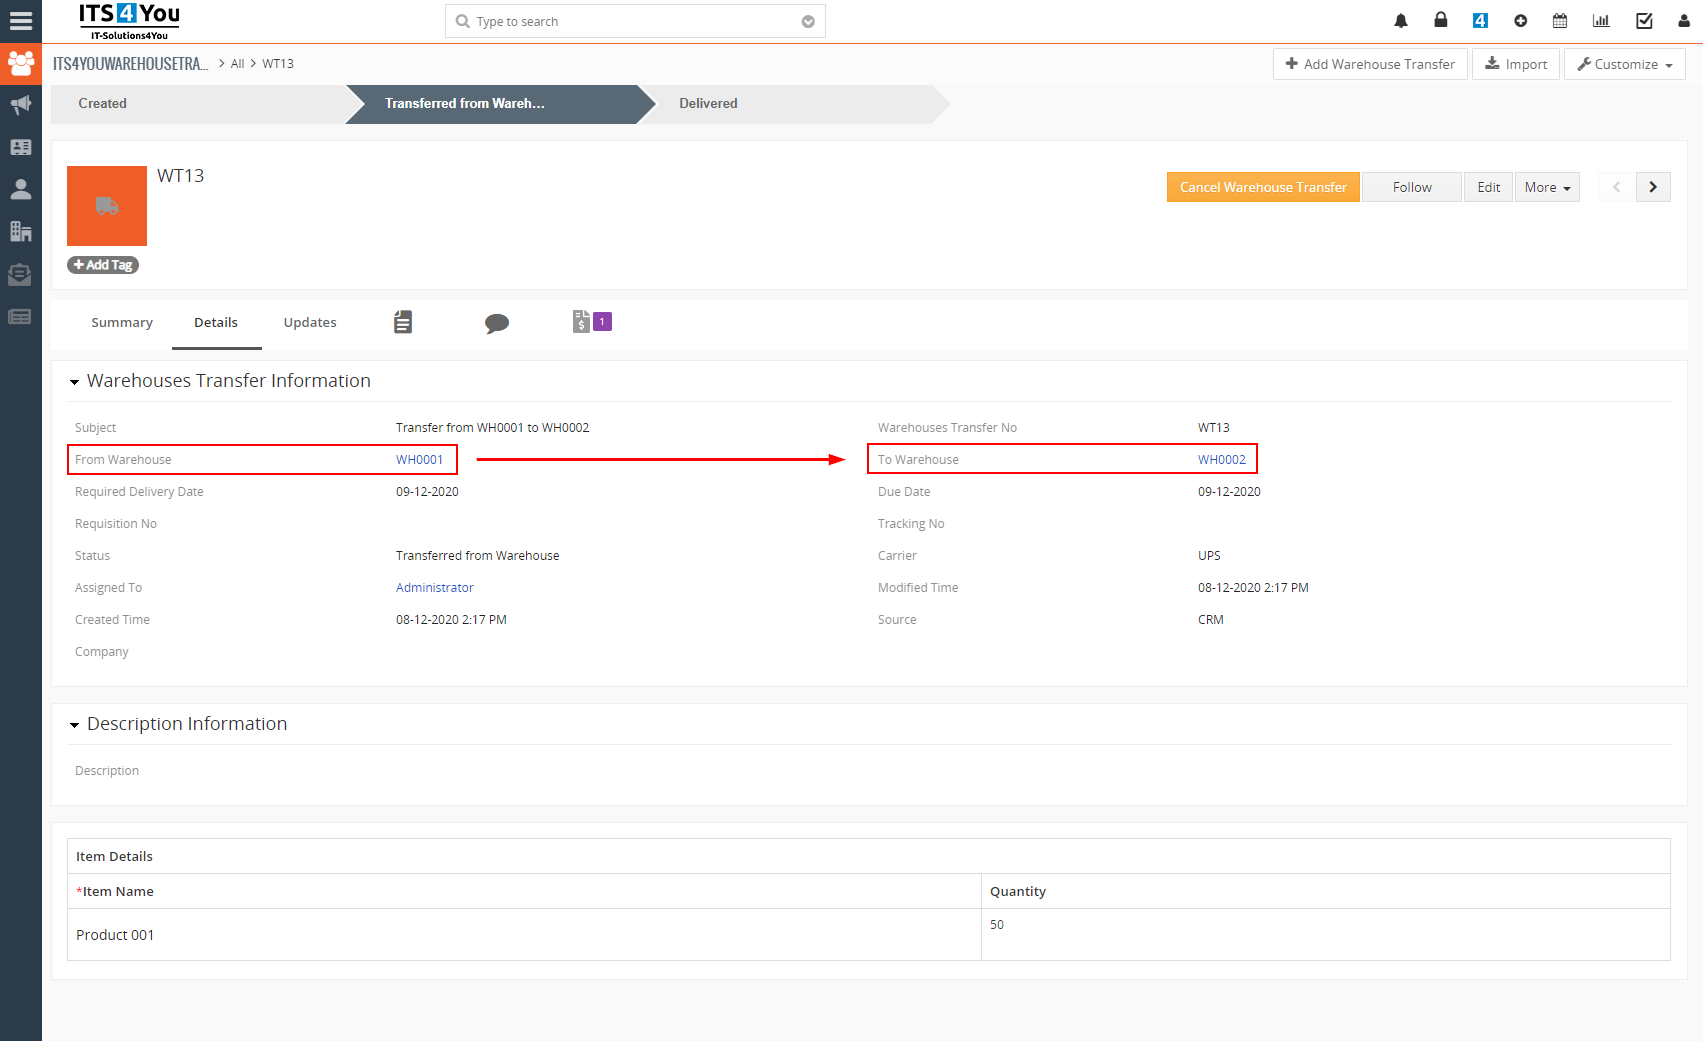
3.2.Warehouse Transfer
Warehouse Transfer is used for transferring Products from one warehouse to other warehouse.
The quantity of products included in the Warehouse Transfer will be transferred from the warehouse to the warehouse, according to the selection of warehouses.
Example:
- In warehouse WH0001 we have 100 products quantity in stock, we want to transfer 50 products quantity to warehouse WH0002 stock.
- We create Warehouse Transfer for 50 products from WH0001 to WH0002.
- When warehouse transfer is created, 50 products are deducted from WH0001 automatically (because they are transferring and they left the warehouse already).
- After confirmation, that the products have been delivered to the warehouse WH0002 from the warehouse WH0001, the total quantity of products in stock for warehouse WH0002 is updated.
![]() Note: Important are dates: Required Delivery Date and Due Date.
Note: Important are dates: Required Delivery Date and Due Date.
There is also option to cancel warehouse transfer via button ![]() in the detail view.
in the detail view.
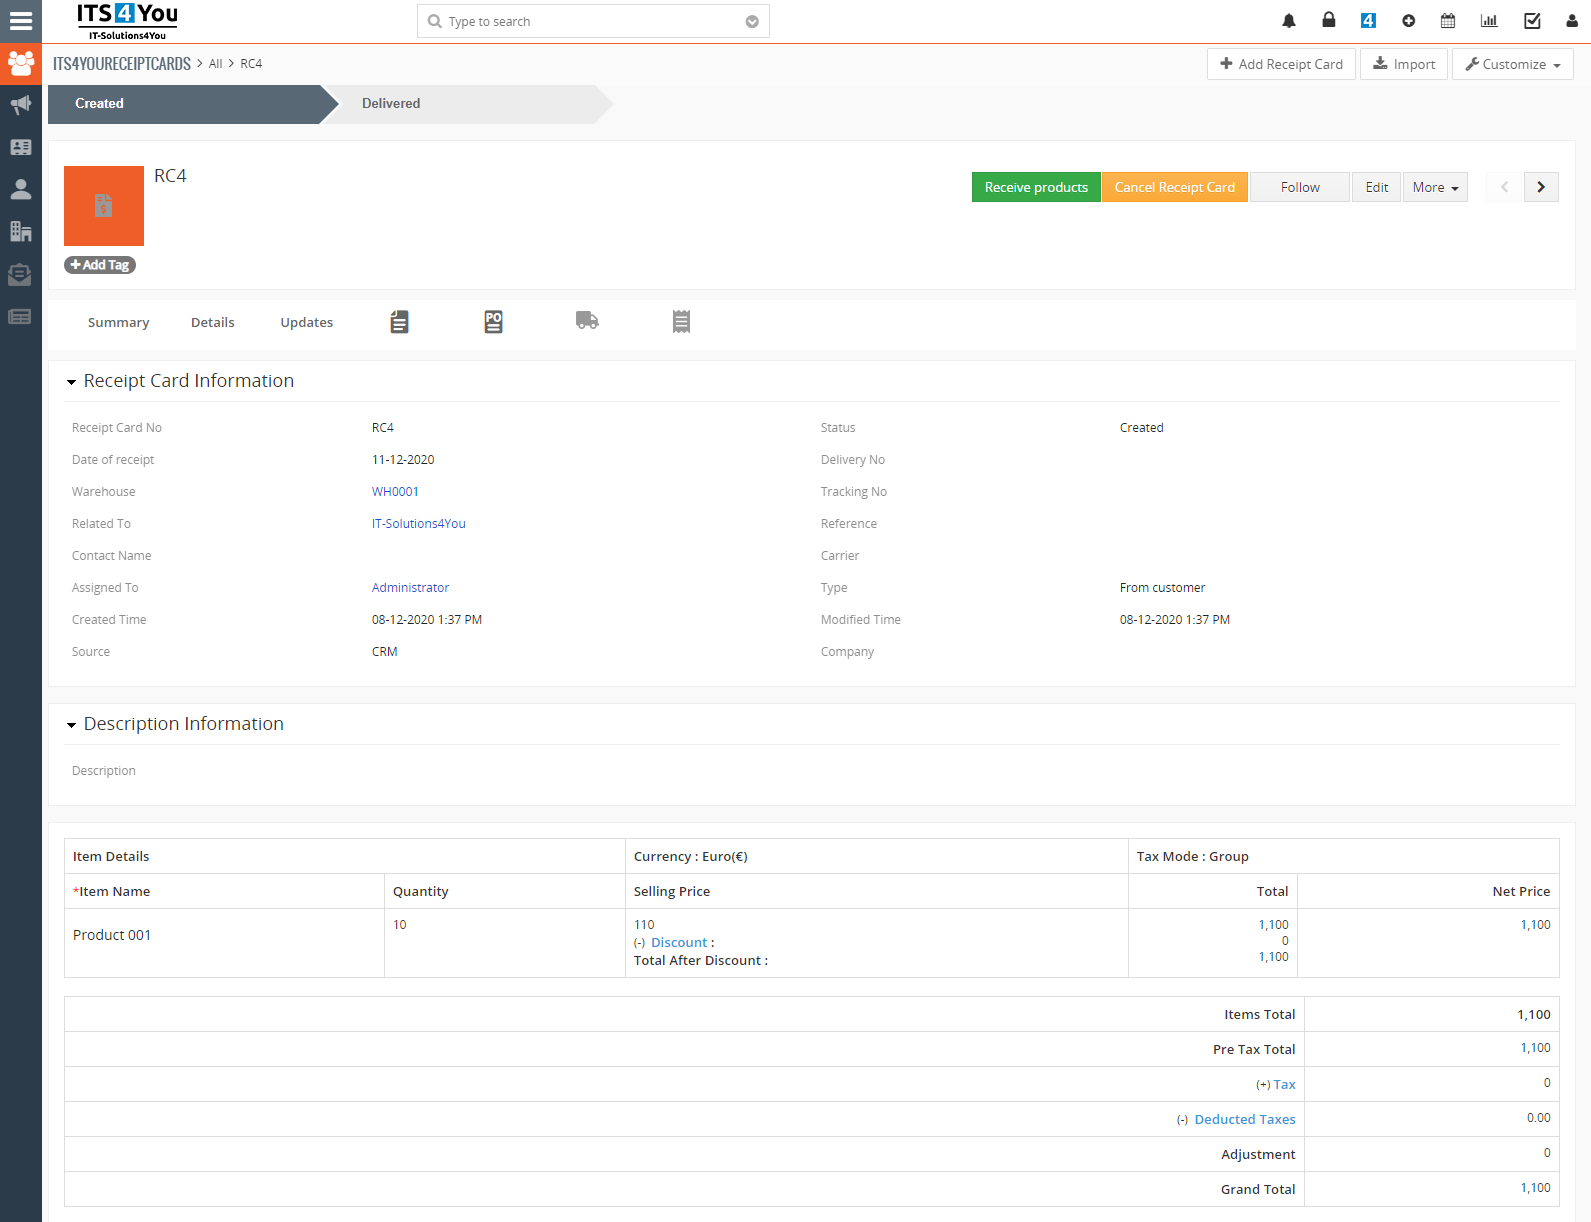
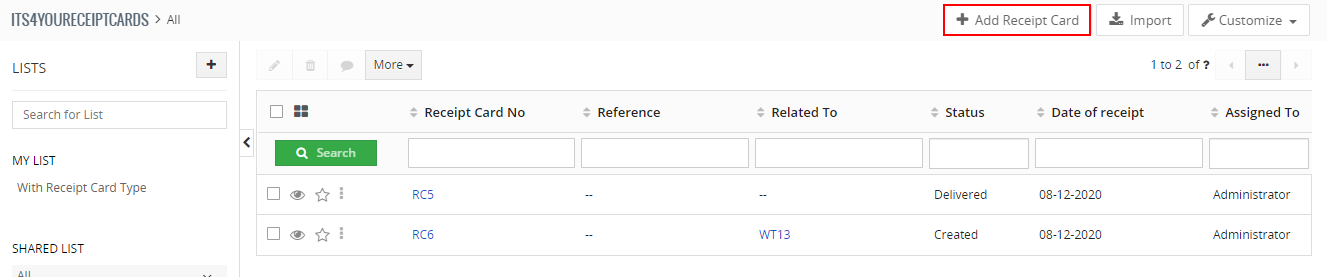
3.3.Receipt cards
The Receipt Card module is used for adding Products to your Warehouse.
You can see here Warehouse transfers (*creating Warehouse Transfer will create also Receipt Card).
Also, you can see receipt products from your Purchase Order(s).
Actions for this module in detail view are:
 – instantly receive products into the warehouse
 – cancel receipt card = products will be not received into the warehouse
- Other default actions are: Edit, Duplicate, Delete & Follow
3.4.Issue cards
Issue Card serves to issue products from warehouse.
The reason may be Promo action or similar, also you can create Delivery Note based on Issue Card.
Actions in detail view are:
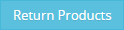 – return products back to Warehouse by creating Receipt Card.
 – cancel Issue Card, status will be changed to Canceled.
 – create Delivery Note via
  button.
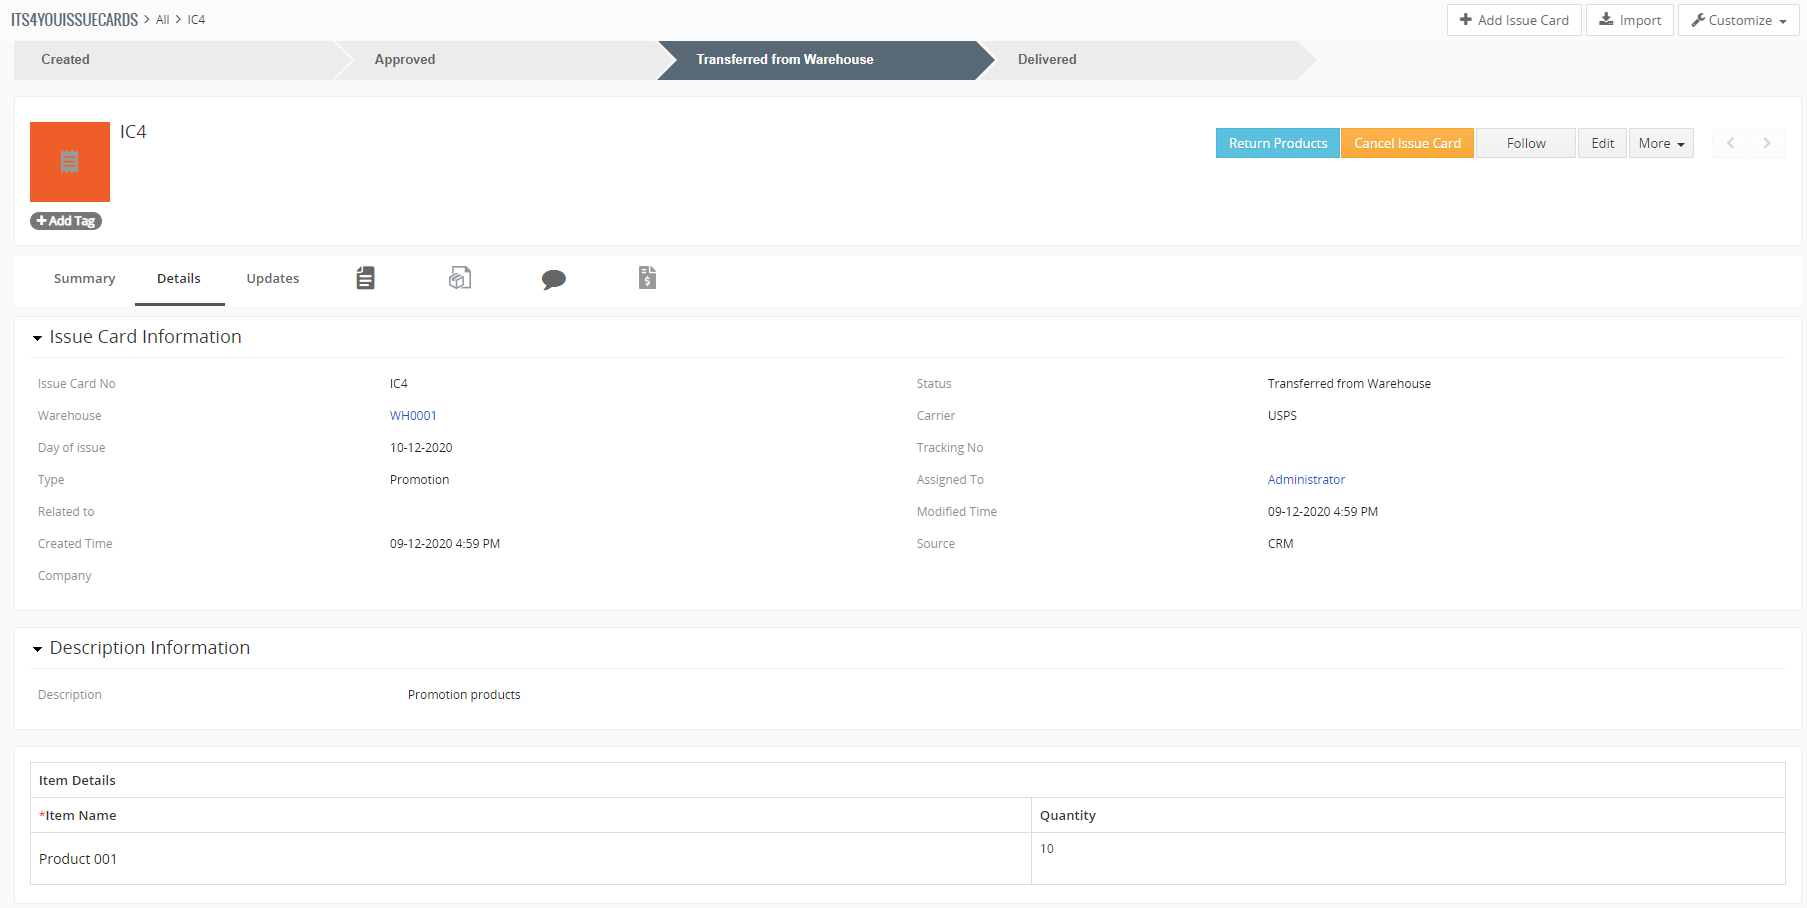
3.5.Incoming products
Incoming Products serve as evidence of Products, which are ordered but not receipted yet.
For example, when you create Purchase Orders, products will be presented here.
You can also perform Mass Receipt action via ![]() button, when the records are selected.
button, when the records are selected.
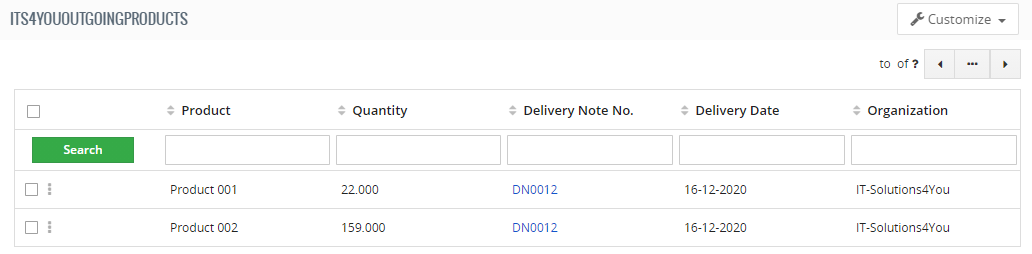
3.6.Outgoing products
Here you can see Products that are Ready to Deliver.
These Products are in you Warehouses and you are able to deliver these Products.
Products from this Delivery Note you can see in Outgoing Products module too.

3.7.WH Delivery notes
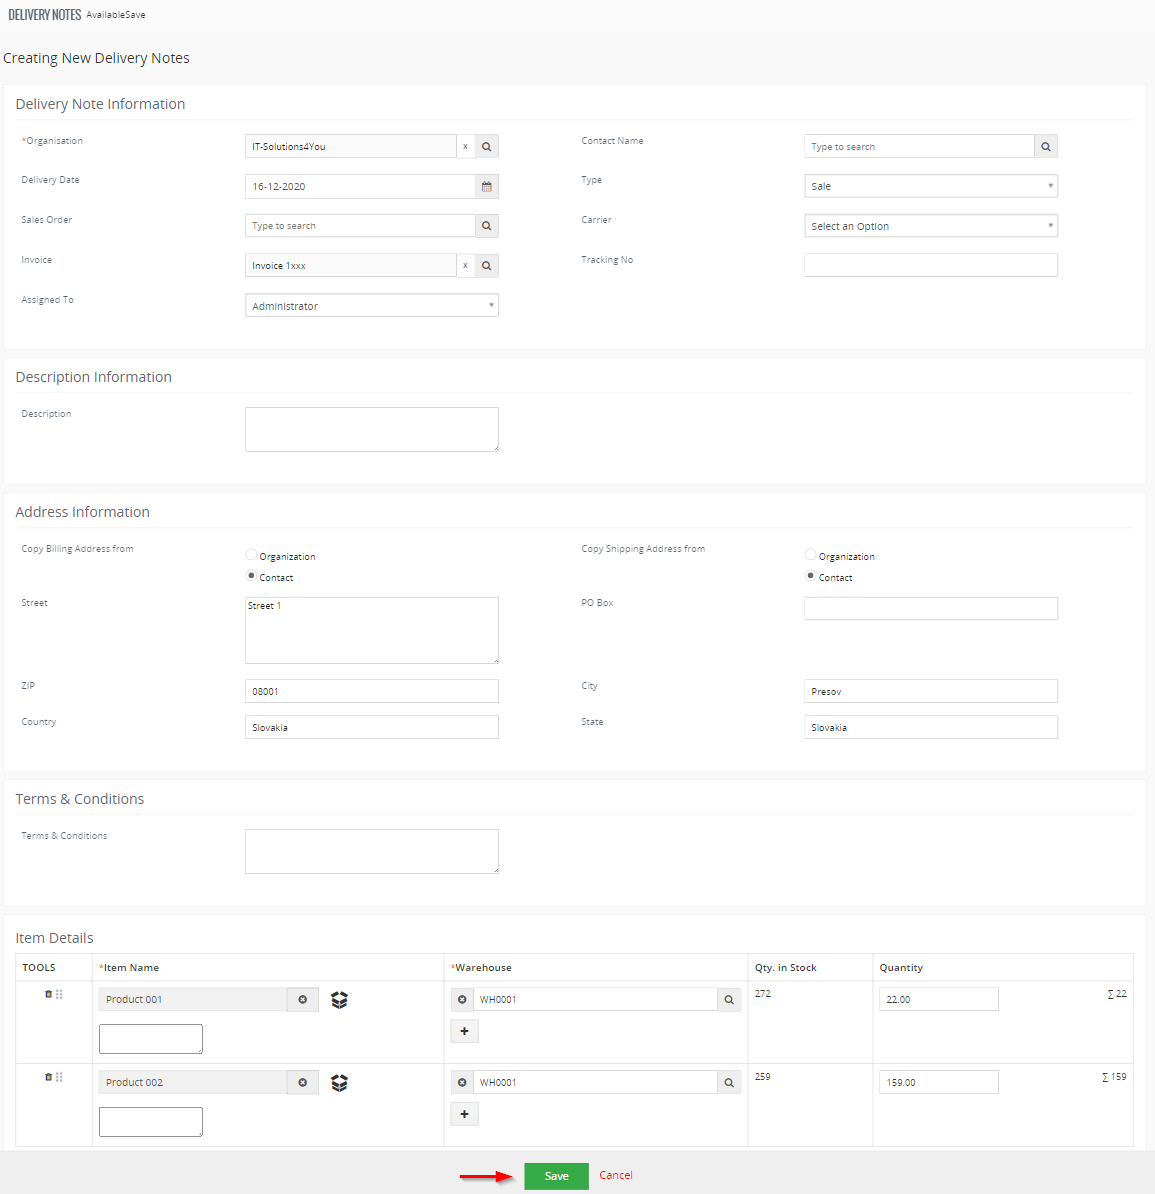
Warehouse Delivery Notes module allows you create Delivery Notes and manage them.
In list view, you can see which Delivery Notes have status:
- Ready to Deliver
- Delivered
- Invoiced
Also, you can perform additional actions when selecting records by click on ![]() button or access settings and features via
button or access settings and features via ![]() button in the list view.
button in the list view.

More about Delivery Notes module you can read here: https://it-solutions4you.com/vtiger-extensions/delivery-notes/
4.How to start using Warehouses
In the following chapters, we will show you how to use Warehouses extension step by step.
4.1.Create Warehouse
The first step to start using Warehouses is create warehouse(s).
Warehouses extension allows you to have one or more warehouses.
Follow the steps below to create a warehouse:
- Select Warehouses from the menu:
 ——>
——> 
- Here you can see your Warehouse(s). To add new please click on

How to create Warehouse - Now, fill information about your warehouse.
(If you check Negative Quantity – quantity of Products in your Warehouse can have negative count, if you don’t check Negative Quantity – then the quantity of Products can’t have negative count)
How to create Warehouse Proceed via
 to create warehouse.
4.2.Adding products to the Warehouse
Now, you need to add your Product(s) into Warehouse.
We would recommend to provide next steps:
- Prepare count of your Product(s).
- In menu go to and then

- Click on
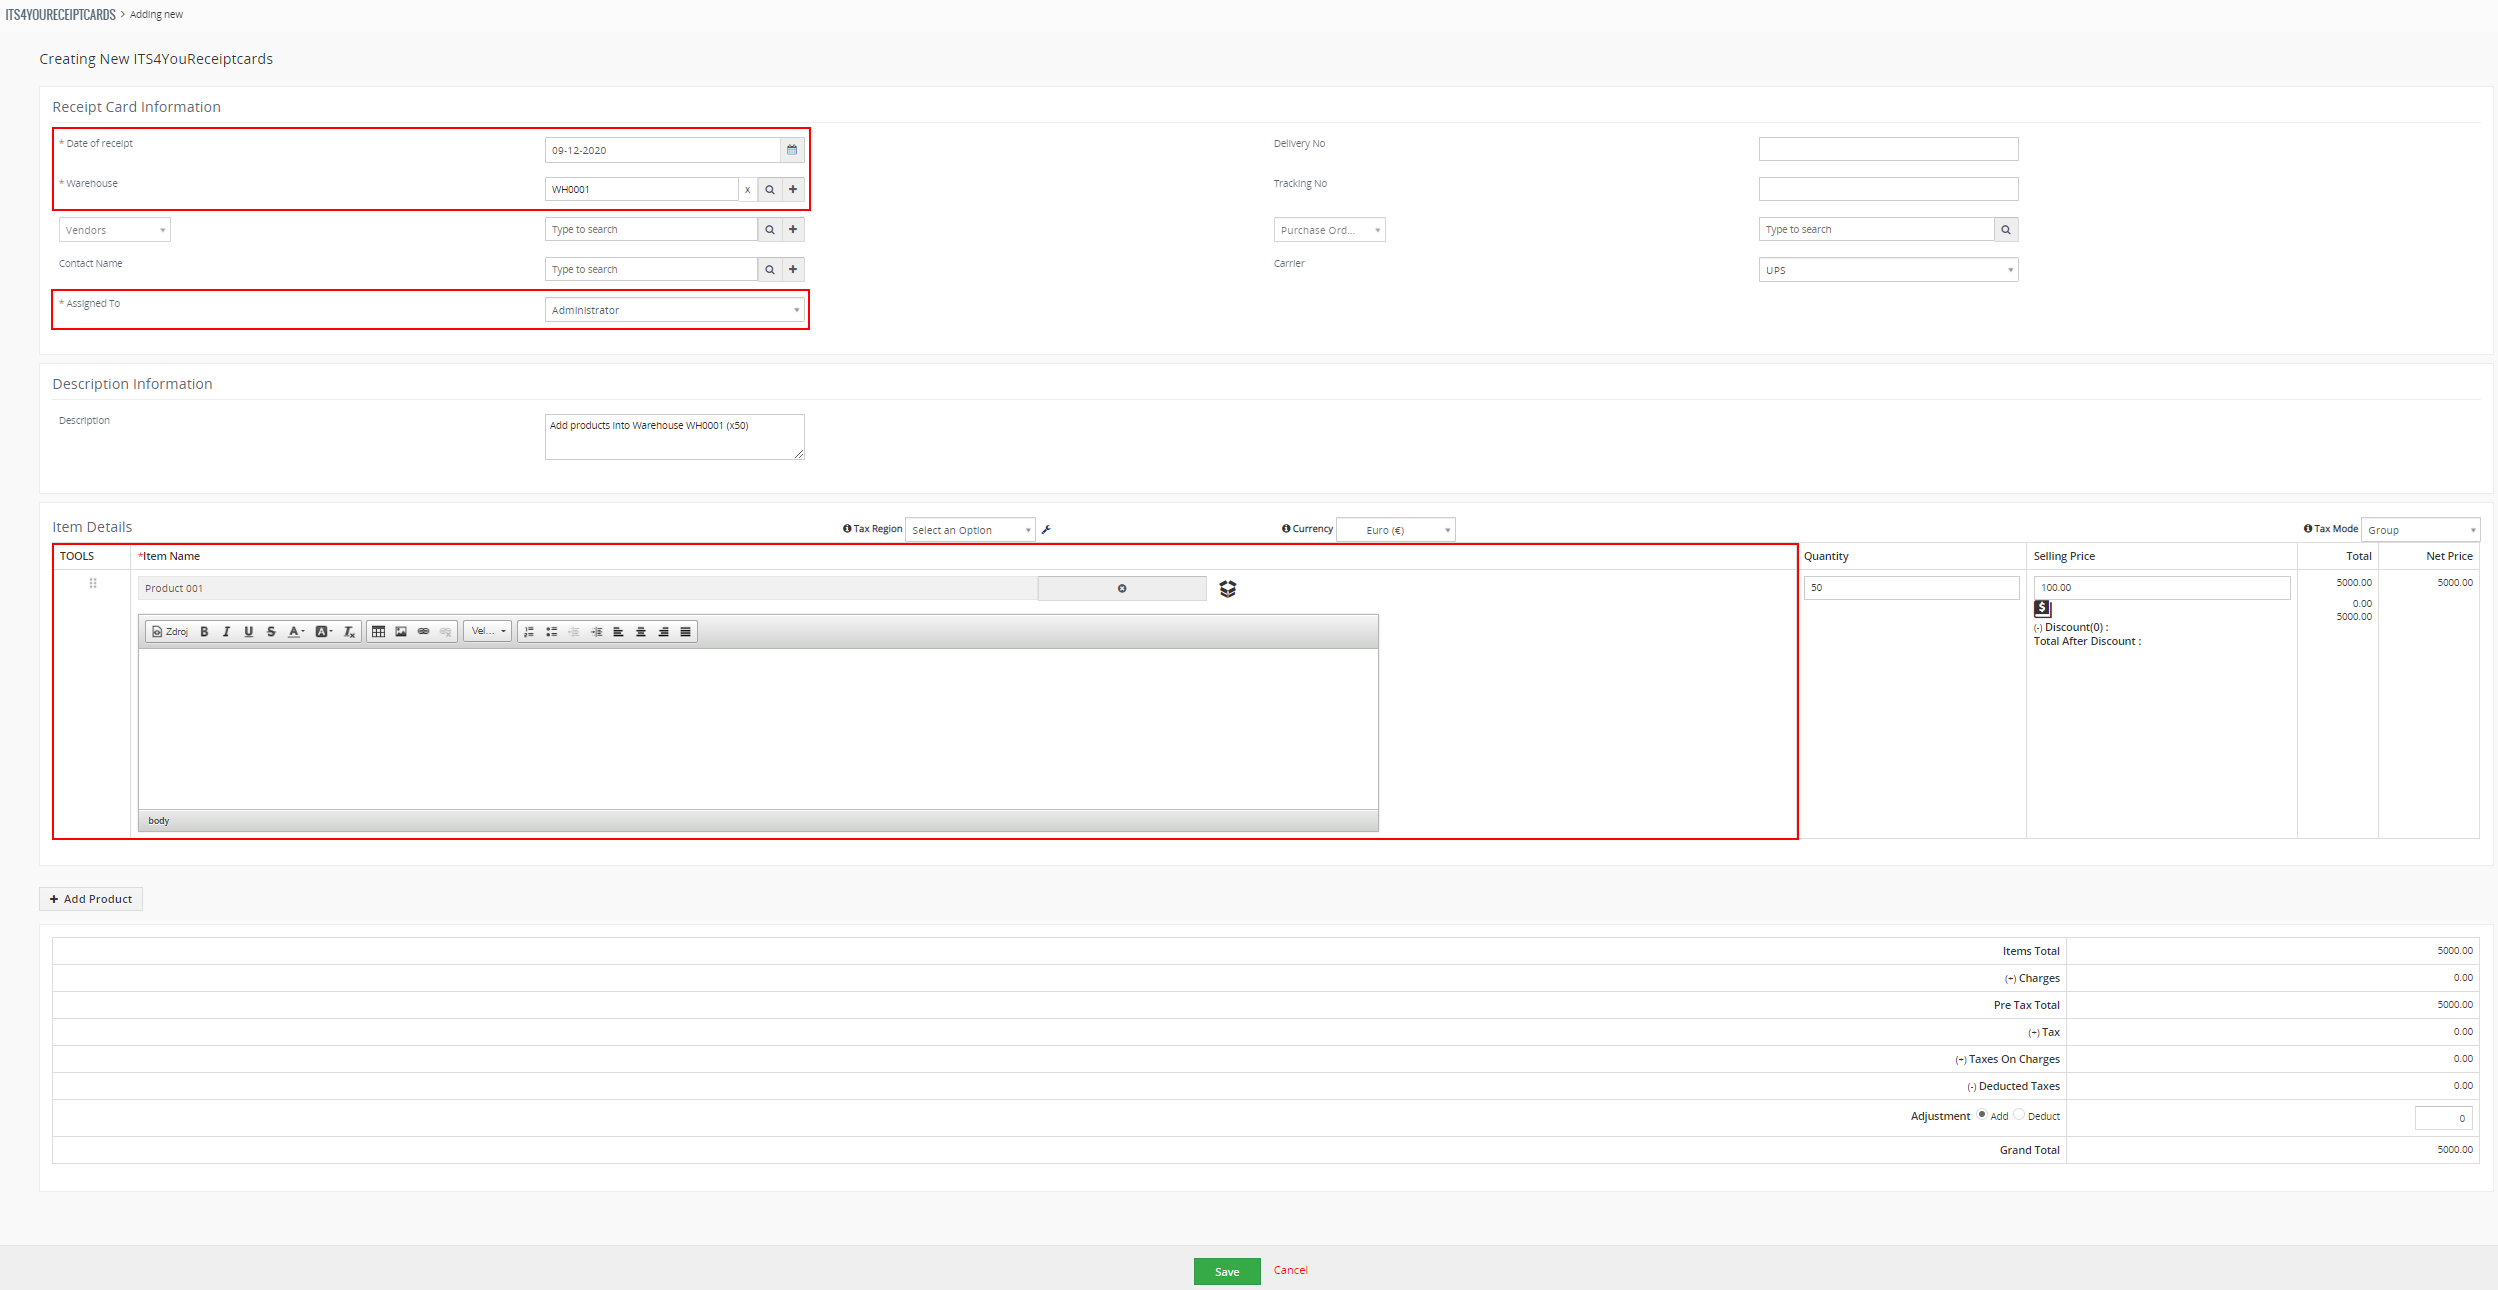
How to add Products into Warehouse - ill fields on the screen.
Mandatory fields are: : Date of receipt, Warehouse (to which warehouse you want to add products), Assigned To.
Then add Products, if you do not have Products, add your Products into Vtiger.
Finally, click on
How to add Products into Warehouse - Now, confirm Receipt Card via button and your Products will be added
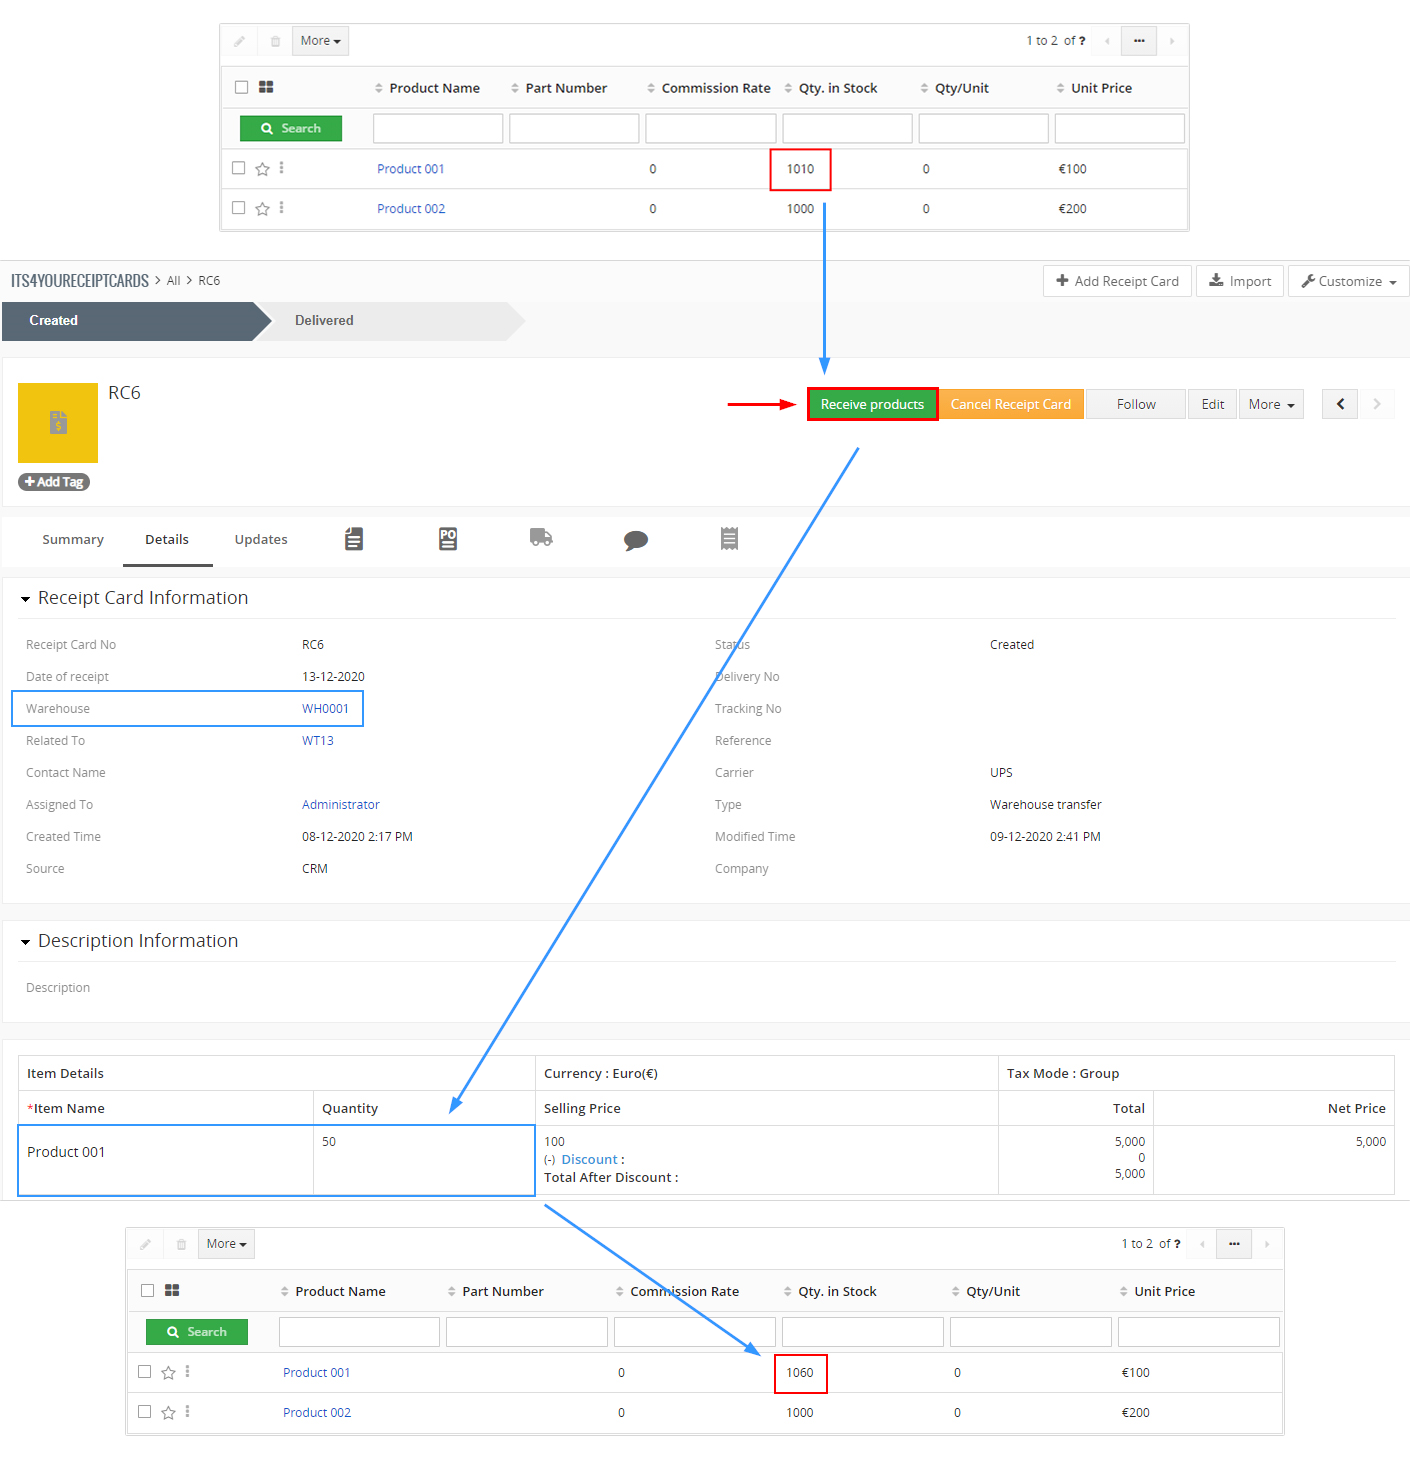
How to add Products into Warehouse - Products were added to the Warehouse, see below:
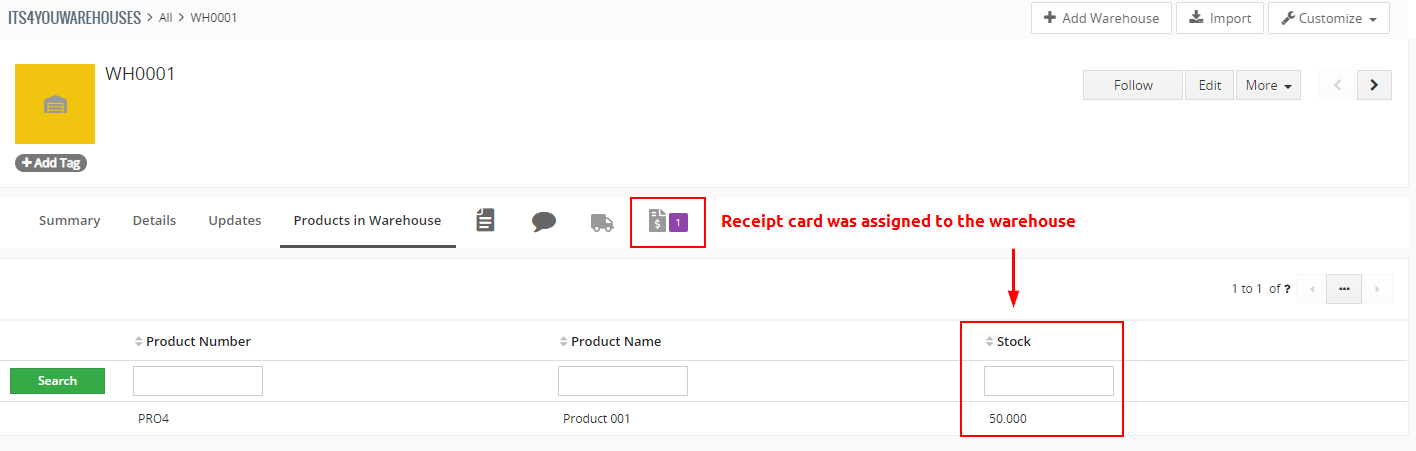
Products added to the Warehouse via Receipt Card
5.The process of using Warehouses
There are 2 ways to use our Warehouses that we recommend.
Also, it depends on how you add Products into Warehouse if there is not enough stock of Products in Warehouse:
- Add Products simply by Receipt Card
- Buy products from your supplier/vendor, create a Purchase Order and when the Products arrive, then add them into the Warehouse
In following situations, you can see the way to use Warehouses as well as both ways to add your Products.
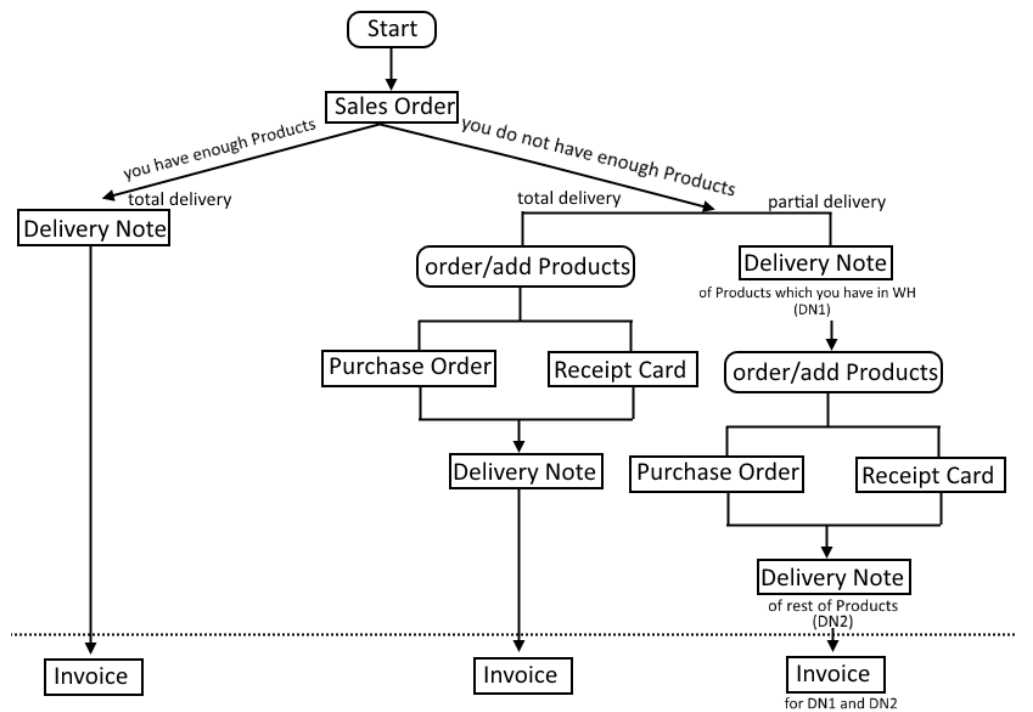
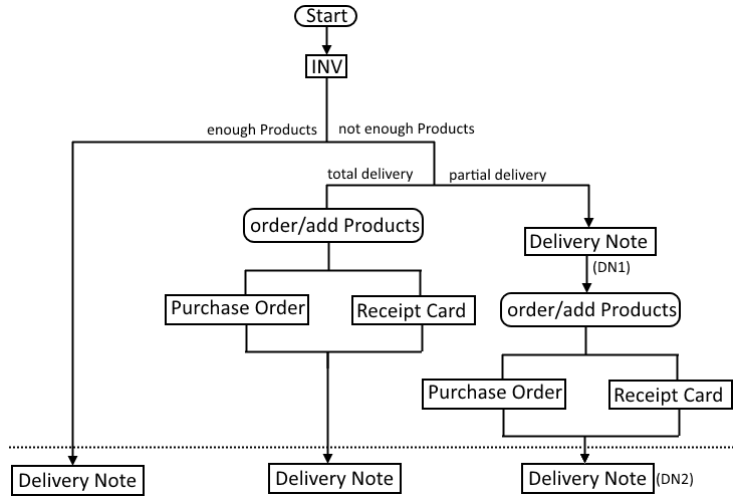
Warehouses extension supports Total delivery and also Partial delivery.
5.1.Sales Order to Delivery Note, DN to Invoice
The first way we recommend is to create Delivery Note from Sales Order.
- If you have enough Products then you can deliver these Products.
- If you do not have enough Products, we will describe how to add Products simply by Receipt Card.
After, you are able to deliver the Products. The final step is creating an Invoice.
Please follow the next steps.
![]() Note: Some parts will be explained during the process.
Note: Some parts will be explained during the process.
1.) Creating Sales Order
- Go to module Sales order and click on “Add Sales Order” button:

Warehouses – Create Sales Order - When you choose more Products than you have in Warehouse you will see: “Not enough stock” alert.
However, you are able create Sales Order.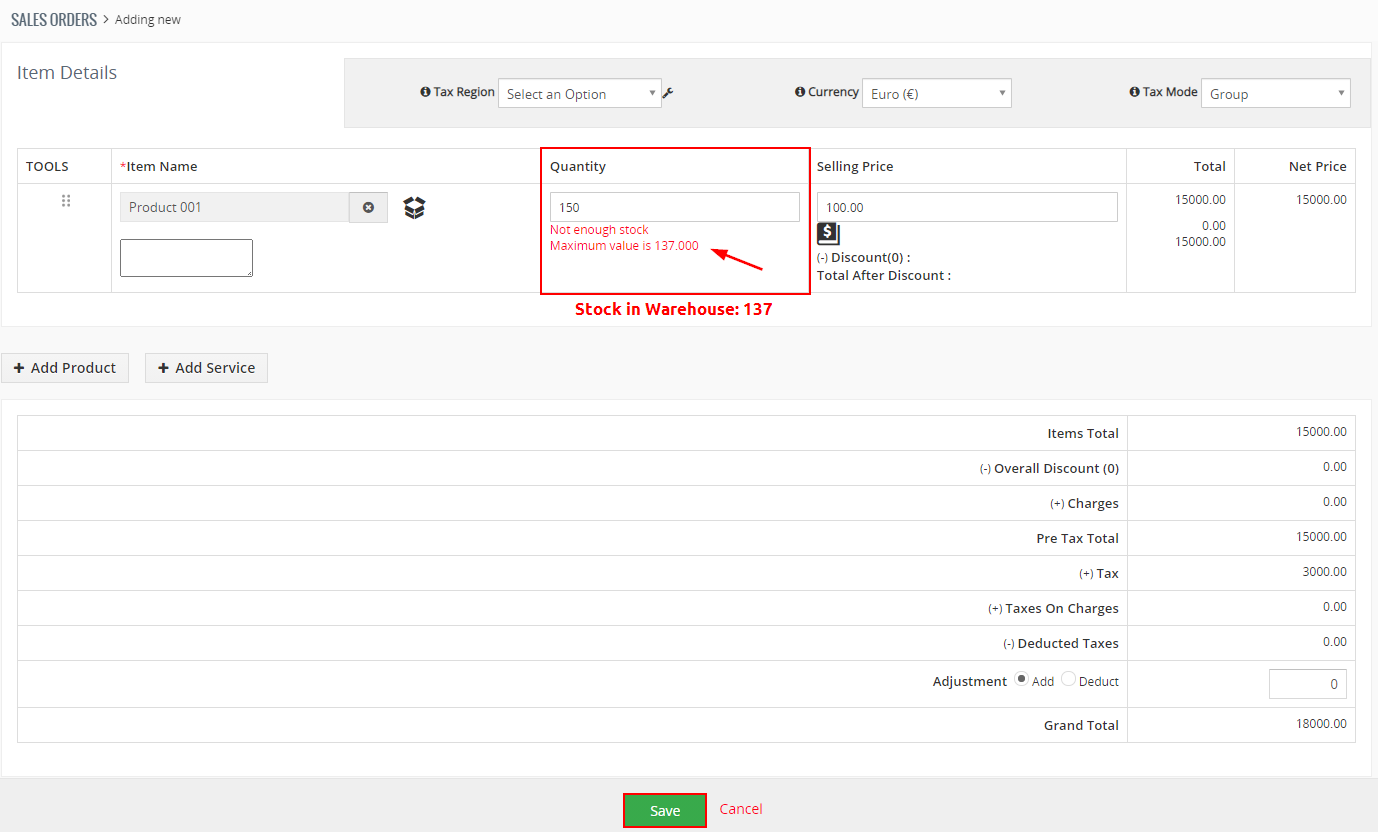
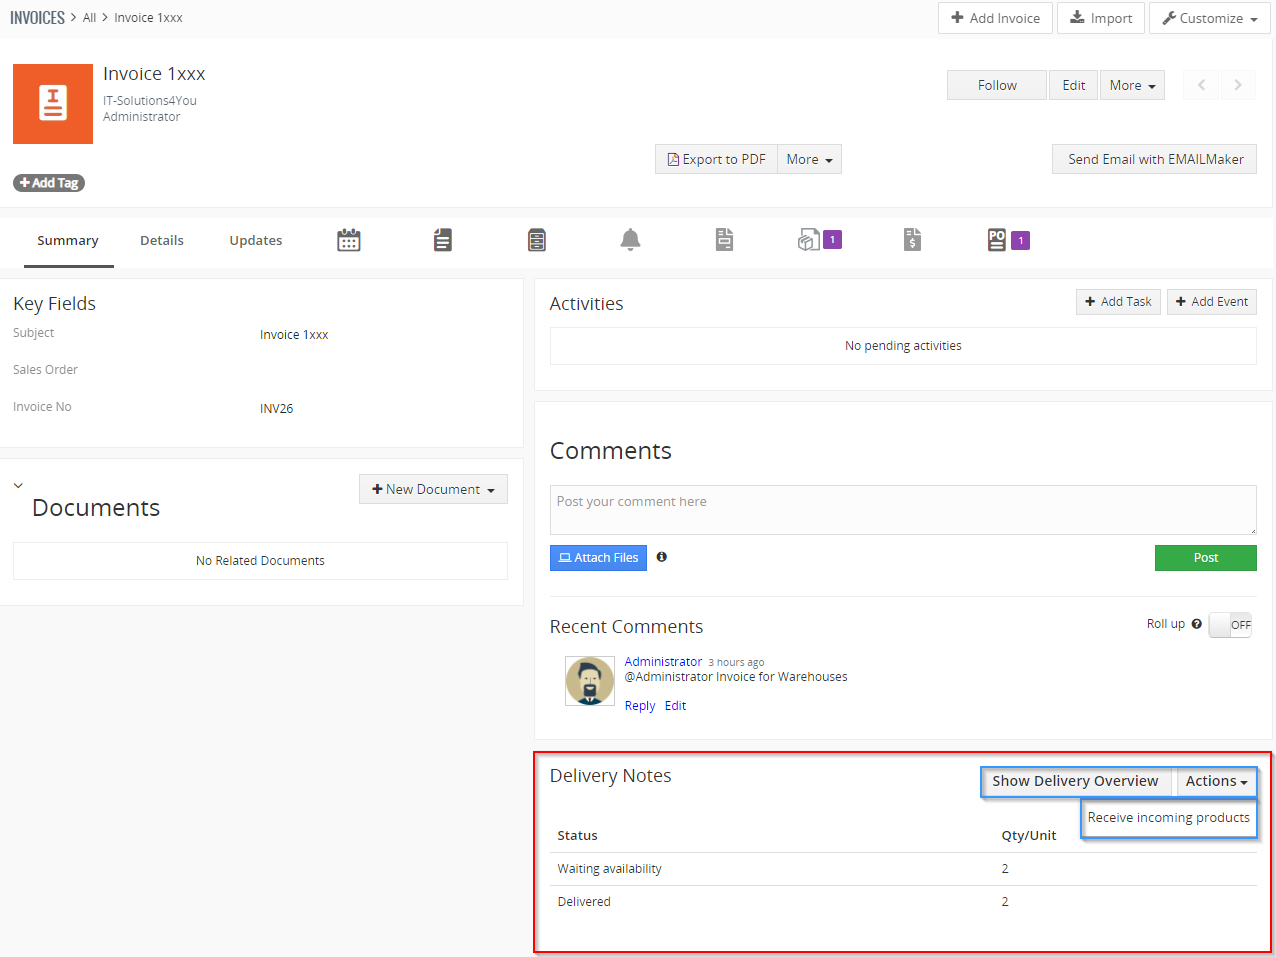
Warehouses – Creating Sales Order - Now, you can see Warehouses Actions block in Detail view of Sales Order.
More about blocks of Warehouses you can read here: 6. Blocks of Warehouses.
Click on or
on or 
If you choose the Actions button, you can create Delivery Notes or order Products.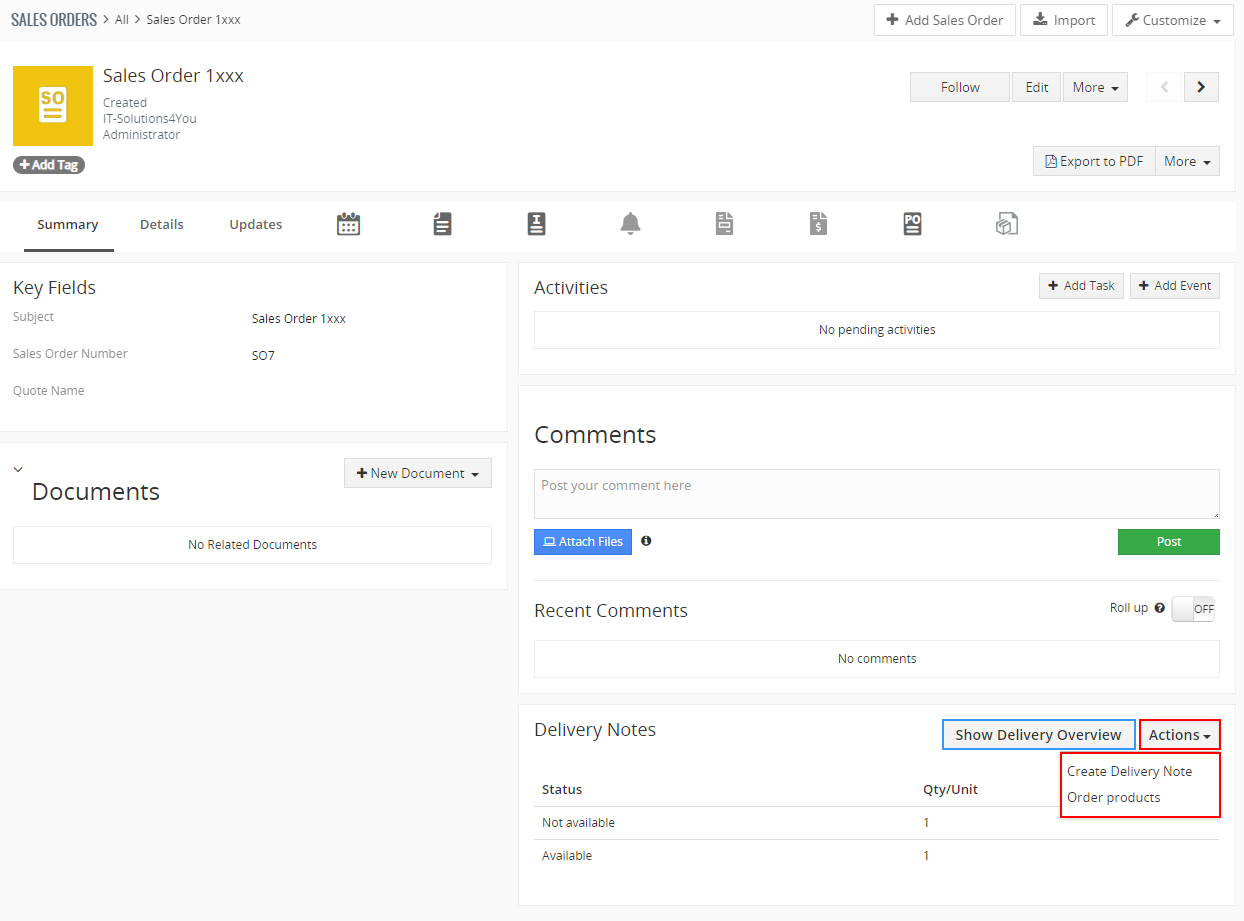
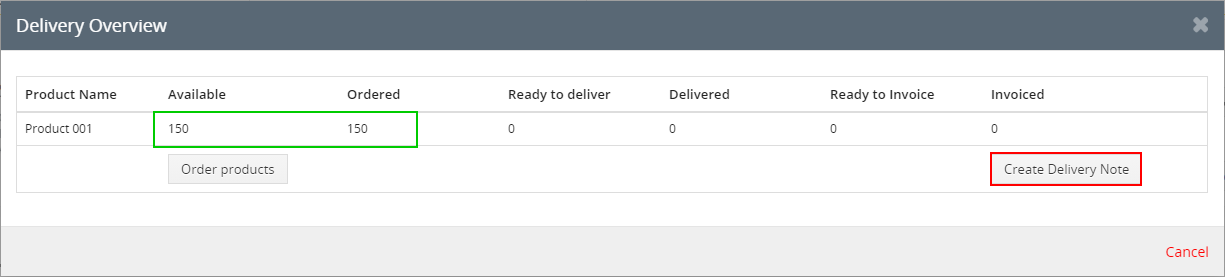
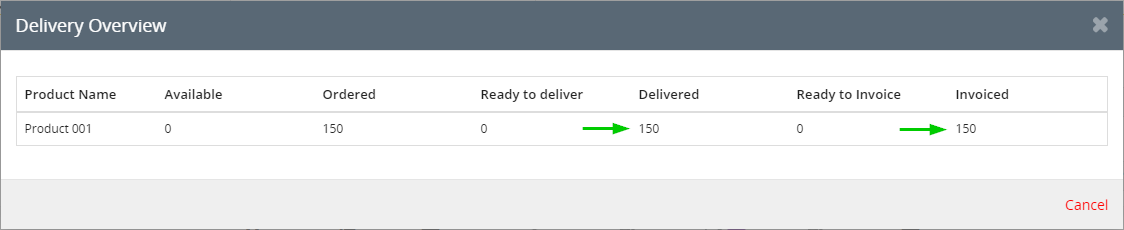
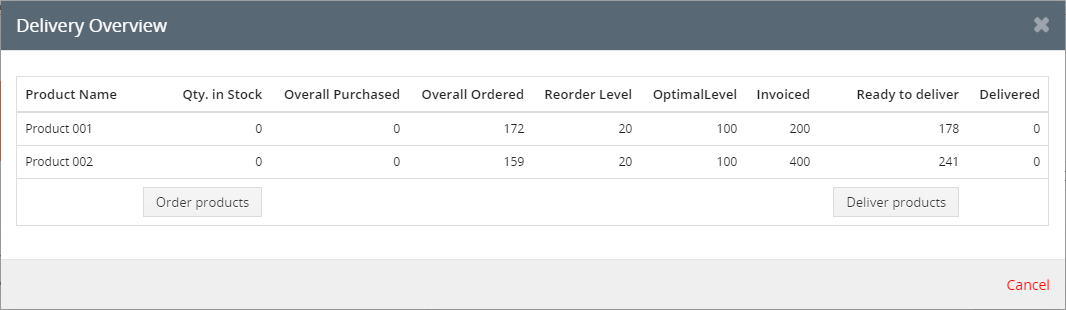
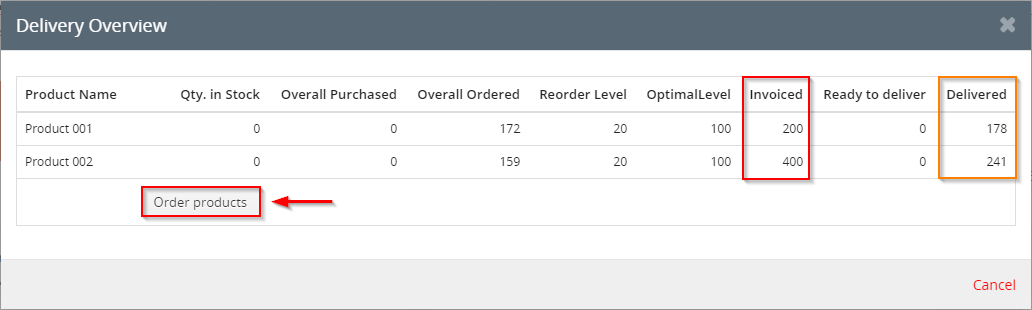
Warehouses – WH Actions block - If you choose “Show Delivery Overview” button, you can see a window with information about Sales Order and Products in Warehouse as well as Overall Purchased and Ordered Products.
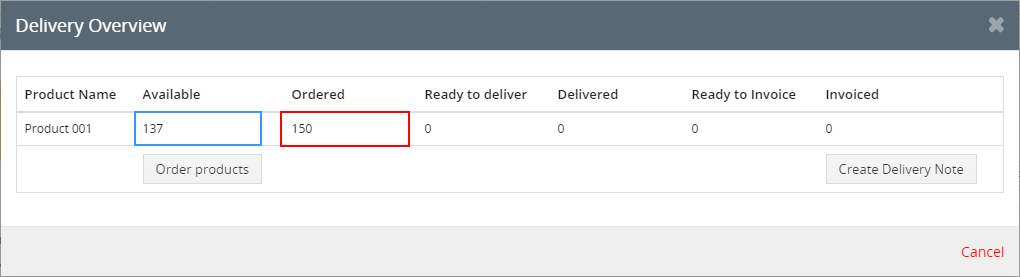
Warehouses – Delivery Overview
You can see that Ordered Products (150) are more then Available (137). Now, you have 2 options:
- Order/add missing Products and then delivery all Products A) Total delivery.
- Deliver part of Products, order/add rest of Products and then deliver the rest B) Partial delivery.
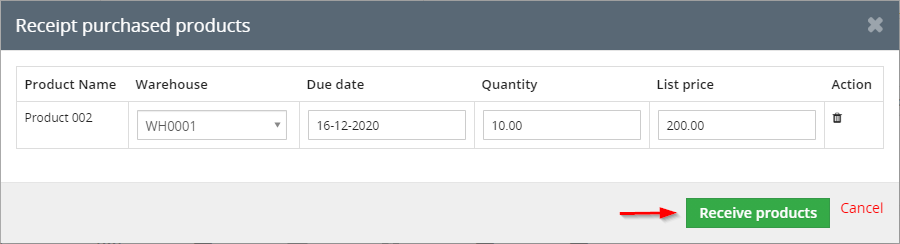
2.) In the next steps, we will show you A) Total delivery situation and how to add Products via Receipt Card.
- Open Receipt Card module and click on
Warehouses – add Products into Warehouse - Create Receipt Card with Qty. of your Products and choose your Warehouse.
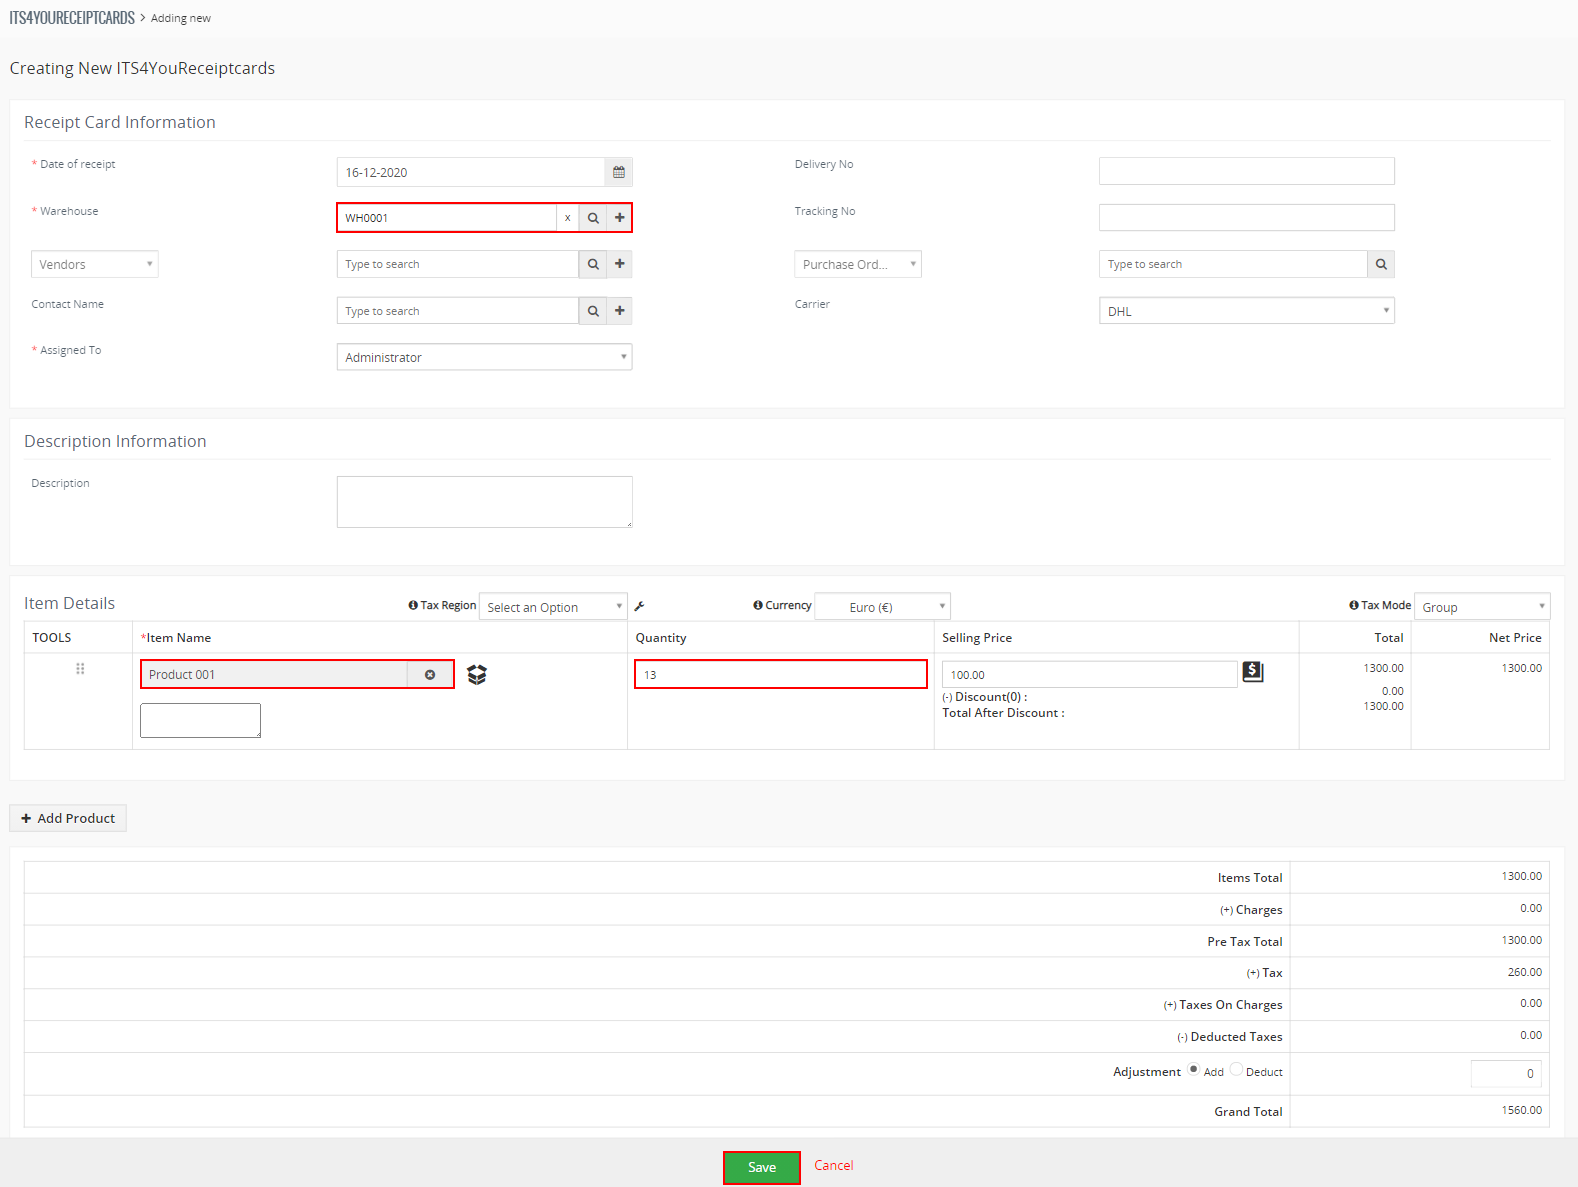
Warehouses – creating Receipt Card - Receive your Products, from detail view of Receipt Card click on
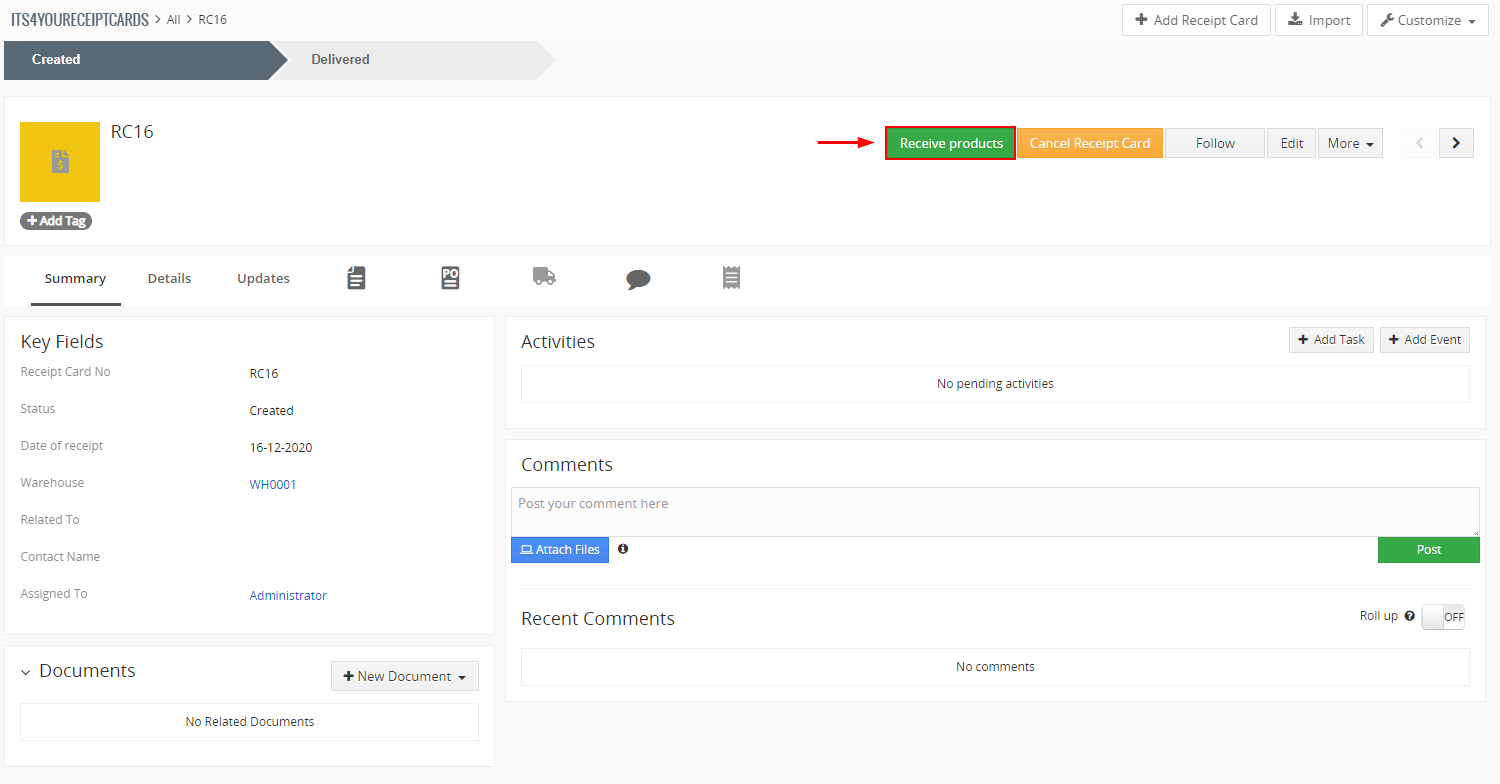
Warehouses – receive products via Receipt Card Now, Products of quantity (13), were delivered to the Warehouse, the total stock of Products (150) in a Warehouse is shown below:

Warehouses – Products in Warehouse after delivery via Receipt Card
3.) Now, you are able to create Delivery Note for whole Sales Order. Open Sales Order detail view and click on “Show Delivery Overview” button.
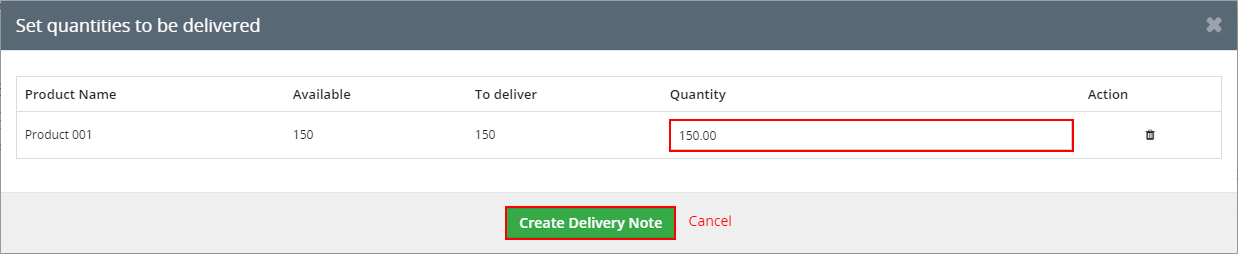
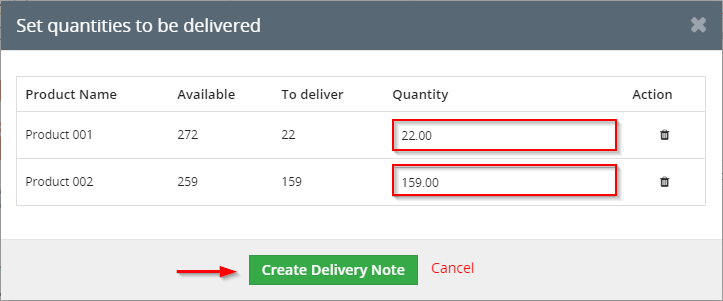
- You can see that there is enough Products to deliver. Click on “Create Delivery Note” button.
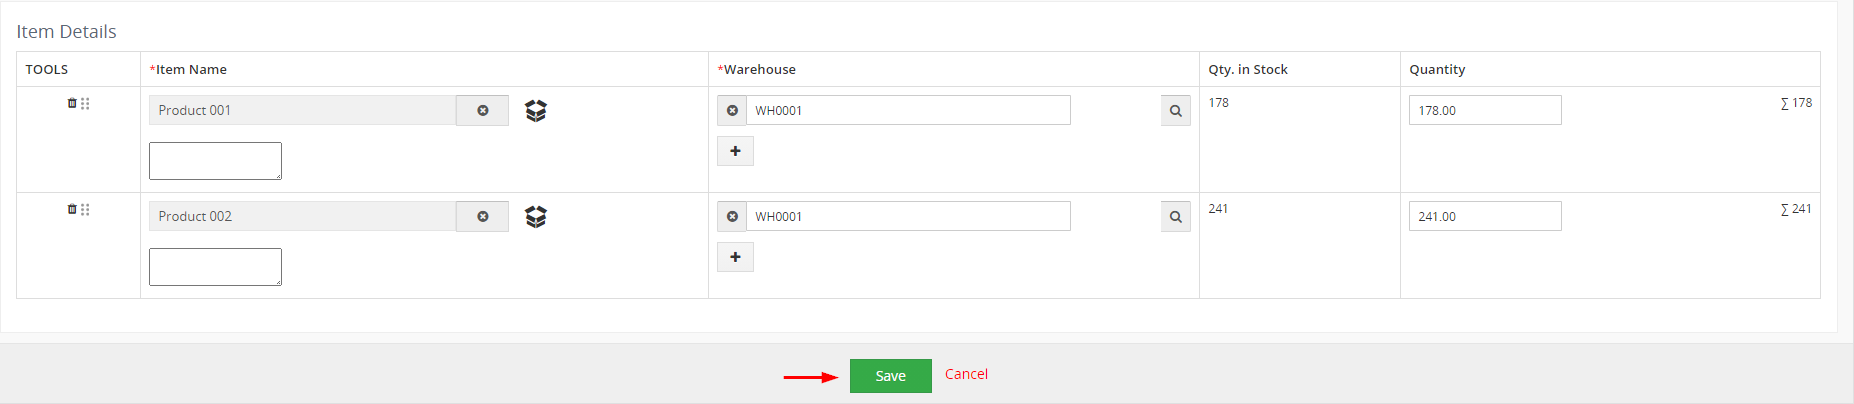
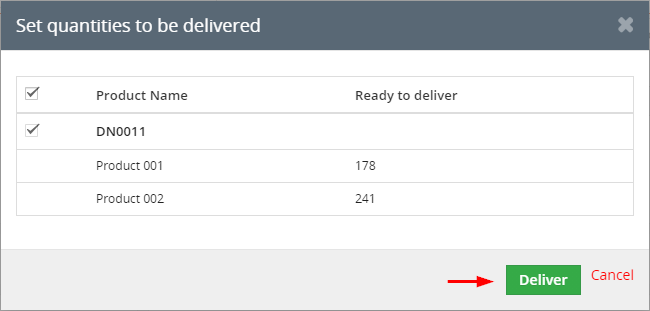
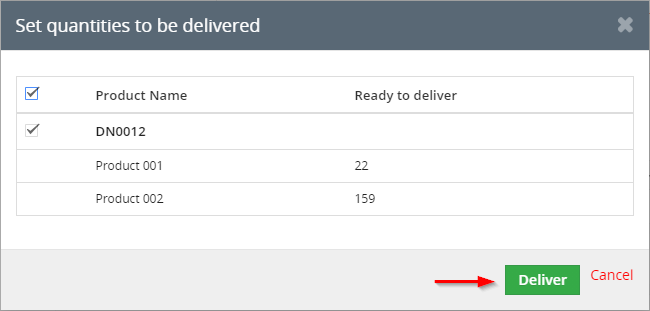
Warehouses – creating DN from SO - Confirm Quantity and click on

Warehouses – creating DN from SO - If you have Products in more Warehouses, here you can see the available list of Warehouses to choose from.
(We have Product 001 just in Warehouse WH0001, so we see only one/this Warehouse available).
Also you can choose from which Warehouse Products will be delivered.
If you click on button once you remove warehouse, if you click on this button again you will remove whole line. To add line again or add new line to add warehouse please click on
  button.
Fill info and and click on button.

Warehouses – creating DN from SO - Delivery Note is created. Now, you can click on
 to deliver products.
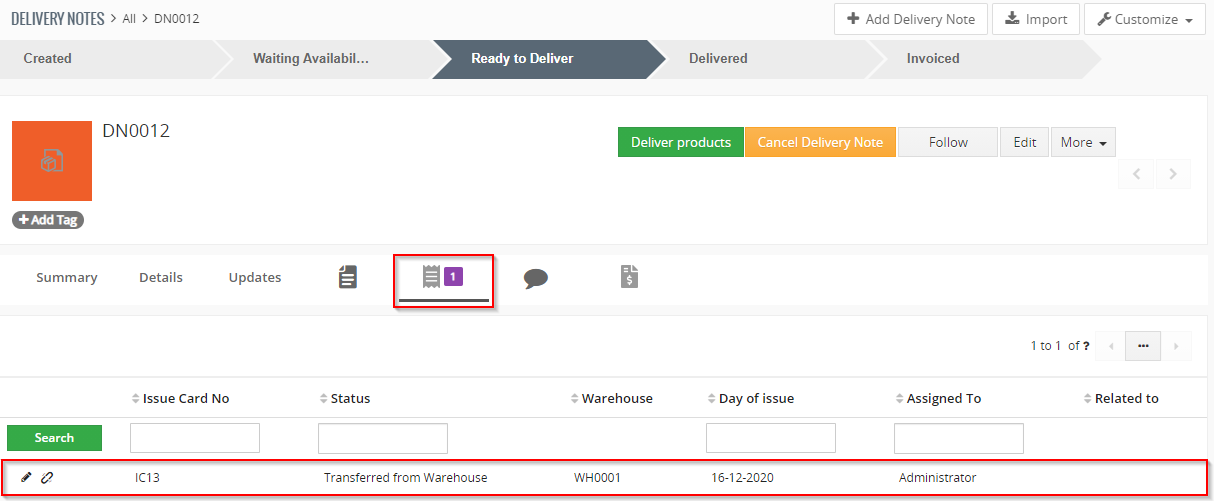
You can also open Issue Card, export to PDF (with PDF Maker) for employees to know how many products should leave from Warehouse.
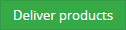
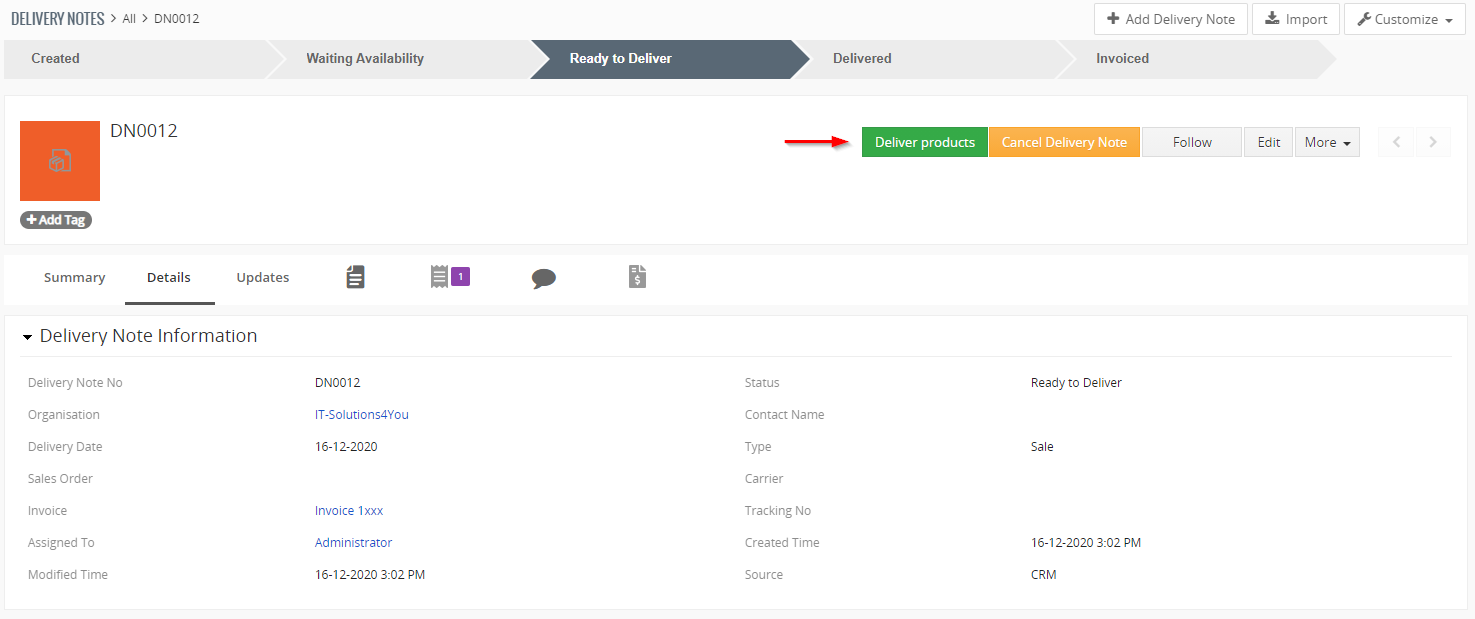
Warehouses – Delivery Note, deliver products - On next window, click on

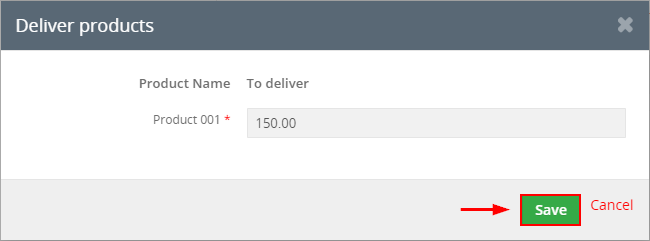
Warehouses – Delivery Note, deliver products - Now, Delivery Note have status Delivered.
You are able to invoice it. Click on and fill info you need and click on
Warehouses – Invoicing products from Delivery Note
Now, in Sales Order or Invoice you can see in WH Actions block that you have Invoiced Products.
You can also click on ![]() for more information.
for more information.
5.2.Invoice to Delivery Note
The other way that we recommend is creating Delivery Note from Invoice.
- If you have enough Products then you can Deliver these Products.
- If you do not have enough Products, we will describe how to add Products using a Purchase Order.
Then you are able to deliver the Products.
Please follow the next steps.
![]() Note: Some parts will be explained during the process.
Note: Some parts will be explained during the process.
1.) Start with creating an Invoice
- Select module Invoices and in the list view click on

Warehouses – Creating Invoice - When you choose more Products like you have in Warehouse you will see: “Not enough stock” alert.
However, you are able to create an invoice.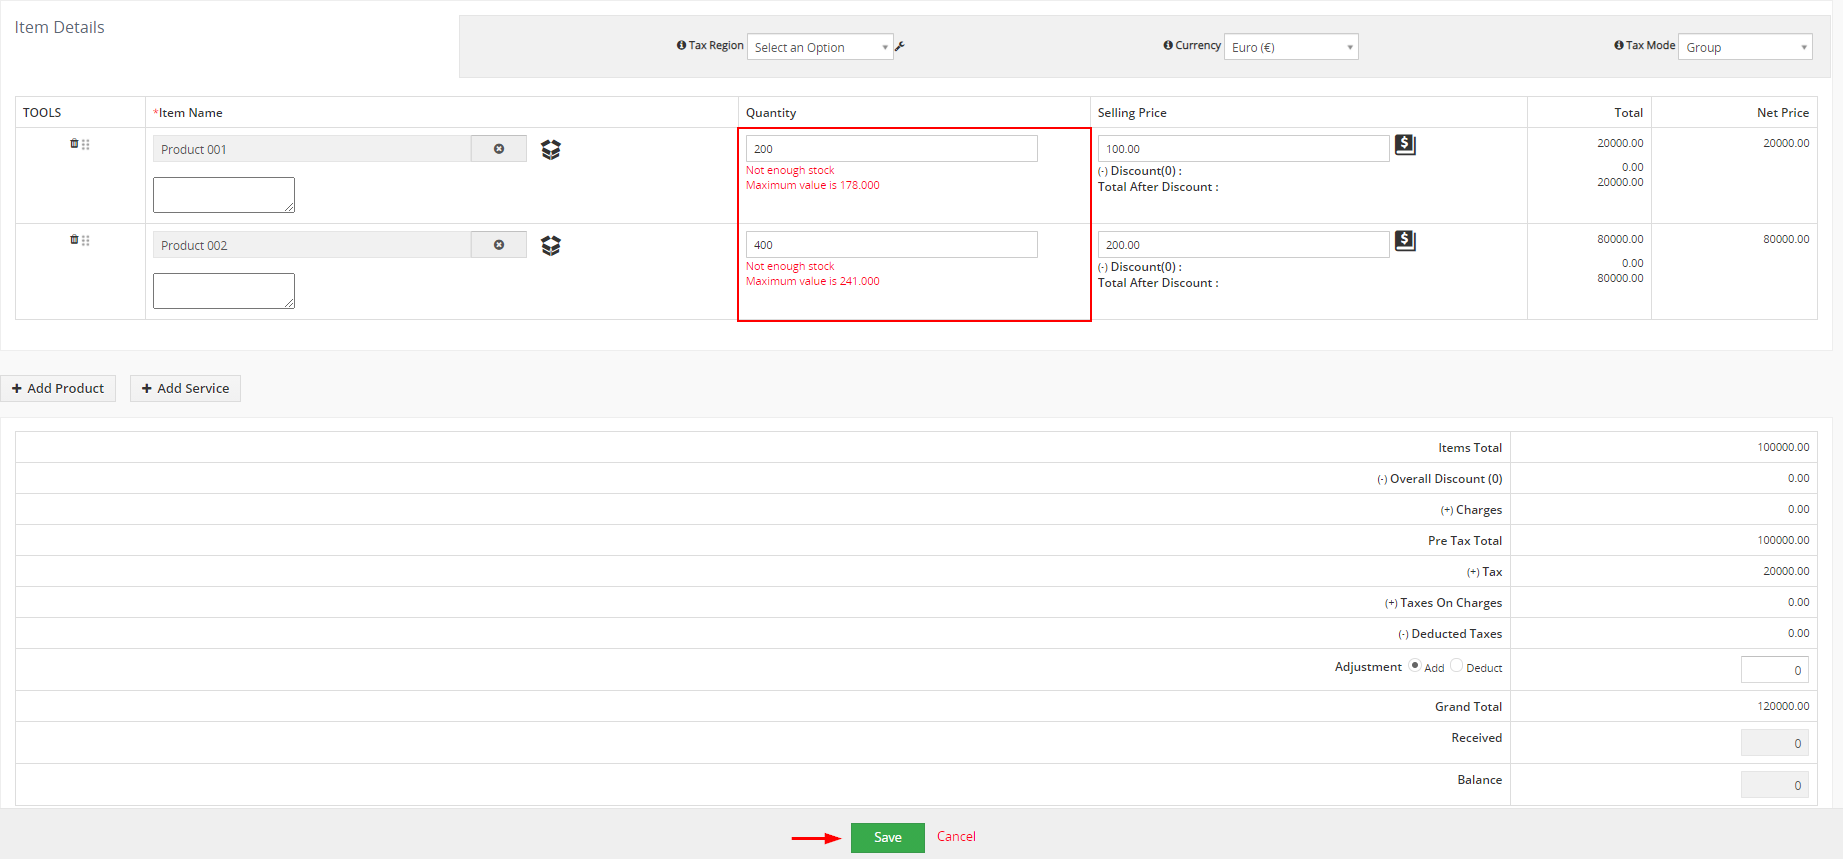
Warehouses – Creating Invoice - Now, you can see Warehouses Actions block in Detail view of Invoice.
More about blocks of Warehouses you can read here: 6. Blocks of Warehouses.
Click on or
If you choose the Actions button, you can create Delivery Notes or order Products.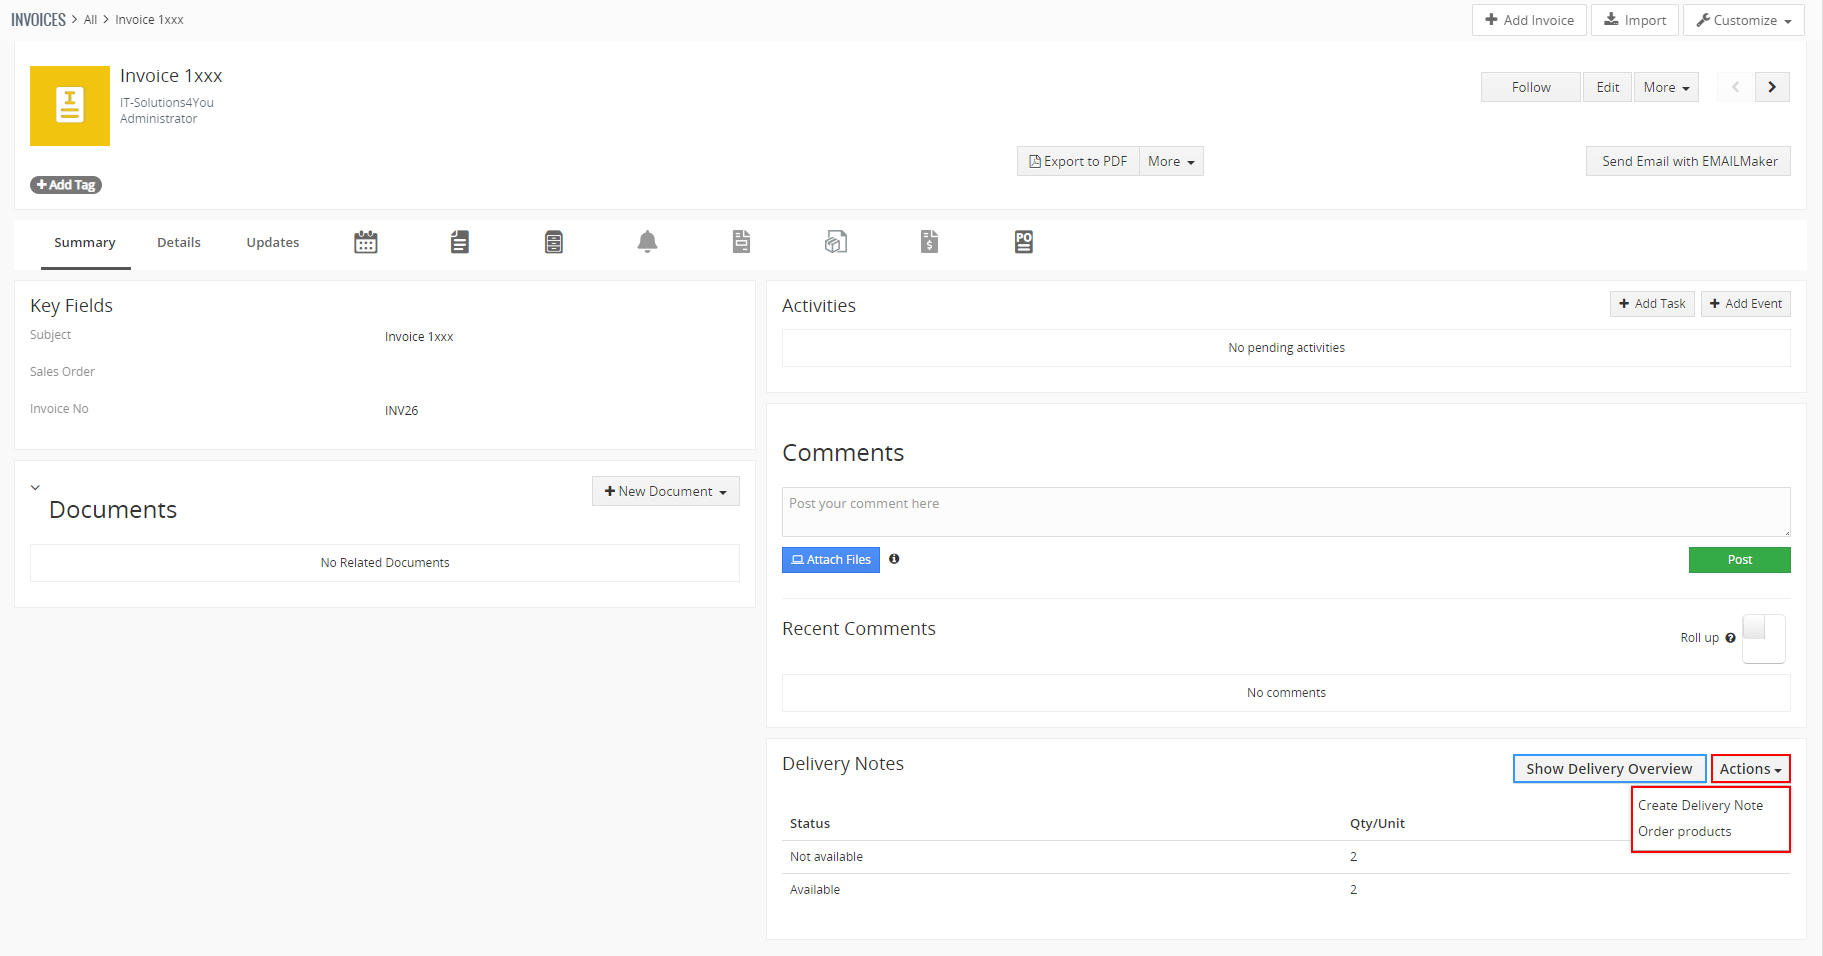
Warehouses – Invoice module, WH Actions block - If you choose “Show Delivery Overview” button, you can see a window with information about Invoice and Products in Warehouse.
Warehouses – Invoice module, Delivery Overview
![]() You can see that Invoiced Products are more than Qty. In Stock.
You can see that Invoiced Products are more than Qty. In Stock.
Now, you have 2 options:
- Order/add missing Products and then delivery all Products A) Total delivery.
- Deliver part of Products, order/add rest of Products and then deliver the rest B) Partial delivery.
2.) In the next steps, we will show you B) Partial delivery situation.
- From the Delivery overview in the Invoice (Image above), click on

Warehouses – Invoice module, Delivery Overview You can see Qty. In Stock and quantity to deliver.
You can deliver less than Qty. in Stock but not more.
Click on
Warehouses – Delivery Note, partial delivery - Check information and confirm Delivery Note via button.
Warehouses – Delivery Note, partial delivery Delivery Note is created. Products from this Delivery Note you can see in Outgoing Products module too.
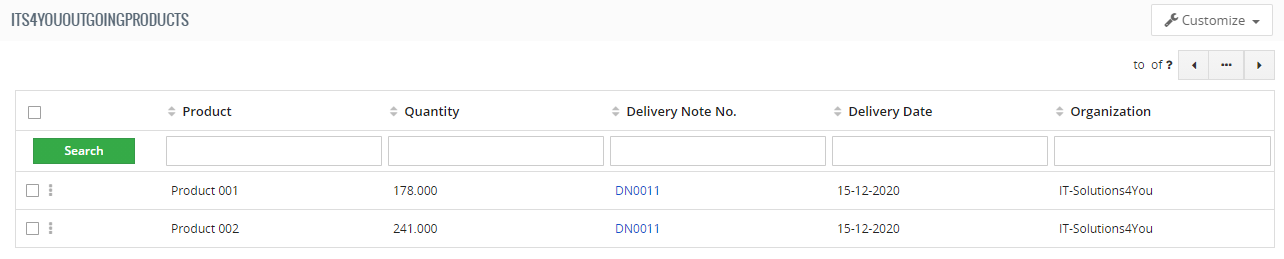
Warehouses – Outgoing Products Also Issue Card is related to Delivery Note.
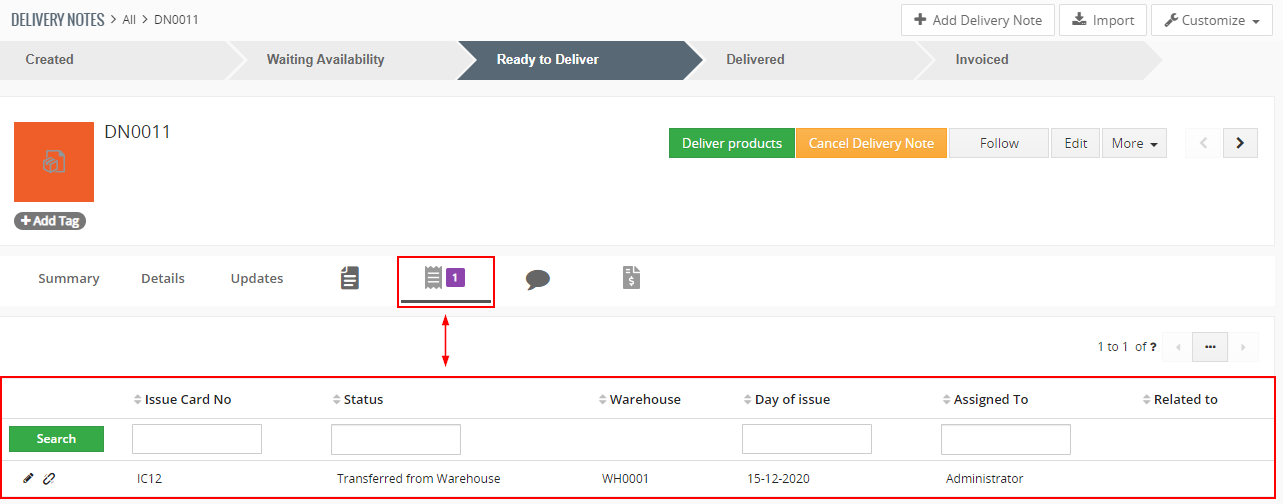
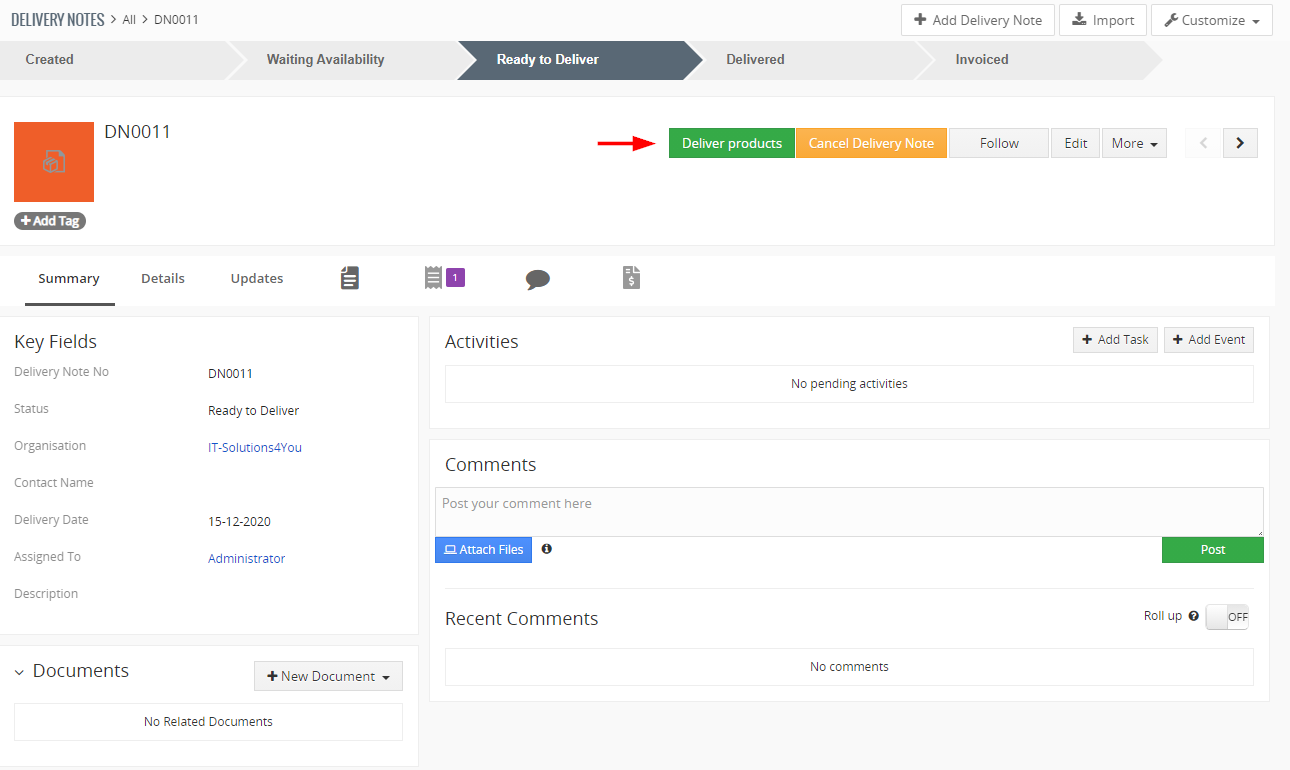
Warehouses – Issue Card related to Delivery Note - Now, you are able to deliver Products from Delivery Note or from Invoice.
From Delivery Note just click on
Warehouses – Deliver products via Delivery Note detail view From Invoice detailview, click on
in WH Actions block and click on 
Warehouses – Deliver products via Invoice Delivery Overview block - We will deliver products via Invoice module, so after clicking on
Choose Delivery Note(s) to deliver and click on button.
Warehouses – Deliver products via Invoice Delivery Overview block The products were delivered, you can see a message:

Warehouses – Products delivery
3.) In next steps, we will show you how to order (add) the rest of the Products by Purchase Order.
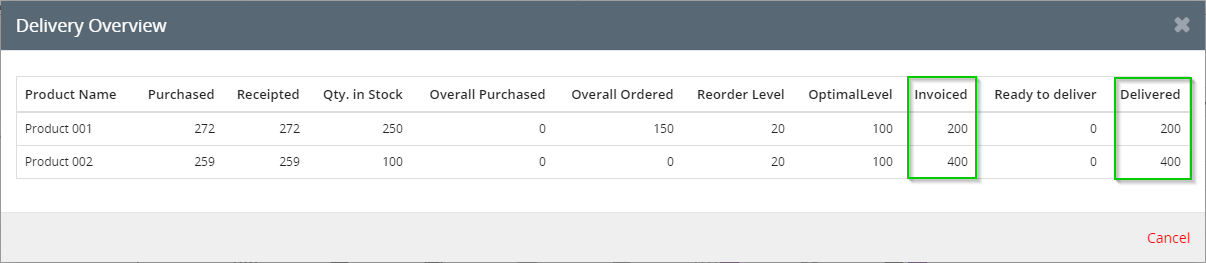
Now, we have delivered quantities for Product 001 (178) and for Product 002 (241).
We have Invoiced for Product 001 (200) and for Product 002 (400).So we need to order the rest of the Products.
Follow steps to order more Products:
- Click on in detail view of Invoice and choose
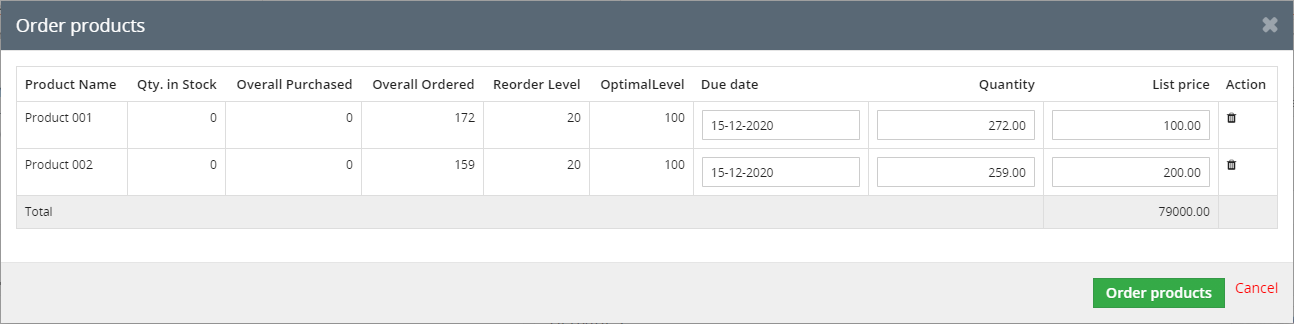
Warehouses – Invoice, Delivery Overview, ordering products - Now, you can see Order products window.
To create Purchase Order choose Quantity and click on button.
Warehouses – Ordering products via Invoice Delivery overview block 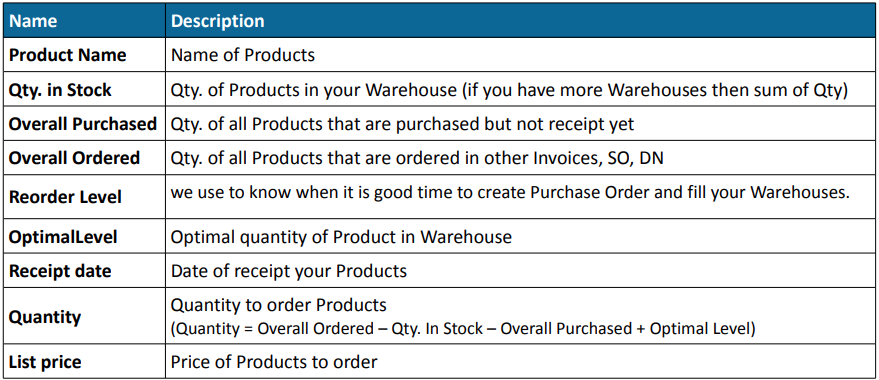
Warehouses – Variables - Purchase Order create window will appear, choose a Vendor and click on
 Note: You have to choose Vendor manually if the Product does not have Vendor assigned.
If there is Vendor assigned for the Product, the Purchase Order will be created automatically.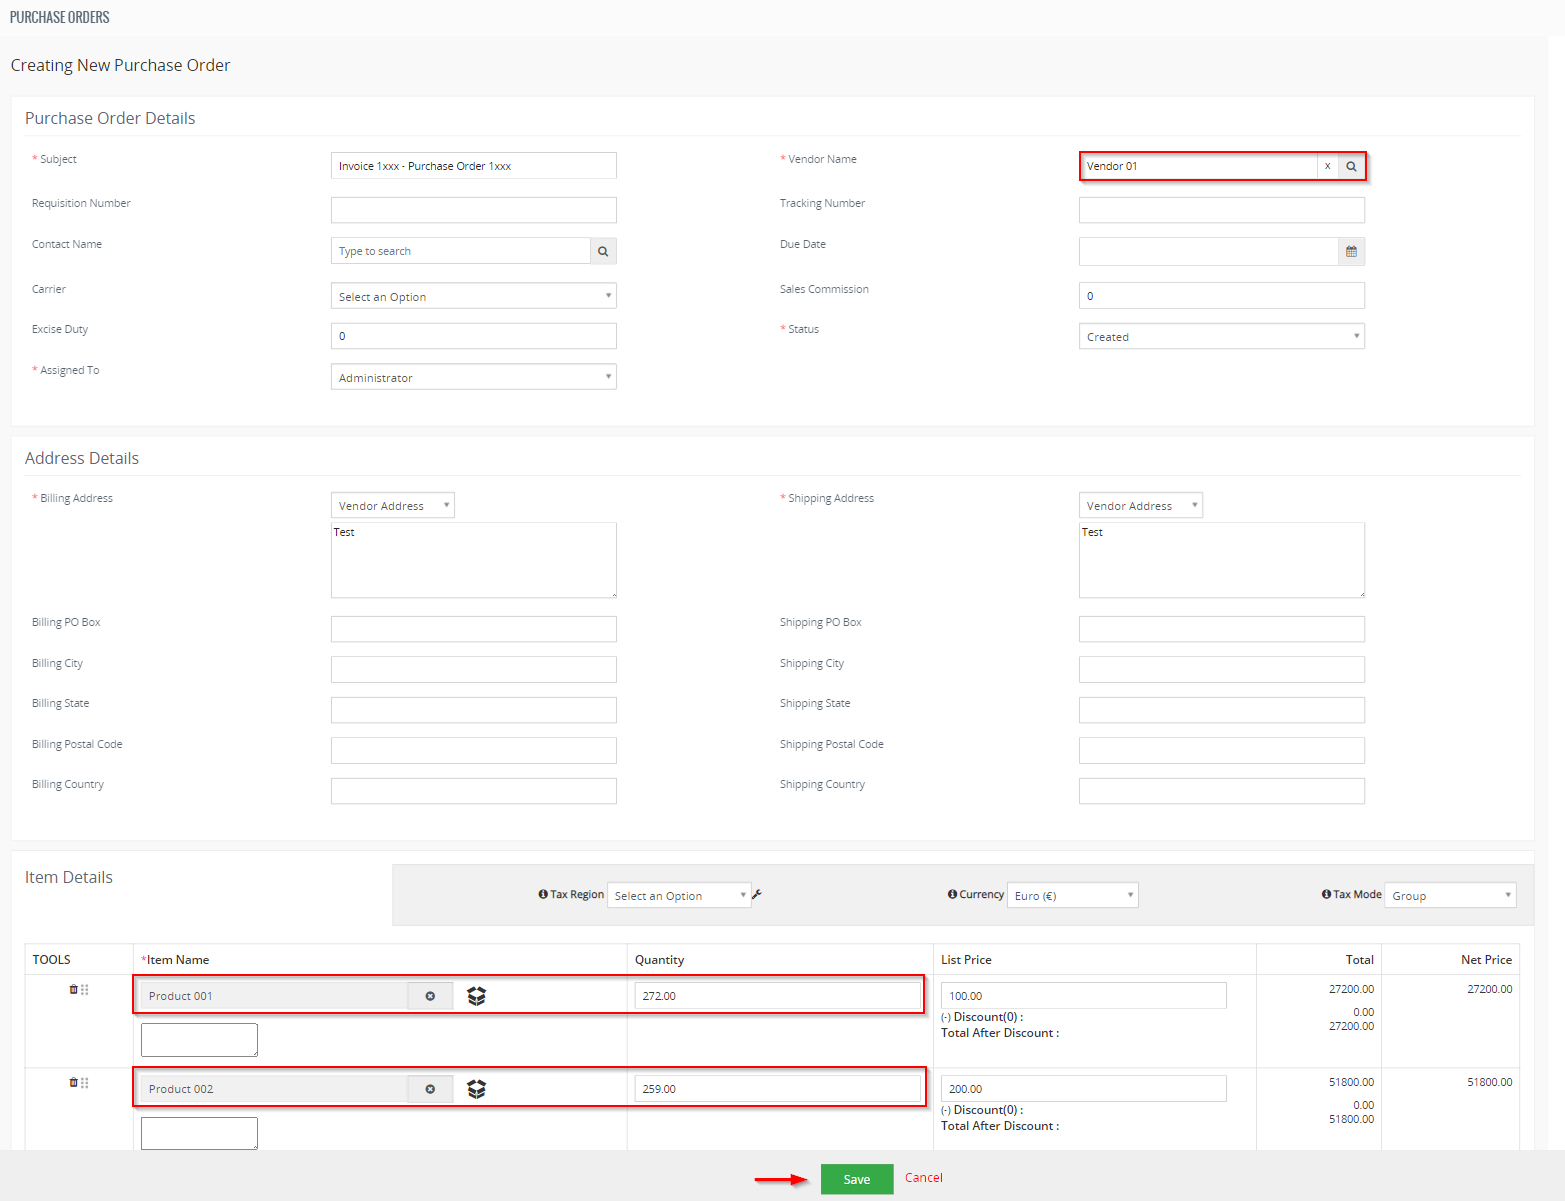
Warehouses – ordering products via Purchase Order Purchase Order was created.

Warehouses – Purchase Order
4.) Purchase Order was created and now we need to receive purchased Products.
There are few options how to perform it:
- From Incoming Products module
- From Purchase Orders module
- From Invoices module
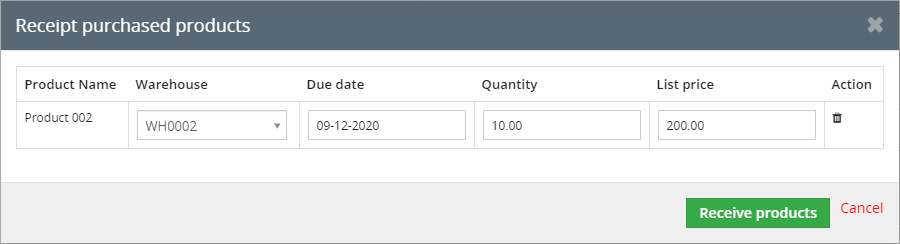
For more detailed information please check chapter: 7.1 Receiving purchased products.
We will demonstrate it with the Invoice module in next steps.
- Open Invoice module and find your Invoice.
Click on or in WH Action block and choose 
Warehouses – Invoice, receiving incoming products 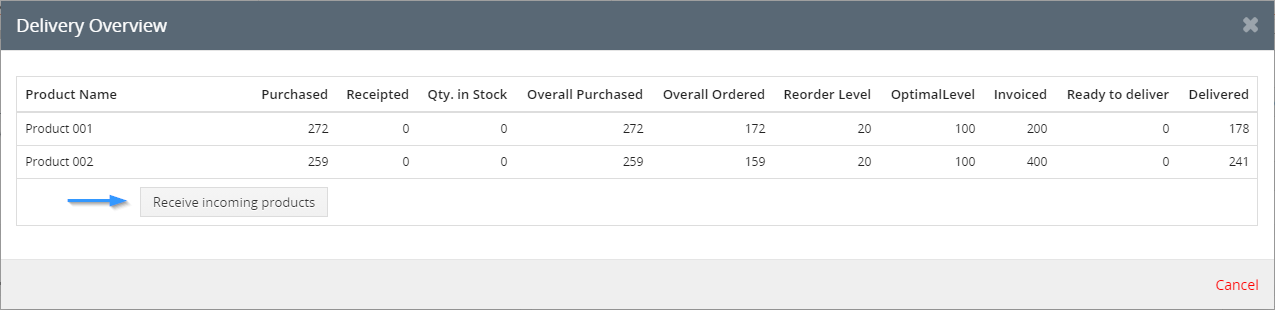
Delivery Overview in Invoice - Next steps to receipt are same for all previous modules.
If you have more Warehouses then choose Warehouse, where you received the products.
Click on button.
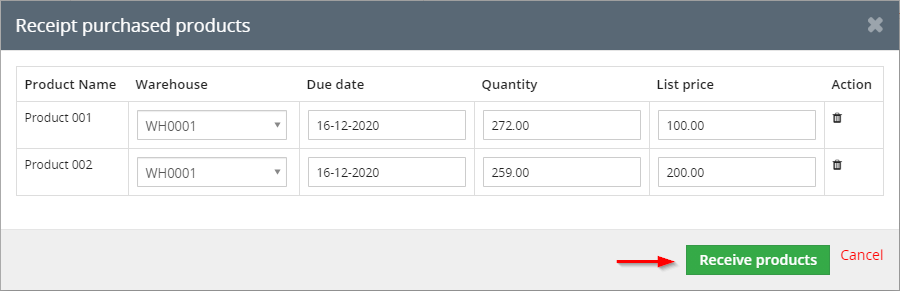
Receive products The products were received. You can see more info Product module, Receipt Card module or in Purchase Orders module.
- Now, you are able to deliver the rest of invoiced Products.
In Invoice detail view, click on or in WH Action block and choose 
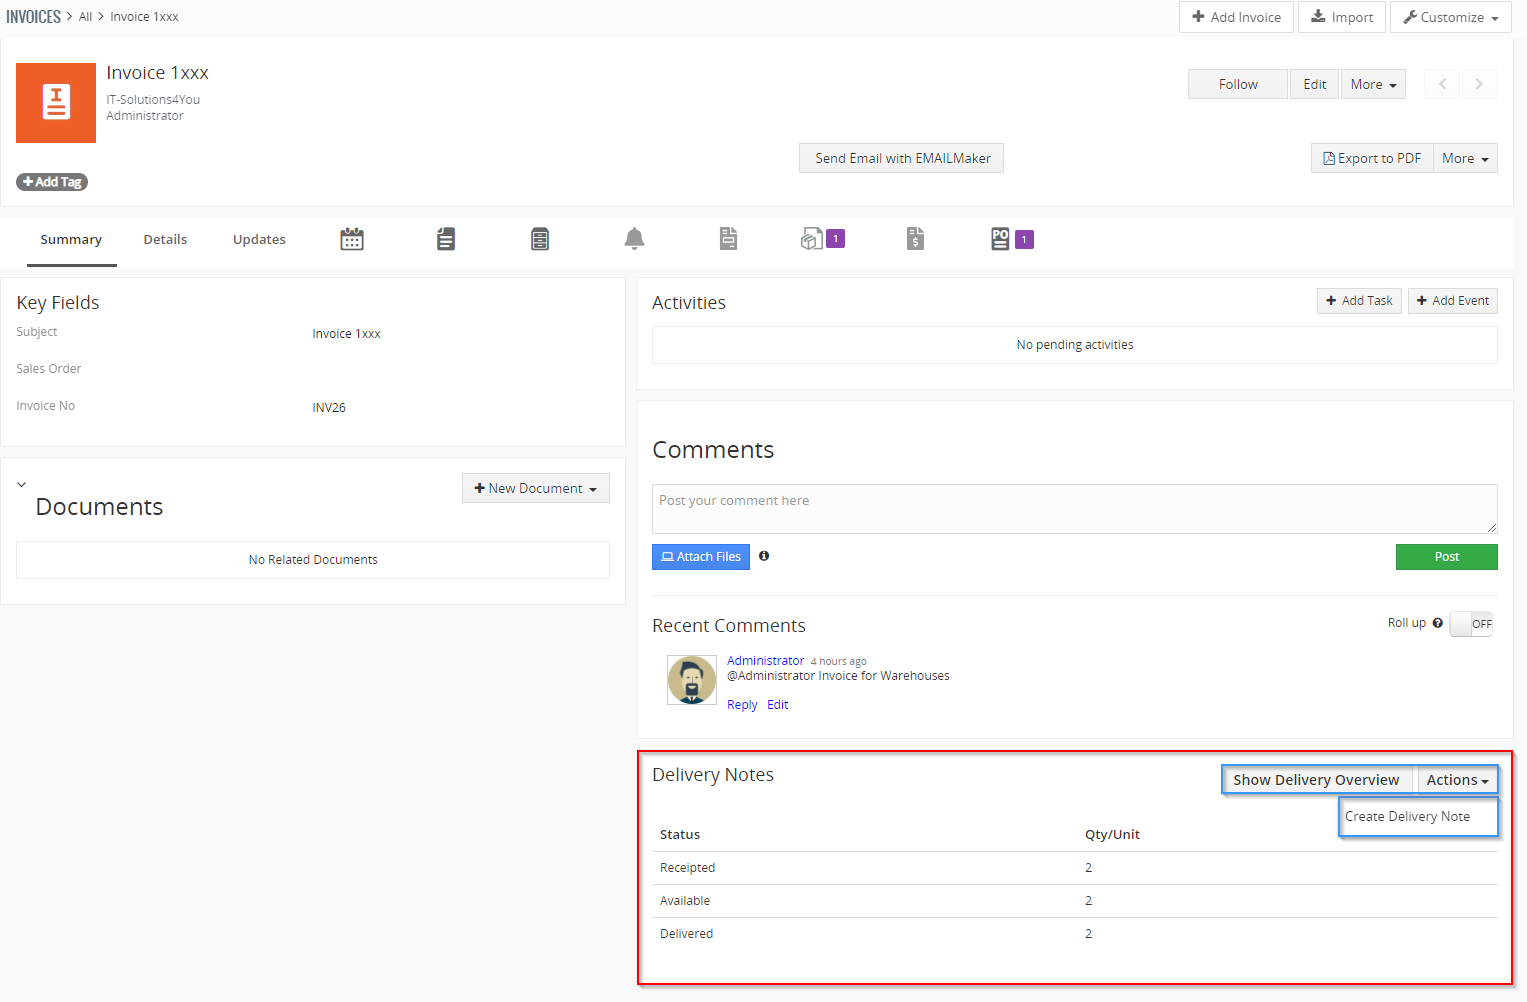
Warehouses – Invoice module, creating Delivery Note 
Warehouses – Invoice module, creating Delivery Note - Check information and click on
Warehouses – Invoice module, creating Delivery Note - Now, please check again information and confirm Delivery Note via button.
Warehouses – Invoice module, creating Delivery Note Delivery Note is created. Products from this Delivery Note you can see in Outgoing Products module too.
Warehouses – Outgoing products Also Issue Card is related to Delivery Note.
Warehouses – Issue Card - Now, you are able to deliver Products from Delivery Note or from Invoice.
From Delivery Note, just click on
Warehouses – delivering products via Delivery Note detail view From Invoice, click on in WH Action block
and click on 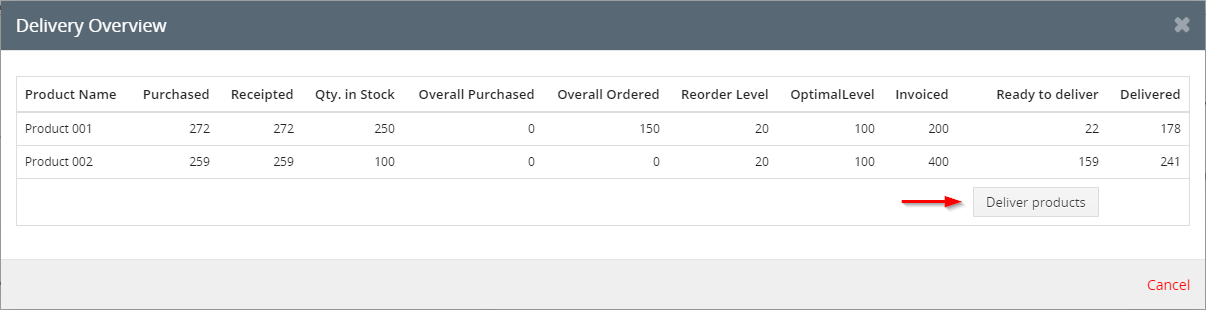
Warehouses – delivering products via Invoice module - Choose Delivery Note(s) to deliver and click on button.
Warehouses – delivering products The products were delivered and invoiced successfully.

Warehouses – successful delivery and invoicing products
Now, button ![]() in Invoice deail view WH Action block is missing.
in Invoice deail view WH Action block is missing.
Also, if you click on a ![]() button, you can not see any button to order or deliver.
button, you can not see any button to order or deliver.
6.Blocks, Tabs & Variables of Warehouses
Warehouses actions block (Delivery Notes block) you can find in detail views of Invoice, Sales Order, Purchase Order and Delivery Notes modules.
WH actions block, allows you to provide actions like order products, deliver, receive products and create invoices.
If there is an option to provide any action with your Invoice, Sales Order, Purchase Order or Delivery note, then you can show in WH actions block ![]() as well as
as well as ![]() buttons.
buttons.
On the other hand, if there is no option to provide any actions there is only ![]() button where you can find information about your INV, SO, PO or DN.
button where you can find information about your INV, SO, PO or DN.
In Warehouses action block, you can see status itself and the numbers of each status.
(This number does not mean how many products are in this status. It means which products (entity) are in this status):
- Not available – you can see this status when you do not have products in warehouse
- Partially Available – you will see this status when you have part of ordered quantity
- Available – you are able to deliver the products in this status
- Ready to deliver – Delivery Note was created and now you can confirm delivery
- Delivered – if you delivered product, but it’s not invoiced yet
- Invoiced – under this status you can find products after invoicing
- Receipted – this status you can see when you confirm receiving of products from the Purchase Order
- Waiting availability – you can see this status, when you created Purchase Order but did not confirm receiving of products
6.1.Blocks and Tabs of Warehouses
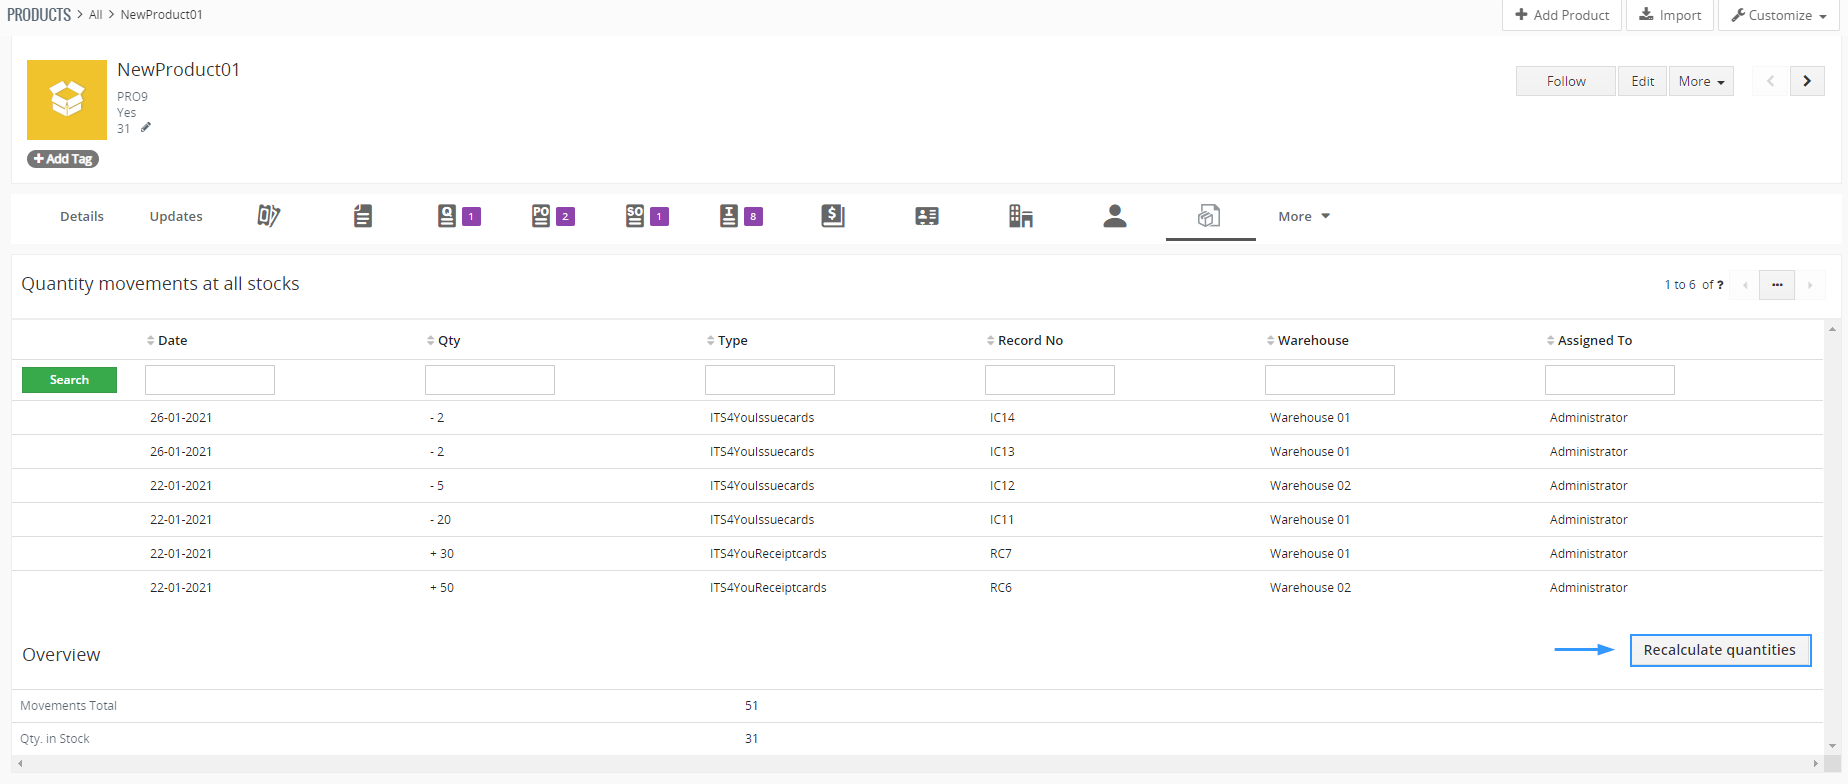
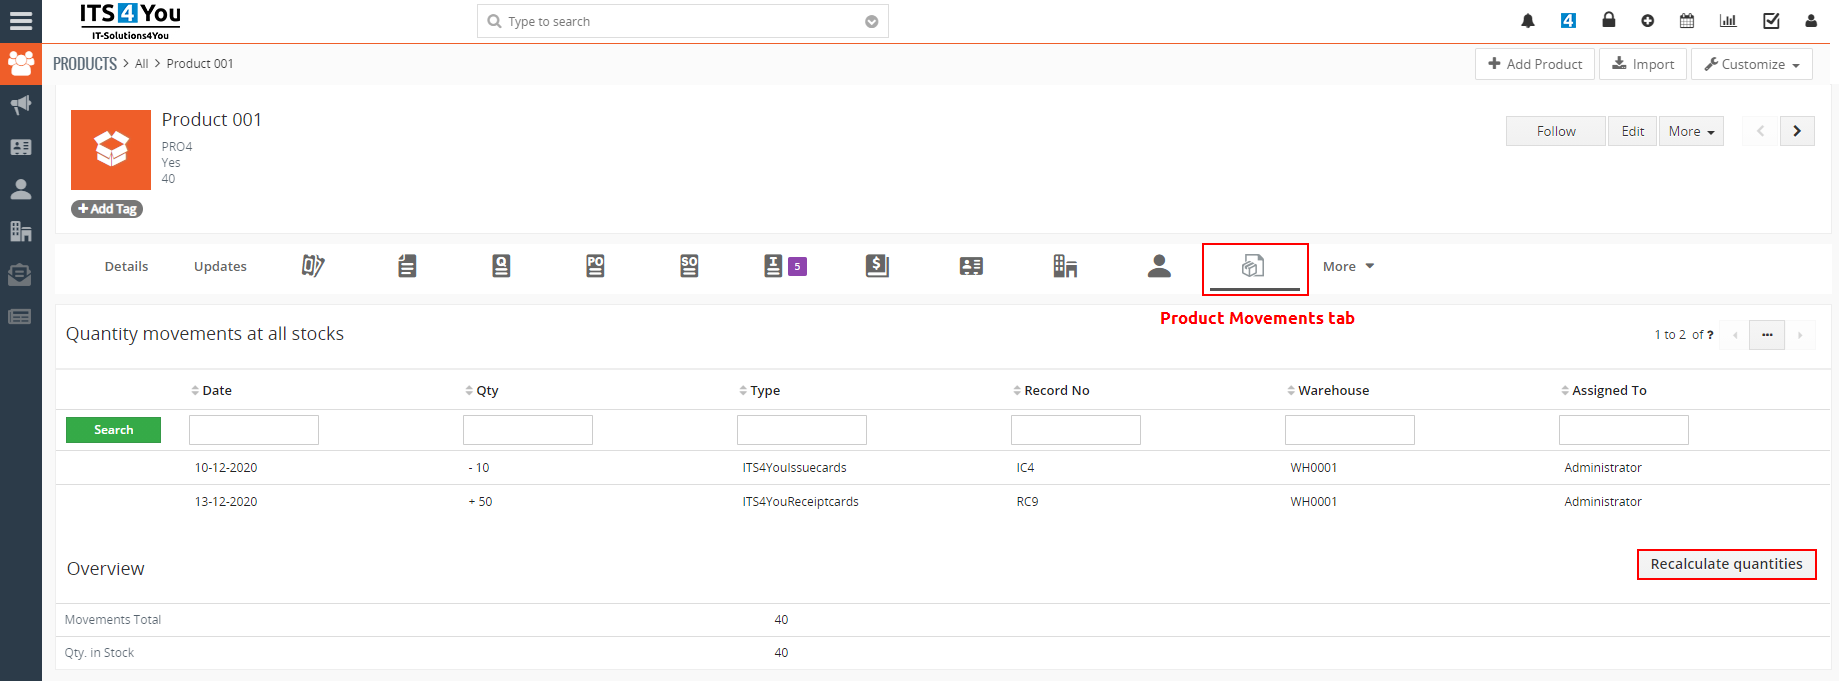
Product Movements block/tab
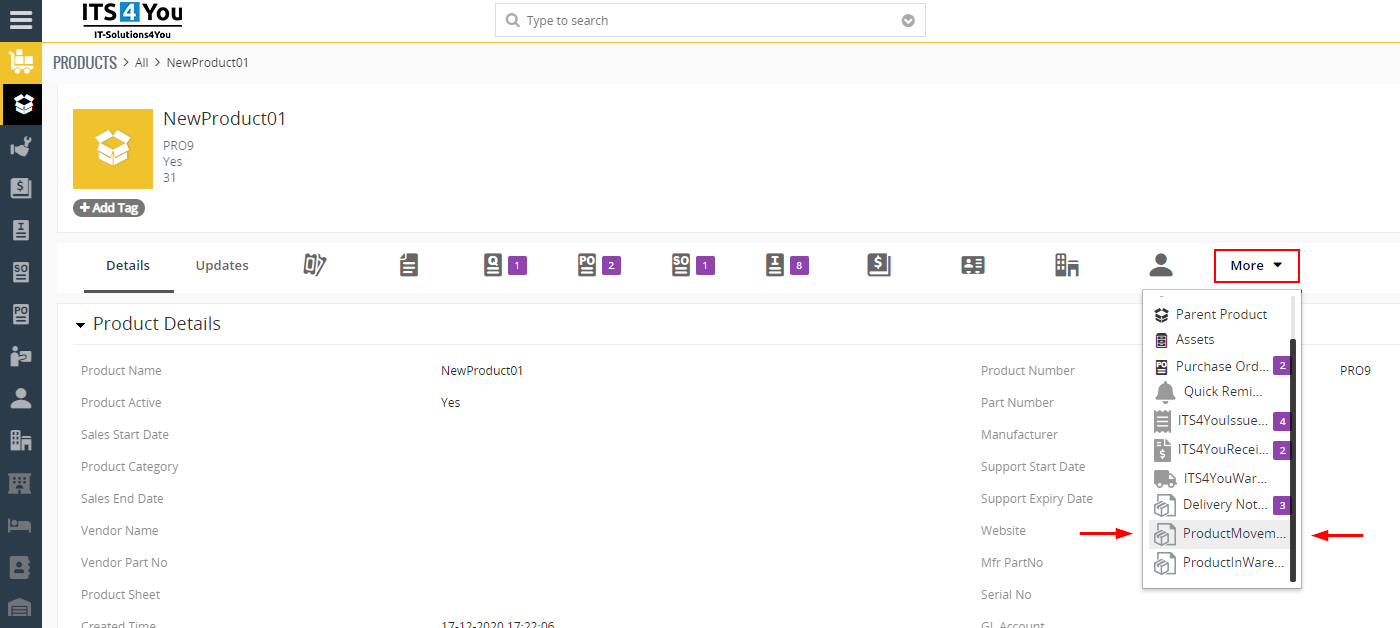
In detail view of Product you can see ProductMovements block.
Here you are able find movements of Product.
To access this block, click on More and from pop-up select ProductsMovements:
The following screen will appear, you can see all movements here and navigate between them, click on the movement to open details, filter movements via search option and more.
Tip: If you are not sure that the quantity is right. Click on ![]() to recalculate quantities.
to recalculate quantities.
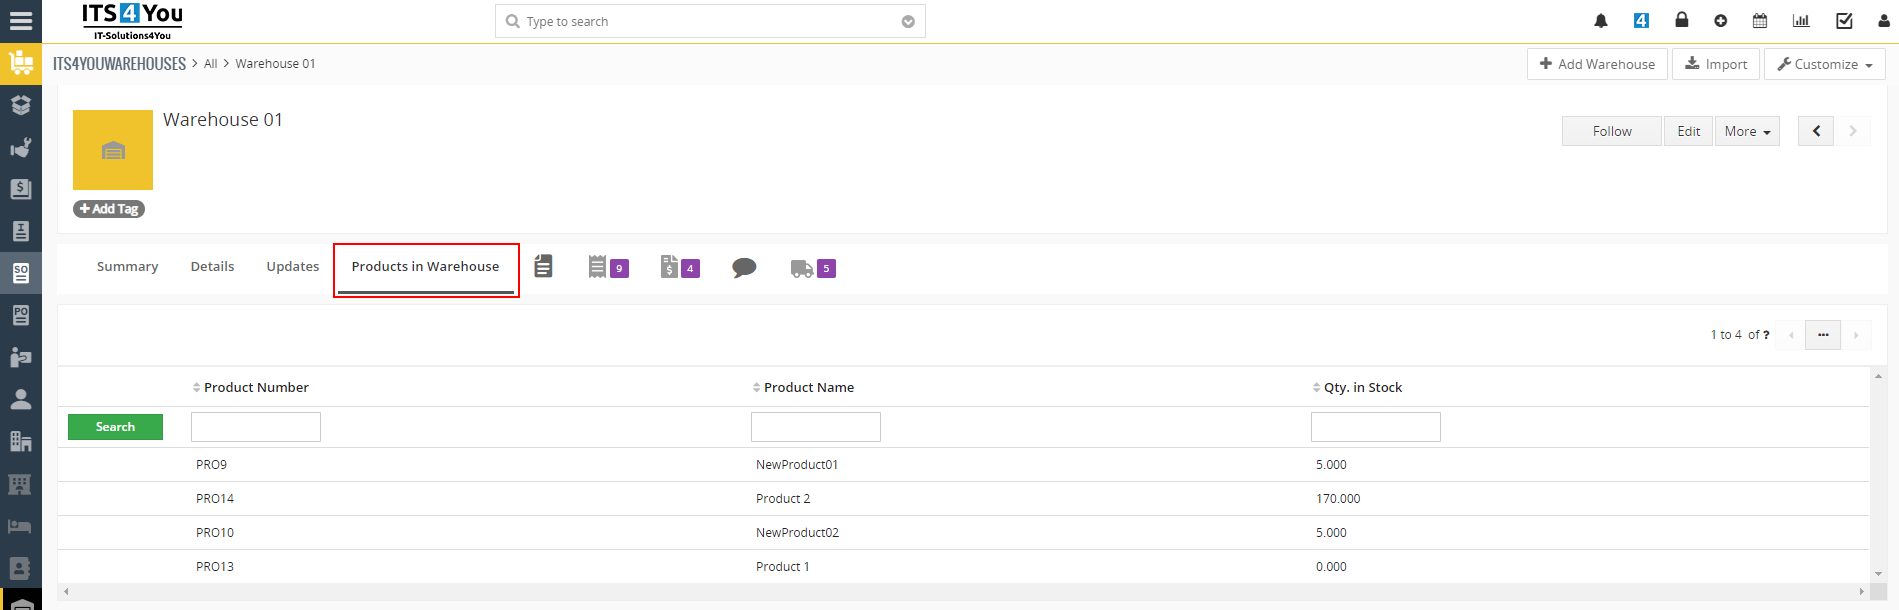
Products in Warehouse tab
In detail view of Product you can see Products in Warehouse relation’s tab.
Here you are able find quantity of Products in Warehouse(s):
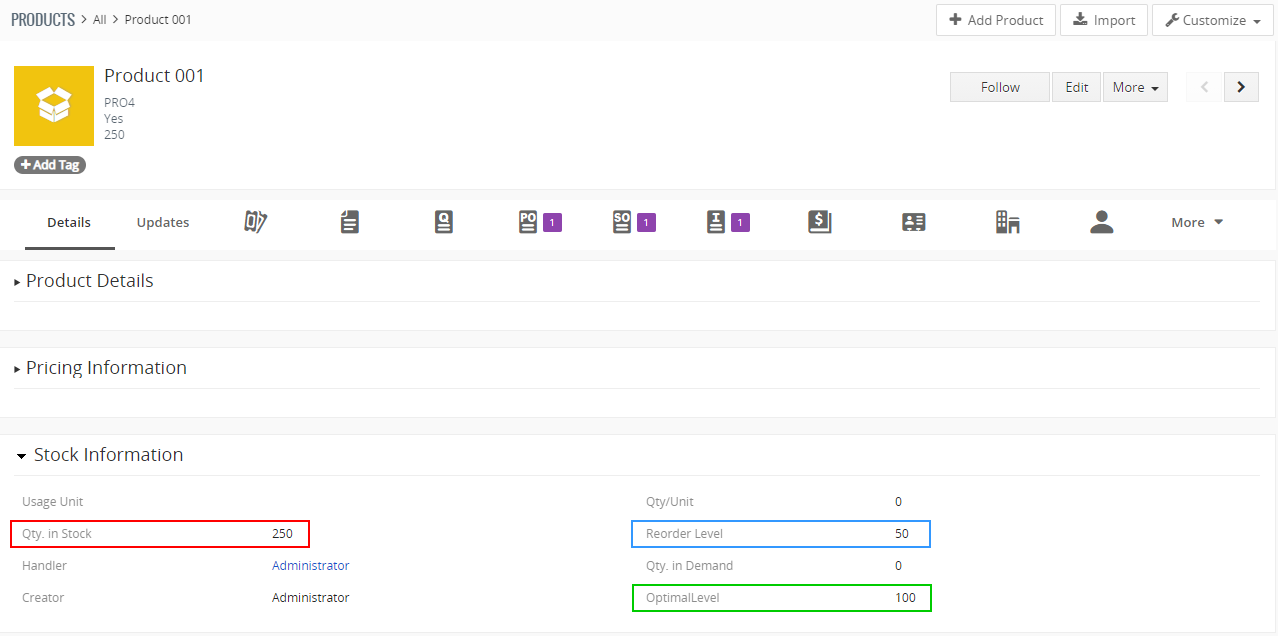
6.2.Variables
Some variables in the Warehouses Action block are probably already known to some users.
But there are few important we want to explain:
- Negative Quantity
- Qty. in Stock
- Reorder Level
- Optimal Level
Qty. in Stock, Reorder Level and Optimal Level variables are found also in Products module.
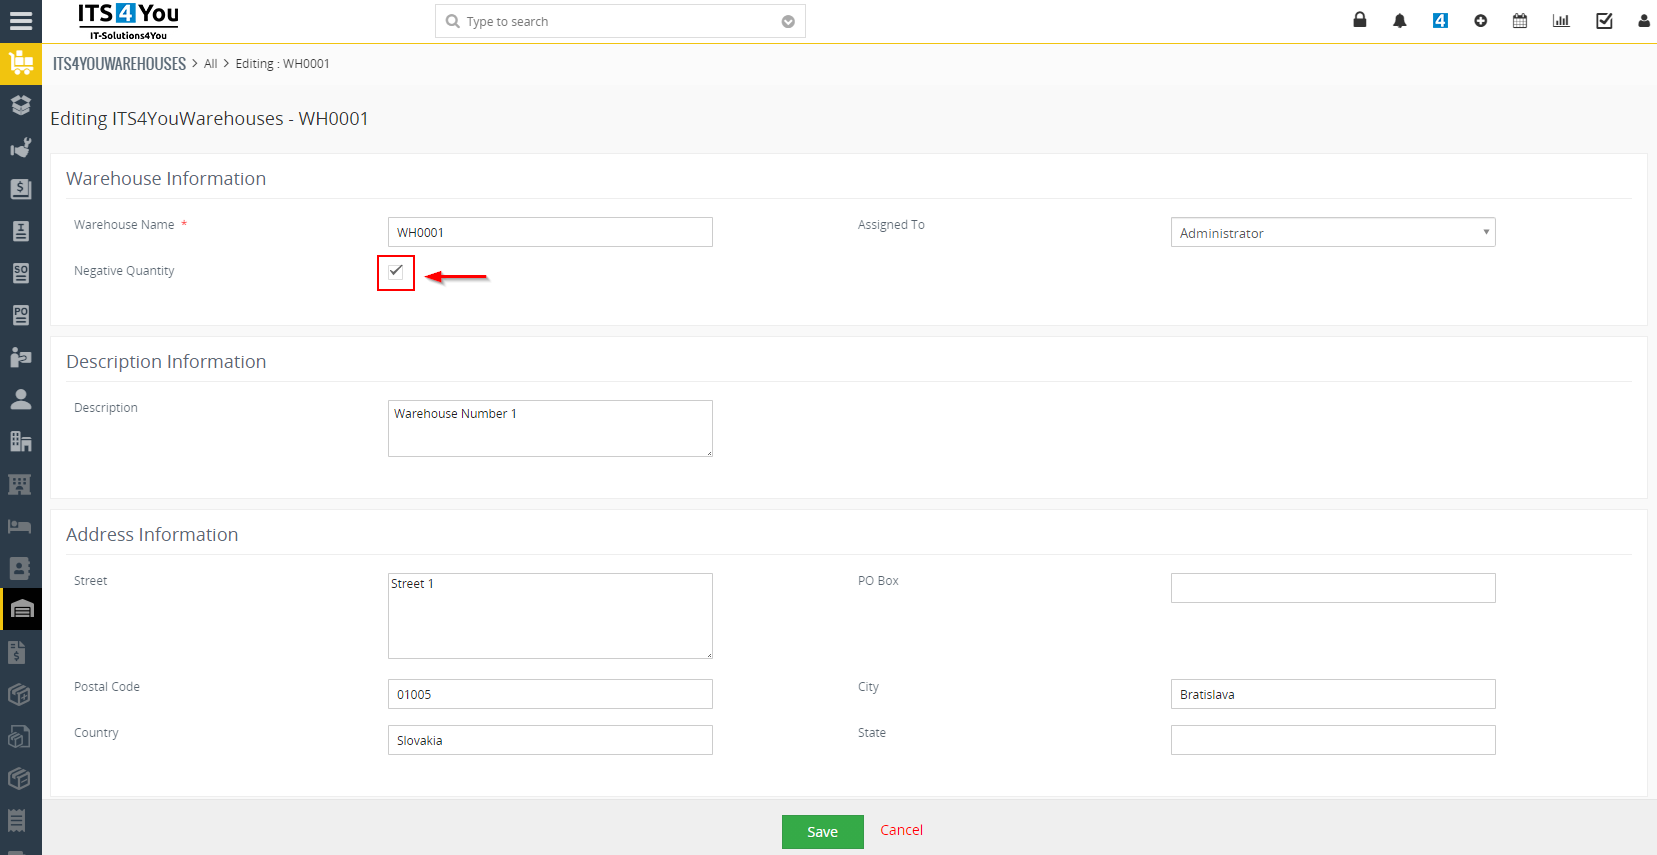
Negative Quantity
You can find Negative Quantity variable in Warehouses module. You can select/check it or not.
When you check it, then Warehouses allows you to create Delivery Note although the quantity of the Products in Warehouses decrease to negative value.
Qty. in Stock
Qty. in Stock variable you can find in Products module.
It is the actual quantity of products in your Warehouses or overall in your system.
(Based if your all products are in warehouses or not, as you can also change quantity manually in Products module).

Reorder Level
Reorder Level variable you can find in Products module.
Reorder Level variable we use to know when it is a good time to create a Purchase Order and fill your Warehouses.
When Quantity of “free” products (Qty. In Stock – all Products from SO and INV) is less than Reorder Level then is the time to create Purchase Order.
Optimal Level
The Optimal Level variable you can find in Products module.
Here you can set how many products you want to have in the Warehouses.
Purchase Order will be automatically created with a quantity of Products that after delivery all Products from Sales Order and Invoices in Warehouses stay Optimal Level products quantity.
7.Additional features
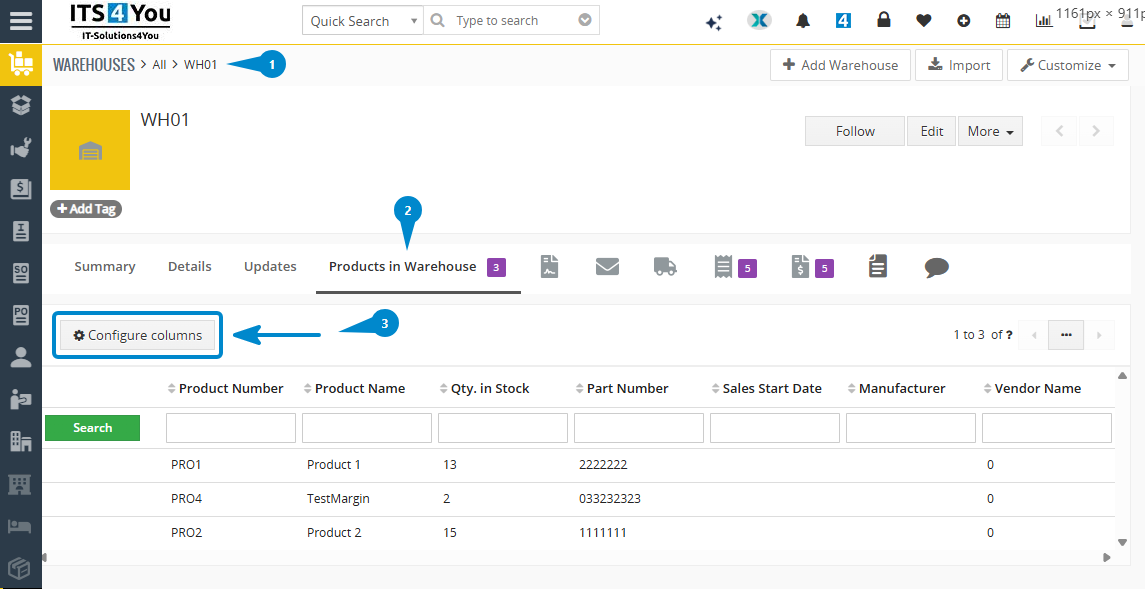
7.1.Products in Warehouse columns settings
Products in Warehouse Columns Settings
Available from version 4.25
In Warehouses, the Products in Warehouse section now supports custom column configuration.
You can define which additional columns should be displayed in the product list by using the
Columns Settings option.
The default columns are always active and cannot be removed. Any columns selected in
Columns Settings are added to the existing default columns and then shown in the
Products in Warehouse list.
How to configure columns
- Open Warehouses.
- Go to the Products in Warehouse section.
- Open Columns Settings.
- Select the columns you want to display.
- Save the settings.
After saving, the selected columns are added to the product list together with the default columns.
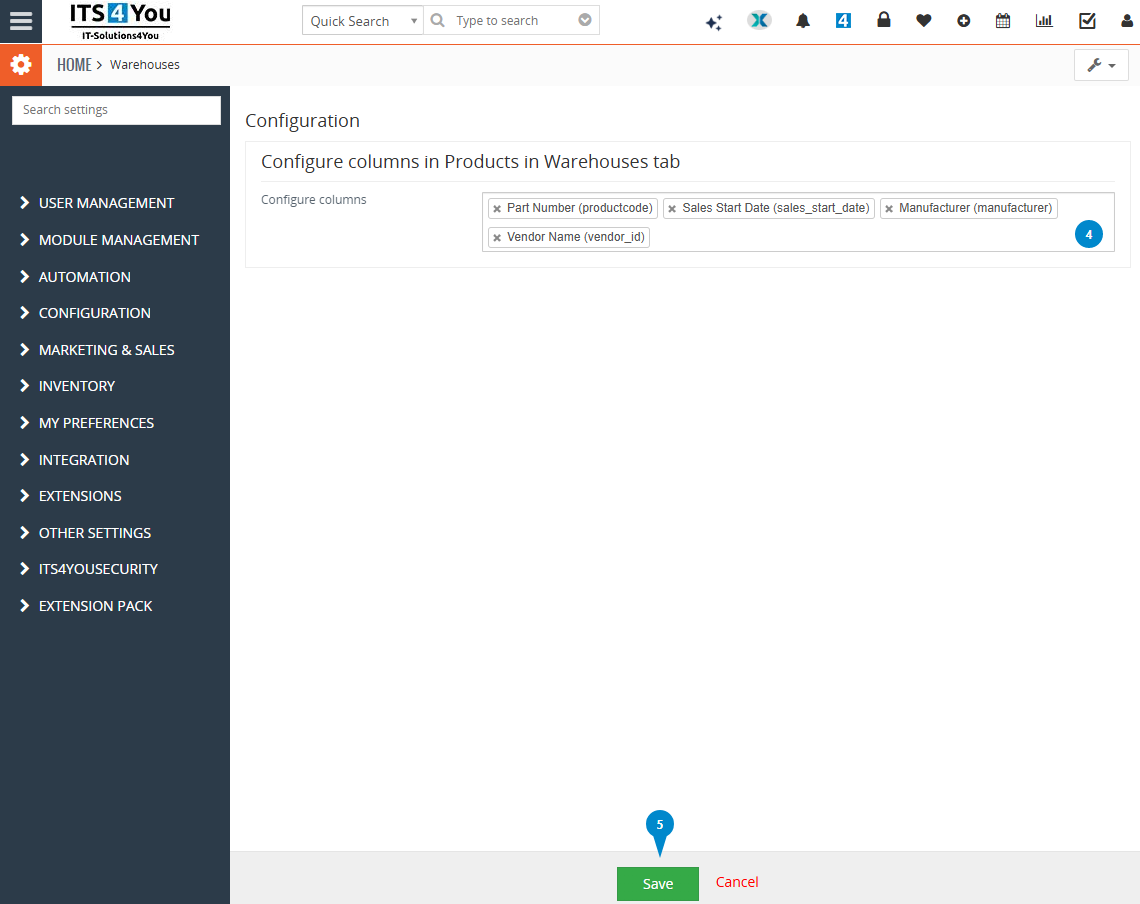
Alternative configuration path
The same column configuration can also be set from:
Warehouse → Customize → Configuration
Use this option when you want to adjust the column setup directly from the warehouse customization settings.
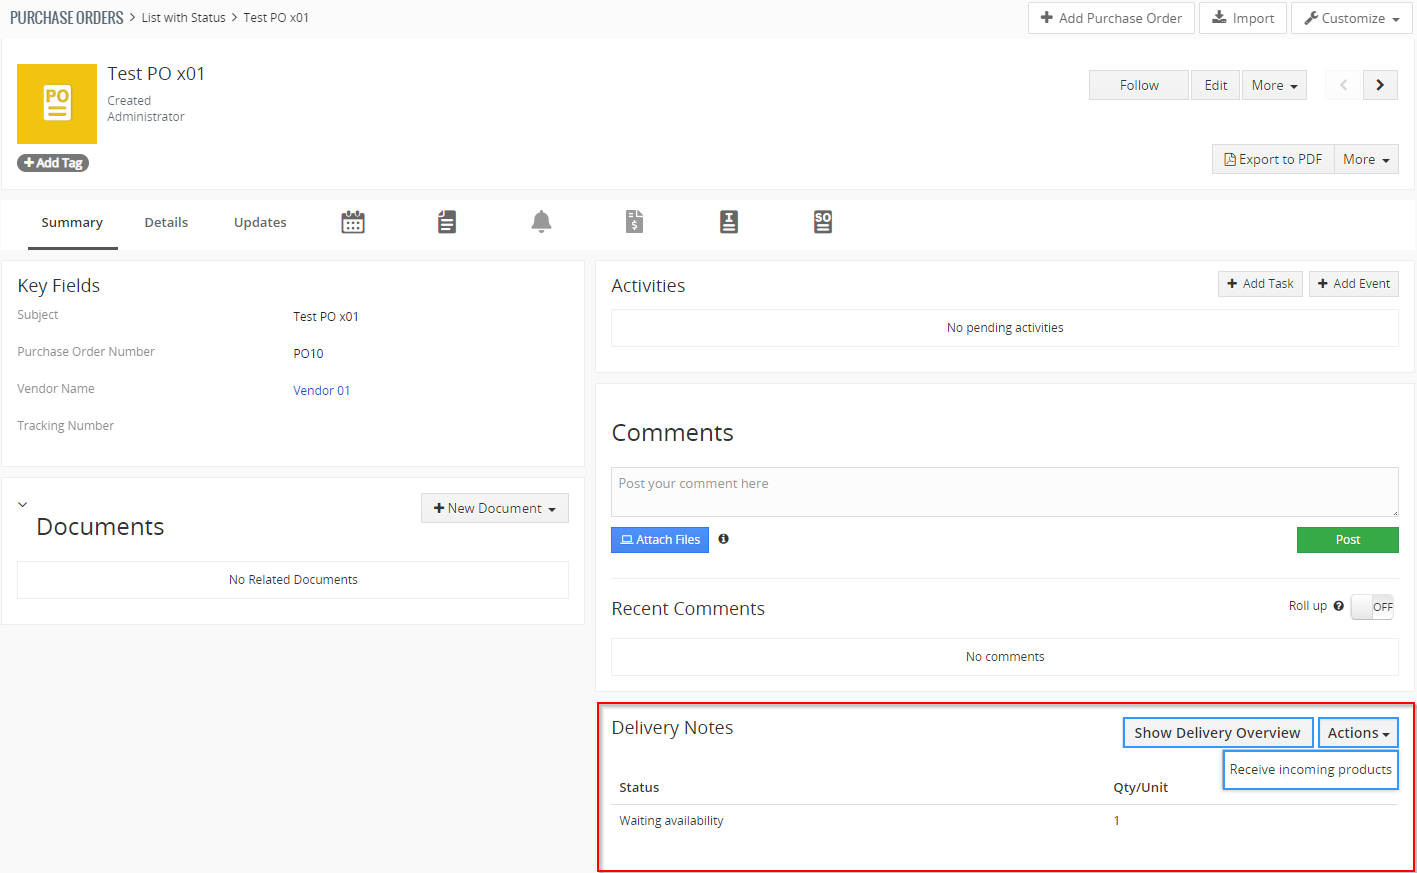
7.2.Receive purchased Products from different modules
There are 3 ways how to receive purchased Products from different modules.
- From Incoming Products module
- From Purchase Orders module
- From Invoices module
From Incoming Products module
All purchased products (from all Purchase Orders) you can see in Incoming Products module.
You are able receipt products in Incoming Products module using button ![]() and selecting “Mass receipt”.
and selecting “Mass receipt”.
From Purchase Orders module
You are also able to receive products from Purchase Order.
Open Purchase Order module and find your Purchase Order.
(To better overview we recommend ListView Colors extension).
Click on ![]() or
or ![]() in WH Action block and choose
in WH Action block and choose ![]()

From Invoices Module
- Open Invoice module and find your Invoice.
Click on or in WH Action block and choose
Warehouses – Invoice, receiving incoming products Delivery Overview in Invoice - Next steps to receipt are same for all previous modules.
If you have more Warehouses then choose Warehouse, where you received the products.
Click on button.
Receive products The products were received. You can see more info Product module, Receipt Card module or in Purchase Orders module.
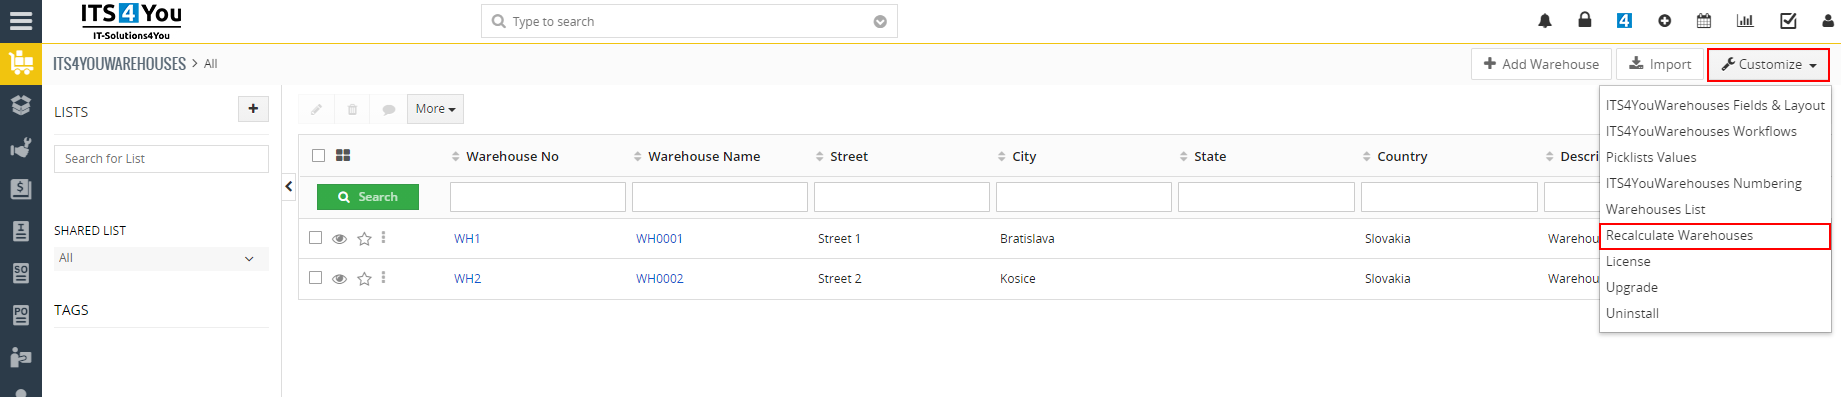
7.3.Recalculate Warehouses quantities
Aren’t you sure about quantity of Products in your Warehouses?
In list view of Warehouses or in Product Movements related tab, you can find an option to recalculate the quantities of Products.
7.4.Enable/Disable Services in Delivery process
In the Delivery Notes module, we have special settings called Preferences, there you can enable Services for Delivery Notes.
You can access these settings via Delivery Notes list view:
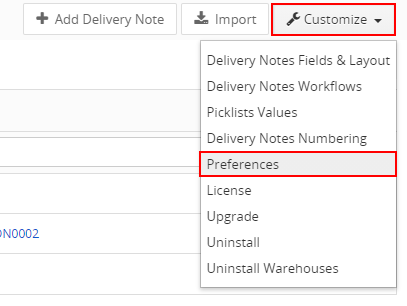
These settings are turned off as default after you install Delivery Notes module to your Vtiger CRM system. You can change these settings via ![]() button.
button.
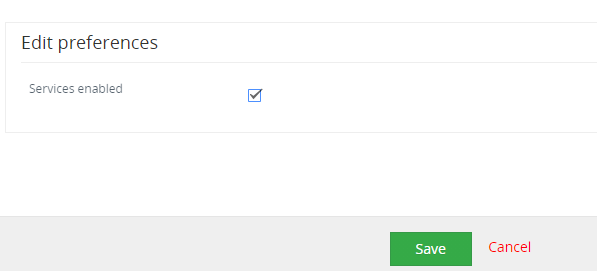
Services enabled
This is for Services module in your Vtiger CRM.
- NO: you CAN’T use Delivery Notes for your Services.
- YES: you CAN use Delivery Notes for your Services.
Example: Delivery Notes are used for Products & Services in Vtiger CRM.
But, Services are turned OFF as default. You can still turn them ON.
![]() We recommend having this feature turned ON. There can be situation when you creating Invoice or Sales Order and you add Products & Services to it. Then you will be need to create Delivery Note for Services, but you will be not able to do that because you didn’t turn ON this feature in the Preferences settings.
We recommend having this feature turned ON. There can be situation when you creating Invoice or Sales Order and you add Products & Services to it. Then you will be need to create Delivery Note for Services, but you will be not able to do that because you didn’t turn ON this feature in the Preferences settings.
8.Settings
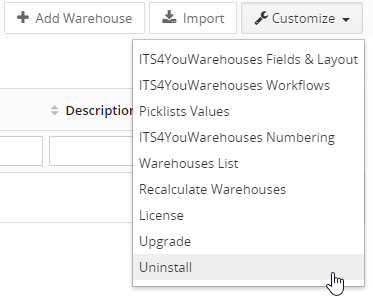
Settings for Warehouses can be found in the List view of module via ![]() button.
button.
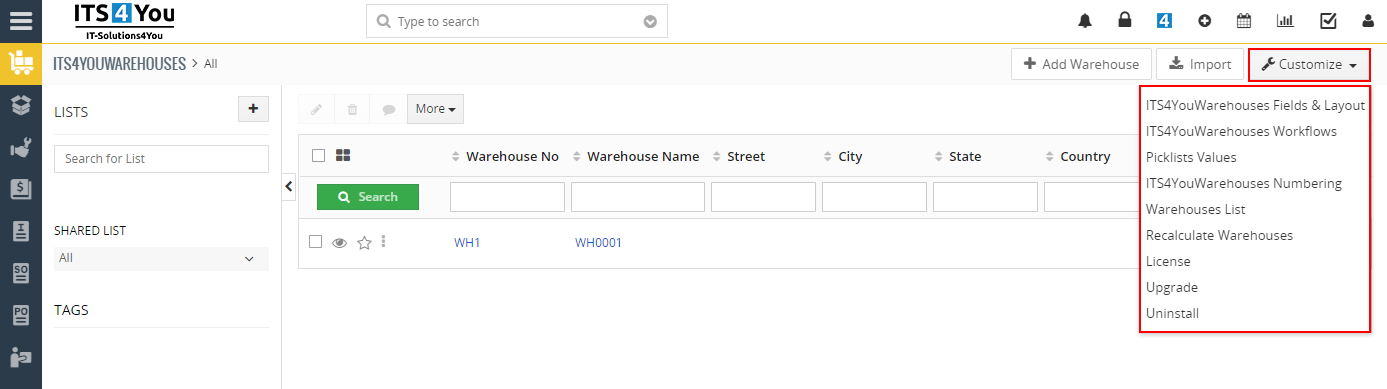
In the Settings you can find:
- Fields & Layouts – manage fields and layouts
- Workflows – create workflows for warehouses
- Picklists values – create pick list values
- Numbering – set numbering for warehouse records
- Warehouses List – list of already created warehouses (list view of extension)
- Recalculate Warehouses – recalculate quantity of items in all warehouses
- License – see if a license is currently active
- Upgrade – updates extension if needed
- Uninstall – remove extension from your CRM along, with all sub-modules
8.1.License Settings
All our modules are using Installer to manage licenses. Please check our Installer pages for more information.
You can access the License settings like its shown below:
(there can be more options from the pick-list, depends on the module)
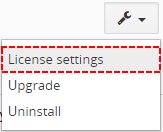
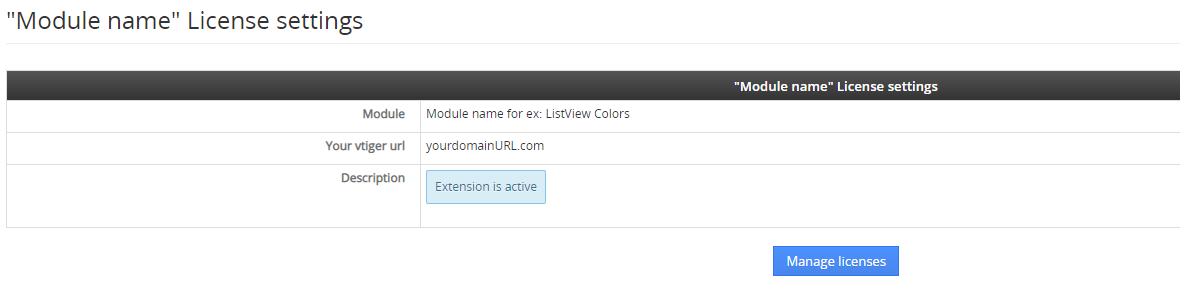
After accessing the License window you can see screen bellow with following information:
- Module name, Your Vtiger domain URL
- Description, if license is activate or not:
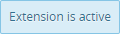 – your license is currently active,
 – your license is not active and you need active it via Installer.
 – the Installer FREE extension is missing on your CRM, please download it.
To activate or manage license, click on the ![]() button.
button.
8.1.1.Deactivate license
If you want to deactivate your license, please provide following steps:
- Go to your Installer, by a click on Notifications Icon
 and then on the button
or via Main Menu – Settings – CRM Settings – Extensions – ITS4YouInstaller - The following screen will appear (see below):

Installer – deactivation of license You can deactivate license by click on the button

![]() Note: The module will be deactivated but not uninstalled and license will be removed from the Activated Licenses tab.
Note: The module will be deactivated but not uninstalled and license will be removed from the Activated Licenses tab.
8.1.2.Reactivate license
To reactivate a license after deactivation, you need to follow the same process as you activated it first time:
- Click on the
 button and enter your license key.

- Confirm with
 button.
When the license was activated you can see module available in the Modules tab below.
![]() Note: To see modules and manage licenses you have to log in to our e-shop with @email and password via
Note: To see modules and manage licenses you have to log in to our e-shop with @email and password via ![]() button (top right screen side in Installer module).
button (top right screen side in Installer module).
8.2.How to update Warehouses
The upgrade of the module is initiated via our Installer or manually.
Updating via Installer (recommended):
- open the Installer in the CRM
- in the Modules tab find your installed module and you should see the
 button available
 - If the new version is available, you will be notified via Installer Notifications icon
Updating Warehouses manually:
Updating module manually is sometimes required when our support team sends you .zip package, if you are having some issues or there is any update or customization available.
Otherwise, we always recommend to use update via Installer.
Update can be done via Module Manager by clicking on the button ![]() and selecting the .zip file.
and selecting the .zip file.
This applies for main module Warehouses & all sub-modules too.
8.3.Uninstall
If you need to remove the module from your Vtiger you have two options:
- Uninstall via Installer.
- Manually via going to module Settings and choose Uninstall option.
⚠️ Uninstalling Warehouses main module will uninstall all sub-modules!
8.3.1.Uninstall via Installer
You have also option to remove the module via Installer window by accessing the Settings – Uninstall window:
- Go to your Installer, by a click on Notifications Icon and then on the button ,
or via Main Menu – Settings – CRM Settings – Extensions – ITS4YouInstaller - Find the module you need to uninstall in the Modules tab
- Via
 pick list button choose the Uninstall option, you will be redirected to the Uninstall window.
 - Click on
 button

- Confirm uninstall with
 button
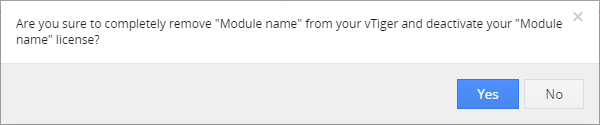
Now, the module has been removed from your Vtiger and your license has been deactivated. To use this module again, you need to provide installation and validation steps (see Installation chapter).
8.3.2.Manual Uninstall
There is also available option to remove Warehouses from your Vtiger manually.
To uninstall please provide following steps:
- Go to the List view of Warehouses and via Customize option select Uninstall.
- Click on button.
 Confirm uninstall with
  button.
Now, Warehouses and all sub-modules are removed from your Vtiger and your license is deactivated.
To use Warehouses again, you need to provide installation and validation steps (see chapter 2. How to install Warehouses).
This can be applied for sub-modules, each one can be uninstalled separately.
9.Change Log
- Check latest versions available and fixes applied
- What was changed/added to manual
9.1.Warehouses
- 3 December 2021: 4.9
- resolved issues and errors related to deactivation modules like Purchase Orders, Sales Orders Invoice, etc., if modules will be inactive error will not appear anymore
- 19 October 2021: 4.8
- added Product Bundles compatibility with Warehouses
- resolved issues with negative quantity stock when creating Issue Cards
- resolved issue with decimals used in the quantity fields for WH Delivery Notes, now the decimals can be used based on Vtiger user preferences
- 8 August 2021: 4.7
- added option to search in Products when creating Warehouse Transfers
- 28 July 2021: 4.6
- Vtiger 7.4 compatibility
- 30 June 2021: 4.5
- Issue cards, return products operation will now properly create a Receipt Card, also the whole process was enhanced if you are returning a partial quantity
- 6 June 2021: 4.4
- the changes have been made for Receipt Cards where the Date of receipt is no longer mandatory field
- improved the process creating Receipt Cards and Warehouse Transfers and their relations, now it will be more clear for users
- ordering products will now load price from Product field Purchase Cost
- Receipt cards now fully support TAX regions
- 30 April 2021: 4.3
- resolved issues with Reports compatibility for Receipt Cards, Issues Cars and Delivery Notes
- WH Delivery notes can now operate with decimal quantity
- fixed an issue with Delivery Notes where the Deliver product’s operation automatically set the status to Invoiced even if Invoice was not created. That way, operation to Invoice products was skipped
- 21 April 2021: 4.2
- fixed issue where Warehouse Transfer status was not changed when the Products were delivered
- 10 February 2021: 4.1
- minor bug changes which improved stability and removed some unwanted errors and warnings
- 1 February 2021: 4.0
- release of Warehouses extension for Vtiger 7.0
9.2.Manual of Warehouses
- February 2021: manual based on Warehouses 4.0 version
- first initiate for Vtiger 7.x
10.Products in Warehouse how to add new fields
Additional fields in the Products in Warehouses tab from version 4.25 Warehouses released on 17.6.2026
You can now display additional product fields in the Products in Warehouses tab. To enable this feature, add the following code to your config.inc.php file:
$ITS4YouWarehouses_ProductsInWarehouseExtraFields = array(
    'unit_price',
    'sales_end_date',
    'serial_no',
);
The values in the array represent field names from the Products module. For example, unit_price displays the product unit price in the Products in Warehouses tab.