

1.Introduction
Google Calendar Sync created is useful extension that allows you to synchronize your Vtiger and Google calendar.
Synchronization is via Cron (Scheduler) fully automatized in the Vtiger CRM.
Main features:
- Each Activity type can be synchronized into own Calendar
- Save your time – Automatic synchronization by Cron
- Choose direction of Sync like you need – One-way or Bidirectional
- Safe synchronization
- Each creation, modification or deletion in Vtiger or Google is synchronized
- Records from Vtiger are synchronized immediately

2.How to install Google Sync
There are currently two options how to install extension:
- (Recommended) Using our Free extension Installer
(Please visit the Installer page for more info) - Manually installation using a .zip file
(You still need to have Installer in order to activate license)
Since December 2019 we launched our extended version of Installer which helps you install / update modules and manage license keys.
⚠️ Uninstalling Google Sync will remove all saved Settings!
2.1.Installation via Installer (default)
Make sure you have Installer installed, you can download Installer via our E-shop when you log in under Free Downloads section.
Next, simply install Installer via Module Management in Vtiger CRM by importing the .zip file you downloaded.
After successful installation, you can access Installer in two ways:
- by a click on Notifications Icon
 and then on the button
- or via Main Menu – Settings – CRM Settings – Extensions – ITS4YouInstaller
![]() Note:
Note:
- To see modules and manage licenses you have to log in to our Installer with @email and password via
 button (top right screen side in Installer module).
 - Login is same for Installer and for our E-Shop.
After log in, you can activate Extensions or our Packages licenses associated to your account via ![]() button.
button.
When the license was activated you can see module available in the Modules tab below.
Simply hit the ![]() button and Extension is installed now.
button and Extension is installed now.
![]() You can only activate Single-key licenses, which are assigned to your Email Account you made purchase with and with which you are logged to the Installer.
You can only activate Single-key licenses, which are assigned to your Email Account you made purchase with and with which you are logged to the Installer.
Package licenses can be logged in via Access Key (license key) following also activation via ![]() button.
button.
2.2.Manual installation
There is also a way to install / update the extension manually in some scenarios:
- Manual installation or update of the extension can be requested if you contact our support because you are facing some issues with extension.
- Standard way of installation and update is using our Installer. In some rare cases we can send you .zip file to update the extension manually.
Please provide following steps in order to install Google Calendar Sync Manually
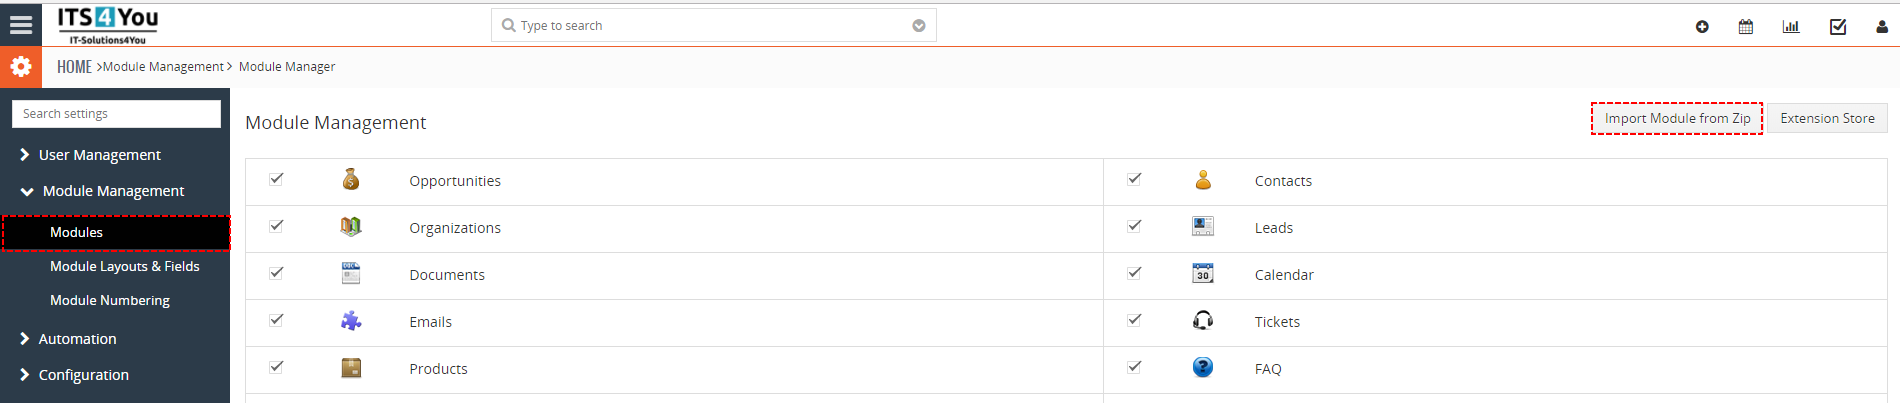
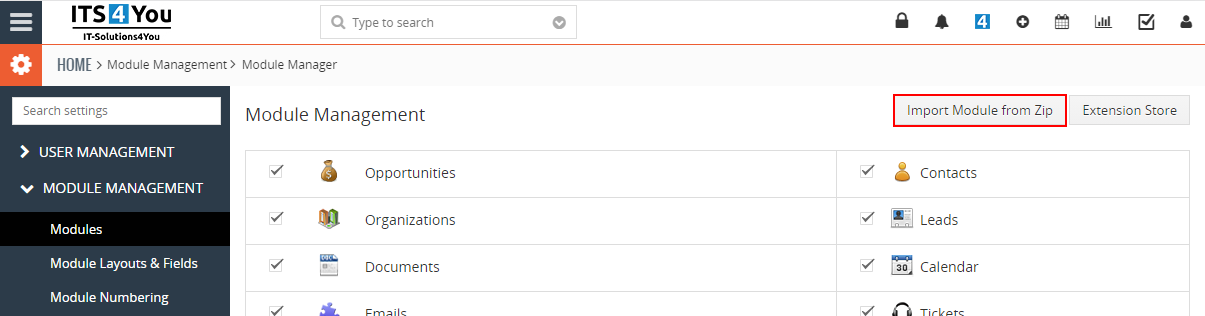
- Install the .zip (package) file of the Google Calendar Sync module via CRM Settings -> Module Management-> Modules. Click on the
 button.
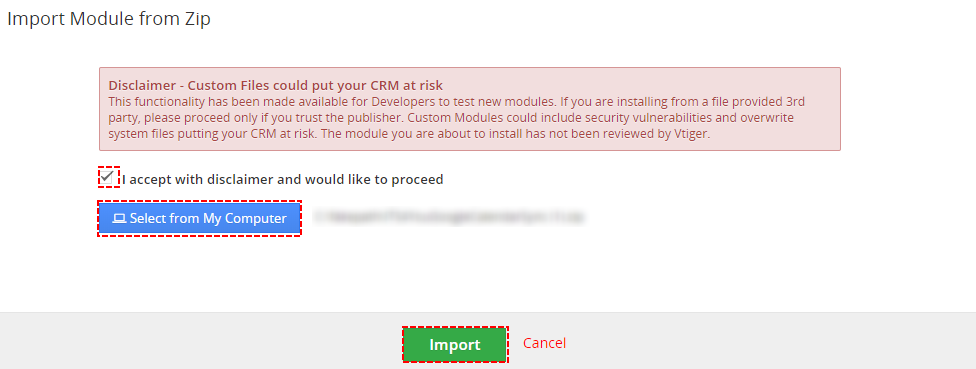
How to install Google Calendar Sync - Select the .zip (package) file that you downloaded from our shop. Please check that you accepted the disclaimer and would like to proceed. Click on the
 button.
How to install Google Calendar Sync If you have after this step error message: Sorry! Attempt to access restricted file. Please check if folder test/vlib has correct write permission for browser (apache, www-data). - Verify the import details parsed from the .zip (package) file. Please check that you accepted the license agreement and click
 to proceed or Cancel to cancel.
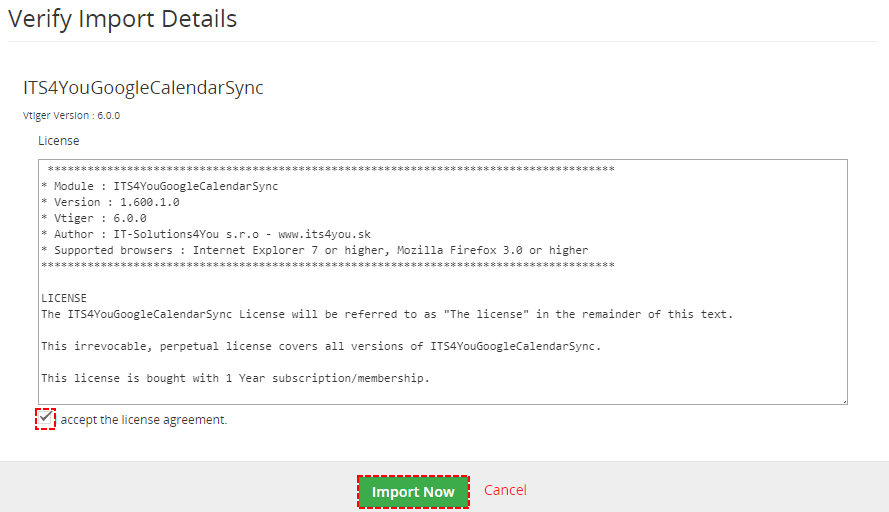
Accept agreement – Google Calendar Vtiger 7 Sync - Google Calendar Sync for Vtiger 7 was imported

Import Successfull – Google Calendar Vtiger 7 Sync
3.Before you start using Google Calendar Sync
Before you start using Google Calendar Sync for your vtiger CRM Open Source, you need to create a Project in Google get the API credentials for correct authenticate you and your Vtiger.
Also in the project settings you will be needed to validate your CRM URL, this will be explained further in the next chapters.
3.1.How to create Project in Google and receive credentials
The process of Creating the Project in Google comprises three steps, which we will elaborate on in greater detail in the upcoming three chapters.
Please follow the order of chapters:
- A) Create Project
- B) Verify Domain
- C) Create OAuth client ID
3.1.1.A) Creating Project
The first important step is creating a Project in the Google APIs.
Please follow instructions below:
A) Creating Project:
- Please visit a page:
https://console.developers.google.com/project
Next log in with your Google Apps or Google (Gmail) account and click on the button .
.

Create Project – Google Calendar Vtiger 7 Sync - A pop-up window will appear, check the Terms of Services and fill project name and click on
 button.
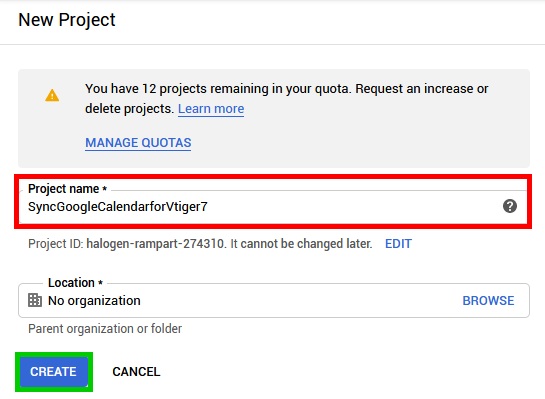
Fill Google Project Name – Google Calendar Vtiger 7 Sync - Your project has been created.
It may take a few seconds until your project will be shown: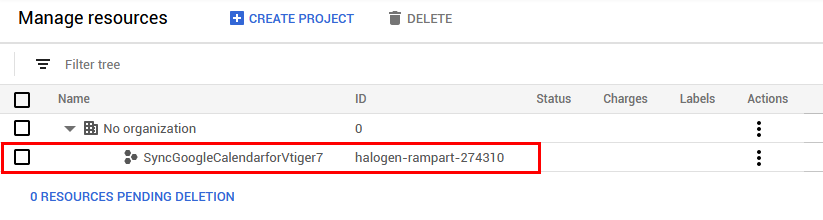
Select Google Project – Google Calendar Vtiger 7 Sync - Next, open Dashboard of Google API:
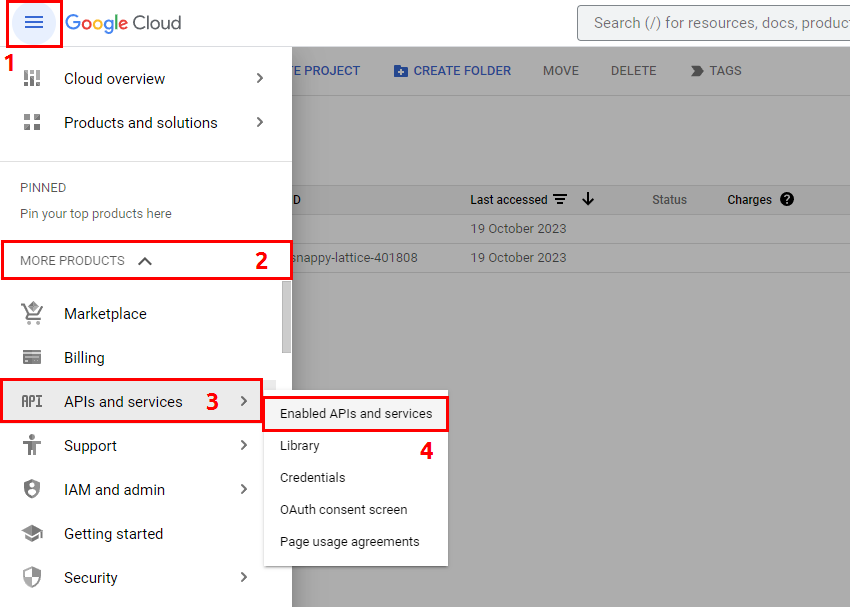
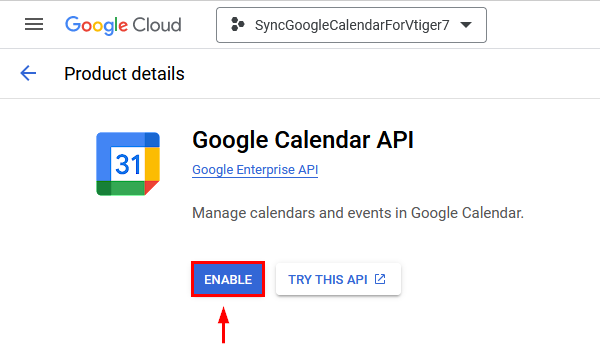
Open Dashbard of Google Project – Google Calendar Vtiger 7 Sync - Enable Calendar API by clicking on
 button:
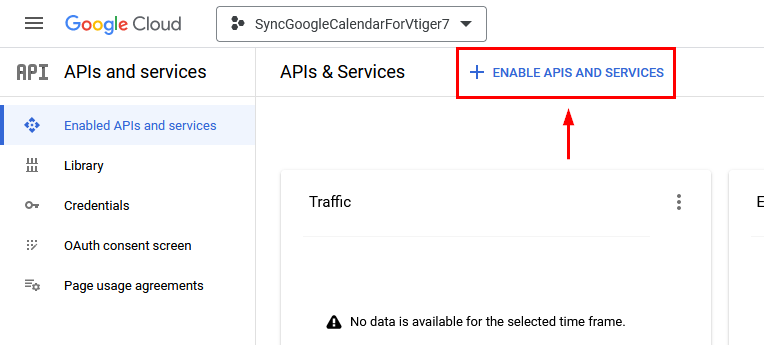
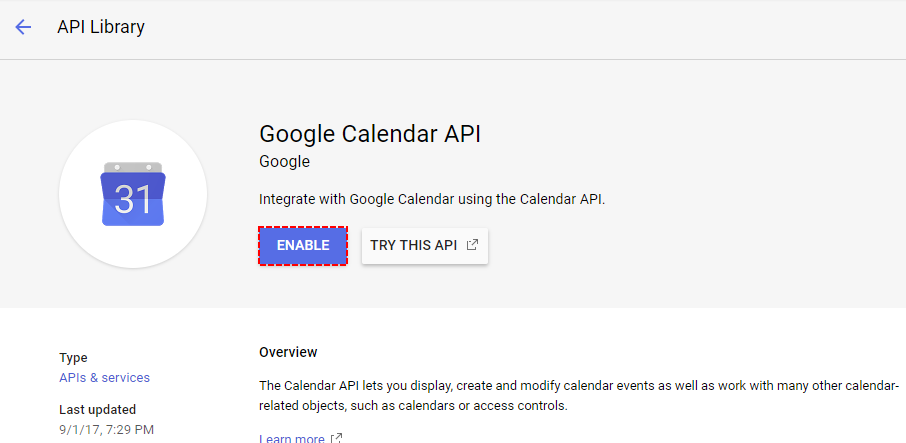
Enable APIS – Google Calendar Vtiger 7 Sync - Select or find Google Calendar API:
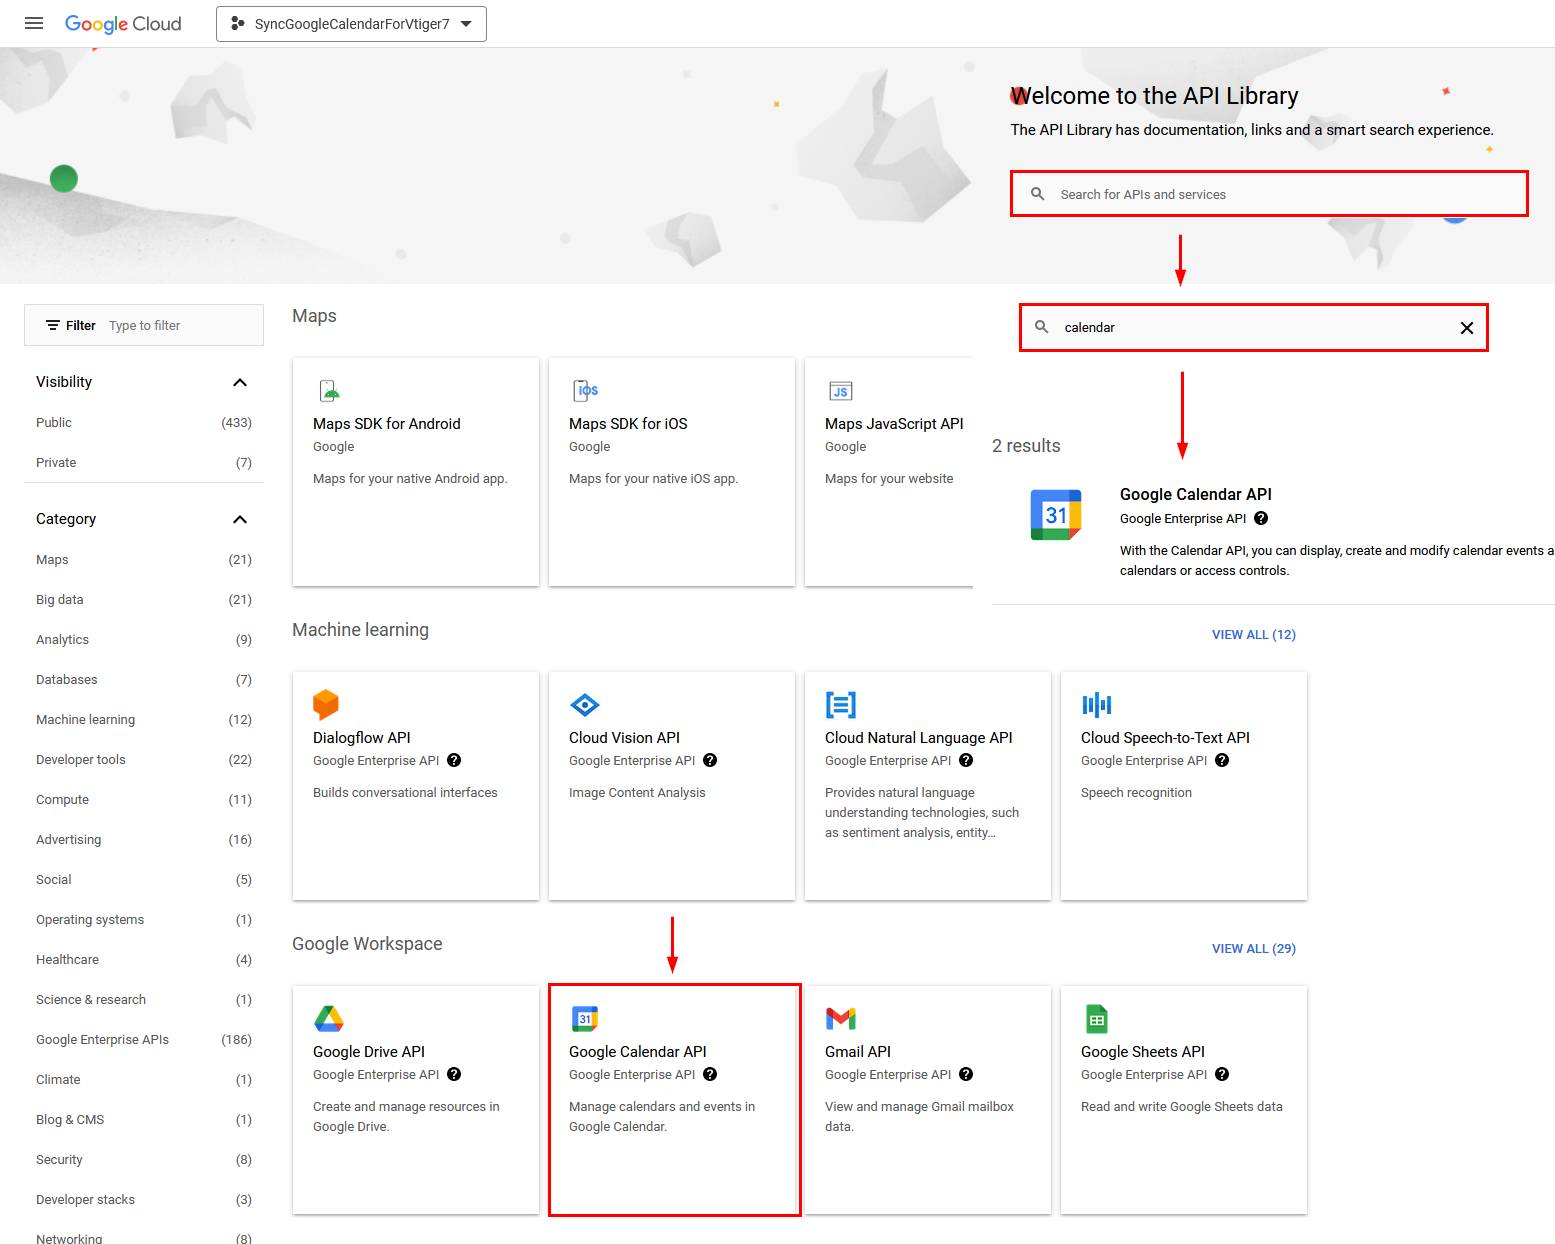
Find Api Google Project – Google Calendar Vtiger 7 Sync - Enable Calendar API:
Enable API Google Project – Google Calendar Vtiger 7 Sync - API has been created:
(Below view will be shown after creation, if you lost this detail view, just find the Google Calendar API in the list of APIs when you click on Enable APIs and services.)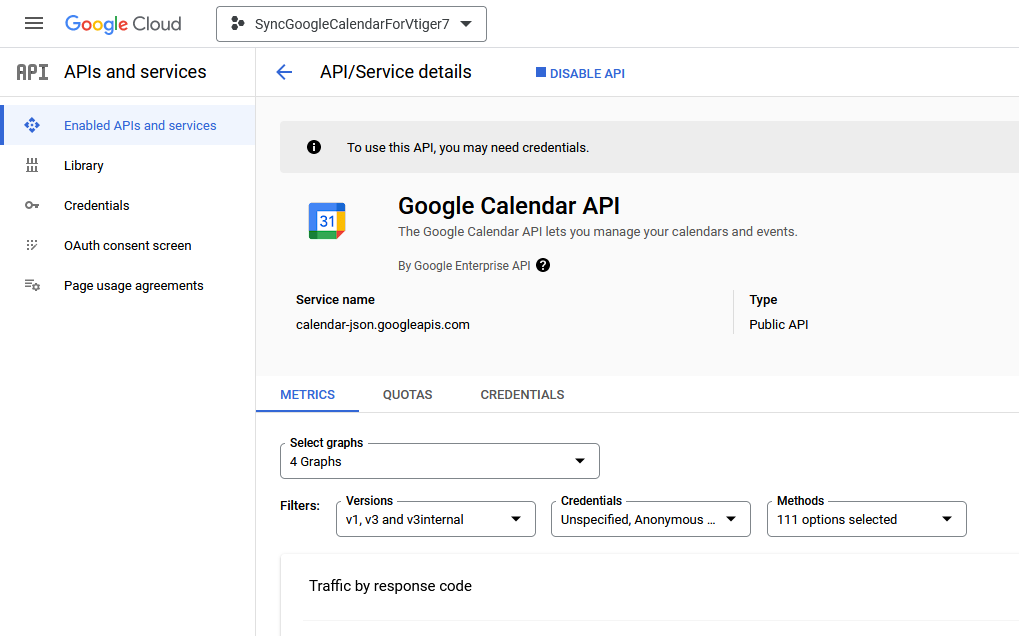
API Google Project – Google Calendar Vtiger 7 Sync - Now you need to set OAuth Credentials:
OAuth Credentials Google Project – Google Calendar Vtiger 7 Sync - You need to Configure consent screen first:
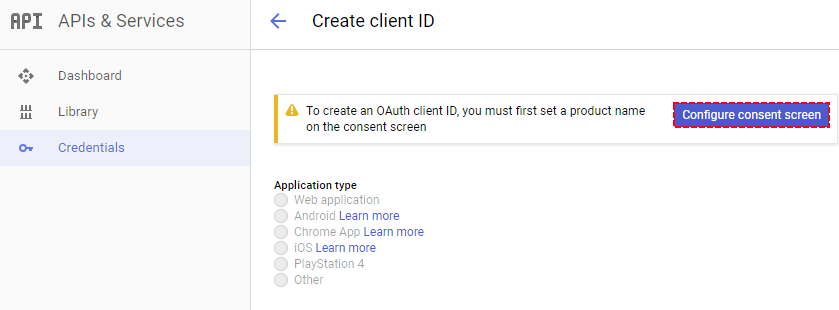
Configure consent screen Google Project – Google Calendar Vtiger 7 Sync - Select User Type:
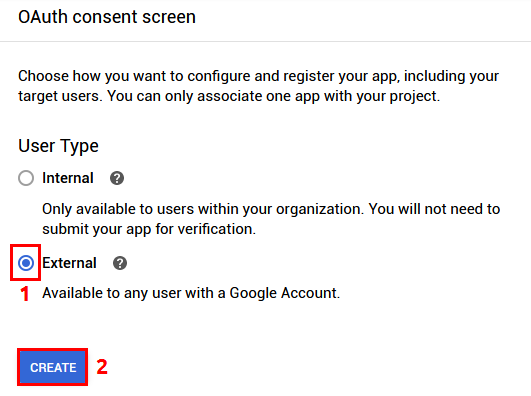
Selecting User Type – Google Calendar Vtiger 7 Sync - Next, fill up the name, support email and developer contact at the bottom, then scroll down and Save:
(In some cases, when filling the name field, word Google can’t be used, if you encounter error upon Saving remove the Google word and use just Calendar Sync 7)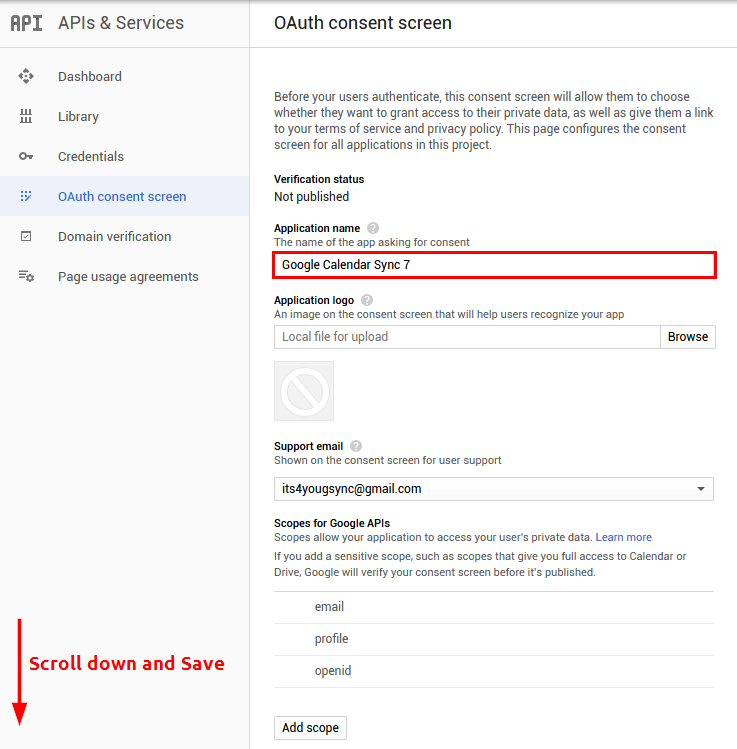
Set name of OAuth Google Project – Google Calendar Vtiger 7 Sync - Last step is to Publish the App, so click on the button and confirm.
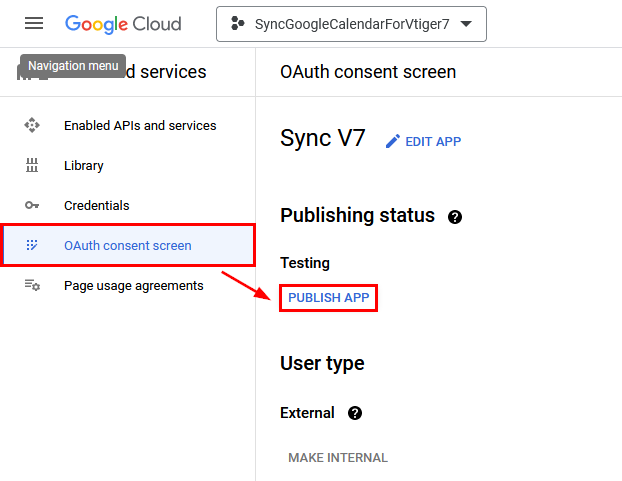
Publish App – Google Calendar Vtiger 7 Sync
3.1.2.B) Verify Domain
Before we proceed to the Creating OAuth Client ID for Google Sync, you need to verify your domain.
Please follow instructions below:
B) Domain verification before creating OAuth Client ID:
Please follow next steps:
- Click on OAuth consent screen and on Edit App button for your already created OAuth.
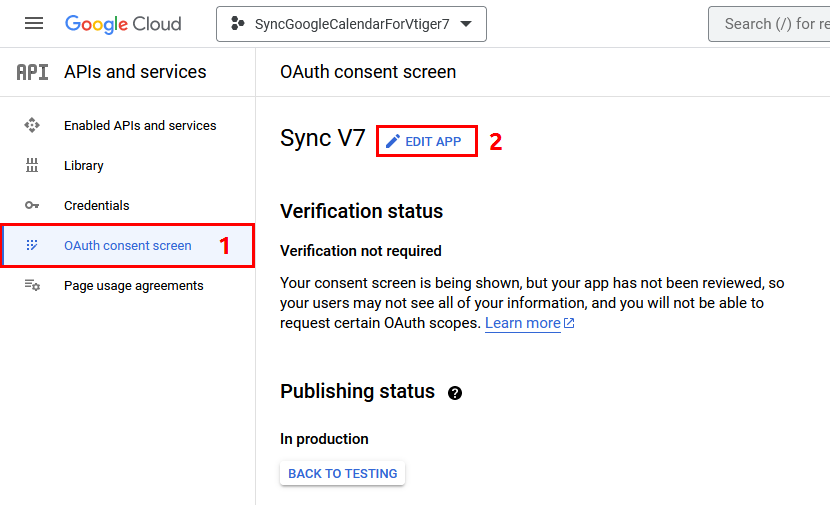
Domain verification – Google Calendar Vtiger 7 Sync - Scroll a bit down and look for Authorised domains then click on Google Search Console:
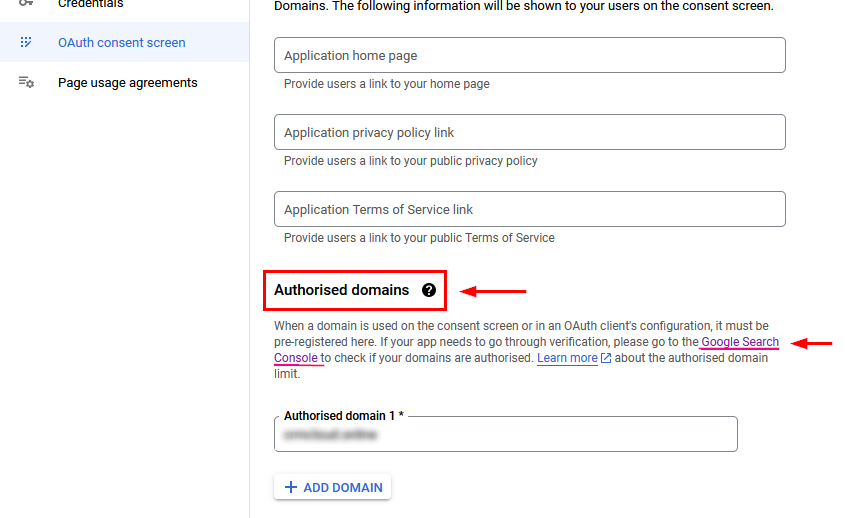
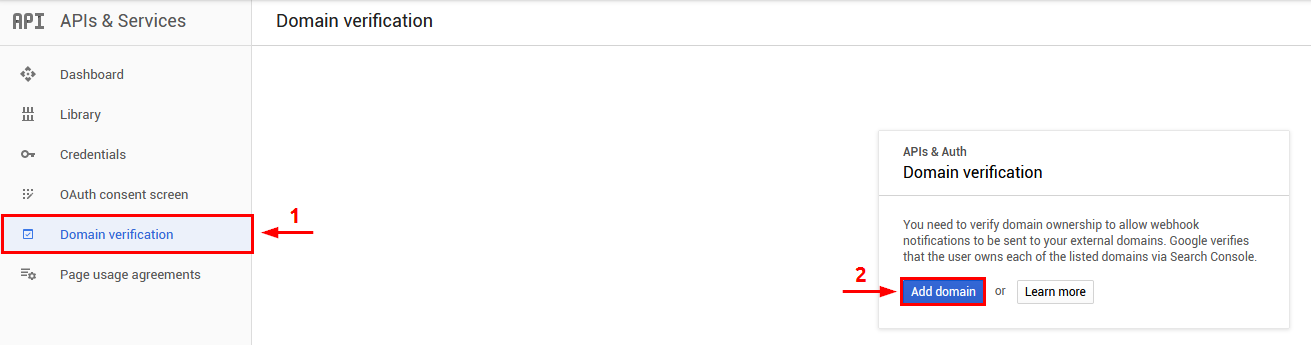
Domain verification – Google Calendar Vtiger 7 Sync - The next screen will appear, please click on

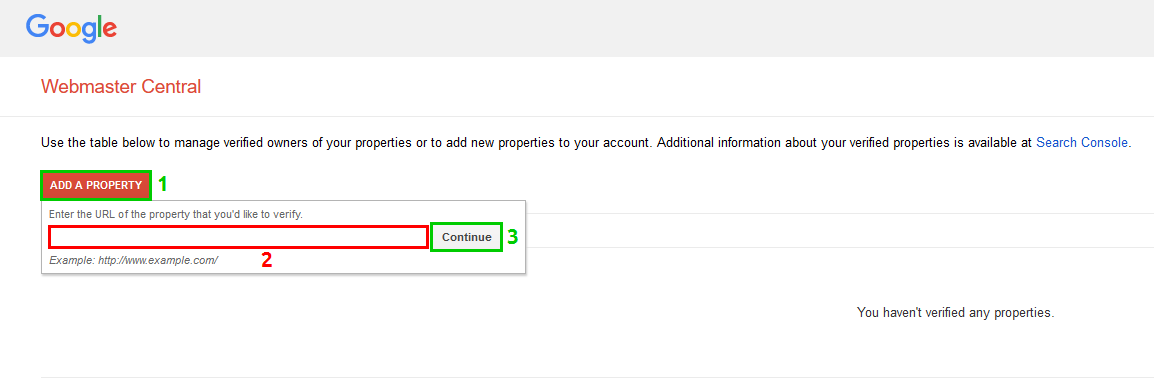
- You will be taken to the Google Search Console, click on drop down menu and then on +Add property:
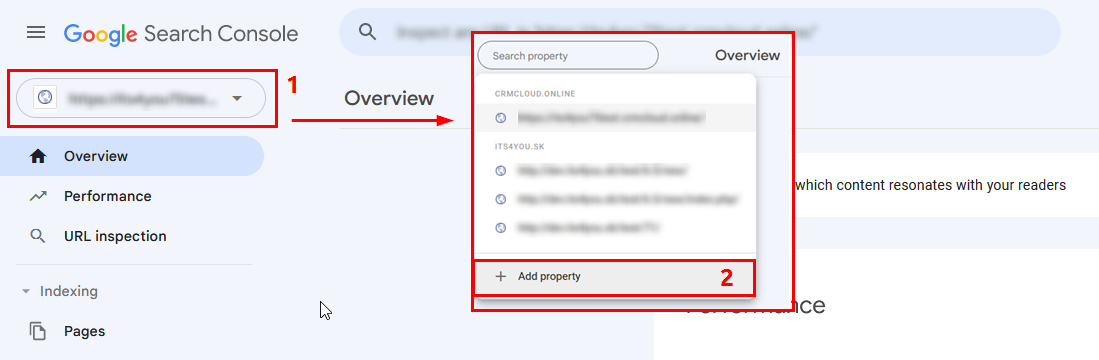
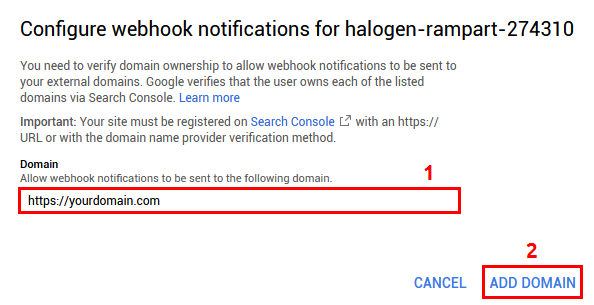
Domain verification – Google Calendar Vtiger 7 Sync - Google Search Console window, will appear. Same as on the Image below, insert your CRM url and confirm with Continue button.
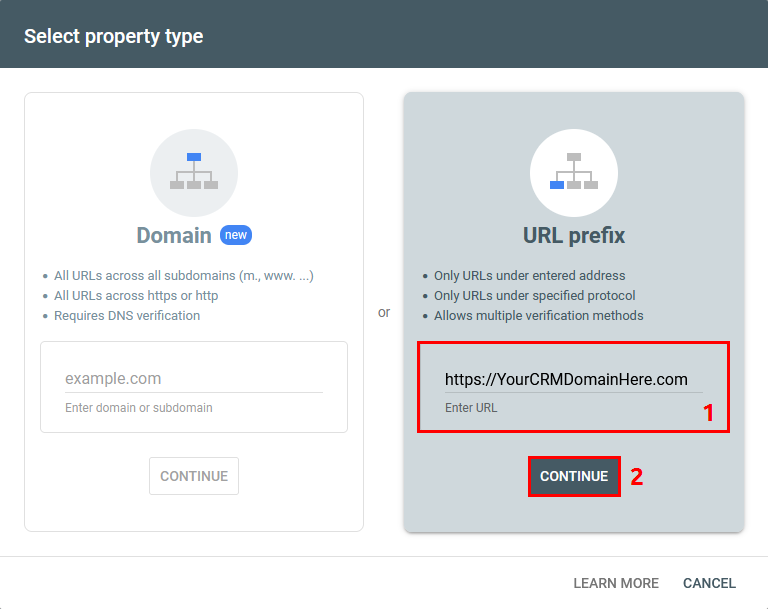
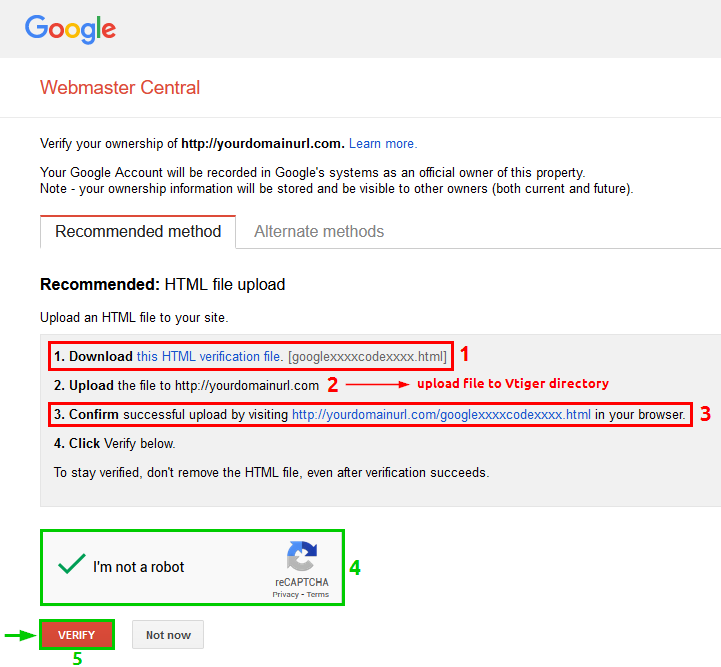
Domain verification – Google Calendar Vtiger 7 Sync - Next, you will be asked to download .html file and copy it to the folder where your CRM is installed and then click on Verify.
Your domain now has been verified.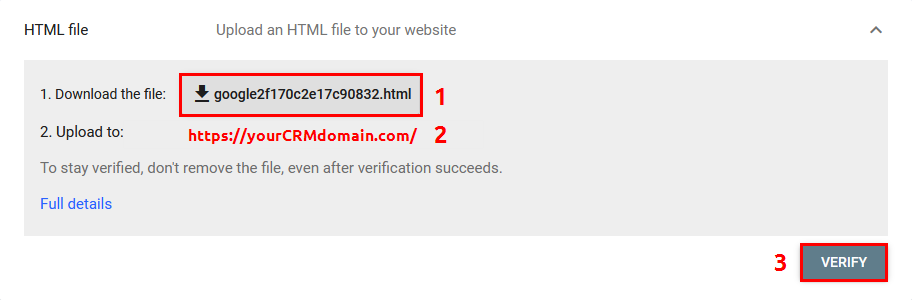
Domain verification – Google Calendar Vtiger 7 Sync - Now again go back to your OAuth and same as before look for Authorised domains and click on +Add Domain and enter your CRM domain .
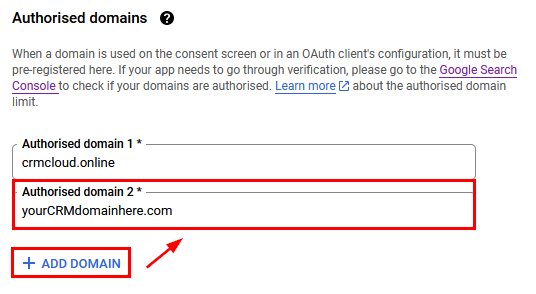
Domain verification – Google Calendar Vtiger 7 Sync - When domain is entered, confirm via
 button.
3.1.3.C) Create OAuth client ID
In the last part here you will create and IDs required for Google Calendar Sync, these IDs will be used mainly in the Vtiger CRM Google Sync Extension.
Please follow instructions below:
C) Creating OAuth Cliend ID
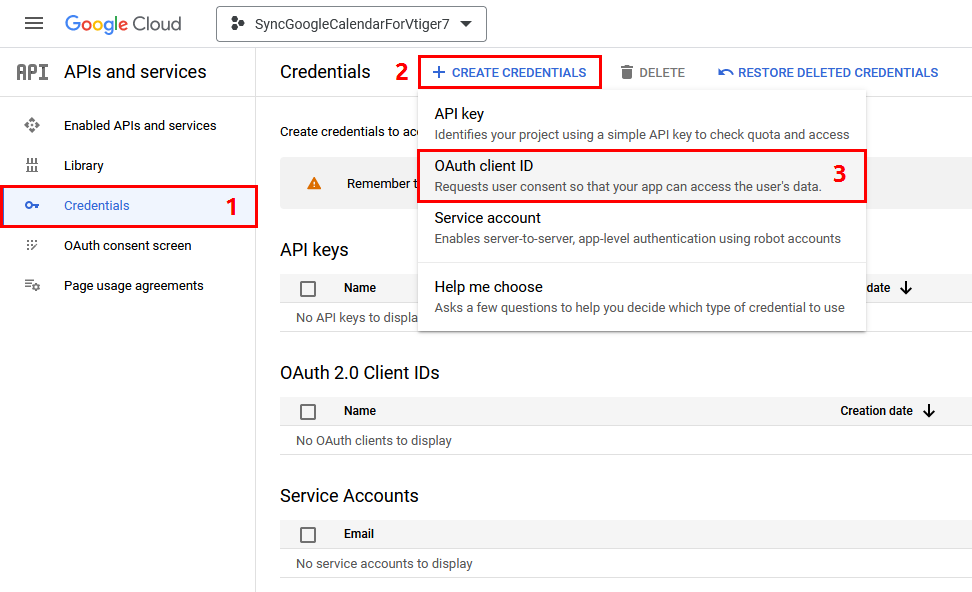
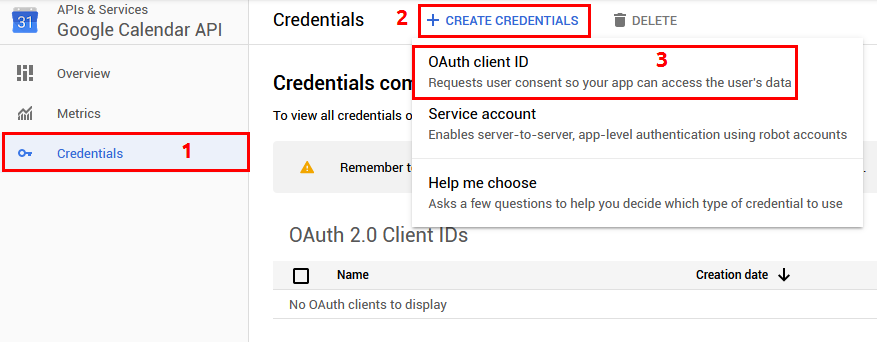
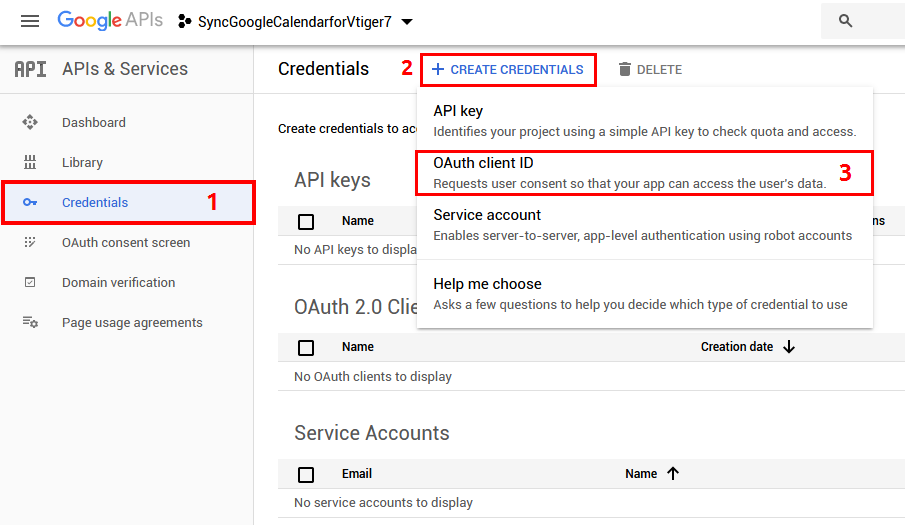
- Now we need to create OAuth client ID, go to Credentials and click on
 then on OAuth client ID
Creating OAuth client ID – Google Calendar Vtiger 7 Sync - Choose “Web application”, fill name and into Authorized redirect URls add your Vtiger site url + following link and press Enter
[yourvtigercrmurl]/index.php?module=Calendar&view=Extension&extensionModule=ITS4YouGoogleCalendarSync&extensionView=Extension&authorize=true&service=GoogleITS4YouGoogleCalendarSync
and click on the
 button.
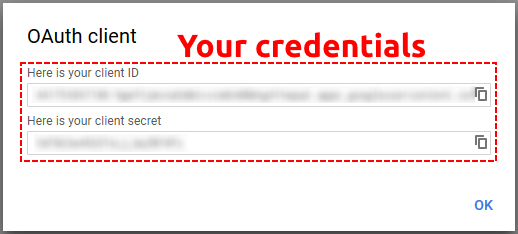
Create ID of Google Project – Google Calendar Vtiger 7 Sync - Finally, you get your Client ID and Client Secret IDs:
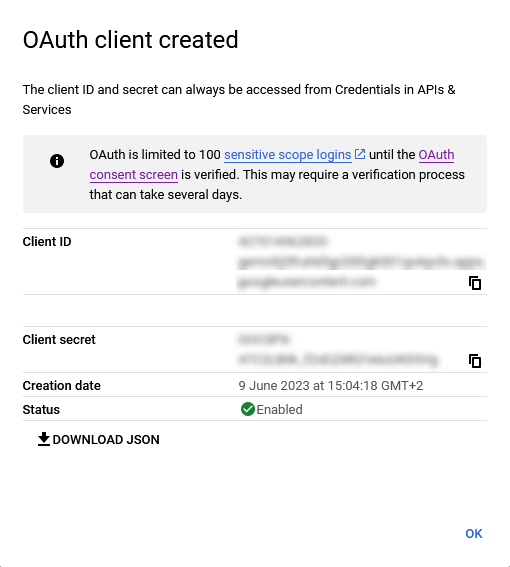
ID of Google Project – Google Calendar Vtiger 7 Sync
3.2.First configuration
Now, you need to set Synchronization in your Vtiger CRM.
There are two options:
- Like Admin set one Default ID of the Project for all users (we recommend this way).
- Each user can set the owner ID of the Project, but it means that each user must create own Project in the Google like is written above in the chapters.
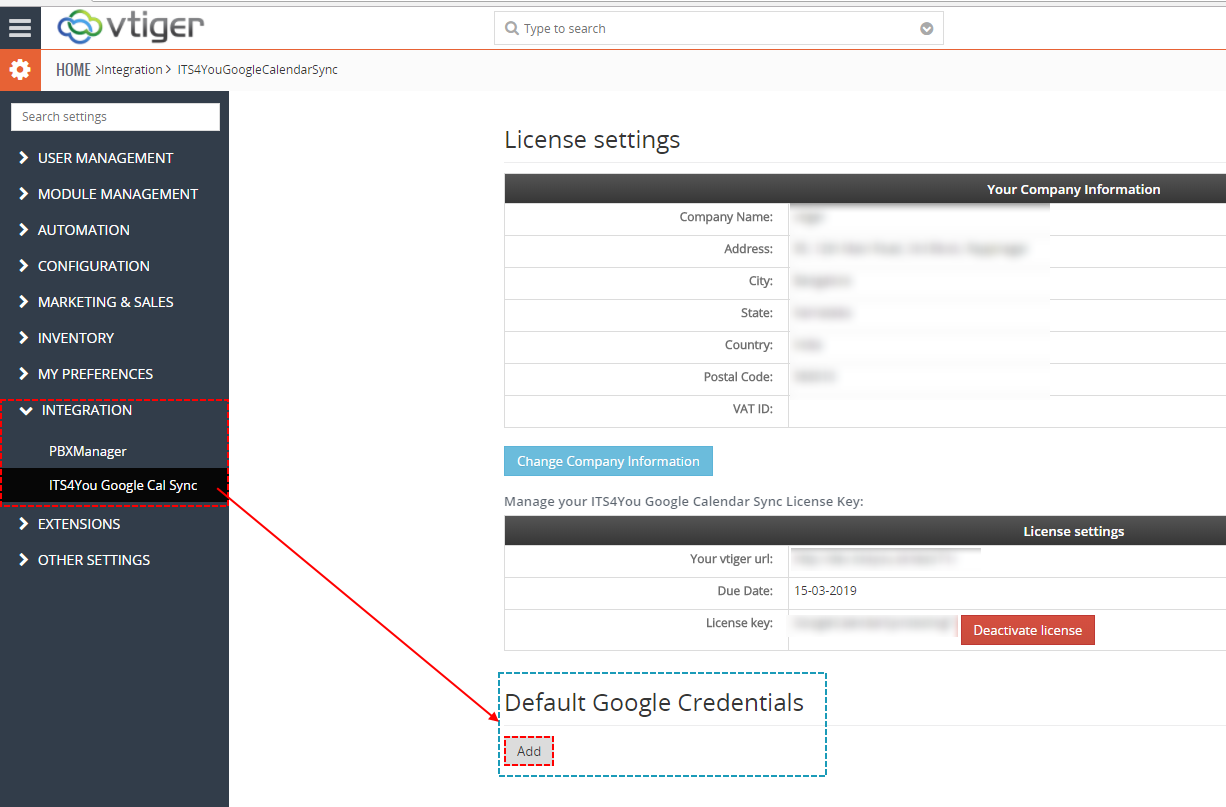
How to set default Project ID for all users
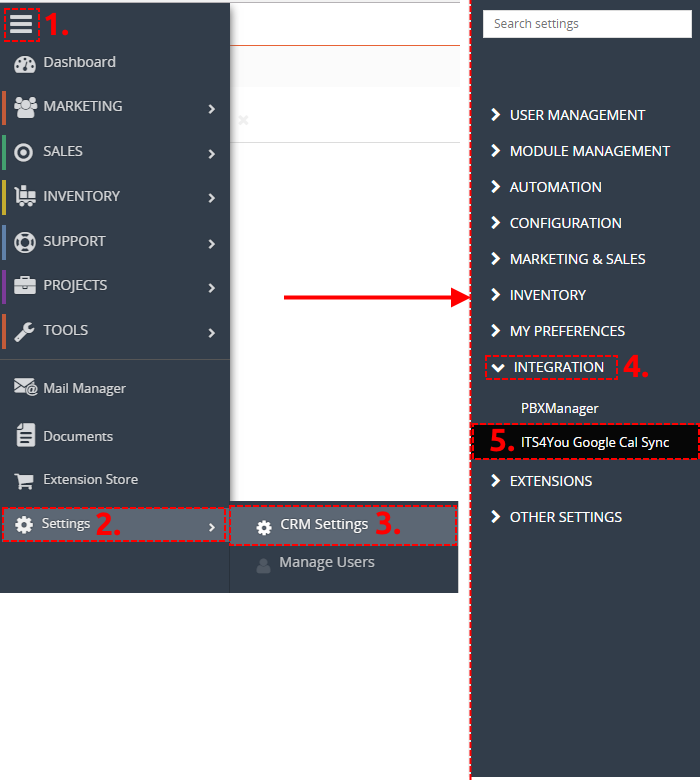
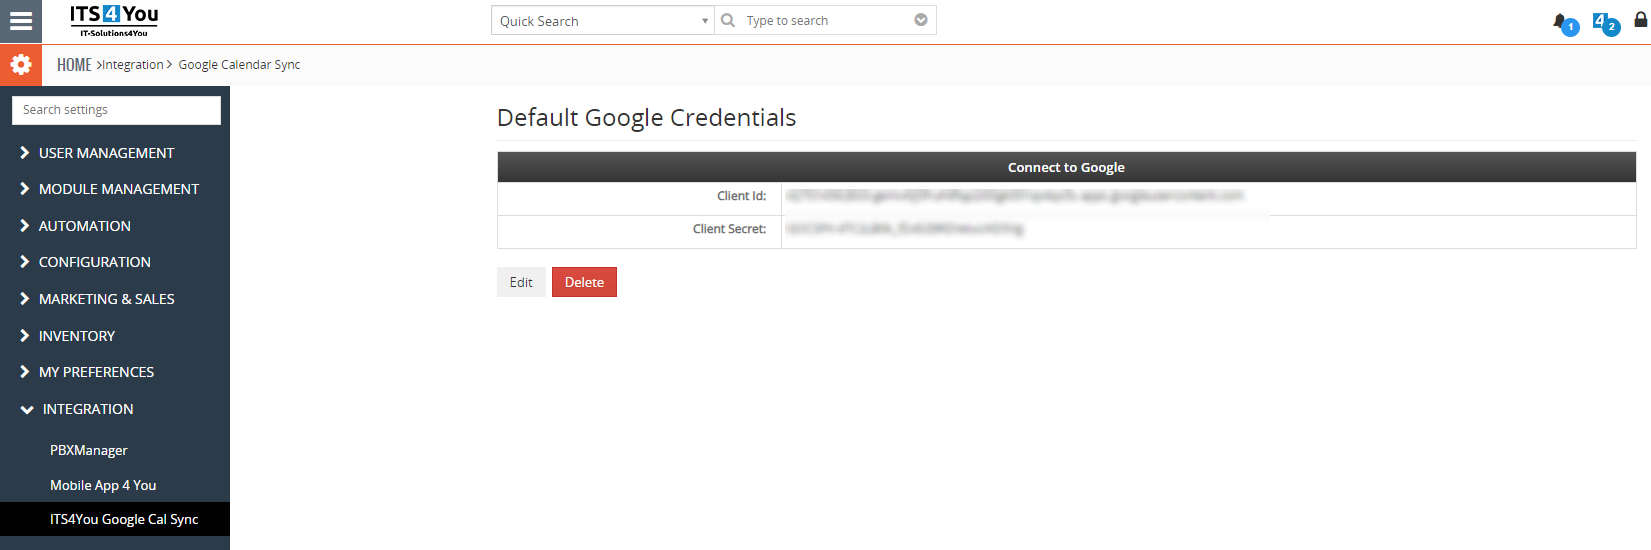
- Open ITS4You Google Cal Sync in Integration settings and click on
 button.
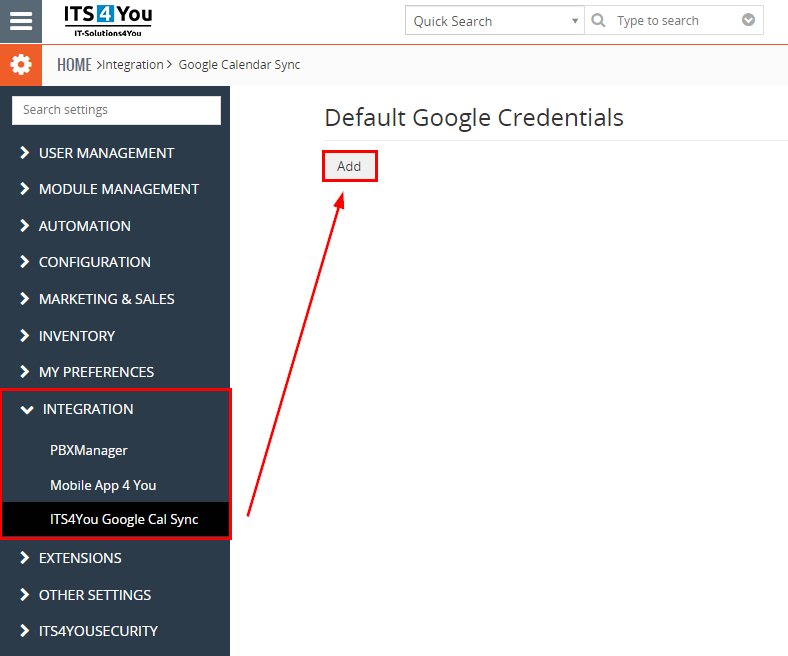
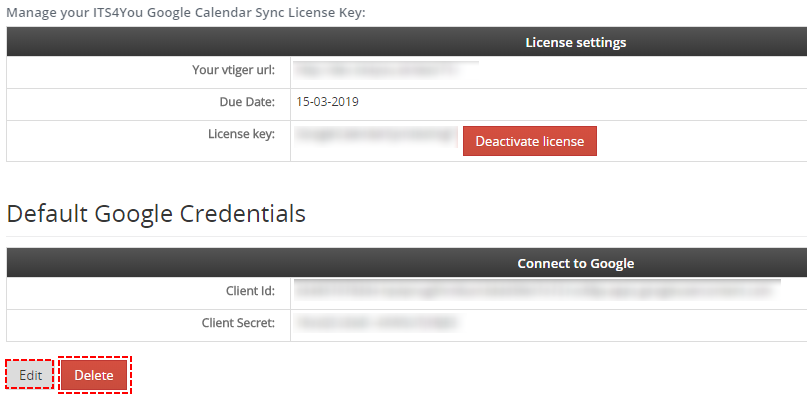
Default ID of Google Project – Google Calendar Vtiger 7 Sync - Now, fill your Credentials from Google Project and click on
 button.
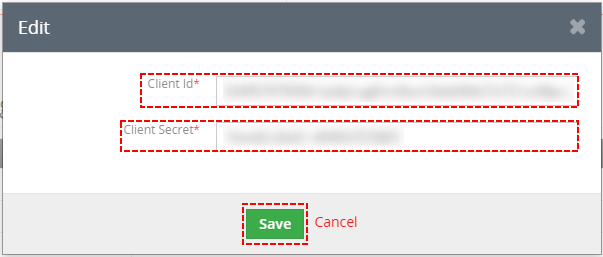
Save default ID of Google Project – Google Calendar Vtiger 7 Sync - You Credentials have been saved. If you need, you can Edit or Remove it from this tab.

Saved default ID of Google Project – Google Calendar Vtiger 7 Sync
How to set ID for each user individually
- Login like user that you want to add Google Project ID
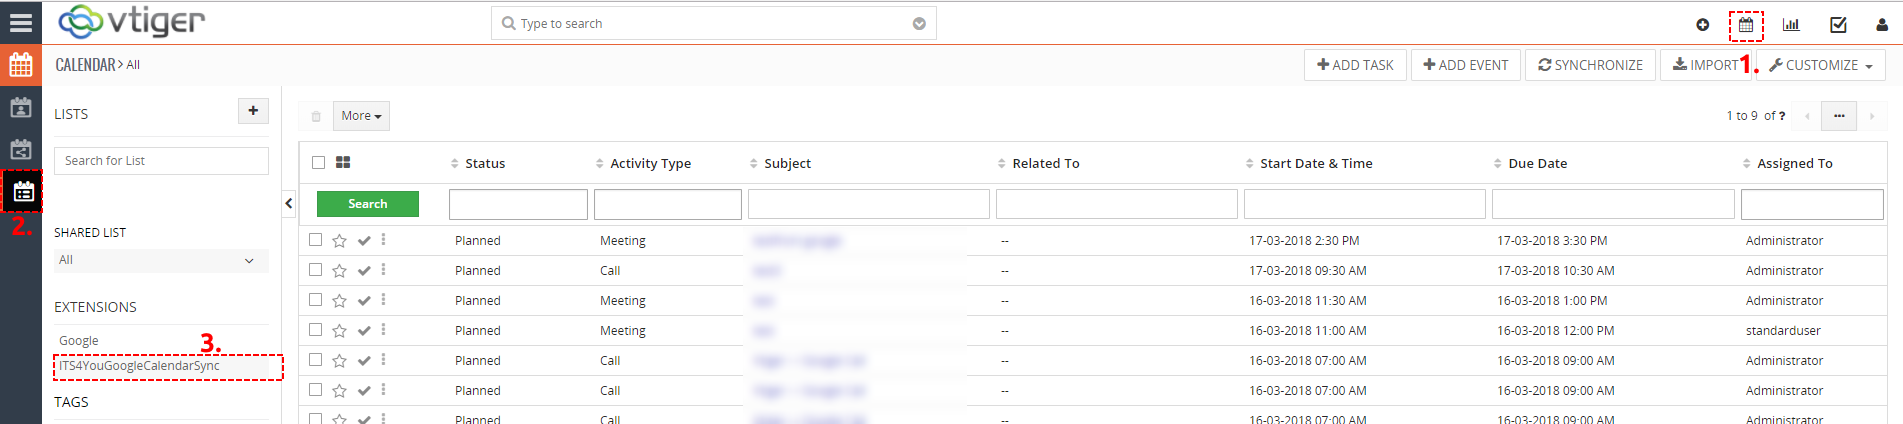
- Open please your Calendar module select List view and choose ITS4YouGoogleCalendarSync.

Add own ID of Google Project – Google Calendar Vtiger 7 Sync - Select “Own” Google Credentials, fill own Credentials, choose Sync Direction and click on Save
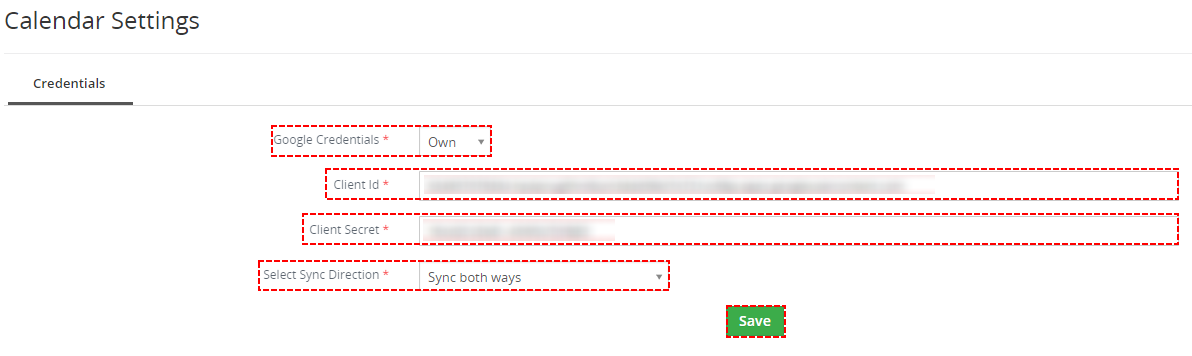
Save own ID of Google Project – Google Calendar Vtiger 7 Sync - Credentials have been successfully saved

Saved Own ID of Google Project – Google Calendar Vtiger 7 Sync
Now, you need to connect your Google account to Vtiger
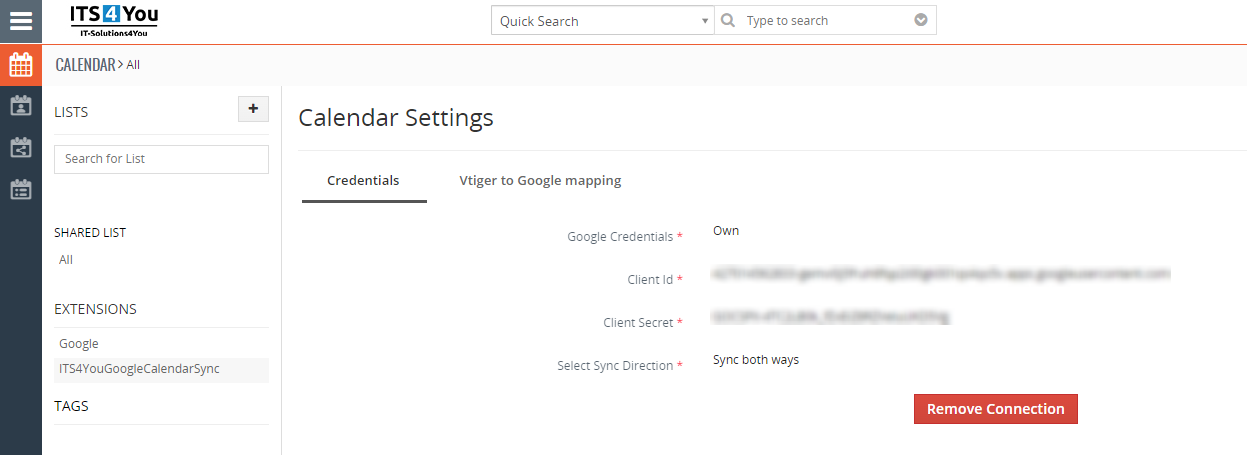
- Open please your Calendar module select ListView and choose ITS4YouGoogleCalendarSync.
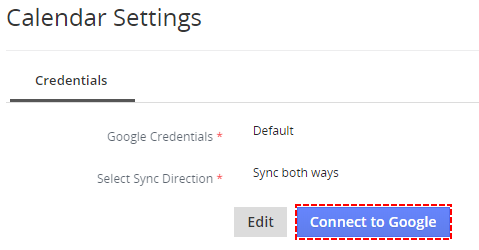
If you want to use Default Google Credentials set by Admin use “Default Google Credentials” option in other case use “Own”(written above). Select Direction of Synchronization and Save it.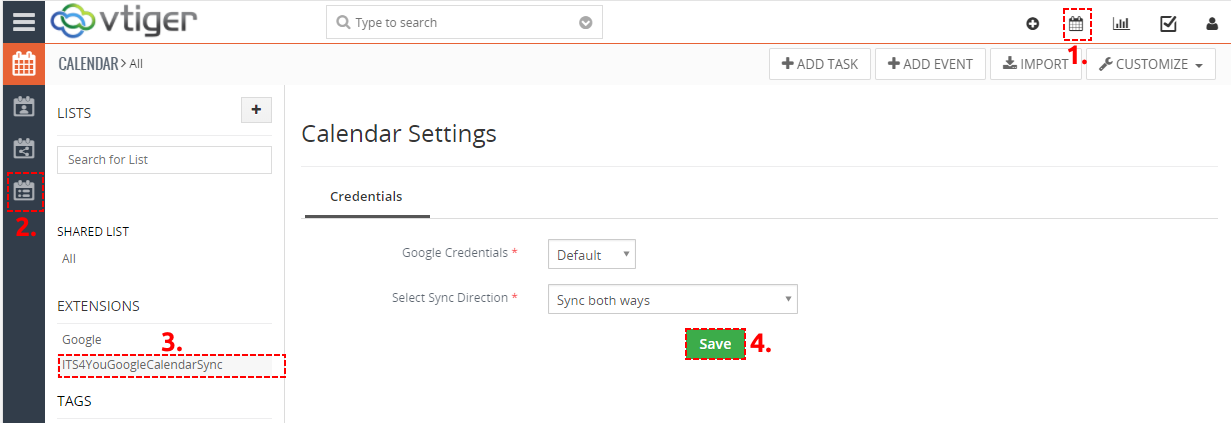
How to connect to Google Account – Google Calendar Vtiger 7 Sync - Now please click on
 button.
How to connect to Google Account – Google Calendar Vtiger 7 Sync - Sign in to your Google account
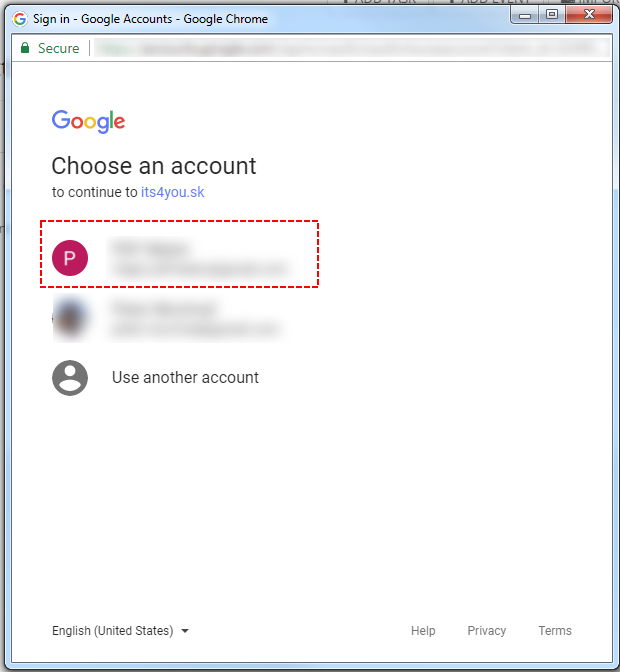
Choose Google Account – Google Calendar Vtiger 7 Sync - Allow Vtiger to manage your Calendar
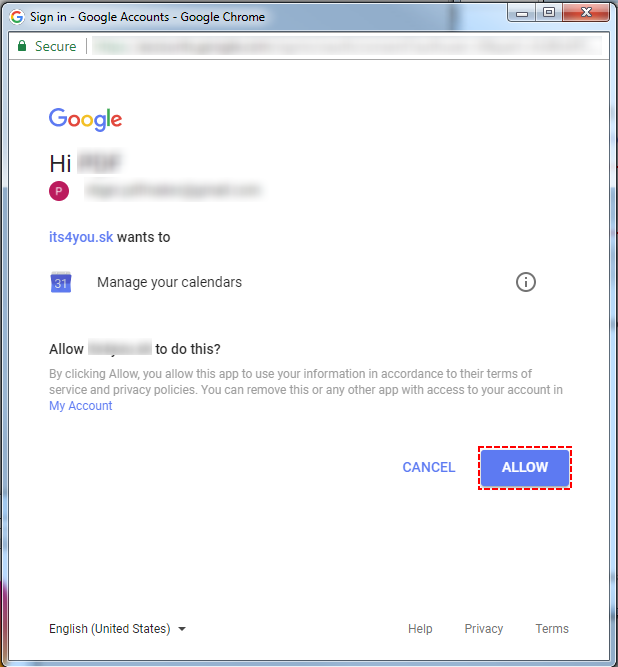
Allow to manage Google Account – Google Calendar Vtiger 7 Sync - You have been successfully sign in Google
Successfully connected to Google Account – Google Calendar Vtiger 7 Sync
3.3.Vtiger to Google mapping
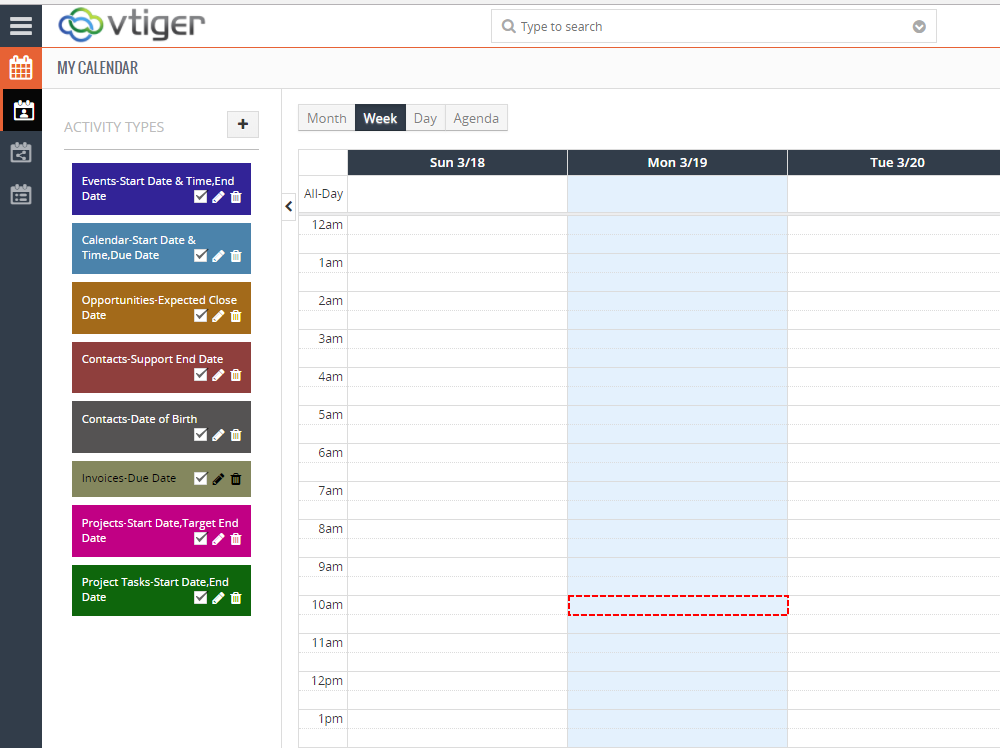
After you have been successfully sign in Google, you need to map Vtiger activity types to Google calendar.
- In Calendar settings please click on Vtiger to Google mapping. Now, you can see all your activity types. So please map it to Calendar that you want.
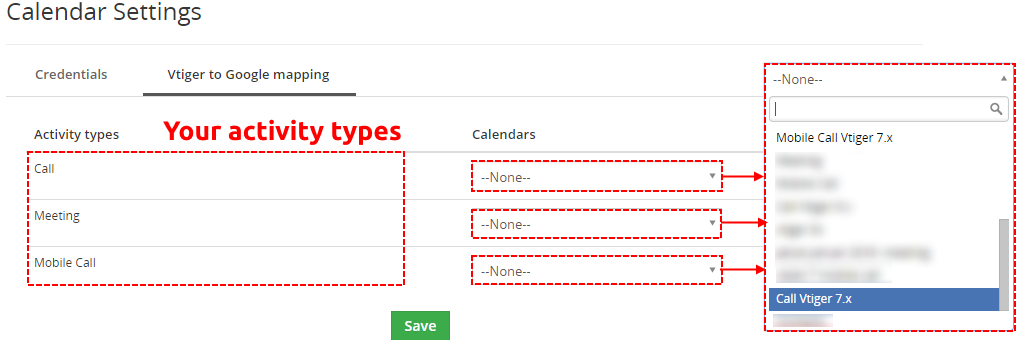
How to map Activity types to Calendar – Google Calendar Vtiger 7 Sync - If you mapped your activity types, please save it.
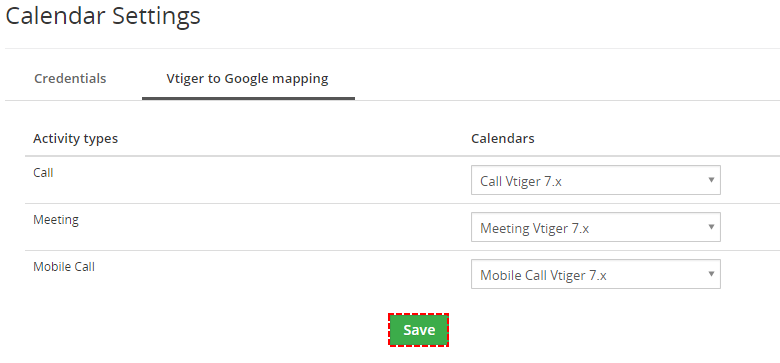
Save mapping of Activity types to Calendar – Google Calendar Vtiger 7 Sync - Mapping has been saved

Saved mapping of Activity types to Calendar – Google Calendar Vtiger 7 Sync
3.4.How to create new Google calendar
We recommend for each activity type create own Calendar because of correct mapping.
To create new Calendar for each Activity type please provide following steps:
- First at all you need to open Google Calendar
- Now, you can see your Calendar(s)
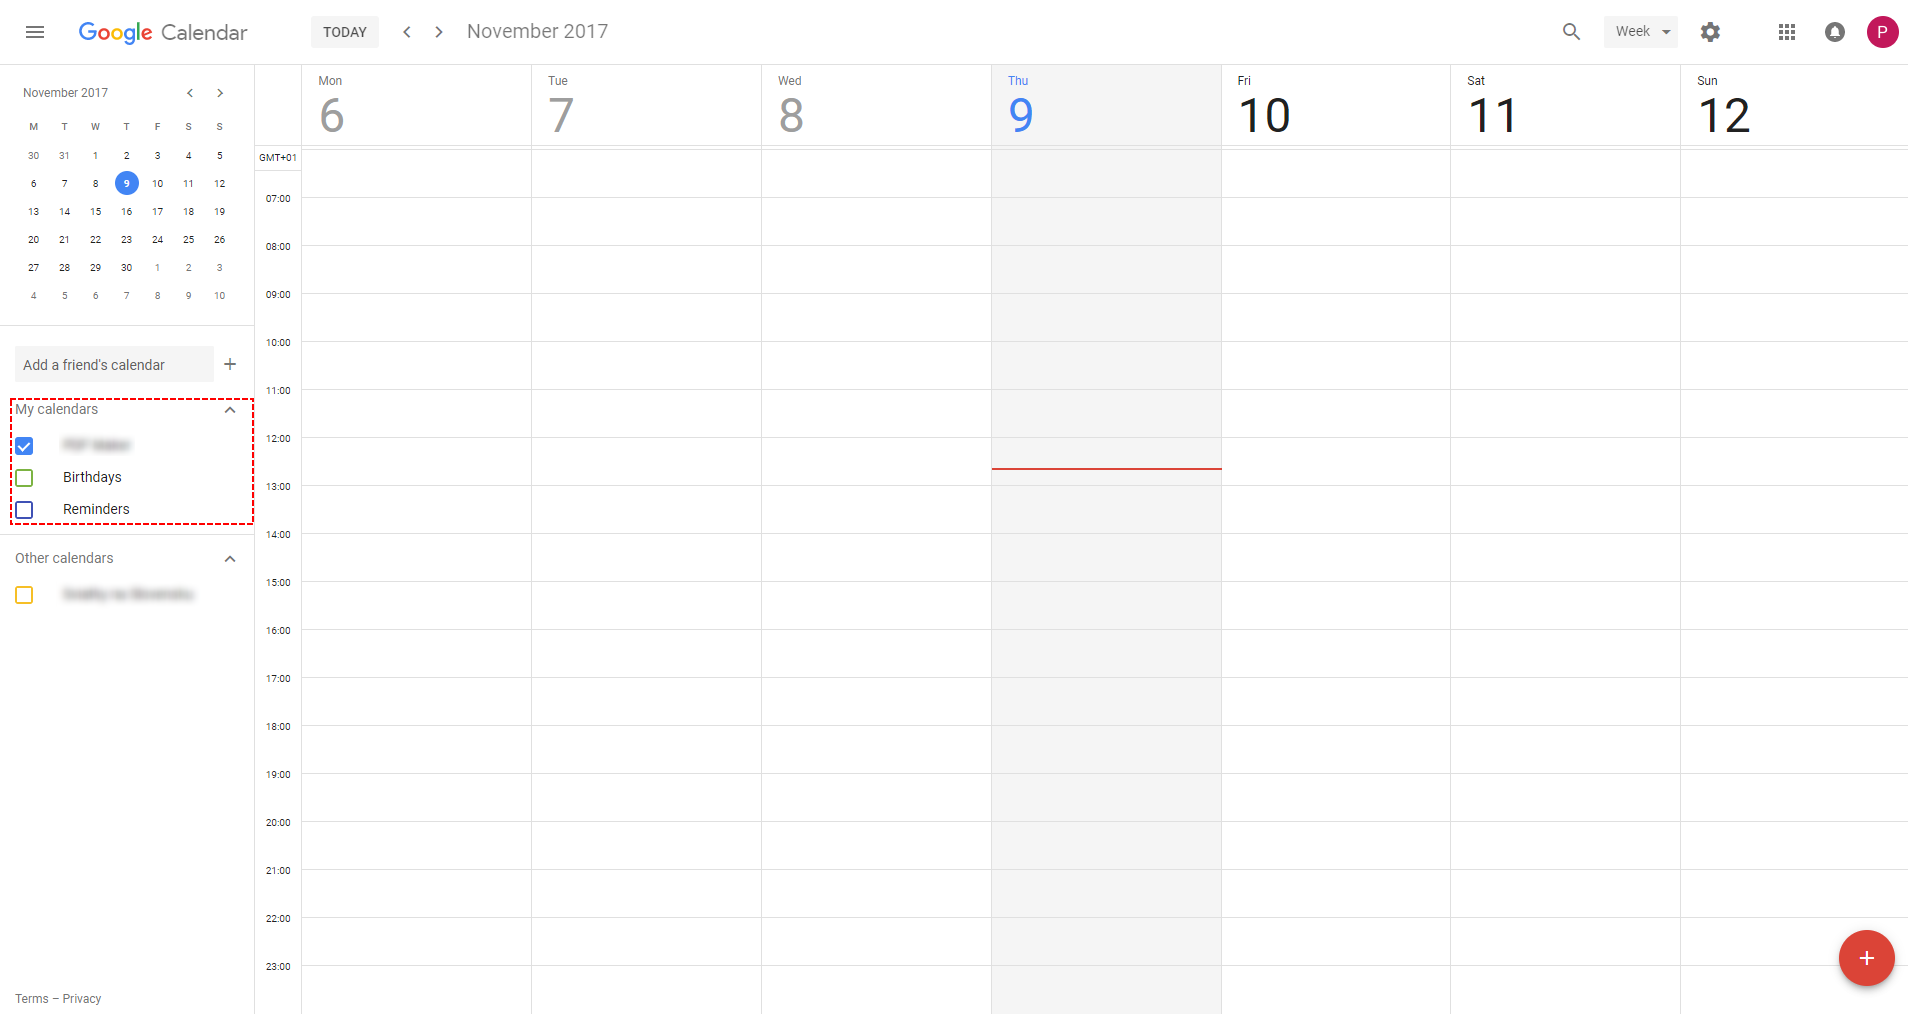
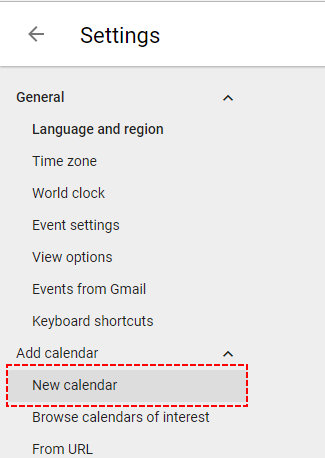
How to create new Google Calendar step 1 – Google Calendar Vtiger 7 Sync - Click on Settings button and select Settings
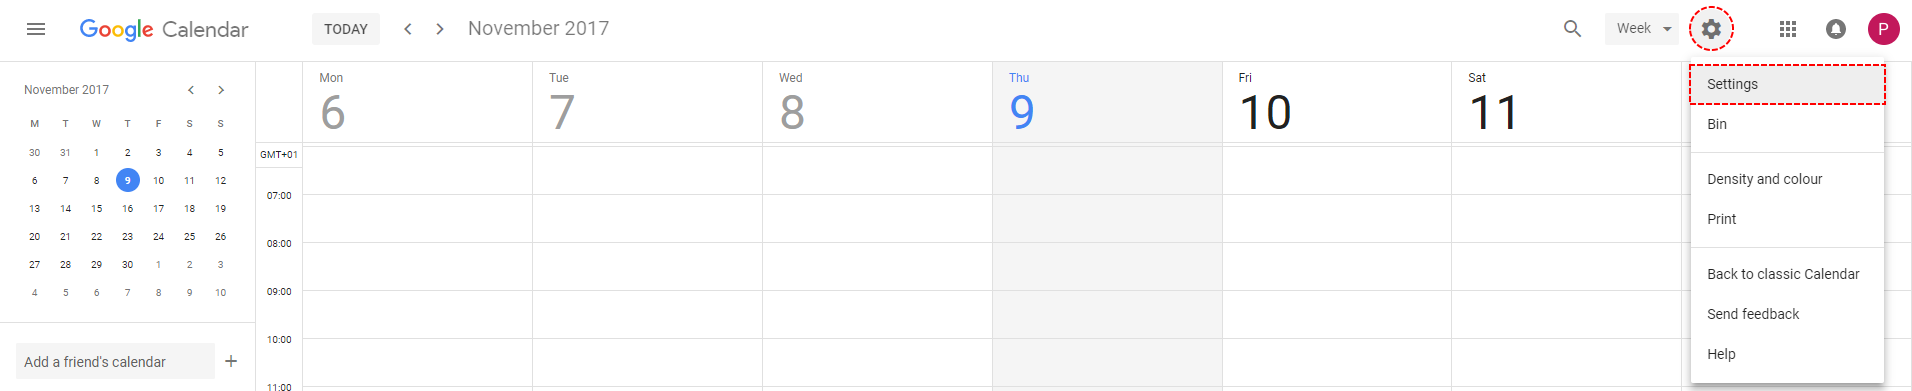
How to create new Google Calendar step 2 – Google Calendar Vtiger 7 Sync - Click on Add calendar and New calendar
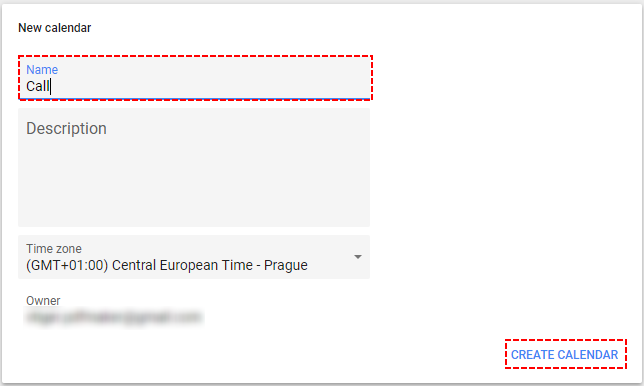
How to create new Google Calendar step 3 – Google Calendar Vtiger 7 Sync - Fill name and create calendar
How to create new Google Calendar step 4 – Google Calendar Vtiger 7 Sync - Now you can see your new Calendar(s)
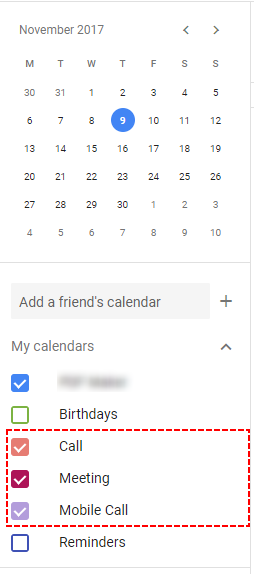
How to create new Google Calendar step 5 – Google Calendar Vtiger 7 Sync
4.How synchronization works?
In following sections is described how synchronization work and how to automate Google->Vtiger CRM way.
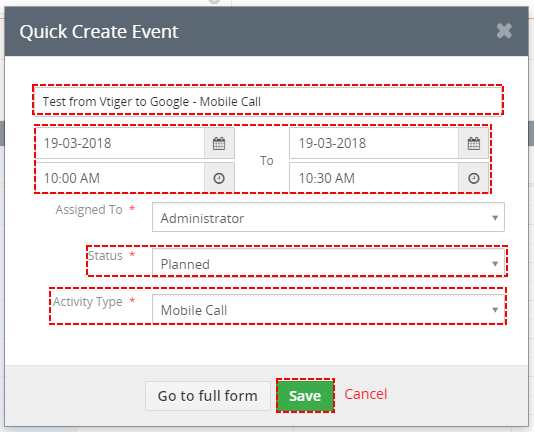
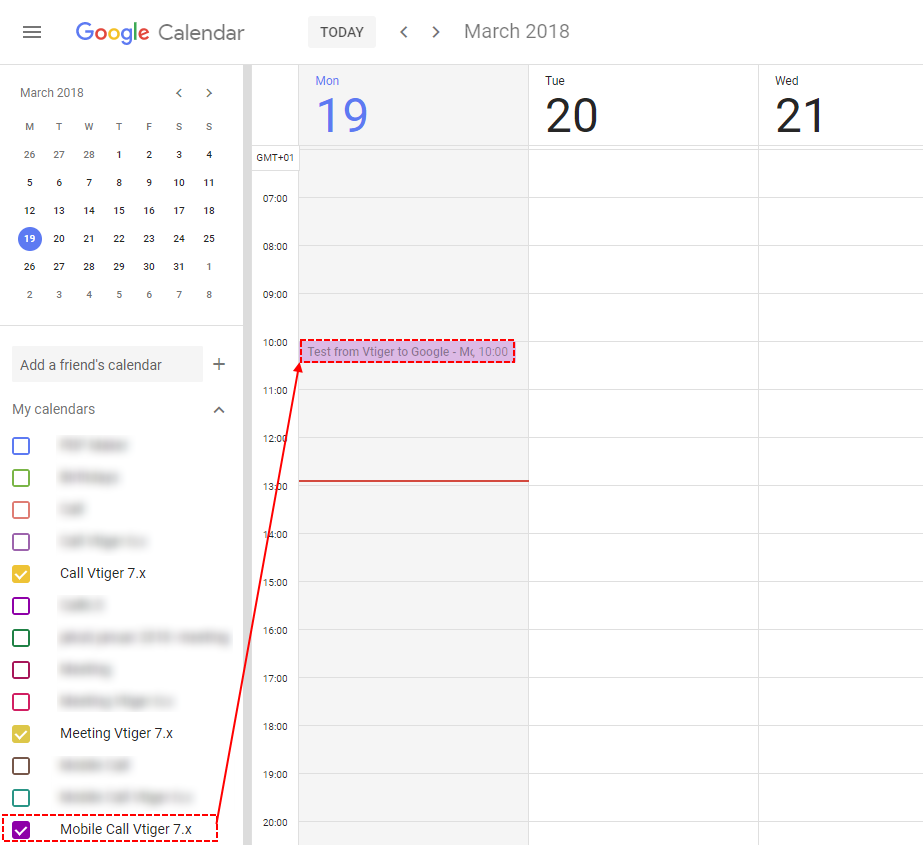
4.1.Vtiger CRM -> Google Calendar
If you create event in your Vtiger, record is immediately sent to Google calendar that you select in mapping setting.
4.2.Google Calendar -> Vtiger CRM
To create record in Google please provide following steps:
- In your Google Calendar please click on date and time or on
 button
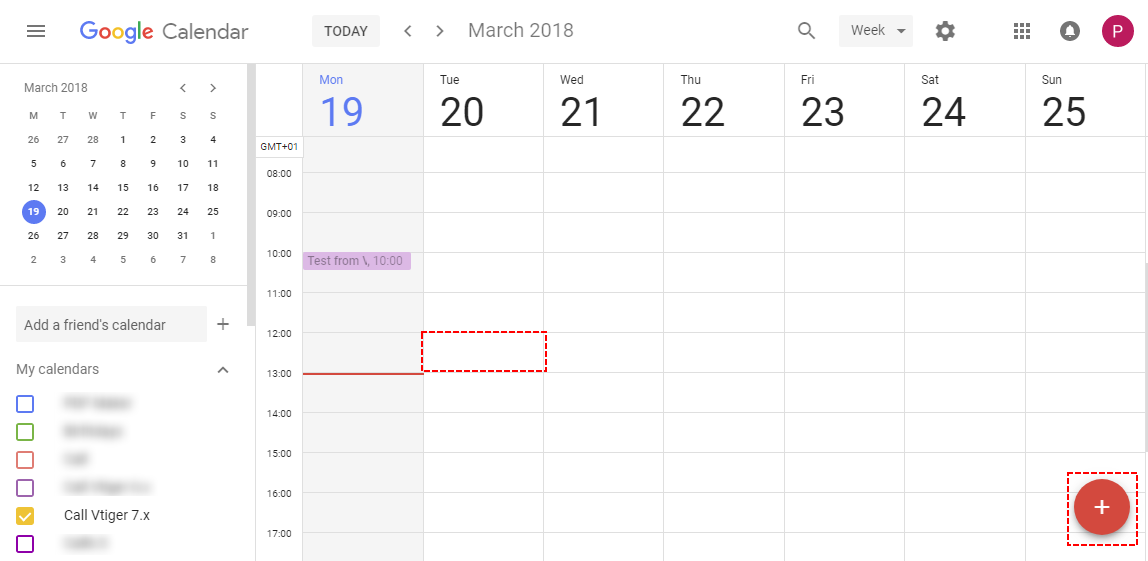
Create record within Google – Google Calendar Vtiger 7 Sync - Fill title of record, select your Calendar (in Vtiger it is “activity type”) and save it
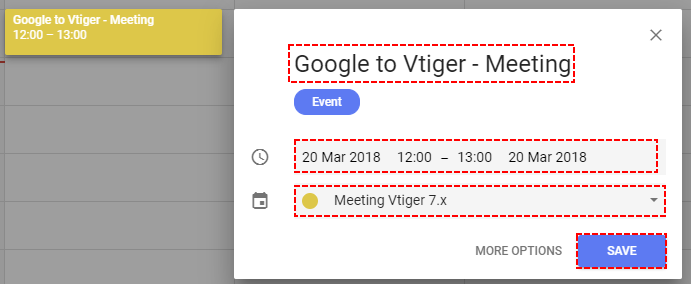
Save record within Google – Google Calendar Vtiger 7 Sync - Your records is now created within Google Calendar
Saved record within Google – Google Calendar Vtiger 7 Sync - But, record is still missing in your Vtiger CRM. To synchronize it please click on
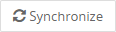 button
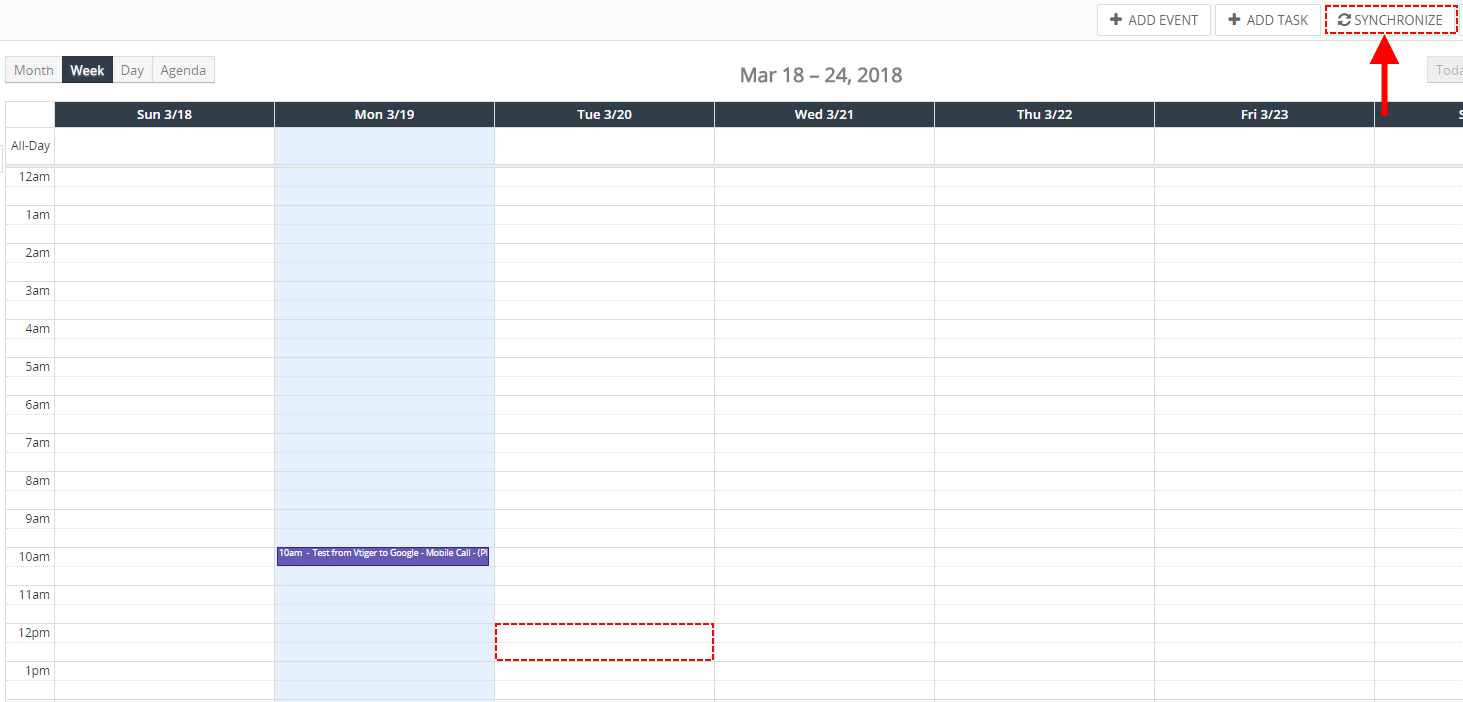
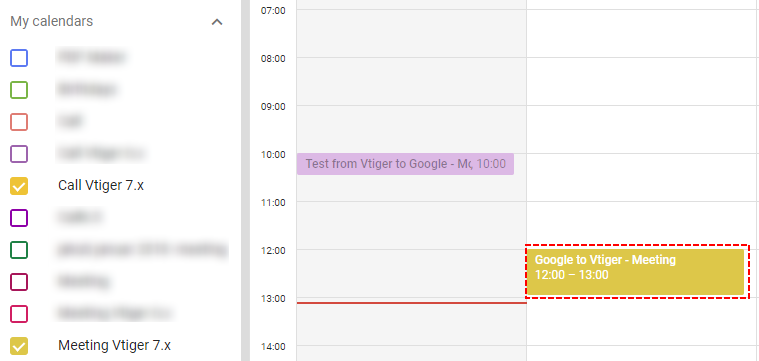
Record from Google is not displayed – Google Calendar Vtiger 7 Sync - Now, you can see your record from Google Calendar in your Vtiger 7 CRM.
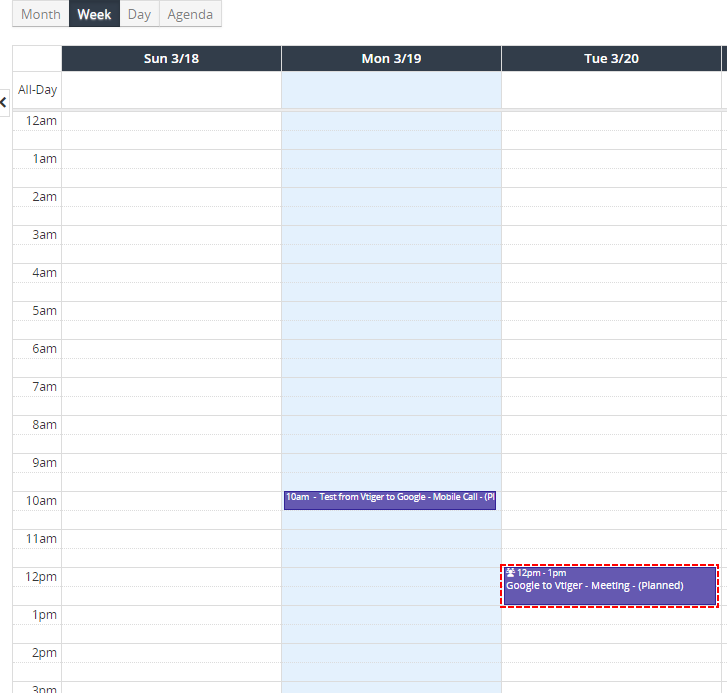
Record from Google within Vtiger – Google Calendar Vtiger 7 Sync
4.2.1.How to automate Google -> Vtiger CRM synchronization
To automate Google->Vtiger 7 CRM Sync you can use our default Cron Job. It is Active by default but you can check it.
To check and activate our Cron Job please provide like admin:
- Go please to Settings -> CRM Settings -> Automation -> Scheduler and and check if Schedule ITS4YouGoogleCalendarSync is Active or Inactive.
- if it is Active then each 15 min (or Frequency that you set) your Vtiger synchronize recorods from Google into your Vtiger
- if it is Inactive then please provide following steps
- If it is Inactive please click on
 button in our Schedule ITS4YouGoogleCalendarSync

How to automate Google step 1 – Google Calendar Vtiger 7 Sync - Set status to Active, set Frequency of cron job and save it
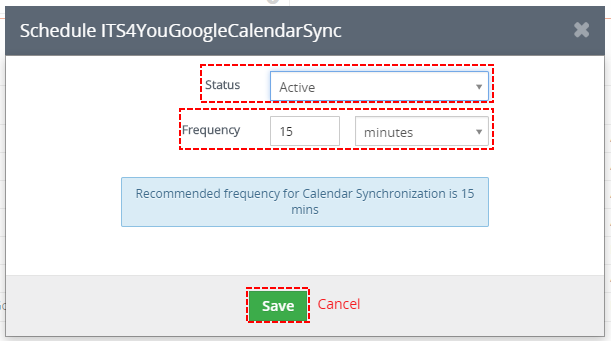
How to automate Google step 2 – Google Calendar Vtiger 7 Sync - Now, your cron has been set. And depends on your frequency Synchronization be starting automatically
5.How to remove Connection
In case that you want to Remove connection please provide following steps:
- Open please your Calendar module select ListView and choose ITS4YouGoogleCalendarSync.
How to remove Google Connection – Google Calendar Vtiger 7 Sync - Click please on

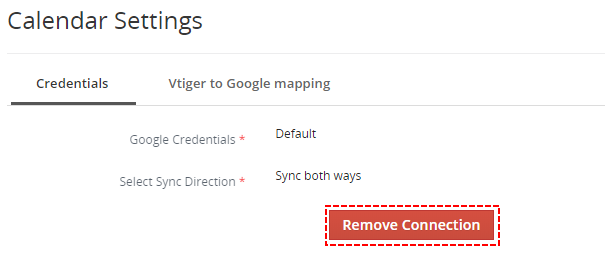
How to remove Google Connection – Google Calendar Vtiger 7 Sync - Your connection has been removed

How to remove Google connection – Google Calendar Vtiger 7 Sync
6.Settings of Google Calendar Sync
Settings part you can find in Settings-> CRM Settings-> Integration-> ITS4You Google Cal Sync.
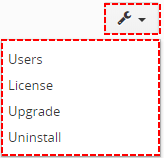
In the Settings, you can find:
- Calendar Settings – settings where you can setup the Credentials like Client Id, Client Secret and Sync Direction
- Integration – add Credentials like Client Id, Client Secret for Default Google Credentials
- Users – shows the currently active users for Google Calendar Sync where you can also perform additional actions
- Module Requirements – check if the all Requirements are met for your module (like Custom links, Event handlers, etc..,)
- License – see if a license is currently active
- Upgrade – option to upade Google Calendar Sync
- Uninstall – remove extension from your CRM
6.1.Calendar Settings
This link will take you to the Calendar Settings where you can also define Vtiger to Google Mapping.
6.2.Integration
Integration link shows the Default Google Credentials which can be also accessed via:
CRM Settings – Integration – ITS4You Google Cal Sync.
6.3.Users
In this section you can see your users who use Google Calendar Synchronize.
Also from this page you can remove Sync for any user.
User section you can find in Setting tab when you select Users.

Now you can see all users who is connected to Google.

If you want to remove user please click on Remove Connection.
And confirm removing.

6.4.License
All our modules are using Installer to manage licenses. Please check our Installer pages for more information.
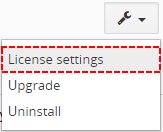
You can access the License settings like its shown below:
(there can be more options from the pick-list, depends on the module)
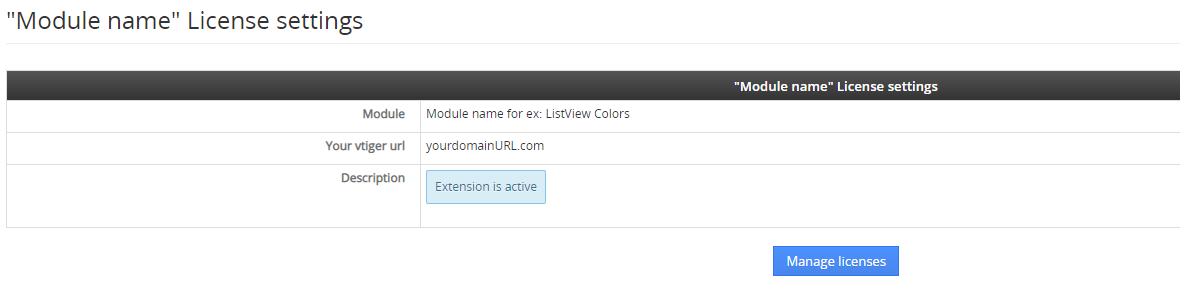
After accessing the License window you can see screen bellow with following information:
- Module name, Your Vtiger domain URL
- Description, if license is activate or not:
 – your license is currently active,
 – your license is not active and you need active it via Installer.
 – the Installer FREE extension is missing on your CRM, please download it.
To activate or manage license, click on the ![]() button.
button.
6.4.1.Deactivate license
If you want to deactivate your license, please provide following steps:
- Go to your Installer, by a click on Notifications Icon
 and then on the button
or via Main Menu – Settings – CRM Settings – Extensions – ITS4YouInstaller - The following screen will appear (see below):

Installer – deactivation of license You can deactivate license by click on the button

![]() Note: The module will be deactivated but not uninstalled and license will be removed from the Activated Licenses tab.
Note: The module will be deactivated but not uninstalled and license will be removed from the Activated Licenses tab.
6.4.2.Reactivate license
To reactivate a license after deactivation, you need to follow the same process as you activated it first time:
- Click on the
 button and enter your license key.

- Confirm with
 button.
When the license was activated you can see module available in the Modules tab below.
![]() Note: To see modules and manage licenses you have to log in to our e-shop with @email and password via
Note: To see modules and manage licenses you have to log in to our e-shop with @email and password via ![]() button (top right screen side in Installer module).
button (top right screen side in Installer module).
6.5.Update
The upgrade of the module is initiated via our Installer or manually.
Updating via Installer (recommended):
- open the Installer in the CRM
- in the Modules tab find your installed module and you should see the
 button available
 - If the new version is available, you will be notified via Installer Notifications icon
Updating Google Calendar Sync manually:
Updating module manually is sometimes required when our support team sends you .zip package, if you are having some issues or there is any update or customization available.
Otherwise, we always recommend to use update via Installer.
Update can be done via Module Manager by clicking on the button ![]() and selecting the .zip file.
and selecting the .zip file.
6.6.Uninstall
If you need to remove the module from your Vtiger you have two options:
- Uninstall via Installer.
- Manually via going to module Settings and choose Uninstall option.
⚠️ Uninstalling Google Calendar Sync will remove all saved Settings!
6.6.1.Uninstall via Installer
You have also option to remove the module via Installer window by accessing the Settings – Uninstall window:
- Go to your Installer, by a click on Notifications Icon and then on the button ,
or via Main Menu – Settings – CRM Settings – Extensions – ITS4YouInstaller - Find the module you need to uninstall in the Modules tab
- Via
 pick list button choose the Uninstall option, you will be redirected to the Uninstall window.
 - Click on
 button

- Confirm uninstall with
 button
Now, the module has been removed from your Vtiger and your license has been deactivated. To use this module again, you need to provide installation and validation steps (see Installation chapter).
6.6.2.Manual Uninstall
There is also available option to remove Google Calendar Sync from your Vtiger manually.
To uninstall please provide following steps::
- In Settings Part select Uninstall
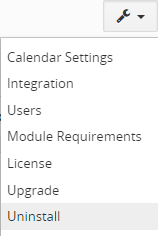
Manual Uninstall of Google Sync extension - Please, click on
 button

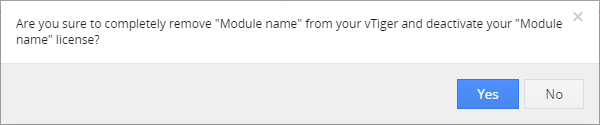
Select Uninstall – Google Calendar Sync - Confirm uninstall
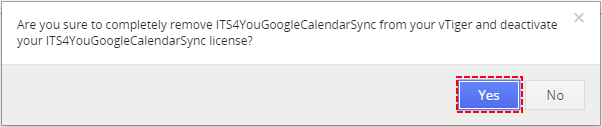
Confirm Uninstall – Google Calendar Vtiger 7 Sync
Now, Google Calendar Sync is removed from your Vtiger and your settings are lost.
To use Google Calendar Sync, you need to provide installation and validation steps (see chapter 2. How to install Google Sync).
7.Change log
- Check latest versions available and fixes applied
- What was changed/added to manual
7.1.GoogleCalendarSync
- 20 June 2023: 4.2
- improved compatibility with older Vtiger versions and PHP 5.6 version
- added compatibility with Extension Packages
(By purchasing packages, you get a certain number of users for google sync) - allowing users to activate multiple Google Sync licenses at the same time, the result is that the number of users of each license will be combined
- 10 April 2023: 4.1
- Vtiger 7.5 and PHP 8.x compatibility
– in case of any issues you will be need to manually edit files and their lines below:
1. open file: /libraries/google-api-php-client/src/Google/Http/REST.php edit line 131 to: $requestUrl .= ‘?’ . implode(‘&’, $queryVars);
2. open file: \vtlib\thirdparty\network\Request.php edit line 935 to: (0 == strlen((string)$this->_body) && (HTTP_REQUEST_METHOD_POST != $this->_method ||
- Vtiger 7.5 and PHP 8.x compatibility
— 2022 —
- 3 November 2022: 4.0
- Installer compatibility
(installation, updates and license validation are now done via Installer instead of downloading zip files) - Events that had a time interval in Google Calendar will no longer be displayed as all-day events in Vtiger Calendars
- other minor improvements
- Installer compatibility
- 5 April 2022: 3.10
- added new alert/info box when the users count per license is reached
- improved synchronization of record details
- fixed issues related to Deactivation of licenses
— 2021 —
- 10 December 2021: 3.9
- solved issues with post uninstalling where some handlers were still present in the system and were causing issues for the users
- added icon for Mobile
- added requirements link to the Settings
- 11 August 2021: 3.8
- Vtiger 7.4 compatibility
- 14 April 2021: 3.7
- events which had field “Repeat” checked, did not synced properly, this was resolved
- 1 January 2021: 3.6
- added Tasks compatibility
— 2019 —
- 16 July 2019: ITS4YouGoogleCalendarSync 3.5
- fixed issues where actualization via Cron/Scheduler was not working properly for users
*We recommend to download/update your Google Sync to this version
- fixed issues where actualization via Cron/Scheduler was not working properly for users
- 28 February 2019: ITS4YouGoogleCalendarSync 3.0-3.2
- fixed issue with licensing on domains with https protocol
- fixed issue where synchronization was not working after updating module to the versions 3.0 and 3.1
— 2018 —
- March 2018: ITS4YouGoogleCalendarSync 1.0
- first initiate for vtiger 7.x
7.2.Manual of GoogleCalendarSync
- June 2023: manual based on ITS4YouGoogleCalendarSync 4.2
- updated chapters:
Install
Befor you start
Settings
Update
Uninstall
License - added new chapters:
Installation via Installer
Google Project
Creating Project, Verify Domain, Create OAuth client ID
Calendar Settings
Integration
Users
Uninstall via Installer
- updated chapters:
— 2020 —
- April 2020: manual based on ITS4YouGoogleCalendarSync 3.5
- updated chapter: 4.1.How to create Project in Google and receive credentials
- March 2018: manual based on ITS4YouGoogleCalendarSync 1.0
- first initiate for vtiger 7.x