

1.Introduction
Descriptions extension is a tool designed for the Vtiger CRM system. The new descriptions are created in CK Editor so you can use adding tables and images to make your description attractive. The new descriptions can be stored separately, it means you can have an additional description to original one or you can simply replace original descriptions by new Descriptions extension. The Descriptions allow you to create a description for particular module as well as global description templates, so you can create one global template and use it everywhere in Vtiger CRM and save time with additional description formatting.
With Descriptions you can:
- Improve the look of your descriptions and terms & conditions for CRM records.
- Use CK Editor for customization.
- Turn off/turn on which modules will be using Descriptions extension (Integration)
- You can use adding tables and images to make your description more attractive.
Features of Descriptions:
- Easy navigation
- Supported for all modules
- Supports images, tables and other text formatting
- Easy using Descriptions templates Pick list
- Usable for Terms & Conditions
- Usable for Custom text area fields
- Support of PDF Maker
- Support of EMAIL Maker
2.How to Install Descriptions
There are currently two options how to install extension:
- (Recommended) Using our Free extension Installer
(Please visit the Installer page for more info) - Manually installation using a .zip file
(You still need to have Installer in order to activate license)
![]() Note: For versions ITS4YouDescriptions_4_0 and higher, you will be needing to have installed our Installer in order to activate license keys.
Note: For versions ITS4YouDescriptions_4_0 and higher, you will be needing to have installed our Installer in order to activate license keys.
Since December 2019 we launched our extended version of Installer which helps you install modules and manage extensions.
2.1.Installation via Installer
Make sure you have Installer installed, you can download Installer via our E-shop when you log in under Free Downloads section.
Next, simply install Installer via Module Management in Vtiger CRM by importing the .zip file you downloaded.
After successful installation, you can access Installer in two ways:
- by a click on Notifications Icon
 and then on the button
  ,
, - or via Main Menu – Settings – CRM Settings – Extensions – ITS4YouInstaller.
![]() Note: To see modules and manage licenses you have to log in to our e-shop with @email and password via
Note: To see modules and manage licenses you have to log in to our e-shop with @email and password via ![]() button (top right screen side in Installer module).
button (top right screen side in Installer module).
After log in, you can activate Extensions or our Packages licenses associated to your account via ![]() button.
button.
When the license was activated you can see module available in the Modules tab below.
Simply hit the ![]() button and Extension is installed now.
button and Extension is installed now.
2.2.Manual Installation
Please provide following steps in order to install Descriptions extension:
- Install the .zip (package) file of the Descriptions extension via Setting -> CRM Settings -> Module Management -> Modules. Click on the Import Module from Zip.
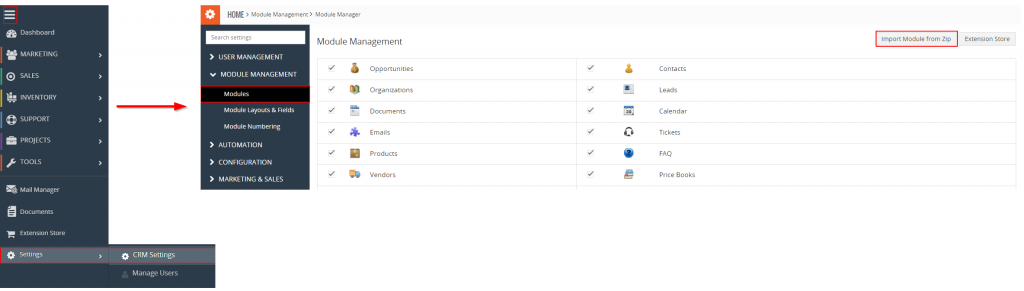
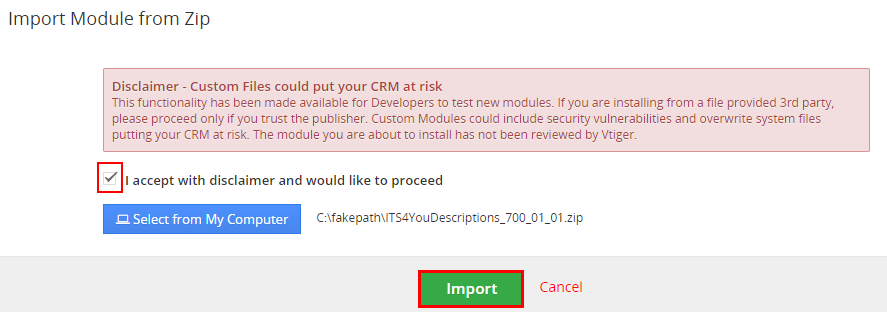
Installation of Descriptions for Vtiger 7 – step 1 - Select the .zip (package) file that you downloaded from our e-shop. Please check that you accepted the disclaimer and would like to proceed. Click on the
 button.

Installation of Descriptions for Vtiger 7 – step 2  Note: If you have after this step error message: Sorry! Attempt to access restricted file. Please check if folder test/vlib has correct write permission for browser (apache, www-data).
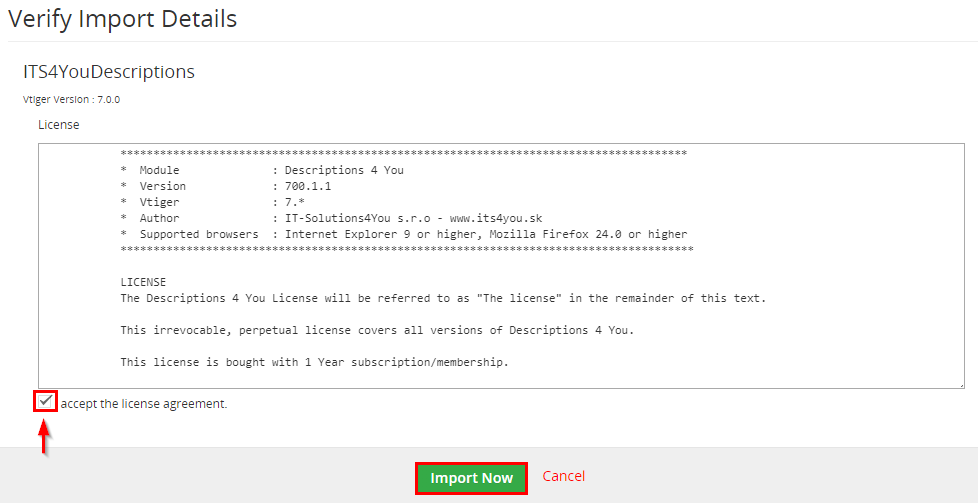
 - Verify the import details parsed from the .zip (package) file. Please check that you accepted the license agreement and click
 to proceed or Cancel to cancel.
Installation of Descriptions for Vtiger 7 – step 3 - Descriptions extension was imported successfully.

Installation of Descriptions for Vtiger 7 – step 4
![]() Note: In order to finish installation, you need activate license. For that please use our Installer
Note: In order to finish installation, you need activate license. For that please use our Installer
3.How to update Descriptions
The upgrade of the module is initiated manually or via our Installer.
Updating via Installer:
- open the Installer in the CRM
- in the Modules tab find your installed module and you should see the
 button available
 - If the new version is available, you will be notified via Installer Notifications icon

Updating Descriptions manually:
Click on Upgrade link in list view of Descriptions.

As you can be seen on the picture below you will be notified that the Descriptions extension already exists. Confirm License agreement and upgrade will start immediately when you click on the ![]() button.
button.
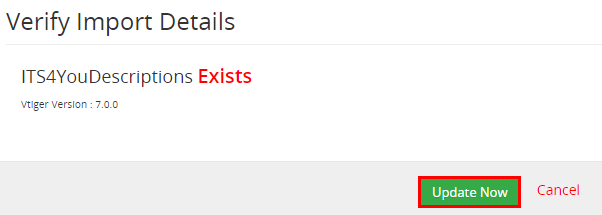
After upgrade the notification about successful upgrade is shown.
4.Work area
The Work area of the Descriptions consists of:
- List view – used for common tasks like select records, delete records, edit records, merge records
- Detail view – shows already created Descriptions in details
- Edit view– allows to edit already created Descriptions
 – used for Integration and License settings, Upgrade and Uninstall
 – used to import records from the other Vtiger systems if needed
 – used to add new Descriptions
For more details about List view, Detail view & Edit view please see next sections.
4.1.List view
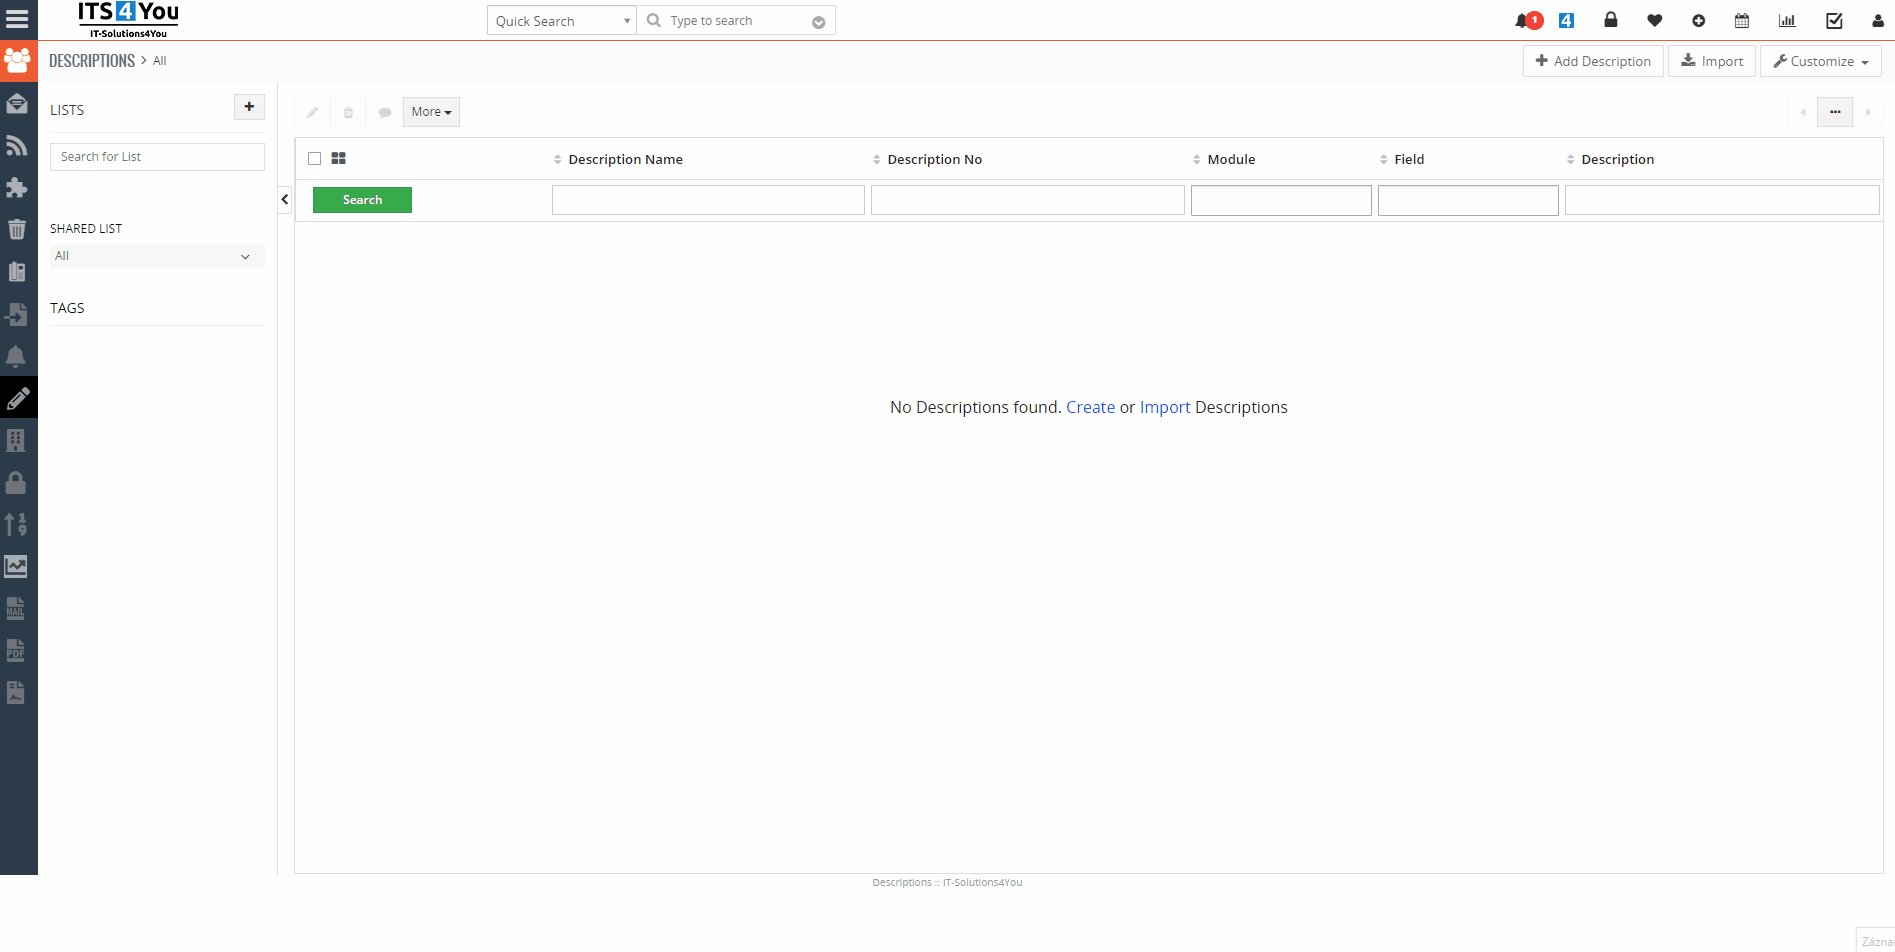
The common tasks like add/delete/find duplicates, import/export Descriptions or start editing has to be initiated via Descriptions List view. Go MENU —> TOOLS and click on DESCRIPTIONS 4 YOU link and Descriptions List view will appear on your screen.

The main part of the Descriptions List view consists of the list of the Descriptions, which gives you information about a Description name, number, module & field used. In the list you can also select one or more Descriptions and consequently delete or export the selected group of Descriptions or do additional tasks.
You can also have the option to create own List of Descriptions and set own fields to see via ![]() button on the left side of the screen.
button on the left side of the screen.
List view of Descriptions consists of:
 – to search Descriptions based on field,
 – is used to add new Description,
- – is used to import Descriptions from other Vtiger CRM system,
 – allow you to set Integration, License setting, Upgrade and Uninstall,
 – if you select records this option becomes available and you can edit or delete selected records,
 – used to perform additional actions like: follow, unfollow, add tag, merge records, find duplicates and export,
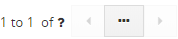 – next/previous page of Descriptions.
4.2.Detail view
From List view you can directly open any Description in Detail view. The Detail view consists of:
- Description Details:
- Description Name
- Module (choose the module for which you will be using Descriptions extension)
- Description No
- Modified Time
- Assigned To
- Field (choose the field which will be used for Descriptions)
- Created Time
- Source
- Description – the actual block where you add your descriptions
- Group of buttons:
 – following a record is a nice fashion of marking a record as a favorite. This will act as a shortcut to get to favorite or active records. By following a record you get updates on it as the users modifies the record,
 – switch to Edit view and start editing,
 – delete or duplicate Description,
 – switch between already created Descriptions in your list view.

4.3.Edit view
The Edit view shown in the picture below is divided into two areas:
- Description Details area – is used for Description Name, Assigned to and choose modules that are allowed + set field for which descriptions will be used
- Editing area – is mainly used for inserting/editing your own text, tables, images etc. and to make some design adjustment of the Description like font change, color, format, size, background color of the text etc. This editing can be initiated via many toolbars located in the above part of editing area.

4.4.Descriptions picklist
After installation Descriptions, you are able to see Descriptions Pick list in allowed modules that provides you to replace or add Description in the text areas.
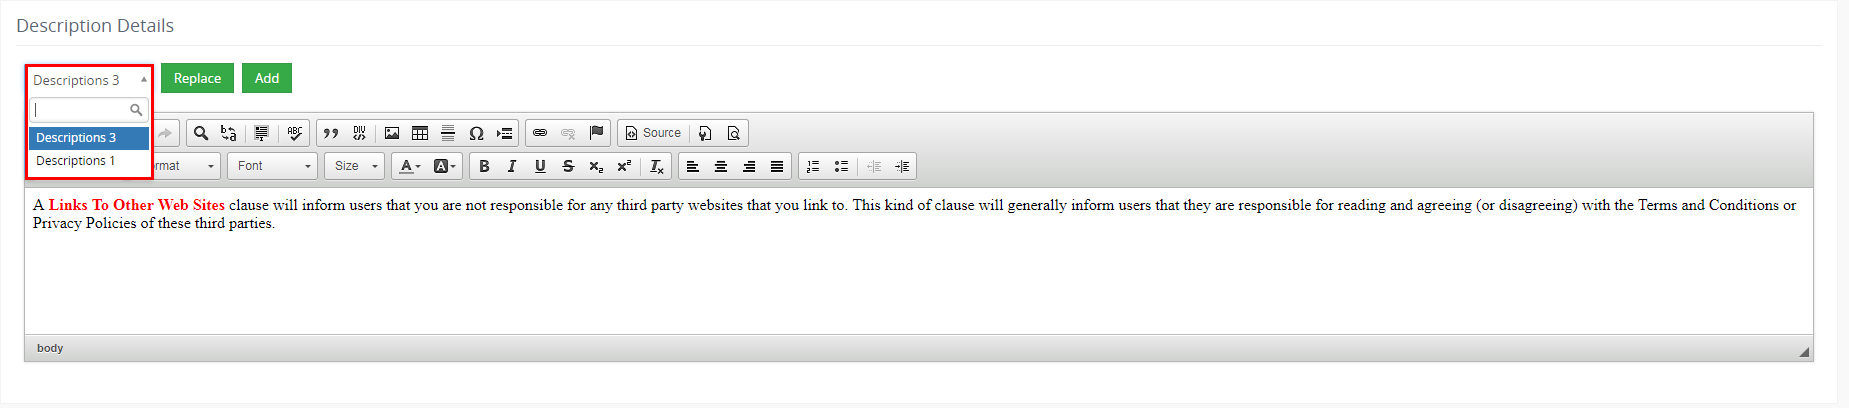
Consists of:
- Available Descriptions for module
 – is used to replace all old text by your Description (old description will be deleted)
 – is used to add new Description after old text (old description won’t be deleted)
![]() Note: After adding or replacing Description you can edit it manually.
Note: After adding or replacing Description you can edit it manually.
5.How to create Descriptions
![]() First check Integration settings and enable each module and field for which you want to use Descriptions.
First check Integration settings and enable each module and field for which you want to use Descriptions.
To create Description please follow next steps:
- Go to Descriptions extension List view and click on button.

Creating Description – step 1 - After click on + Add Description you will be redirected to Edit view window.
Creating is divided into two areas:
Area 1) Current information of your Description:
Description Name – name of your description
Assigned To – set to whose is description assigned to
Module – for which module you can use your description. To add/delete allowed module please see chapter 7.1 Integration. Global is for all allowed modules.
Field – field for which you can use your description. If you want use own fields please see chapter 6.3 Support of Custom Text area fields
Area 2) CK Editor area – The second area is CK Editor that is mainly used for inserting/editing your own text, tables, images etc. and to make some design adjustment of the Description like font change, color, format, size, background color of the text etc. This editing can be initiated via many toolbars located in the above part of Editing area.
Fill the data you need and click on button.

Creating Description – step 2
Now, you are able to add/replace your description into allowed modules. For adding or replacing your old description please check chapter 4.4 Descriptions pick list.
Known issues:
You do not see a Descriptions for a specific module? Please make sure to check Integration settings.
6.Additional features
Additional features for Descriptions are:
- Support of PDF Maker
- Support of EMAIL Maker
- Support of Custom Text area fields
6.1.Support of PDF Maker
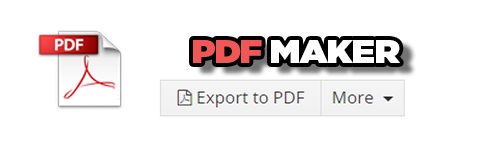
The PDF Maker is extension tool designed by It-Solutions 4 You for Vtiger CRM. It is powerful and flexible tool which allows users of Vtiger CRM to create own PDF templates. For more information check following link:
https://it-solutions4you.com/extensions/vtiger/pdf-maker/
Before creating PDF file you need to create template of PDF Maker. To create template please check manual for PDF Maker:
https://it-solutions4you.com/manuals/vtiger7/pdfmaker/
How to use Descriptions extension with PDF Maker
Create template with PDF Maker
Create description
Insert description, for example into your Invoice
Go to PDF Maker template for Invoice and insert variable for descriptions $INVOICE_DESCRIPTION$
6.2.Support of EMAIL Maker

The EMAIL Maker is an extension tool designed for the Vtiger CRM. Using EMAIL Maker, you can create email templates with predefined information and send them from all the modules. There are available all the fields from source and related modules, the fields related to recipients, the company information and many more.
The intention was to provide powerful and flexible tool which allows users of Vtiger CRM to create own email templates. Using the email templates you can send mass emails from the List view (e.g. Invoices, Quotes, Products, etc.) and finally save a lot of your time. Sending is running in the background. You are informed about sending process by a small pop-up window.
For more information check following link:
https://it-solutions4you.com/extensions/vtiger/email-maker-extension-vtiger-crm/
Before sending email you need to create template of EMAIL Maker. To create template please check manual for EMAIL Maker:
https://it-solutions4you.com/manuals/vtiger7/email-maker-vtiger-7/
How to use Descriptions extension with EMAIL Maker
Create template with EMAIL Maker
Create description
Insert description, for example into your Invoice
Go to EMAIL Maker template for Invoice and insert variable for descriptions $s-invoice-description$
6.3.Support of Custom Text area fields
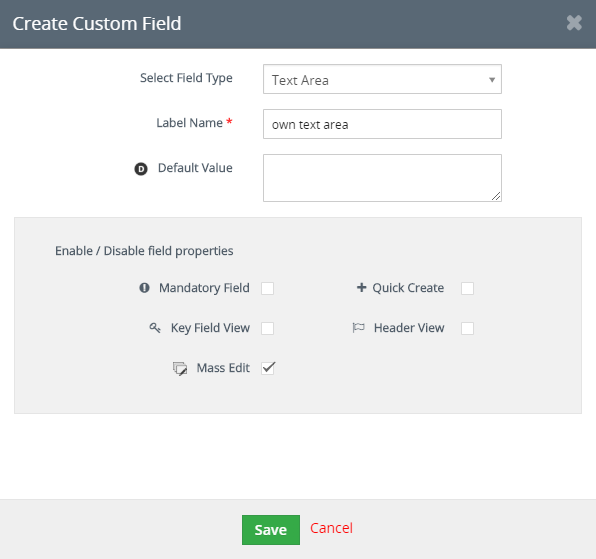
You can add your description or text into your own Custom Fields for all modules, that are “Text area” type. To create own Text area fields please provide following steps (if you have created your Custom Text area field already, you can skip steps 1-3):
- Click on in module you want to edit and choose Fields & Layouts
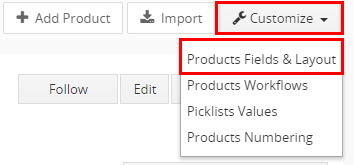
Descriptions – Custom fields – step 1 - Next, click on
 button

Descriptions – Custom fields – step 2 - Choose Text area and type name of your field. You can also set field as mandatory or choose other settings for this field. Click on and your field will be created
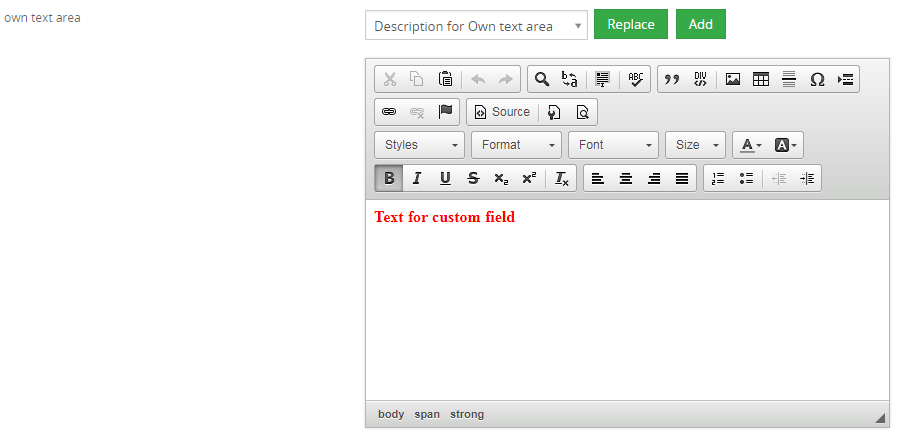
Descriptions – Custom fields – step 3 - Now you can use Custom field in Edit view and add your own Description template
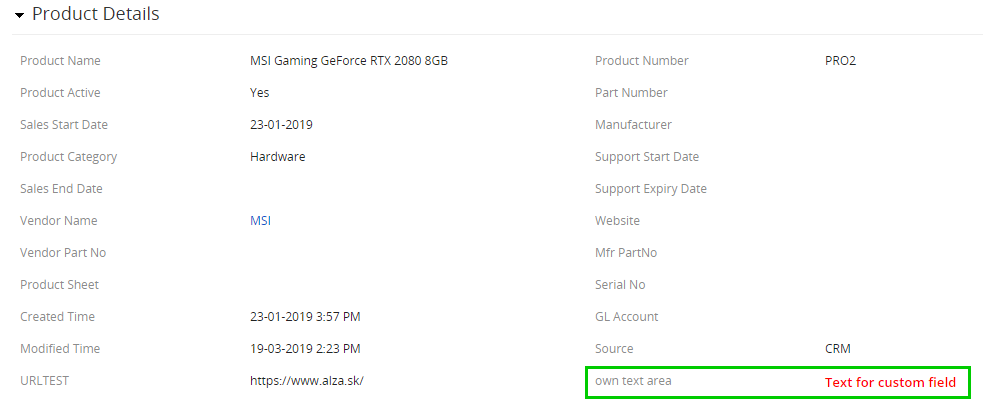
Descriptions – Custom fields – step 4 - Your description in Detail view
Descriptions – Custom fields – step 5
7.Settings
Settings for Descriptions can be found in the List view via ![]() button.
button.

7.1.Integration
Via Integration settings you are able to activate/deactivate modules & fields for which you can use Descriptions extension.
Example: if you deactivate module Tickets in Integration settings, you will not see this module active for Descriptions and you can’t choose it when you are creating Descriptions.
![]() Note: by default / after installation of Descriptions, modules & fields are turned off in Integration settings, means you need activate modules you need.
Note: by default / after installation of Descriptions, modules & fields are turned off in Integration settings, means you need activate modules you need.
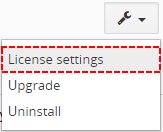
7.2.License Settings
Since December 2019/January 2020 all our modules will be using Installer to manage licenses. Please check our Installer pages for more information.
You can access the License settings like its shown below:
(there can be more options from the pick-list, depends on the module)
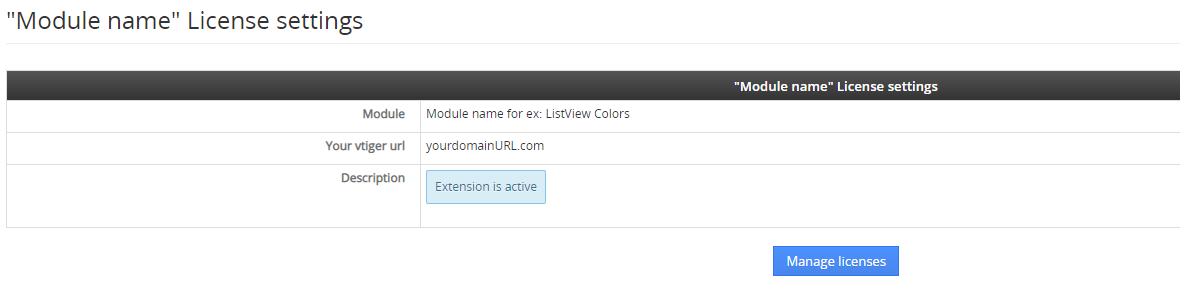
After accessing the License window you can see screen bellow with following information:
- Module name, Your Vtiger domain URL
- Description, if license is activate or not:
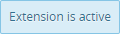 – your license is currently active,
 – your license is not active and you need active it via Installer.
To activate or manage license, click on the ![]() button.
button.
7.2.1.Deactivate license
If you want to deactivate your license, please provide following steps:
- Go to your Installer, by a click on Notifications Icon and then on the button ,
or via Main Menu – Settings – CRM Settings – Extensions – ITS4YouInstaller - The following screen will appear (see below):

Installer – deactivation of license You can deactivate license by click on the button

![]() Note: The module will be deactivated but not uninstalled and license will be removed from the Activated Licenses tab.
Note: The module will be deactivated but not uninstalled and license will be removed from the Activated Licenses tab.
7.2.2.Reactivate license
To reactivate a license after deactivation, you need to follow the same process as you activated it first time:
- Click on the
 button and enter your license key.

- Confirm with
 button.
When the license was activated you can see module available in the Modules tab below.
![]() Note: To see modules and manage licenses you have to log in to our e-shop with @email and password via
Note: To see modules and manage licenses you have to log in to our e-shop with @email and password via ![]() button (top right screen side in Installer module).
button (top right screen side in Installer module).
7.3.How to update Descriptions
The upgrade of the module is initiated manually or via our Installer.
Updating via Installer:
- open the Installer in the CRM
- in the Modules tab find your installed module and you should see the button available
- If the new version is available, you will be notified via Installer Notifications icon
Updating Descriptions manually:
Click on Upgrade link in list view of Descriptions.
As you can be seen on the picture below you will be notified that the Descriptions extension already exists. Confirm License agreement and upgrade will start immediately when you click on the ![]() button.
button.
After upgrade the notification about successful upgrade is shown.
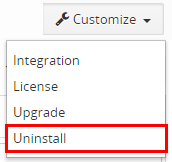
7.4.Uninstall
If you need to remove the module from your Vtiger you have two options:
- Uninstall via Installer.
- Manually via going to module Settings and choose Uninstall option.
7.4.1.Uninstall via Installer
You have also option to remove the module via Installer window by accessing the Settings – Uninstall window:
- Go to your Installer, by a click on Notifications Icon and then on the button ,
or via Main Menu – Settings – CRM Settings – Extensions – ITS4YouInstaller - Find the module you need to uninstall in the Modules tab
- Via
 pick list button choose the Uninstall option, you will be redirected to the Uninstall window.
 - Click on
 button

- Confirm uninstall with
 button
Now, the module has been removed from your Vtiger and your license has been deactivated. To use this module again, you need to provide installation and validation steps (see Installation chapter).
7.4.2.Manual Uninstall
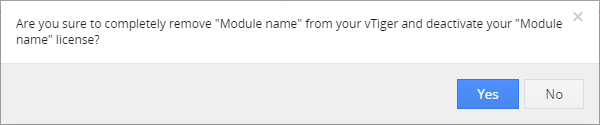
There is also available option to remove Descriptions manually from your Vtiger. To uninstall please provide following steps:
- Go to the List view of Descriptions and in Settings choose option Uninstall
Uninstall Descriptions - Click on button

Uninstall Descriptions - Confirm uninstall with
 button
Now, Descriptions are removed from your Vtiger and your license is deactivated. To use Descriptions again you need to provide installation and validation steps (see chapter 2. How to install Descriptions).
Unistalling Descriptions
- If you uninstall a module, all descriptions you have made before will stay in your records, but you will not see them correctly (The HTML tags will be included if you used bold font or similar options/customizations).
- This prevents to loose any data saved in the Descriptions or Terms & Conditions window.
8.Change Log
- Check latest versions available and fixes applied
- What was changed/added to manual
8.1.Descriptions
- 5 August 2021: 4.13
- Vtiger 7.4 compatibility
- 2 July 2021: 4.12
- fixed issues where creating a description in the Item Details block for product items caused issues in some rare cases
- 20 May 2021: 4.11
- fixed issue where deactivating descriptions for Products and Services did not deactivated CK Editor for these modules Text area fields
- 15 April 2021: 4.10
- fixed issue causing problems to edit descriptions in the related records via quick edit
(records did not save or were added as duplicate)
- fixed issue causing problems to edit descriptions in the related records via quick edit
- 25 March 2021: 4.9
- fixed issue where custom descriptions for Product or Services in Item detail block was removed once user applied discount
- the Note field in Documents module will now properly load the Descriptions
- 25 February 2021: 4.8
- improved loading times of descriptions
- 8 January 2021: 4.7
- fixed issue where in some rare cases, Descriptions were not properly loaded in Detail view (clear cache solved the issue)
— 2020 —
- 4 December 2020: Descriptions 4.6
- select box when selecting Descriptions was enlarged
- 23 November 2020: Descriptions 4.5
- added compatibility with the Calendar module (activate it in Integration settings)
- minor bug fixes
- 28 August 2020: Descriptions 4.4
- fixed descriptions block in the Summary view of records, where the description block was overlapping
- fixed issue where upon opening related records, descriptions were not shown at all or were showing with html tags
- 13 August 2020: Descriptions 4.3
- added possibility to use descriptions for selected fields via Integration settings
- CKEditor descriptions screen for products and services in items detail block was optimized for smaller screens
- 16 June 2020: Descriptions 4.2
- fixed issues after installation of extension which caused sometimes the blank page (database collations error)
- 04 March 2020: Descriptions 4.1
- fixed compatibility issues with the PDF Maker, where using Descriptions in combination with PDF Maker caused duplication of empty space/lines and (inserting double <br> instead of one)
- January 2020: Descriptions 4.0
- new validation system via our FREE extension Installer
— 2019 —
- April 2019 – Descriptions 700.1.4
- fixed issue with incorrect labels
- minor bug fixes
- March 2019 – Descriptions 700.1.1 – 700.1.3
- fixed problem with HTML tags showing in the Detail view
- fixed compatibility with PDF Maker and Email Maker
- minor bug fixes
- March 2019 – Descriptions 700.1.0
- compatibility with Vtiger 7
8.2.Manual of Descriptions
- November 2020: manual based on Descriptions version: 4.5
- updated chapters: Integration
- January 2020: manual based on Descriptions version: 4.0
- updated chapters: Installation, Updates, License settings, Uninstall
- new licensing via Installer – additional chapters added
- March 2019: manual based on Descriptions 700.1.0
- first initiate for Vtiger 7