

1.Introduction
The Email Marketing is perfect tool to create email campaigns and send them to selected lists of subscribers. You are also able to track the status via Key Metrics block where you see clicks, number of opened emails, unsubscribes count and much more.
Under the Key Metrics tab is a progress bar how many emails were already sent.
Email Marketing is coming with Newsletter extension in which you are able to create colorful templates via GrapeJS for your campaigns.
You have also option to use Email Maker templates if you require custom functions.
Main features of Email Marketing extension:
- Create Campaigns for your business
- Select templates from Newsletter or Email Maker
(Email Maker support of custom functions too) - Variables from Newsletter supported too!
- Schedule when emails will be sent
- Send Preview Email
- Track status of Campaign: Access Count, Click Count & more…
- Work with Organizations, Contacts, Leads, Vendors, Campaigns modules
- Most Email clients supported
- Unsubscribe feature (from version 4.2 and higher)
- Key metrics block and progress bar
- Easy installation & usage
- Vtiger 7.x/6.x compatible
- Included in our packages: Extended, All Access
![]() Note: Works only with Newsletter or Email Maker modules.
Note: Works only with Newsletter or Email Maker modules.

⚠️ Note: In order to fully use our Extension, we suggest you to have working Scheduler (Cronjob) ⚠️
![]() The number of e-mails sent per day, depends on the Vtiger Outgoing Server
The number of e-mails sent per day, depends on the Vtiger Outgoing Server
2.How to Install Email Marketing
There are currently two options how to install extension:
- (Recommended) Using our Free extension Installer
(Please visit the Installer page for more info) - Manually installation using a .zip file
(You still need to have Installer in order to activate license)
![]() Note: For versions 4.0 and higher, you will be needing to have installed our Installer in order to activate license keys.
Note: For versions 4.0 and higher, you will be needing to have installed our Installer in order to activate license keys.
Since December 2019 we launched our extended version of Installer which helps you install modules and manage extensions.
2.1.Installation via Installer
Make sure you have Installer installed, you can download Installer via our E-shop when you log in under Free Downloads section.
Next, simply install Installer via Module Management in Vtiger CRM by importing the .zip file you downloaded.
After successful installation, you can access Installer in two ways:
- by a click on Notifications Icon
 and then on the button
- or via Main Menu – Settings – CRM Settings – Extensions – ITS4YouInstaller.
![]() Note: To see modules and manage licenses you have to log in to our e-shop with @email and password via
Note: To see modules and manage licenses you have to log in to our e-shop with @email and password via ![]() button (top right screen side in Installer module).
button (top right screen side in Installer module).
After log in, you can activate Extensions or our Packages licenses associated to your account via ![]() button.
button.
When the license was activated you can see module available in the Modules tab below.
Simply hit the ![]() button and Extension is installed now.
button and Extension is installed now.
![]() You can only Activate these licenses, which are assigned to your Email Account you made purchase with and with which you are logged to the Installer.
You can only Activate these licenses, which are assigned to your Email Account you made purchase with and with which you are logged to the Installer.
3.How to update Email Marketing
The upgrade of the module is initiated manually or via our Installer.
Updating via Installer:
- open the Installer in the CRM
- in the Modules tab find your installed module and you should see the
 button available
 - If the new version is available, you will be notified via Installer Notifications icon

Updating Email Marketing manually:
Updating module manually is sometimes required when our support team sends you .zip package, if you are having some issues or there is any update or customization available.
Otherwise, we always recommend to use update via Installer.
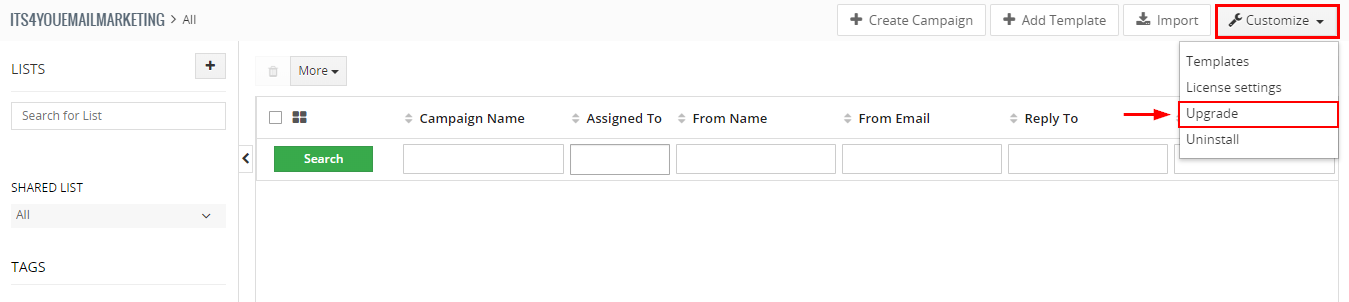
Go to Menu – Marketing – Email Marketing, in the list view click on the ![]() button and choose “Upgrade” option.
button and choose “Upgrade” option.
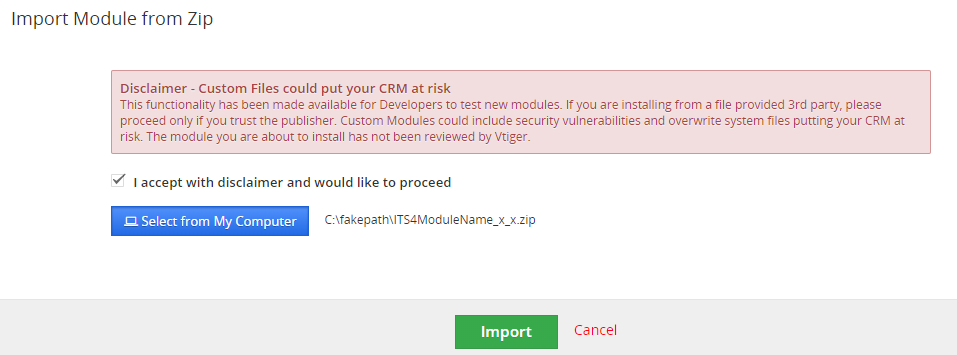
Please refer to below installation part for details how to initiate the import of the module from the .zip file.
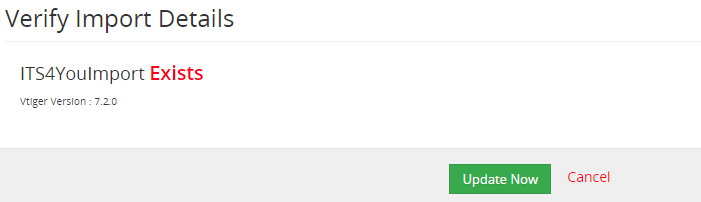
As you can be seen on the picture below you will be notified that the Email Marketing extension already exists. Confirm License agreement and upgrade will start immediately when you click on the ![]() button.
button.
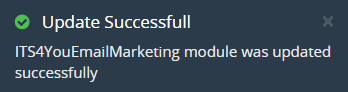
After upgrade the notification about successful upgrade is shown.
4.Work area
The Work Area of the Email Marketing consists of:
- List view – shows the list of created Email Marketing campaigns with additional actions
- Create/Edit view – consists of 4 steps: Campaign Details, Subscribes, Templates, Schedule
- Summary / Detail view – view when you can see all information for the specific campaign created, you can track status and other statistics of the campaign here + perform additional actions
4.1.List view
In the List view of Email Marketing you are able to see a list of already created campaigns, by clicking on the campaign name you will be taken to the Detail view.
In the list view you see default information of campaigns, like: Campaign Name, Assigned To, From Name, Reply To etc.
You can also create own list view if you require to show other information in it.
In the list view of Email Marketing you can perform the following actions:
- Create new campaign via
 button
 - Create new Newsletter template via
 button
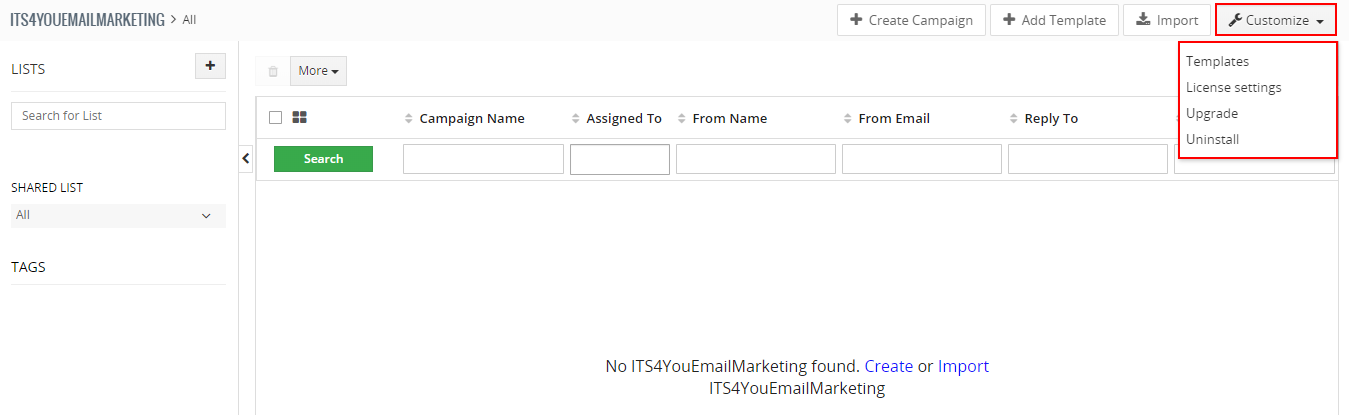
 - Access Settings via
 drop down menu:
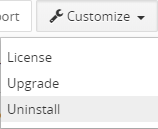
Templates – list view of Newsletter templates
License settings – check status of your license
Upgrade – option to update module manually
Uninstall – Remove the module from the CRM system - Enter to Summary / Detail view by clicking on campaign record
- Delete the already created campaigns
- Perform additional actions via
 drop down menu like: Follow, Unfollow, Add Tag, Find duplicates, Export
4.2.Create/Edit view
In this view you are creating new campaigns or editing already created ones.
You are filling the fields with required values or performing additional actions to create/edit your desired campaign.
This view consists of 4 steps:
Each step will be explained in the next chapters below.
4.2.1.Campaign Details (step 1)
Following fields needs to be filled in this step so you can create campaigns:
- Campaign Name – name for the campaign you are creating, this name will be shown just in your Email Marketing list view or detail view
- Assigned To – select the user to whom this campaign will be assigned
(by default its to user who is creating the campaign) - From Name – name of the user or person who is sending campaign, you can use any name you want, for example your organization name too
- From Email – email from which campaign will be sent, this email will be shown to the recipient of your campaign as “From: -email you filled-“
- Reply to – email, where the emails will be sent if your recipients reply to your campaign
- Description – this is shown just for you as a campaign creator, you can see it in your CRM system, recipients will NOT see this description, you can put any descriptions or notes you need here
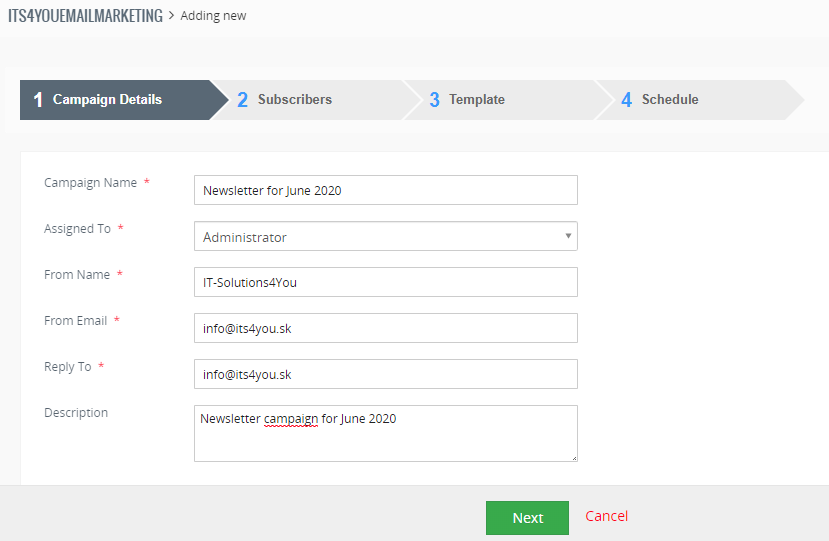
Example of step 1 is shown below:
4.2.2.Subscribers (step 2)
This is a very important step of creating campaigns, here you are selecting all recipients which will receive your campaign emails.
You need to select the module and also list view from which recipients (records) will be loaded.
Note: You can create any list view you need based on conditions.
See: More information about custom list views
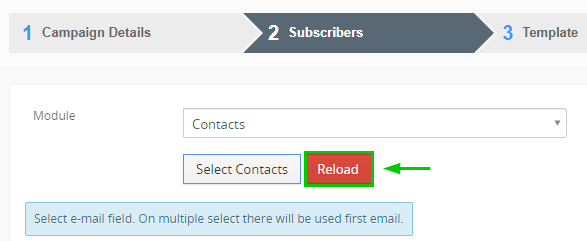
All available list views will be shown in the table, you can load contacts from this list view via ![]() button.
button.
After selecting emails use checkbox to check, which email fields will be used for the record:
- Primary or Secondary email field
Example of step 2 is shown below (before loading contacts):

Selecting/Removing contacts from the list manually
When the list of contacts is loaded, you can also add or remove contacts (recipients) manually via ![]() button.
button.
After clicking on the button, your browser will open new tab with the list of conctacts included in this list.
(9 in total) see below:
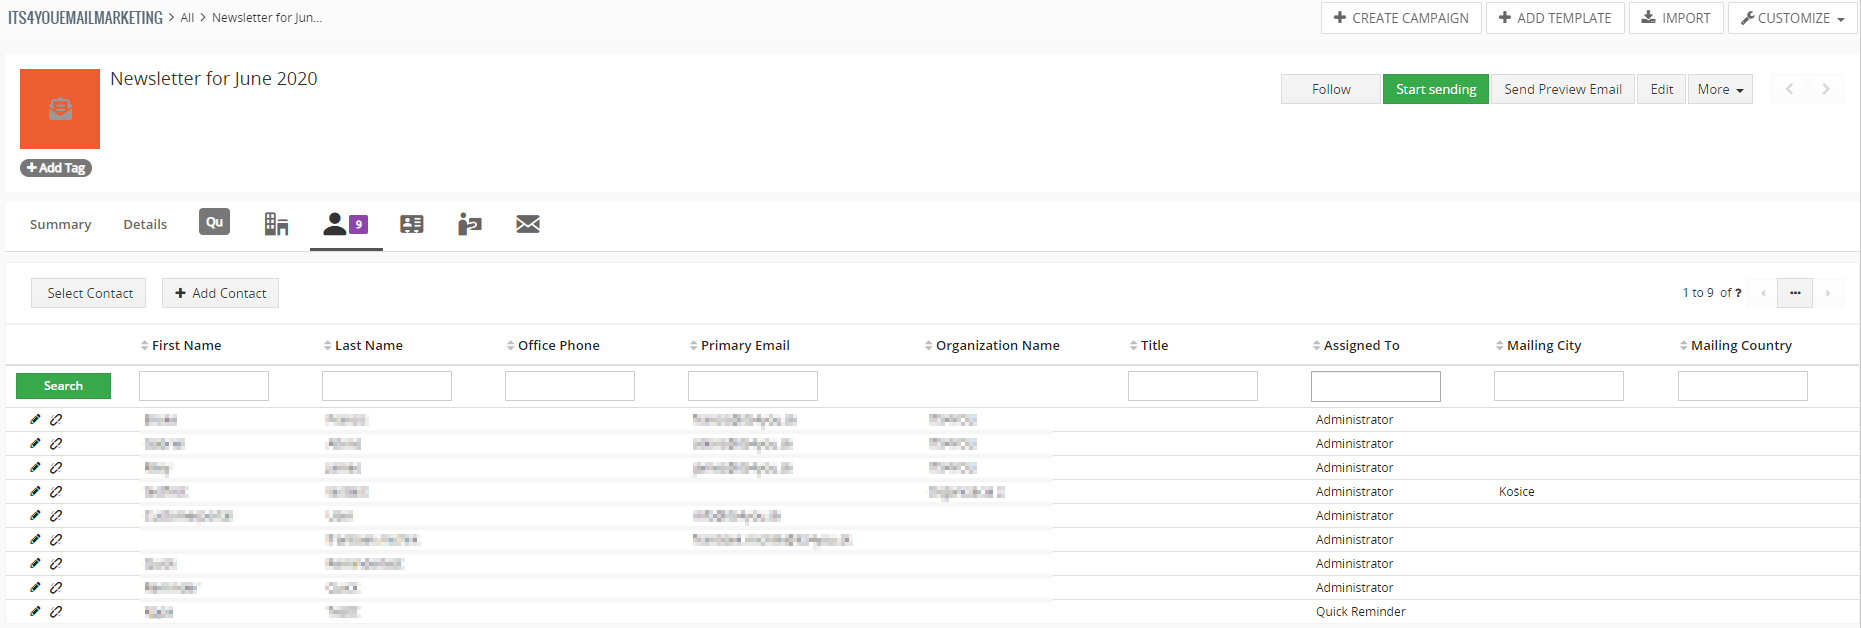
In the list, you have options to:
- Select already created contacts via
 button
 - Create new contacts via
 button
 - Unlink contacts which are loaded into the list via
 option near your record in the list view
 - Edit contacts which are loaded into the list via
 option near your record in the list view
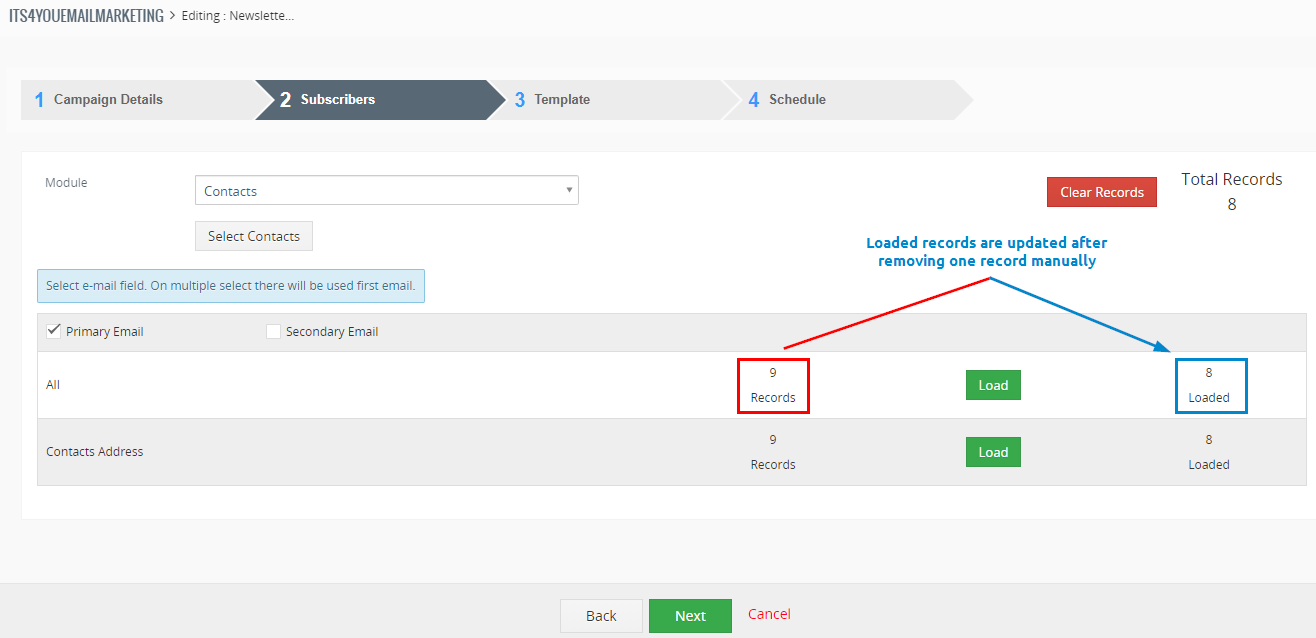
When you are done with actions mentioned above, simply close the newly opened tab and hit the button ![]() in the Subscribers step 2, see below:
in the Subscribers step 2, see below:
Example of step 2 is shown below (after manually removed one contact via ![]() button):
button):
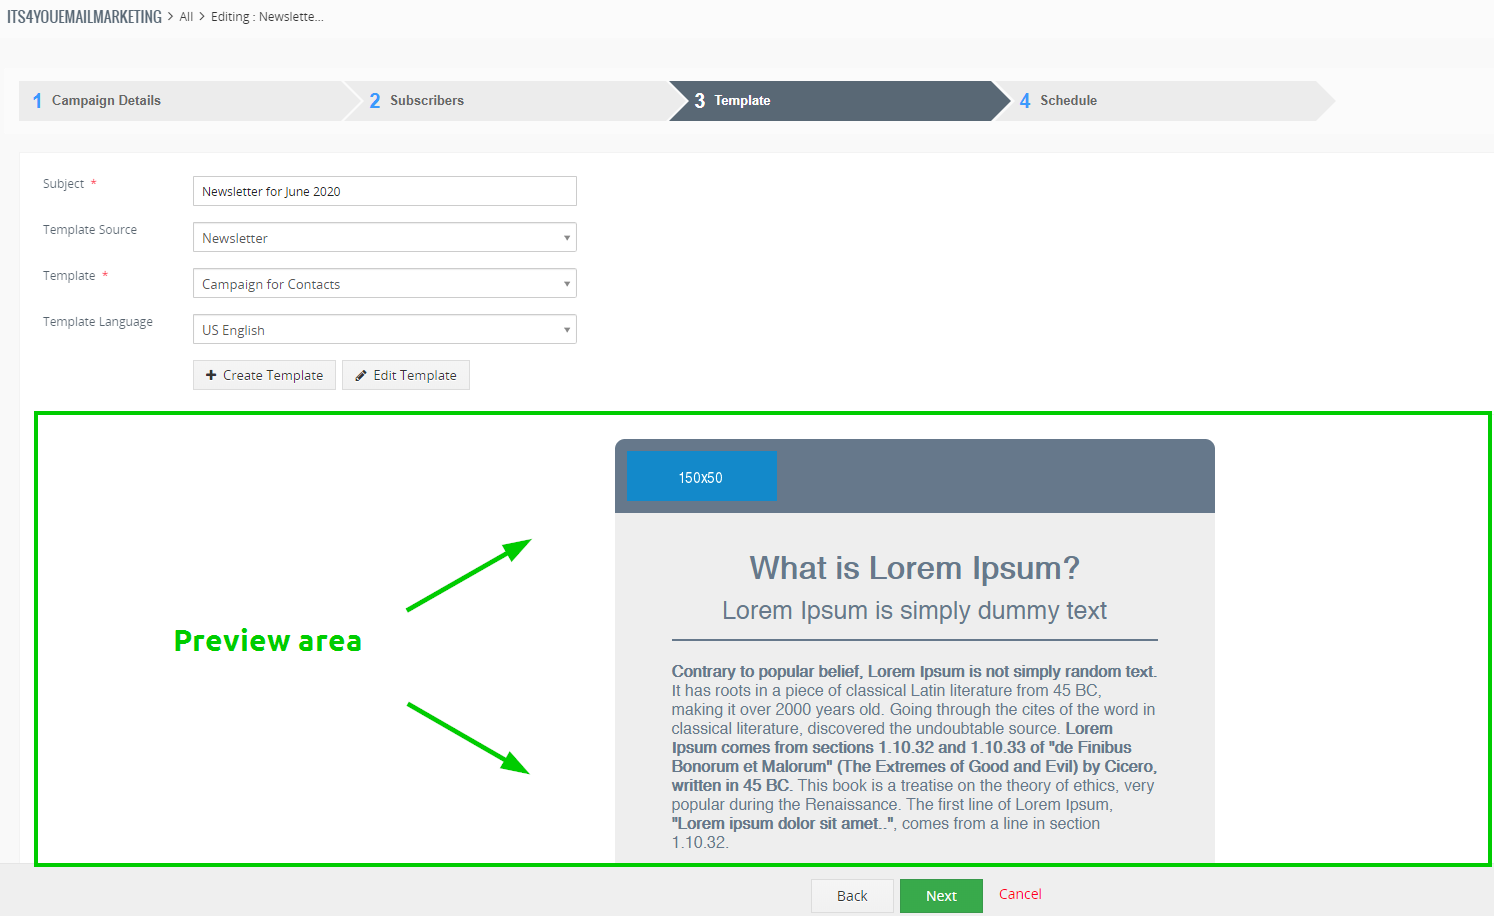
4.2.3.Template (step 3)
In this step of creating/editing email campaign you need to select which templates you want to use. These templates are shown as the content of emails which will be sent to your selected recipients.
There are two options from where you can load templates:
- Newsletter – this extension coming in the package if you purchased the Email Marketing module, its used to create templates with improved styling and design via GrapeJS editor.
How to create Newsletter template guide - Email Maker – this is a standalone extension from It-Solutions4You. If you have this extension purchased, you can create Email Maker templates and use these templates for Email Marketing too!
Features like custom functions, related blocks and using all variables are supported also. Values are loaded from the record which will be receiving the email.
How to create an Email Maker templates guide
This step includes following fields and actions:
- Subject – fill the subject, this subject will be shown to your recipients. Subject also can be automatically pre-filled when you select template, it will use the subject from the template you have created.
- Template Source – select from which module will be templated loaded, you can choose Newsletter or Email Maker.
- Template – if you have selected module from which will be templates loaded, now you need to select specific template.
 Note: Templates are displayed according to which module they are assigned to. If Email Marketing subscribers are loaded from Conctacts module, you need to select template created for module Contacts too.
 - Template Language – select which language will be used for your template.
 – this button opens new browser tab where you can create new templates. If you selected Template source Newsletter, you will be redirected to Newsletter create a template window.
 – via this button you can edit already loaded/created a template, you also will be redirected to the Edit window of selected modules.
Note: When you decide to use these buttons, after editing or creating new templates, you need to deselect the module from the Template Source field and select it again same with the template.
When the template is selected, you are also able to see preview of it, like it’s shown on the image below:
In order to continue to the next step, you need to have template selected, otherwise following error message will pop-up:
![]()
This may also indicate that you are missing module to create templates and you need to install it. Without it, you are not able to continue.
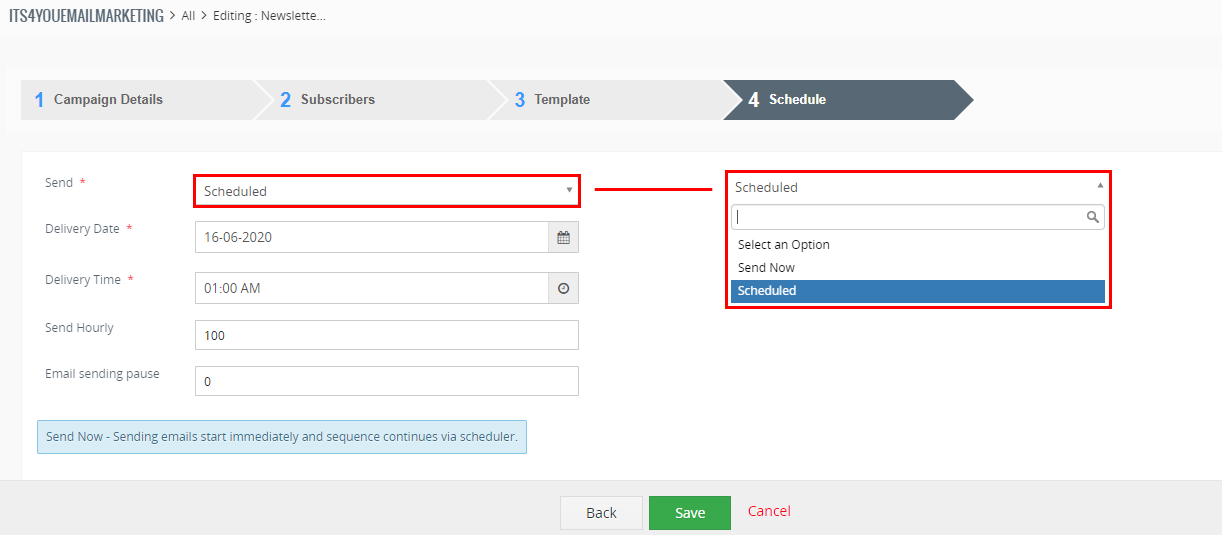
4.2.4.Schedule (step 4)
The last step is where you need to choose how your email will be sent. What does that mean?
Email Marketing is working via Scheduler (CronJob).
Sending emails is performed via Scheduler in your CRM each 15 minutes. So if you set Send Hourly email’s value to 100, means each 15 minutes 25 emails will be sent.
There are two options how to send emails:
- Send Now – sending emails start immediately after clicking on
 button and the sequence continues via scheduler.
*If you have 100 recipients/subscribers and Send Hourly field will be set to 100, each 15 minutes 25 emails will be sent. For Send Now option, first 25 emails are sent immediately without any delay. - Scheduled – set the date and time when the email sending sequence will start if you don’t want to start sending immediately.
Other options in this step:
- Send Hourly – how many emails will be sent in one hour sequence.
*If you have 100 recipients/subscribers and Send Hourly field will be set to 100, each 15 minutes 25 emails will be sent. For Send Now option, first 25 emails are sent immediately without any delay. - Email sending pause – time between each email is sent, by default this is set to 1 second.
The preview of this step is shown on the image below:
4.3.Summary / Detail view
Summary / Detail view, provides you detailed information about your already created campaign, showing you the fields you filled during creation of the campaign.
You can perform many actions from here via specific buttons in this view and also track progress and statistics of the current campaign.
There is an option to check the list of subscribes loaded for this campaign![]() and also see a list of already send emails
and also see a list of already send emails ![]() .
.
Please see Detail view image below (click to enlarge):
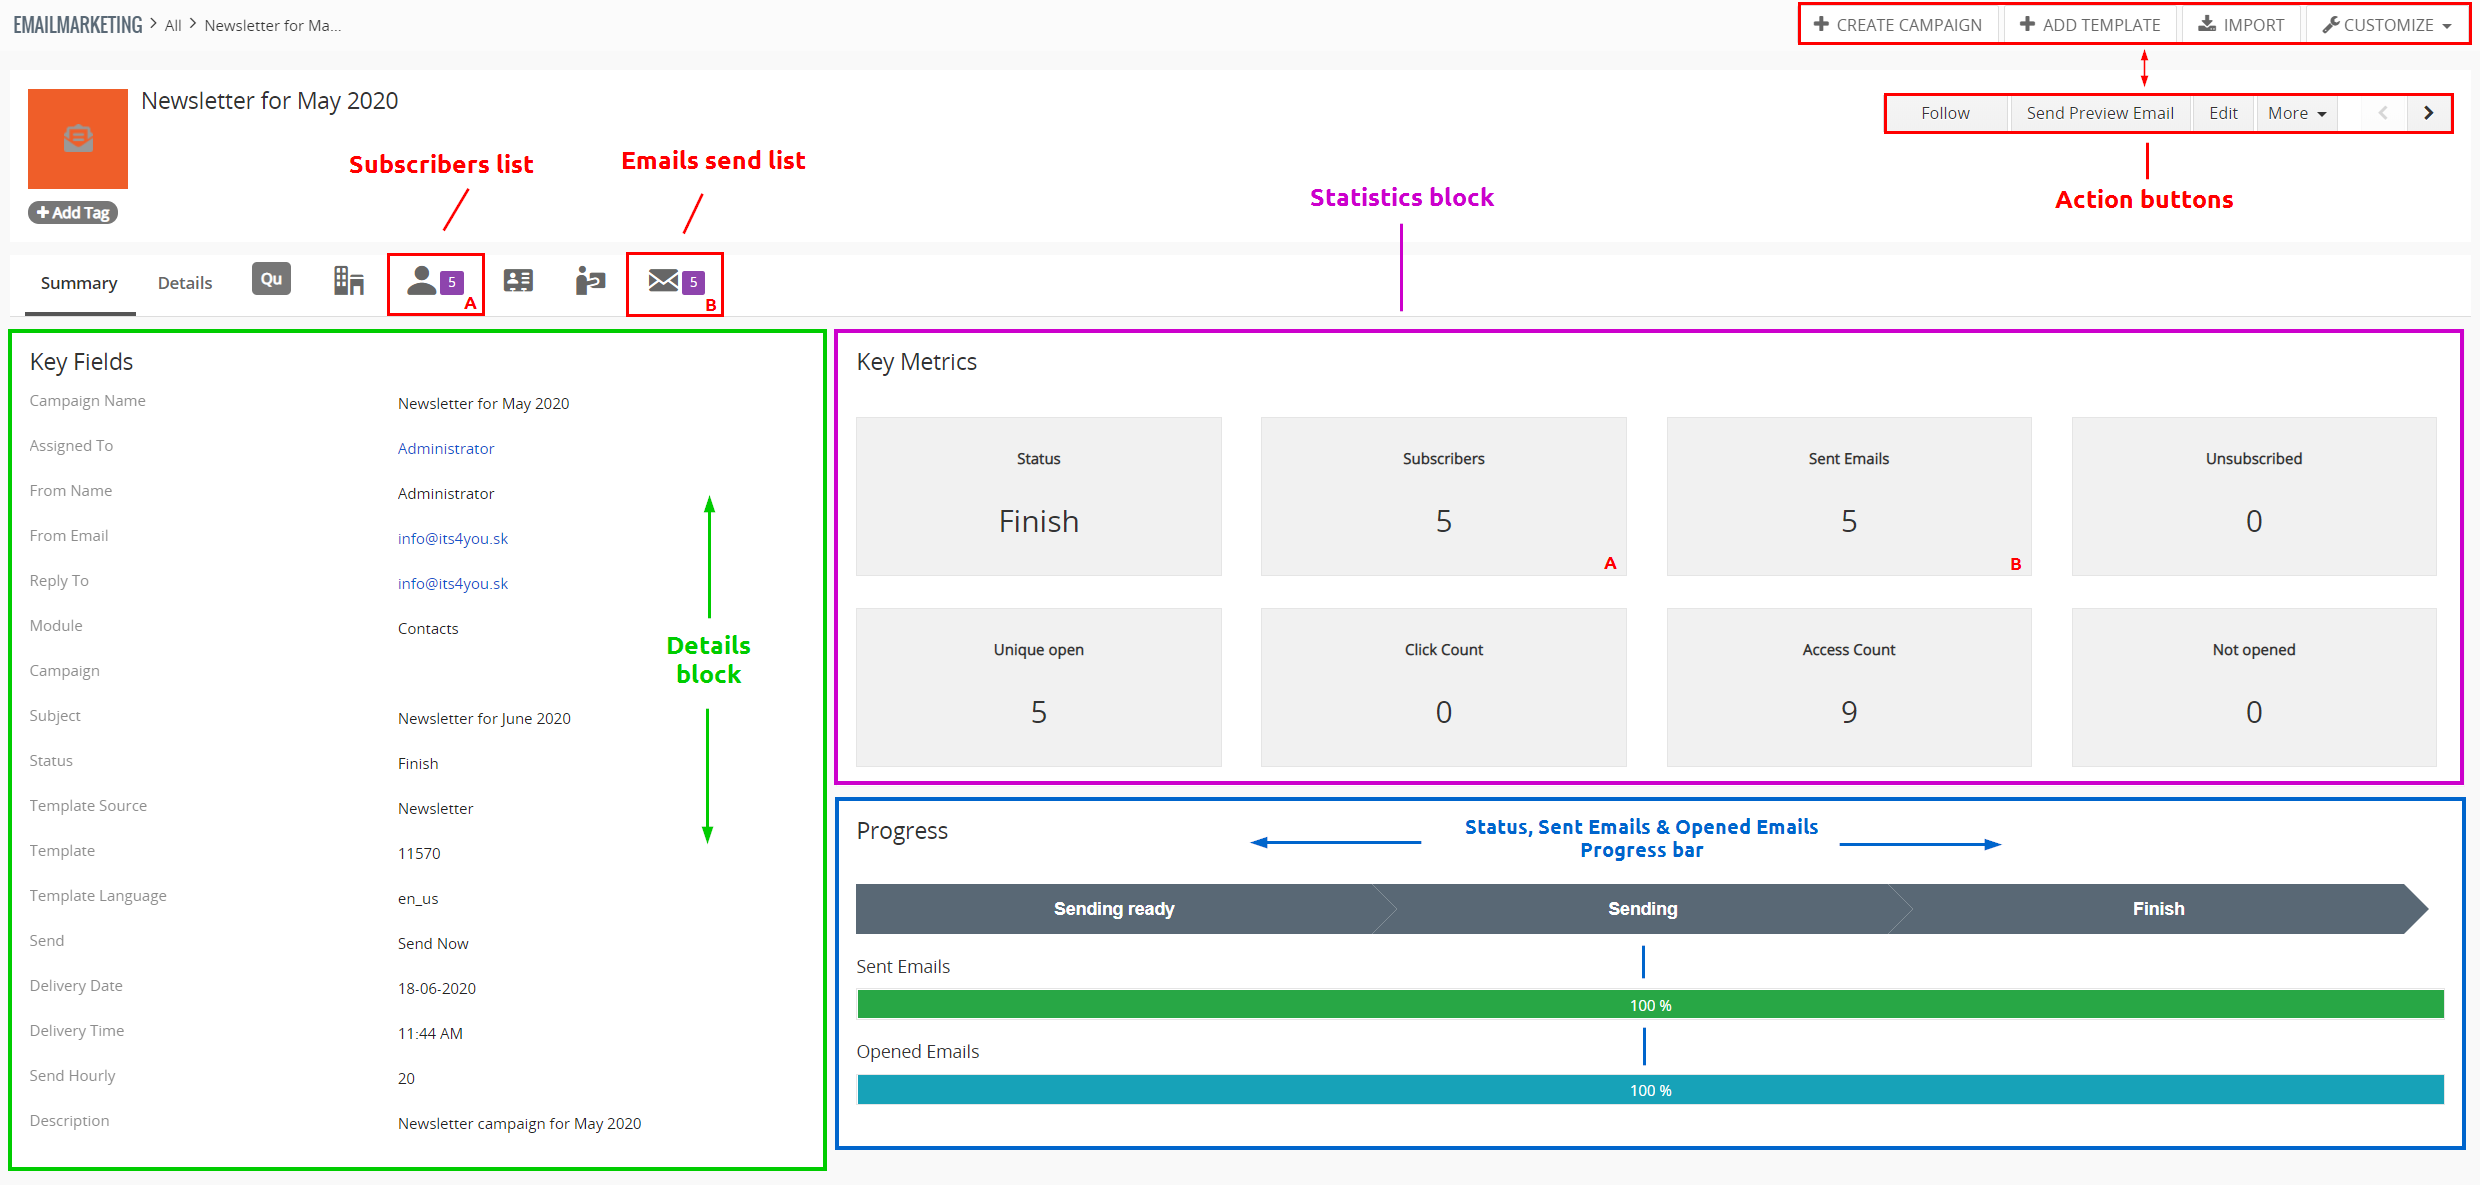
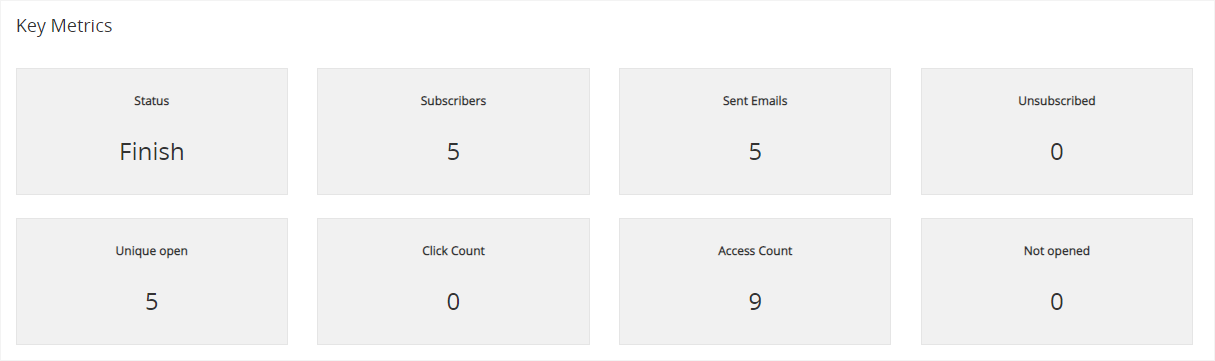
4.3.1.Campaign statistics / Key Metrics
Each campaign has own Key Metrics available in the summary view.
Key Metrics block has own fields which are explained below:
- Status – its the current status of your campaign, normally when the campaign is finished status should be Finish. There are other status values like:
Created/Sending ready – you can start sending emails,
Pause – campaign is paused and emails are not sent,
Stop – The campaign was stopped but you can still resume it by changing the status of it,
Finish – campaign is finished, when all the emails have been sent. - Subscribers – shows the number of the records you loaded from the list for this campaign.
- Sent Emails – number of emails sent by your campaign.
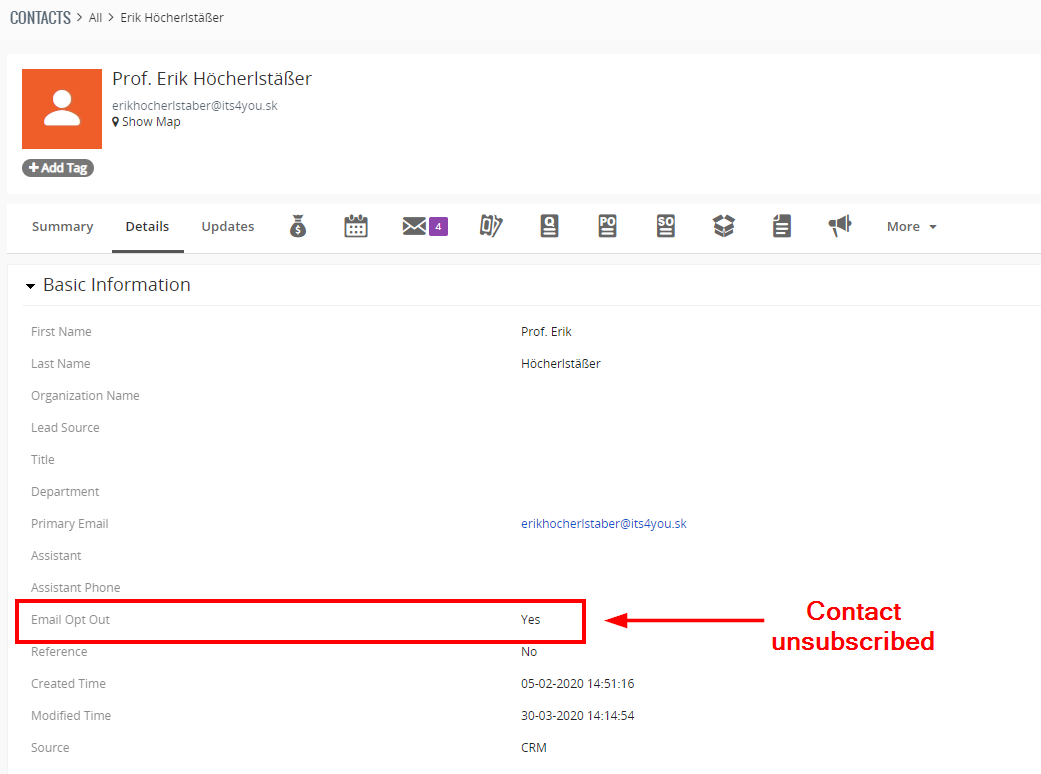
- Unsubscribed – how many people unsubscribed and don’t want to receive campaign emails.
This is based on the field value Email Opt Out, for example, in the Contact detail view.
Email Opt Out value in the default view of the Contact is by default set to No = Subscribed, but it can be changed to Yes = Unsubscribed. - Unique open – how many times were email opened, this should be equal to:
1 email sent = 1 email unique open.
for example:
Sent emails = 5 / Not opened emails = 1 …. Unique open =4 , because only 4 recipients opened the email. - Click count – this count shows how many times someone clicked on the url/link in the actual template/email body (if there is any).
- Access Count – counts how many clicks total were on the email subject.
- Not opened – shows the number how many emails were unread.
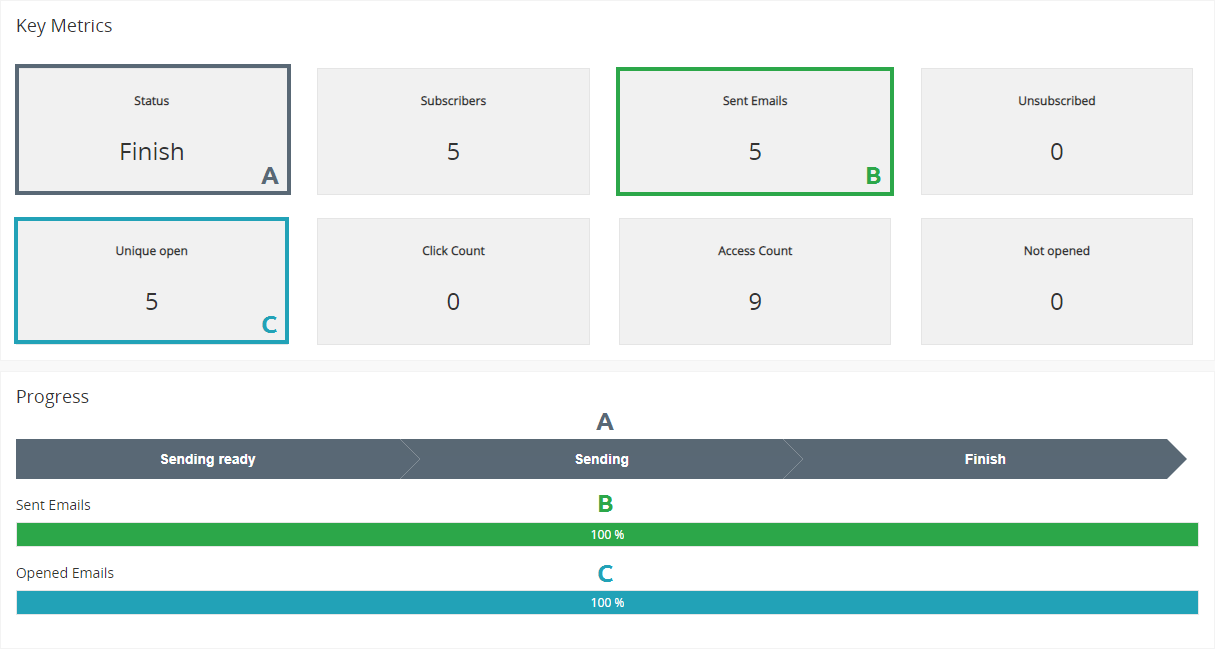
4.3.2.Progress bars
In the summary view you can track campaign status also via Progress bars.
You can track:
- Status – current status of your campaign
- Send Emails percentage – % how many emails was sent already
- Opened Emails percentage – % how many emails were opened
Progress bar is using data from Key Metrics block, see below:
4.3.3.Recipients / Subscribers list
You are also able to see the recipients list when you click on related emails icon ![]()
Here you can track every recipient individually, most important is click count and access count.
To see recipients list, simply click on relation icon in the summary view of the Email Marketing campaign:
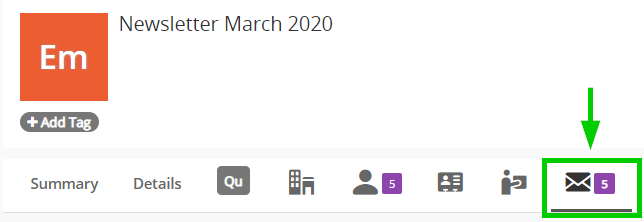
The following window will appear with the list of recipients.
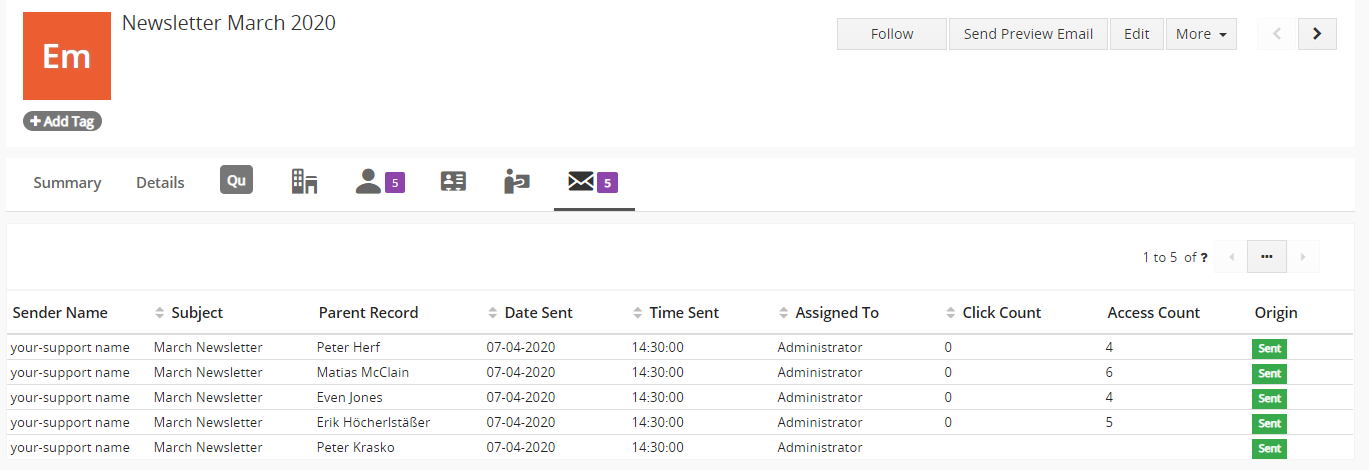
You can see and track the following information on the screen:
- Sender name – shows sender name based on settings $HELPDESK_SUPPORT_NAME in the file /config.inc.php in your Vtiger directory.
- Subject – subject of the email send to the recipients.
- Parent Record – record name
- Date sent – where was the email sent.
- Time sent – exact time when was email sent.
- Assigned to – shows to who is the record assigned.
- Click count – this count shows how many times a recipient clicked on the url/link in the actual template/email body (if there is any).
If there is no any number means recipient didn’t open email yet. - Access Count – counts how many clicks total were on the email subject by the recipient.
If there is no any number means recipient didn’t open email yet. - Origin – status of the email.
5.How to use Email Marketing
In the following chapters, we will show you how to use our Email Marketing extension step by step.
5.1.Before you start
Before you start using Email Marketing please check following:
Technical settings:
- Vtiger parameters – we recommend to have correct parameters for Vtiger and our extensions, this will prevent to have any issues.
- Working Cron / Scheduler – extension is using Scheduler to send emails, emails are sent each 15 minutes (by default).
(You can edit the 15 minute interval, but we recommend to keep it at 15 minutes to prevent any issues).
If the Scheduler is not configured or is turned off, you can still send emails manually via “Send Emails” button which will appear in Summary view. - Outgoing Server – in order to send email, you need to set up your outgoing server in Vtiger CRM system.
Templates:
In order to fully use Email Marketing, you will be needed to have some templates created, these templates will serve as the content of emails for campaigns.
There are two options from where you can load templates:
- Newsletter – this extension coming in the package if you purchased the Email Marketing module, its used to create templates with improved styling and design via GrapeJS editor.
How to create Newsletter template guide - Email Maker – this is a standalone extension from It-Solutions4You. If you have this extension purchased, you can create Email Maker templates and use these templates for Email Marketing too!
Features like custom functions, related blocks and using all variables are supported also. Values are loaded from the record which will be receiving the email.
How to create an Email Maker templates guide
5.2.Creating campaign
In the following steps, we will simulate how to create a campaign:
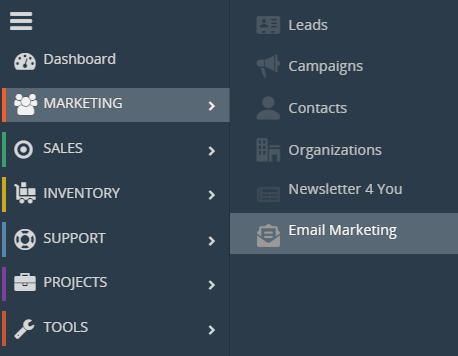
- Navigate to Menu – Marketing – Email Marketing, you will be redirected to List view, click on the button to start creating Campaign.
The button is used if you want to create a template in the Newsletter.
 - Creating Campaign consists of 4 steps.
In first step Campaign Details, fill all required data like:
Name for your campaign
Assigned To
From Name – name of sender
From Email – email from which campaign is sent
Reply To – where you will receive emails when someone reply to your campaign emails
Description if needed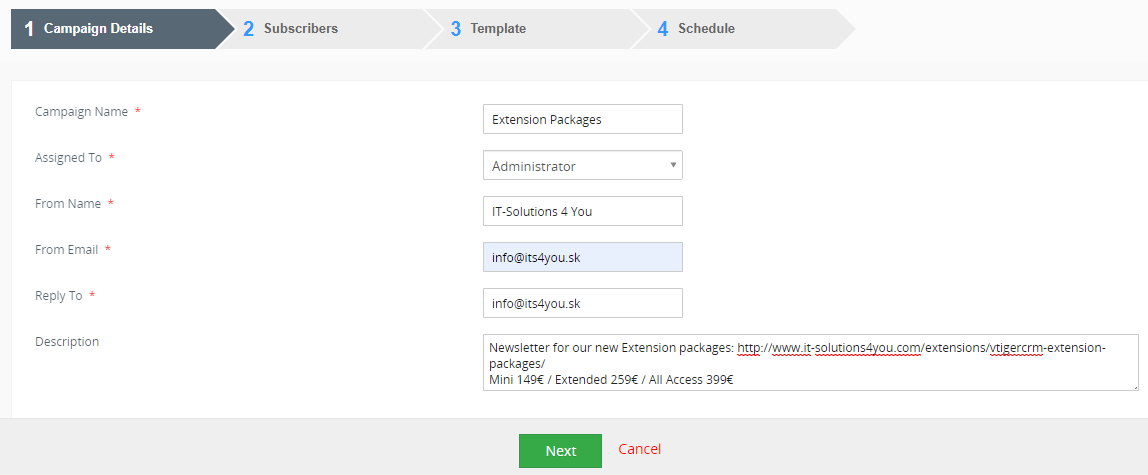
Email Marketing for Vtiger CRM – Creating campaign step 1 When all fields are filled, proceed via
 button.
 - Second step Subscribers, please select the Module first (1), you can choose from 5 modules: Organizations, Contacts, Leads, Vendors & Campaigns.
For our guide we used Contacts module. After selecting the Module, available lists of contacts will appear (2). Select the list you want and proceed via button (3).
Also, you need select which email field will be used, Primary or Secondary Email (4).
There is also option to: Select/Remove contacts from the list manually via
button (5). Note: Please see the chapter Subscribers (step2) for more detailed information.When subscribers are selected, proceed via
button.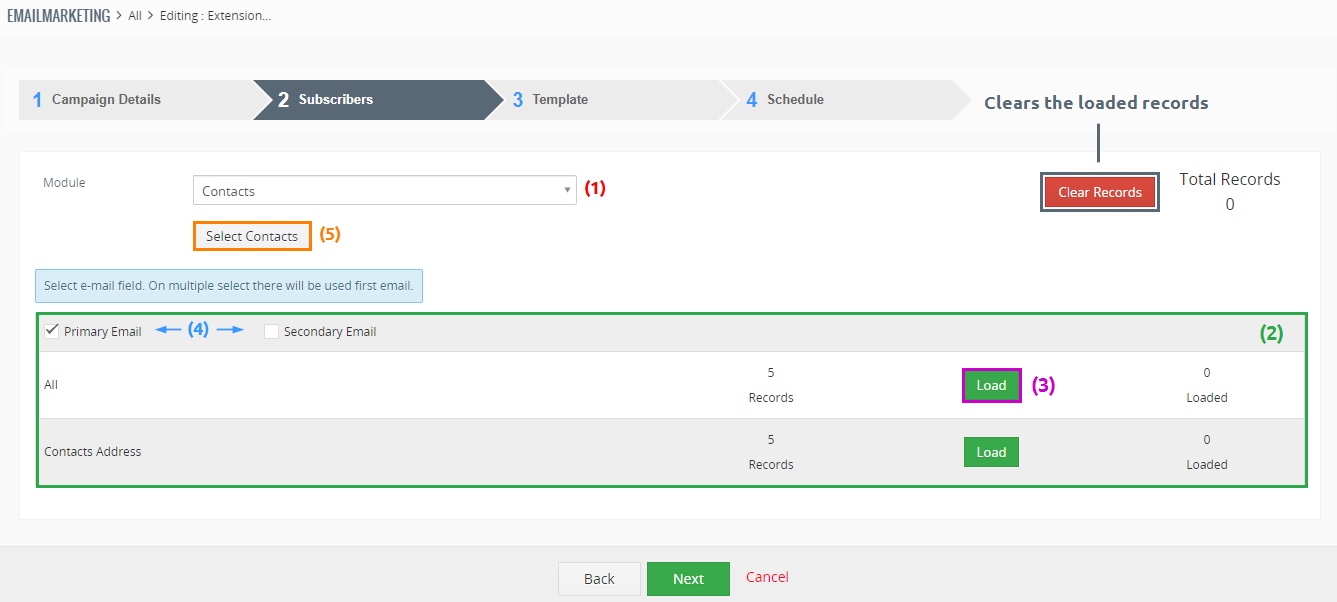
Email Marketing for Vtiger CRM – Creating campaign step 2 - The third step Template, is where you choose Newsletter/Email Maker templates you created.
More information about this step you can find in the chapter: Template (step 3)
Select the template source module via a pick list menu (1).
Next, select the template (2).
Also language used for the template (3), it’s not mandatory. Note: Subject* field value can be filled manually by the user, or can be pre-filled from a Newsletter template.The template should be loaded and you can proceed via
button.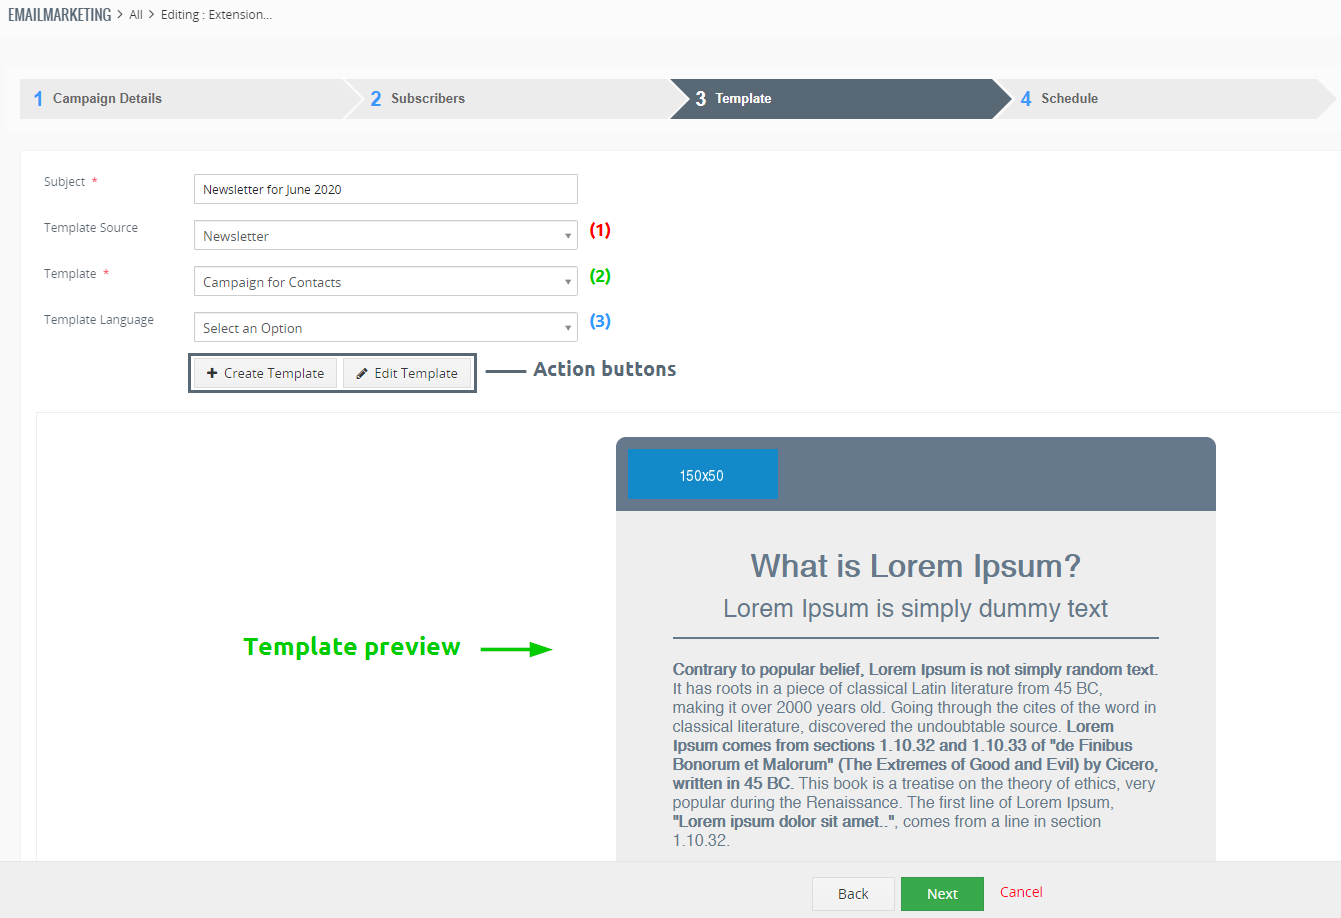
Email Marketing for Vtiger CRM – Creating campaign step 3 - The last step is Schedule, you need to choose how your email will be sent.
More information about this step you can find in the chapter: Schedule (4).
Select from the pick list how the emails will be send (1):
Send Now – sending emails start immediately after clicking on button and the sequence continues via scheduler.
If you have 100 recipients/subscribers and Send Hourly field will be set to 100, each 15 minutes 25 emails will be sent. For Send Now option, first 25 emails are sent immediately without any delay.
Scheduled – set the date and time when the email sending sequence will start if you don’t want to start sending immediately.Set how many emails will be sent per hour in one sequence (2).
Define Email sending pause – time between each email is sent, by default this is set to 1 second (3).
Finish the creating Email Campaign and proceed via
 button.
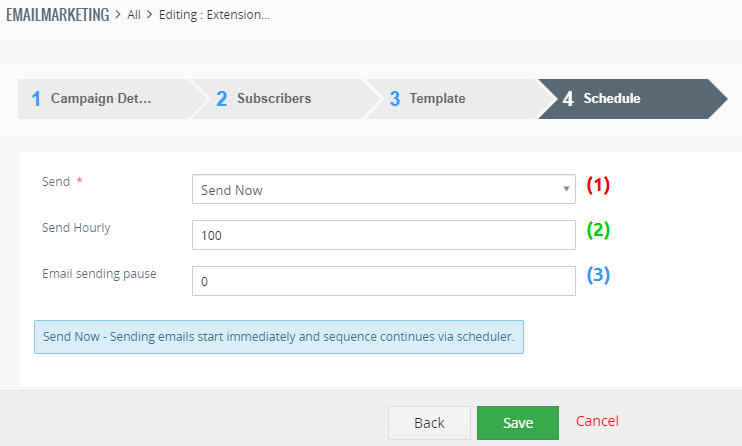
Email Marketing for Vtiger CRM – Creating campaign step 4
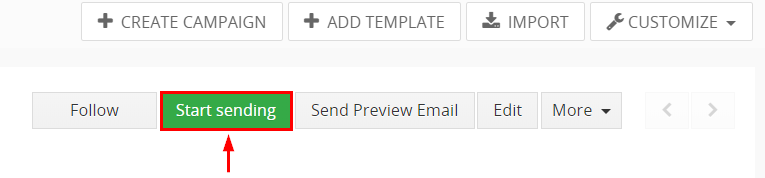
The campaign was created, now you can start sending emails via ![]() button on the Summary view:
button on the Summary view:
6.Additional features
6.1.Unsubscribe
An Email Marketing extension come with built in unsubscribe feature, however this is not automatically added to the templates, you need to add it manually.
There are two options how to use unsubscribe:
- Newsletter template – add an unsubscribe link in the GrapeJS editor
- Email Maker template – using custom function in the template

Please see the chapters below for detailed information.
6.1.1.Unsubscribe via Newsletter
![]() Note: This feature is available from version of Email Marketing 4.2, so please update your extension via Installer if you want to use it without any issues.
Note: This feature is available from version of Email Marketing 4.2, so please update your extension via Installer if you want to use it without any issues.
This feature is added in to the template of Newsletter which comes with Email Marketing extension.
- In the Newsletter module, simple open any template you created/creating.
- In the Editor you see Content Icon (1)
 , click on it and look for Unsubscribe icon (3) under Content block (2), see below:
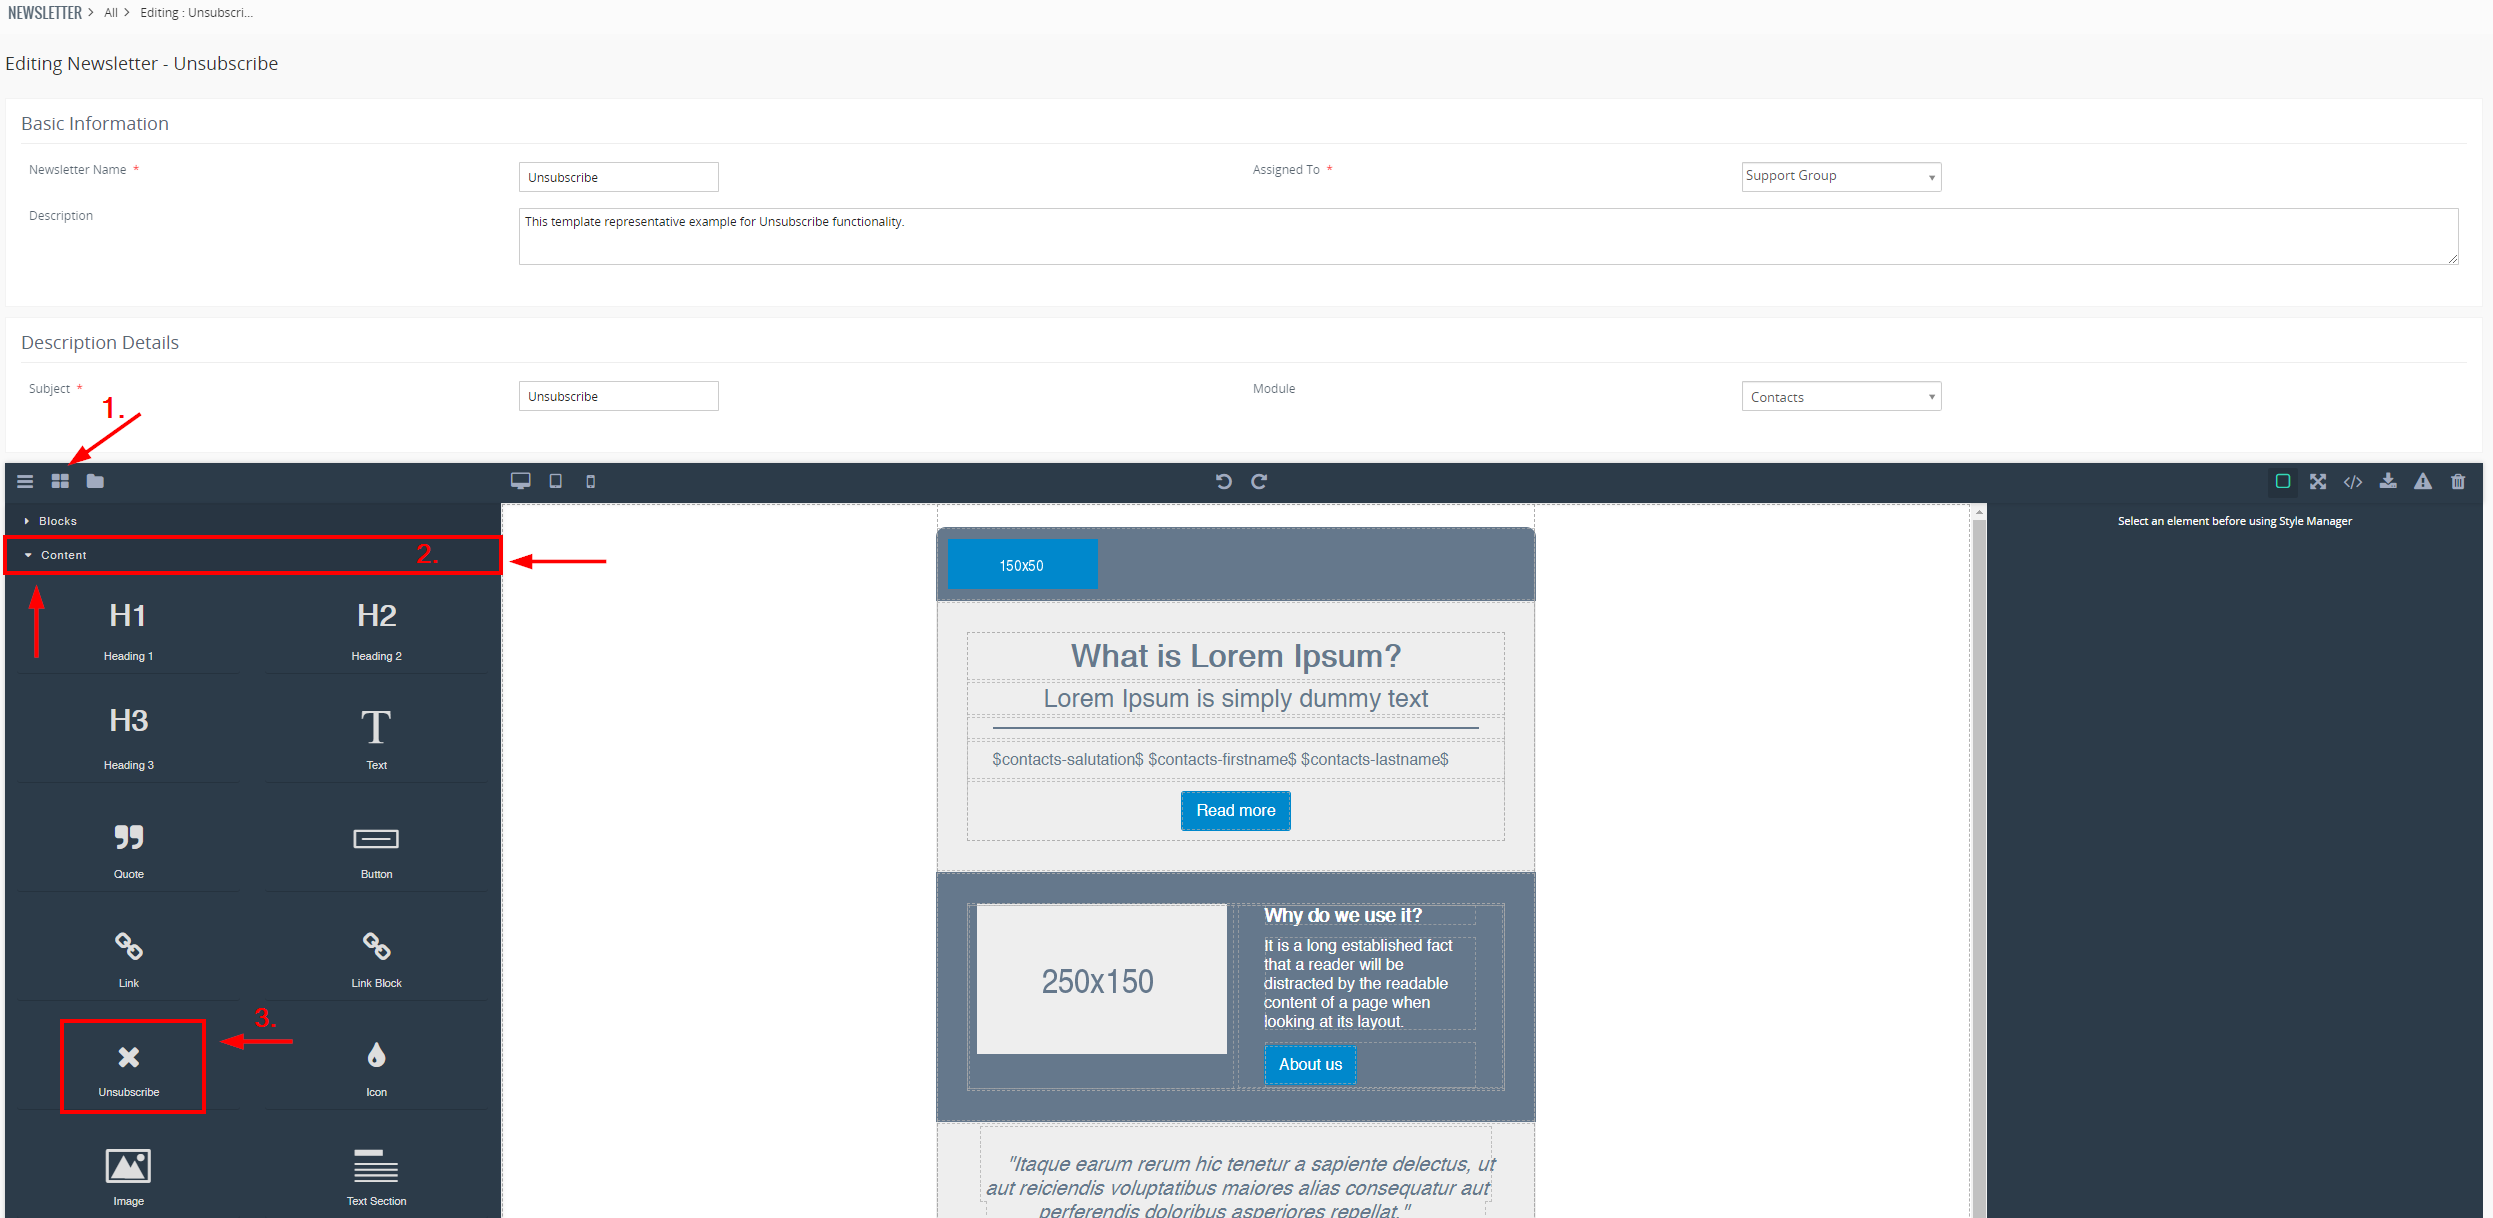
- Next step is to place the Unsubscribe link where do you want, its drag and drop process.
Simple drag the Unsubsribe icon from the left side of the menu and drop it to the template, see below:
- After placing an Unsubscribe link / button, you can send out the emails via Email Marketing.
Whoever clicks on the button / link will be unsubscribed from your emails.
For example, in module Contacts, the field Email Opt Out will change from No to Yes, if the unsubscribe link was clicked by a Contact.
Yes means he will not receive any emails. You can change it anytime by editing this field.
Changing the style of button and unsubscribe message.
Changing the style of added unsubscribe link/button is very easy and you can change, label, add icon, change font style, color and more.
- Click on the Unsubscribe link you added to the template.
- On the right side of the screen you can see the Settings window will pop-up for certain link/button you clicked.
- See below:
How to change Unsubscribe message?
- Go to your Vtiger folder directory and look for ITS4YouUnsubscribe.php file.
- Open the file with any editor you like and look for line (25) with:
$message = ‘<p>Your email address has been unsubscribed</p>’; - You can change the message between <p> and </p> as you like for example:
$message = ‘<p>You have successfully unsubscribed.</p>’; - Save the changes.
6.1.2.Unsubscribe via Email Maker
In order to use the Unsubscribe feature for the Email Maker template, first you need to perform setup steps.
Unsubscribe is performed via Unsubscribe custom function.
For some kind of the email templates (campaign, advertising…) You can insert into your email template “Unsubscribe from emails” link. This link allows the recipient to unsubscribe himself from receiving such multiple emails just by one click.
![]() Note: All these steps are performed in the Email Maker extension.
Note: All these steps are performed in the Email Maker extension.
Please provide following steps to start using Unsubscribe Email functionality:
- Download UnsubscribeEmail.zip

Download UnsubscribeEmail.zip – Email Maker Vtiger 7 - Unzip content of the .zip file into your server (we recommend into the same location where you have Vtiger installed)

Unzip UnsubscribeEmail.zip – Email Maker Vtiger 7 - Inside UnsbuscibeEmail.php is necessary to define:
- $server_path – this is your Vtiger URL. (Be sure that $server_path is same like $site_URL from config.inc.php of your Vtiger installation)
- $user_name – this is the username you use to login to the Vtiger CRM, see also “My Preferences”
- $user_access_key – the access key can be retrieved by logging into your Vtiger CRM account, going to “My Preferences”
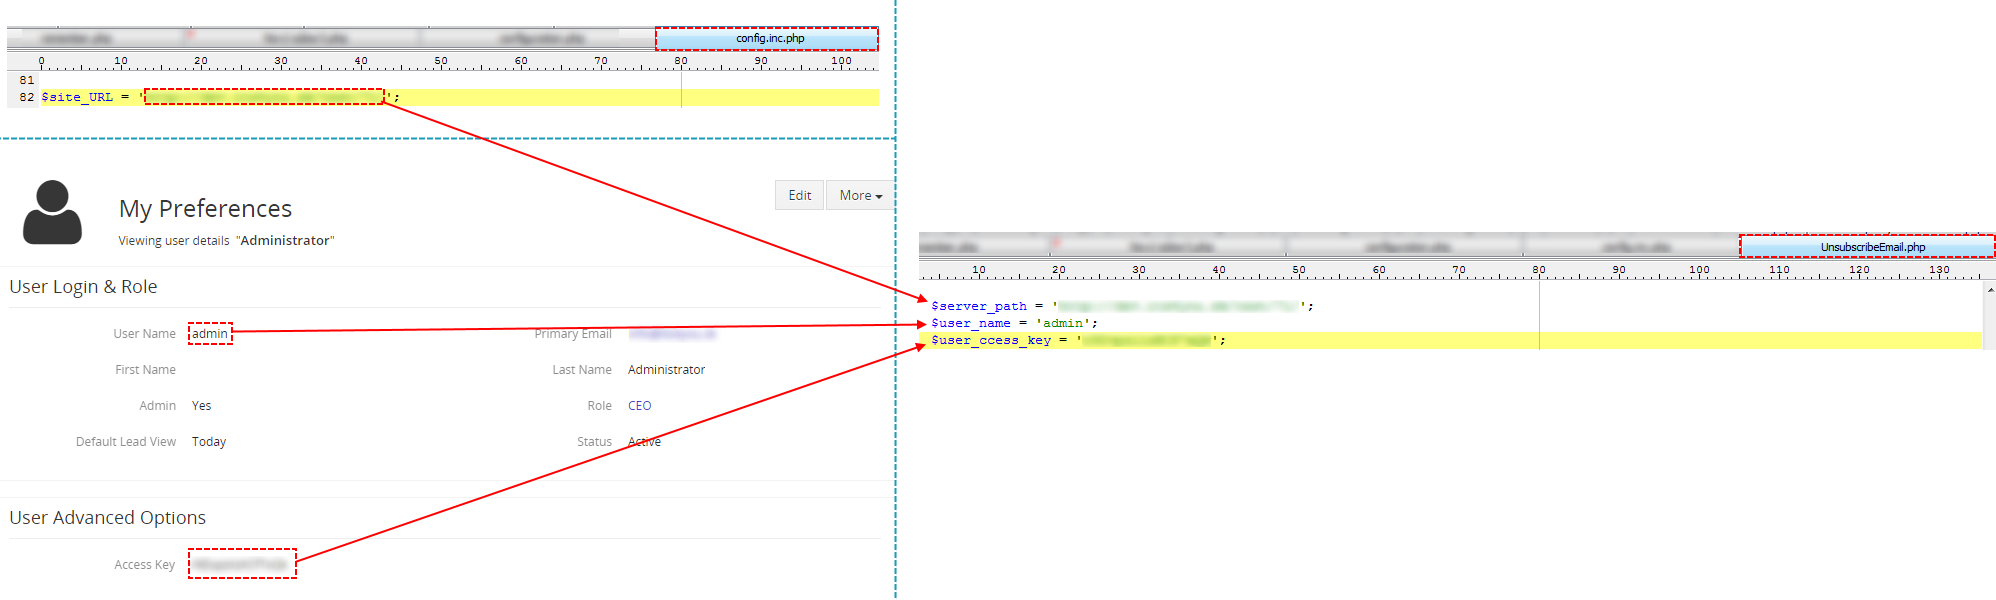
Edit UnsubscribeEmail.php – Email Maker Vtiger 7 - Sentence shown after successful unsubscribing (row 81) (optional edit)
- Sentence shown when email address has not been unsubscribed (row 83) (optional edit)
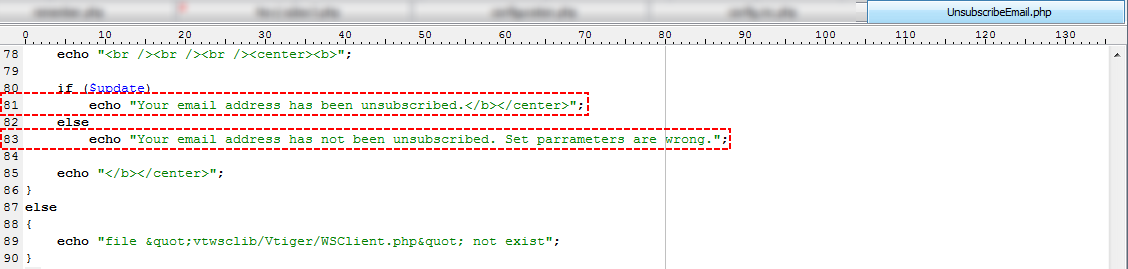
Edit sentences – Email Maker Vtiger 7
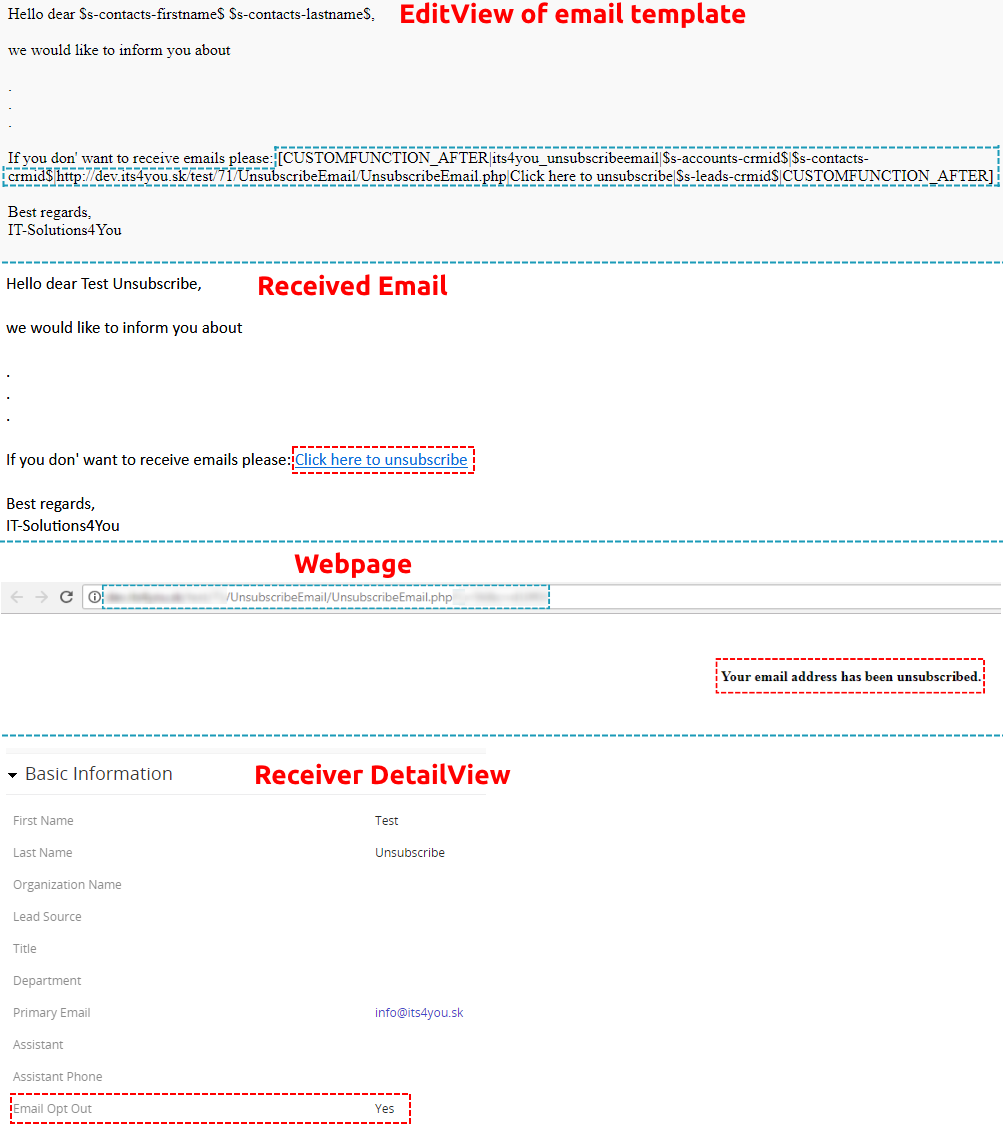
- The final step is to put custom function its4you_unsubscribeemail into your template. There are just two parameters which you need to modify inside custom function
[CUSTOMFUNCTION_AFTER|its4you_unsubscribeemail|$s-accounts-crmid$|$s-contacts-crmid$|url_address|label|$s-leads-crmid$|CUSTOMFUNCTION_AFTER]- URL_ADDRESS – URL address of your UnsubscribeEmail.php
- label – Text of the unsubscribe link
Next picture shows process of unsubscribing contact which leads to change his “Email Opt Out” to “yes”.
![]() When the setup is finished, you can load this template via Email Marketing and keep using this feature.
When the setup is finished, you can load this template via Email Marketing and keep using this feature.
6.1.3.Unsubscribe custom page
If users want to have custom page when clicked on Unsubscribe link in the emails, they can set it easy!
Follow these steps:
- Go to Vtiger folder and open file config.inc.php
- Add line:
$ITS4YouUnsubscribeRedirectUrl = “www.YourUnsubPage.com”;
Should look like this:
- Save the changes.
Now when subscribers click on the Unsubscribe link in the Email, they will be redirected to this page and unsubscribed.
7.Settings
Settings for Email Marketing can be found in the List view via ![]() button.
button.
7.1.License Settings
Since December 2019/January 2020 all our modules will be using Installer to manage licenses. Please check our Installer pages for more information.
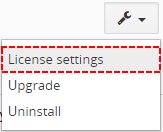
You can access the License settings like its shown below:
(there can be more options from the pick-list, depends on the module)
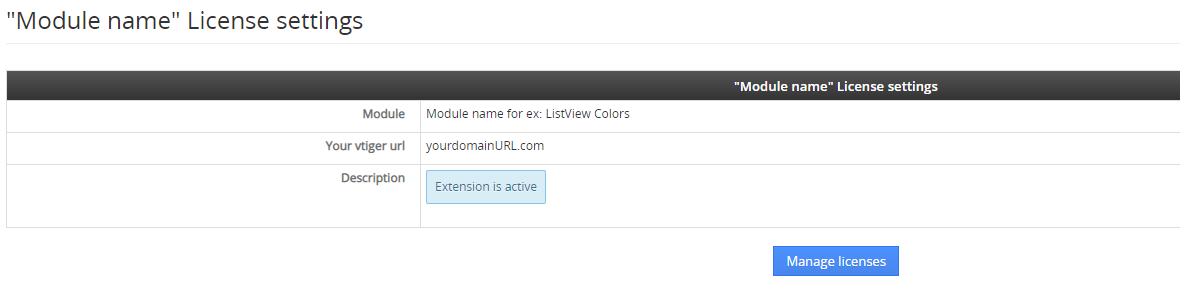
After accessing the License window you can see screen bellow with following information:
- Module name, Your Vtiger domain URL
- Description, if license is activate or not:
 – your license is currently active,
 – your license is not active and you need active it via Installer.
To activate or manage license, click on the ![]() button.
button.
7.1.1.Deactivate license
If you want to deactivate your license, please provide following steps:
- Go to your Installer, by a click on Notifications Icon and then on the button
or via Main Menu – Settings – CRM Settings – Extensions – ITS4YouInstaller - The following screen will appear (see below):

Installer – deactivation of license You can deactivate license by click on the button

![]() Note: The module will be deactivated but not uninstalled and license will be removed from the Activated Licenses tab.
Note: The module will be deactivated but not uninstalled and license will be removed from the Activated Licenses tab.
7.1.2.Reactivate license
To reactivate a license after deactivation, you need to follow the same process as you activated it first time:
- Click on the
 button and enter your license key.

- Confirm with
 button.
When the license was activated you can see module available in the Modules tab below.
![]() Note: To see modules and manage licenses you have to log in to our e-shop with @email and password via
Note: To see modules and manage licenses you have to log in to our e-shop with @email and password via ![]() button (top right screen side in Installer module).
button (top right screen side in Installer module).
7.2.How to update Email Marketing
The upgrade of the module is initiated manually or via our Installer.
Updating via Installer:
- open the Installer in the CRM
- in the Modules tab find your installed module and you should see the button available
- If the new version is available, you will be notified via Installer Notifications icon
Updating Email Marketing manually:
Updating module manually is sometimes required when our support team sends you .zip package, if you are having some issues or there is any update or customization available.
Otherwise, we always recommend to use update via Installer.
Go to Menu – Marketing – Email Marketing, in the list view click on the ![]() button and choose “Upgrade” option.
button and choose “Upgrade” option.
Please refer to below installation part for details how to initiate the import of the module from the .zip file.
As you can be seen on the picture below you will be notified that the Email Marketing extension already exists. Confirm License agreement and upgrade will start immediately when you click on the ![]() button.
button.
After upgrade the notification about successful upgrade is shown.
7.3.Uninstall
If you need to remove the module from your Vtiger you have two options:
- Uninstall via Installer.
- Manually via going to module Settings and choose Uninstall option.
7.3.1.Uninstall via Installer
You have also option to remove the module via Installer window by accessing the Settings – Uninstall window:
- Go to your Installer, by a click on Notifications Icon and then on the button ,
or via Main Menu – Settings – CRM Settings – Extensions – ITS4YouInstaller - Find the module you need to uninstall in the Modules tab
- Via
 pick list button choose the Uninstall option, you will be redirected to the Uninstall window.
 - Click on
 button

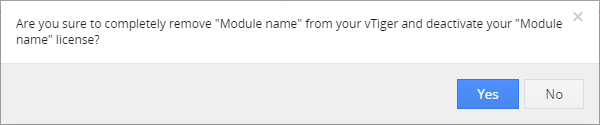
- Confirm uninstall with
 button
Now, the module has been removed from your Vtiger and your license has been deactivated. To use this module again, you need to provide installation and validation steps (see Installation chapter).
7.3.2.Manual Uninstall
There is also available option to remove Email Marketing from your Vtiger manually. To uninstall please provide following steps:
- Go to the List view of Email Marketing and via Customize option select Uninstall.
- Click on button.

- Confirm uninstall with
 button.
Now, Email Marketing is removed from your Vtiger and your license is deactivated. To use Email Marketing again you need to provide installation and validation steps (see chapter 2. How to Install Email Marketing).
8.Change Log
- Check latest versions available and fixes applied
- What was changed/added to manual
8.1.Email Marketing
- 18 May 2021: 4.15
- now you can use “order by” in related Emails tab, for example order by Access Count
- fixed issue where campaign randomly stopped, even when not all subscribers received emails yet
- 26 March 2021: 4.14
- minor bug fixes
- 20 February 2021: 4.13
- the subscribers list load times were improved
- fixed messed up the layout when selecting the subscribers manually
- fixed issue where scheduled delivery times were adding +4 hours when the campaign was edited
- supported email variables loaded from a Newsletter templates
- improved stability
- other minor bug fixes
- 30 January 2021: 4.12
- fixed issue where in some rare cases Unsubscribe feature was not working properly
- 20 December 2020: 4.11
- lowered server load when there were over 2000+ subscribers for a campaign loaded
- 30 October 2020: 4.10
- minor bug fixes
- 18 September 2020: 4.9
- added new feature “Records Block” which will show a list of loaded records (Newsletter template)
- added new step while creating an Email Marketing campaign, “Template Records”
- 19 June 2020: 4.8
- fixed issues with progress bars
- fixed issue where loaded records/subscribers count was not showing correctly
- decreased loading times for summary/detail view of campaign
- 28 May 2020: 4.7
- removed fatal error require_once ‘vtlib\Vtiger\Cron.php’;
- added option to turn off Email Tracking
(edit code in the file: vtigerfolder/config.inc.php to $email_tracking = ‘No’;) - added button “Continue sending” when there is an error in the campaign (wrong recipient email or similar)
- added “Email sending pause” in the last step (pause between emails send, default value is 1 second)
- added option to use the Unsubscribe custom function from Email Maker (when using Email Maker template)
- added Progress bars under Key Metrics block where you are able to track status of the campaign, Sent Emails and Opened Emails
- 22 May 2020: 4.6
- fixed issue when there were more than 2 email campaigns scheduled, the sending failed
- 06 May 2020: 4.5
- *(there was a versions skip because of fixes and features added):
- new icon added for Email Marketing
- added compatibility to use Email Maker templates
(also custom functions can be used/loaded from Email Maker templates and other variables too) - added feature to add/remove subscribers manually in step 2. Subscribers when creating campaign
- added alerts/info messages during creation of the campaign
(example: you see an alert in step 2 if you did not choose which email field will be loaded, primary or secondary) - improved stability of extension
- 30 March 2020: 4.3
- fixed issues with Unsubscribe functionality
- 02 February 2020: 4.1
- added option to send emails manually when your Scheduler is inactive or having issues
- 09 December 2019: 4.0
- new validation process via Installer extension for both Vtiger versions 7.x and 6.x
- 04 December 2019: 600.700.1.3
- fixed issue where an error message was popping out when emails were not sent
- 30 September 2019: 600.700.1.2
- minor bug fixes
- 21 August 2019: 600.700.1.1
- release of extension for Vtiger 6.x versions
- same installation package for Vtiger 7.x and 6.x
- minor bug fixes
- July 2019: 700.1.1
- fixed issue with licensing and unistalling module
- April 2019: 700.0.1
- release of extension for Vtiger 7.x versions
8.2.Manual of Email Marketing
- 19 June 2020: manual based on Email Marketing 4.8 version
- first initiate for Vtiger 7.x