

1.Introduction

The Cashflow module is designed for Vtiger CRM 7 Open Source. The Cashflow module helps you to register your incoming or outgoing payments and associate that payment with other entities in the Vtiger CRM Open Source. The extension allows you to track incoming payments that we will receive from customers or will have to make in the future. So it is easy to create a Report or Custom view on a payments forecast for incoming or outgoing payment made by our company. It enables you to define payments for some categories like (goods, services…).
Others of the many features of Cashflow module:
- Track partial incoming and outgoing payment
- Different color for incoming and outgoing payment amount
- Balance amount is automatically calculated
- If balance is null, then Invoice or Pre-Invoice is updated automatically to Paid
- If balance is null then Credit Notes is updated automatically to Refunded
- Reference of payments made on SO, PO, PI, CN, OP or Invoice is showed in „More Information“
- Relation of payments to Organization or Vendor is showed in “More Information“
- Total and Pending Payment control
- Support relation to Document
- One payment made against various invoices
![]() Note: For versions Cashflow4You_4_0 and higher, you will be needing to have installed our Installer in order to activate license keys.
Note: For versions Cashflow4You_4_0 and higher, you will be needing to have installed our Installer in order to activate license keys.
2.How to install Cashflow
There are currently two options how to install extension:
- (Recommended) Using our Free extension Installer
(Please visit the Installer page for more info) - Manually installation using a .zip file
(You still need to have Installer in order to activate license)
![]() Note: For versions Cashflow4You_4_0 and higher, you will be needing to have installed our Installer in order to activate license keys.
Note: For versions Cashflow4You_4_0 and higher, you will be needing to have installed our Installer in order to activate license keys.
Since December 2019 we launched our extended version of Installer which helps you install modules and manage extensions.
2.1.Installation via Installer
Make sure you have Installer installed, you can download Installer via our E-shop when you log in under Free Downloads section.
Next, simply install Installer via Module Management in Vtiger CRM by importing the .zip file you downloaded.
After successful installation, you can access Installer in two ways:
- by a click on Notifications Icon
 and then on the button
  ,
, - or via Main Menu – Settings – CRM Settings – Extensions – ITS4YouInstaller.
![]() Note: To see modules and manage licenses you have to log in to our e-shop with @email and password via
Note: To see modules and manage licenses you have to log in to our e-shop with @email and password via ![]() button (top right screen side in Installer module).
button (top right screen side in Installer module).
After log in, you can activate Extensions or our Packages licenses associated to your account via ![]() button.
button.
When the license was activated you can see module available in the Modules tab below.
Simply hit the ![]() button and Extension is installed now.
button and Extension is installed now.
2.2.Manual Installation
Please provide following steps in order to install Cashflow manually:
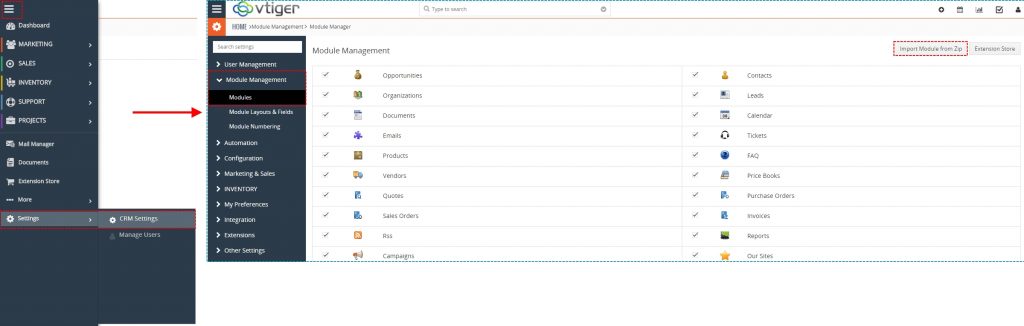
- Install the .zip (package) file of the Cashflow module via Setting -> CRM Settings -> Module Management -> Modules. Click on the Import Module from Zip.
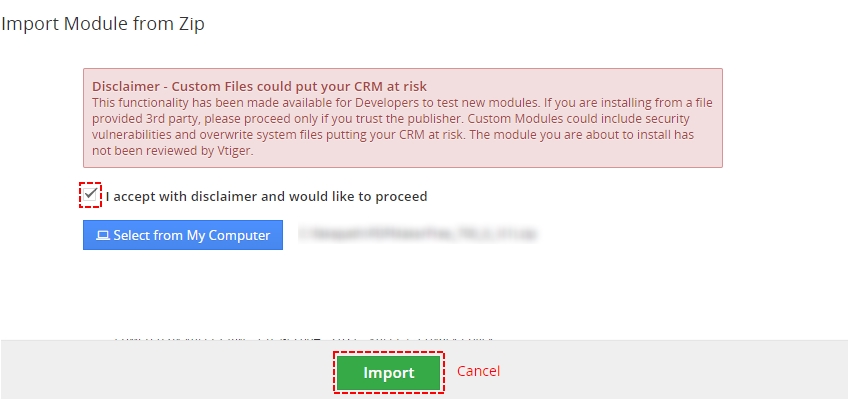
Installation of Cashflow for vtiger 7 – step 1 - Select the .zip (package) file that you downloaded from our shop. Please check that you accepted the disclaimer and would like to proceed. Click on the [Import] button.
Installation of Cashflow for vtiger 7 – step 2 Note: If you have after this step error message: Sorry! Attempt to access restricted file. Please check if folder test/vlib has correct write permission for browser (apache, www-data).
- Verify the import details parsed from the .zip (package) file. Please check that you accepted the license agreement and click [Import Now] to proceed or [Cancel] to cancel.
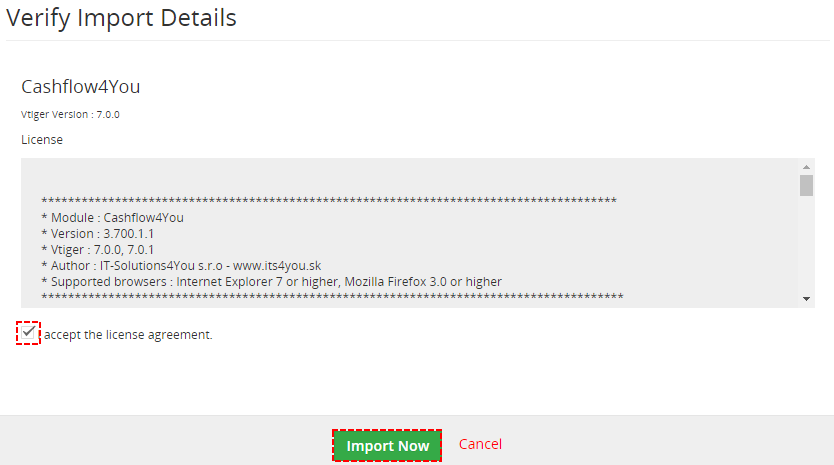
Installation of Cashflow for vtiger 7 – step 3 - Cashflow was imported

Installation of Cashflow for vtiger 7 – step 4

![]() Note: In order to finish installation, you need activate license. For that please use our Installer
Note: In order to finish installation, you need activate license. For that please use our Installer
3.How to update Cashflow
The upgrade of the module is initiated manually or via our Installer.
Updating via Installer:
- open the Installer in the CRM
- in the Modules tab find your installed module and you should see the
 button available
 - If the new version is available, you will be notified via Installer Notifications icon

Updating Cashflow manually:
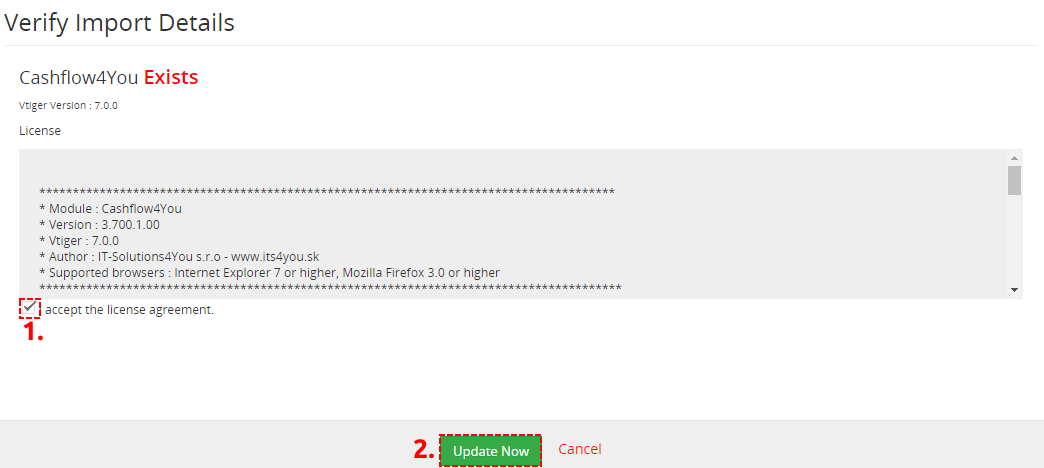
Click on Upgrade link in list view of Cashflow. So please refer to above installation part for details how to initiate the import of the module from the file.


As you can be seen on the Picture below you will be notified that the Cashflow module already exists. Confirm License agreement and upgrade will start immediately when you click on the  button.
After upgrade the notification about successful upgrade is shown.
4.How to create Payment
In the following sections you can find short description of the payment and how to create your first payment for vtiger CRM using Cashflow. As was already mentioned, the Cashflow allows you to track incoming payments that you will receive from customers or outgoing payments you will have to make in the future. The payment consists of more or less twenty fields, but to create the new payment only following 4 are required:
| Name | Description |
|---|---|
| Payment Name | Payment Name; used to distinguish payments. |
| Payment Type | Type of the payment. Can be only incoming or outgoing. |
| Amount | The amount of the payment |
| Due Date | The data until the payment has to be paid or is expected |
Table 1: Required fields for payment creation
The fields mentioned in the Table 1 are enough to be filled in order to create simple payment but they are not sufficient to utilize the real potential of the Cashflow. Using additional fields you can simply refer the payments to entities of other modules (INV, SO, PO, CN, PI, OP), check the status of payment (invoice) or define payment category to have better view of your business.
| Name | Description |
|---|---|
| Reference | Reference to invoice, sales order or purchase order. (Not required) |
| Payment Date | Real date of payment. (most important field for Cashflow based on this field is set Payment status) |
| Payment Status | Status automatically defined based of Due Date and Payment Date.
|
| Payment Category, Payment Subcategory |
(Sub)Category of the payment. User editable field. |
Table 2: Fields for payment creation
Within the module Cashflow you are able to create payments without any reference (also called “Other” payments) or payments with references. The following picture describes the references between Cashflow and other vtiger CRM modules and type of references for modules:
- Invoice – there are three possibilities how to create payment for invoices:
- 1:1 – one payment for one invoice
- M:1 – more payments for one invoice – used for advanced payments
- 1:N – one payment from one organization to pay more invoices at once
- Sales Order, Purchase Order, PreInvoice, CreditNotes, Opportunities – there are just two
possibilities to create payment:- 1:1 – one payment for one sales order, purchase order, preinvoice, creditnote,
opportunity - M:1 – more payments for one sales order, purchase order, preinvoice, creditnote,
opportunity – used for advanced payments
- 1:1 – one payment for one sales order, purchase order, preinvoice, creditnote,
The Cashflow4You takes care also in case of payment(s) for sales order and additional payment(s) for related invoices. This scenario is described in details in the chapter (4.5 SO – payment – INV – payment scenario).
In addition to above mentioned references, the payments can refer to Organization or Vendor as well. Two approaches exist to assign the payment towards Organization (or Vendor):
- automatic creation of the reference – information about Organization is taken directly from Invoice, Sales Order, PreInvoice, Credit Note, Opportunity; for Vendor the information is taken from Purchase Order
- manual creation of the reference – you can assign each payment to Organization or to Vendor according to your needs, i.e. you can assign payments to Organization or Vendor although the payment is without any reference to INV, SO,PO, PI, CN or OP.
Creating payment
In order to create the Cashflow4You payment you can use following three approaches:
- Cashflow Payments button – from the DetailView of the modules INV, SO, PO, PI, CN; very quick approach which pre-defines the fields based on related INV, SO, PO, PI or CN
records (The creation of the payment or partial-payment from payments block) - The creation of the multi-payment for more invoices – this is used to create one payment for more invoices in one step (The creation of the multi-payment for more invoices)
- The basic creation of the template from Cashflow4You ListView – the payment is created from scratch, i.e. you have to define all necessary fields according to your needs from the beginning (The basic creation of the template from Cashflow4You ListView)
4.1.The creation of the payment or partial-payment from DetailView of record
The Cashflow Payments button is available inside the DetailView of the modules Invoice, Sales Order, Purchase Order, PreInvoice and Credit Notes. As already mentioned, the payment or partial-payment can refer to records from these modules. This makes creation of the payment and partial-payment much easier. In order to create the payment using Payments block please provide following steps:
- Go to the DetailView of the module Invoice or Sales Order or Purchase Order or PreInvoice or Credit Notes according to your needs and click on
 button and select Add Payment or Payments.
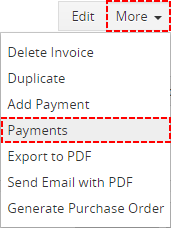
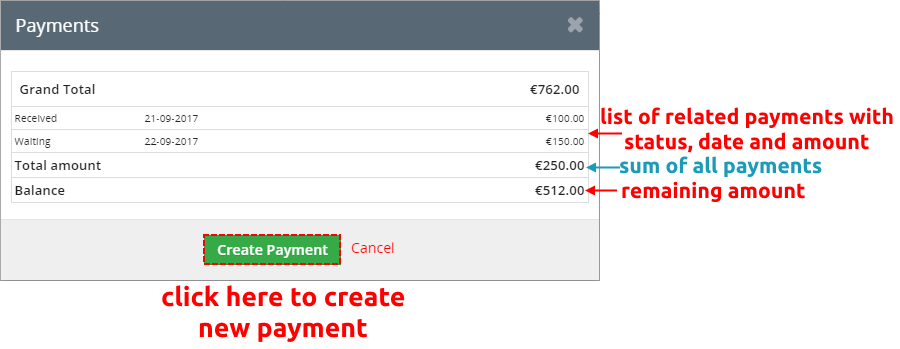
Add payment from DetailView - If you click on Add Payment skip to step 3. If you choose Payments you can see Cashflow block with info about previous Payments. Click on

Payment block - The EditView will appear on the screen. As you can see below the fields Payment Type, Amount, Due Date, Payment date (actual date) and references to invoice (SO, PO, PI, OP, or CN) and organization or Vendor are already available and based on fields from related record. Fill in at least all missing required fields. You can also define Payment Category and Payment Subcategory. Please note that you can define your own values for these fields.Save the payment.
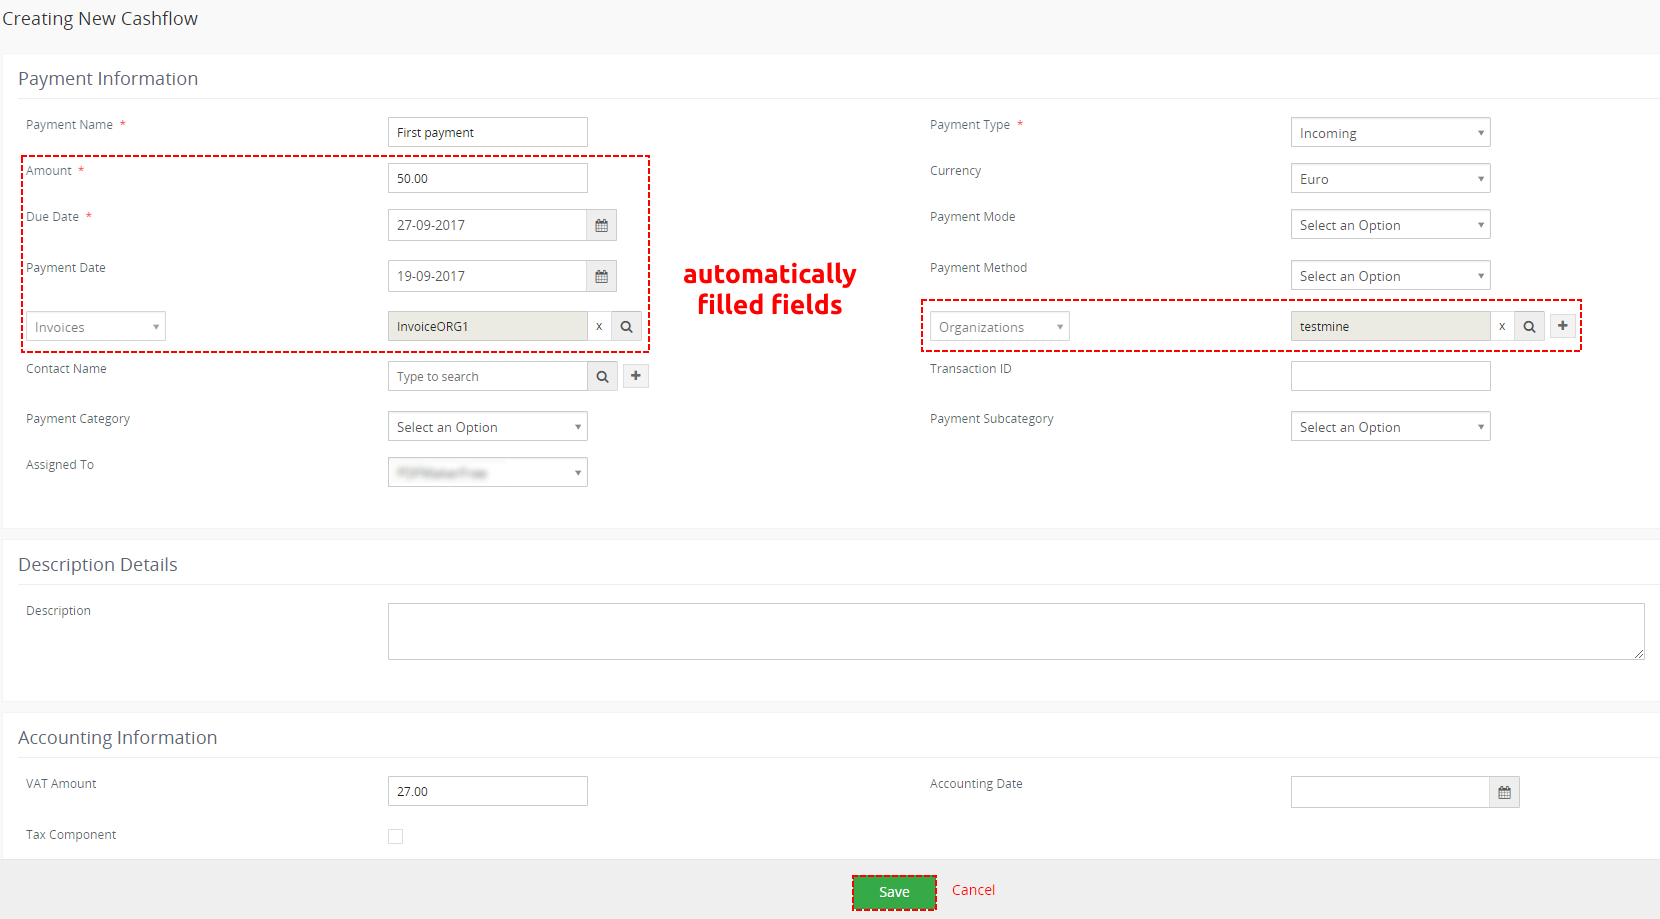
Creating Payment from DetailView of Invoice (SO, PO, PI, CN, OP)
Please refer also to chapter Payment block for more details regarding block Payments.
4.2.The creation of the one payment for more invoices
Especially for module invoices the Cashflow brings the possibility to assign one payment towards more invoices. This functionality is available only for Invoice module. This possibility is useful in case that one organization sent payment at ones for more invoices. Such payment can be created only from ListView of the module Invoice:
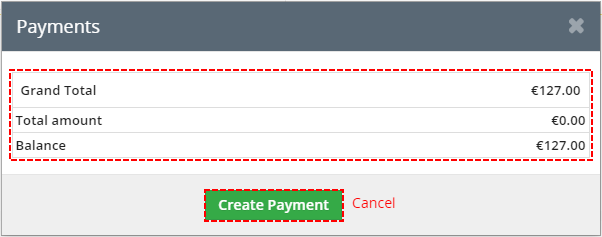
- Go to the ListView of the module Invoice and select two or more invoices. Click on More button and choose Create Payment.
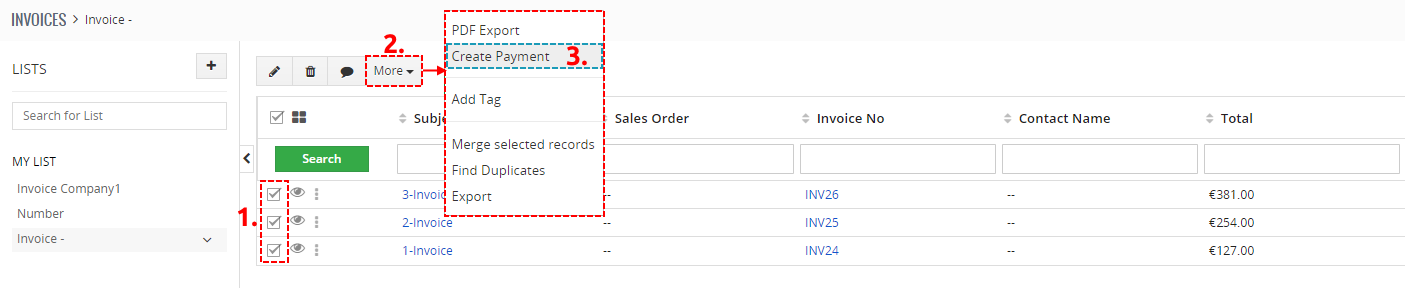
ListView of Invoice - The Create Payment window will appear on the screen. As you can see below the fields Payment Type and Amount are already available and based on fields from related Invoices. Save the payment using button
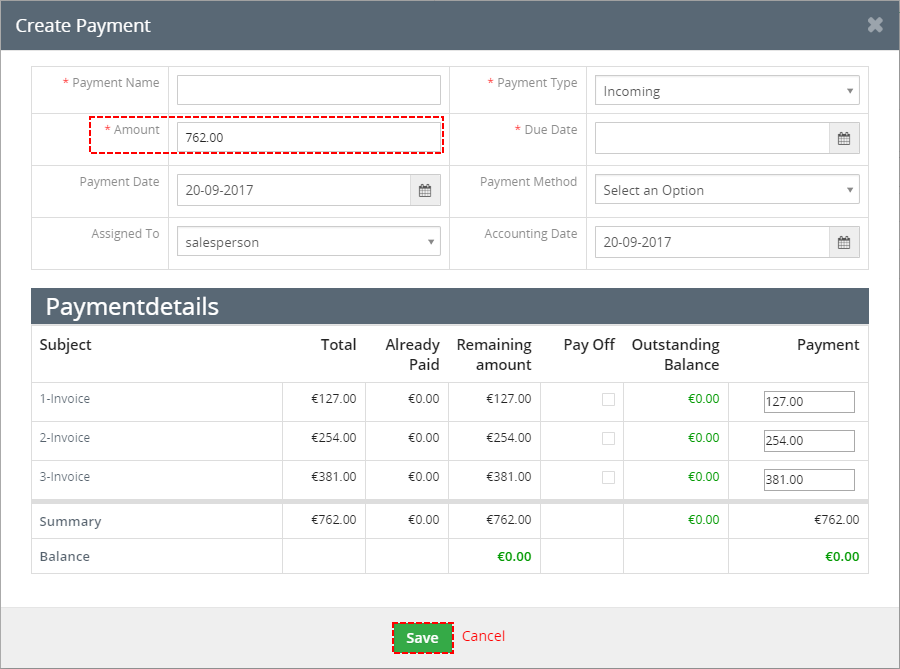
How to add one payment to more Invoices - New functionality you can use when Amount is less than Summary of Invoice’s Total. Standard behavior of Cashflow is that Cashflow try to use Amount to balance Invoice in Order.
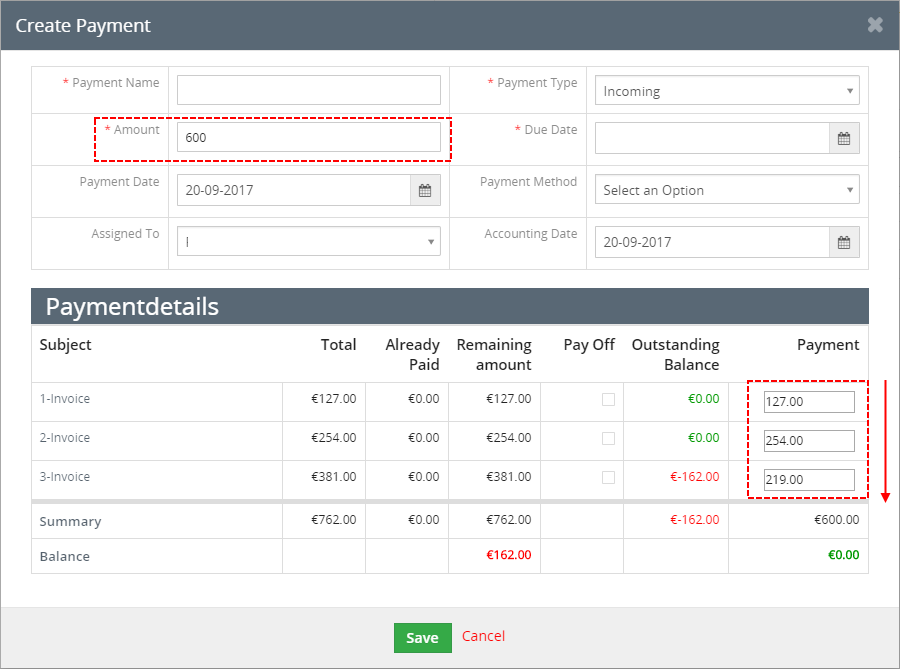
Split amount in order But now, you can prioritize Invoice by using check-box Pay Off.
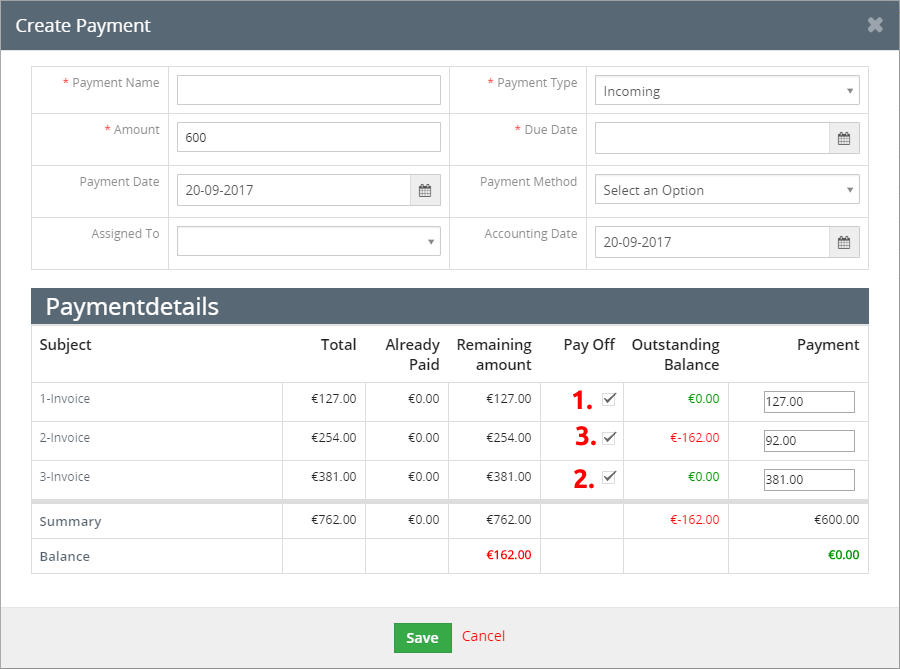
How to change distribution of amount
- New functionality you can use when Amount is less than Summary of Invoice’s Total. Standard behavior of Cashflow is that Cashflow try to use Amount to balance Invoice in Order.
- In the More Information part of Payment you can find references to these Invoices.
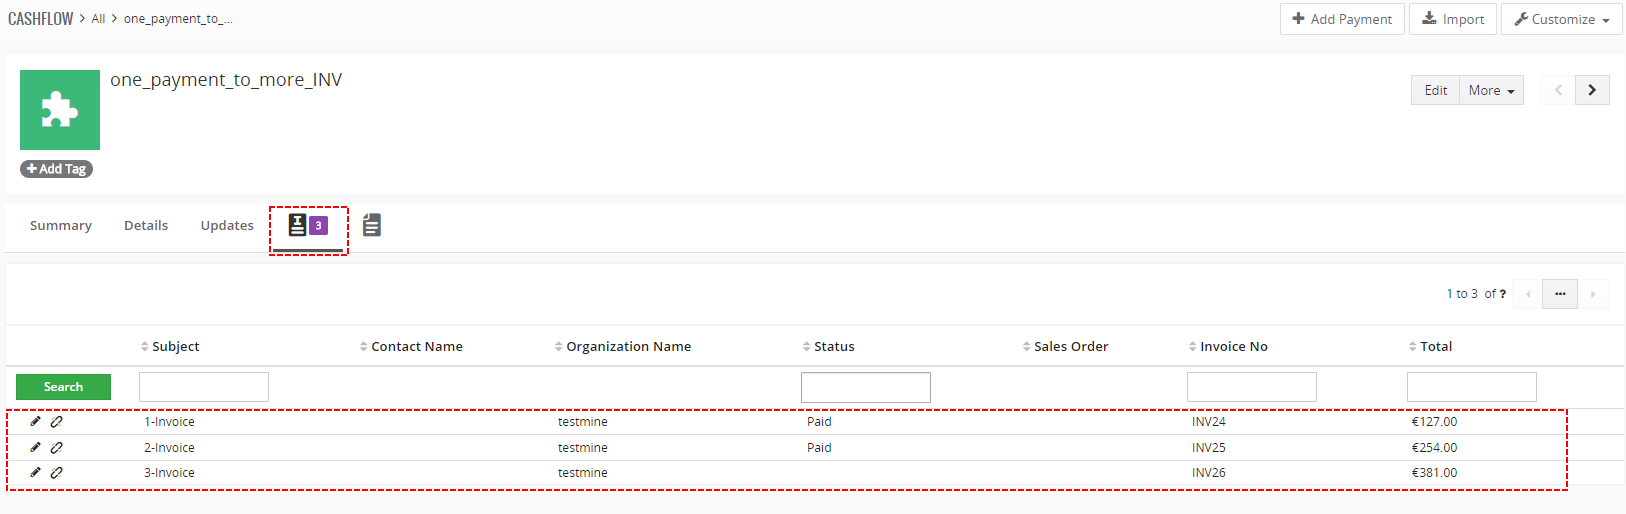
References to Invoices in DetailView of multi-payment
The Amount and all particular payments are editable in case you want to define them according to your needs. Currently there is restriction that Amount <= Sum of all payments i.e. final Balance has to be zero. Please note that Due Date is not prefilled because can be different for more Invoices. You have to define your own date in this case.
4.3.The basic creation of the payment from Cashflow ListView
This approach will be used by users mostly for payments which are not related to any invoice, sales order or purchase order, i.e. to “other” payments. In order to start creation of the template provide following steps:
- Go to the Cashflow ListView and click on button
 .
.

Cashflow ListView - The EditView will appear on the screen. Fill in at least all required fields. You can also define Payment Category and Payment Subcategory. Please note that you can define your own values for these fields. Save the payment.
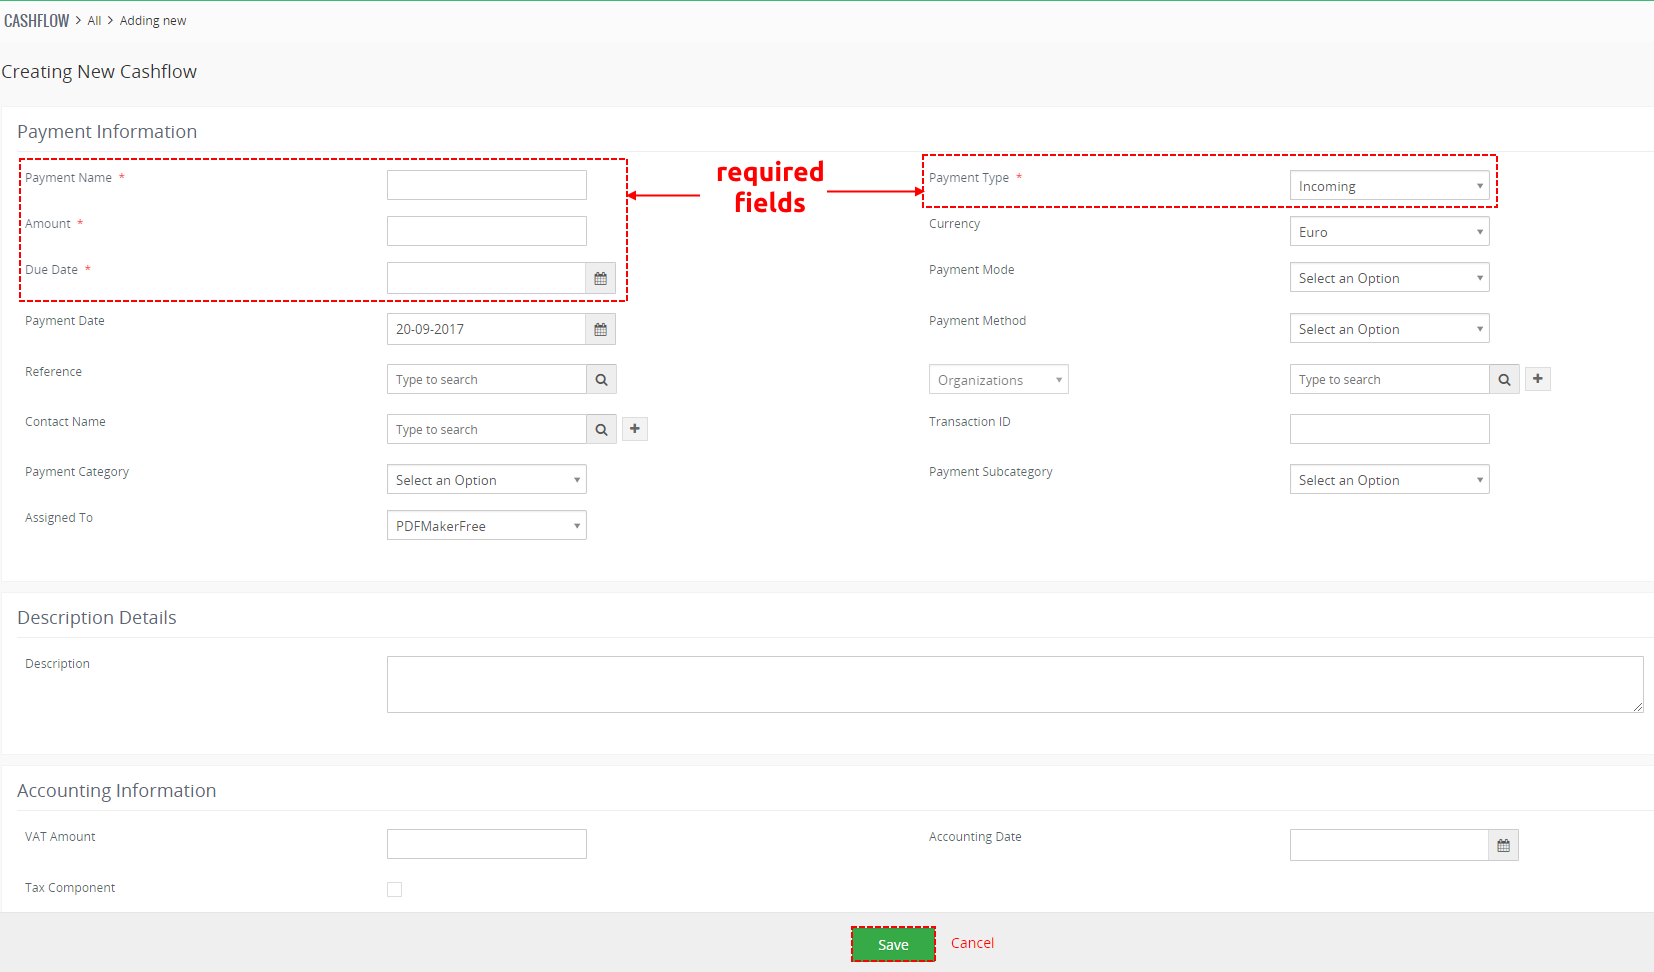
Basic creation of the payment
5.Work area
Work area of Cashflow consists of:
- ListView – used for common tasks like add new, edit and delete payment, import and export payments and access to others tools
- DetailView – shows already created payment in details
- EditView – allows the preparation of the new payment or editing existing payments
- Cashflow Payments block – mainly used for creation of the new payments from related modules and informs about already created/paid payments
- Cashflow4You Information tab – for the modules Invoice, Purchase Order, Sales Order, PreInvoice and Credit Notes the new tab for Cashflow information is introduced with fields Paid Amount and Remaining Amount
5.1.ListView
The common tasks like add/delete Cashflow, import/export Cashflow or start editing have to be initiated via Cashflow ListView. Go to Menu → SALES → Cashflow and Cashflow ListView will appear on your screen.

The main part of the Cashflow ListView consists of list of the Cashflows, which gives you information about a Cashflow name, a reference, an amount, Payment Status and related dates. As
shown in the picture, above the list of the payments you can find following:
- Action area – contains actions for mass edit, delete, comment, add tag, merge, finding duplicates and export. For options of PDF Export please see (Additional features)
- button – is used to add new Cashflow
 button – is used to import
- Settings area – vtiger related tools, License settings, Integration, Upgrade and Uninstall
- List of created Cashflow
- filtering
 – navigation bar
- Searching part
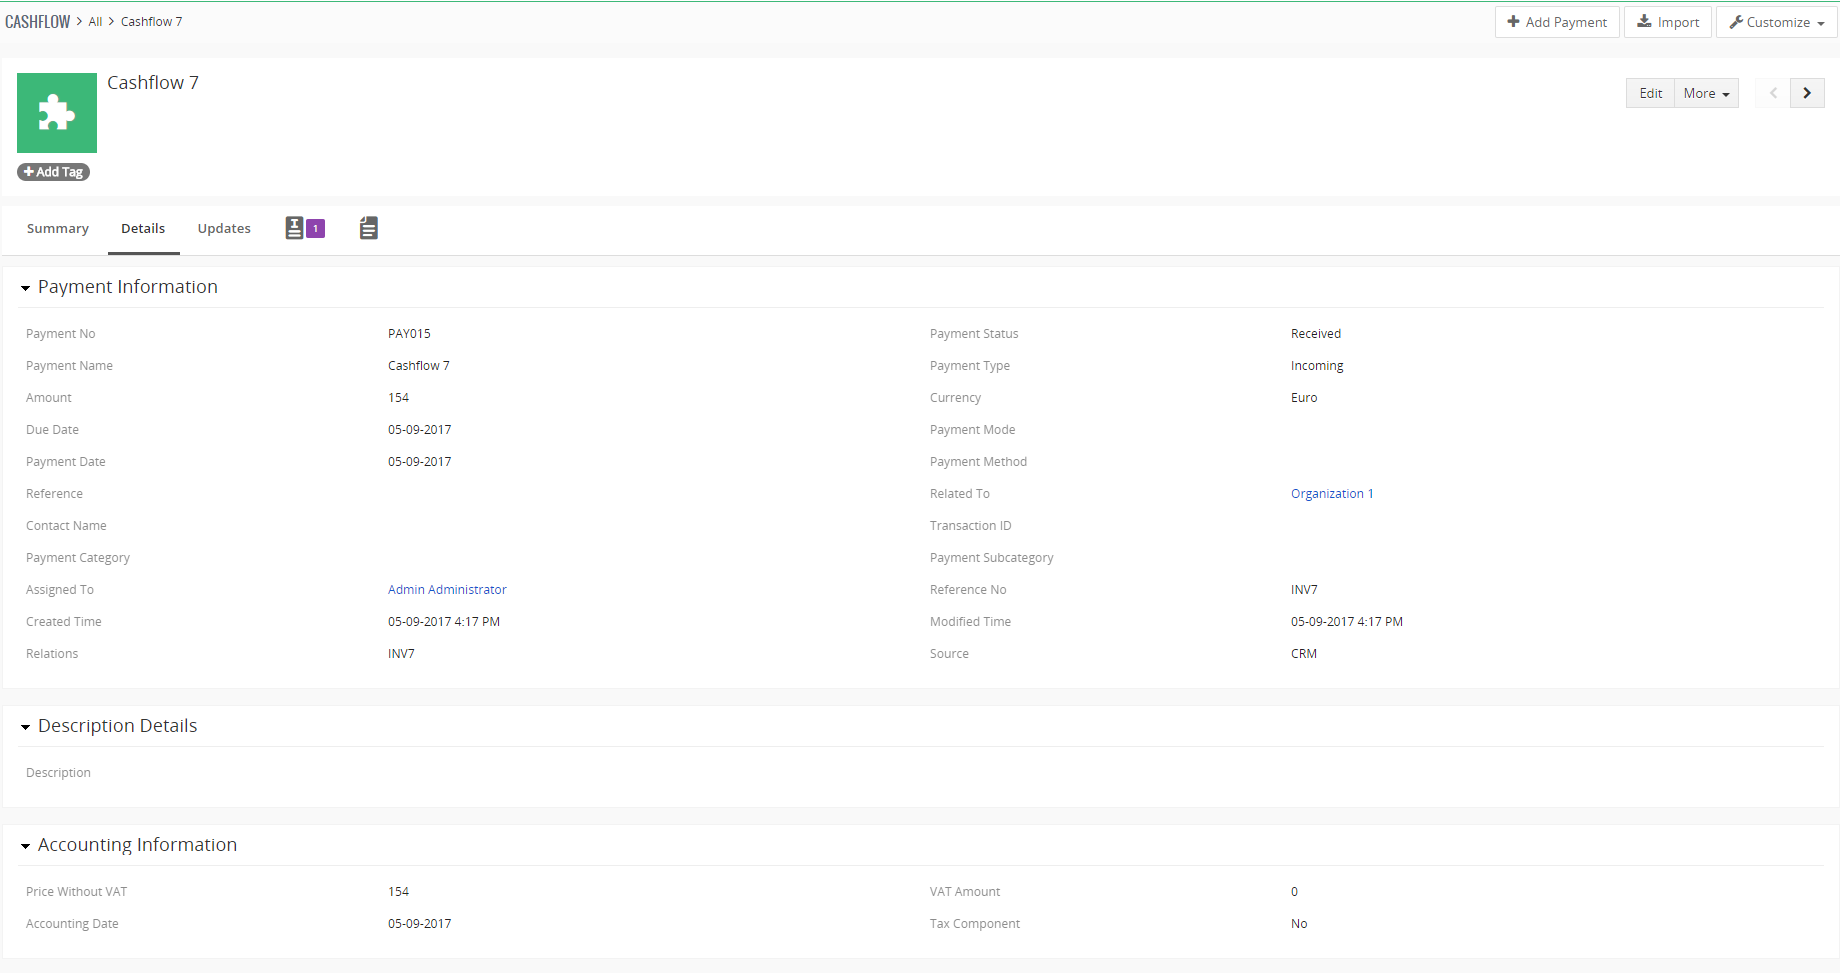
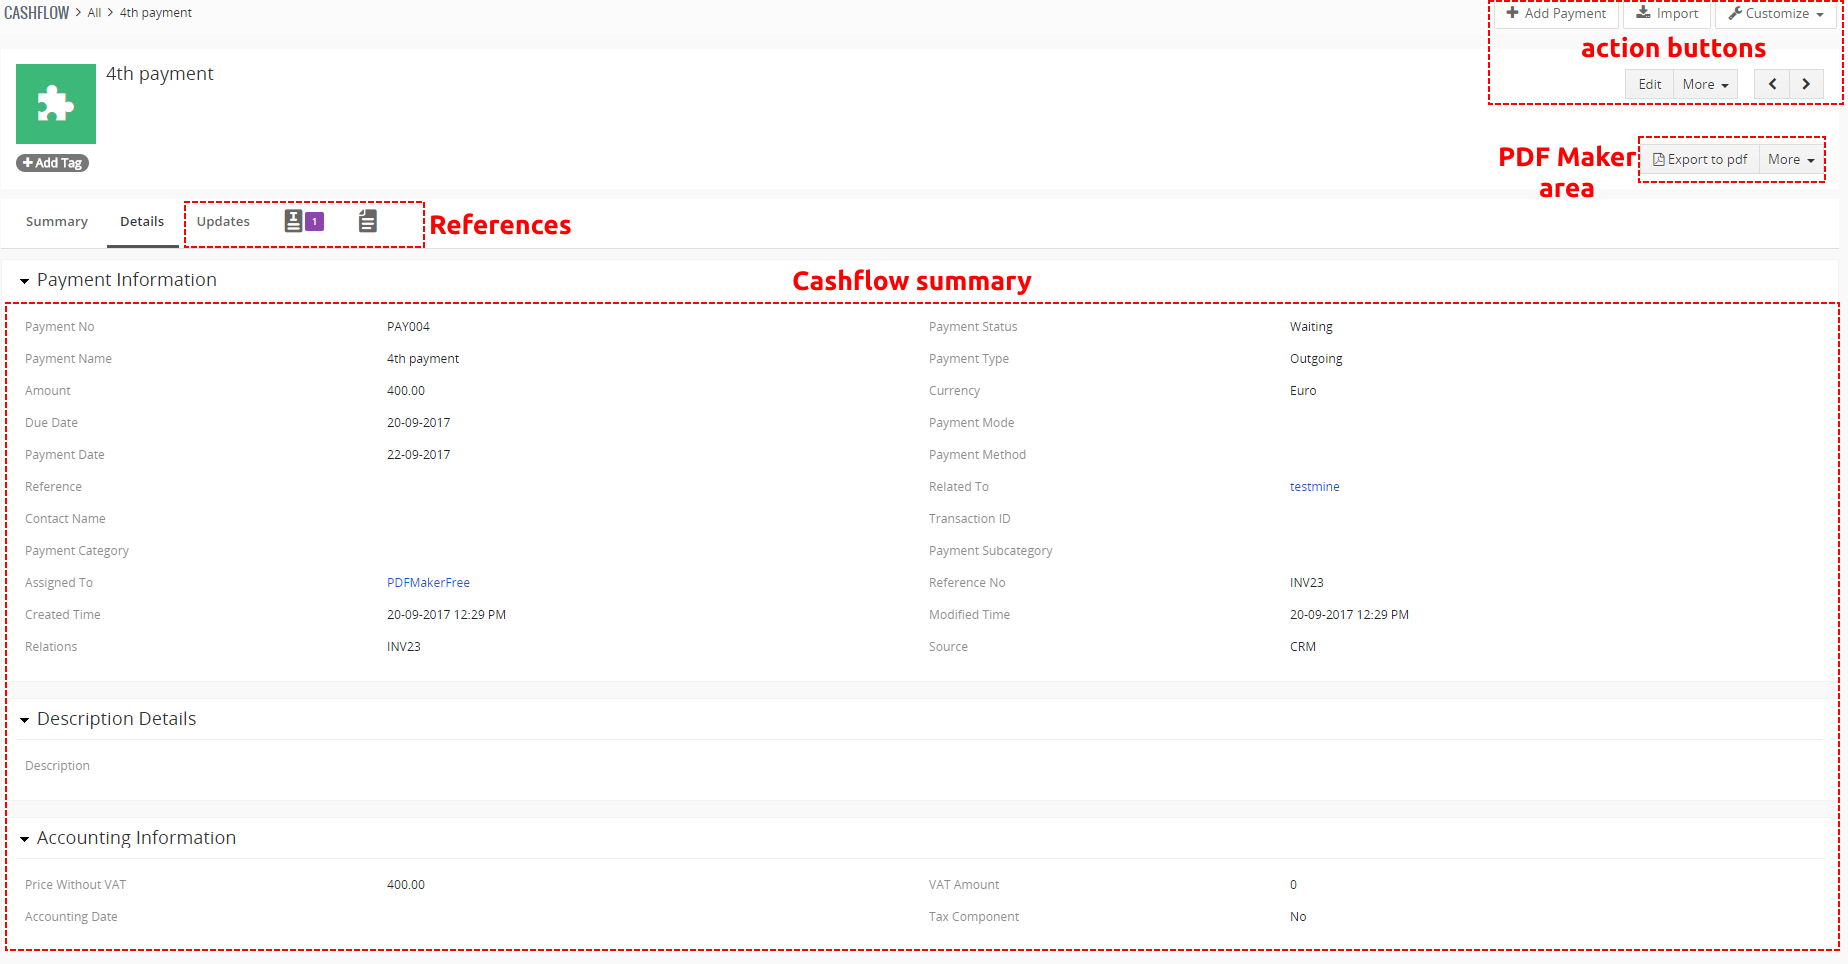
5.2.DetailView
From ListView you can directly open any payment in the DetailView. The DetailView consists of:
- Cashflow details part
- Group of action buttons
 – switch to EditView and start editing
 – allows to delete or duplicate Cashflow
 – vtiger related tools, License, Integration, Upgrade and Uninstall of Cashflow4You
 – navigation buttons (previous/next Cashflow)
- References part – most important is reference to Documents, Updates and Comments
- PDF Maker area – allows to create PDF file( Additional features)
5.3.EditView
The EditView shown in the picture below allows the preparation of the new payment as was mentioned in the chapter The basic creation of the payment from Cashflow ListView or editing existing payments. The main utilization of the EditView is in the additional correction of the payments mainly for ‘Payment Date’, ‘Payment Amount’ and others. The EditView is divided into three parts:
- Payment Information – main part which contains all mandatory fields
- Description details – can be used to more detailed description or important notes
- Accounting Information – contains additional accounting information (used mostly for some countries)

5.4.Cashflow Payments block
The Payment block can be found in the DetailView of the modules Invoice, Sales Order, Purchase Order, Credit Notes, PreInvoice and Opportunities when you click on Payments in . Its main purpose is to allow creation of the new payments directly from the DetailView of the related record. In addition it informs you about list of already created payment or partial-payments, the sum of already created payments and the balance. The balance is counted as Grand Total – sum of all payments (including waiting payments and outgoing payments). The balance is used to predefine the Amount in the new payments creation. If you want to disable Cashflow for some module please check chapter Integration.
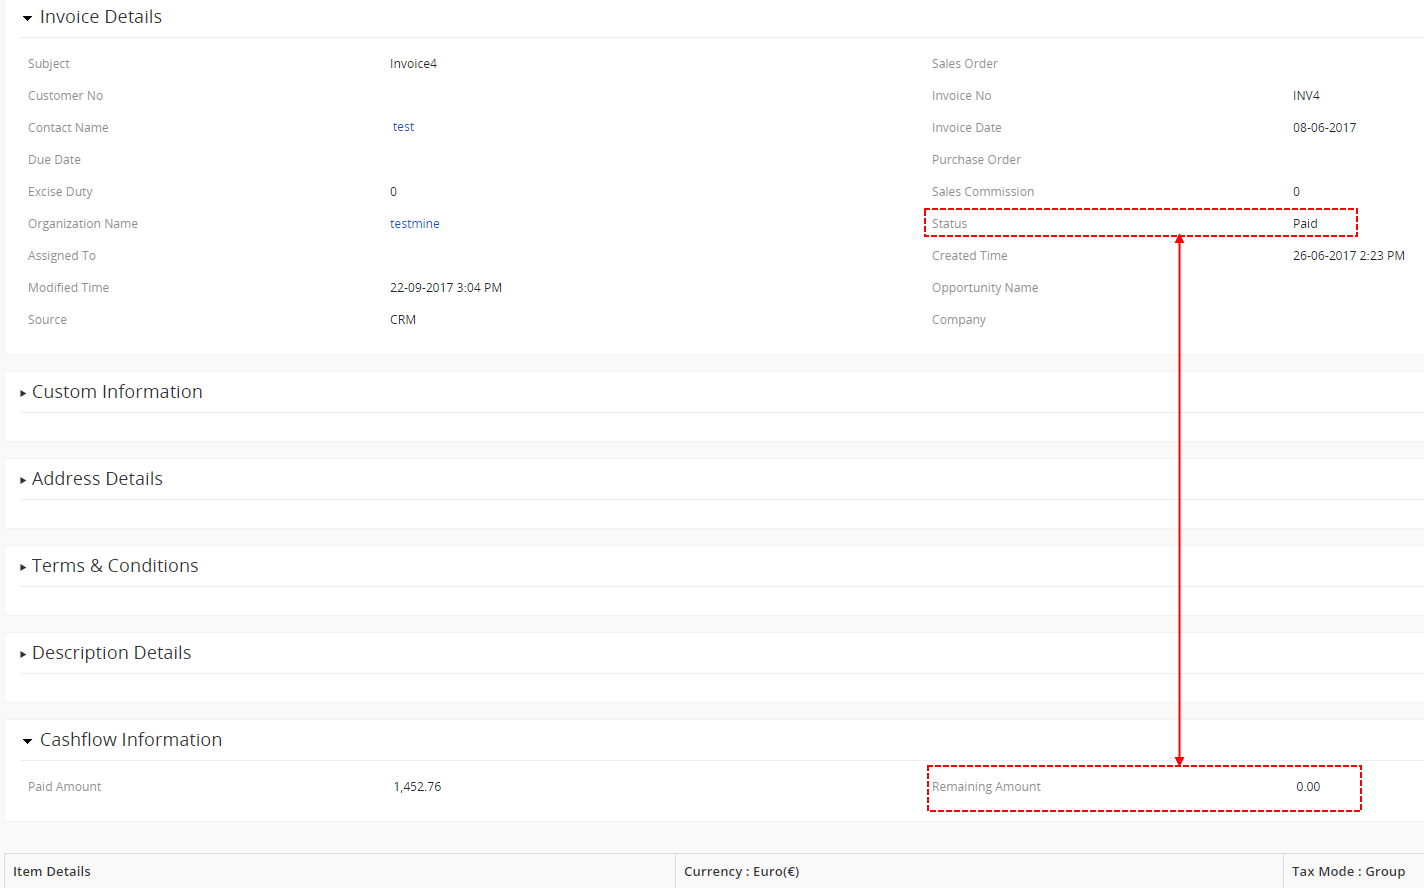
5.5.Cashflow Information tab
The Cashflow Information tab can be found inside the DetailView of the modules Invoice, Purchase Order, Sales Order, PreInvoice and CreditNotes. Two field are introduced:
- Paid Ammount – total of incoming and outgoing payments
- Remaining Ammount – Grant Total – Paid Ammount; (the waiting payments are not counted)
These two fields are very useful in case of creation filters/views for modules Invoice, Purchase Order, Sales Order, PreInvoice and CreditNotes. So you can obtain real view of Invoice, Purchase Order, Sales Order, PreInvoice and CreditNotes already paid or still not paid etc. irrespective of Invoice, Purchase Order, Sales Order, PreInvoice and CreditNotes status. The value of Remaining Amount is also used to automatic change of the INV/PI/CN status (4.4 Invoice/PreInvoice/CreditNotes status change).

6.Additional features
6.1.Support of PDF Maker
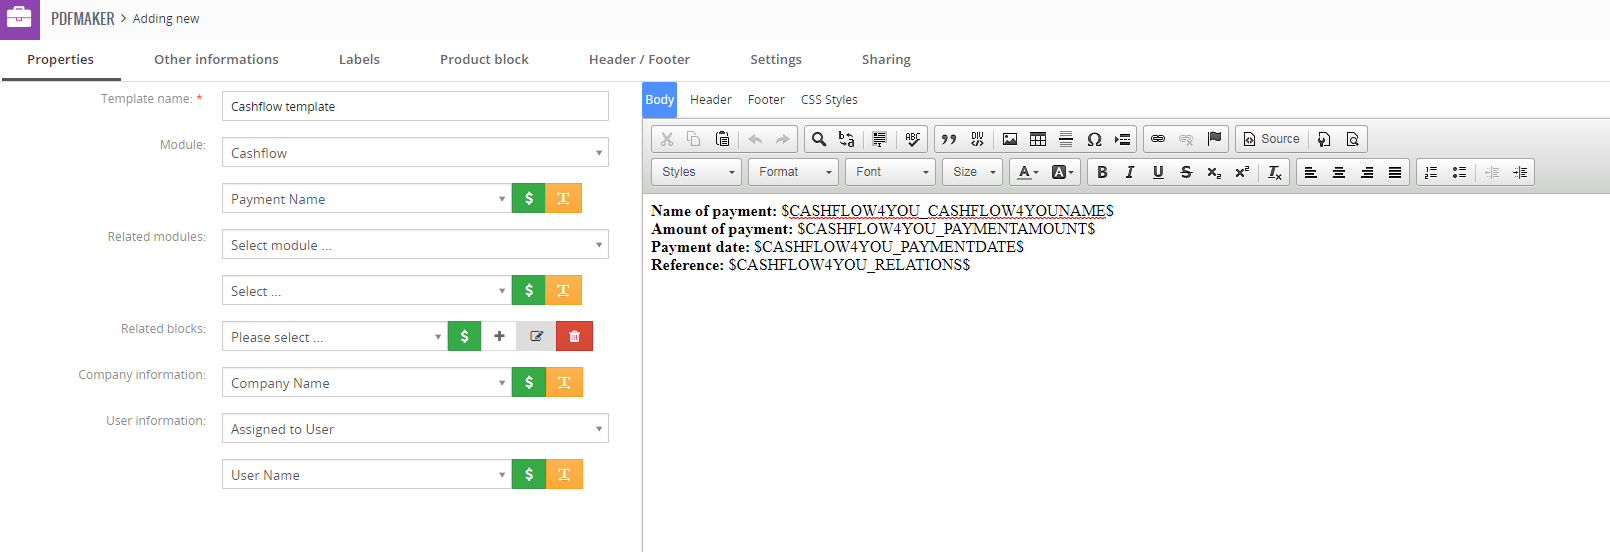
The PDF Maker is extension tool designed by ITS4You for vtiger CRM. It is powerful and flexible tool which allows users of vtiger CRM to create own pdf templates.
Before creating PDF file you need to create template of PDF Maker. To create template please check manual for PDF Maker: www.it-solutions4you.com/manuals/vtiger7/pdfmaker
You are able to export PDF from DetailView/ListView of Cashflow.

Note: Please check also: 6.2 Correction showing Cashflow Information block values in PDF Maker.
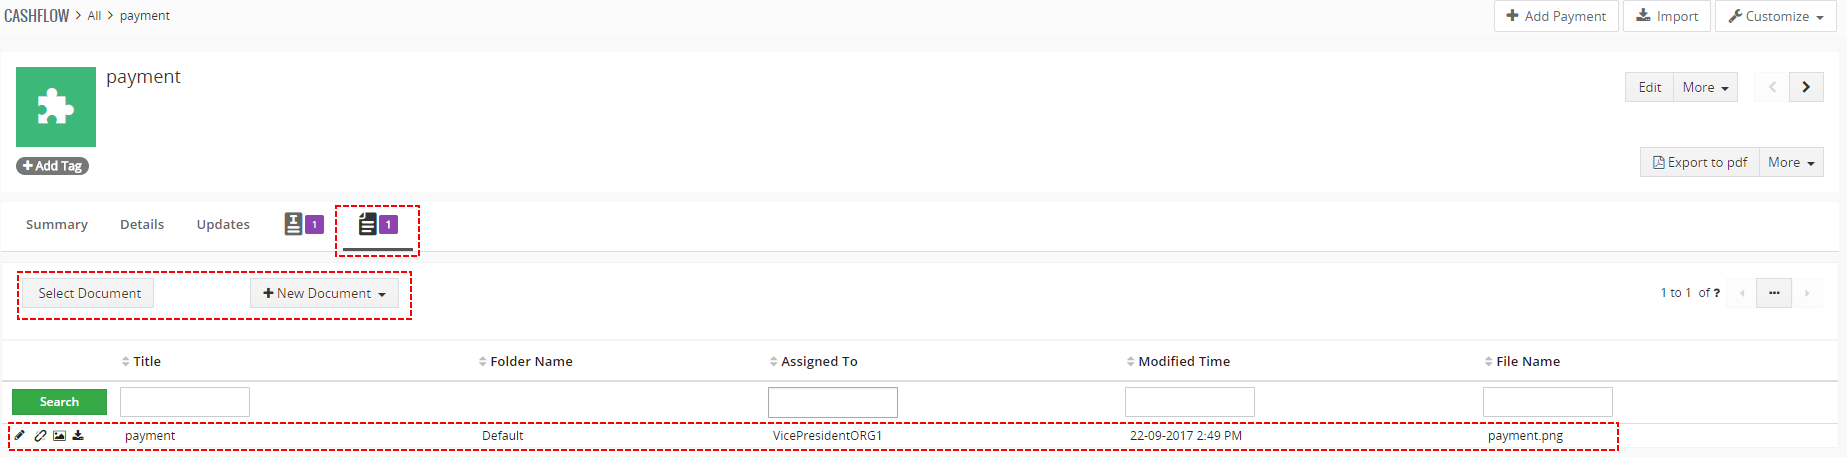
6.2.Support of Document module
The Cashflow4You allows you to attach the documents to payments. It can be simply done using buttons  and
and  in the DetailView of Cashflow.
6.3.Invoice status changes
As already mentioned, in the module Invoice the new tab Cashflow information is introduced with field Remaining Amount. Status of the invoice is automatically changed based on value of Remaining Amount:
- PAID – when Remaining Amount = 0
- CREATED – when Remaining Amount > 0 ; for example also in case the payment is remove, change amount of payment etc.
6.4.SO – payment – INV – payment scenario
It is also supported inside Cashflow4You to monitor and take into account the payments done within Sales Order to related Invoice.

7.Settings
Settings part you can find in ListView and DetailView of Cashflow module.

Cashflow Fields & Layout, Casfhlow Numbering and Cashflow Workflow are standard vtiger setting options so these options are not included in this manual.
You can find more on official vtiger page: https://www.vtiger.com/docs
7.1.Integration
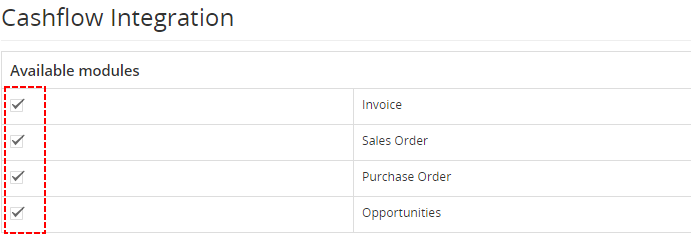
There is new option to enable or disable for which modules you want to use Cashflow. After installation is Cashflow enable for Invoice, Sales Order, Purchase Order. You can change it in Integration settings.
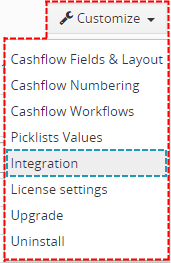
Now, please choose for which module(s) you want to enable or disable Cashflow.
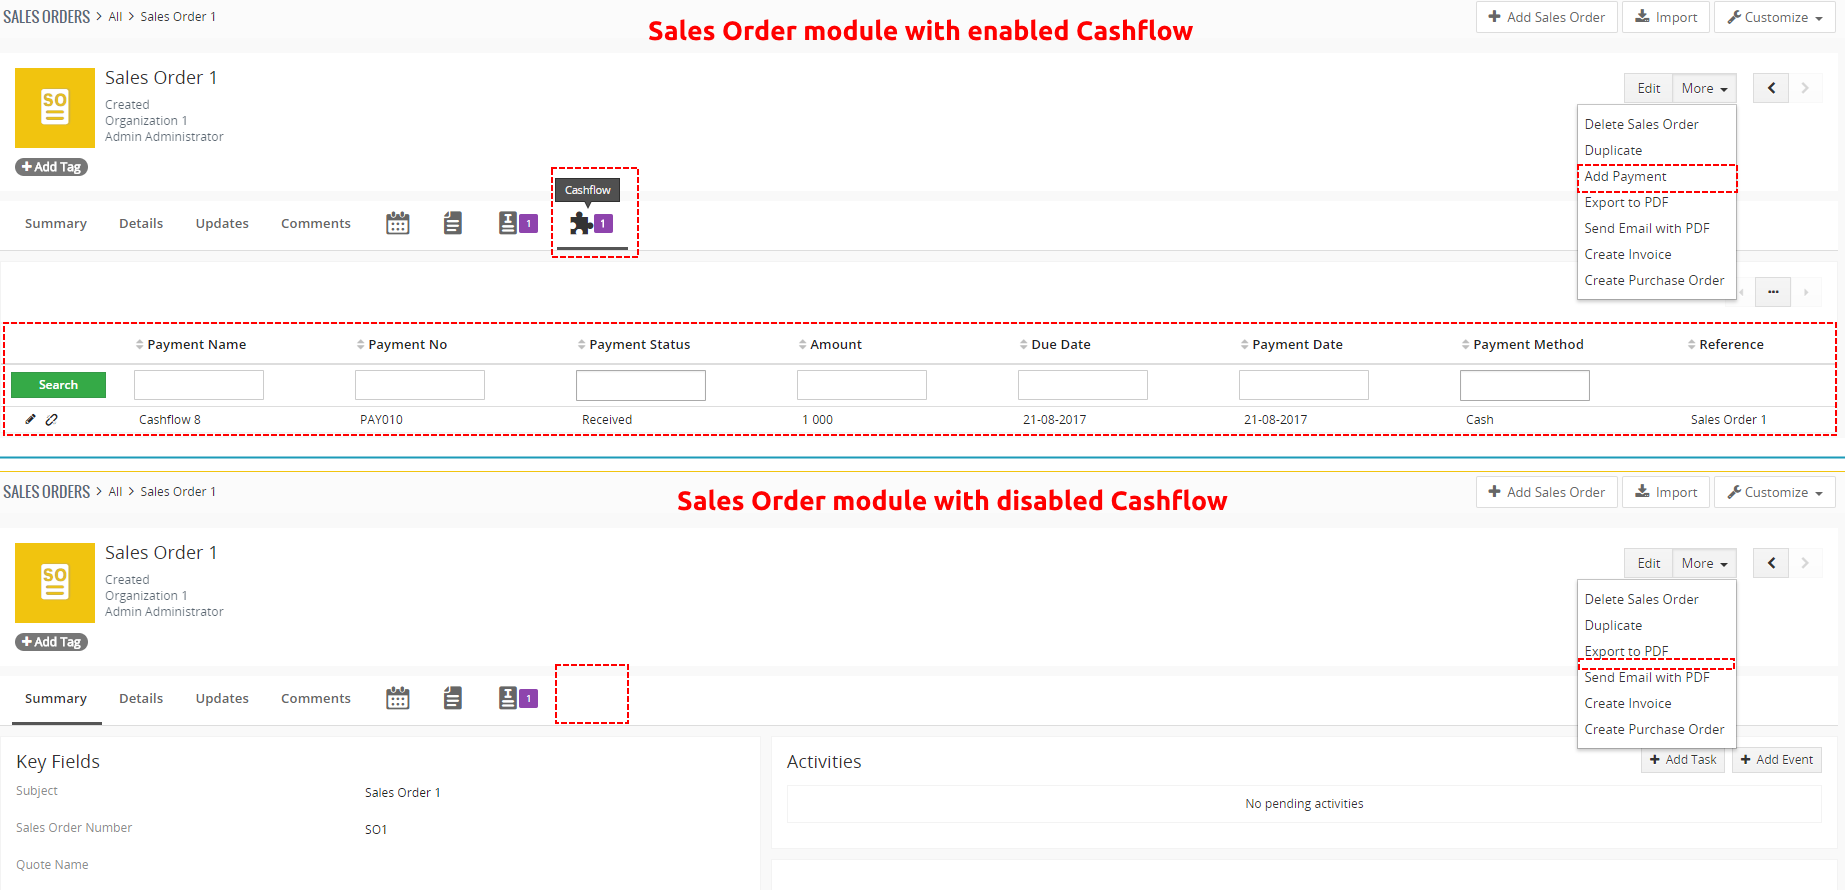
On the next picture you can see differences between enabled and disabled Cashflow extension in Sales Order module.
7.1.1.Purchase Order relation does not work
If you are trying to create Casfhlow and want to load Purchase Order via relation, the following error can be presented:
TEMPLATE: layout/modules/PurchaseOrder/PopupContents.tpl
This issue is related to Vtiger, in order to fix it, go to the folder:
vtigerfolder/layouts/v7/modules/PurchaseOrder
And rename file PopupContents.tpl to PopupContentsOLD.tpl
7.2.License Settings
Since December 2019/January 2020 all our modules will be using Installer to manage licenses. Please check our Installer pages for more information.
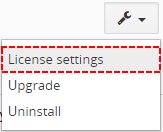
You can access the License settings like its shown below:
(there can be more options from the pick-list, depends on the module)
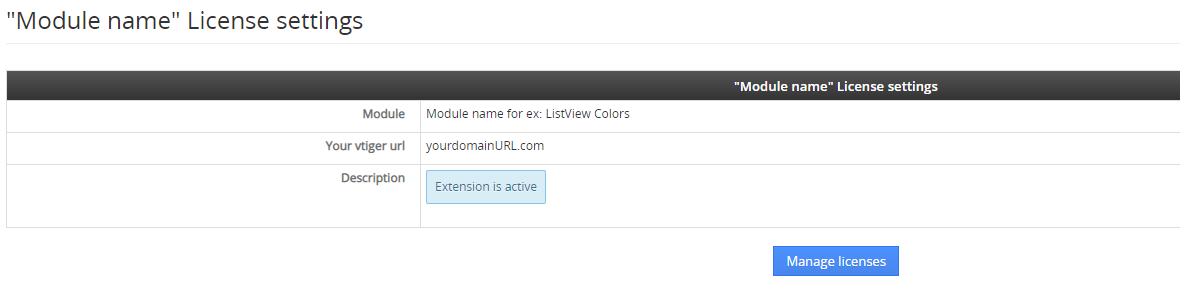
After accessing the License window you can see screen bellow with following information:
- Module name, Your Vtiger domain URL
- Description, if license is activate or not:
 – your license is currently active,
 – your license is not active and you need active it via Installer.
To activate or manage license, click on the ![]() button.
button.
7.2.1.Deactivate license
If you want to deactivate your license, please provide following steps:
- Go to your Installer, by a click on Notifications Icon and then on the button ,
or via Main Menu – Settings – CRM Settings – Extensions – ITS4YouInstaller - The following screen will appear (see below):

Installer – deactivation of license You can deactivate license by click on the button

![]() Note: The module will be deactivated but not uninstalled and license will be removed from the Activated Licenses tab.
Note: The module will be deactivated but not uninstalled and license will be removed from the Activated Licenses tab.
7.2.2.Reactivate license
To reactivate a license after deactivation, you need to follow the same process as you activated it first time:
- Click on the
 button and enter your license key.

- Confirm with
 button.
When the license was activated you can see module available in the Modules tab below.
![]() Note: To see modules and manage licenses you have to log in to our e-shop with @email and password via
Note: To see modules and manage licenses you have to log in to our e-shop with @email and password via ![]() button (top right screen side in Installer module).
button (top right screen side in Installer module).
7.3.How to update Cashflow
The upgrade of the module is initiated manually or via our Installer.
Updating via Installer:
- open the Installer in the CRM
- in the Modules tab find your installed module and you should see the button available
- If the new version is available, you will be notified via Installer Notifications icon
Updating Cashflow manually:
Click on Upgrade link in list view of Cashflow. So please refer to above installation part for details how to initiate the import of the module from the file.
As you can be seen on the Picture below you will be notified that the Cashflow module already exists. Confirm License agreement and upgrade will start immediately when you click on the button.
After upgrade the notification about successful upgrade is shown.
7.4.Uninstall
If you need to remove the module from your Vtiger you have two options:
- Uninstall via Installer.
- Manually via going to module Settings and choose Uninstall option.
7.4.1.Uninstall via Installer
You have also option to remove the module via Installer window by accessing the Settings – Uninstall window:
- Go to your Installer, by a click on Notifications Icon and then on the button ,
or via Main Menu – Settings – CRM Settings – Extensions – ITS4YouInstaller - Find the module you need to uninstall in the Modules tab
- Via
 pick list button choose the Uninstall option, you will be redirected to the Uninstall window.
 - Click on
 button

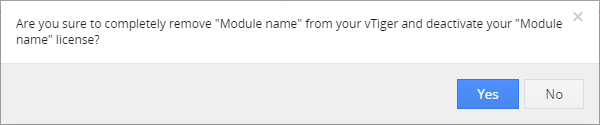
- Confirm uninstall with
 button
Now, the module has been removed from your Vtiger and your license has been deactivated. To use this module again, you need to provide installation and validation steps (see Installation chapter).
7.4.2.Manual Uninstall
There is also available option to remove Cashflow from your Vtiger manually. To uninstall please provide following steps:
- Go to the list viewiew of Cashflow and in Customize choose option Uninstall
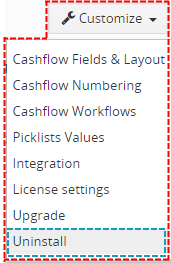
Uninstall Cashflow
- Click on button

Uninstall Cashflow
- Confirm uninstall with button
Now, Cashflow is removed from your vtiger and your license is deactivated. To use Cashflow again you need to provide installation and validation steps (see chapter 2. How to install Cashflow).
8.Tips & tricks
8.1.Correction showing Cashflow Information block values in Reports
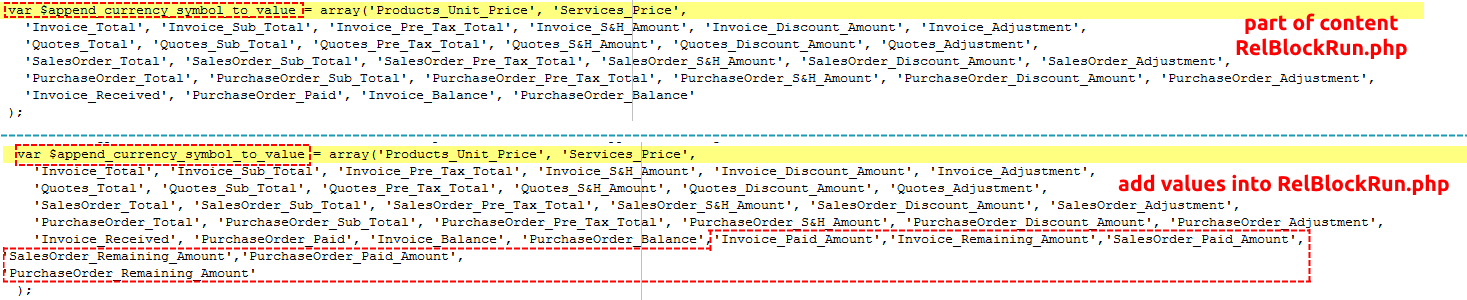
If you want to show values from Cashflow Information block in Reports you need to do some changes in vTiger source code. Please provide following steps.
- open file modules\Reports\ReportRun.php
- find value var $append_currency_symbol_to_value
- add this all:
,’Invoice_Paid_Amount’,’Invoice_Remaining_Amount’,’SalesOrder_Paid_Amount’,
‘SalesOrder_Remaining_Amount’,’PurchaseOrder_Paid_Amount’,
‘PurchaseOrder_Remaining_Amount’
into var $append_currency_symbol_to_value
8.2.Nicer formatting of Cashflow ListView values
Would you like to have formatting like on following picture?
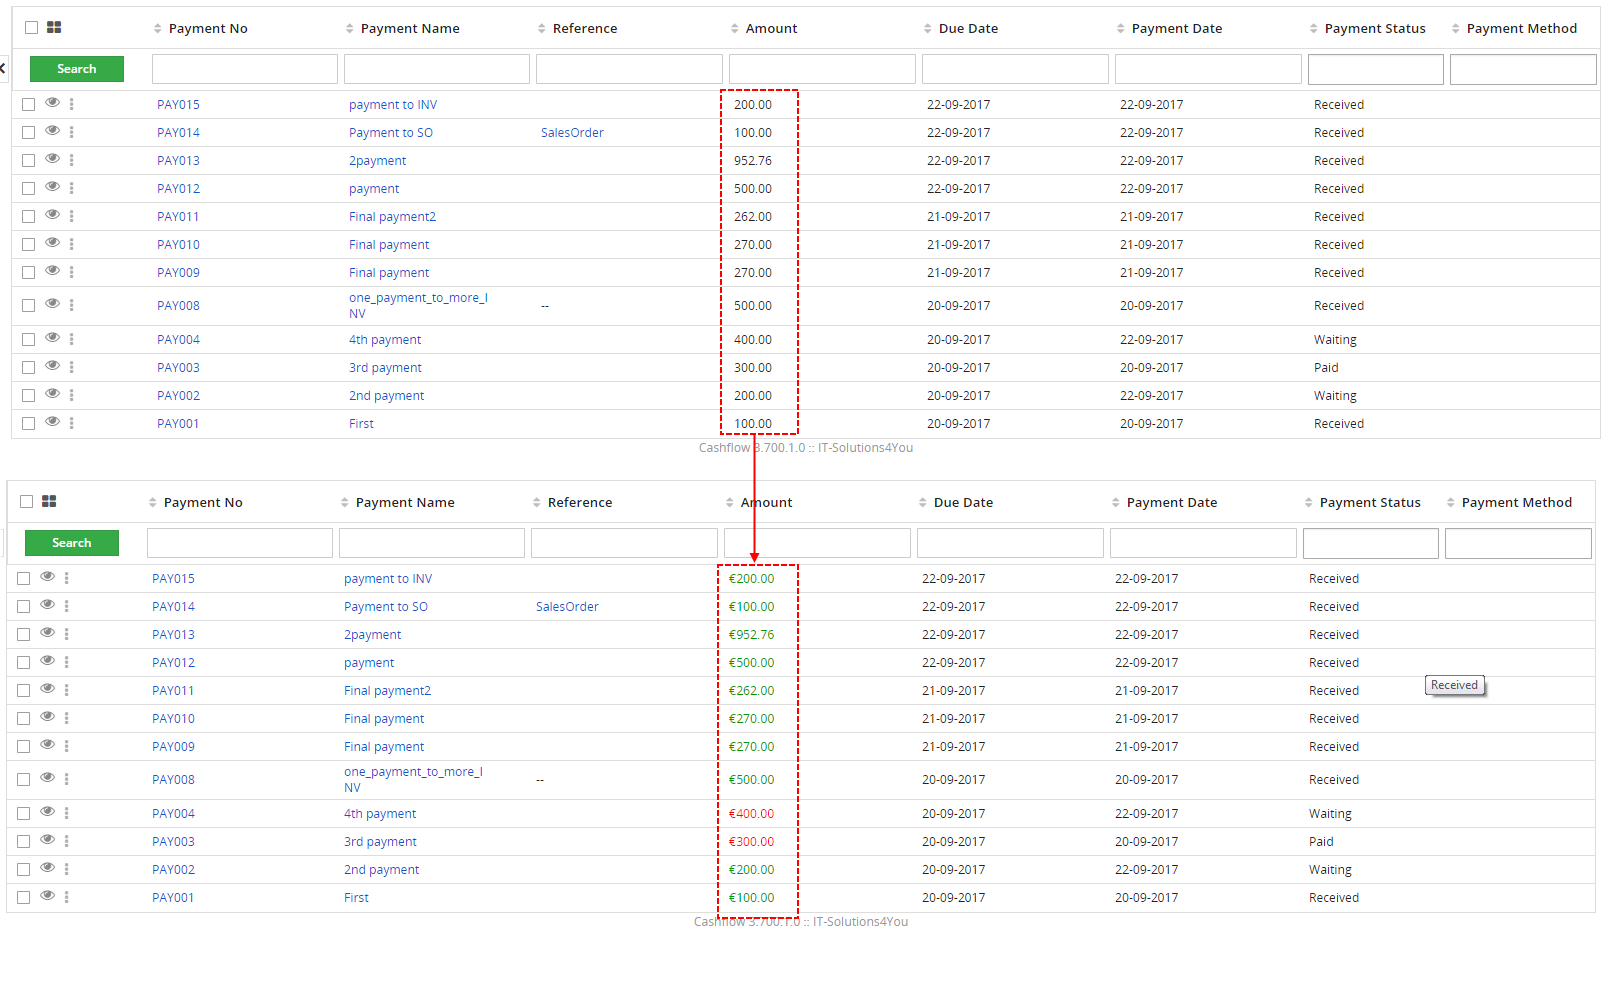
Please provide next step
1. Provide SQL commands:
UPDATE `vtiger_field` SET `uitype`= '72' WHERE `tablename`= 'its4you_cashflow4you' AND `columnname`= 'paymentamount'
UPDATE `vtiger_field` SET `uitype`= '72' WHERE `tablename`= 'its4you_cashflow4you' AND `columnname`= 'vat_amount'
UPDATE `vtiger_field` SET `uitype`= '72' WHERE `tablename`= 'its4you_cashflow4you' AND `columnname`= 'total_without_vat'
9.Change log
- Check latest versions available and fixes applied
- What was changed/added to manual
![]() Note: After update of Extension, we always suggest to clear browser cache.
Note: After update of Extension, we always suggest to clear browser cache.
9.1.Cashflow
- 11 August 2021: 4.17
- currency fields formating will not support combinations of separators : “,” and “.”
- 5 August 2021: 4.16
- Vtiger 7.4 compatibility
- 2 August 2021: 4.15
- fixed issue with Pick Lists and dependencies where in some cases the Pick list values like Payment Mode were not saved
- 4 June 2021: 4.13
- fixed issue where Vtiger Reports were showing some fields as zero
- 28 May 2021: 4.12
- resolived issues causing Uninstall of the module
- 14 May 2021: 4.11
- added Integration settings for modules with Total value in the Item Details block
- 26 March 2021: 4.10
- fixed issue where it was not possible to create Cash flow from Credit Note
- fixed issue when creating Cash flow via workflow did not created or updated Currency field
- other minor bug fixes
— 2020 —
- 7 December 2020: 4.9
- fixed issue where our extension List View colors was not working for Cashflow in related tabs of modules
- fixed compatibility issues with Opportunities module
- 19 November 2020: 4.8
- added new option to create payments via the widget in summary view of records:

- fixed issue, where a change of status was missing in the Updates tab for specific records assigned to Payment/Cashflow
- fixed issue, where Quick Create feature in Vtiger for Cashflow was not working properly
- added new option to create payments via the widget in summary view of records:
- 7 October 2020: 4.7
- fixed issue where users were not able to turn on/off Invoice module via Integration menu
- compatibility with Vtiger 7.3
- 3 August 2020: 4.6
- fixed issue where creating payments from custom list views was causing issues
(records were not correctly loaded)
- fixed issue where creating payments from custom list views was causing issues
- 17 July 2020: 4.5
- fixed issue where creating payments from multiple Invoices was not working
- 9 July 2020: 4.4
- fixed issue where after installing the Cash Flow module, the Invoice Received payment updates were no longer updating/showing
- fixed compatibility issues with Reports module
- Improved currency exchange rate when creating Cash Flow from Invoice with multiple currencies
- minor bug fixes and improvements
- 25 February 2020: 4.2
- fixed issue in the list view when using filters and then creating payments, balance was not shown properly
- added option to use more decimals for payments for ex: 0,0005
- 13 February 2020: 4.1
- fixed issue where button Create Payment was not working sometimes properly
- minor bug fixes
- January 2020: 4.0
- new validation system via our FREE extension Installer
— 2019 —
- May 2019 – Cashflow 700.2.3
- added compatibility with Credit Notes, when the credit note is paid, Cashflow will change the status of credit note to Refunded and will increase the quantity in stock from credit note
- April 2019 – Cashflow 700.2.2
- minor bug fixes
- January 2019 – Cashflow 700.2.1
- fixed issues with open amount rewriting always to 0
- January 2019 – Cashflow 700.2.0
- fixed issues with licensing
- June 2018 – Cashflow 700.1.3
- compatibility with Credit Notes 4 You
- added Integration modules – add/remove Links: Add Payment, Payments
- May 2018 – Cashflow 700.1.2
- minor bug fixes
- September 2017 – Cashflow 700.1.0
- compatibility with vtiger 7.x
9.2.Manual of Cashflow
- January 2020: manual based on Cashflow version: 4.0
- updated chapters: Installation, Updates, License settings, Uninstall
- new licensing via Installer – additional chapters added
- September 2017: manual based on Cashflow 700.1.0
- first initiate for vtiger 7.x