1.Introduction to PDF Maker Free
The PDF Maker is extension tool designed for vtiger CRM. There is already possibility of the export to pdf format in vtiger CRM functionality but it covers just few modules. In addition pdf templates are hardcoded and cannot be edited. Therefore, the intention was to provide powerful and flexible tool which allows users of vtiger CRM to create own pdf templates.
The PDF Maker Free benefits are:
- Personalized Invoice, Quotes, Sales Orders and Purchase Orders formats
- Personalized Product Profiles with image
- Terms and Conditions
Product Features :
- You can use all Fields (including custom)
- Company and User information
- Translation from Global and Module languages
- Print from list view module
- Define Page format (A3, A4, A5, A6, Letter, Legal and own format is possible)
- Using Products images in Invoice, Quotes, Purchase or Sales Order
2.Install PDF Maker Free via Installer
To install PDF Maker Free via Module Manager you need to have installed our Installer free extension.
So please read following steps how to download, install our Installer and our PDF Maker:
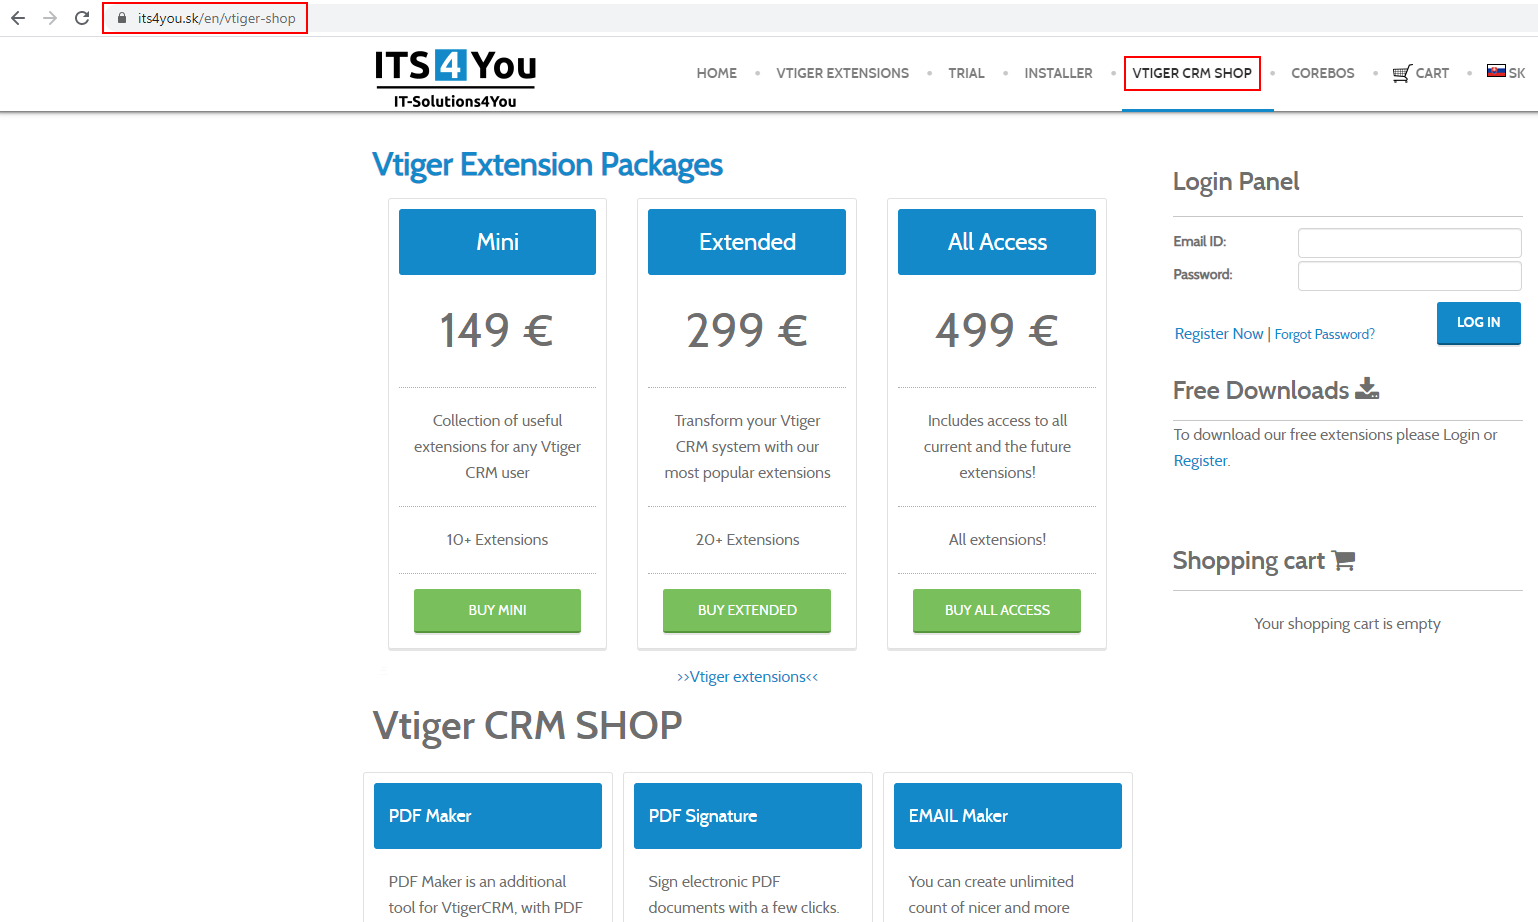
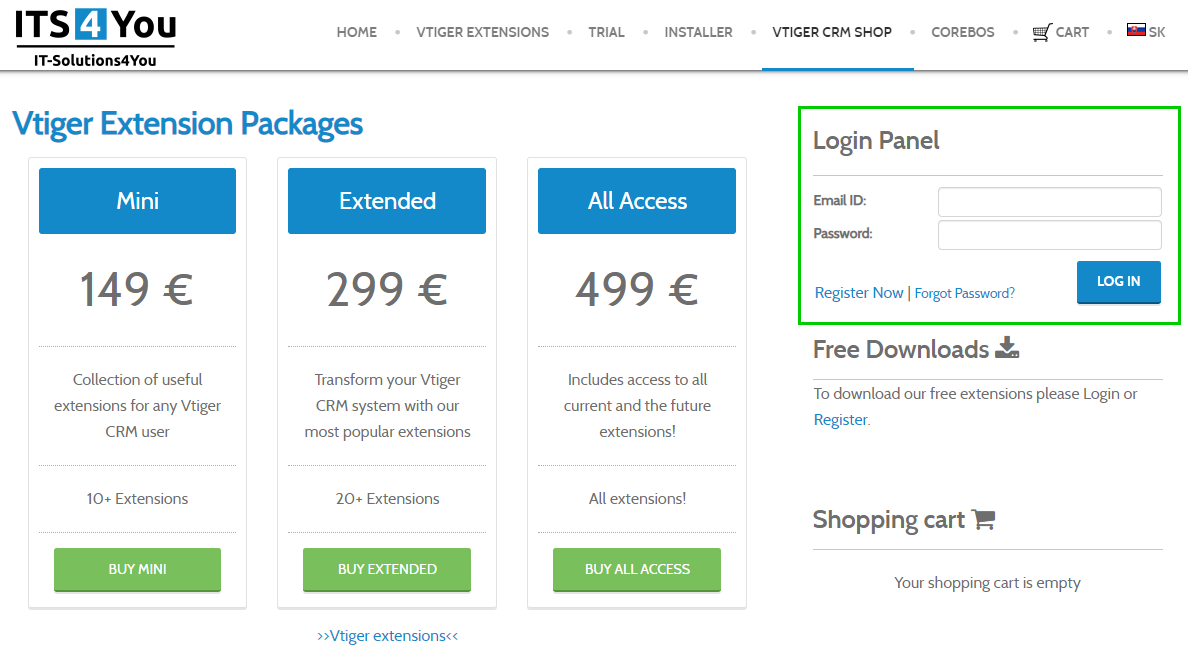
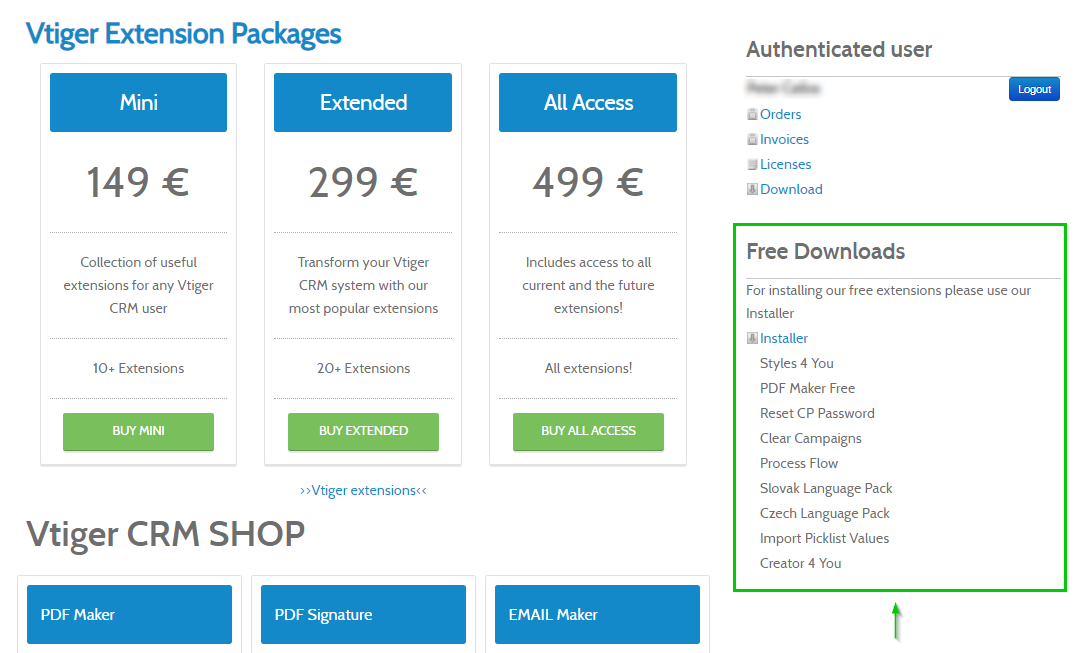
- First of all, you need to go into our E-shop.
- If you are already registered, just simply login into our E-shop.
- If you don’t have registration, please provide few steps to make one:
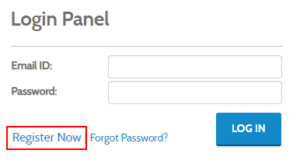
- Click on Register Now button.
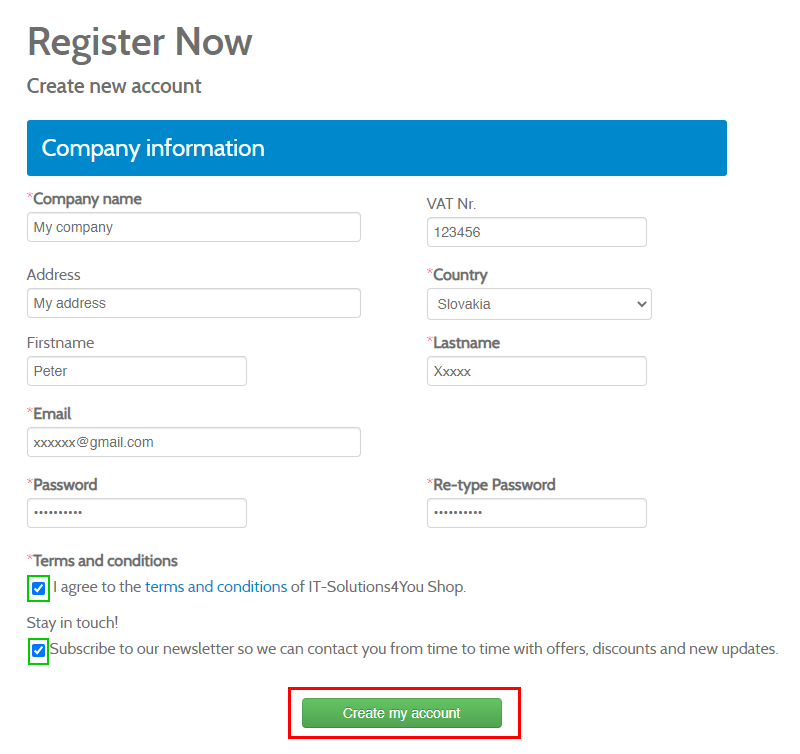
- Fill required info and accept Terms and Conditions. We also recommend to subscribe to our Newsletter to receive hot offers, Discounts or info about Updates and new Extensions.
And click on button.
- After Registration you will be logged in automatically.
- Click on Register Now button.
- If you are already registered, just simply login into our E-shop.
- In our E-shop you can see Free Downloads section.
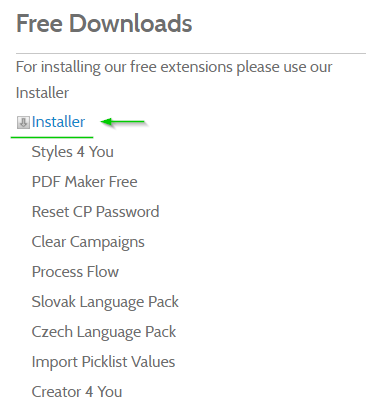
- In the section you can see the list of free extensions and Installer with on click action.
Please click on the Installer: - The Istaller .zip file will be downloaded.

The Installer .zip file is downloaded
- Next step is to install our Installer via Module Manager.
- Once the Installer is installed, please log in to the Installer with same details you used for E-Shop registration.
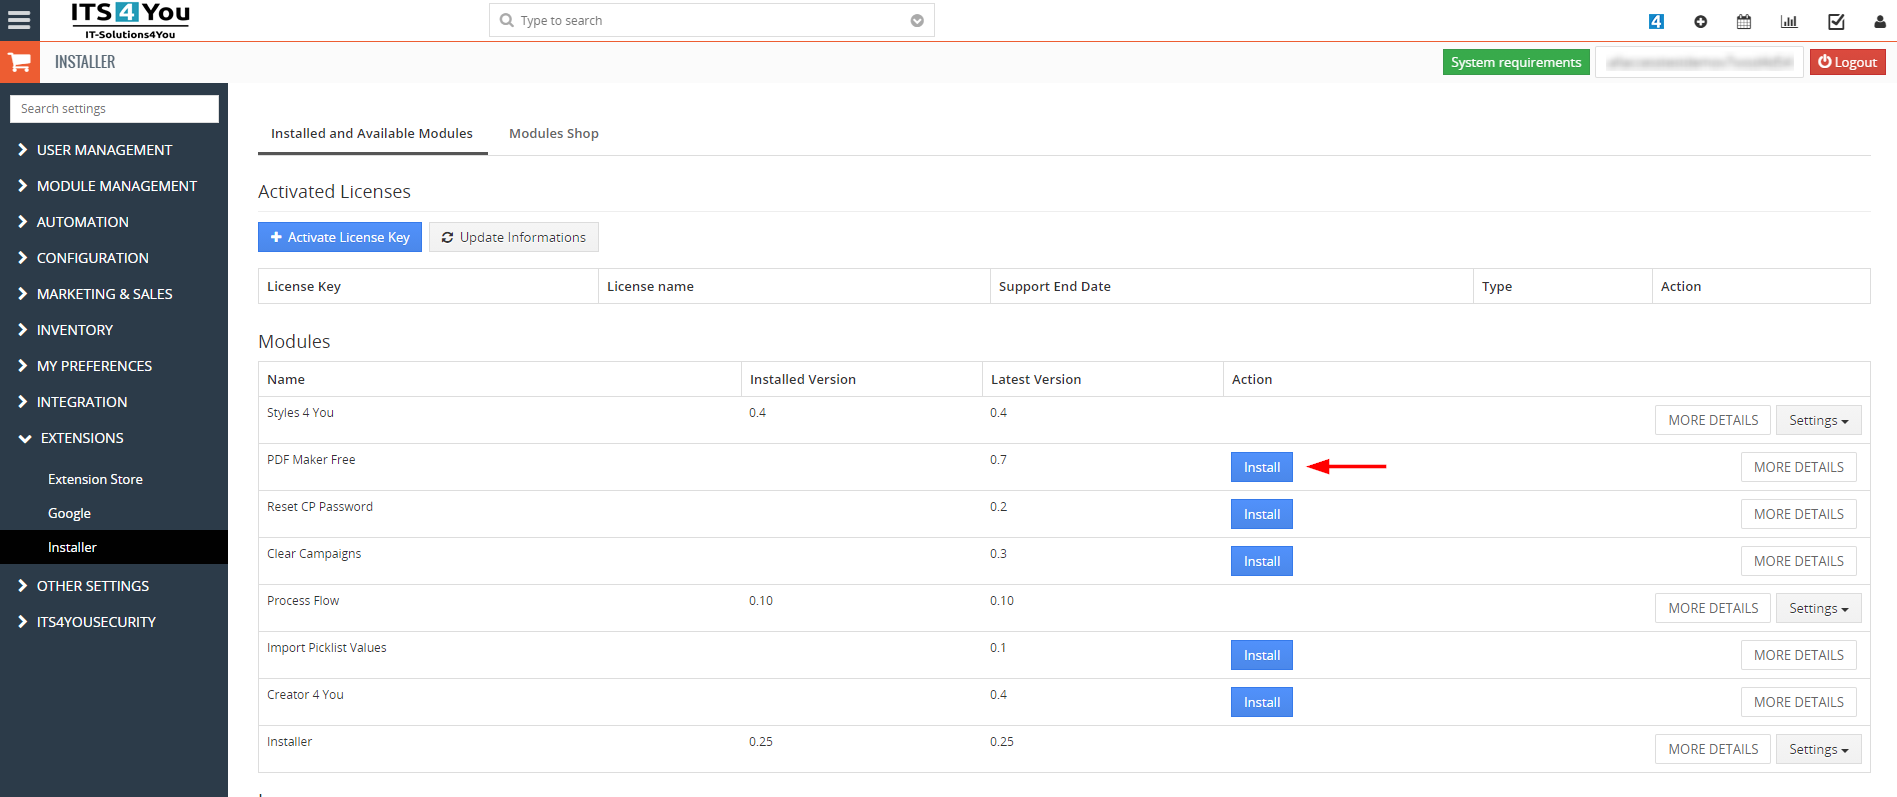
More details how to login and use our Installer you can find here. - Following screen will appear with the available Free Extensions list, click
 button to install PDF Maker.
- The installation is finished and you will see an Installation Log, in case there are no any errors marked with red text, installations was successful.
- Procced via
 button.
 - Go to PDF Maker via Memnu – Tools – PDF Maker and click on
 button and on the next screen click on
  and
and  buttons.
The PDF Maker Free was sucessfully installed:
3.How to update PDF Maker Free
There is also a way to install / update the extension manually in some scenarios:
- Manual installation or update of the extension can be requested if you contact our support because you are facing some issues with extension.
- Standard way of installation and update is using our Installer. In some rare cases we can send you .zip file to update the extension manually.
Installation can be done via Module Manager by clicking on the button ![]() and selecting the .zip file.
and selecting the .zip file.
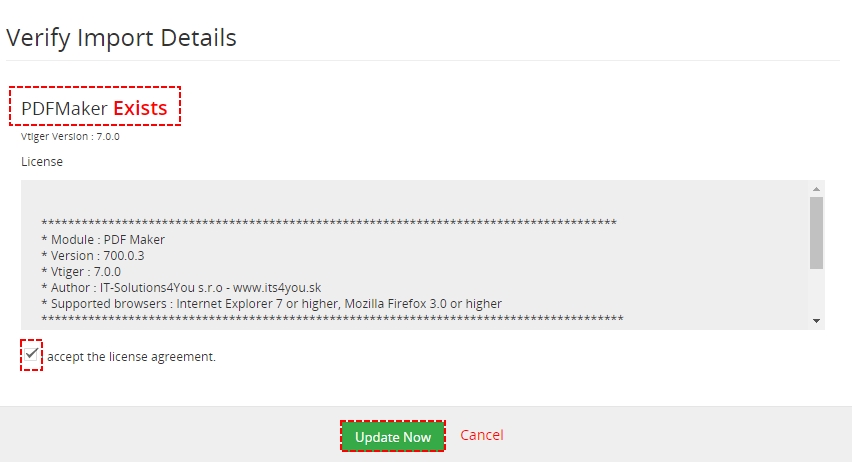
The upgrade of the PDF Maker is initiated in the same way as PDF maker installation or click on Upgrade PDFMaker link in Customize tab of PDF Maker.
So please refer to above installation part for details how to initiate the import of the module from the file. As can be seen on following picture you will be notified that the PDF Maker module already exists. The upgrade will start immediately when you click on the [Update Now] button.
After upgrade the notification about successful upgrade is shown.
4.Quick start
In the following section you can find short description how to edit your PDF template for vtiger CRM using PDF Maker.
4.1.Edit the PDF template
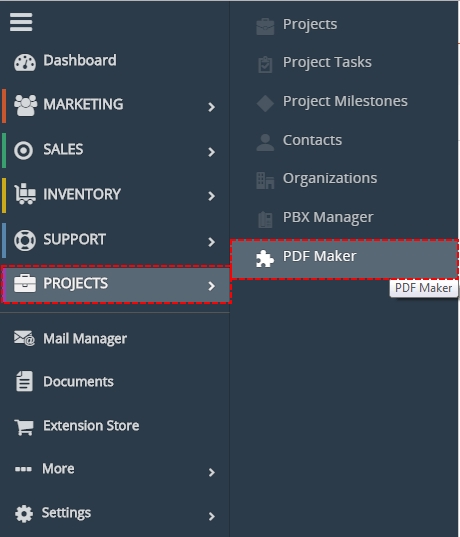
In order to edit the PDF template you have to start the PDF Maker tool which can be after installation located under the Projects as seen below on the picture.
- In vtiger CRM menu please go to Projects and click on PDF Maker (since vtiger 7 there is no Tools part so records which used to be in Tools tab are in Projects tab now)
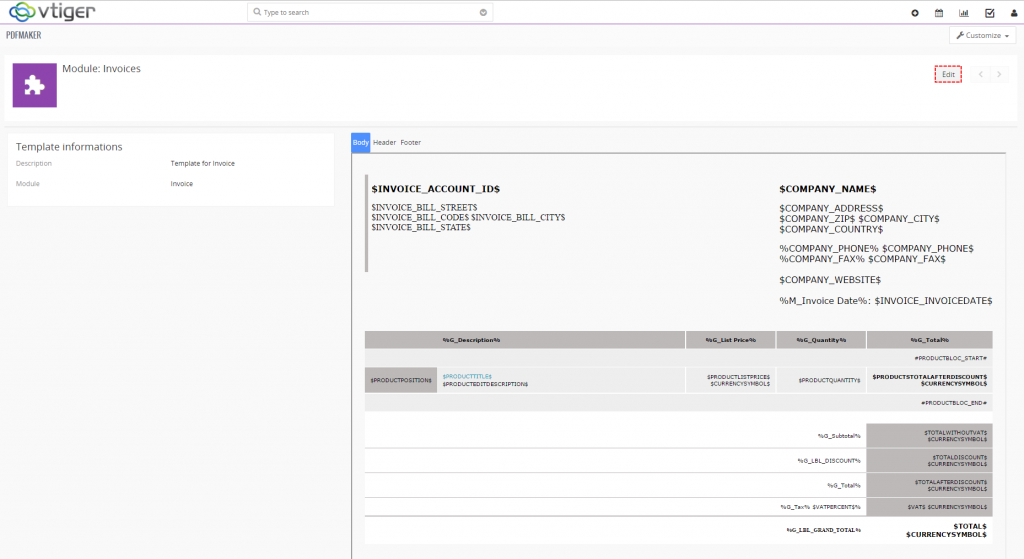
- The screenshot below shows PDF Maker ListView. You can click on template to see preview.
- In preview click on [Edit] to start editing templates
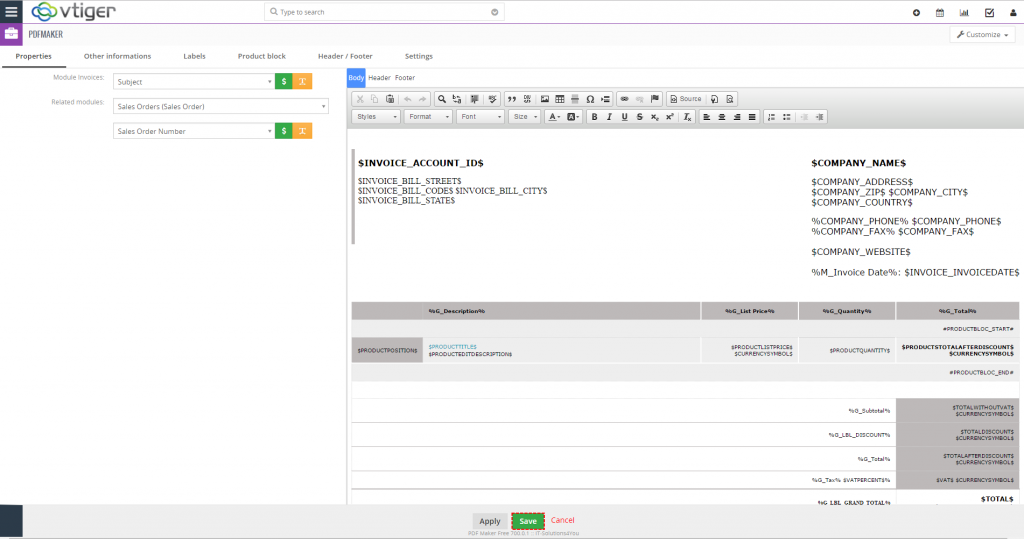
- After editing click on [Save] button
4.2.How to generate PDF file with PDF Maker template
With PDF Maker Free you can generate PDF file only from DetailView.
To generate PDF file please provide following steps:
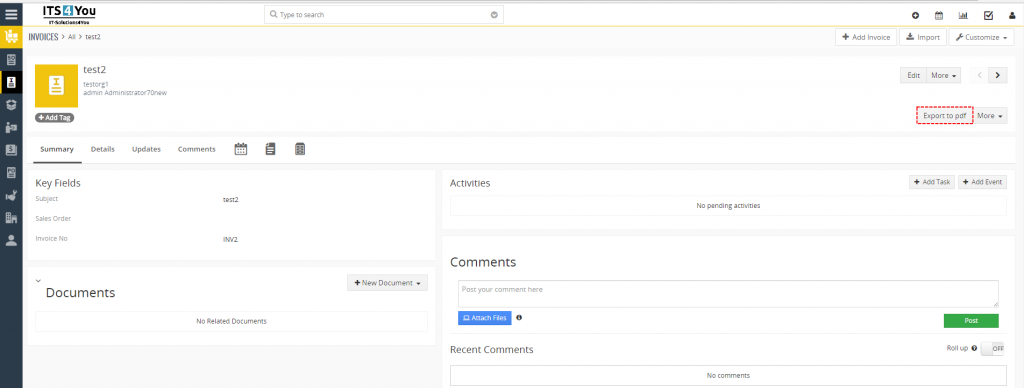
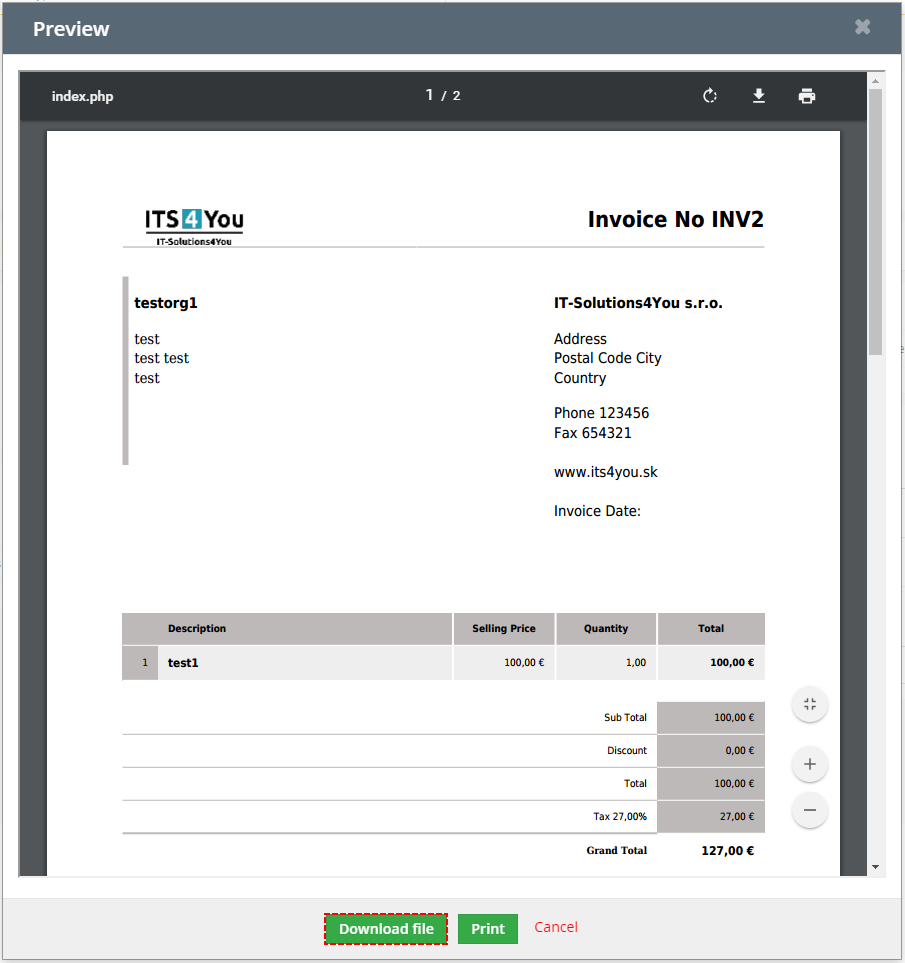
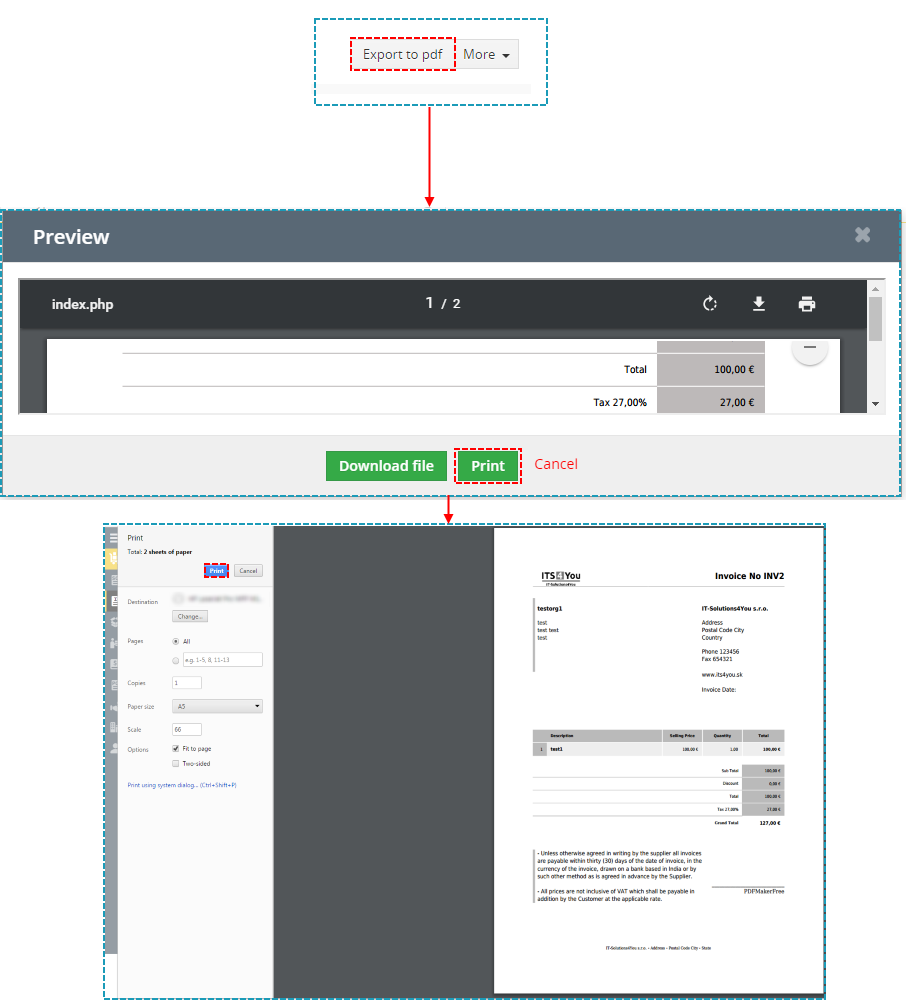
- To generate without changing default language click in DetailView of record on [Export to pdf] button and in popup window click on [Download file]
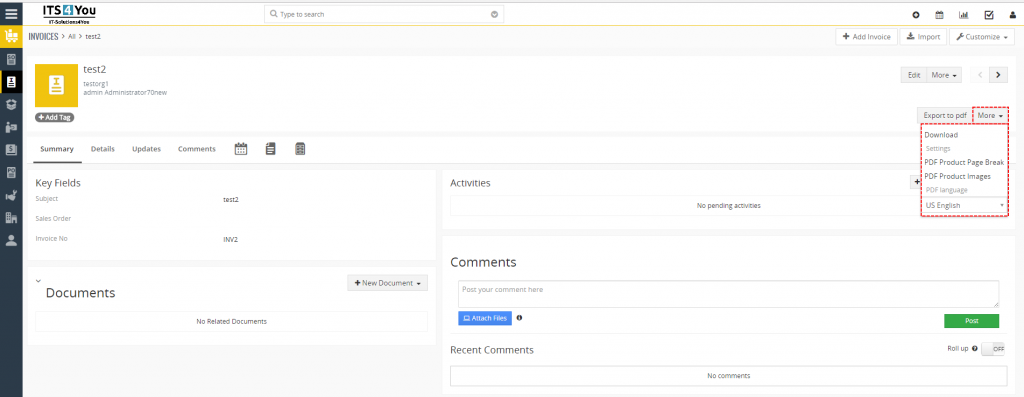
- First, if you want to change language of pdf file or add PDF Product Page Break or change PDF Product Images click on [More] button
- Then click on [Download] or [Export to pdf] button
5.Work area
The Work Area of PDF Maker consists of:
- ListView – list of your templates
- DetailView – shows already created pdf template in details
- EditView – allows you to edit existing templates
- PDF Maker block – mainly used for export records to pdf file
5.1.ListView of PDF Maker Free
The main part of the PDF Maker ListView consists of list of the PDF templates, which gives you information about a module and a short description.
Under customize button you can find:
- Upgrade PDF Maker
- Uninstall PDF Maker
There are also buttons to see PDF template details and Edit PDF template.
5.2.DetailView of PDF Maker Free
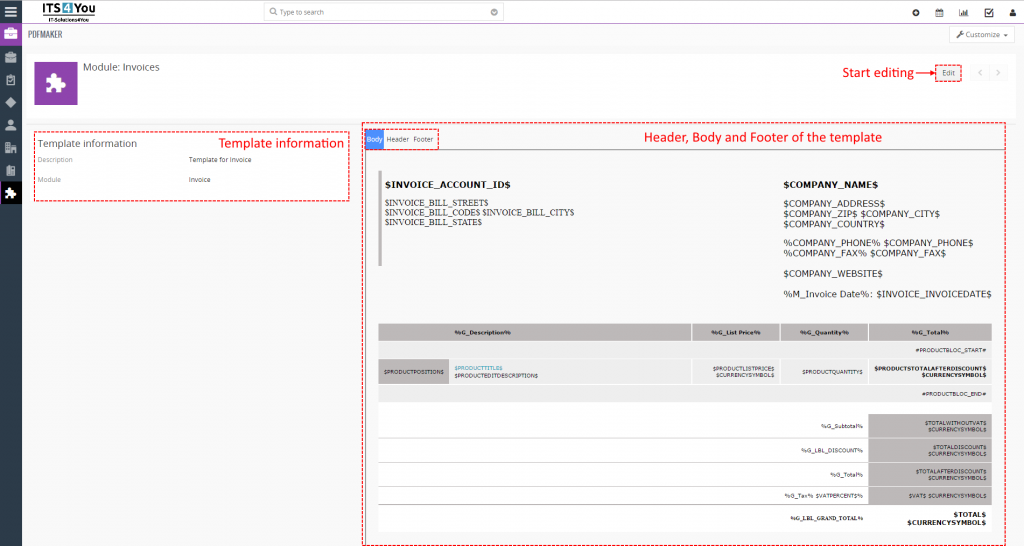
From ListView you can directly open any pdf template in DetailView. The DetailView consists of:
- Template information part – gives basic information of the template
- PDF template itself which consist of Header, Body and Footer part.
- [Edit] button – switch to EditView and start editing
5.3.EditView of PDF Maker Free
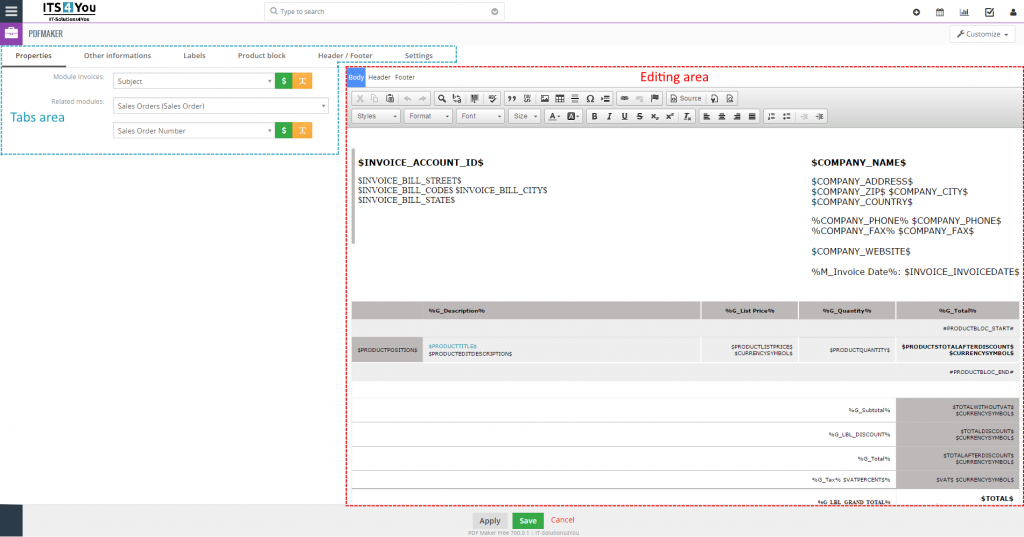
The EditView shown in the picture below is divided into two areas:,
- Tabs area – allows user to insert into template different kind of values, fields, labels and to set up properties and other common settings of the pdf template. Tabs area consists of following tabs, which are described in the following subchapters:
- Properties
- Other informations
- Labels
- Product block
- Header/Footer
- Settings
- Editing area – is mainly used for inserting/editing your own text, tables, images etc. and to make some design adjustment of the template like font change, color, format, size, background color of the text etc. This editing can be initiated via many toolbars located inside three tabs (Body, Header and Footer) in the above part of Editing area.
5.3.1.Properties
The main purpose of the Properties tab is to add variables of module and related modules.
| Name | Description |
|---|---|
| Primary Module | Template will be based and available only for one primary module and its fields. |
| Related modules | If exists related module(s) to selected module, it is possible here to select and use fields from any related modules. |
5.3.2.Other information
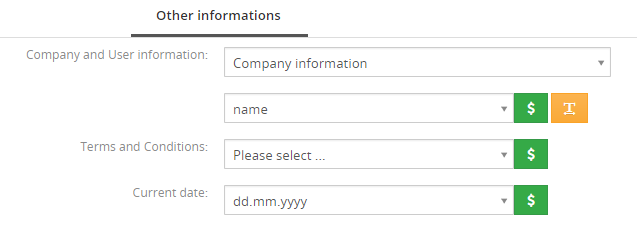
As shown below Other informations tab contains several fields. They are Company and User information, Terms and Conditions, Current date, Barcodes, QR code and Custom functions.
| Name | Description |
|---|---|
| Company and User information | Comprises group of fields from Company information, Assigned to User, Logged in User, Modified by User and Created by User. Custom fields also supported. |
| Terms and Conditions | Terms and Conditions. |
| Current date | Current date in several formats. |
5.3.4.Product block
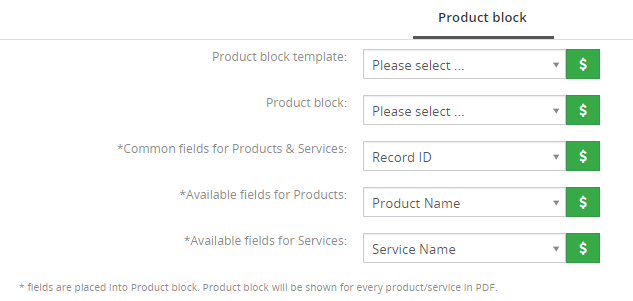
The product block tab allows inserting product block template and editing it. In addition, you can create your own product block using “Block start”, “Block end” and fields for products and services.
| Name | Description |
|---|---|
| Product block template | Insert predefined and created product block templates. |
| Product block | Products and Services Block start, Products and Services Block end. Products Block start, Products Block end. Services Block start, Services Block end. Each product block has to start with “Block start” and ends with “Block end”. |
| Common fields for Products & Services | Fields common for products & services. You can find same fields for products and services separately as well, but it is recommended to prefer common fields in the templates. |
| Available fields for Products | Fields for products. |
| Available fields for Services | Fields for services. |
5.3.6.Settings
The settings tab allows defining Description of template, page format, page settings, number format and other settings from usage of template point of view.
| Name | Description |
|---|---|
| Description | The description of the pdf template. |
| Page format | A3, A4, A5, A6, Letter, Legal or Custom. Custom page format allows to define width and height of the page in mm. Maximum values are 2000 mm x 2000 mm and minimum values are 100mm x 100mm. |
| Page orientation | Portrait or landscape. |
| Ignored picklist values | Define picklist values which will be ignored in the final pdf document like None, none, keine etc. Entered values have to be separated with comma. |
| Margins | Margins in cm. Maximum value is 9.9 cm and minimum value is 0 cm. |
| Number format | Decimal point separator – comma, dot (but any symbol can be used) Number of decimal points – 0-3 Thousands separator – comma, dot, space (but any symbol can be used) |
5.4.PDF Maker block of PDF Maker Free
The PDF Maker block can be found inside the specific module. In the module ListView it is necessary to click on any record to see details and on the right side, you can find the block. PDF Maker block contains of 2 buttons.
- [Export to pdf] – you will see Preview of pdf with default options (Language, Product Page Break and Product Image) and you can see options to Download and print PDF file
- [More] – in more button you can find Download option to direct download pdf file, PDF Product Page Break to move product on other page, PDF Product Images to choose Product image for Products and set size. Also there is option to change PDF language
7.1.Update PDF Maker Free
There is also a way to install / update the extension manually in some scenarios:
- Manual installation or update of the extension can be requested if you contact our support because you are facing some issues with extension.
- Standard way of installation and update is using our Installer. In some rare cases we can send you .zip file to update the extension manually.
Installation can be done via Module Manager by clicking on the button ![]() and selecting the .zip file.
and selecting the .zip file.
The upgrade of the PDF Maker is initiated in the same way as PDF maker installation or click on Upgrade PDFMaker link in Customize tab of PDF Maker.
So please refer to above installation part for details how to initiate the import of the module from the file. As can be seen on following picture you will be notified that the PDF Maker module already exists. The upgrade will start immediately when you click on the [Update Now] button.
After upgrade the notification about successful upgrade is shown.

How to update PDF Maker
7.2.Uninstall PDF Maker
There is also available option to remove PDF Maker from your vTiger. To uninstall please provide following steps:
- Go to the ListView of PDF Maker and choose option Uninstall PDFMaker
- Click on [Uninstall PDF Maker] button
- Confirm uninstall with [Yes] button
Now, PDF Maker is removed from your vTiger. To use PDF Maker again you need to provide installation steús.
8.Change log
- Check latest versions available and fixes applied
- What was changed/added to manual
8.1.PDF Maker Free
- 20. December 2020 – PDF Maker 0.7
- compatibility with Installer and Vtiger 7.3 version
- 11. June 2020 – PDF Maker 0.6
- new version numbering
- fixed issues with installation on Vtiger 7.2/7.3 versions
- minor bug fixes
- 31. May 2017 – PDF Maker 700.1.0
- compatibility with vtiger 7.0.0
8.2.Manual of PDF Maker Free
- 5. February 2021: manual based on PDF Maker 0.7
- updated chapters Install and Update of PDF Maker
- 14. October 2020: manual based on PDF Maker 0.6
- updated Install chapter (PDF Maker is no longer possible to install via Market Place)
- 31. May 2017: manual based on PDF Maker 700.1.0
- first initiate for vtiger 7.x.x
