

In the following sections you can find short description of the payment and how to create your first payment for vtiger CRM using Cashflow. As was already mentioned, the Cashflow allows you to track incoming payments that you will receive from customers or outgoing payments you will have to make in the future. The payment consists of more or less twenty fields, but to create the new payment only following 4 are required:
| Name | Description |
|---|---|
| Payment Name | Payment Name; used to distinguish payments. |
| Payment Type | Type of the payment. Can be only incoming or outgoing. |
| Amount | The amount of the payment |
| Due Date | The data until the payment has to be paid or is expected |
Table 1: Required fields for payment creation
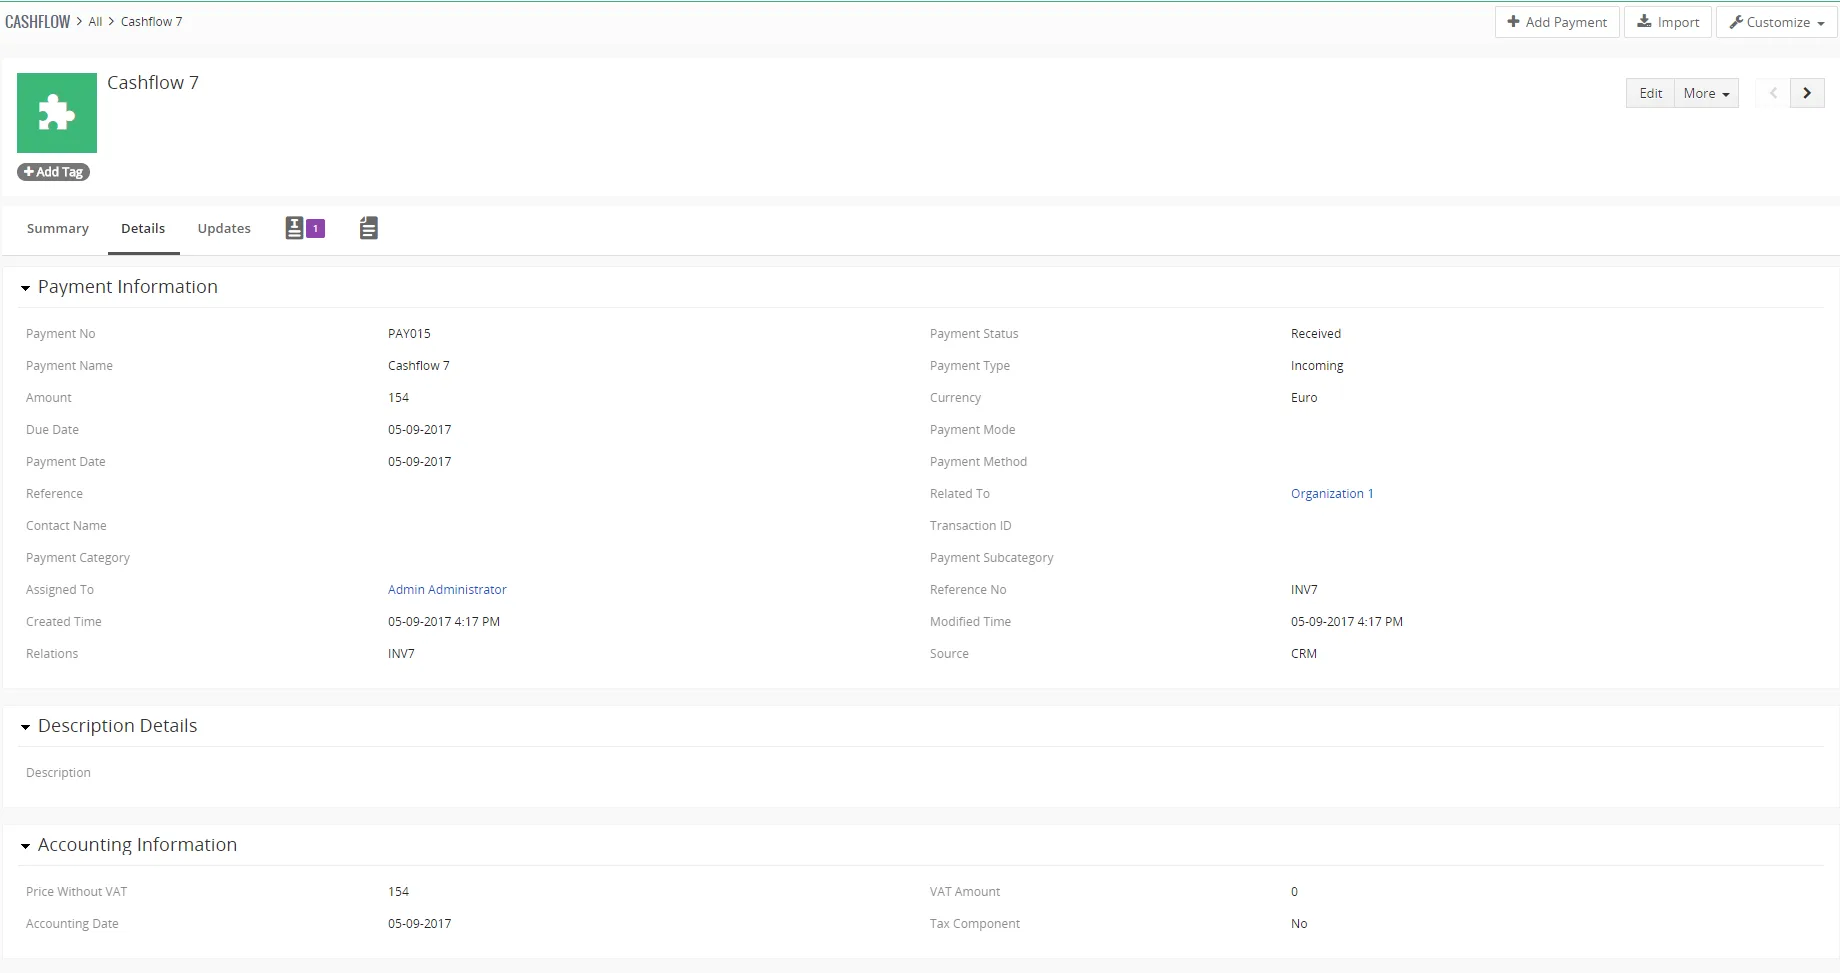
The fields mentioned in the Table 1 are enough to be filled in order to create simple payment but they are not sufficient to utilize the real potential of the Cashflow. Using additional fields you can simply refer the payments to entities of other modules (INV, SO, PO, CN, PI, OP), check the status of payment (invoice) or define payment category to have better view of your business.
| Name | Description |
|---|---|
| Reference | Reference to invoice, sales order or purchase order. (Not required) |
| Payment Date | Real date of payment. (most important field for Cashflow based on this field is set Payment status) |
| Payment Status | Status automatically defined based of Due Date and Payment Date.
|
| Payment Category, Payment Subcategory | (Sub)Category of the payment. User editable field. |
Table 2: Fields for payment creation
Within the module Cashflow you are able to create payments without any reference (also called “Other” payments) or payments with references. The following picture describes the references between Cashflow and other vtiger CRM modules and type of references for modules:
- Invoice – there are three possibilities how to create payment for invoices:
- 1:1 – one payment for one invoice
- M:1 – more payments for one invoice – used for advanced payments
- 1:N – one payment from one organization to pay more invoices at once
- Sales Order, Purchase Order, PreInvoice, CreditNotes, Opportunities – there are just two
possibilities to create payment:- 1:1 – one payment for one sales order, purchase order, preinvoice, creditnote,
opportunity - M:1 – more payments for one sales order, purchase order, preinvoice, creditnote,
opportunity – used for advanced payments
- 1:1 – one payment for one sales order, purchase order, preinvoice, creditnote,
The Cashflow4You takes care also in case of payment(s) for sales order and additional payment(s) for related invoices. This scenario is described in details in the chapter (4.5 SO – payment – INV – payment scenario).
In addition to above mentioned references, the payments can refer to Organization or Vendor as well. Two approaches exist to assign the payment towards Organization (or Vendor):
- automatic creation of the reference – information about Organization is taken directly from Invoice, Sales Order, PreInvoice, Credit Note, Opportunity; for Vendor the information is taken from Purchase Order
- manual creation of the reference – you can assign each payment to Organization or to Vendor according to your needs, i.e. you can assign payments to Organization or Vendor although the payment is without any reference to INV, SO,PO, PI, CN or OP.
Creating payment
In order to create the Cashflow4You payment you can use following three approaches:
- Cashflow Payments button – from the DetailView of the modules INV, SO, PO, PI, CN; very quick approach which pre-defines the fields based on related INV, SO, PO, PI or CN
records (The creation of the payment or partial-payment from payments block) - The creation of the multi-payment for more invoices – this is used to create one payment for more invoices in one step (The creation of the multi-payment for more invoices)
- The basic creation of the template from Cashflow4You ListView – the payment is created from scratch, i.e. you have to define all necessary fields according to your needs from the beginning (The basic creation of the template from Cashflow4You ListView)
4.1 The creation of the payment or partial-payment from DetailView of record
The Cashflow Payments button is available inside the DetailView of the modules Invoice, Sales Order, Purchase Order, PreInvoice and Credit Notes. As already mentioned, the payment or partial-payment can refer to records from these modules. This makes creation of the payment and partial-payment much easier. In order to create the payment using Payments block please provide following steps:
- Go to the DetailView of the module Invoice or Sales Order or Purchase Order or PreInvoice or Credit Notes according to your needs and click on
 button and select Add Payment or Payments.
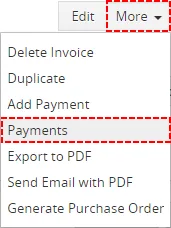
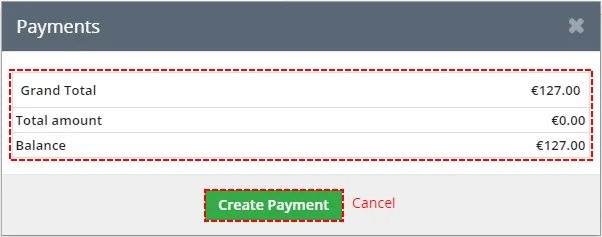
Add payment from DetailView - If you click on Add Payment skip to step 3. If you choose Payments you can see Cashflow block with info about previous Payments. Click on

Payment block - The EditView will appear on the screen. As you can see below the fields Payment Type, Amount, Due Date, Payment date (actual date) and references to invoice (SO, PO, PI, OP, or CN) and organization or Vendor are already available and based on fields from related record. Fill in at least all missing required fields. You can also define Payment Category and Payment Subcategory.
Save the payment.
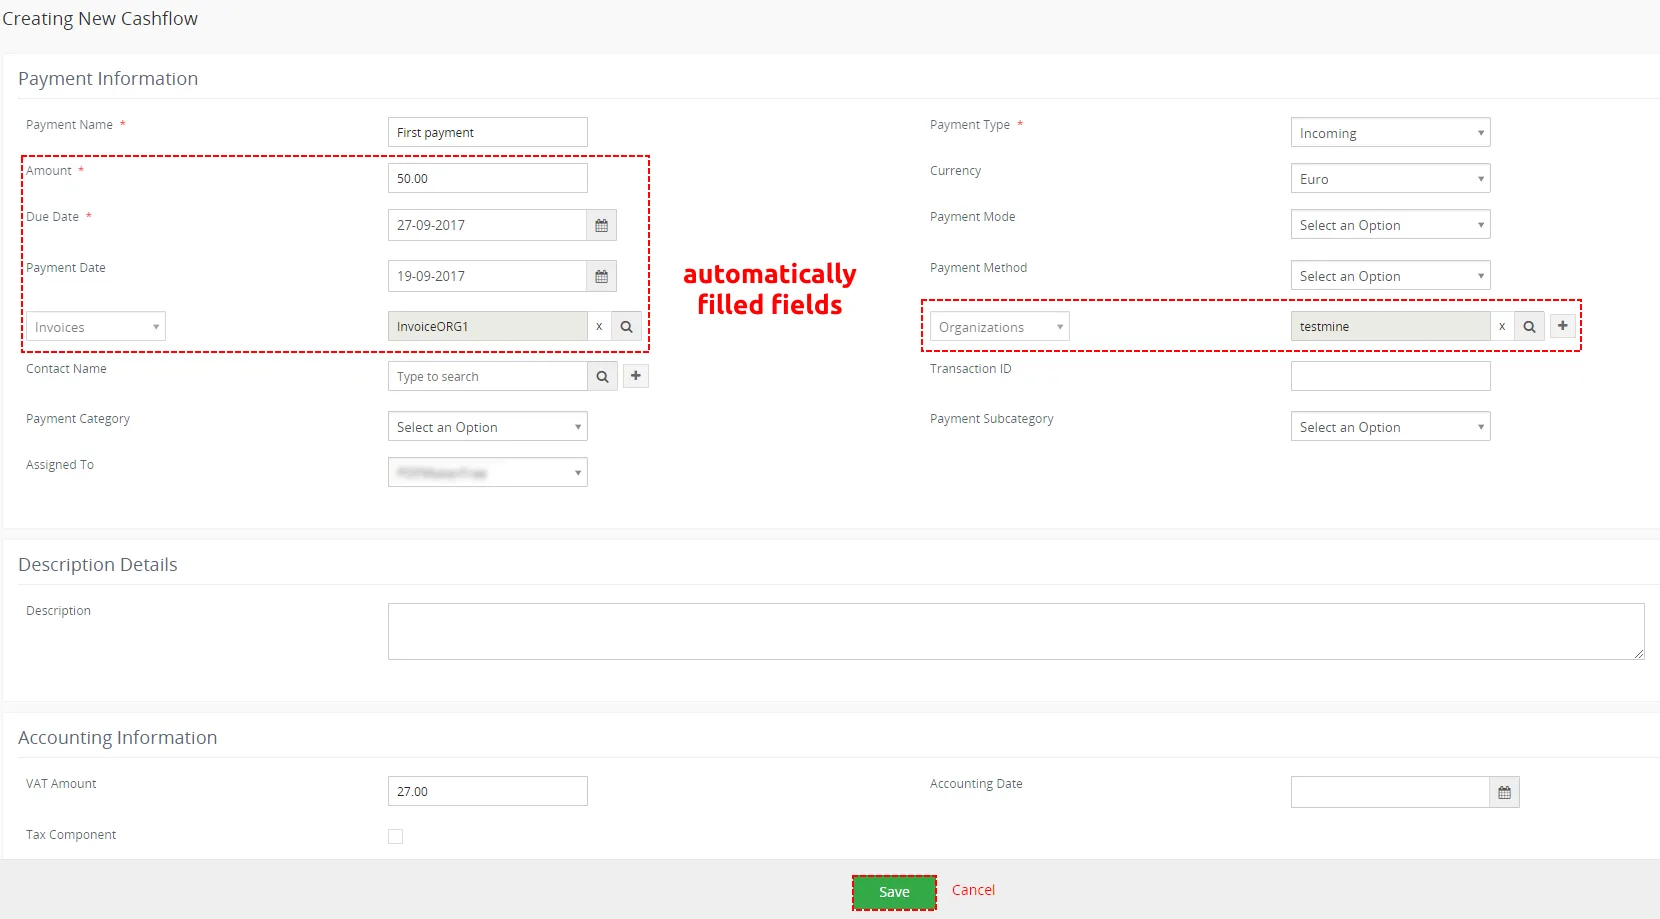
Creating Payment from DetailView of Invoice (SO, PO, PI, CN, OP)
Please refer also to chapter Payment block for more details regarding block Payments.
4.2 The creation of the one payment for more invoices
Especially for module invoices the Cashflow brings the possibility to assign one payment towards more invoices. This functionality is available only for Invoice module. This possibility is useful in case that one organization sent payment at ones for more invoices. Such payment can be created only from ListView of the module Invoice:
- Go to the ListView of the module Invoice and select two or more invoices. Click on More button and choose Create Payment.
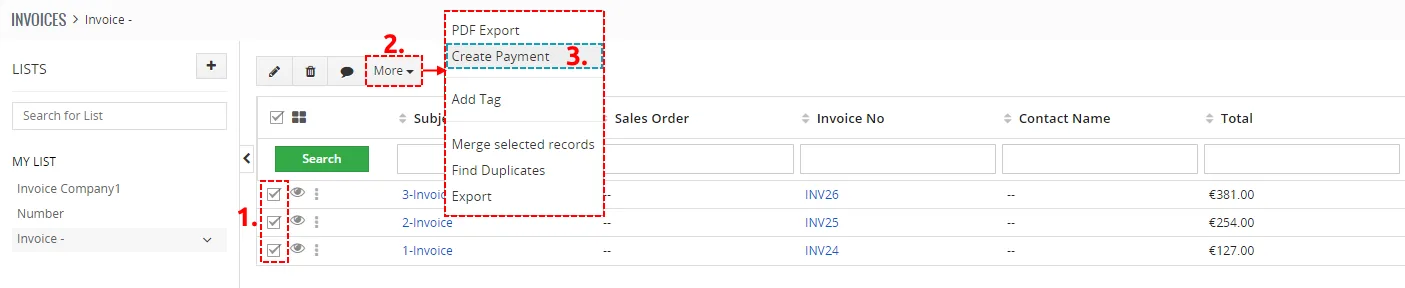
ListView of Invoice - The Create Payment window will appear on the screen. As you can see below the fields Payment Type and Amount are already available and based on fields from related Invoices. Save the payment using button
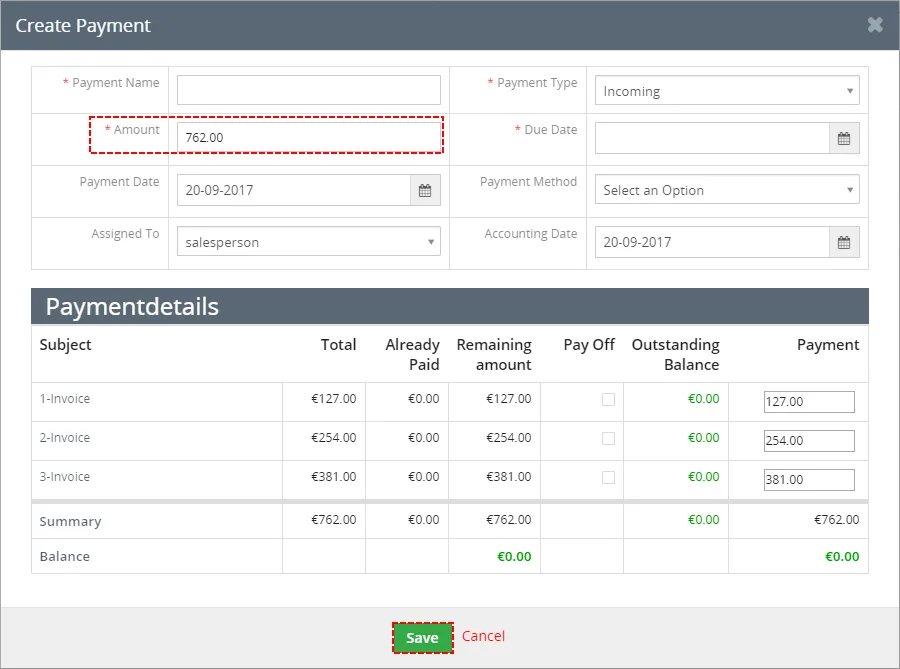
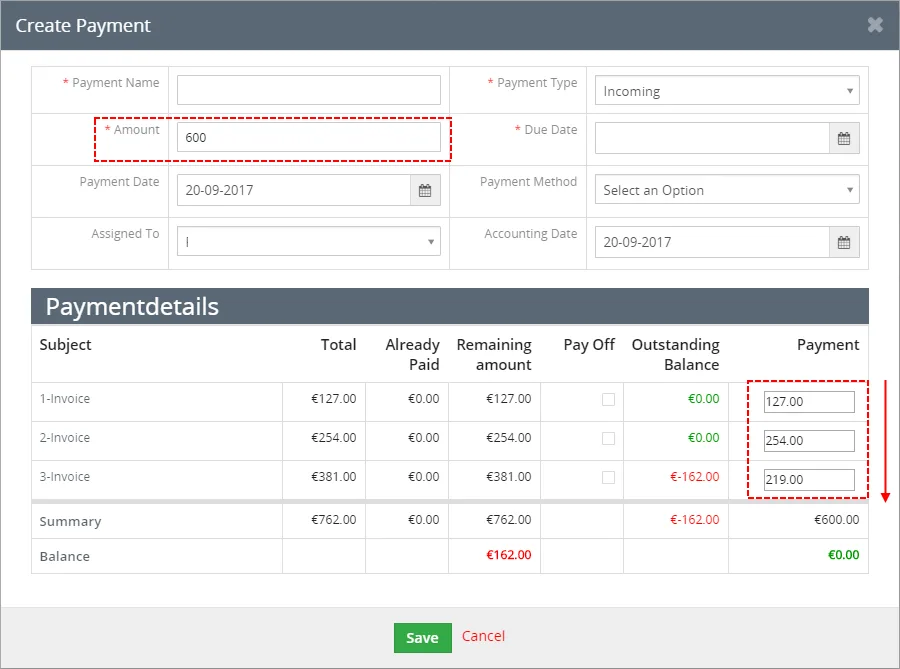
How to add one payment to more Invoices - New functionality you can use when Amount is less than Summary of Invoice’s Total. Standard behavior of Cashflow is that Cashflow try to use Amount to balance Invoice in Order.
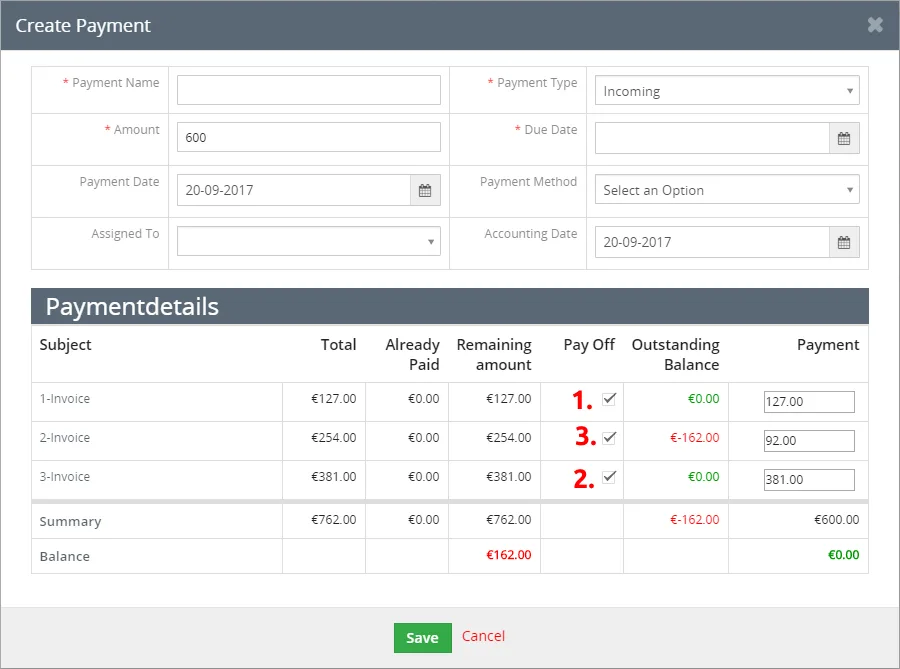
Split amount in order But now, you can prioritize Invoice by using check-box Pay Off.
How to change distribution of amount
- New functionality you can use when Amount is less than Summary of Invoice’s Total. Standard behavior of Cashflow is that Cashflow try to use Amount to balance Invoice in Order.
- In the More Information part of Payment you can find references to these Invoices.
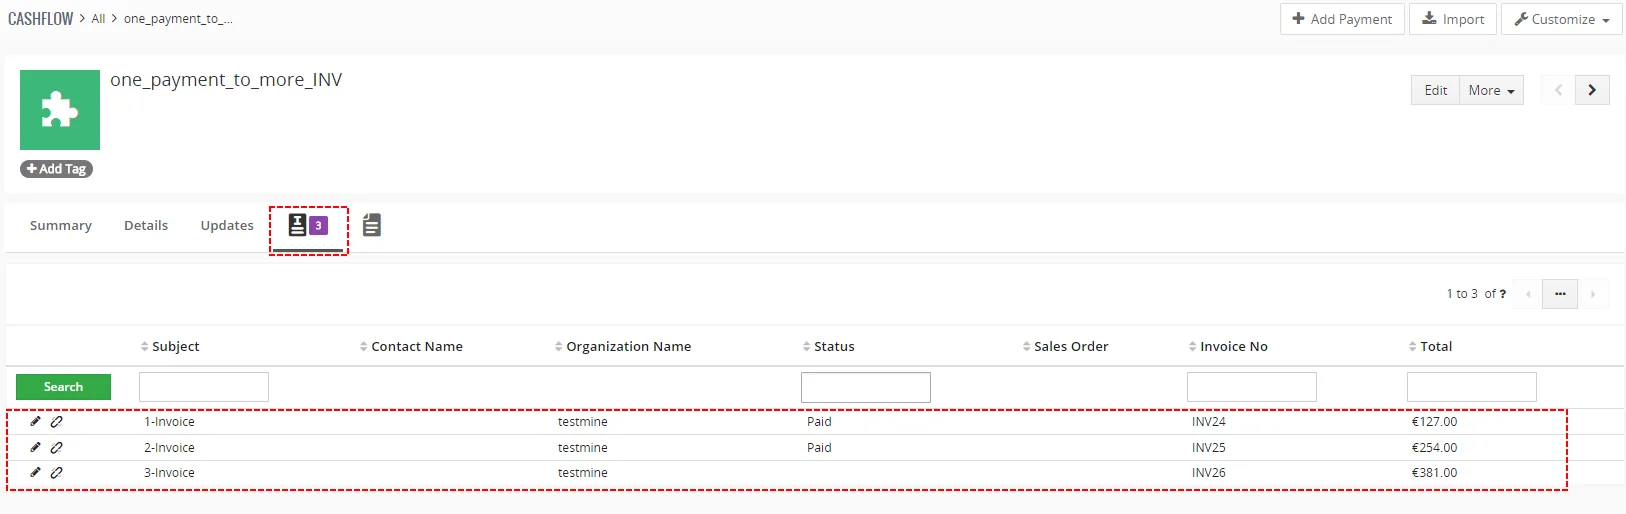
References to Invoices in DetailView of multi-payment
The Amount and all particular payments are editable in case you want to define them according to your needs. Currently there is restriction that Amount <= Sum of all payments i.e. final Balance has to be zero. Please note that Due Date is not prefilled because can be different for more Invoices. You have to define your own date in this case.
4.3 The basic creation of the payment from Cashflow ListView
This approach will be used by users mostly for payments which are not related to any invoice, sales order or purchase order, i.e. to “other” payments. In order to start creation of the template provide following steps:
- Go to the Cashflow ListView and click on button
 .

Cashflow ListView - The EditView will appear on the screen. Fill in at least all required fields. You can also define Payment Category and Payment Subcategory. Please note that you can define your own values for these fields. Save the payment.
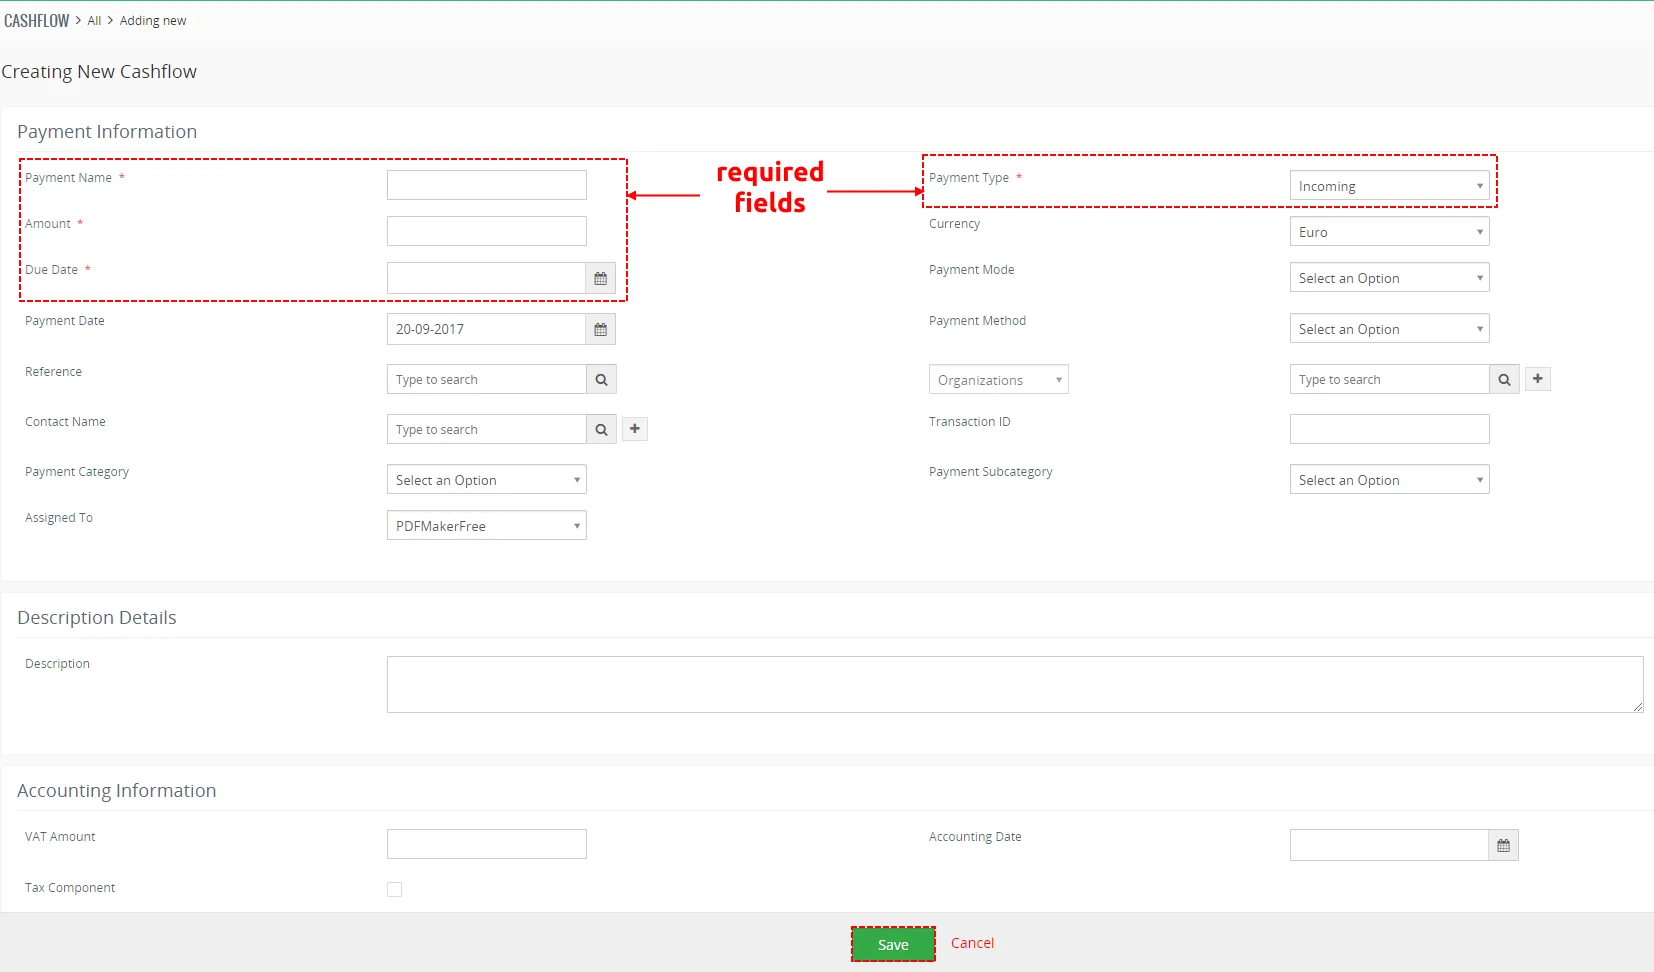
Basic creation of the payment
Need help with Cashflow?
Our support team answers questions about installation, templates and settings.