1.Introduction
 The ListView Colors is extension tool designed for Vtiger CRM. The ListView Colors allows in few simple steps change of default list view to colored list view. You can define colors of
rows in list view depending on conditions separately for each module. This gives you better view, faster orientation and more information using same data in list view as well as in related records. The ListView Colors benefits are:
2.How to install ListView Colors
There are currently two options how to install ListView Colors extension
- (Recommended) Using our Free extension Installer
(Please visit the Installer page for more info) - Manually installation using a .zip file
(You still need to have Installer in order to activate license)
![]() Note: For versions ITS4YouListViewColors_4_0 and higher, you will be needing to have installed our Installer in order to activate license keys.
Note: For versions ITS4YouListViewColors_4_0 and higher, you will be needing to have installed our Installer in order to activate license keys.
Since December 2019 we launched our extended version of Installer which helps you install modules and manage extensions.
2.1.Installation via Installer
Make sure you have Installer installed, you can download Installer via our E-shop when you log in under Free Downloads section.
Next, simply install Installer via Module Management in Vtiger CRM by importing the .zip file you downloaded.
After successful installation, you can access Installer in two ways:
- by a click on Notifications Icon
 and then on the button
  ,
, - or via Main Menu – Settings – CRM Settings – Extensions – ITS4YouInstaller.
![]() Note: To see modules and manage licenses you have to log in to our e-shop with @email and password via
Note: To see modules and manage licenses you have to log in to our e-shop with @email and password via ![]() button (top right screen side in Installer module).
button (top right screen side in Installer module).
How to validate license:
- Start with login via (1)
 button as mentioned above.
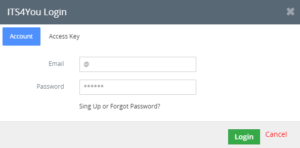
 - In next pop-up screen ITS4You Login, please insert your email + password you used for our e-shop.
- Next please click on the (2)
 button and enter your license key.

- Confirm with
 button.
When the license was activated you can see module available in the Modules tab below.
Simply hit the ![]() button and ListView Colors are installed now.
button and ListView Colors are installed now.
2.2.Manual Installation
Please provide following steps in order to install ListView Colors:
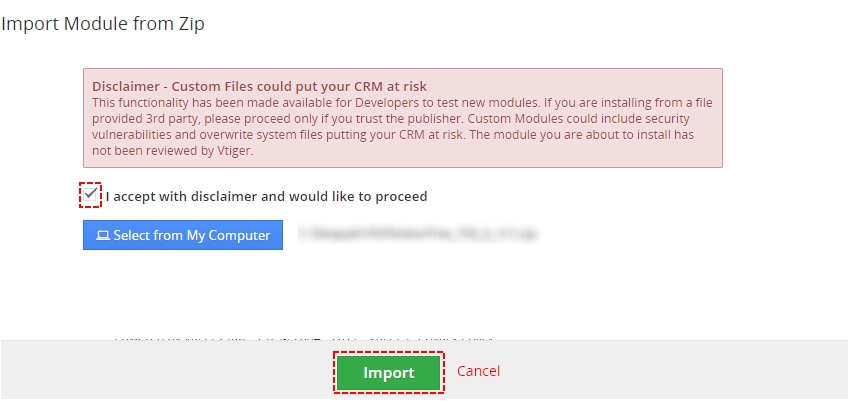
- Install the .zip (package) file of the ListView Colors 4 You module via Setting -> CRM Settings -> Module Management -> Modules. Click on the Import Module from Zip.
- Select the .zip (package) file that you downloaded from our shop. Please check that you accepted the disclaimer and would like to proceed. Click on the [Import] button.
Note: If you have after this step error message: Sorry! Attempt to access restricted file. Please check if folder test/vlib has correct write permission for browser (apache, www-data).
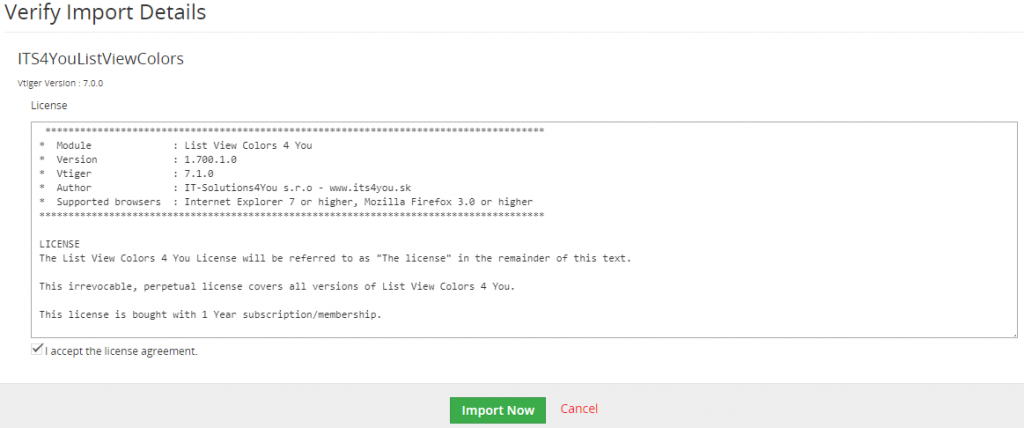
- Verify the import details parsed from the .zip (package) file. Please check that you accepted the license agreement and click [Import Now] to proceed or [Cancel] to cancel.
- ListView Colors 4 You was imported
![]() Note: In order to finish installation, you need activate license. For that please use our Installer
Note: In order to finish installation, you need activate license. For that please use our Installer
3.How to update ListView Colors
The upgrade of the module is initiated manually or via our Installer.
Updating via Installer:
- open the Installer in the CRM
- in the Modules tab find your installed module and you should see the
 button available
 - If the new version is available, you will be notified via Installer Notifications icon

Updating ListView Colors manually:
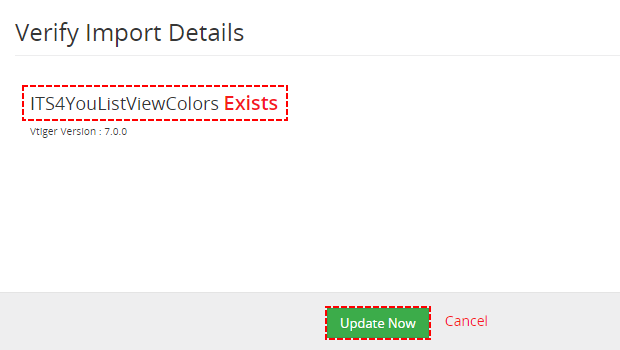
So please refer to above installation part for details how to initiate the import of the module from the file. As can be seen on following picture you will be notified that the ListView Colors module already exists. The upgrade will start immediately when you click on the  button.
After upgrade the notification about successful upgrade is shown.

Upgrade – ListView Colors 4 You Vtiger 7
4.How to use ListView Colors
In the following sections you can find how to create new color and then how to use it to colorize your Vtiger.
4.1.How to create color
To create new Color please provide following steps:
- Open ListView of ListView Colors 4 You and click on
 button
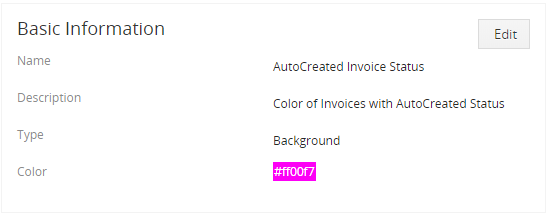
- Fill name, you can also fill description.
Then you need to select type of color. If you want to colorize background of records or text color.
And select color. You can insert hex code of color or select color from window. - Save it using
 button.
 - Now, your Color has been created. How to apply your Color you can find in next section
4.2.How to apply color
Now you need to create conditions when your Color will be used. Since Vtiger 7 we use Process Flow extension to create conditions to execute some actions like colorize your Vtiger.
Please provide following steps to create conditions:
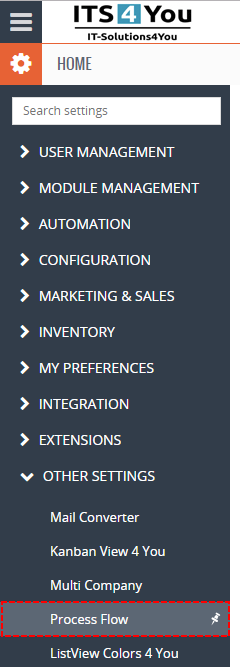
- Open Process Flow 4 You extension. Go to All → Settings → Other Settings → Process Flow
- In ListView of Process Flow click on
 button
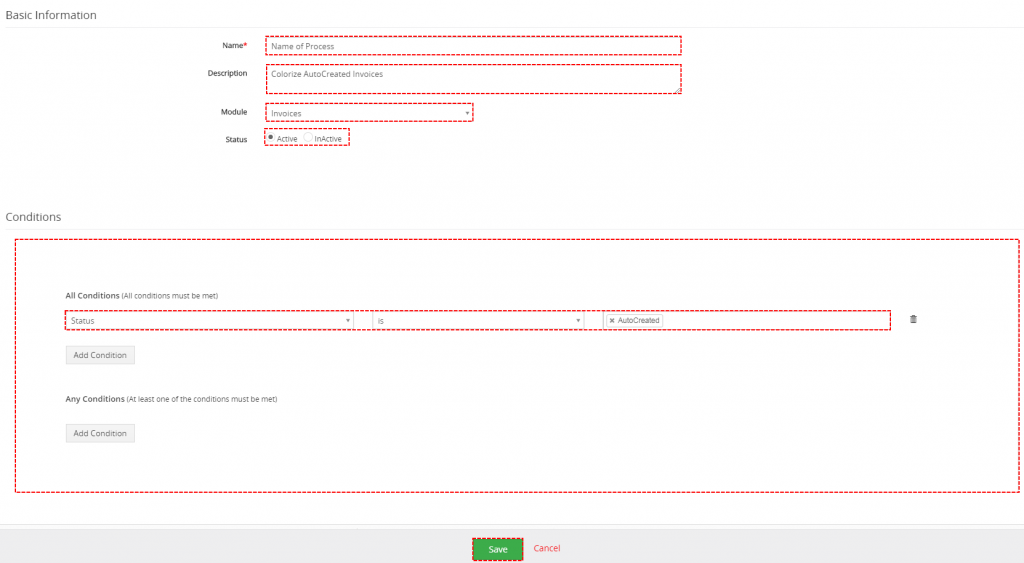
- Fill name, description, select module and choose status
- Now, you can create condition to use your created Color
- And Save it using
 button
- Your Process Flow has been created.
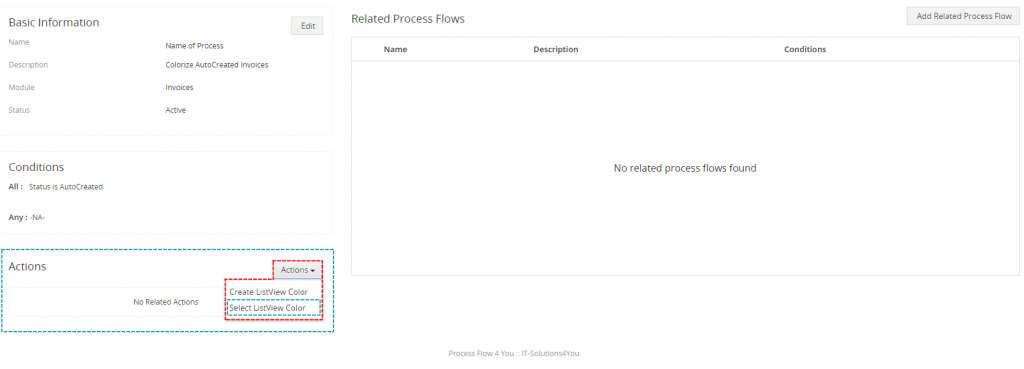
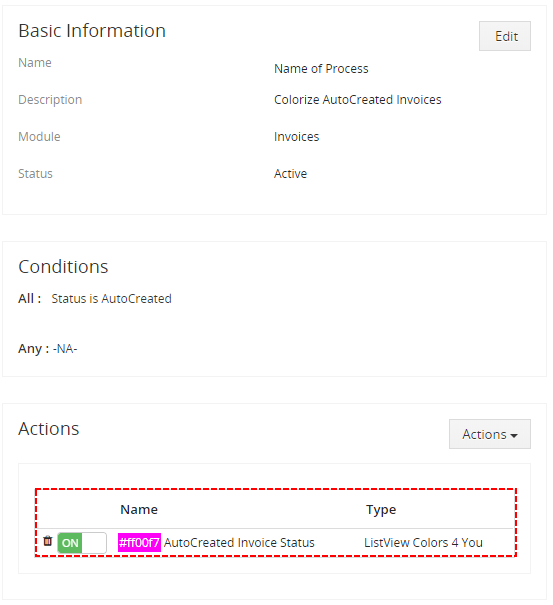
Now, you need to select your Color in Actions part.
Please click on button a choose Select ListView Color
- Select your Color
- Color has been added and used in your Vtiger based on your conditions
Since Vtiger 7 version, ListView Colors 4 You also colors records in Related List.
5.Work area
Work area of ListView Colors 4 You consists of:
- ListView – used for common tasks like add new, edit and delete Colors
- DetailView – shows already created Colors in details
- EditView – allows the preparation of the new Colors or editing existing Colors
5.1.ListView
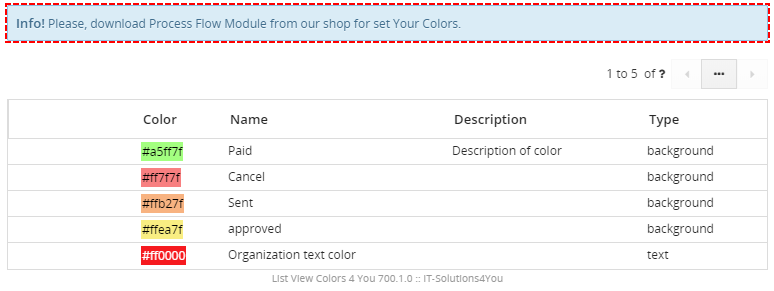
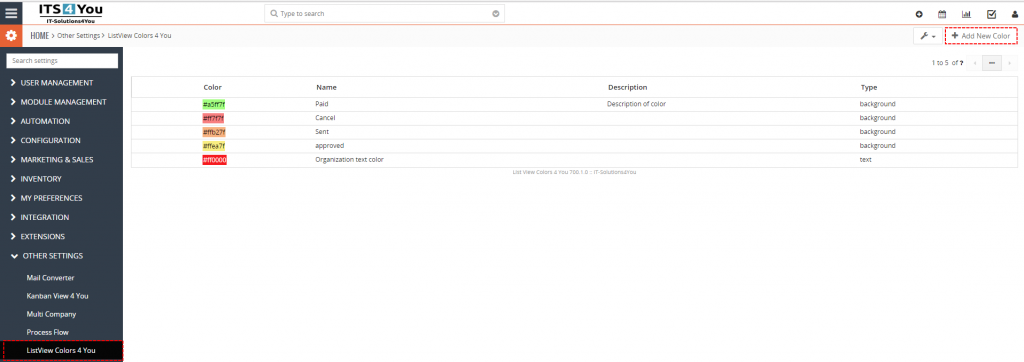
The common tasks like add/delete Colors or start editing have to be initiated via ListView Colors 4 You ListView. Go to All → Settings → Other Settings → ListView Colors 4 You and ListView Colors 4 You ListView will appear on your screen.
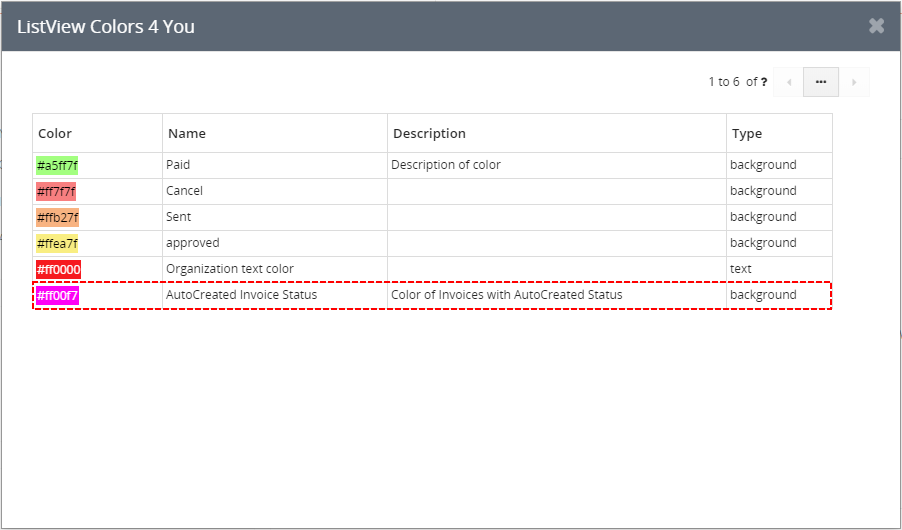
The main part of the ListView Colors 4 You ListView consists of list of the Colors, which gives you information about a Color name, a description, a type and a color.
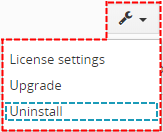
 – contains actions for License settings, Upgrade and Uninstall
 – is used to add new Color
 – navigation bar
- List of created Colors
 – Delete and Edit options
5.3.EditView
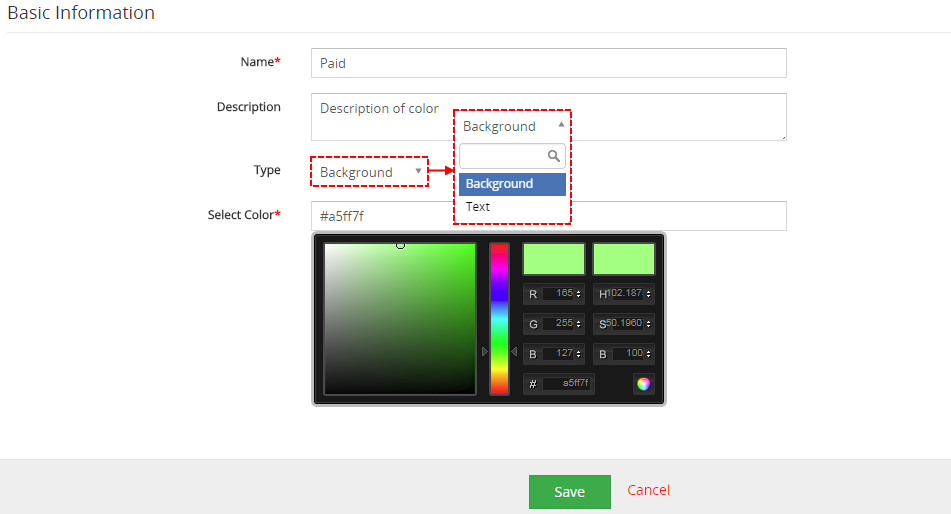
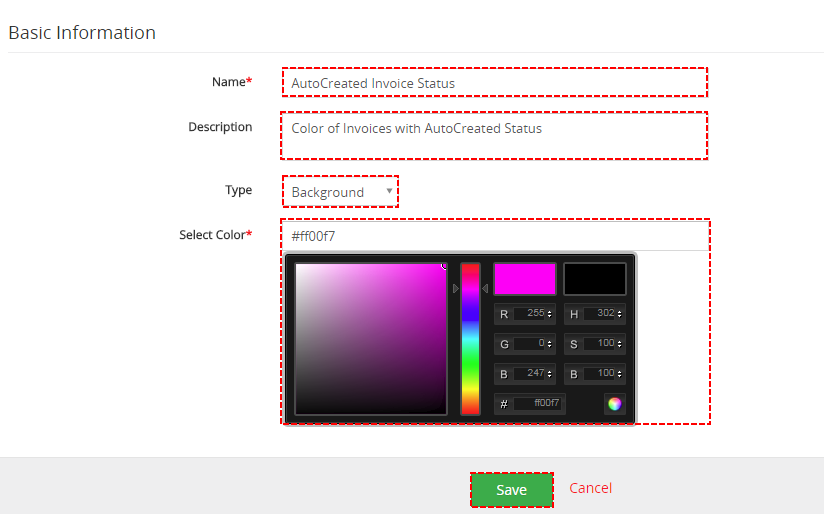
The EditView shown in the picture below allows the preparation of the new Color or editing existing Color.
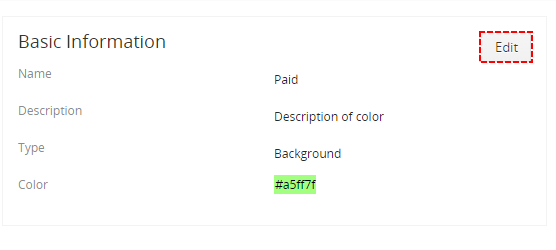
- Name – name of color
- Description – short description of your color
- Type – since Vtiger 7 there is also option to colorize text as well as background
- Select Color – you can insert hex code of color or select color manually
6.1.License Settings
Since December 2019/January 2020 all our modules will be using Installer to manage licenses. Please check our Installer pages for more information.
You can access the License settings like its shown below:
(there can be more options from the pick-list, depends on the module)
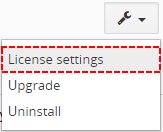
Settings – License settings
After accessing the License window you can see screen bellow with following information:
- Module name, Your Vtiger domain URL
- Description, if license is activate or not:
 – your license is currently active,
 – your license is not active and you need active it via Installer.
To activate or manage license, click on the ![]() button.
button.
6.1.1.Deactivate license
If you want to deactivate your license, please provide following steps:
- Go to your Installer, by a click on Notifications Icon
 and then on the button
  ,
,
or via Main Menu – Settings – CRM Settings – Extensions – ITS4YouInstaller - The following screen will appear (see below):
You can deactivate license by click on the button

![]() Note: The module will be deactivated but not uninstalled and license will be removed from the Activated Licenses tab.
Note: The module will be deactivated but not uninstalled and license will be removed from the Activated Licenses tab.
6.1.2.Reactivate license
To reactivate a license after deactivation, you need to follow the same process as you activated it first time:
- Click on the
 button and enter your license key.

- Confirm with
 button.
When the license was activated you can see module available in the Modules tab below.
![]() Note: To see modules and manage licenses you have to log in to our e-shop with @email and password via
Note: To see modules and manage licenses you have to log in to our e-shop with @email and password via ![]() button (top right screen side in Installer module).
button (top right screen side in Installer module).
6.2.How to update ListView Colors
The upgrade of the ListView Colors is initiated manually or via our Installer.
Updating via Installer:
- open the Installer in the CRM
- in the Modules tab find ListView colors and you should see the
 button available
 - If the new version is available, you will be notified via Installer Notifications icon

Updating ListView Colors manually:
So please refer to above installation part for details how to initiate the import of the module from the file. As can be seen on following picture you will be notified that the ListView Colors module already exists. The upgrade will start immediately when you click on the  button.
After upgrade the notification about successful upgrade is shown.
6.3.Uninstall
If you need to remove the module from your Vtiger you have two options:
- Uninstall via Installer.
- Manually via going to module Settings and choose Uninstall option.
6.3.1.Uninstall via Installer
You have also option to remove the module via Installer window by accessing the Settings – Uninstall window:
- Go to your Installer, by a click on Notifications Icon
 and then on the button
  ,
,
or via Main Menu – Settings – CRM Settings – Extensions – ITS4YouInstaller - Find the module you need to uninstall in the Modules tab
- Via
 pick list button choose the Uninstall option, you will be redirected to the Uninstall window.
 - Click on
 button

Installer – Uninstall module screen 1
- Confirm uninstall with
 button

Installer – Uninstall module screen 2
Now, the module has been removed from your Vtiger and your license has been deactivated. To use this module again, you need to provide installation and validation steps (see Installation chapter).
6.3.2.Manual Uninstall
There is also available option to remove ListView Colors 4 You from your Vtiger. To uninstall please provide following steps:
- Go to the ListView of ListView Colors and in Settings part choose Uninstall option
- Click on
 button
- Confirm uninstall with
 button
Now, ListView Colors 4 You has been removed from your Vtiger and your license has been deactivated. To use ListView Colors 4 You again, you need to provide installation and validation steps (see chapter 2. How to install ListView Colors 4 You).
7.Tips & tricks
7.1.Info message
Do you see this message in ListView Colors?
You need to download Process Flow from our e-shop. It is FREE extension which manages conditions and Process Flow is required for ListView Colors. You can read more how to use Process Flow.
8.Change log
- Check latest versions available and fixes applied
- What was changed/added to manual
8.1.ListView Colors
- 3 September 2021 – List view Colors 4.2
— 2020 —
- 26 August 2020 – List view Colors 4.1
- fixed issue when selecting List view Colors in Process Flow for condition “if false”, selected List view Colors was assigned to “if true” condition instead of false
- January 2020 – List view Colors 4.0
- PHP 7.2 & 7.3 compatibility (fixed issue where you were unable to choose List view colors in Process Flow conditions action window)
- Activation of license via Installer
— 2018 —
- December 2018 – ListView Colors 700.4.0
- fixed issue with licensing and communication with our validation server
- November 2018 – ListView Colors 700.3.0
- change in licensing from nusoap to rest api
- September 2018 – ListView Colors 700.1.1
- fixed issue with license activation
- July 2018 – ListView Colors 700.1.0
- compatibility with Vtiger 7
- coloration of Related Records available
8.2.Manual of ListView Colors
- January 2020: manual based on ITS4YouListViewColors_4_0
- updated chapters with Installing and Updating module via Installer
- July 2018: manual based on ListView Colors4 You 700.1.0
- first initiate for Vtiger 7.x







 – switch to EditView and start editing