
Before you start using Google Calendar Sync for your vtiger CRM Open Source, you need to create a Project in Google get the API credentials for correct authenticate you and your Vtiger.
Also in the project settings you will be needed to validate your CRM URL, this will be explained further in the next chapters.
3.1 How to create Project in Google and receive credentials
The process of Creating the Project in Google comprises three steps, which we will elaborate on in greater detail in the upcoming three chapters.
Please follow the order of chapters:
- A) Create Project
- B) Verify Domain
- C) Create OAuth client ID
3.1.1 A) Creating Project
The first important step is creating a Project in the Google APIs.
Please follow instructions below:
A) Creating Project:
- Please visit a page:
https://console.developers.google.com/project
Next log in with your Google Apps or Google (Gmail) account and click on the button .

Create Project – Google Calendar Vtiger 7 Sync - A pop-up window will appear, check the Terms of Services and fill project name and click on
 button.
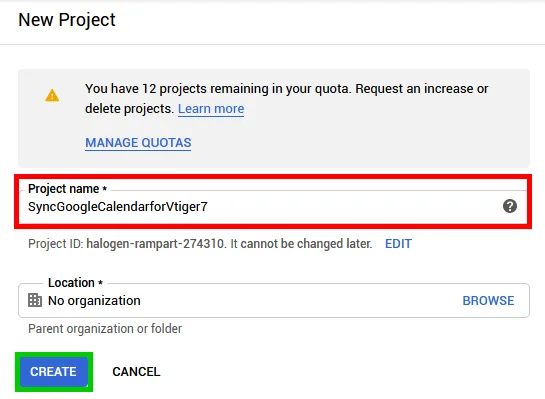
Fill Google Project Name – Google Calendar Vtiger 7 Sync - Your project has been created.
It may take a few seconds until your project will be shown: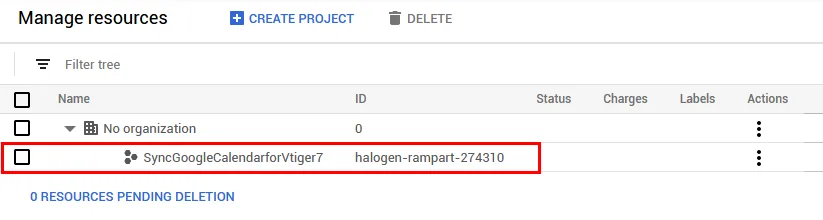
Select Google Project – Google Calendar Vtiger 7 Sync - Next, open Dashboard of Google API:
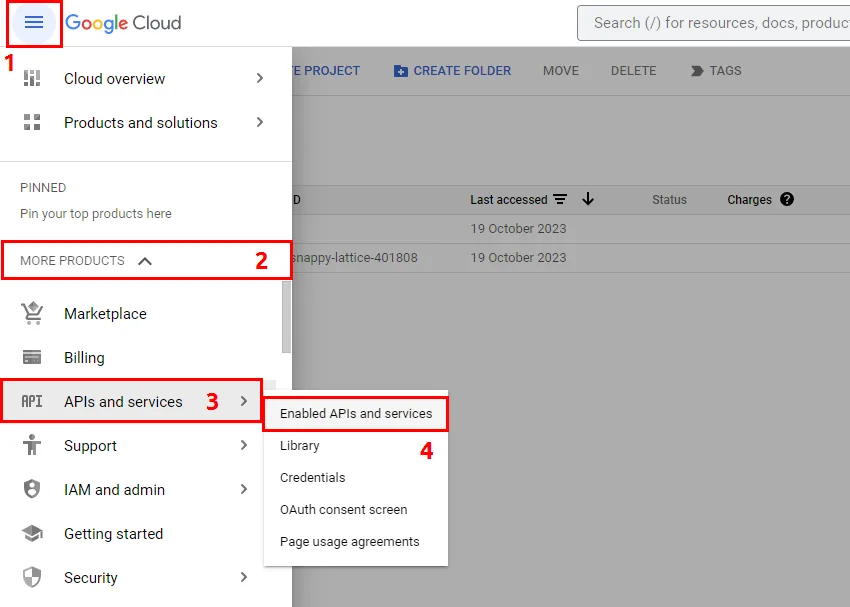
Open Dashbard of Google Project – Google Calendar Vtiger 7 Sync - Enable Calendar API by clicking on
 button:
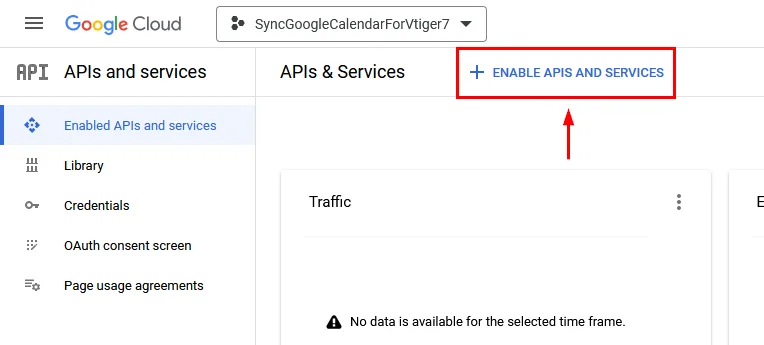
Enable APIS – Google Calendar Vtiger 7 Sync - Select or find Google Calendar API:
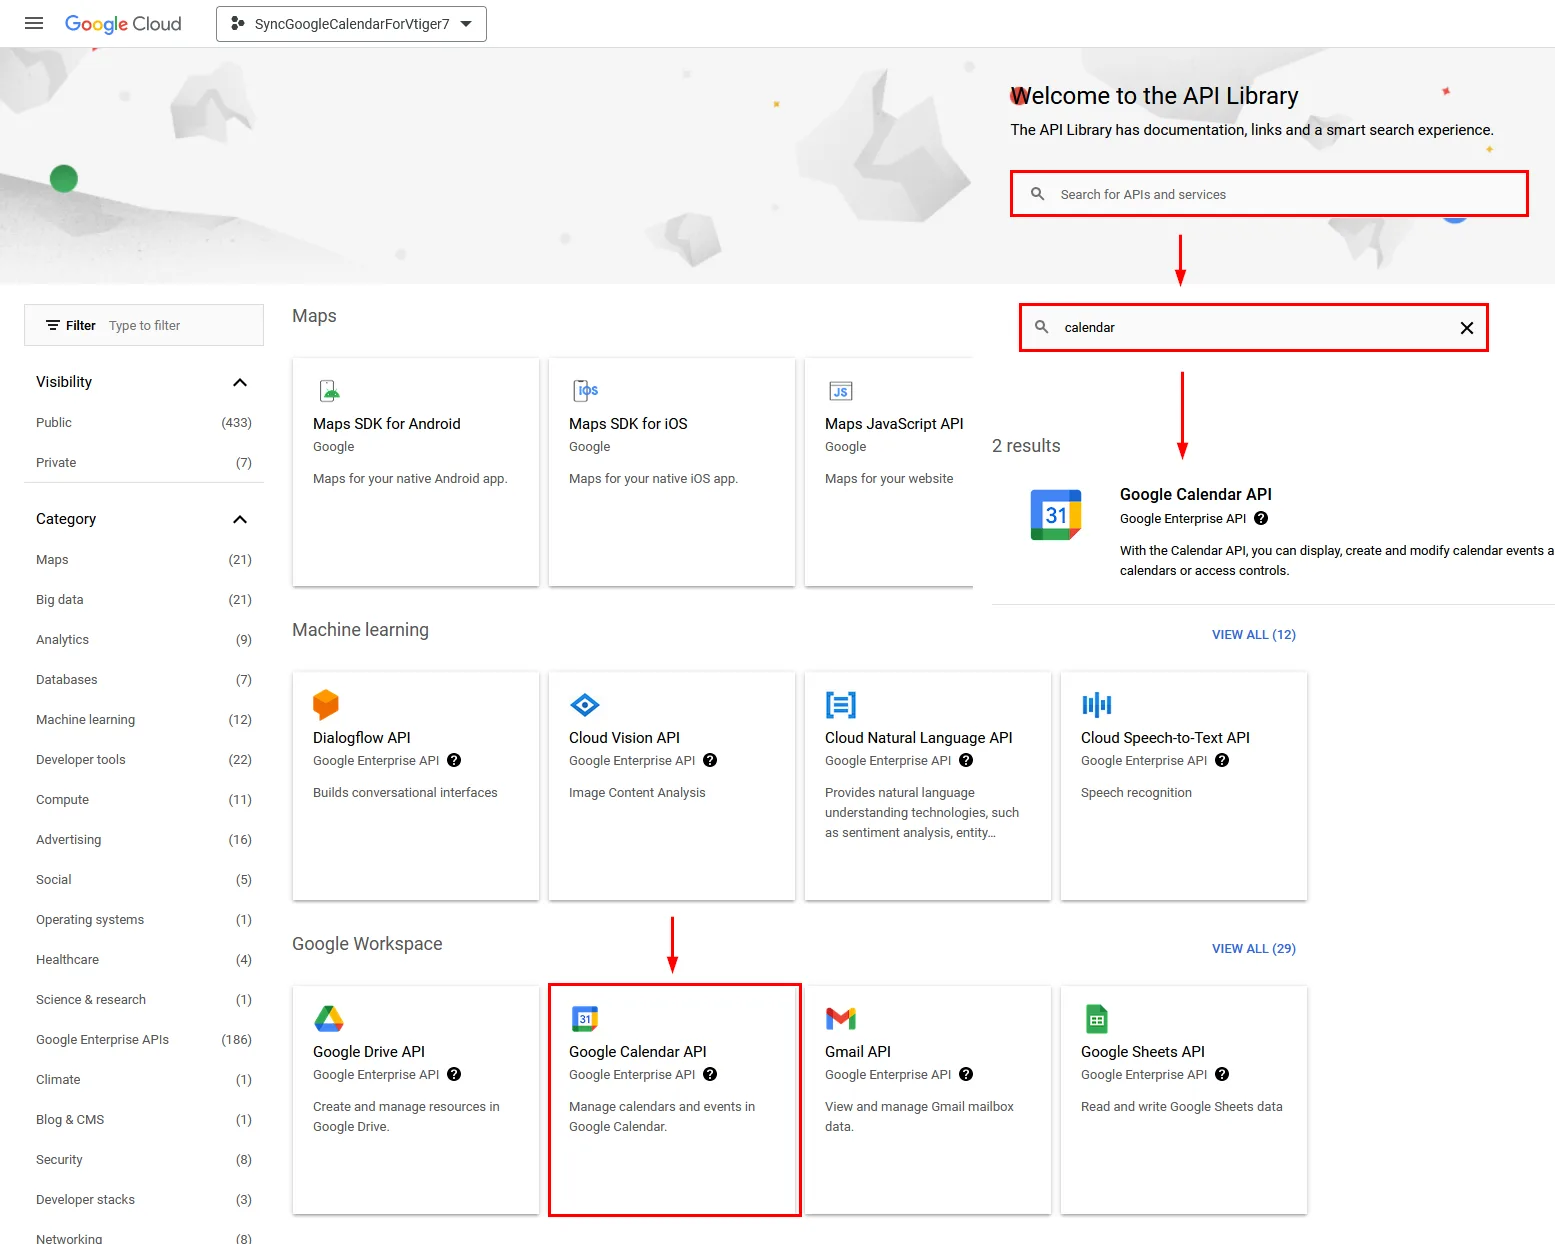
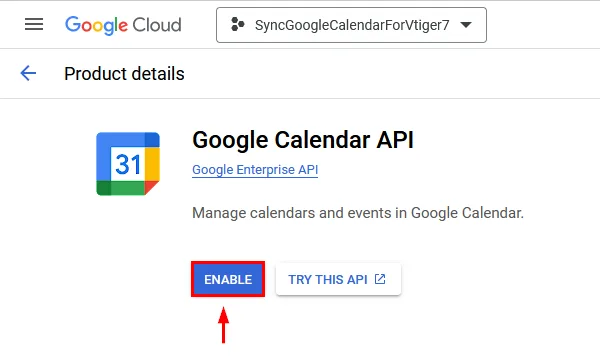
Find Api Google Project – Google Calendar Vtiger 7 Sync - Enable Calendar API:
Enable API Google Project – Google Calendar Vtiger 7 Sync - API has been created:
(Below view will be shown after creation, if you lost this detail view, just find the Google Calendar API in the list of APIs when you click on Enable APIs and services.)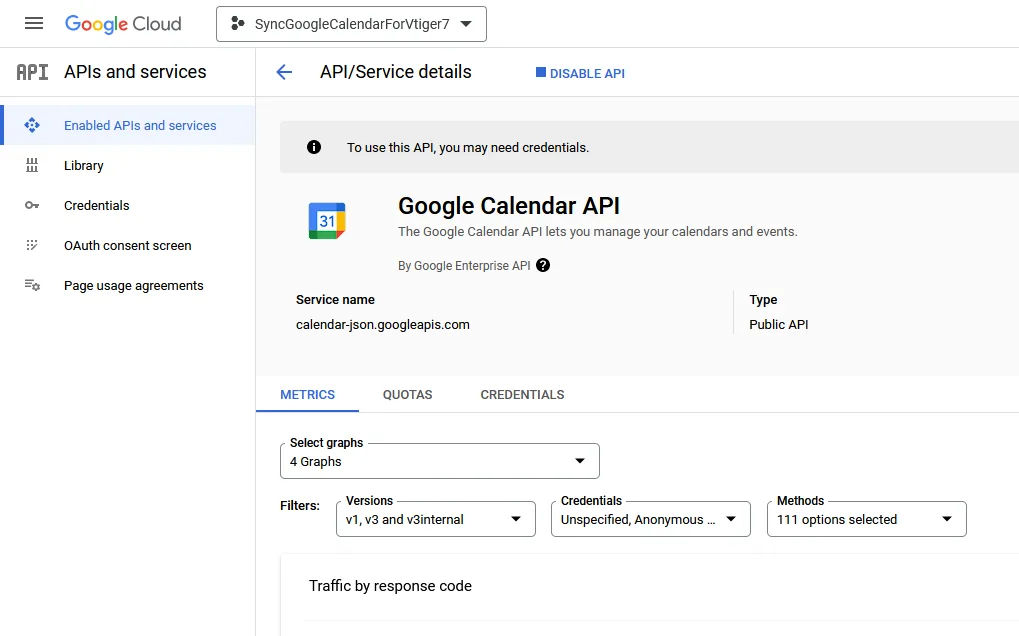
API Google Project – Google Calendar Vtiger 7 Sync - Now you need to set OAuth Credentials:
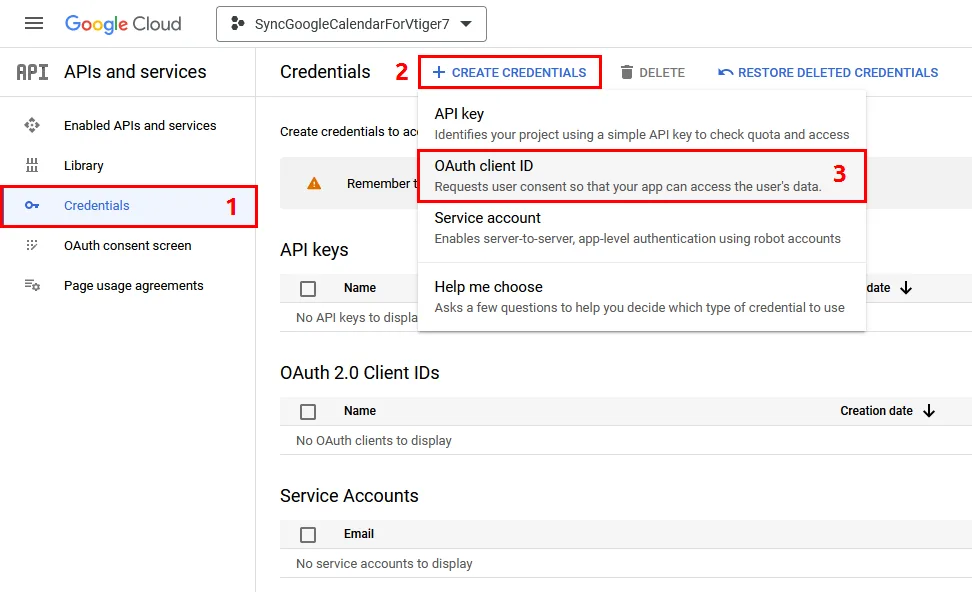
OAuth Credentials Google Project – Google Calendar Vtiger 7 Sync - You need to Configure consent screen first:
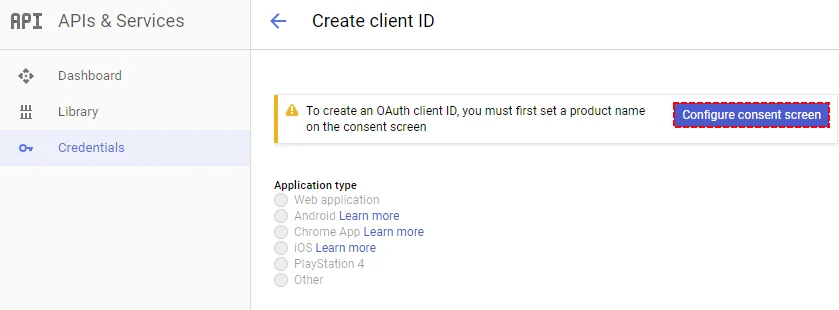
Configure consent screen Google Project – Google Calendar Vtiger 7 Sync - Select User Type:
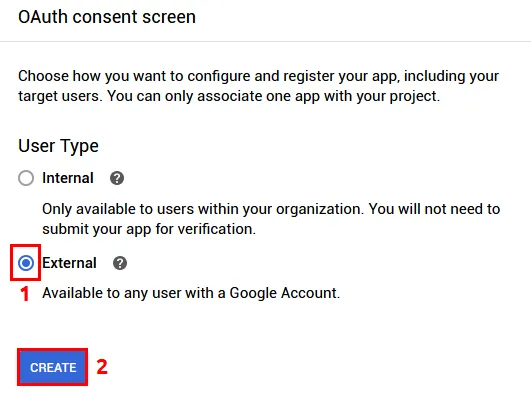
Selecting User Type – Google Calendar Vtiger 7 Sync - Next, fill up the name, support email and developer contact at the bottom, then scroll down and Save:
(In some cases, when filling the name field, word Google can’t be used, if you encounter error upon Saving remove the Google word and use just Calendar Sync 7)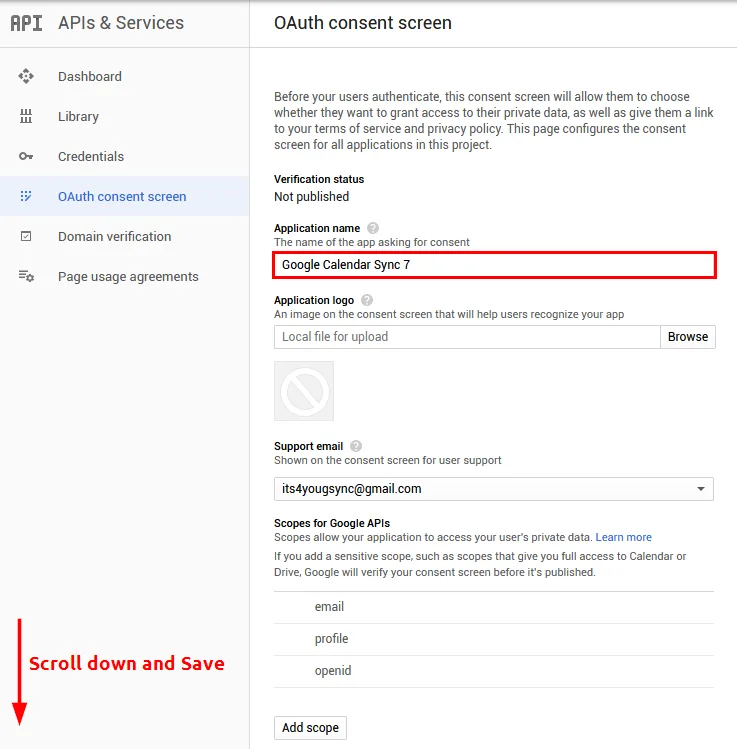
Set name of OAuth Google Project – Google Calendar Vtiger 7 Sync - Last step is to Publish the App, so click on the button and confirm.
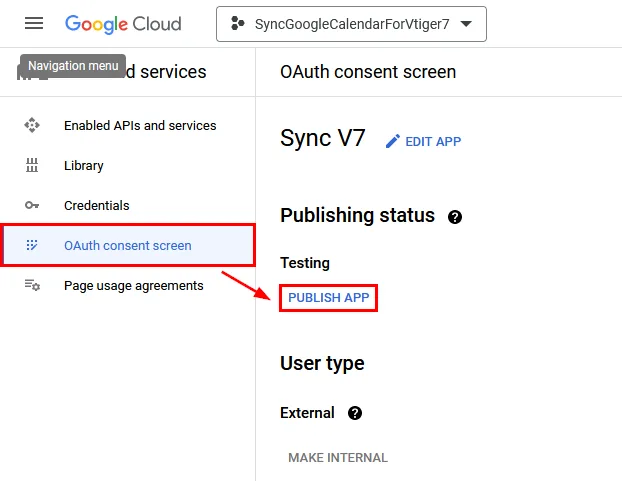
Publish App – Google Calendar Vtiger 7 Sync
3.1.2 B) Verify Domain
Before we proceed to the Creating OAuth Client ID for Google Sync, you need to verify your domain.
Please follow instructions below:
B) Domain verification before creating OAuth Client ID:
Please follow next steps:
- Click on OAuth consent screen and on Edit App button for your already created OAuth.
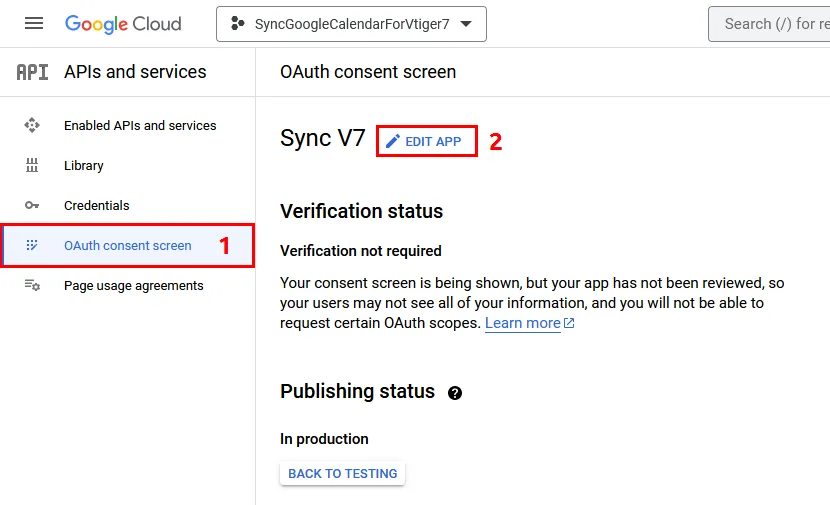
Domain verification – Google Calendar Vtiger 7 Sync - Scroll a bit down and look for Authorised domains then click on Google Search Console:
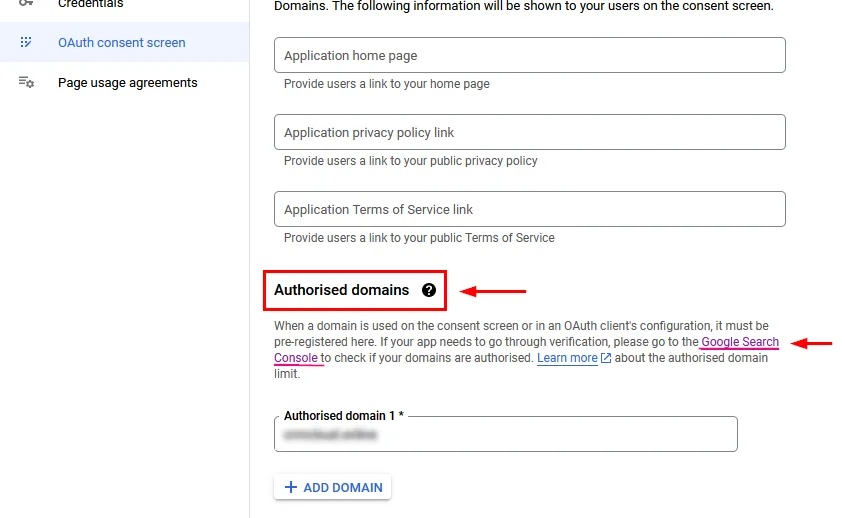
Domain verification – Google Calendar Vtiger 7 Sync - The next screen will appear, please click on

- You will be taken to the Google Search Console, click on drop down menu and then on +Add property:
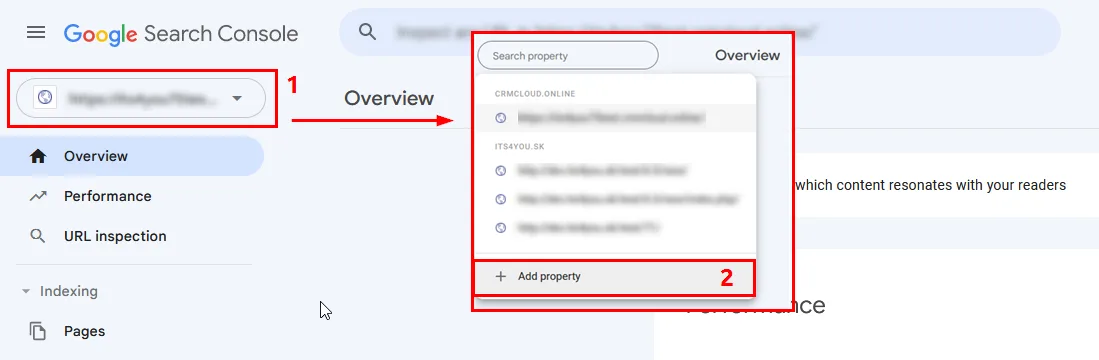
Domain verification – Google Calendar Vtiger 7 Sync - Google Search Console window, will appear. Same as on the Image below, insert your CRM url and confirm with Continue button.
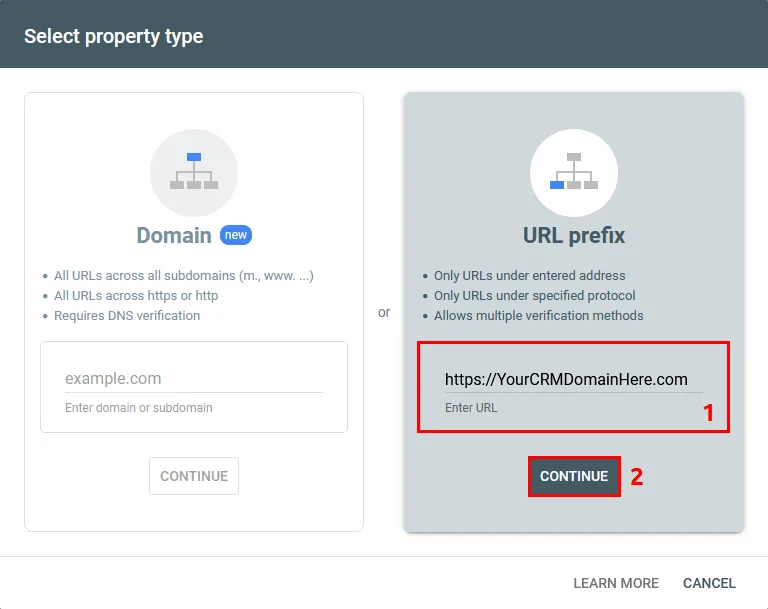
Domain verification – Google Calendar Vtiger 7 Sync - Next, you will be asked to download .html file and copy it to the folder where your CRM is installed and then click on Verify.
Your domain now has been verified.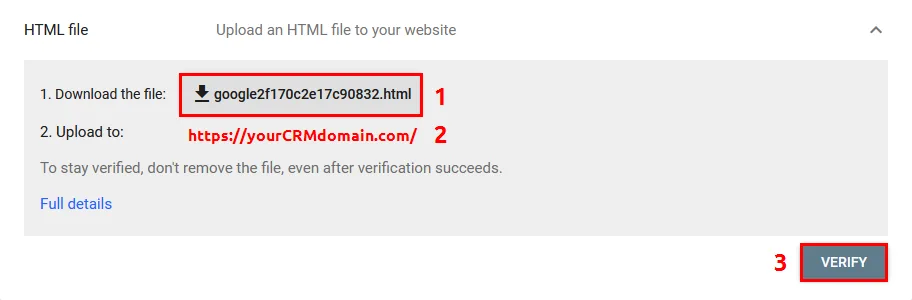
Domain verification – Google Calendar Vtiger 7 Sync - Now again go back to your OAuth and same as before look for Authorised domains and click on +Add Domain and enter your CRM domain .
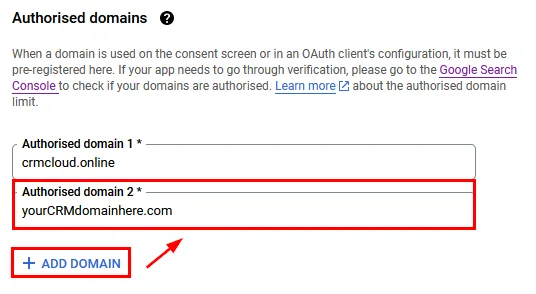
Domain verification – Google Calendar Vtiger 7 Sync - When domain is entered, confirm via
 button.
3.1.3 C) Create OAuth client ID
In the last part here you will create and IDs required for Google Calendar Sync, these IDs will be used mainly in the Vtiger CRM Google Sync Extension.
Please follow instructions below:
C) Creating OAuth Cliend ID
- Now we need to create OAuth client ID, go to Credentials and click on
 then on OAuth client ID
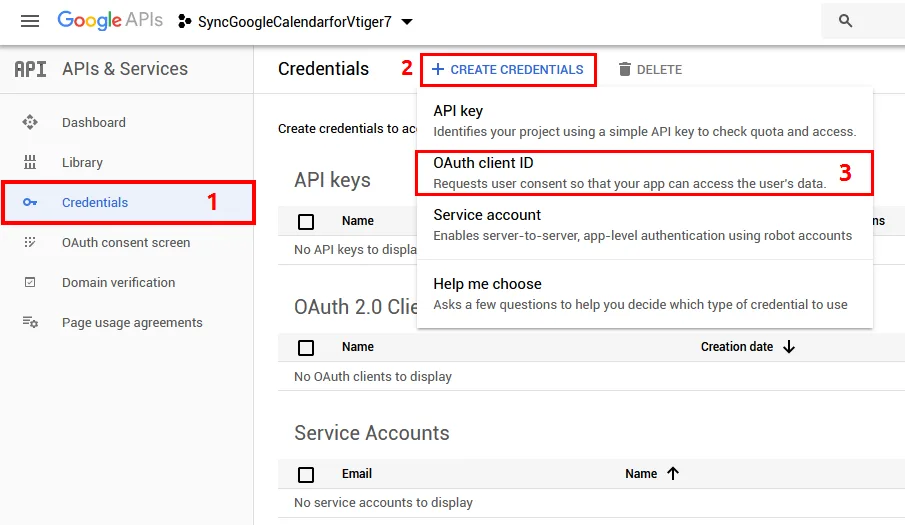
Creating OAuth client ID – Google Calendar Vtiger 7 Sync - Choose “Web application”, fill name and into Authorized redirect URlsadd your Vtiger site url + following link and press Enter
[yourvtigercrmurl]/index.php?module=Calendar&view=Extension&extensionModule=ITS4YouGoogleCalendarSync&extensionView=Extension&authorize=true&service=GoogleITS4YouGoogleCalendarSyncand click on the
 button.
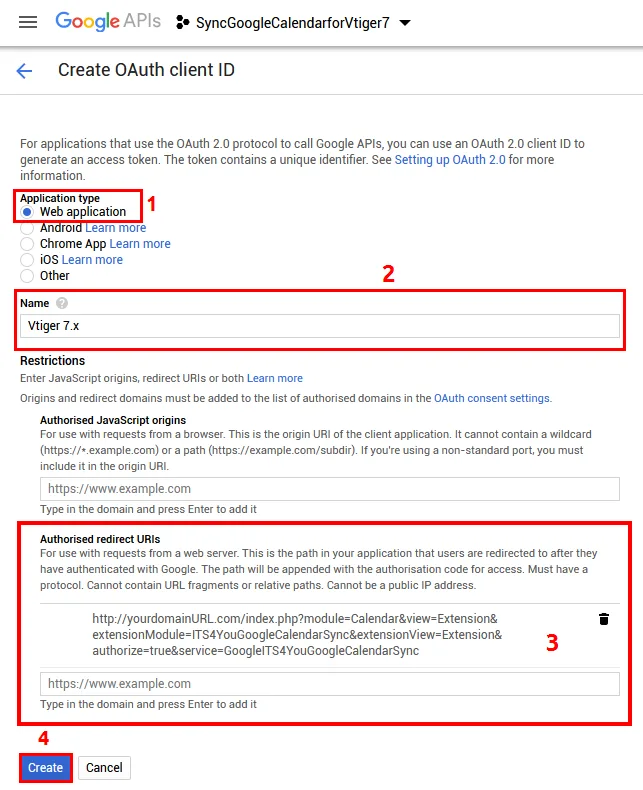
Create ID of Google Project – Google Calendar Vtiger 7 Sync - Finally, you get your Client ID and Client Secret IDs:
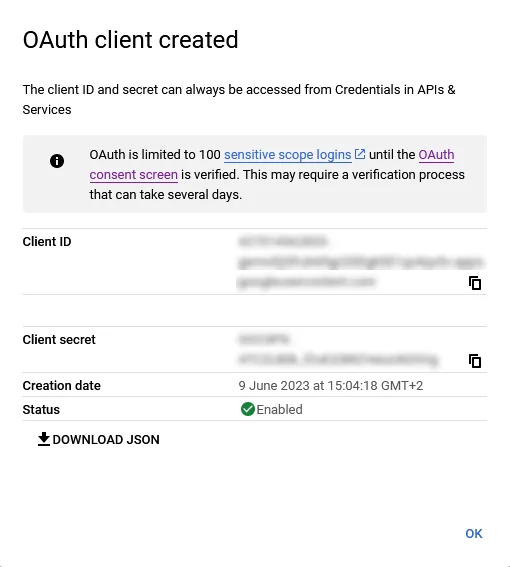
ID of Google Project – Google Calendar Vtiger 7 Sync
3.2 First configuration
Now, you need to set Synchronization in your Vtiger CRM.
There are two options:
- Like Admin set one Default ID of the Project for all users (we recommend this way).
- Each user can set the owner ID of the Project, but it means that each user must create own Project in the Google like is written above in the chapters.
How to set default Project ID for all users
- Open ITS4You Google Cal Sync in Integration settings and click on
 button.
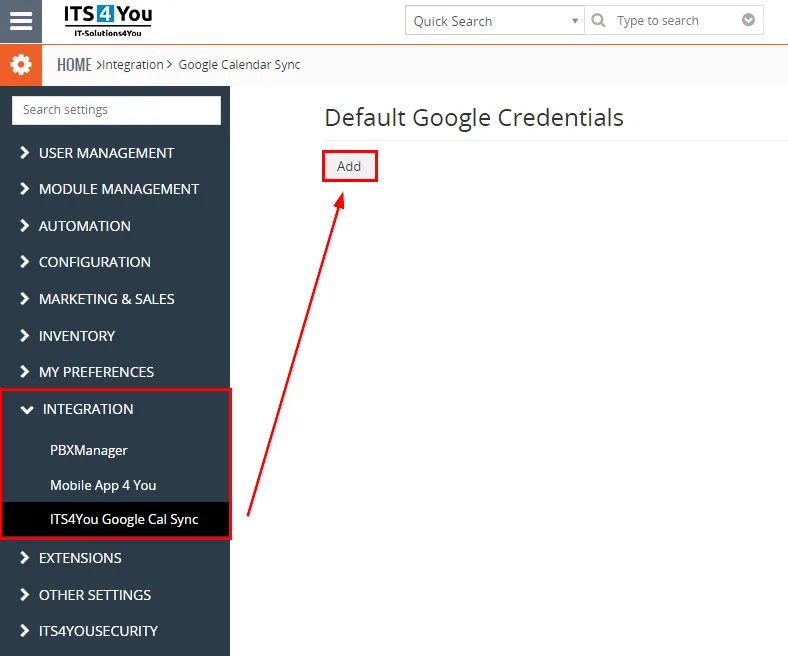
Default ID of Google Project – Google Calendar Vtiger 7 Sync - Now, fill your Credentials from Google Project and click on
 button.
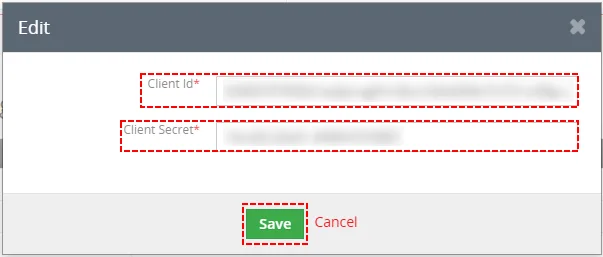
Save default ID of Google Project – Google Calendar Vtiger 7 Sync - You Credentials have been saved. If you need, you can Edit or Remove it from this tab.

Saved default ID of Google Project – Google Calendar Vtiger 7 Sync
How to set ID for each user individually
- Login like user that you want to add Google Project ID
- Open please your Calendar module select List view and choose ITS4YouGoogleCalendarSync.
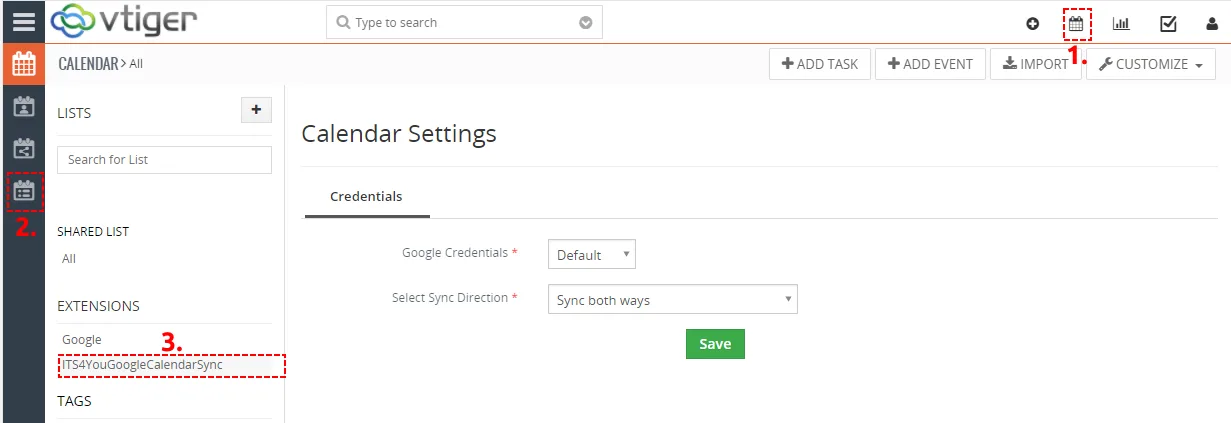
Add own ID of Google Project – Google Calendar Vtiger 7 Sync - Select “Own” Google Credentials, fill own Credentials, choose Sync Direction and click on Save
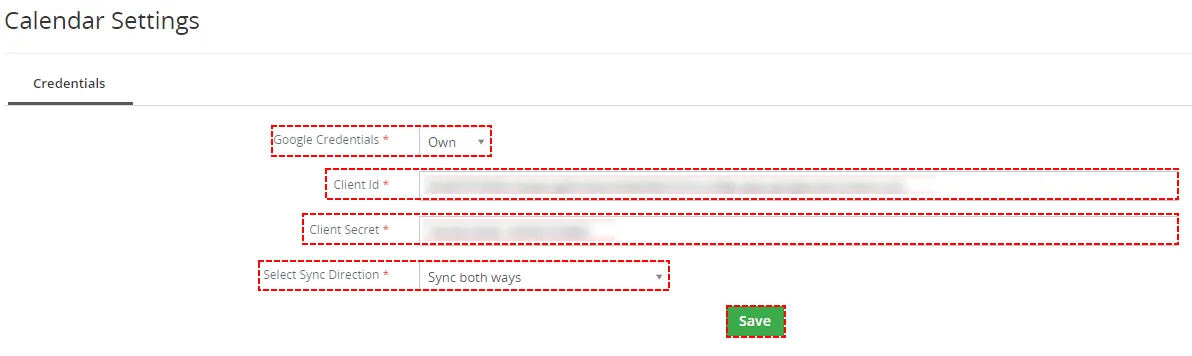
Save own ID of Google Project – Google Calendar Vtiger 7 Sync - Credentials have been successfully saved

Saved Own ID of Google Project – Google Calendar Vtiger 7 Sync
Now, you need to connect your Google account to Vtiger
- Open please your Calendar module select ListView and choose ITS4YouGoogleCalendarSync.
If you want to use Default Google Credentials set by Admin use “Default Google Credentials” option in other case use “Own”(written above). Select Direction of Synchronization and Save it.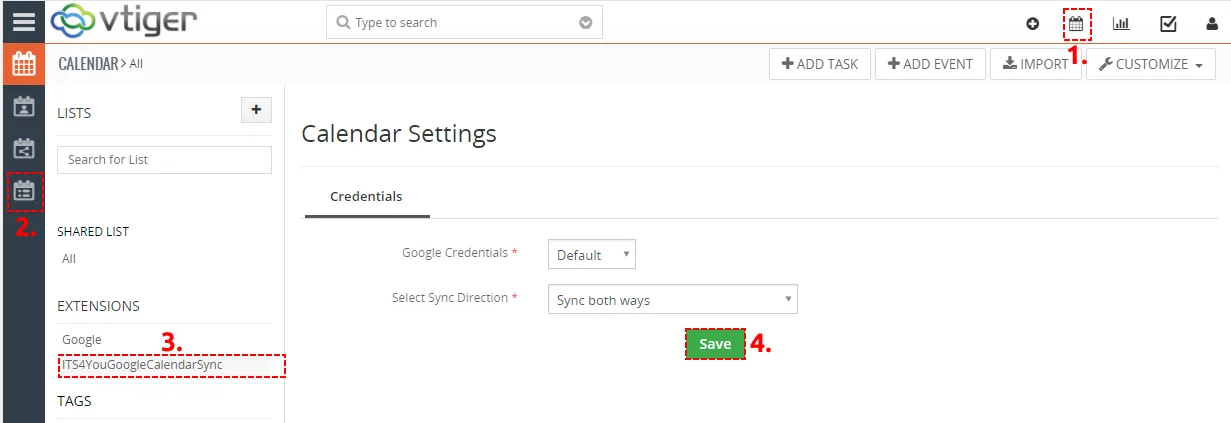
How to connect to Google Account – Google Calendar Vtiger 7 Sync - Now please click on
 button.
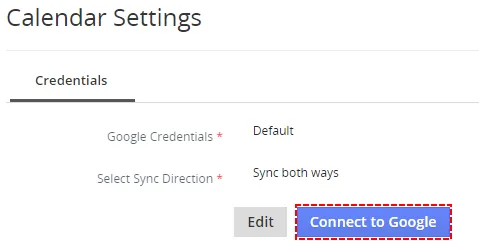
How to connect to Google Account – Google Calendar Vtiger 7 Sync - Sign in to your Google account
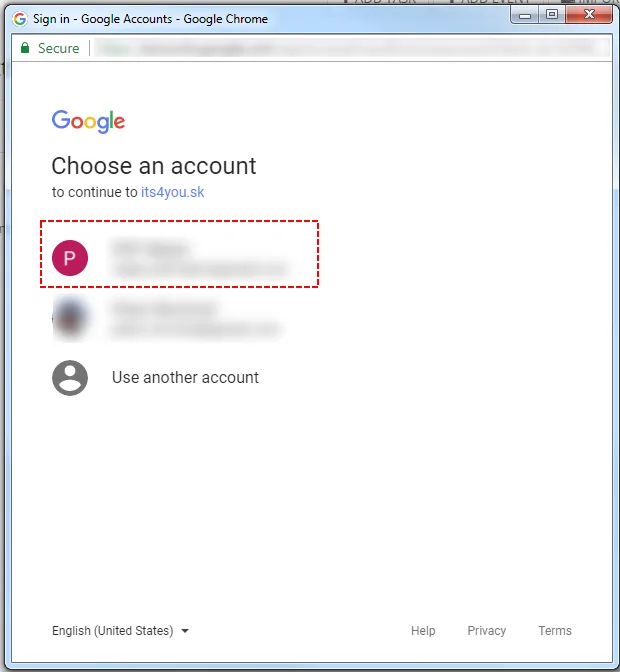
Choose Google Account – Google Calendar Vtiger 7 Sync - Allow Vtiger to manage your Calendar
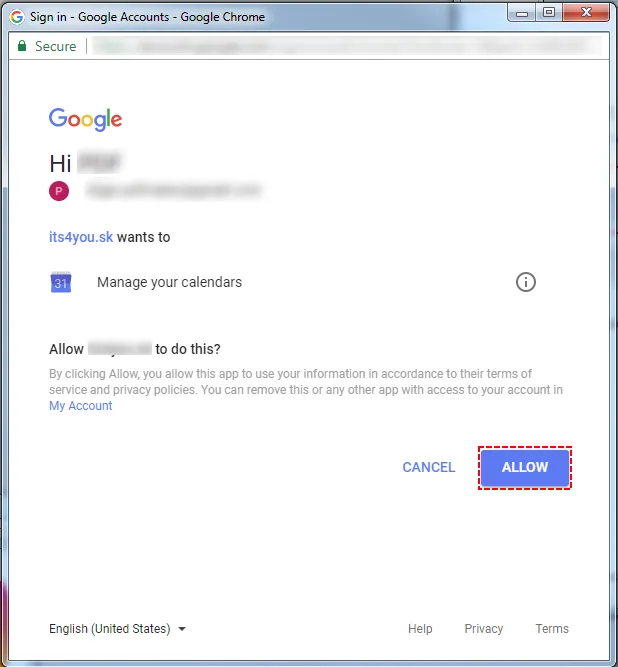
Allow to manage Google Account – Google Calendar Vtiger 7 Sync - You have been successfully sign in Google

Successfully connected to Google Account – Google Calendar Vtiger 7 Sync
3.3 Vtiger to Google mapping
After you have been successfully sign in Google, you need to map Vtiger activity types to Google calendar.
- In Calendar settings please click on Vtiger to Google mapping.Now, you can see all your activity types. So please map it to Calendar that you want.
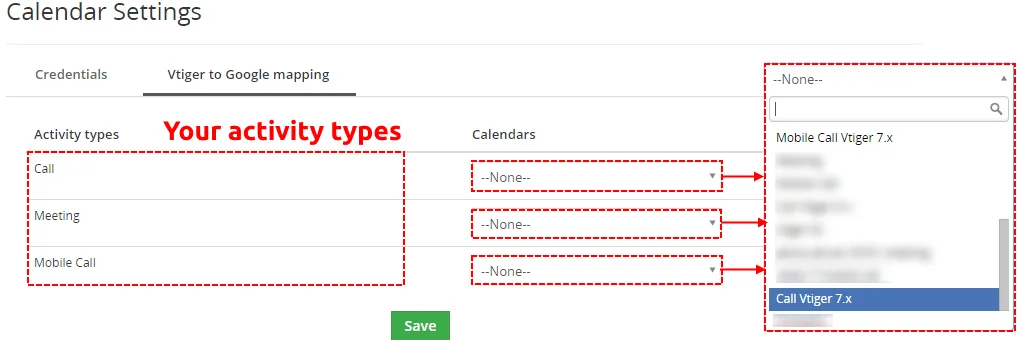
How to map Activity types to Calendar – Google Calendar Vtiger 7 Sync - If you mapped your activity types, please save it.
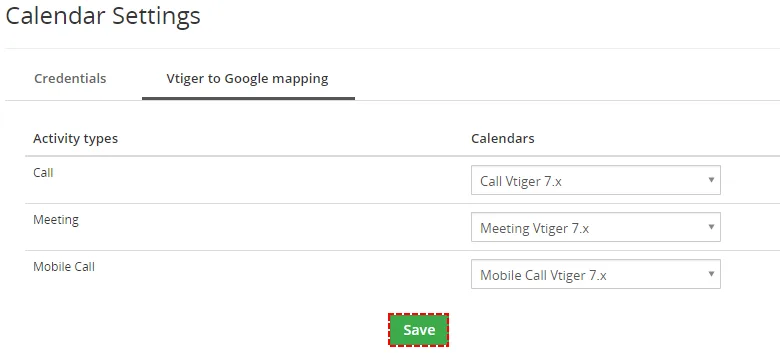
Save mapping of Activity types to Calendar – Google Calendar Vtiger 7 Sync - Mapping has been saved

Saved mapping of Activity types to Calendar – Google Calendar Vtiger 7 Sync
3.4 How to create new Google calendar
We recommend for each activity type create own Calendar because of correct mapping.
To create new Calendar for each Activity type please provide following steps:
- First at all you need to open Google Calendar
- Now, you can see your Calendar(s)
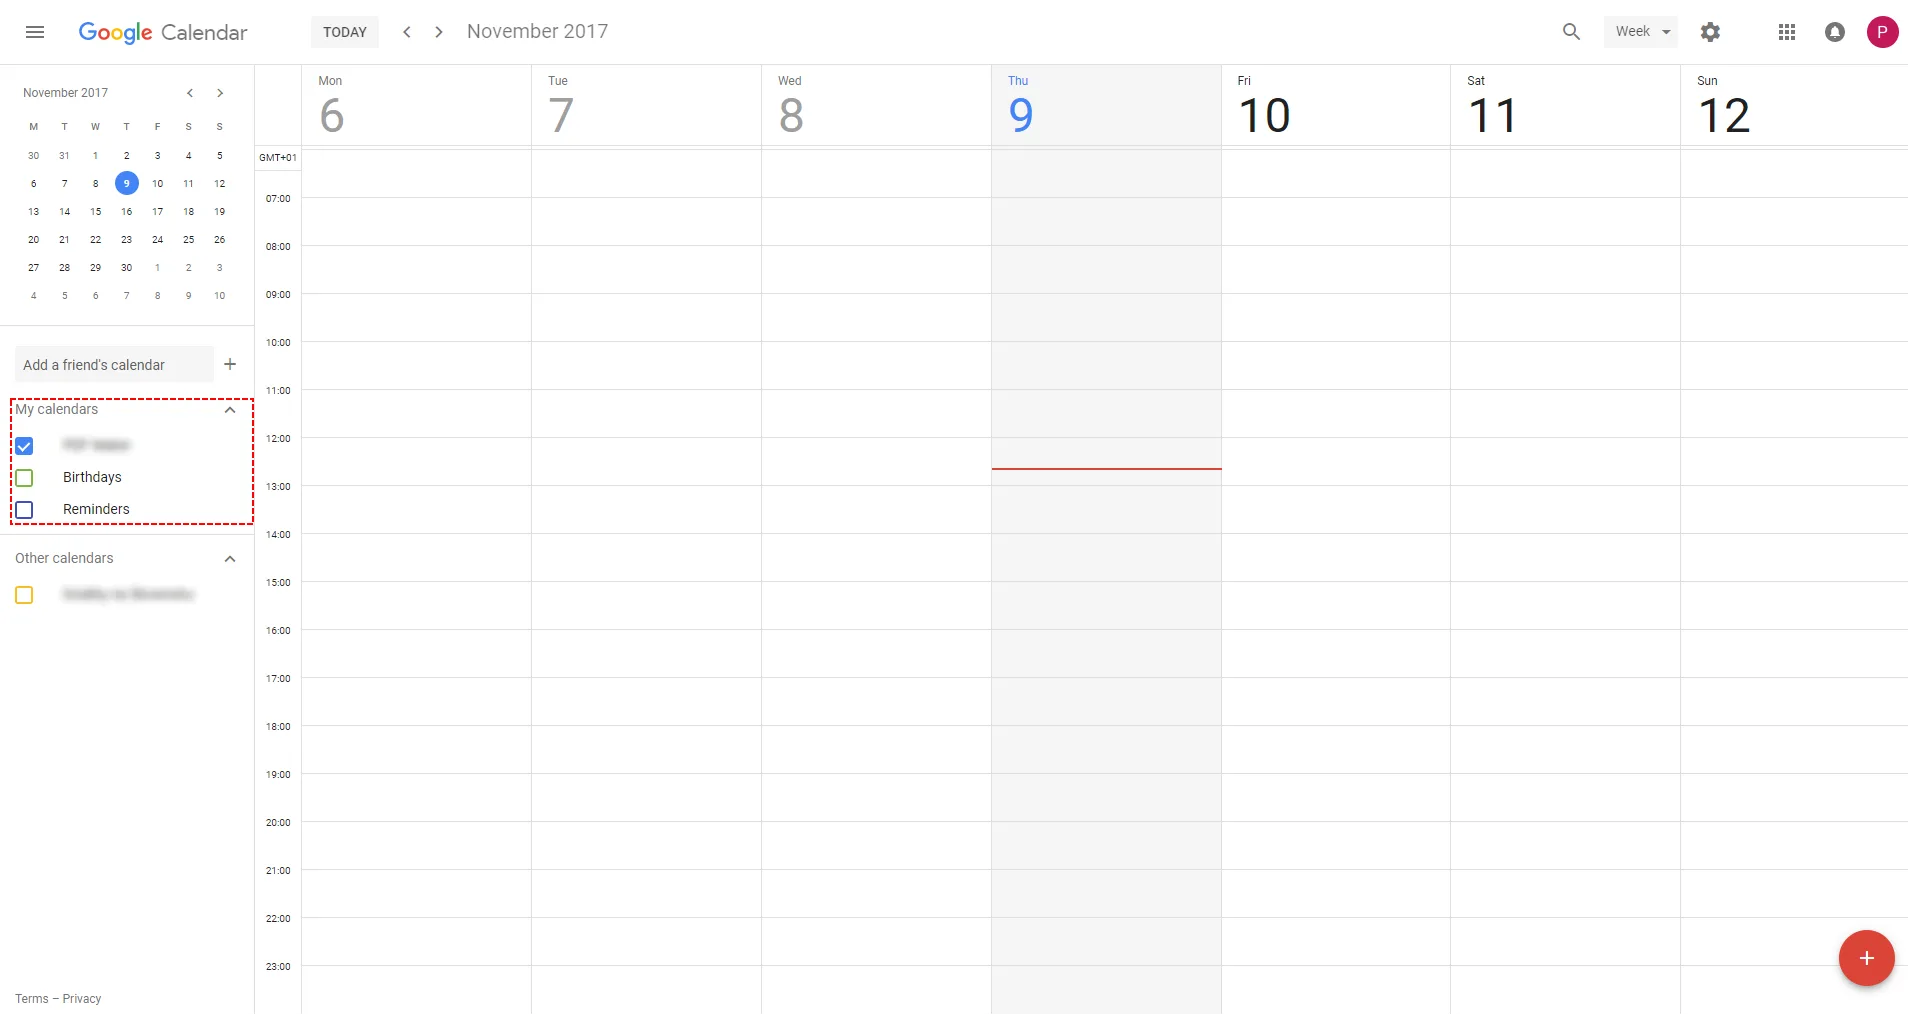
How to create new Google Calendar step 1 – Google Calendar Vtiger 7 Sync - Click on Settings button and select Settings
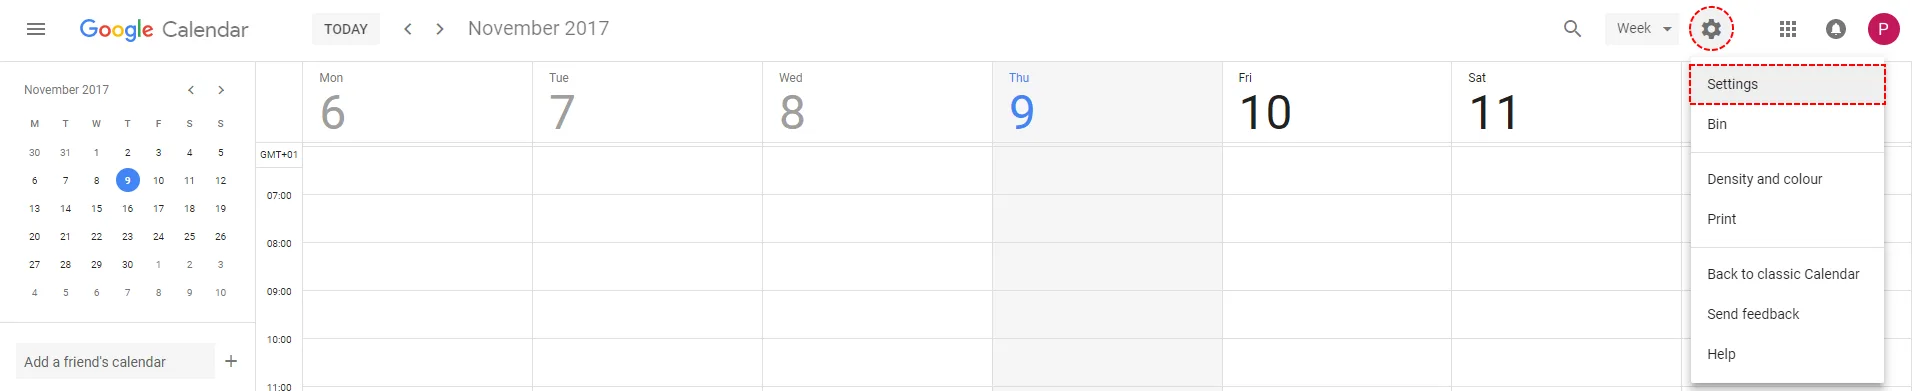
How to create new Google Calendar step 2 – Google Calendar Vtiger 7 Sync - Click on Add calendar and New calendar
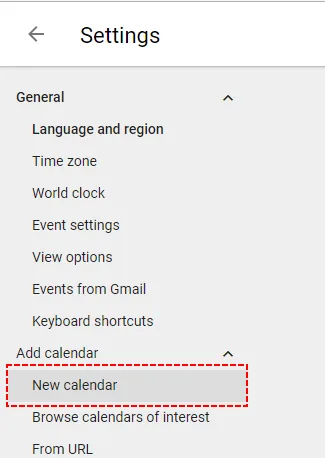
How to create new Google Calendar step 3 – Google Calendar Vtiger 7 Sync - Fill name and create calendar
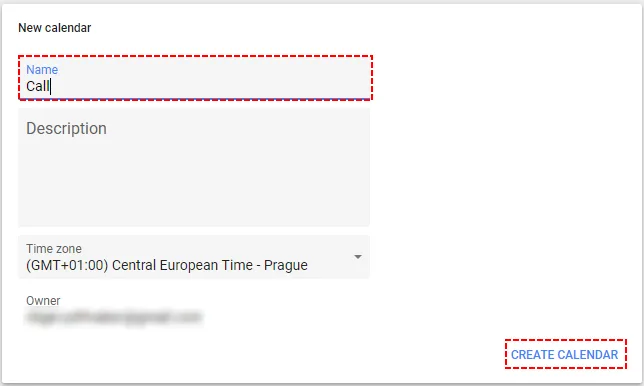
How to create new Google Calendar step 4 – Google Calendar Vtiger 7 Sync - Now you can see your new Calendar(s)
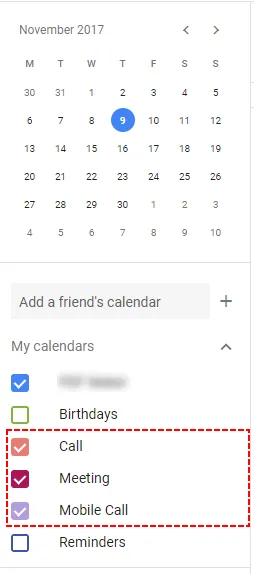
How to create new Google Calendar step 5 – Google Calendar Vtiger 7 Sync
Need help with Google Calendar Sync?
Our support team answers questions about installation, templates and settings.