Header Status Bar Manager extension for Vtiger CRM
Allows users to easily see the selected status in the header of the records

Add more visibility of selected status fields to your records in the Vtiger CRM
Header Status Bar Manager features
![]() Added new Quick edit functionality for Header Status Bar and also compatibility with Dynymic fields
Added new Quick edit functionality for Header Status Bar and also compatibility with Dynymic fields

Start using Header Status Bar Manager now!
How to access Header Status Bar Manager?
After successful installation of the extension, you can go to the settings.
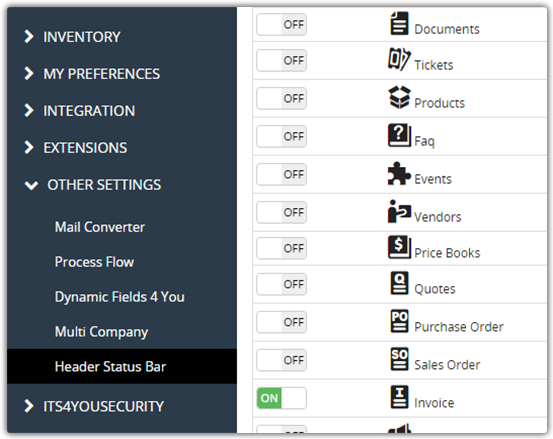
- Navigate to CRM Settings – Other Settings – Header Status Bar.
- In the Settings/Setup screen you are able to select picklists for certain modules.
![]() Custom modules & picklist fields are supported too.
Custom modules & picklist fields are supported too.
How to show Status Bars in records?
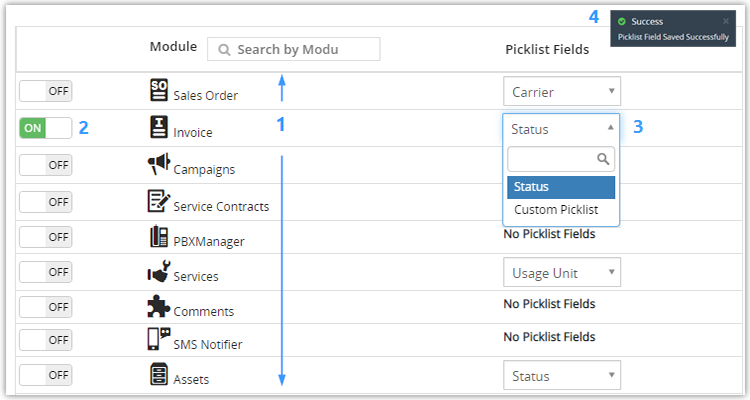
Selecting a picklist field to be shown in the record:
- Select the module from the list.
- Turn the module ON via a switch button
 .
. - Select the picklist field which will be shown in the header of the record.
- “Picklist Field Saved successfully” alert will appear.
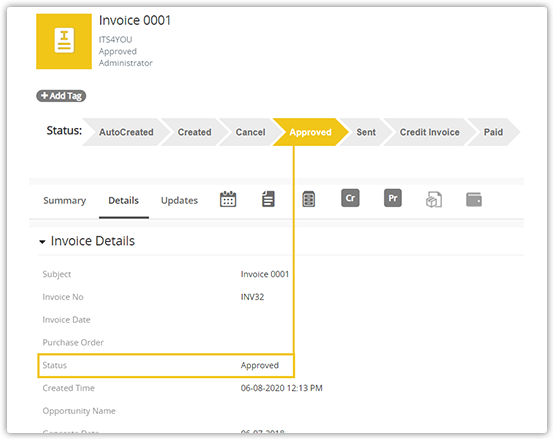
Now you can go to the record of a selected module to see header status bar for selected picklist value.
![]() You can select Custom modules & Custom picklist fields too.
You can select Custom modules & Custom picklist fields too.
View selected Status Bars
Selected status bars will be shown in Summary & Detail view of records.
- Changing the value in the picklist will be reflected in the status bar when reloading the record or refreshing the page.
- The number of values displayed in the header depends on the number of values in the picklist and the length of their names.
- The colours displayed in the headers depend on the colour theme of the current module.
Quick status change feature
This feature was added on 5 November 2024. You can now click status values directly in the header without using Dynamic Fields. If you want more advanced actions, such as clicking based on specific conditions, you will need the Dynamic Fields extension.
How does it work?:
- Navigate to Header Status Bar settings
- Select the module and Picklist Fields you need and click on

- Select which picklist value will be clickable and click on

- Now configure your quick edit action by filling/adjusting fields required
(fields are explained below)
If you only want to click on values in the record, simply check the ‘Is Active’ checkbox — no further actions are needed.
If you want to perform additional actions using Dynamic Fields, proceed further.
- Proceed
 via button
Fields explanations:
- Is active – checkbox where you can activate/deactivate operation = status values will become clickable in the record
- Width – define the width of form when selecting the status in the record
- Mode – by default this is empty or value “Default” is used, this is using standard mode which form you see
(there is an option to create own forms, coding skill is required, read for more info) - Config – here you are configuring the top and bottom text + Dynamic Fields field action
Now you return to your record, in our case we used opportunities, you can notice that the value we set is clickable and this way the status can be changed without the need to edit the record.
![]() You can define more values you need and by that have all of them clickable.
You can define more values you need and by that have all of them clickable.
![]() Dynamic Fields extension is needed in order to perform more enhanced operation in Settings.
Dynamic Fields extension is needed in order to perform more enhanced operation in Settings.


