

In the following chapters, we will show you how to use our Email Marketing extension step by step.
5.1 Before you start
Before you start using Email Marketing please check following:
Technical settings:
- Vtiger parameters – we recommend to have correct parameters for Vtiger and our extensions, this will prevent to have any issues.
- Working Cron / Scheduler – extension is using Scheduler to send emails, emails are sent each 15 minutes (by default).
(You can edit the 15 minute interval, but we recommend to keep it at 15 minutes to prevent any issues).
If the Scheduler is not configured or is turned off, you can still send emails manually via “Send Emails” button which will appear in Summary view. - Outgoing Server – in order to send email, you need to set up your outgoing server in Vtiger CRM system.
Templates:
In order to fully use Email Marketing, you will be needed to have some templates created, these templates will serve as the content of emails for campaigns.
There are two options from where you can load templates:
- Newsletter – this extension coming in the package if you purchased the Email Marketing module, its used to create templates with improved styling and design via GrapeJS editor.
How to create Newsletter template guide - Email Maker – this is a standalone extension from It-Solutions4You. If you have this extension purchased, you can create Email Maker templates and use these templates for Email Marketing too!
Features like custom functions, related blocks and using all variables are supported also. Values are loaded from the record which will be receiving the email.
How to create an Email Maker templates guide
5.2 Creating campaign
In the following steps, we will simulate how to create a campaign:
- Navigate to Menu – Marketing – Email Marketing, you will be redirected to List view, click on the button
 to start creating Campaign.
The button is used if you want to create a template in the Newsletter.
- Creating Campaign consists of 4 steps.
In first step Campaign Details, fill all required data like:
Name for your campaign
Assigned To
From Name – name of sender
From Email – email from which campaign is sent
Reply To – where you will receive emails when someone reply to your campaign emails
Description if needed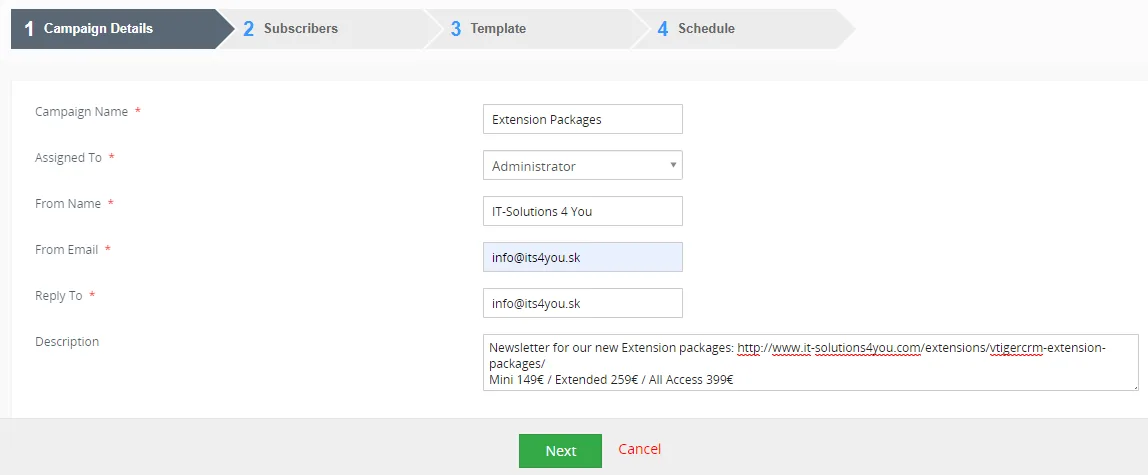
Email Marketing for Vtiger CRM – Creating campaign step 1 When all fields are filled, proceed via
 button.
- Second step Subscribers, please select the Module first (1), you can choose from 5 modules: Organizations, Contacts, Leads, Vendors & Campaigns.
For our guide we used Contacts module.After selecting the Module, available lists of contacts will appear (2).Select the list you want and proceed via button (3).
Also, you need select which email field will be used, Primary or Secondary Email (4).
There is also option to: Select/Remove contacts from the list manually via
 button (5).
 Note: Please see the chapter Subscribers (step2) for more detailed information.
When subscribers are selected, proceed via
button.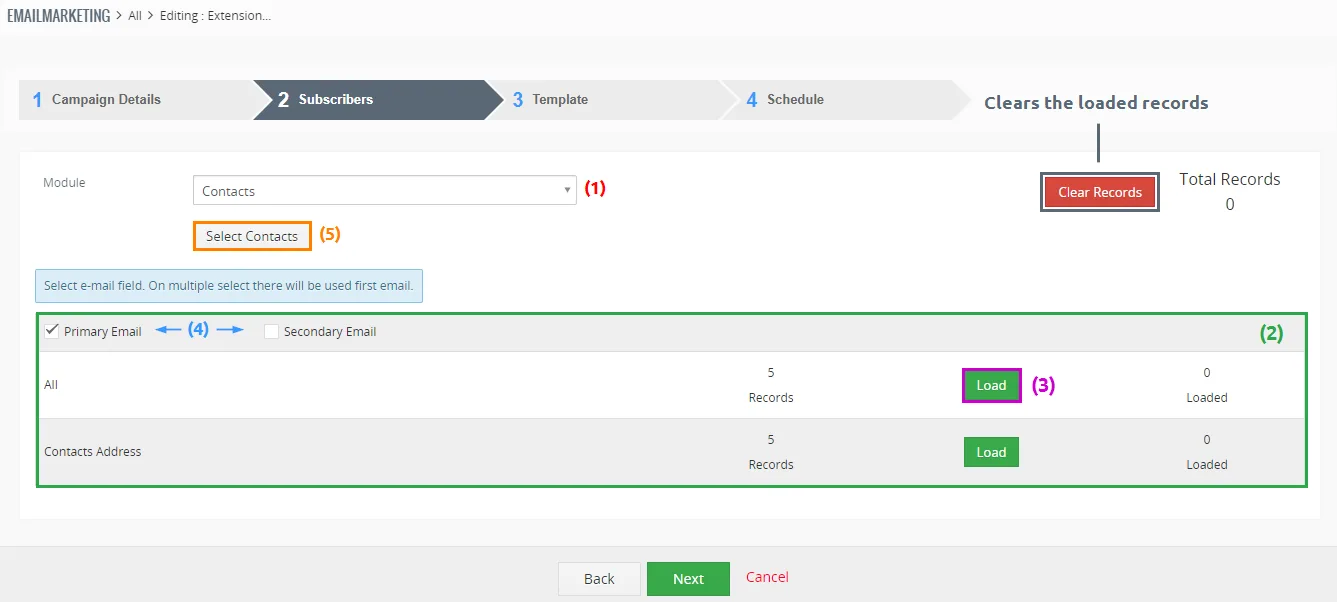
Email Marketing for Vtiger CRM – Creating campaign step 2 - The third step Template, is where you choose Newsletter/Email Maker templates you created.
More information about this step you can find in the chapter: Template (step 3)
Select the template source module via a pick list menu (1).
Next, select the template (2).
Also language used for the template (3), it’s not mandatory. Note: Subject* field value can be filled manually by the user, or can be pre-filled from a Newsletter template.The template should be loaded and you can proceed via
button.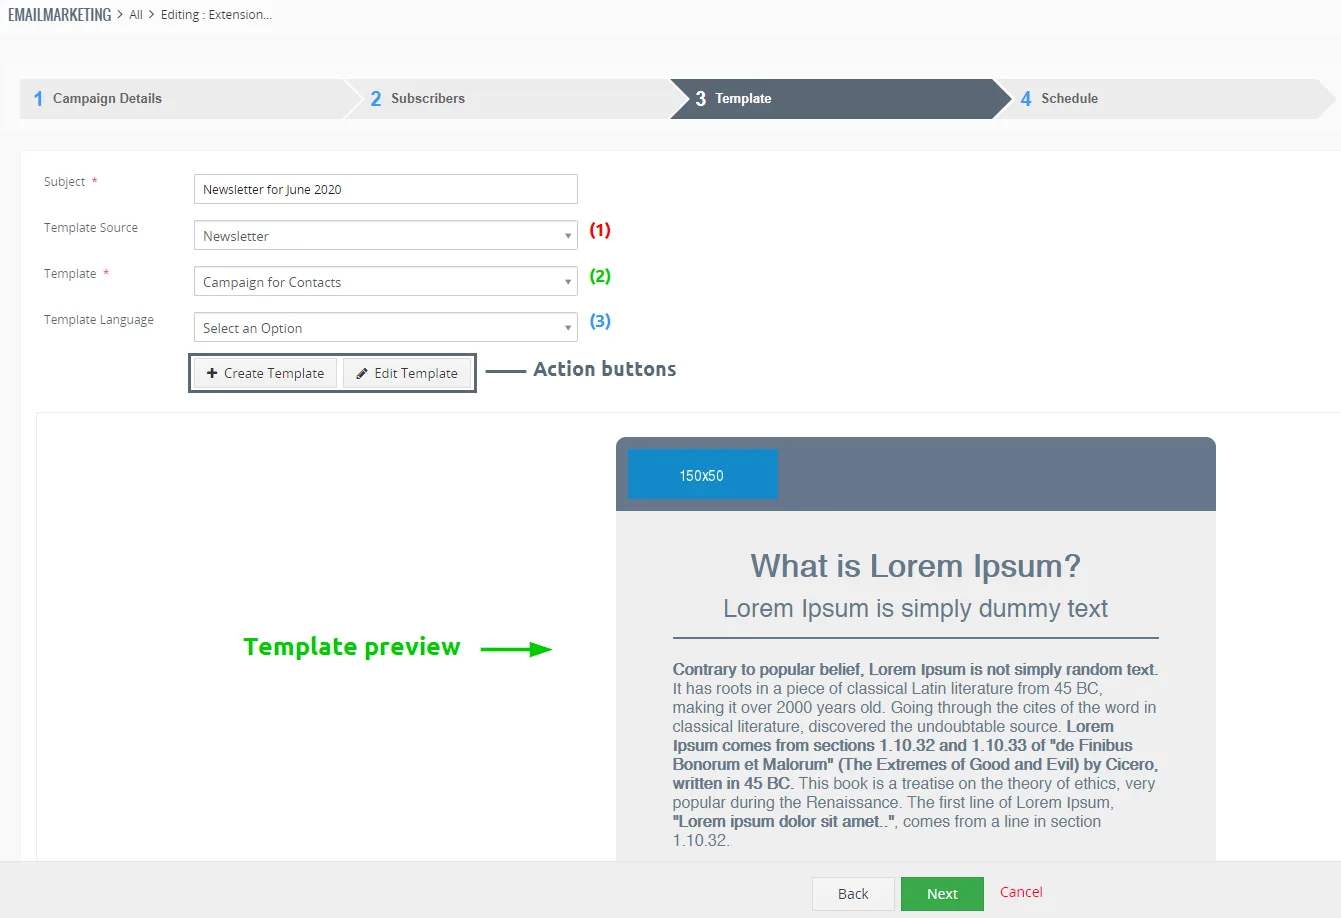
Email Marketing for Vtiger CRM – Creating campaign step 3 - The last step is Schedule, you need to choose how your email will be sent.
More information about this step you can find in the chapter: Schedule (4).
Select from the pick list how the emails will be send (1):
Send Now – sending emails start immediately after clicking on button and the sequence continues via scheduler.
If you have 100 recipients/subscribers and Send Hourly field will be set to 100, each 15 minutes 25 emails will be sent. For Send Now option, first 25 emails are sent immediately without any delay.
Scheduled – set the date and time when the email sending sequence will start if you don’t want to start sending immediately.Set how many emails will be sent per hour in one sequence (2).
Define Email sending pause – time between each email is sent, by default this is set to 1 second (3).
Finish the creating Email Campaign and proceed via
 button.
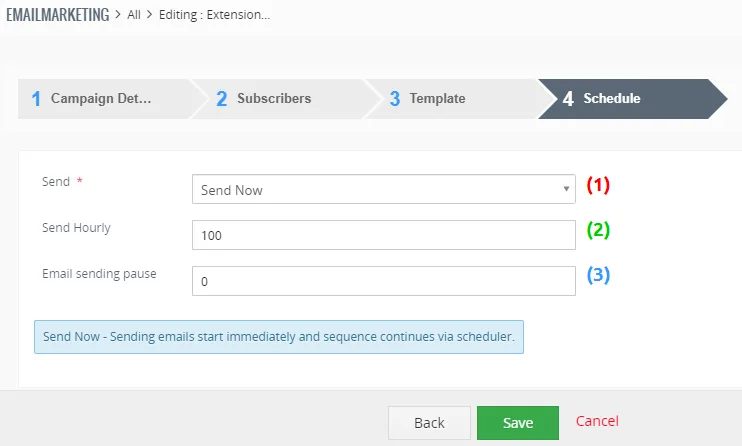
Email Marketing for Vtiger CRM – Creating campaign step 4
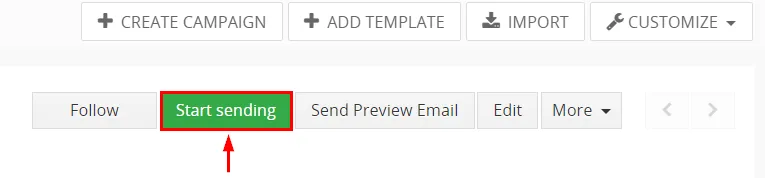
The campaign was created, now you can start sending emails via button on the Summary view:
Need help with Email Marketing?
Our support team answers questions about installation, templates and settings.