

The Work Area of the EMAIL Maker consists of:
- ListView – used for common tasks like add, delete, duplicate template, import and export templates and access to others tools
- DetailView – shows already created email template in details
- EditView – allows the preparation of the new email template or editing existing templates
- EMAIL Maker Pop-Up window– used for sending emails
5.1 ListView of EMAIL Maker
The common tasks like add/delete/duplicate template, import/export templates or start editing have to be initiated via EMAIL Maker ListView. Click on  (Menu) -> PROJECTS and select EMAIL Maker link and EMAIL Maker ListView will appear on your screen.

The main part of the EMAIL Maker ListView consists of the list of the email templates, which gives you information about a template name, a primary module, a short description, sharing info, template owner and its status. In the list you can also select one or more templates and consequently delete or export the selected group of templates. As shown in the picture, it is also possible to use links under the  button in order to edit or duplicate already created email templates directly from the ListView. Also there is option to search your template.
There are three buttons above the list of email templates:
 contains actions for deletion, import or export of the templates
 is used to add new template
 allows you to add new template theme
 contains Extensions, Profiles Self-defined labels, Product block templates, License, Update and Uninstall options
Note: How to import or export email template is described in the chapter Export and import templates.
5.2 DetailView of EMAIL Maker
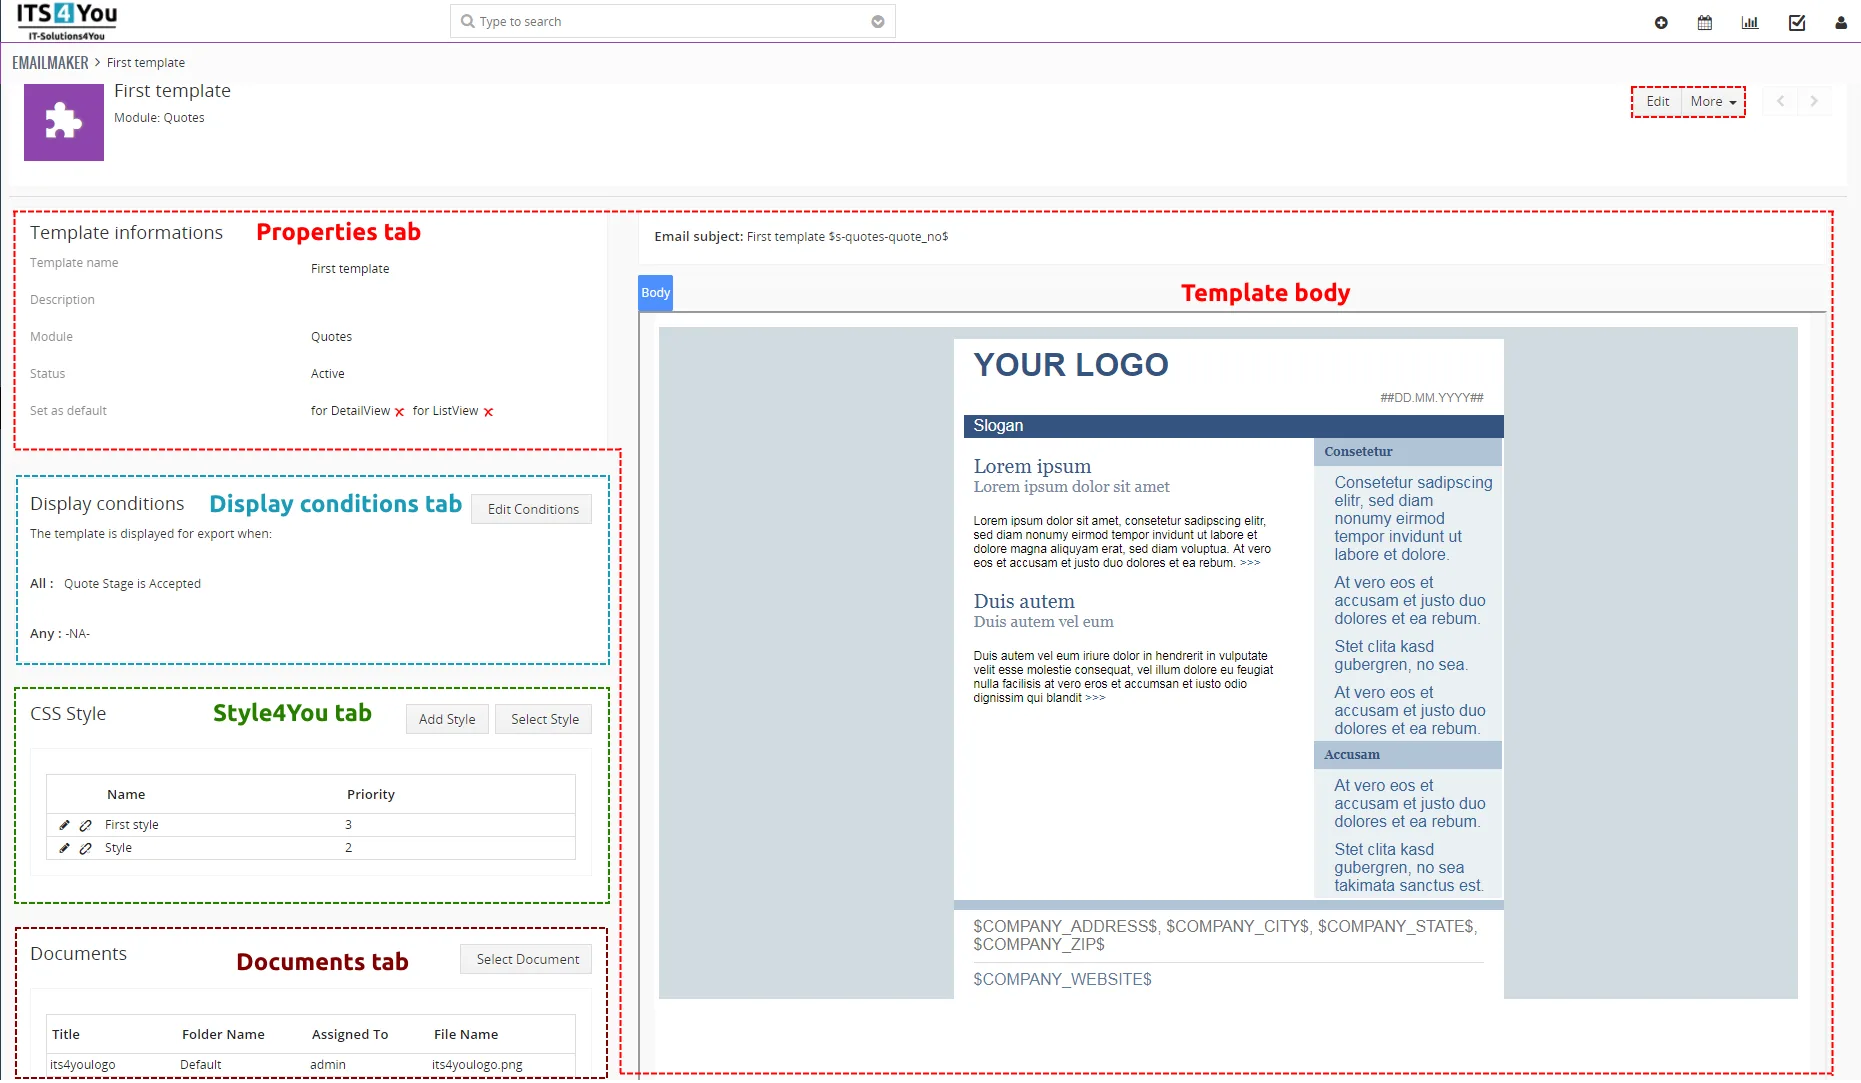
From ListView you can directly open any email template in DetailView. The DetailView consists of:
- Properties tab
- gives basic information of the email template
- contains the email template body
- Display conditions – you can hide/show template for record based on created condition(s)
- Styles – if you use Styles4You extension here you can find your added styles
- Documents tab – button allows you to add documents to the email template as attachment. This functionality is not available in EditView; before sending email you will be able to delete this attachment or add additional attachments as well
- Email Workflows – here you can see in which worklow(s) this Template is used
- Group of buttons
 switches to EditView and start editing
 creates duplicate of the template and start editing
- allows you to delete template
5.3 EditView of EMAIL MAker
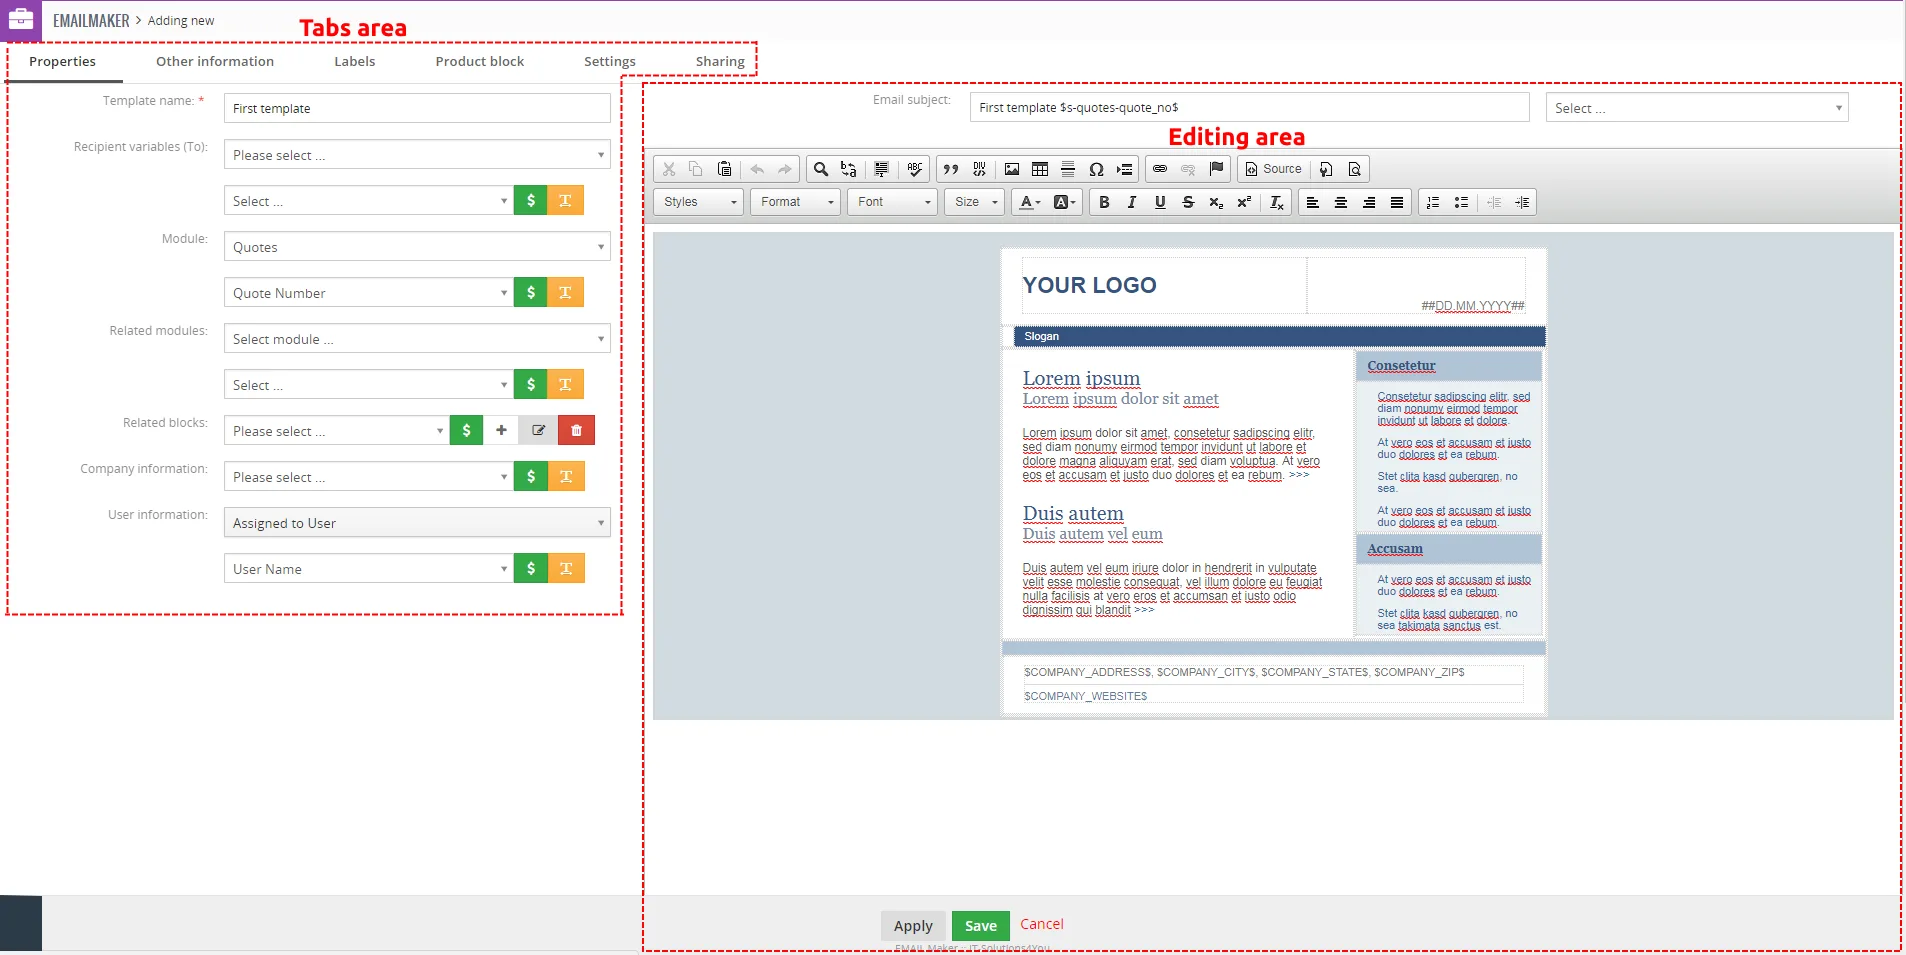
The EditView shown in the picture below is divided into two areas:
- Tabs area – allows user to insert into template different kind of values, fields and to set up properties, sharing and other common settings of the email template. Tabs area consists of following tabs, which are described in the following subchapters:
- Properties
- Module information
- Other information
- Labels
- Product block
- Settings
- Sharing
- Display conditions
- Editing area – is mainly used for inserting/editing your own text, tables, images etc. and to make some design adjustment of the template like font change, color, format, size, background color of the text etc. This editing can be initiated via many toolbars located in the above part of Editing area. Please refer to the chapter Editing email templates for the details related to editing.
5.3.1 Properties
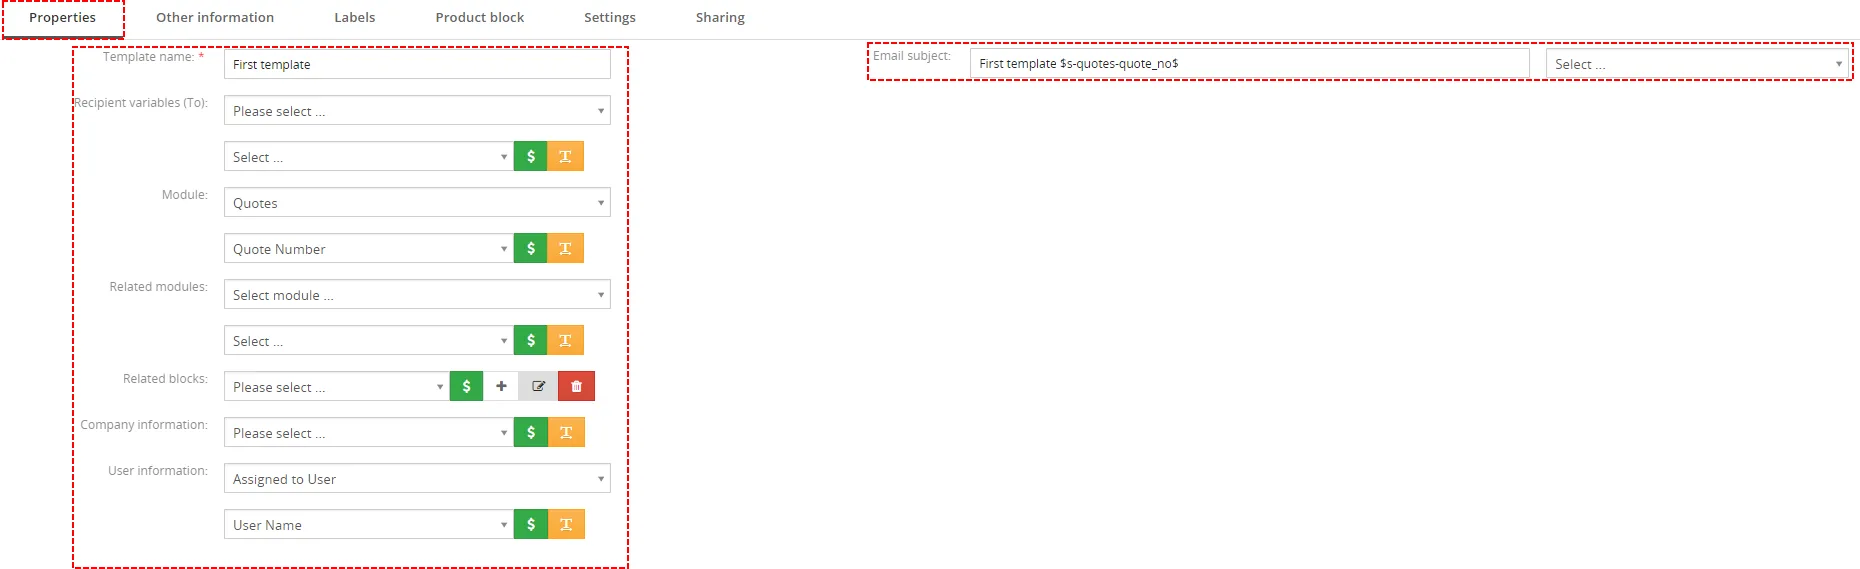
The main purpose of the Properties tab is to define template name and description. Although description is not required, it is recommended to describe here main purpose and properties of the template for future edit or re-usage. Also, The EMAIL template can be common for all modules or based on one primary module. To define that the Module information tab is used.
| Name | Description |
|---|---|
| Template name | The name of the template. It is mandatory field for template creation. |
| Recipient variables (To) | Variables related to recipient |
| Module | Template will be based and available only for one selected module and its fields. |
| Related modules | If exists related module(s) to selected module, it is possible here to select and use fields from any related module. |
| Related blocks | Related block(s) to selected module, with buttons to insert, create, edit or delete related block. For details please refer to chapter Using related blocks. |
| Company information | Comprises mainly group of fields from Company information |
| User information | Comprises mainly group of fields from Assigned to User, Logged in User, Modified by User and Created by User |
| Email subject | The subject of the email. You can use simple text, predefined common fields or fields related to primary module if exists. |
5.3.2 Other information
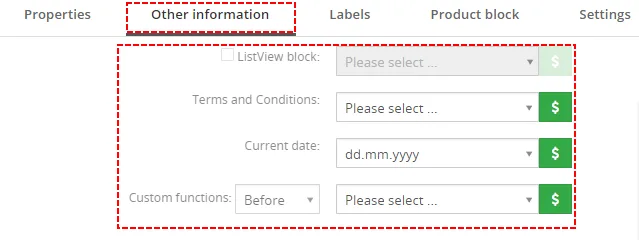
As shown below Other information tab contains several fields. They are ListView block option, Terms and Conditions, Current date and Custom functions.
| Name | Description |
|---|---|
| ListView block | Allows adding ListView block. For details please refer to chapter Using ListView block |
| Terms and Conditions | Terms and Conditions. |
| Current date | Current date in several formats. |
| Custom functions | Custom functions. For details please refer to chapter Custom functions |
5.3.3 Labels
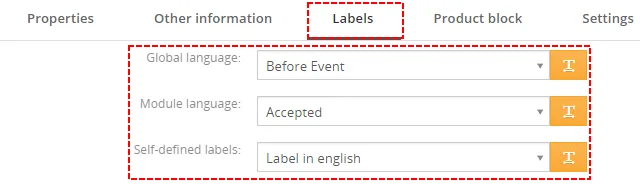
Labels tab consists of Global language and Module language part. Labels are very useful especially in case you need to send emails in two or more languages. Please refer to chapter Inserting labels to see details.
| Name | Description |
|---|---|
| Global language | Global labels. |
| Module language | Labels related only to selected module. |
| Template name | Labels defined by user. See chapter Self-defined labels |
5.3.4 Product block
The product block tab allows inserting product block template and editing it. In addition, you can create your own product block using “Block start”, “Block end” and fields for products and services. How to insert, edit and create product block is described in chapter Using a product blocks.
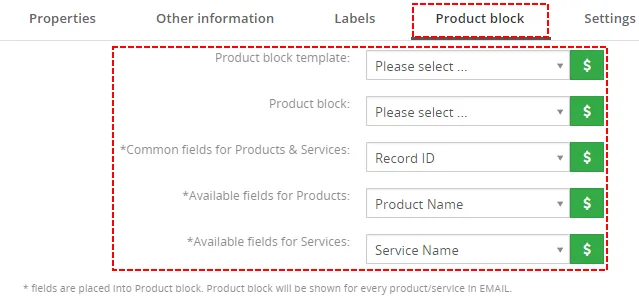
| Name | Description |
|---|---|
| Product block template | Insert predefined product block templates. For details please refer to chapter Using a product blocks. |
| Product block | Products and Services Block start, Products and Services Block end. Products Block start, Products Block end. Services Block start, Services Block end. Each product block must start with “Block start” and must end with “Block end”. |
| Common fields for Products & Services | Fields common for products & services. You can find same fields for products and services separately as well, but it is recommended to prefer common fields in the templates. |
| Available fields for Products | Fields for products. |
| Available fields for Services | Fields for services. |
5.3.5 Settings
The settings tab allows defining Description, Category, Default from email, Ignored picklist values, Status, number format and option to Set template as default.
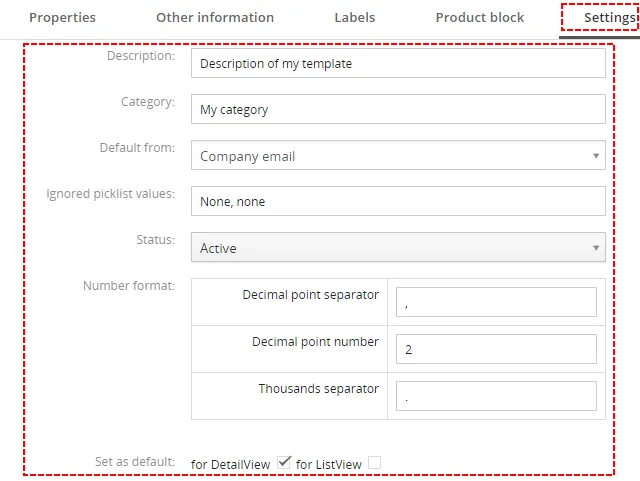
| Name | Description |
|---|---|
| Description | The description of the email template. |
| Category | Category of the email template. You can define categories according to your needs directly from this field. |
| Default from | Select here default sender of the email template. This value can be set separately for each logged user. |
| Ignored picklist values | Define picklist values which will be ignored in the final email like None, none, keine etc. Entered values have to be separated with comma |
| Status | Active / Inactive. Please refer to chapter Status for details |
| Number format | Decimal point separator – comma, dot (but any symbol can be used) Decimal point number – 0-3 Thousands separator – comma, dot, space (but any symbol can be used) |
| Set as default | Set/unset as default for DetailView and ListView. For details please refer to chapter Set as default. |
5.3.6 Sharing
The Sharing tab changes depend on whether email template is shared or public/private. Using this tab you can define how to share your template between you and other users or groups. Please refer to chapter Sharing to see details.
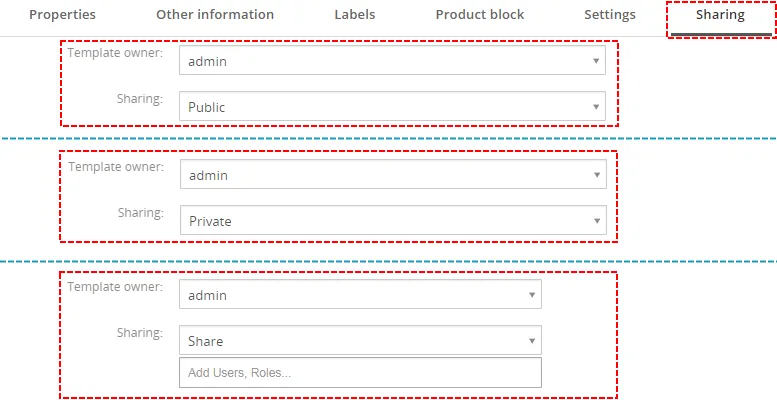
| Name | Description |
|---|---|
| Template owner | Select template owner from the list. |
| Sharing | Select “Public”, “Private”, “Share” |
5.4 Email Maker pop-up Window
The EMAIL Maker pop-up Window can be found after you click on  button in DetailView of module. In the module ListView it is necessary to
select any record(s) and click on More button and select Send Emails with EMAILMaker. The EMAIL Maker pop-up is used to send emails for particular record. Two forms of EMAIL maker pop-up can be seen in the screen:
a) EMAIL Maker pop-up without email template
b) Standard layout of the EMAIL Maker block pop-up
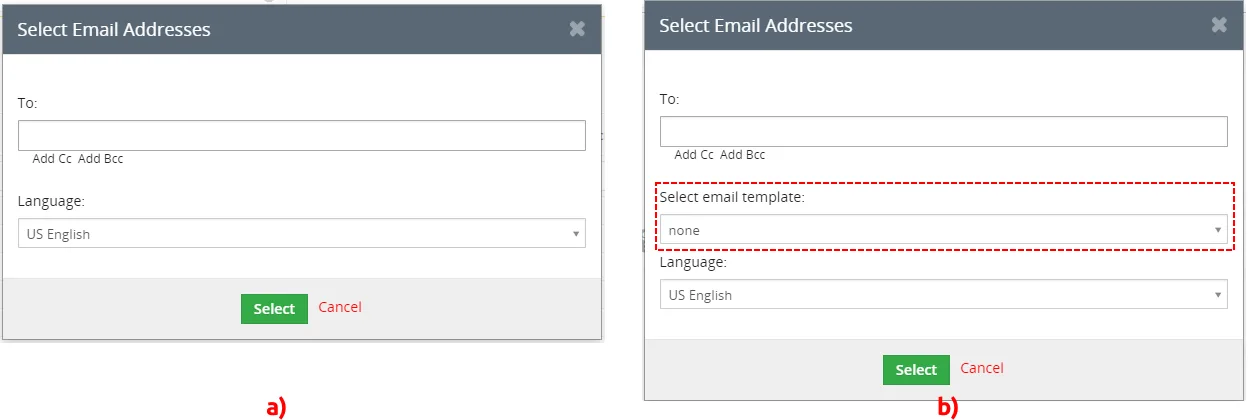
How to send emails via EMAIL Maker pop-up is described in the chapter Sending emails.
Need help with EMAIL Maker?
Our support team answers questions about installation, templates and settings.