

8.1 Chat with Assistant
The Email Maker AI Assistant is built directly into Email Maker and helps users create, redesign, and improve email templates more efficiently.
The assistant uses the content from the currently opened template section and can also work with Email Maker variables. It can help generate a new template, update an existing template, improve the design, or add missing parts such as a product block.
Token usage
Each user has 500,000 AI tokens per month included in the Email Maker/Packages subscription.
Tokens are used when the AI Assistant processes prompts and generates responses. The token limit is reset automatically every month.
No external API key is required. The AI Assistant is already integrated into Email Maker, so users do not need to configure any third party AI service.
The current token usage is visible directly in the AI Assistant area. Users can see the usage in the progress bar and also as a percentage value.
Where to find the AI Assistant
In the Email Maker Template Editor, there is a new AI tab.
Inside this tab, users can enter prompts and send them to the AI Assistant. Based on the prompt, the assistant can generate a new Email template or modify the currently opened template.
This makes template creation and editing easier, especially when users want to improve the structure, layout, or visual design of a Email template.
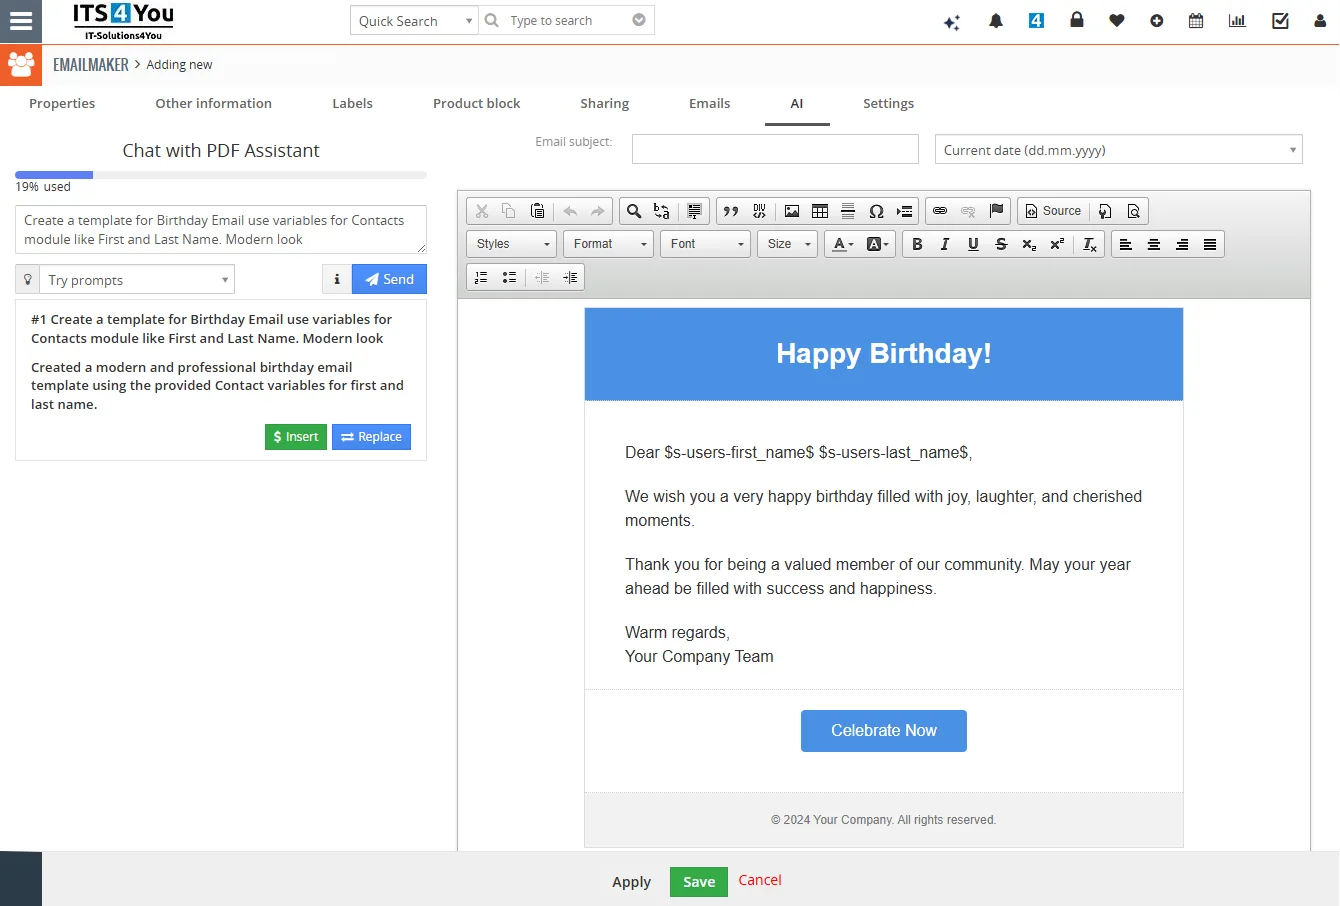
Example prompts
Users can enter prompts such as:
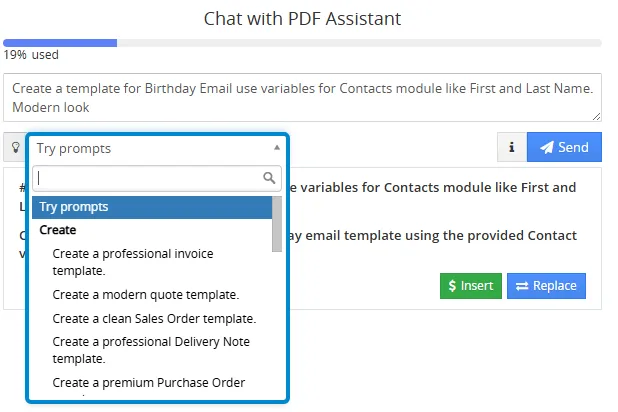
Generating content
After entering a prompt, click the Send button.
The AI Assistant will generate a response based on the current template content, available variables, and the user prompt.
After the response is generated, the user can choose how to use the result.
Available actions
Insert
The Insert button inserts the generated content into the template.
This option is useful when the user wants to add new content without replacing the existing template section.
Replace
The Replace button replaces selected template content with the generated result.
History of AI responses
The full history of prompts, responses, and available actions is displayed below the chat window.
Each generated response remains available in the history. This allows the user to return to an earlier result and use it again.
For example, if the user makes a mistake in step 4, but the result from step 3 was correct, the user can use the Replace action from step 3 and restore that version into the template.
Important notes
AI generated content should always be reviewed before final use.
Some results may require additional adjustments, especially when working with Email Maker variables, product blocks, or complex template structures.
Users should check that all variables are correct and that the basic Email Maker Maker template rules are followed.
The AI Assistant may not always create the perfect result from the first prompt. In some cases, users may need to refine the prompt or continue with additional instructions.
The AI model will continue to be improved so that it better supports customer requirements and makes everyday Email template creation faster and easier.
8.2 Default CC and BCC Recipients
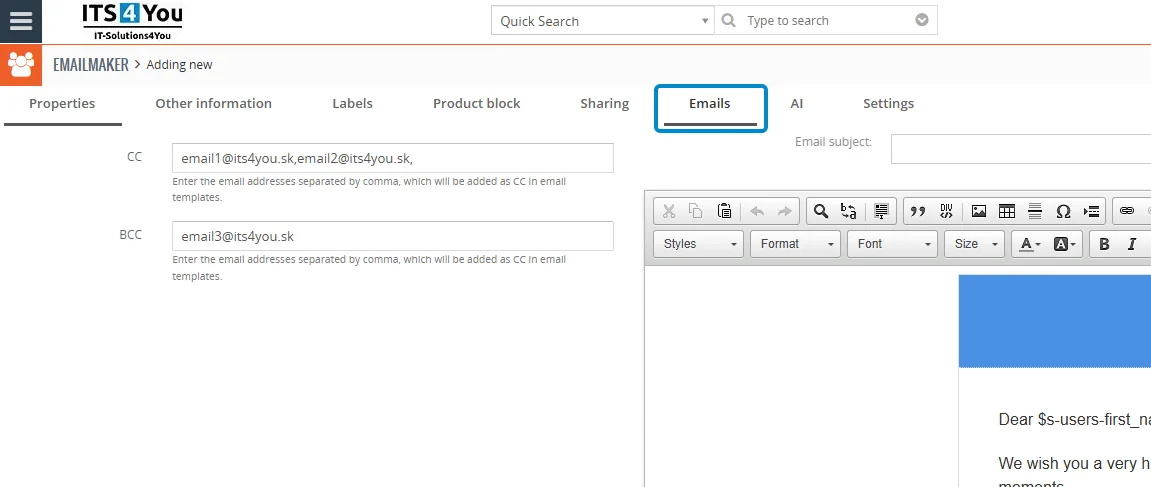
Starting from Email Maker version 4.65, it is possible to define default CC and BCC email addresses directly in an email template.
This option is available in the Emails tab when creating or editing an Email Maker template.
When CC or BCC email addresses are added to the template, they are automatically loaded into the Compose Email window after the template is selected. This helps users prepare emails faster and ensures that predefined recipients are added consistently.
Multiple email addresses can be entered and separated by commas.
Important note
This feature applies only to emails created manually through the Compose Email window.
It does not apply to workflow emails.
For workflows, CC and BCC recipients must be configured directly in the workflow action settings.
8.3 Prevent emails from being sent
This feature was added on November 12, 2024. To use it, please ensure you have installed or updated our FREE Emails extension to version 0.32.
Description
The newly added feature allows you to prevent emails from being sent if they contain banned words that you define. You can also choose to block emails entirely based on specific templates from Email Maker, PDF Maker, and Email Marketing. If a banned word appears in the content or body of an email, it will not be sent to the recipient.
This feature is ideal for maintaining professional communication with clients, avoiding offensive language, or blocking certain emails from being sent entirely.
Key benefits:
- Keep control over your outgoing emails
- Supports workflows
- Works seamlessly with PDF Maker, Email Maker, and Email Marketing extensions
- Allows you to define multiple banned words, not just one
- Option to prevent emails from being sent based on the template used
- Emails blocked from sending are still created in the system under the Emails extension, allowing you to review the reason they weren’t sent
What is required?
- Emails extension version 0.32 or higher required
- Our extensions that use mailing functions, such as PDF Maker, Email Maker, and Email Marketing
- Ensure all extensions are up to date
- Supports Vtiger versions 7.x and 8.x
- Installer requirements should meet recommended values
How does it work?
A/ Prevent emails from being sent with defined banned words
This feature enables you to block emails from being sent if they contain specific banned words that you define. This is useful for ensuring professional communication and avoiding the use of prohibited or sensitive language in outgoing messages.
- Go to Vtiger folder, open file config.inc.php
- Add following code with your banned word/s:
$ITS4YouEmails_BannedWords = [‘word1’, ‘word2′,’word3’,];

- Save the config.inc.php file
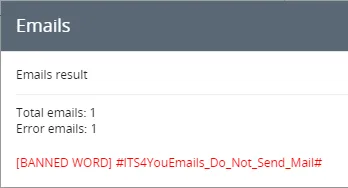
Now, when you try to send an email—let’s say via Email Maker—and the template or body content includes the word “bannedword,” the email will not be sent, and the following message will appear: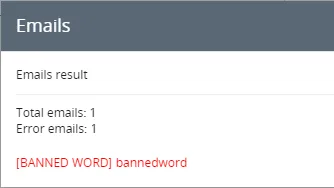
B/ Prevent emails from being sent at all for specific template
Prevents emails from being sent entirely for a specific template by using the following code: #ITS4YouEmails_Do_Not_Send_Mail#
- Open any template you want and add to body code
#ITS4YouEmails_Do_Not_Send_Mail#
- Save the template.
- Go to record module and try to send email using a template we defined code in.
Following message should appear:
8.4 Campaigns and EMAIL Maker
With the EMAIL Maker module you can now use Campaigns in a more effective way. We added a feature where you can send e-mail to Contacts which are added to your Campaign.
Follow simple steps to send a Campaign e-mails to selected Contacts:
- First create or choose already created Campaign and click on Contacts

You will be redirected to Campaign Contacts view like you can see on the following picture: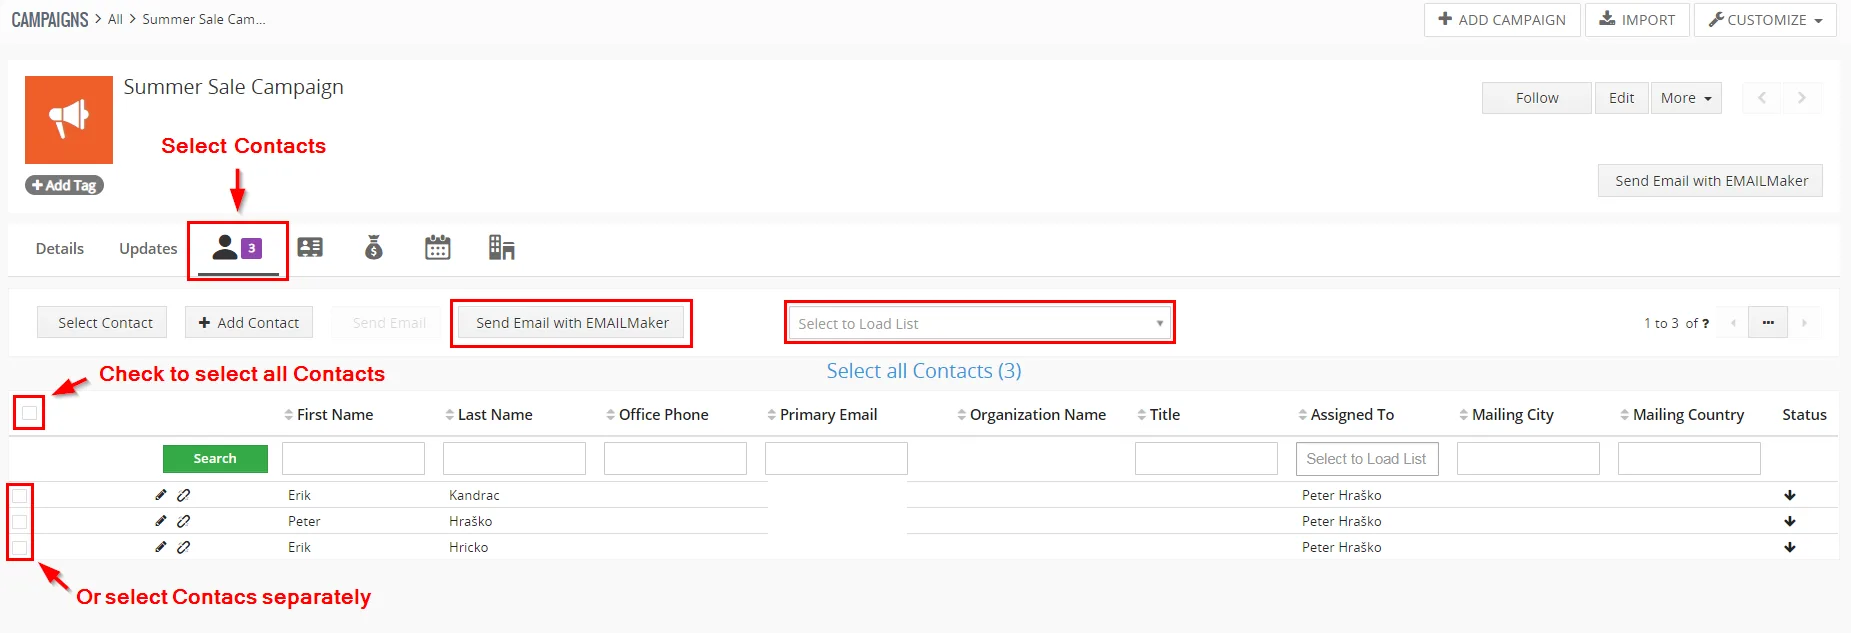
Campaigns and EMAIL Maker - Next you have to add Contact/s to Campaign. You have 3 options here how to add Contacts:
a.) Select Contact/s via button.
b.) Add Contact/s via button.
c.) Load Contacts from the already created Contact List
- Now select Contacts which will be receiving e-mails. You can use the check – box where all contacts will be selected or you can check – box contacts separately:
Campaigns and EMAIL Maker - When you selected Contacts proceed by clicking on the
 button.
- On the next Screen you have to choose which E-mail fields will be used. Also, you can choose the EMAIL MAKER template you already created. The process is shown on following picture:
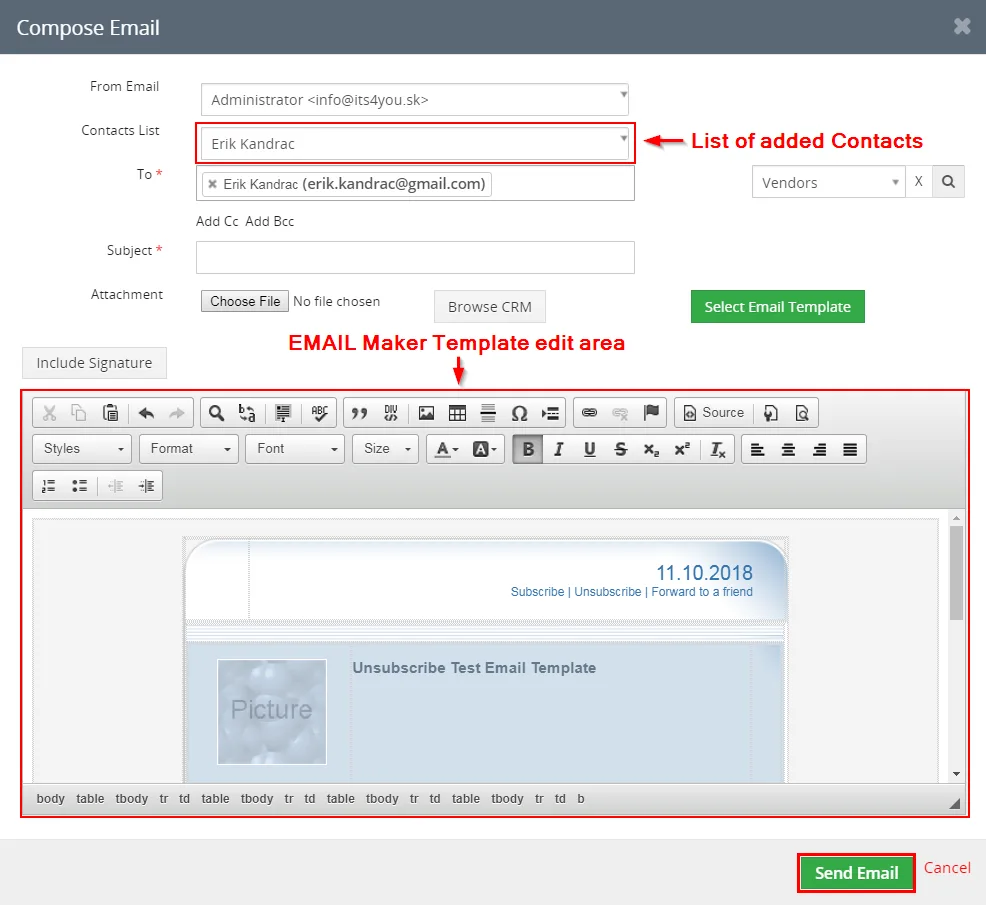
Campaigns and EMAIL Maker - In the last step you will be redirected to Compose email window. Here you can see which Contacts you added in the Contacts List field. Also, you can edit the template you did choose for your Campaign. When you are done with editing or adding additional recipients press
 button.
Campaigns and EMAIL Maker
8.5 Export and import templates
Export and import of the email templates makes it easy to work with EMAIL Maker templates by migration process or moving templates from development to productive installation.
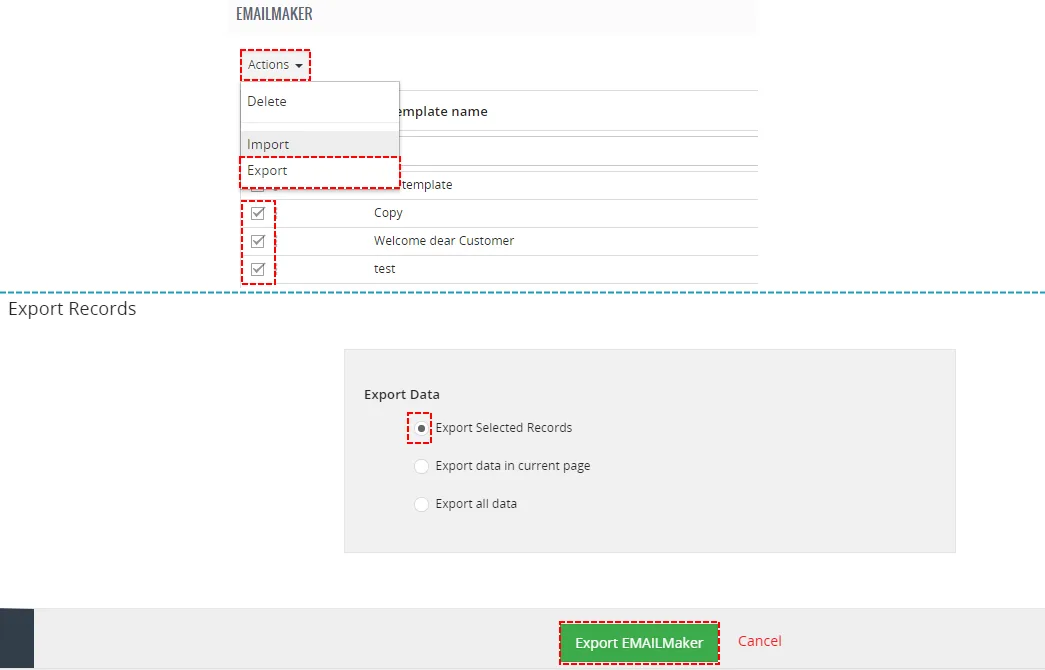
In order to export EMAIL templates to external sources in EMAIL Maker tool do following steps:
- In the EMAIL Maker ListView page select one or more templates which would you like to export.
- Click on
 and “Export”.
- In the File Download pop-up dialog select “Save File”.
- Click to save the templates in *.xml file format.
To import email templates from external sources click on and “Import”. After click the new import page will appear on the screen.
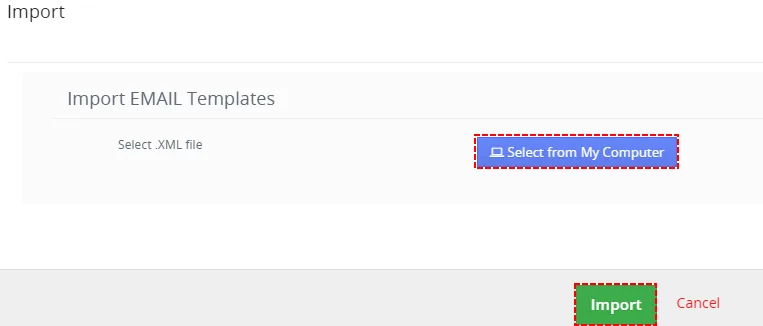
In the Import pdf templates page, browse the EMAIL Maker template-related data in *.xml format and then click the button. It will take a few seconds to complete the import. The imported templates can be found in the EMAIL Maker ListView page.
8.6 Custom functions
If you need a special treatment of vtiger data in your template, you can use custom (your own) functions. There is a folder „functions“ under [vTigerROOT]/modules/EMAILMaker/resources, where you can place your own .php file with functions which would you like to use. This file will be included automatically. Inside this folder is file „its4you.php“, which contains our functions. These functions are descibed below and are provided for you for free. Do not modify this file, because by next version it will be overwritten. If you would
like to use your own functions, please create your own file/files, it means create new .php file under [vTigerROOT]/modules/EMAILMaker/resources/functions and place here your functions. In order to insert custom function into template provide following:
1. Go to EditView, and in Other information tab select custom function from selectbox „Custom functions“. As example in the picture below its4you_if is selected.
2. Click button . It adds function in form [CUSTOMFUNCTION|functionname|param1|param2|…|CUSTOMFUNCTION] or [CUSTOMFUNCTION_AFTER|functionname|param1|param2|…|CUSTOMFUNCTION].
3. Finally you have to define function name and parameters of the function as shown in the picture below.
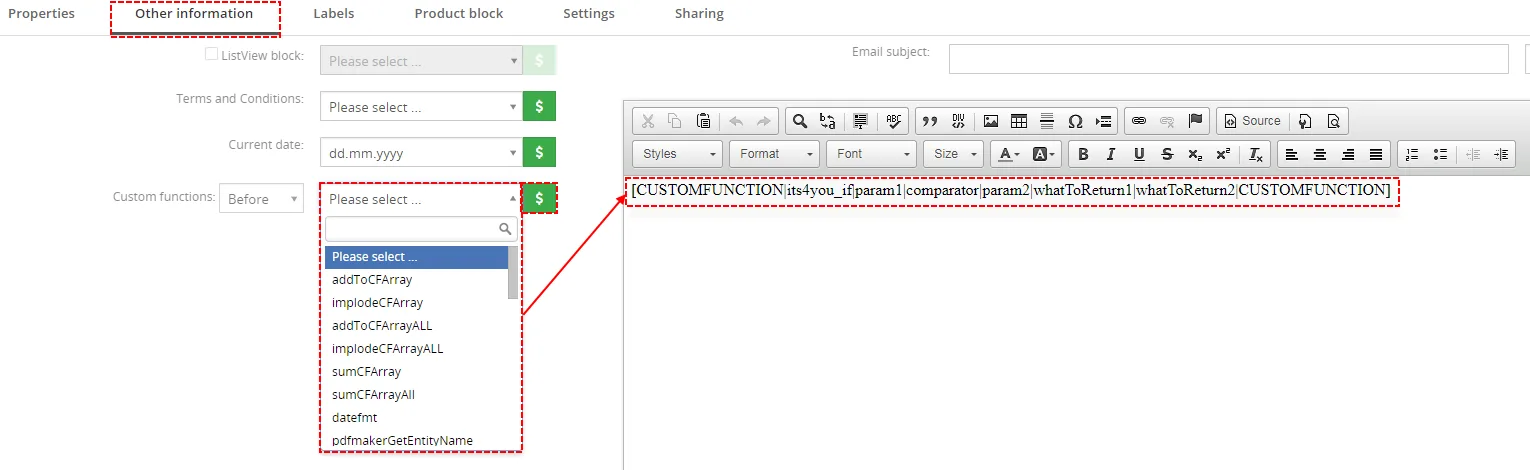
In the above example function with 5 parameters was used, i.e. [CUSTOMFUNCTION|functionname|param1|param2|param3|param4|param5|CUSTOMFUNCTION]. It is possible to use functions without parameters as well. In this case use just notation [CUSTOMFUNCTION|functionname|CUSTOMFUNCTION].
Here you can find list of functions available for EMAIL Maker:
- addToCFArray
- implodeCFArray
- addToCFArrayALL
- implodeCFArrayALL
- sumCFArray
- sumCFArrayAll
- datefmt
- pdfmakerGetEntityName
- isInMultiselectbox
- its4you_if
- its4you_relatedlist
- getTemplateId
- its4you_getContactImage
- its4you_formatNumberToPDF
- its4you_formatNumberFromPDF
- its4you_multiplication
- its4you_deduct
- its4you_sum
- its4you_divide
- its4you_nl2br
- setCFGNumberValue
- sumCFGNumberValue
- deductCFGNumberValue
- mathCFGNumberValue
- showCFGNumberValue
- its4you_unsubscribeemail
- setCFNumberValue
- sumCFNumberValue
- deductCFNumberValue
- mathCFNumberValue
- showCFNumberValue
- semantic_ru
- num2str_ru
Following sections contain short description of some our its4you_* functions which you can use in your Email templates.
More info how to add own custom function you can find in our blog: How to create own Custom function for PDF Maker or EMAIL Maker?
8.7 Pay by Square
With Email Maker you can use the feature Pay by Square easy and load a values for payments from the records via variables used in the template.
Paying with Square is more than a mobile cash register. It also offers free apps for making payments with your smartphone and using bank apps for sending money to your friends or clients.
In order to use the Pay by Square in your templates. Please follow steps below:
- Open your template (in our example we will use Invoice module)
- In the template go to Other information tab and then Custom functions, search for payBySquare function
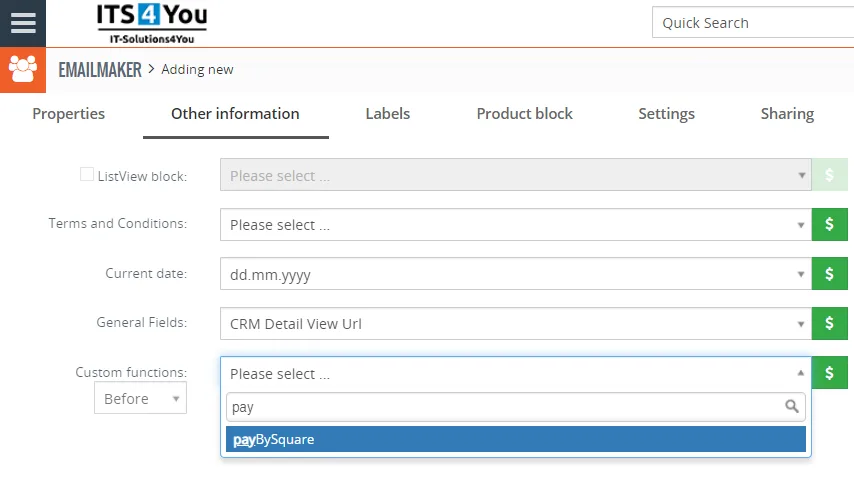
- Insert the function where you want it in to your template, function should look like by default:
[CUSTOMFUNCTION|payBySquare|iban|amount|currency|vs|ss|cs|note|due_date|size|CUSTOMFUNCTION]
- Custom function has own parameters which should be replaced with values or variables, see an example:
[CUSTOMFUNCTION|payBySquare|SK2811110000009999983002|$TOTAL$|$CURRENCYCODE$|1234567890|1234567890|1234|$INVOICE_DESCRIPTION$|$INVOICE_DUEDATE$|100|CUSTOMFUNCTION]
- When the parameters are added, Save the template and you can sent it or do additional operations.
This is how Pay by Square QR code looks like:
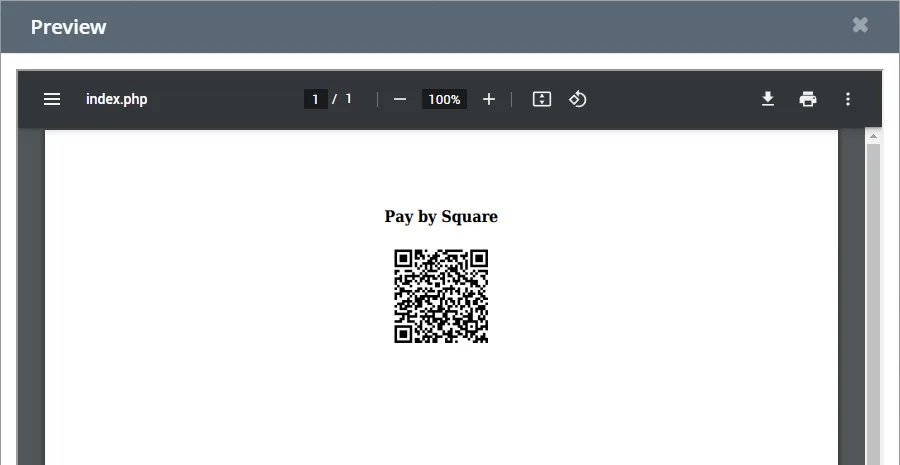
Parameters of the custom function definition:
[CUSTOMFUNCTION|payBySquare|iban|amount|currency|vs|ss|cs|note|due_date|size|CUSTOMFUNCTION]
- iban = iban of the person / organization which will be receiving a payment, you can aswell use a variable and load a Custom field from Vtiger CRM which has this value filled
- amount = payment amount, same here can be used variable from an Invoice module like $TOTAL$
- currency = currency in which payment should be made, we suggest using a $CURRENCYCODE$ variable which will load specific record symbol of the currency
- vs = variable symbol
- ss = specific symbol
- cs = constant symbol
- note = payment note for recipient
- due_date = most of the payments need to have a due date, so it has to be filled, we suggest using Due Date variable $INVOICE_DUEDATE$ (each module has own variable for due date)
- size = size of the QR code symbol, here you define only one number for example 200 means = 200 x 200
 Note: Some of the parameters can be removed if not needed, for example:
[CUSTOMFUNCTION|payBySquare|iban|amount|currency||||note|due_date|size|CUSTOMFUNCTION]
You need only delete the text like “vs/ss/cs” but keep the separators “|”
8.8 Related documents auto-loading
This feature is available from version 0.44 and higher.
How does it all work? When sending the email of the given record, the related documents will be attached to the email, the attached documents will be selected from the folders you selected in the template settings in the Settings tab.
The documents will be automatically attached to the email and you do not have to select them manually.
Please do the following steps:
- Navigate to your Email Maker template and then click on the Settings tab:
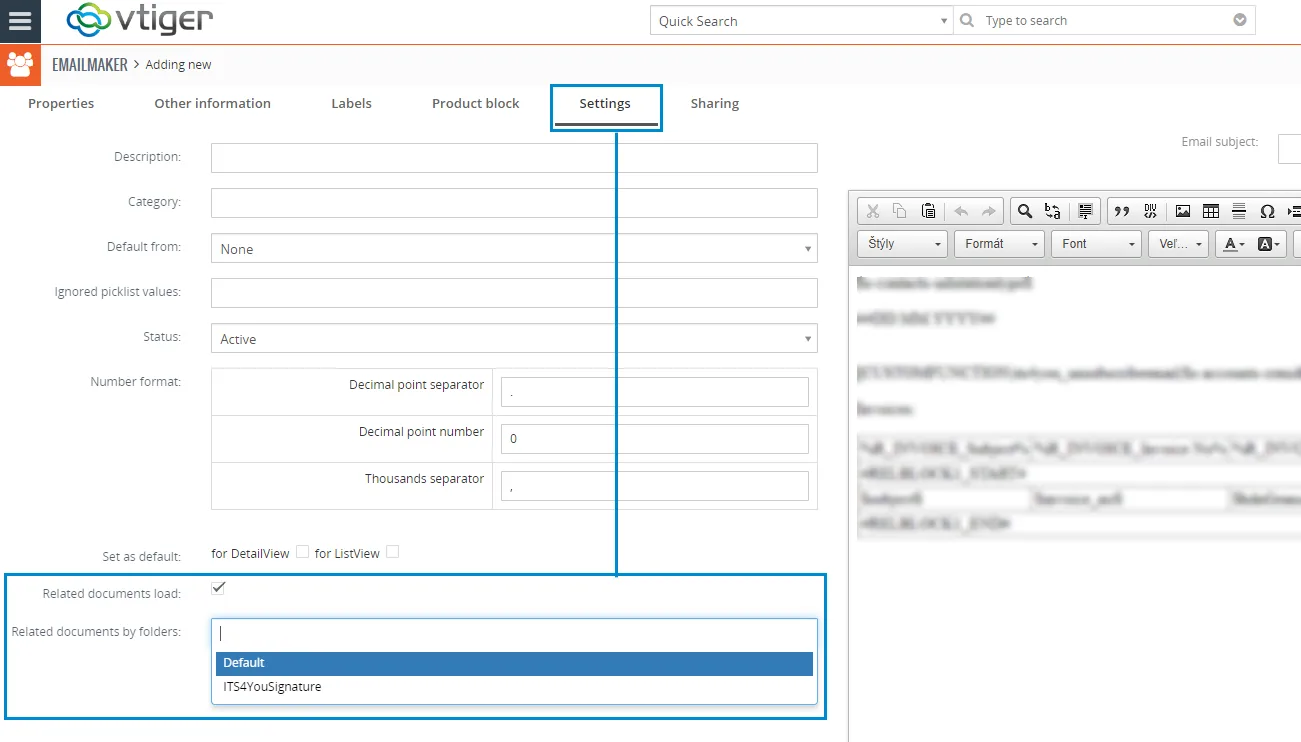
- Next, please make sure the “Related documents load” is checked and then select the folder for Documents.
Note: Each module has different folders.

- Save the template and open your record, as an example we will use Contacts module.
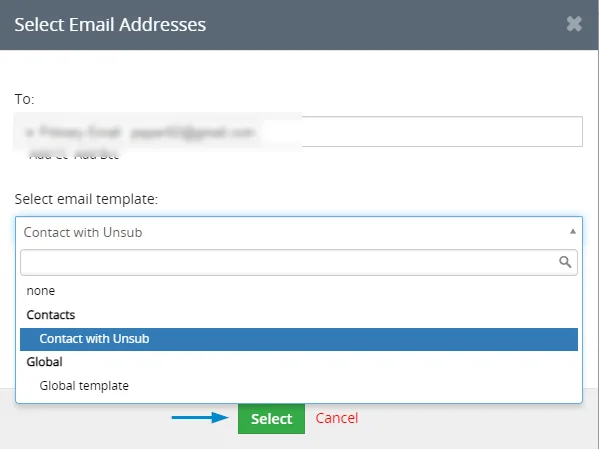
Click on and select the template for which you defined Related documents load.
Procced with button.
- Now, on the preview below you can see that only documents from folder we selected were attached to the email, so you do not need to do it manually.
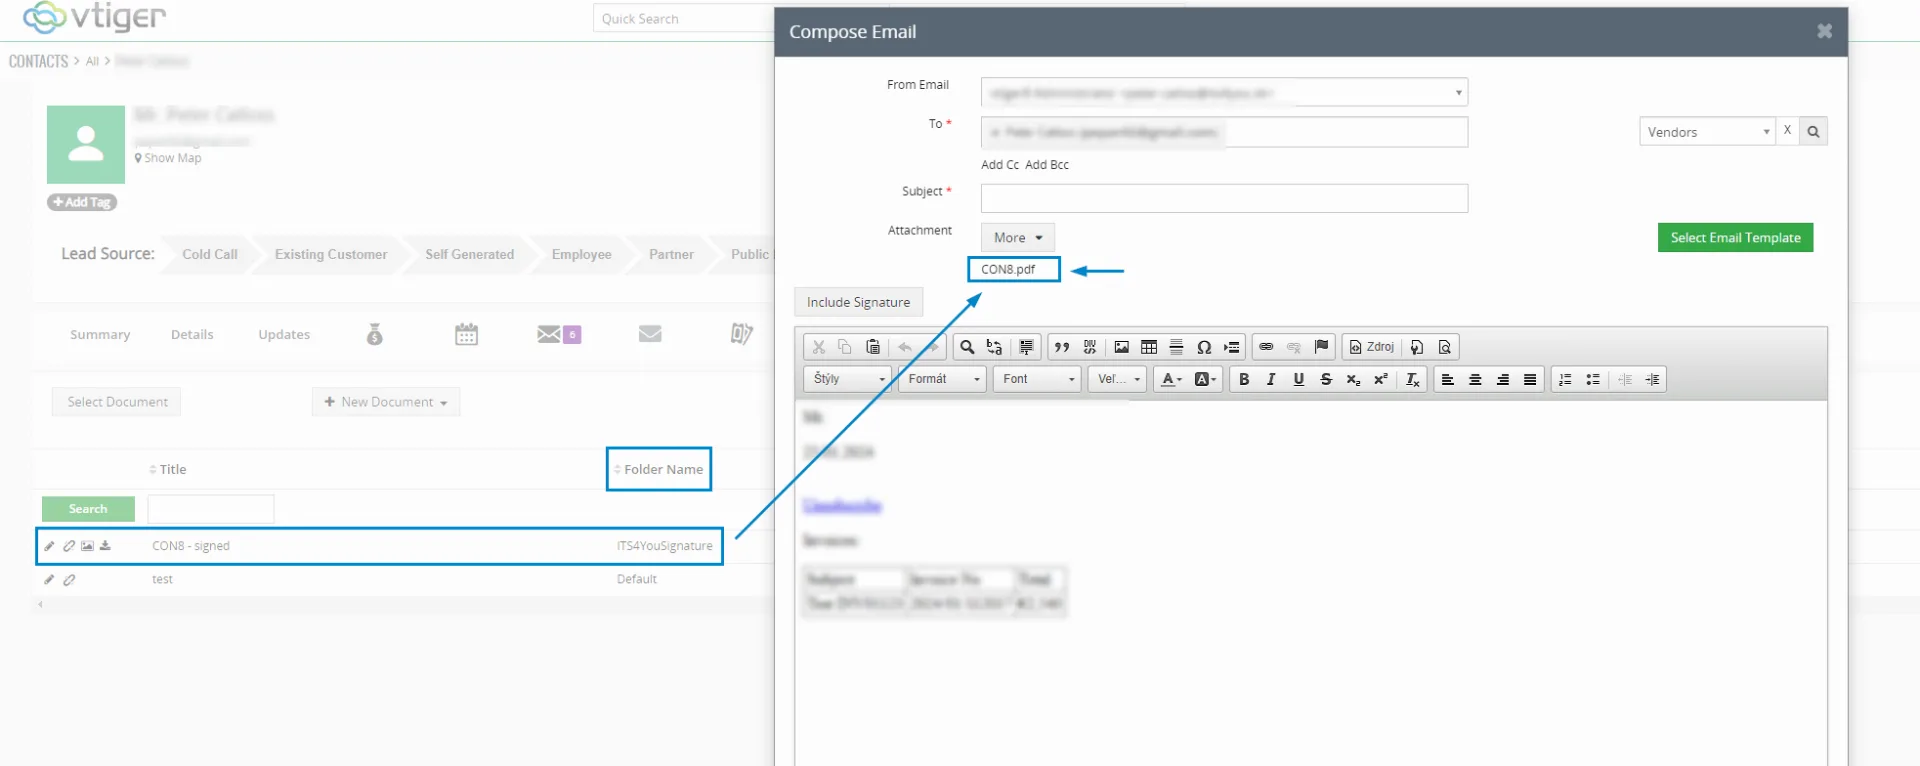
Note: When Related documents load is checked/selected, but no Related documents by folders or Related documents by fields are selected/filled, then all related documents to the record will be loaded/attached.
8.8.1 Related documents by fields
This feature is available from version 0.51 and higher.
What does this feature? It will load/attach documents from selected Module based on a Field filled in original record from which email is being sent. So for example, we have a Contact record, that Contact has filled field Organization Name: IT-Solutions4You.

In the template Settings we have defined following:
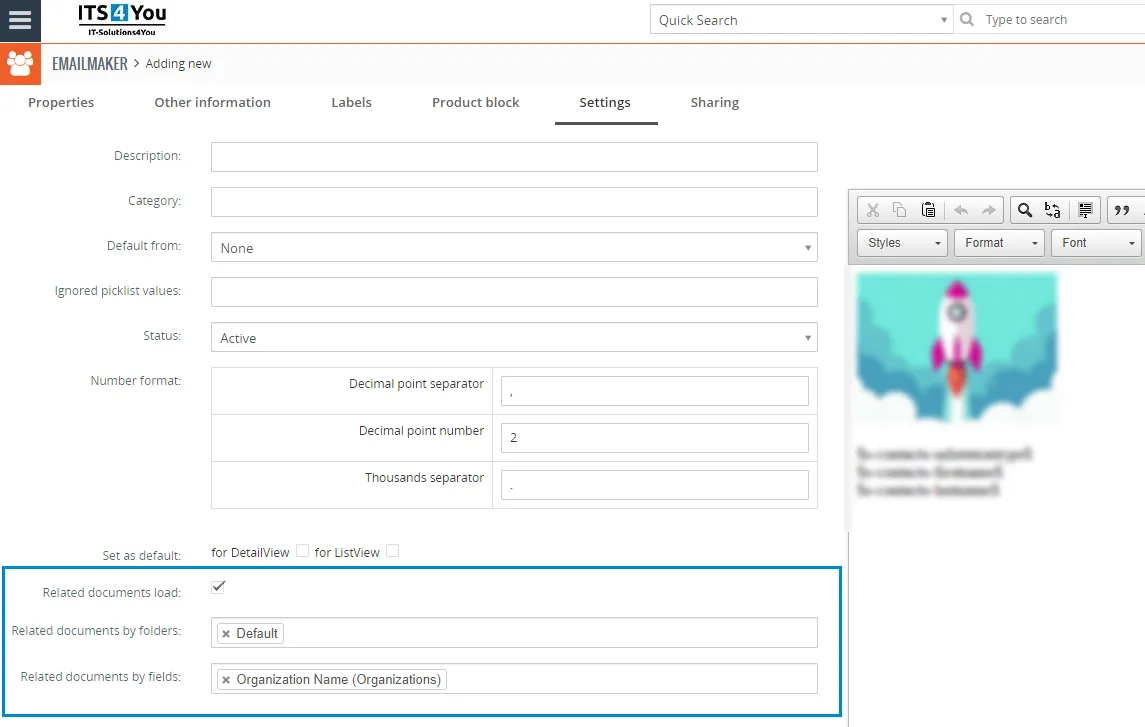
- Related documents load must be checked in order to make this work
- Related documents by folders, here you select a folder based on which documents will be attached to an email
- Related documents by fields, here you select a field which is filled in your Contact record, in our case its Organization Name, so any attached files to that Organization with folder “Default” will be also attached to an email from Contacts module.
Below you can see documents related to Contact record with folder set to Default:

Below you can see documents related to Organization record with folder set to Default:
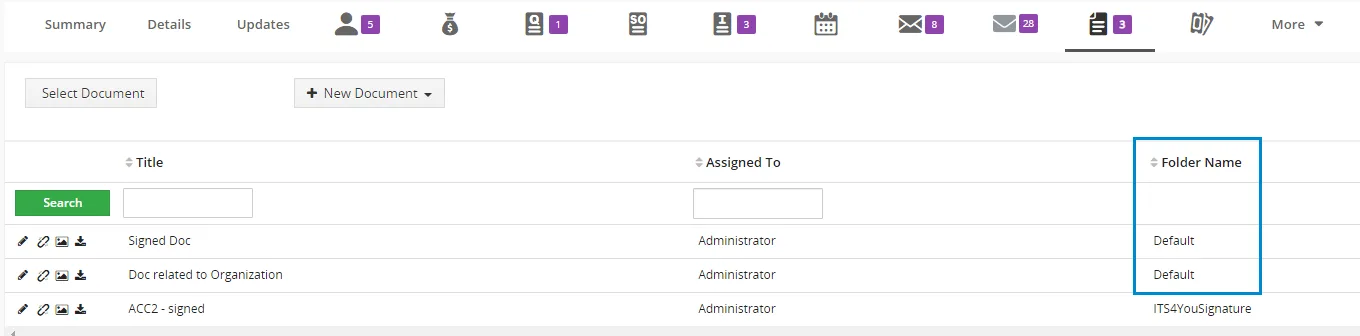
As you can see Signed Doc document is same in module, but document “Doc related to Organization” is under Organization IT-Solutions4You which is defined as Organization Name for the Contact.
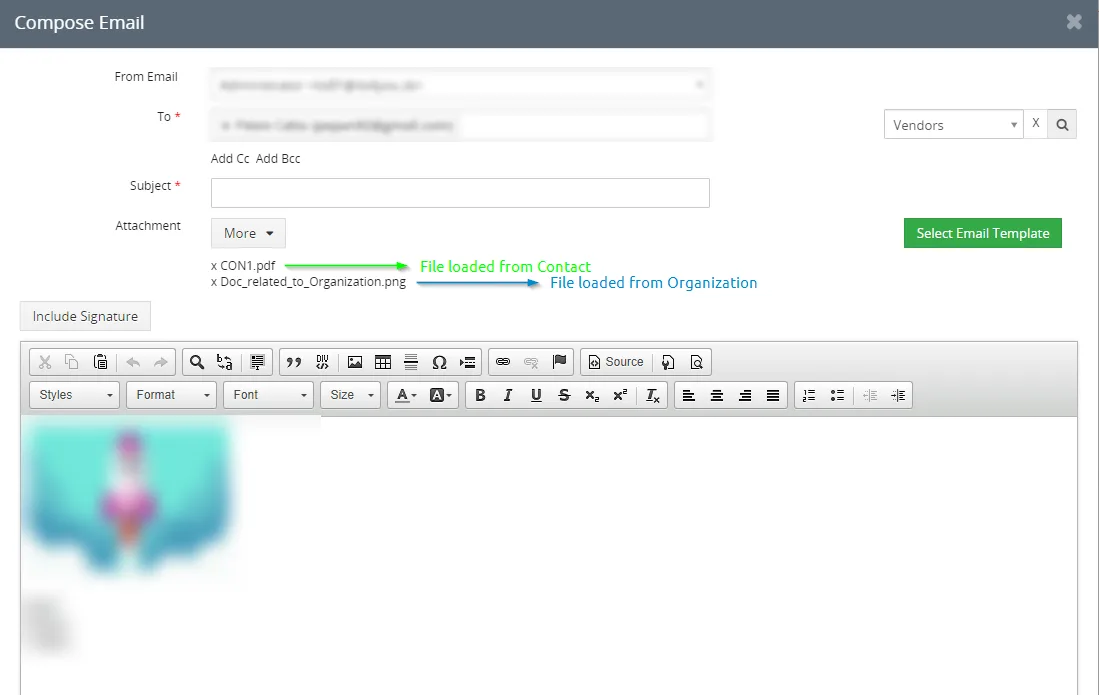
Then when we compose an email in the Contact via and we select our Email Template we can see the following documents were attached automatically.
One document is loaded from the Contact Module and other document is loaded from Organization module and more specifically organization IT-Solutions4You:
Note: File names are presented in the attachment area, not Title of Documents.
8.9 Default PDFMaker Template for EMAILMaker
This feature is available from version 0.46 and higher.
Users can set that when sending an email via email maker, the PDF Maker template for the given module is automatically assigned.
Only one template can be loaded per time.
So how does this all works?
- Make sure to have selected same module for both Email Maker and PDF Maker templates
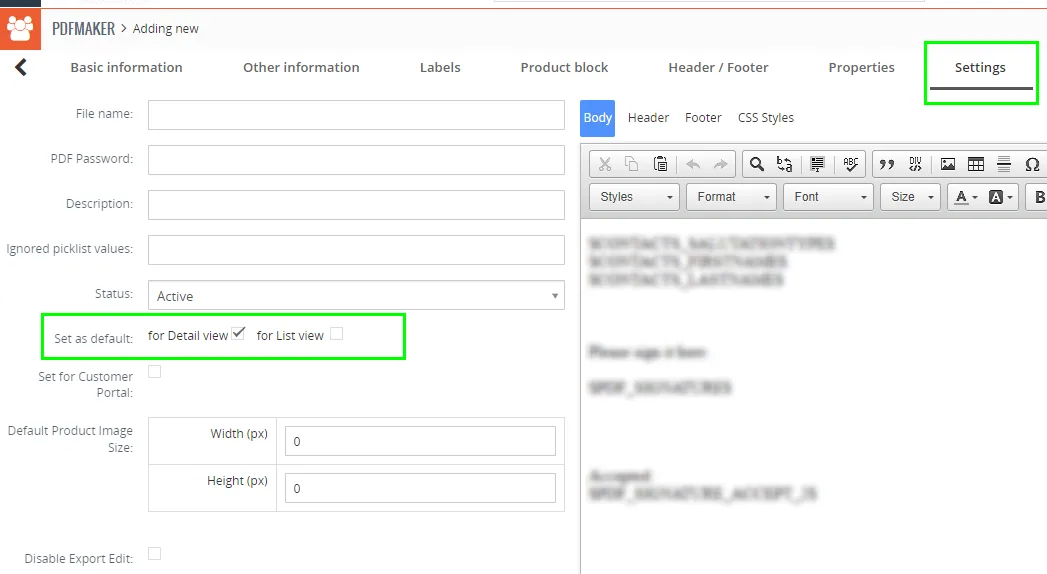
- Then navigate to PDF Maker template, in our case we choose the Contacts module, and click on the Settings tab and then check “Set as default”:
You can select Detail view or List view, based on this setting the template will be added to the Email Maker compose email
- Then go to your record for which you want to send email, click on and you can see that the template of PDF Maker was automatically attached:
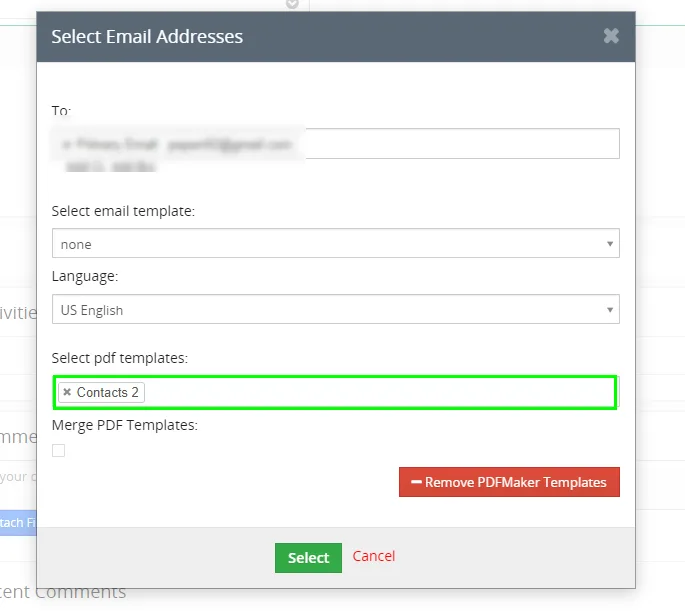
- You can still remove the template if you like by clicking on:

or Add new templates.
Only one template can be loaded per time.
Need help with EMAIL Maker?
Our support team answers questions about installation, templates and settings.