
The PDF Maker tool itself is very extensive, so in the next chapters we will show you its other features that can be used.
9.1 Chat with PDF Assistant
The PDF Maker AI Assistant is built directly into PDF Maker and helps users create, redesign, and improve PDF templates more efficiently.
The assistant uses the content from the currently opened template section and can also work with PDF Maker variables. It can help generate a new template, update an existing template, improve the design, or add missing parts such as a product block.
Token usage
Each user has 500,000 AI tokens per month included in the PDF Maker subscription.
Tokens are used when the AI Assistant processes prompts and generates responses. The token limit is reset automatically every month.
No external API key is required. The AI Assistant is already integrated into PDF Maker, so users do not need to configure any third party AI service.
The current token usage is visible directly in the AI Assistant area. Users can see the usage in the progress bar and also as a percentage value.
Where to find the AI Assistant
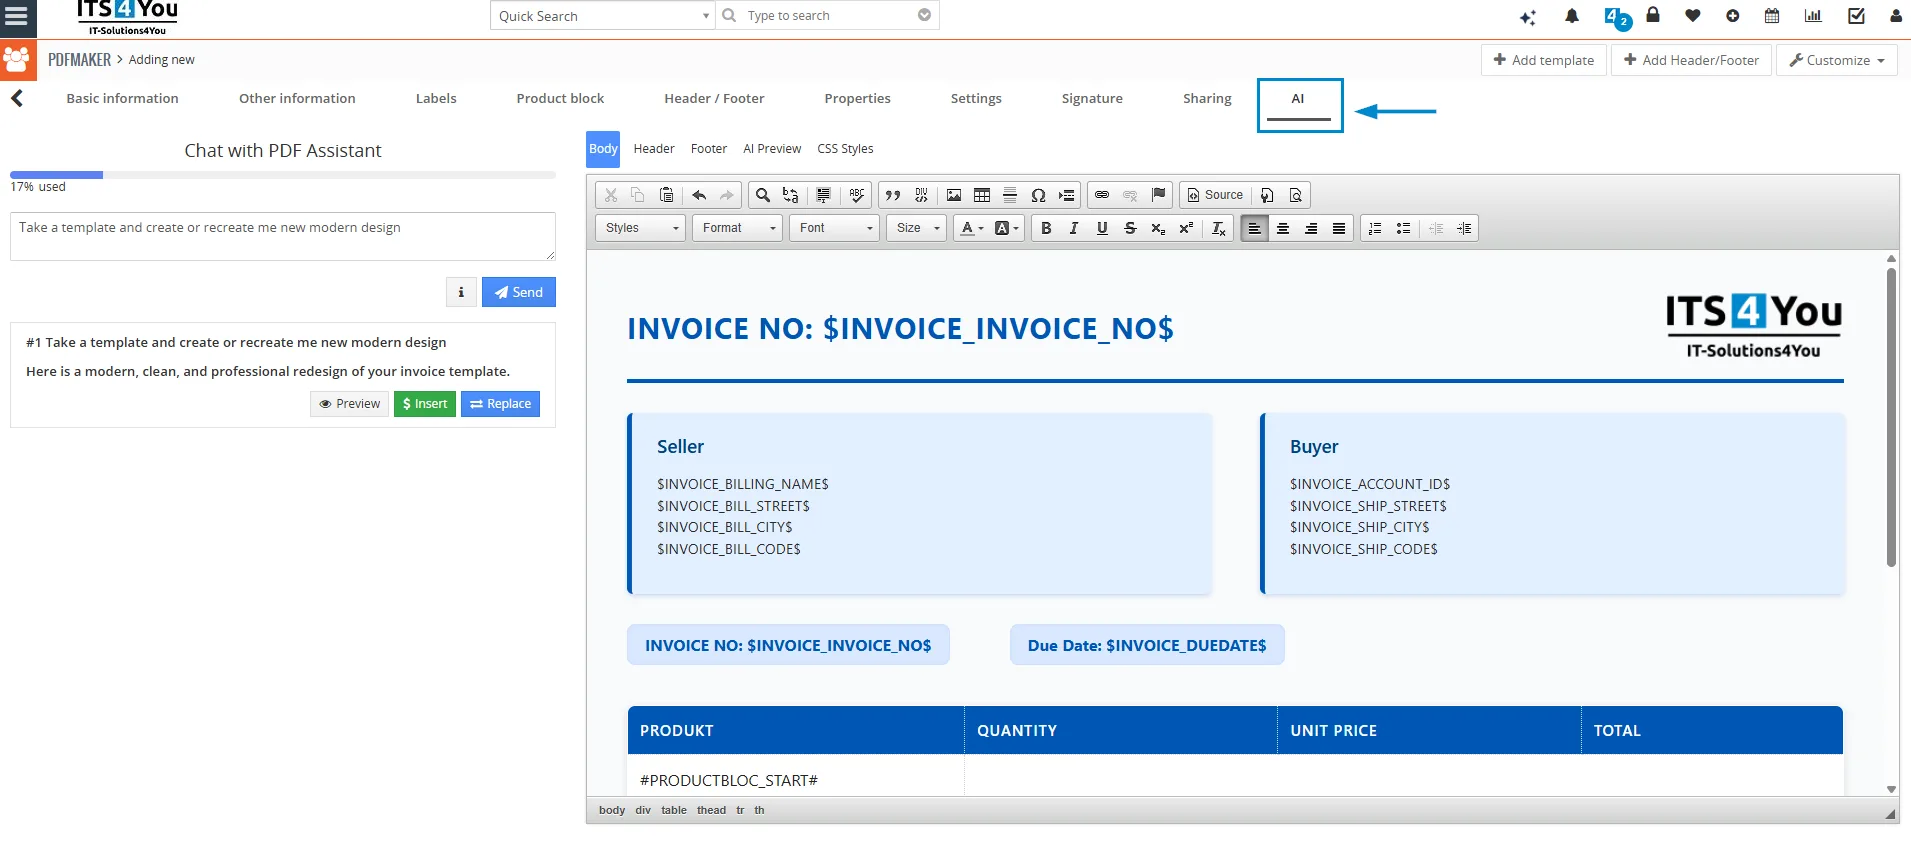
In the PDF Maker Template Editor, there is a new AI tab.
Inside this tab, users can enter prompts and send them to the AI Assistant. Based on the prompt, the assistant can generate a new PDF template or modify the currently opened template.
This makes template creation and editing easier, especially when users want to improve the structure, layout, or visual design of a PDF template.
Example prompts
Users can enter prompts such as:
- Create an invoice template.
- Add a product block to my template.
- Take the whole template and apply a nice blue design.
- Improve the layout of this PDF template and make it look more professional.
- Redesign the body section but keep the existing PDF Maker variables.
Generating content
After entering a prompt, click the Send button.
The AI Assistant will generate a response based on the current template content, available variables, and the user prompt.
After the response is generated, the user can choose how to use the result.
Available actions
Preview
The Preview button allows the user to review the generated result before inserting it into the template.
The generated content will be transferred into the AI Preview tab in the CKEditor, where the user can visually inspect it.
Insert
The Insert button inserts the generated content into the template.
This option is useful when the user wants to add new content without replacing the existing template section.
Replace
The Replace button replaces selected template content with the generated result.
For example, if the template currently contains only the body section and the user wants to redesign it using the AI Assistant, the user can choose Replace and then select Replace body.
History of AI responses
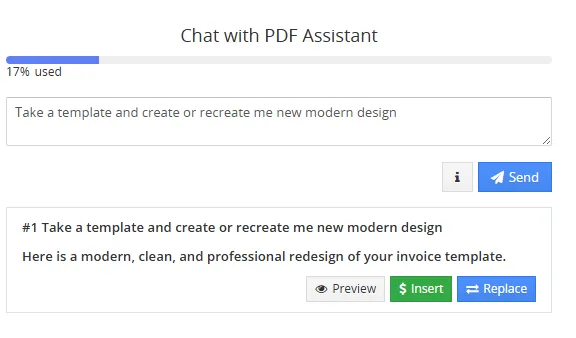
The full history of prompts, responses, and available actions is displayed below the chat window.
Each generated response remains available in the history. This allows the user to return to an earlier result and use it again.
For example, if the user makes a mistake in step 4, but the result from step 3 was correct, the user can use the Replace action from step 3 and restore that version into the template.
Important notes
AI generated content should always be reviewed before final use.
Some results may require additional adjustments, especially when working with PDF Maker variables, product blocks, or complex template structures.
Users should check that all variables are correct and that the basic PDF Maker template rules are followed.
The AI Assistant may not always create the perfect result from the first prompt. In some cases, users may need to refine the prompt or continue with additional instructions.
The AI model will continue to be improved so that it better supports customer requirements and makes everyday PDF template creation faster and easier.
9.2 Prevent emails from being sent
This feature was added on November 12, 2024. To use it, please ensure you have installed or updated our FREE Emails extension to version 0.32.
Description
The newly added feature allows you to prevent emails from being sent if they contain banned words that you define. You can also choose to block emails entirely based on specific templates from Email Maker, PDF Maker, and Email Marketing. If a banned word appears in the content or body of an email, it will not be sent to the recipient.
This feature is ideal for maintaining professional communication with clients, avoiding offensive language, or blocking certain emails from being sent entirely.
Key benefits:
- Keep control over your outgoing emails
- Supports workflows
- Works seamlessly with PDF Maker, Email Maker, and Email Marketing extensions
- Allows you to define multiple banned words, not just one
- Option to prevent emails from being sent based on the template used
- Emails blocked from sending are still created in the system under the Emails extension, allowing you to review the reason they weren’t sent
What is required?
- Emails extension version 0.32 or higher required
- Our extensions that use mailing functions, such as PDF Maker, Email Maker, and Email Marketing
- Ensure all extensions are up to date
- Supports Vtiger versions 7.x and 8.x
- Installer requirements should meet recommended values
How does it work?
A/ Prevent emails from being sent with defined banned words
This feature enables you to block emails from being sent if they contain specific banned words that you define. This is useful for ensuring professional communication and avoiding the use of prohibited or sensitive language in outgoing messages.
- Go to Vtiger folder, open file config.inc.php
- Add following code with your banned word/s:
$ITS4YouEmails_BannedWords = [‘word1’, ‘word2′,’word3’,];

- Save the config.inc.php file
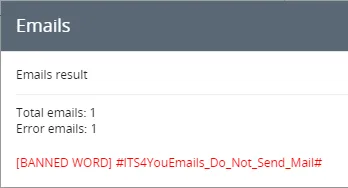
Now, when you try to send an email—let’s say via Email Maker—and the template or body content includes the word “bannedword,” the email will not be sent, and the following message will appear: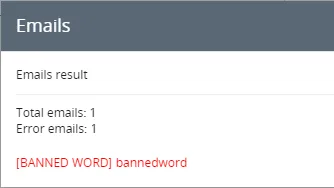
B/ Prevent emails from being sent at all for specific template
Prevents emails from being sent entirely for a specific template by using the following code: #ITS4YouEmails_Do_Not_Send_Mail#
- Open any template you want and add to body code
#ITS4YouEmails_Do_Not_Send_Mail#
- Save the template.
- Go to record module and try to send email using a template we defined code in.
Following message should appear:
9.3 How to add Fonts for PDF Maker
Please read before we start
- PDF Maker is working via mPDF Library
- PDF Maker also cooperates with CKEditor, which is used to create/customize your own templates
- However, its not possible to change fonts styles in your template via CKEditor layout
* You can use all features of the CK Editor for fonts like: styles, formats, size, colors but not the fonts

- Fonts can be only defined via source code of the template, using HTML or CSS tags, or via our free extension Styles 4 You by creating a style
Example: <p style=”font-family: frutiger”>Text in Frutiger</p> - mPDF supports Truetype fonts, reading and embedding directly from the .ttf font files
- Truetype collections (.ttc files) and Opentype files (.otf) in Truetype format are also supported
- That’s why you should read next section how to use custom fonts in the PDF Maker
More info about using mPDF fonts in mPDF 7.x
How to add new fonts for PDF Maker
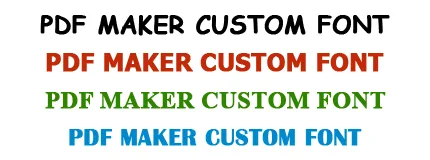
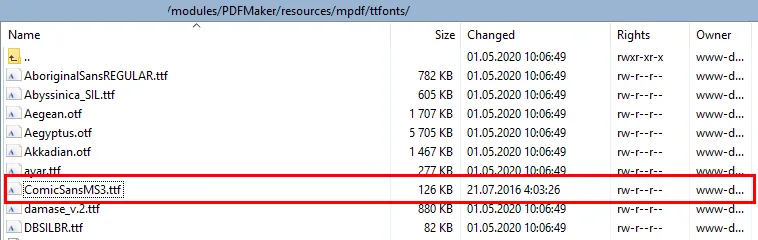
- Find the font you want, we will use Comic Sans MS (make sure your font is .ttf font)
- Upload the Truetype font file to the fonts directory (vtigerfolder/modules/PDFMaker/resources/mpdf/ttfonts)
- Next open the file modules/PDFMaker/mpdf/config_fonts.php

- Now, we need to define this font by adding array so we can use it as HTML or CSS in our templates
In the file we have opened config_fonts.php:
around line 83: “$this->fontdata = array” you can see how other fonts are defined
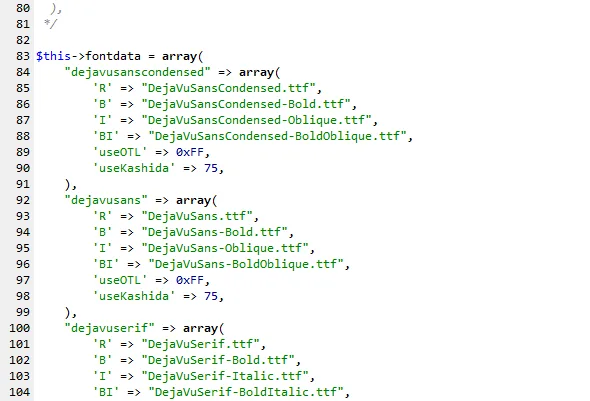
We need to add our array:
“comicsansms” => array(
‘R’ => “ComicSansMS3.ttf”,
),
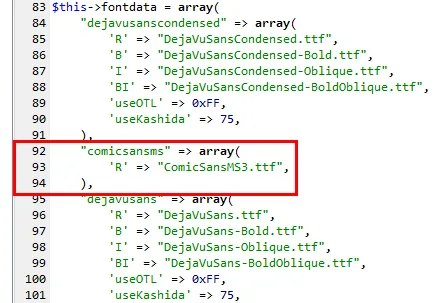
Short explanation of some definitions we added:
“”comicsansms” = will be used in a template/styles to define font, you can name it as you want
‘R’ = means regular font, you can also use bold font ‘B’ if you uploaded bold fonts too
*(will be explained in the next section)
“ComicSansMS3.ttf” = is the name of the font we uploaded in the step 2
 Note: We suggest naming fonts with lower case fonts and if possible do not use separate words like comic sans, this may work for some fonts but for another not.
Example: Good = comicsansms / Bad = Comic Sans – MS - When done, save the changes in file config_fonts.php
Applying new fonts to the template
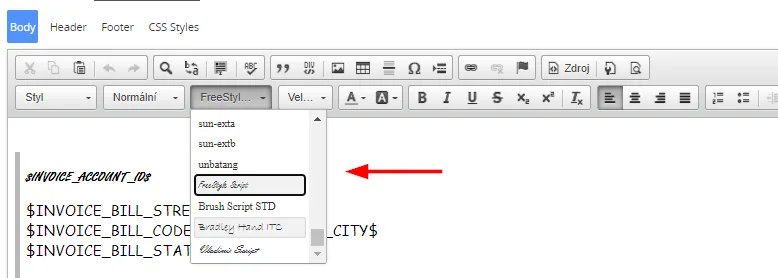
Directly via CK Editor by selecting fonts:
Note:This is supported only from version 4.21 of PDF Maker.
Manually by creating/editing the HTML code:
- Open the PDF Maker template with your text, and click on the “Source” button via CKEditor layout
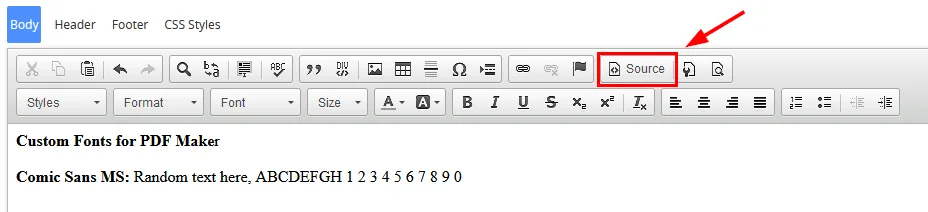 The template will switchto source code HTML format, we need now define font we uploaded in order to change text style
By default you should see code:
<html>
<head>
<title></title>
</head>
<body><strong>Custom Fonts for PDF Make</strong>r<br />
<br />
<strong>Comic Sans MS:</strong> Random text here, ABCDEFGH 1 2 3 4 5 6 7 8 9 0</body>
</html>
Now we need to add style for our font, should look like this:
<html>
<head>
<title></title>
</head>
<body><strong>Custom Fonts for PDF Make</strong>r<br />
<br />
<span style=”font-family:comicsansms”><strong>Comic Sans MS:</strong> Random text here, ABCDEFGH 1 2 3 4 5 6 7 8 9 0</span></body>
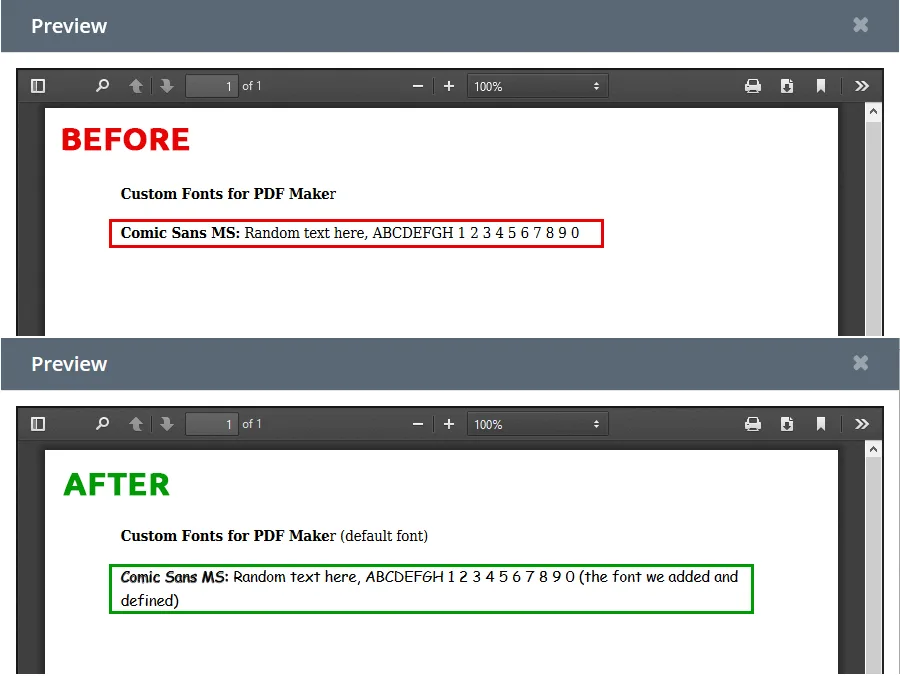
</html> You can use any font styles html/css you prefer to define fonts: span style=”font-family, p style=”font-family. - Save/Apply the changes and try Export or Preview template
9.3.1 F.A.Q Custom Fonts
Can I use custom fonts in combination with your Styles 4 You?
Yes! you can visit our Styles 4 You section to see more details. All you need to do is define fonts via CSS/HTML.
All fonts are supported?
mPDF supports Truetype fonts, reading and embedding directly from the .ttf font files. Fonts must follow the Truetype specification and use Unicode mapping to the characters. Truetype collections (.ttc files) and Opentype files (.otf) in Truetype format are also supported.
Does mPDF already contain some other fonts in addition to the fonts I want to use?
Yes, you can check the list here: Available fonts v6 and v7
When I uploaded the fonts I noticed in the config_fonts.php array lines like are ‘R’ / ‘B’ / ‘I’ what does that mean?
[‘R’] = Regular (normal font)
[‘B’] = Bold (bold font)
[‘I’] = Italic (italic font)Each font-family must have a Regular (‘R’) file defined – the others (Bold ‘B’, Italic ‘I’, bold-italic ‘BI’) are optional.
This is used when you have 3 .ttf files and each is unique for his font variant.
“cambria” => array(
‘R’ => “cambria.ttf”,
‘B’ => “cambriab.ttf”,
‘I’ => “cambriai.ttf”,
9.4 Font Awesome Icons

With the new feature Font Awesome you can add a lot of icons to your PDF Maker template just with few clicks!
How to add Font Awesome Icons to your PDF Maker template?
- Make sure you have installed PDF Maker version 700.7.0 or higher
- Open your template and go to Other information tab, where you can find a Font Awesome menu with the following options:
A) List of Icons – in this list you can see the names of icons which you can choose by clicking on any of them
B) Icon preview / Icon import button – here is icon preview and also an icon import button (click on the image icon and icon will be imported to your template)
C) Font Awesome icon detailed list view– you can find here: Icon, CSS Class, & Unicode Cheatsheet
D) Icon imported to your template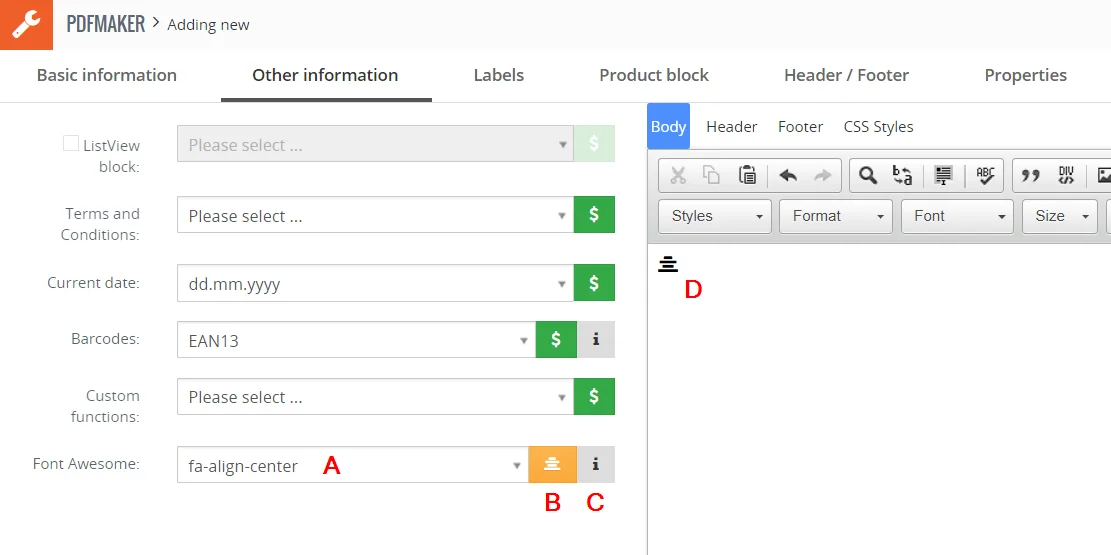
PDF Maker – Font Awesome - Full process how to add Icons to your template is shown on following picture:
Note: On the picture, you can see that there is also an option to change size, color, background color. There is also option to align icons.
PDF Maker – Font Awesome
9.5 Mass export and merging templates
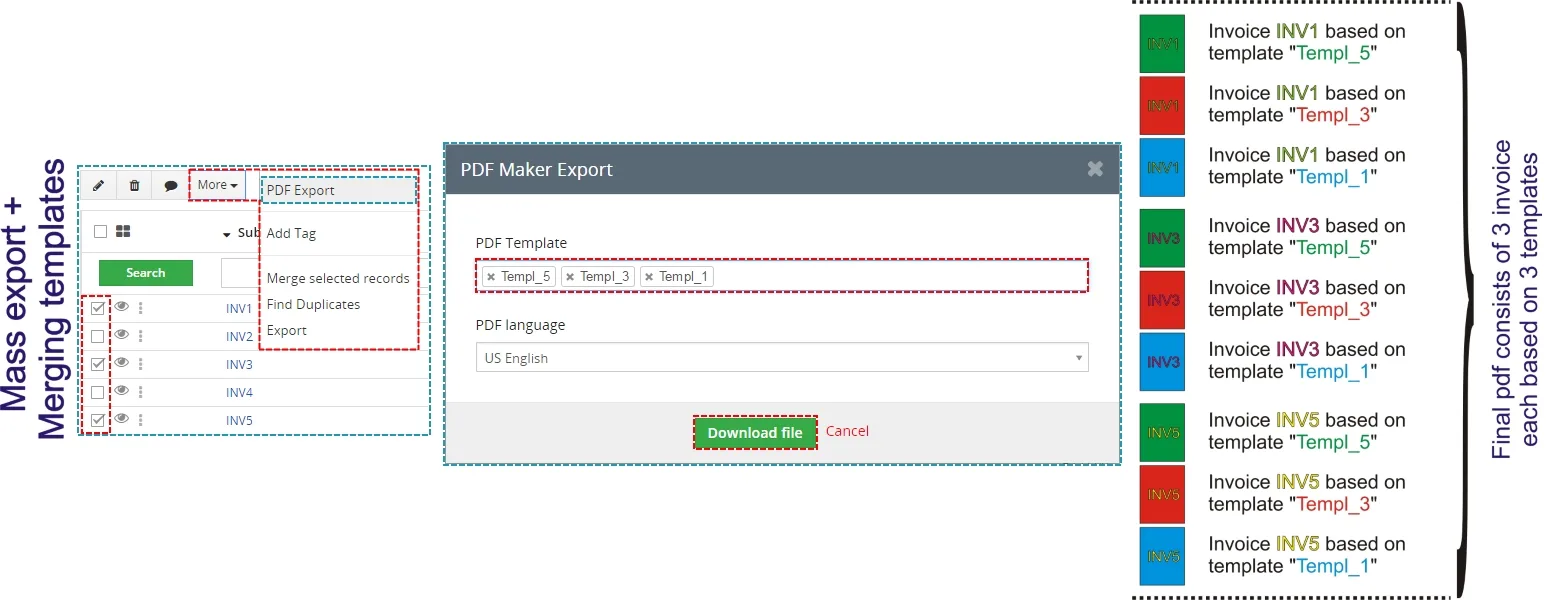
In the chapter Export was described how to export documents via PDF Maker block. There is additional possibility of the export to PDF via ListView. In addition, ListView allows you mass export and merging templates. To do mass export in ListView please provide following steps:
- Inside ListView, select one or more document.
- Click on
 .
- PDF Maker batch export window will appear on the screen.
- Select the PDF template.
- Click on
 .
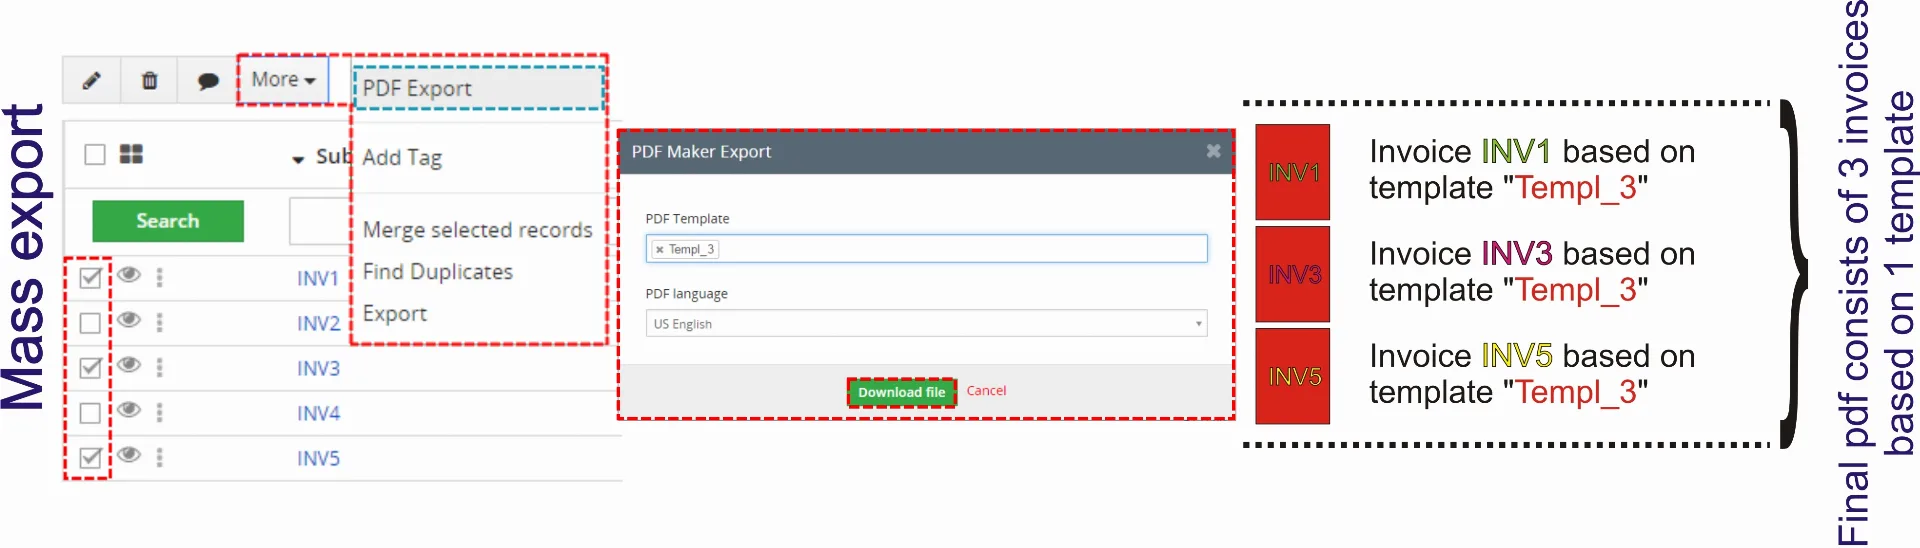
The merging of the templates allows you to print one or more documents using more templates at once.
Next picture shows the merging of the templates.
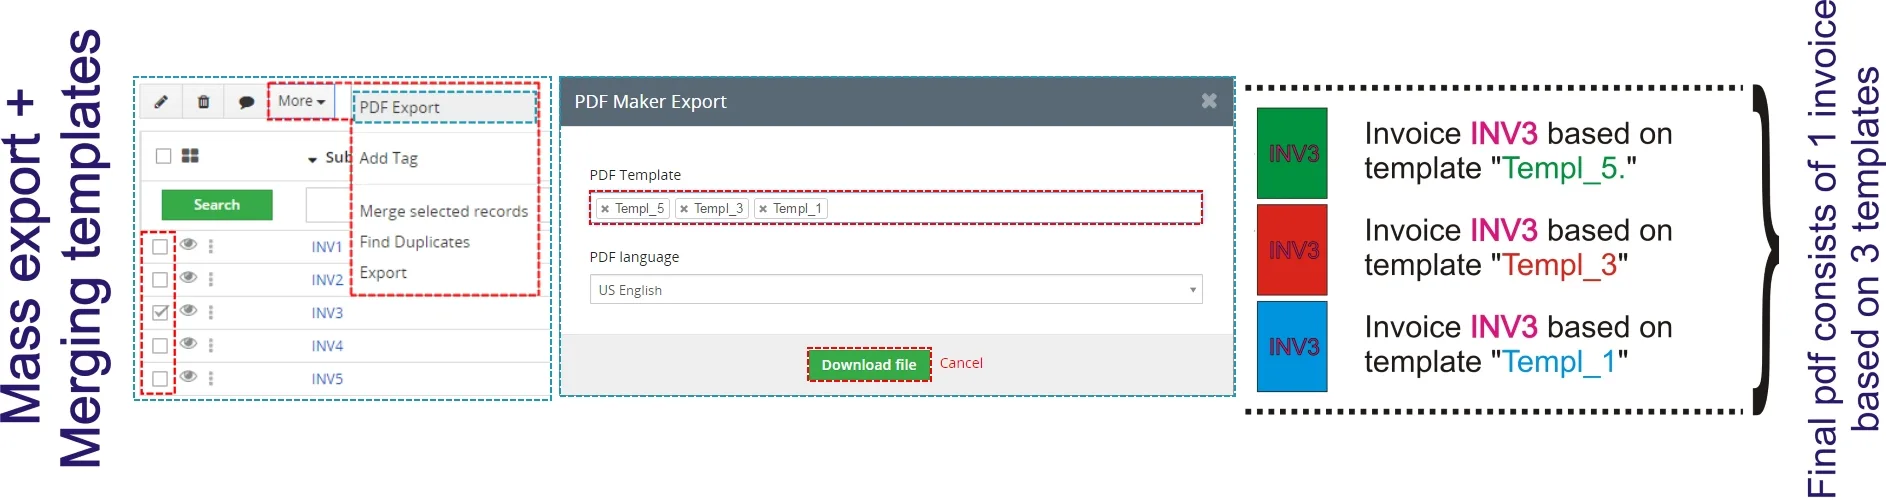
If you combine mass export and merging templates you will obtain final PDF document as is shown in the
next picture.
9.5.1 Sorting within mass export
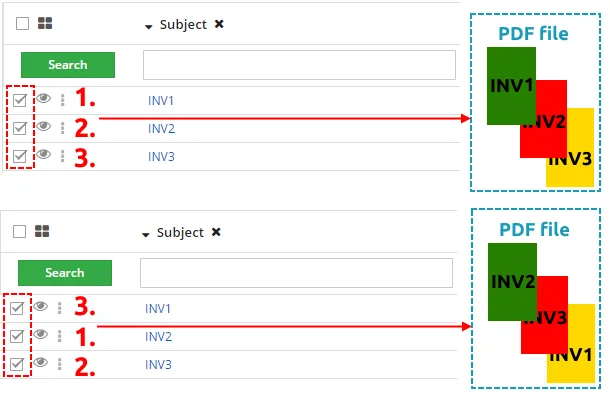
The order of the records exported in the pdf file within mass export depends on sorting used in the ListView. So if you change sorting of the records in the ListView then the final PDF file will correspond this sorting, i.e. records will be ordered as sorted in the ListView and the order will depend on sequence of choosing records.
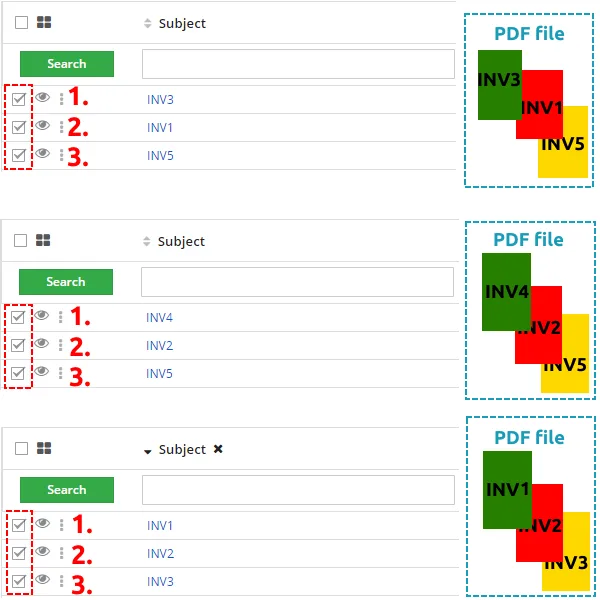
You are able to manage your records in PDF file according to choosing records in ListView.
9.6 Download all records in one click
Since version of PDF Maker 4.19 from 19 January 2021 there is option to Download all records with one click.
Downloaded records will be exported as a .zip file.
You can select one or more templates for download.
Note: However, if more templates are selected and you select 5 records, for example, only 5 .pdf files will be exported as by default, selecting more templates is merged into the one file.
Note: Filename must be unique or empty, so that files are not overwritten. Check template Settings.
Please follow the next steps to perform this operation:
- Make sure 4.19 PDF Maker is installed/updated
- Go to the List view of any module you like and select all records you wish to export with one click
- Click on the
 button and select “PDF Export”
- On the next screen pick template/s and click
 button:
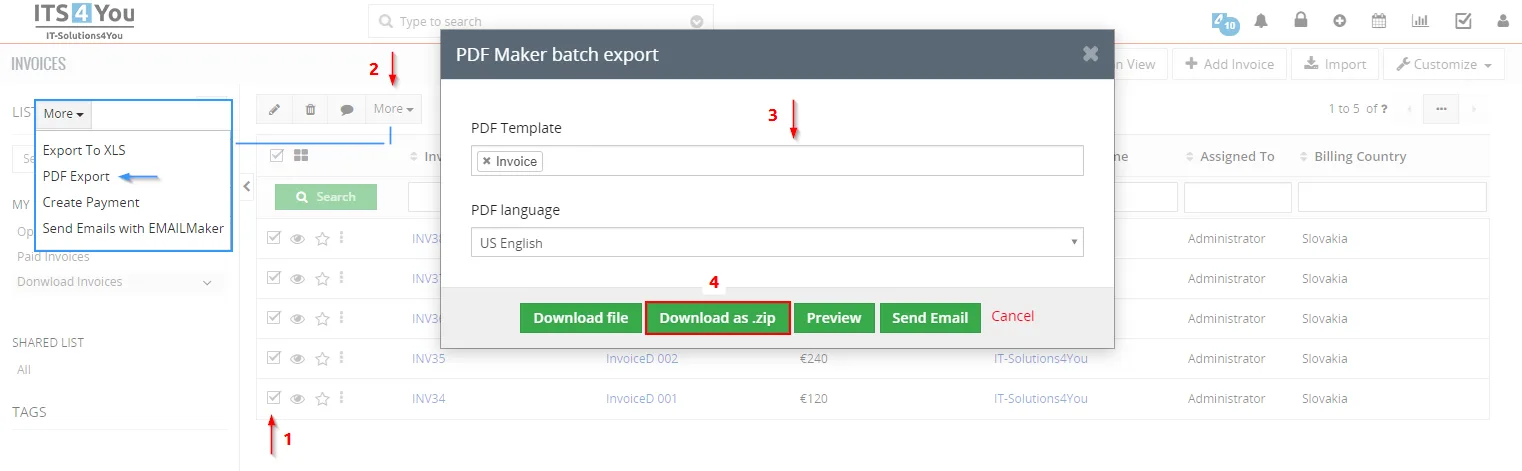
PDF Maker – Once click download all, list view steps - Zip file will be downloaded with all records (. pdf’s)
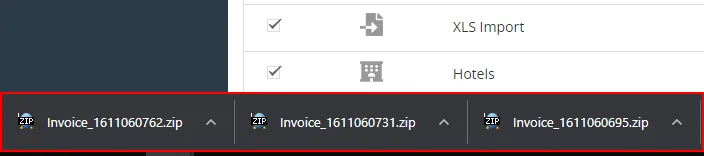
PDF Maker – Once click download all, downloaded .zip file 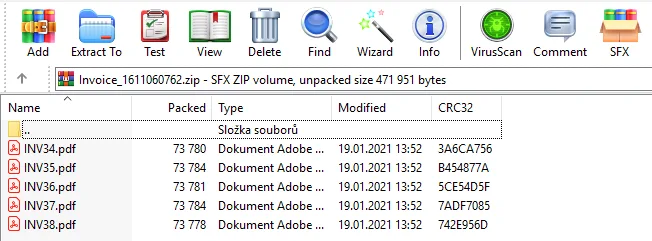
PDF Maker – Once click download all, packged .pdf files in the .zip file
Note: Filename must be unique or empty, so that files are not overwritten. Check template Settings.
9.7 Pay by Square
With PDF Maker Professional you can use the feature Pay by Square easy and load a values for payments from the records via variables used in the template.
Paying with Square is more than a mobile cash register. It also offers free apps for making payments with your smartphone and using bank apps for sending money to your friends or clients.
In order to use the Pay by Square in your templates. Please follow steps below:
- Open your template (in our example we will use Invoice module)
- In the template go to Other information tab and then Custom functions, search for payBySquare function
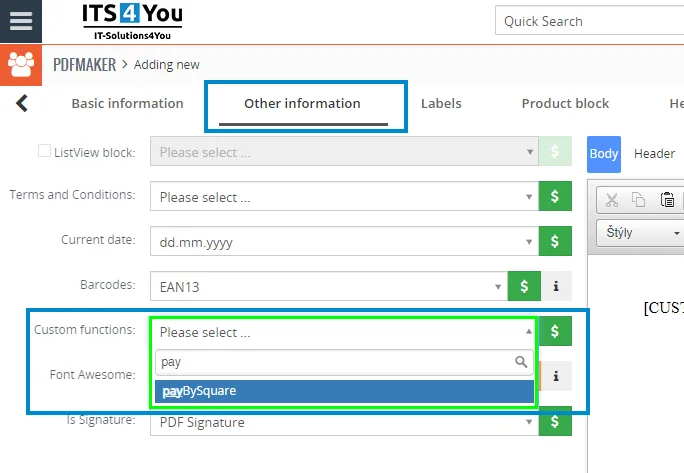
- Insert the function where you want it in to your template, function should look like by default:
[CUSTOMFUNCTION|payBySquare|iban|amount|currency|vs|ss|cs|note|due_date|size|CUSTOMFUNCTION]
- Custom function has own parameters which should be replaced with values or variables, see an example:
[CUSTOMFUNCTION|payBySquare|SK2811110000009999983002|$TOTAL$|$CURRENCYCODE$|1234567890|1234567890|1234|$INVOICE_DESCRIPTION$|$INVOICE_DUEDATE$|100|CUSTOMFUNCTION]
- When the parameters are added, Save the template and you can export it or do additional operations, like preview, send it etc.
This is how Pay by Square QR code looks like upon export from our template:
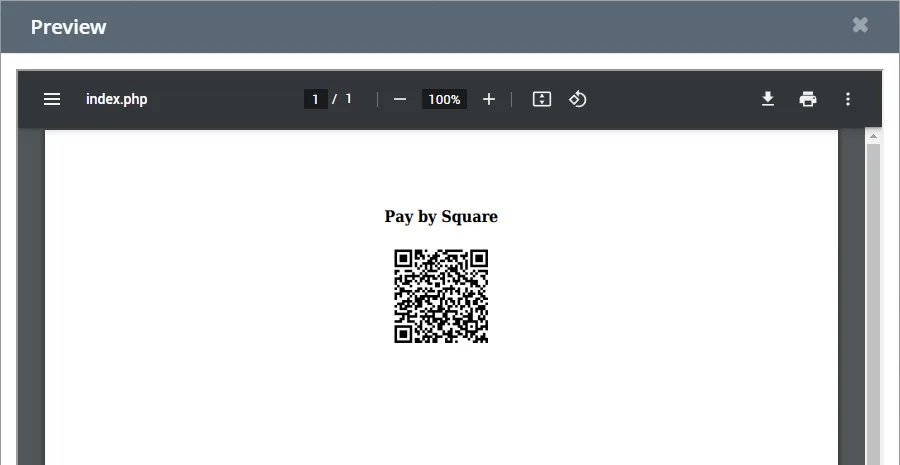
Parameters of the custom function definition:
[CUSTOMFUNCTION|payBySquare|iban|amount|currency|vs|ss|cs|note|due_date|size|CUSTOMFUNCTION]
- iban = iban of the person / organization which will be receiving a payment, you can aswell use a variable and load a Custom field from Vtiger CRM which has this value filled
- amount = payment amount, same here can be used variable from an Invoice module like $TOTAL$
- currency = currency in which payment should be made, we suggest using a $CURRENCYCODE$ variable which will load specific record symbol of the currency
- vs = variable symbol
- ss = specific symbol
- cs = constant symbol
- note = payment note for recipient
- due_date = most of the payments need to have a due date, so it has to be filled, we suggest using Due Date variable $INVOICE_DUEDATE$ (each module has own variable for due date)
- size = size of the QR code symbol, here you define only one number for example 200 means = 200 x 200
Note: Some of the parameters can be removed if not needed, for example:
[CUSTOMFUNCTION|payBySquare|iban|amount|currency||||note|due_date|size|CUSTOMFUNCTION]
You need only delete the text like “vs/ss/cs” but keep the separators “|”
9.8 Export and import templates
Export and import of the PDF templates makes it easy to work with PDF Maker templates by migration process or moving templates from development to productive installation.
In order to export PDF templates to external sources in PDF Maker tool do following steps:
- In the PDF Maker ListView page select one or more templates which would you like to export.
- Click on
 and “Export”.
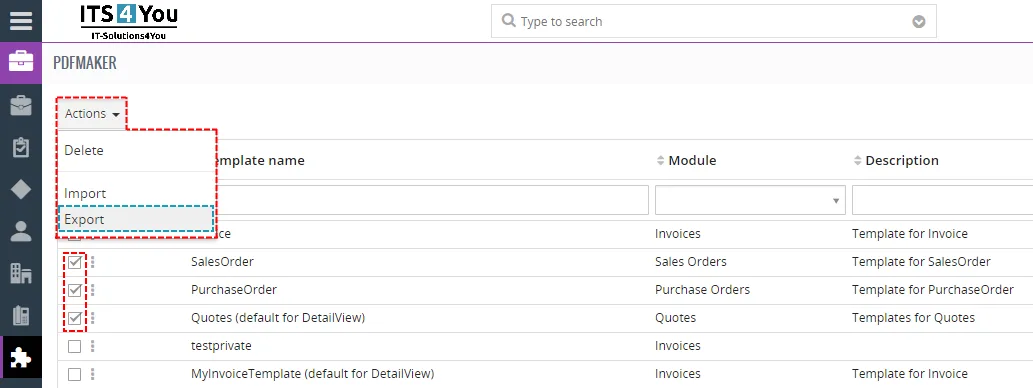
Export of the templates - Confirm export with
 or choose other option to export and then export.
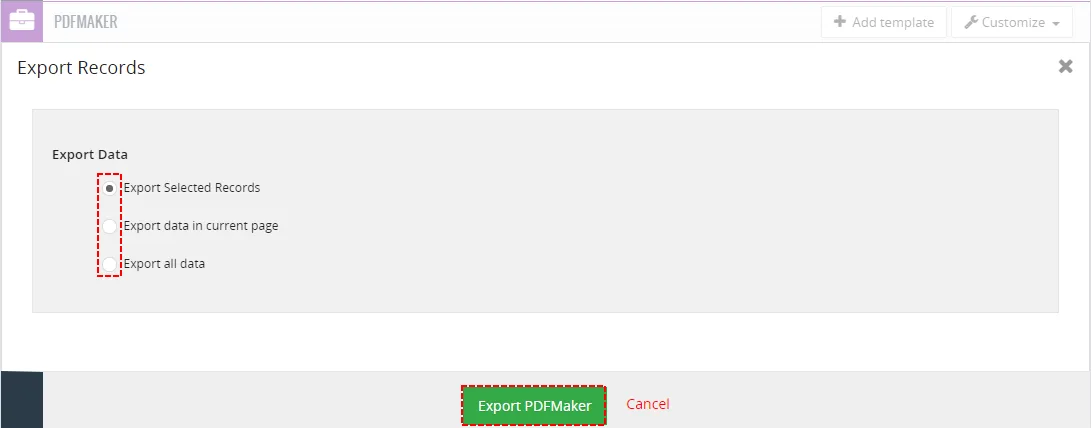
Export of the templates
To import PDF templates from external sources click on the “Import” from (see Picture 6.7 point 2.). After click the new import page will appear on the screen.
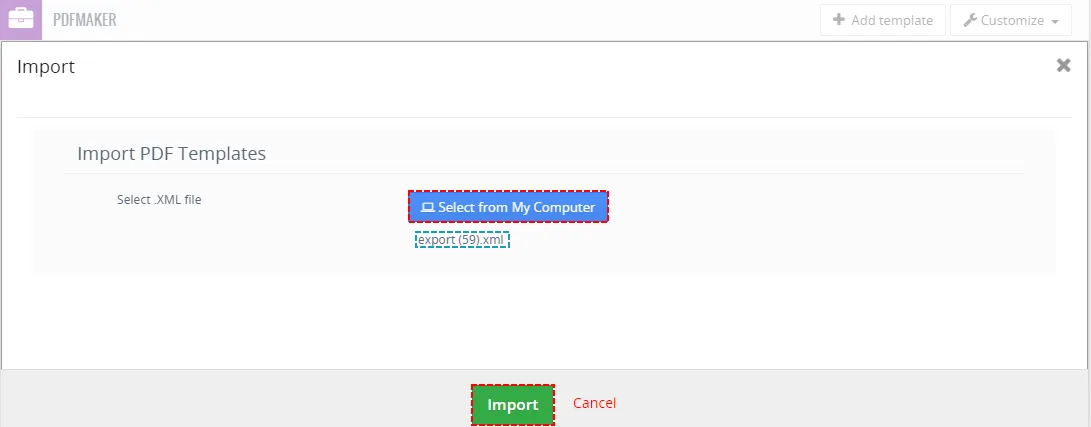
In the Import PDF templates page, browse the PDF Maker template-related data in *.xml format and then click the  button. It will take a few seconds to complete the import. The imported templates can be found in PDF Maker ListView page.
9.9 Colorize Product Bundles
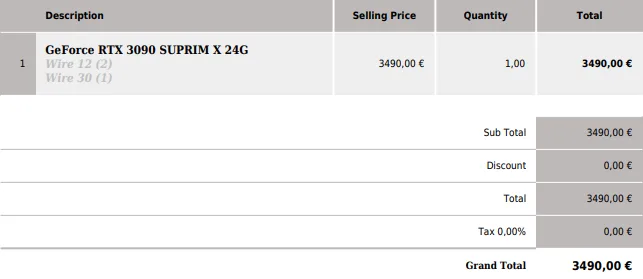
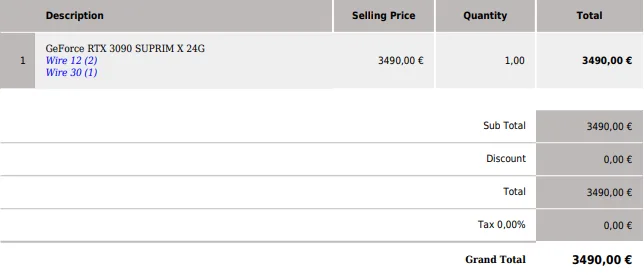
By default Product bundles are shown as light grey, sometimes this is not good for users which have grey background or require to have these bundles more visible.
So we added option to use CSS style, you can use it via Styles 4 You which is our Free extension or directly add this CSS into the template Source code.
For example we wanted a blue color so we used CSS style:
(no need to use any HTML code, just CSS)
- .SubProductsForProductName { color: blue; }
- Added via our Styles free extension:
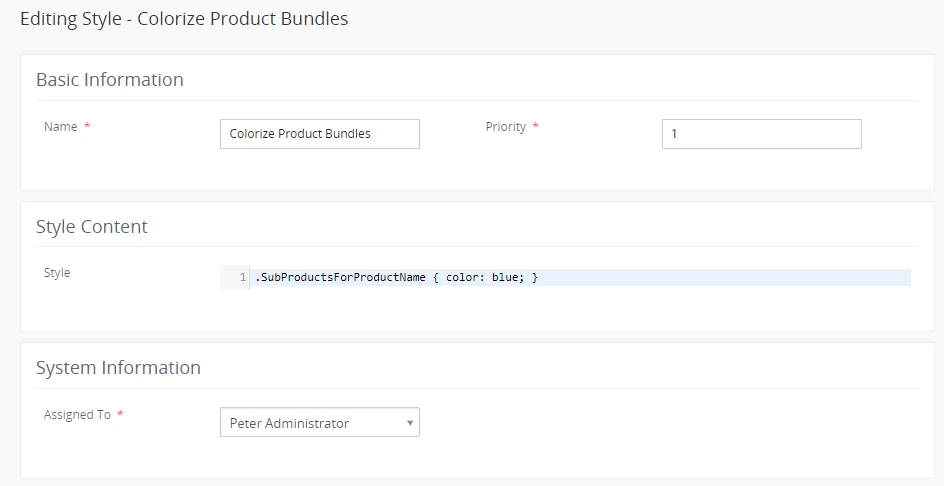
Before
After
9.10 Sharing
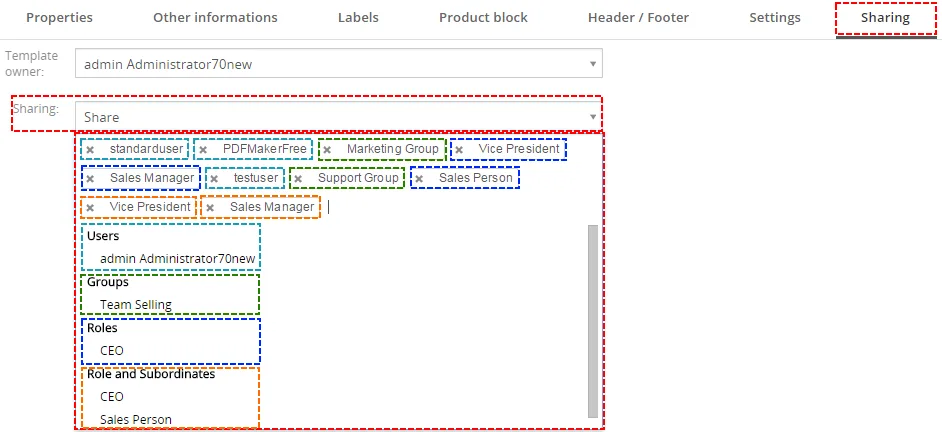
Using Sharing tab you can define template owner and how to share your template between you and other users or groups. You can setup sharing for different entities & members. In order to share your template:
- Select “Share” from the list.
- Choose groups, roles, roles & subordinates or users to share.
9.11 Disable Export Edit
Note: This feature was added in version 4.21 of PDF Maker
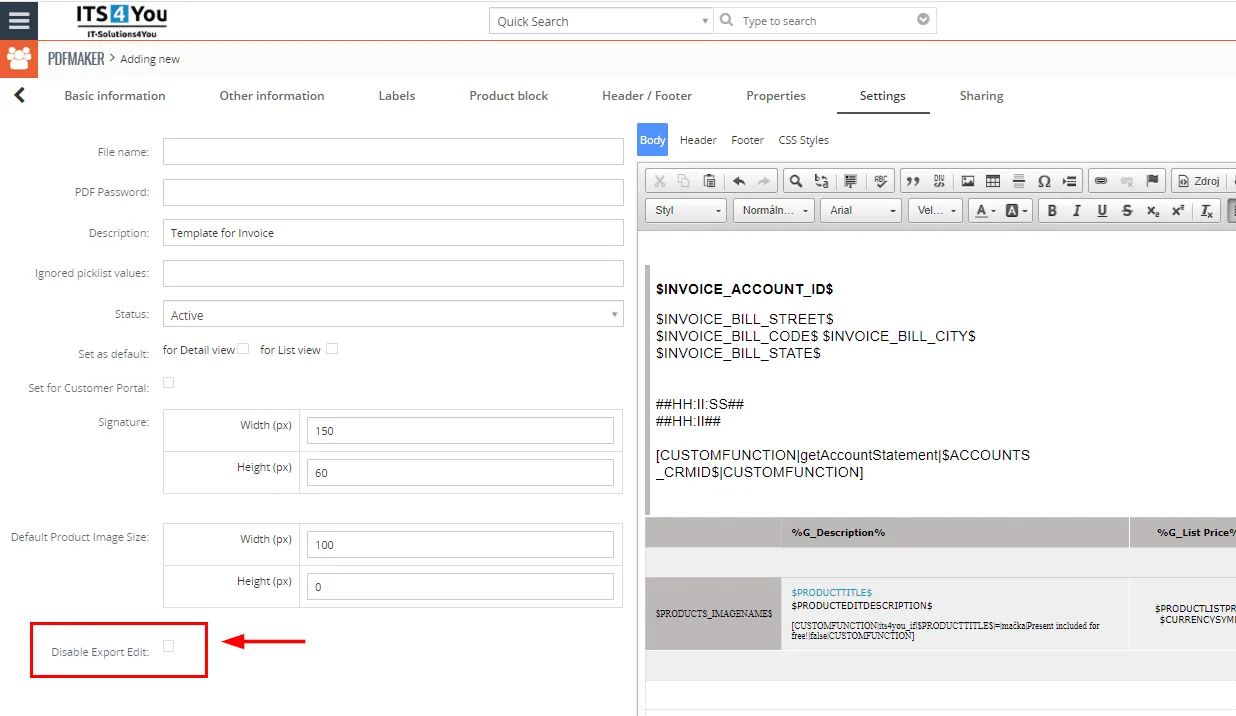
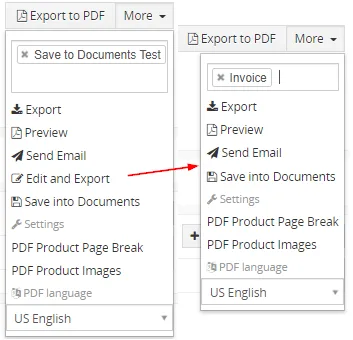
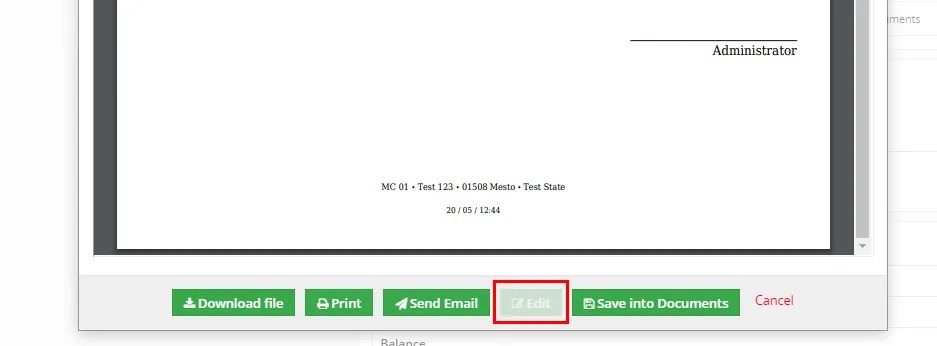
We have added new feature Disable Export Edit, with this feature you can disable editing template before export.
Simply check the checkbox for specific template and when this template is selected, users are unable select option  and also make any changes to it upon export and preview.
9.12 Custom functions
Custom functions work only with PDF Maker Professional.
Also, there is an option to use standard PHP functions with our PDF Maker like:
[CUSTOMFUNCTION|round|$PRODUCTQUANTITY$|CUSTOMFUNCTION]
If you need a special treatment of vtiger data in your template, you can use custom (your own) functions. There is a folder functions under [vTigerROOT]/modules/PDFMaker/resources/, where you can place your own .php file with functions which would you like to use. This file will be included automatically. Inside this folder is file „its4you.php“, which contains our functions. These functions are listed in the Table 6-1 and are provided for you for free. Do not modify this file, because by next version it will be overwritten. If you would like to use your own functions, please create your own file/files, it means create new .php file under [vTigerROOT]/modules/PDFMaker/resources/functions and place here your functions. In order to insert custom function into template provide following:
- Go to EditView, and in Other information tab select custom function from selectbox „Custom functions“. You can choose one of our functions (its4you_*), or your own function.
- Click on
 button. It adds function in form
[CUSTOMFUNCTION|functionname|param1|param2|…|CUSTOMFUNCTION]. - Finally you have to define parameters of the function as shown in the picture.
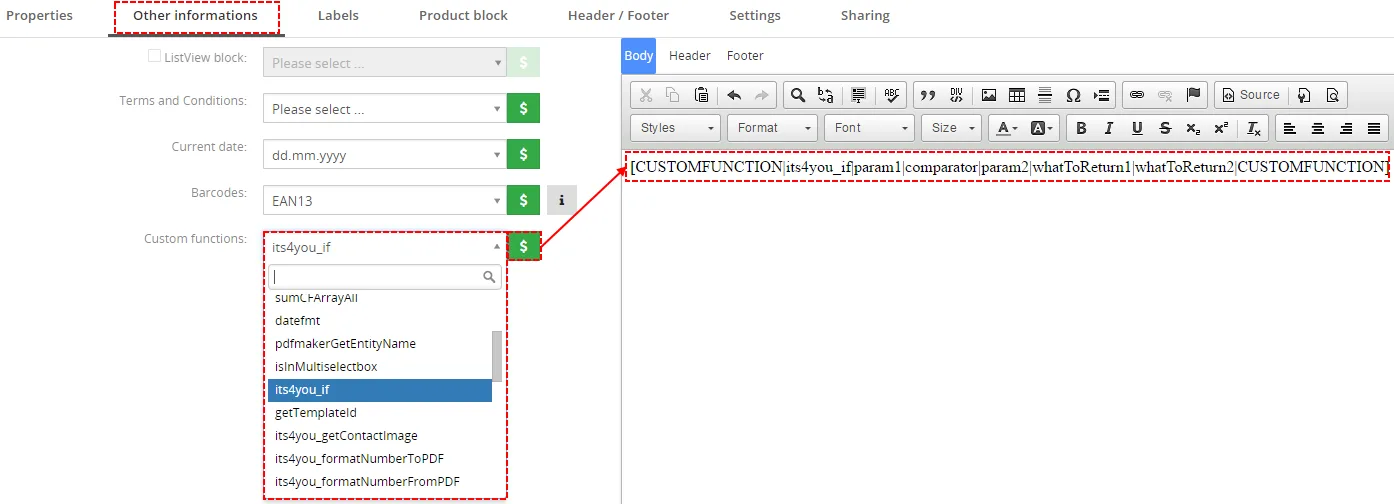
In the above example function with 5 parameters was used, i.e. [CUSTOMFUNCTION|functionname|param1|param2|param3|param4|param5|CUSTOMFUNCTION]. It is possible to use functions without parameters as well. In this case use just notation [CUSTOMFUNCTION|functionname|CUSTOMFUNCTION].
Here you can find list of functions available for PDF Maker Pro version:
- addToCFArray
- implodeCFArray
- addToCFArrayALL
- implodeCFArrayALL
- sumCFArray
- sumCFArrayAll
- datefmt
- pdfmakerGetEntityName
- isInMultiselectbox
- its4you_if
- getTemplateId
- its4you_getContactImage
- its4you_formatNumberToPDF
- its4you_formatNumberFromPDF
- its4you_multiplication
- its4you_deduct
- its4you_sum
- its4you_divide
- its4you_nl2br
- setCFGNumberValue
- sumCFGNumberValue
- deductCFGNumberValue
- mathCFGNumberValue
- showCFGNumberValue
- its4you_NumberFormat
- setCFNumberValue
- sumCFNumberValue
- deductCFNumberValue
- mathCFNumberValue
- showCFNumberValue
- semantic_ru
- num2str_ru
- convert_number_to_words
Following sections contain short description of some our its4you_* functions which you can use in your PDF templates.
9.12.1 datefmt function
Syntax
[CUSTOMFUNCTION|datefmt|date|outFormat|CUSTOMFUNCTION]
Description
This function will change any date in your desired format. For example, from 10-11-2018 to 10 November 2018, November 10 2018 or 10/11/2018and more.
Parameters
datefmt
a parameter which needs to always stay in a custom function, you don’t need to change it or remove it
date
inserting your date here or variable from the CRM system, for example: $INVOICE_INVOICEDATE$
outFormat
the most important parameter where you need to set your date format for example: from 10-11-2018 to 10 November 2018 you will use the values: “d F Y” instead of “outformat”. You can check PHP values here: PHP date format values
Usage
Do you want change your due date format for example from 10-11-2018 to 10 November 2018? Follow next steps:
First you need to place function into template.
[CUSTOMFUNCTION|datefmt|date|outFormat|CUSTOMFUNCTION]
Then modify Parameters:
- keep datefmt
- replace date with: $INVOICE_DUEDATE$
- replace outFormat with: d Y F
Finally, your function is:
[CUSTOMFUNCTION|datefmt|$INVOICE_DUEDATE$|d F Y|CUSTOMFUNCTION]
Result:10-11-2018 ——> 10 November 2018
9.12.1.1 datetimefmt
Added from version of PDF Maker 4.62.
Syntax
[CUSTOMFUNCTION|datetimefmt|date|outFormat|CUSTOMFUNCTION]
Description
This function will change any date field included also a time in your desired format.
Parameters
datefmt
a parameter which needs to always stay in a custom function, you don’t need to change it or remove it
date
inserting your date here or variable from the CRM system, for example: $INVOICE_CREATEDTIME$
outFormat
the most important parameter where you need to set your date format for example: from 10-11-2018 to 10 November 2018 you will use the values: “d F Y” instead of “outformat”. You can check PHP values here: PHP date format values
Usage
This function works same as datefmt function.
9.12.2 its4you_if function
Syntax
[CUSTOMFUNCTION|its4you_if|param1|comparator|param2|whatToReturn1|whatToReturn2|CUSTOMFUNCTION]
Description
This function executes if-else statement based on given parameters.
Parameters
- param1
- first parameter of comparison
- comparator
- you can use one of these possible attributes ==,!=,<,>,<=,>=
- == – equal to
- != – not equal
- < – less than
- > – greater than
- <= – less than or equal to
- >= – greater than or equal to
- param2
- second parameter of comparison
- whatToReturn1
- value returned when comparison succeeded
- whatToReturn2
- value returned when comparison didn’t succeed
Usage
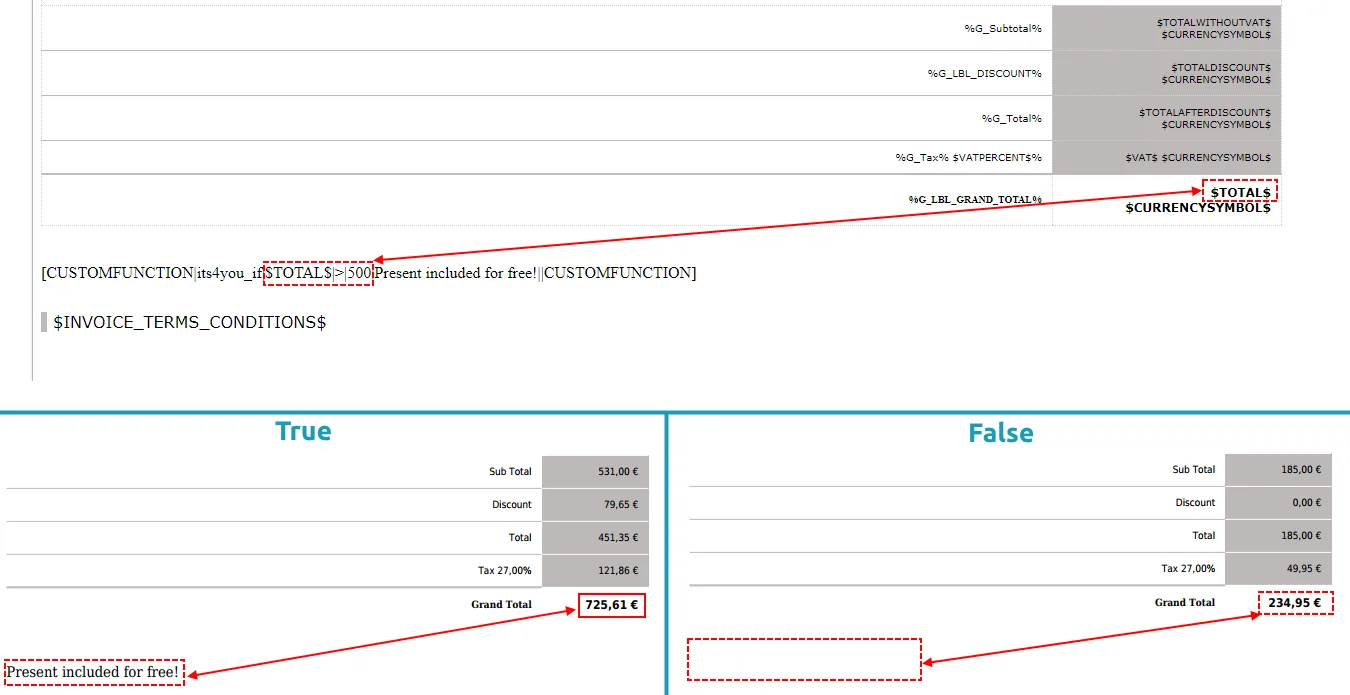
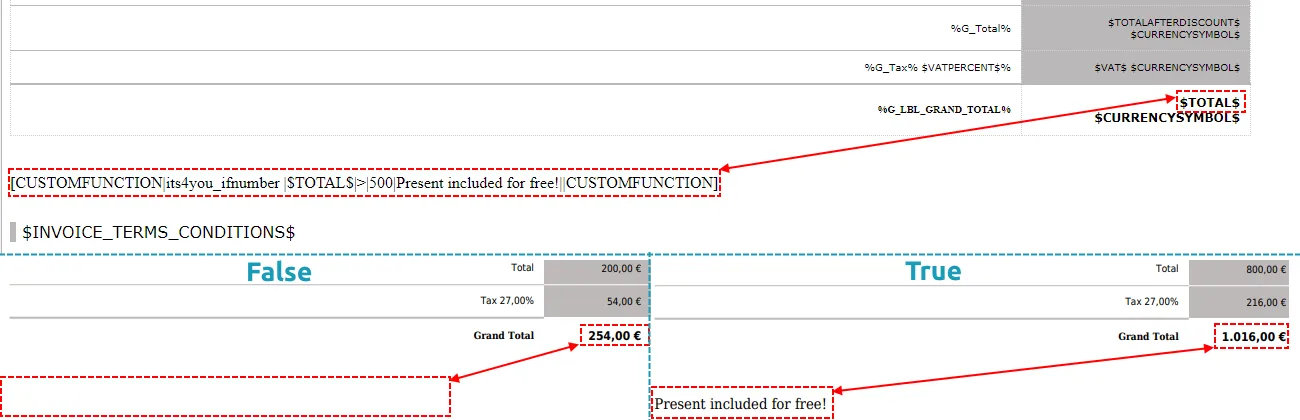
You want to show “Thanks message” if Grand Total is more than 500€.
First you need to place function into template.
[CUSTOMFUNCTION|its4you_if|param1|comparator|param2|whatToReturn1|whatToReturn2|CUSTOMFUNCTION]
Now replace please:
- param1 with $TOTAL$
- Comparator with > (Possible attributes are ==,!=,<,>,<=,>= )
- param2 with 500
- whatToReturn1 with Present included for free!
- whatToReturn2 leave empty
Finally, your function is:
[CUSTOMFUNCTION|its4you_if|$TOTAL$|>|500|Present included for free!||CUSTOMFUNCTION]
9.12.3 its4you_ifnumber
Syntax
[CUSTOMFUNCTION|its4you_ifnumber|param1|comparator|param2|whatToReturn1|whatToReturn2|CUSTOMFUNCTION]
Description
This function executes if-else statement based on given parameters. its4you_ifnumber is similar like its4you_if but it is more suitable for comparing numbers because it convert param1 and param2 into number format.
Parameters
- param1
- first parameter of comparison
- comparator
- you can use one of these possible attributes ==,!=,<,>,<=,>=
- param2
- second parameter of comparison
- whatToReturn1
- value returned when comparison succeeded
- whatToReturn2
- value returned when comparison didn’t succeed
Usage
You want to show “Thanks message” if Grand Total is more than 500€.
First you need to place function into template.
[CUSTOMFUNCTION|its4you_ifnumber|param1|comparator|param2|whatToReturn1|whatToReturn2|CUSTOMFUNCTION]
Now replace please:
- param1 with $TOTAL$
- Comparator with > (Possible attributes are ==,!=,<,>,<=,>= )
- param2 with 500
- whatToReturn1 with Present included for free!
- whatToReturn2 leave empty
Finally, your function is:
[CUSTOMFUNCTION|its4you_ifnumber|$TOTAL$|>|500|Present included for free!||CUSTOMFUNCTION]
9.12.4 its4you_isnull
Syntax
[CUSTOMFUNCTION|its4you_isnull|param1|whatToReturn1|whatToReturn2|CUSTOMFUNCTION]
Description
This function executes if-else statement based on given parameters. its4you_isnull is similar like its4you_if but it is created to find if param1 is NULL or 0.
Function works only with number value, if you want to use text or variables please use its4you_if function.
Parameters
- param1
- first parameter of comparison if it is NULL or 0
- whatToReturn1
- value returned when comparison succeeded (param1 = NULL or 0)
- whatToReturn2
- value returned when comparison didn’t succeed (param1 != NULL or 0)
Usage
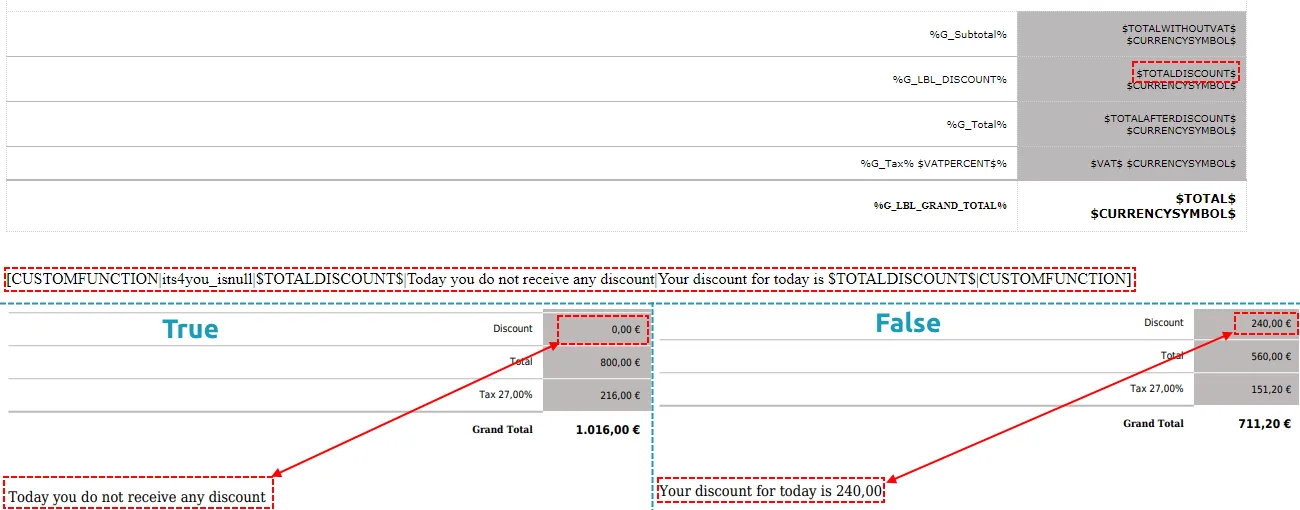
You want to show “Sorry message” if Discount is more 0.
And “Info message” is there is any Discount.
First you need to place function into template.
[CUSTOMFUNCTION|its4you_ifnull|param1|whatToReturn1|whatToReturn2|CUSTOMFUNCTION]
Now replace please:
- param1 with $TOTALDISCOUNT$
- whatToReturn1 with Today you do not receive any discount
- whatToReturn2 with Your discount for today is $TOTALDISCOUNT$
Finally, your function is:
[CUSTOMFUNCTION|its4you_isnull|$TOTALDISCOUNT$|Today you do not receive any discount|Your discount for today is $TOTALDISCOUNT$|CUSTOMFUNCTION]
9.12.5 #HIDETR#
First at all, #HIDETR# is not exactly custom function. It is functionality that you can use in combination with custom function(most common with its4you_if, its4you_ifnumber, its4you_isnull)
Syntax
[CUSTOMFUNCTION|its4you_*****|param1|#HIDETR#||CUSTOMFUNCTION]
Description
If you use #HIDETR# functionality in custom function, it hide <tr> from your table.
Parameters
- without parameters
Usage
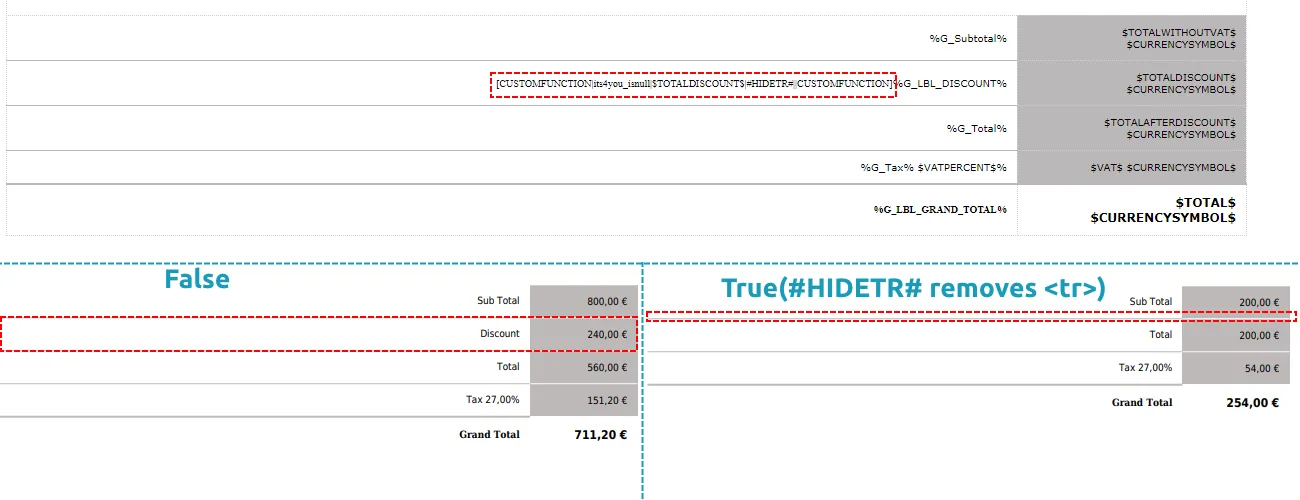
Try to imagine that you have PDF template with Discount line. Until now, yow had to have 2 different templates if you wanted hide Discount line when Discount is 0 (One template with discount line and one without).
Since now, you can use #HIDETR# if Discount is 0.
First at all choose and insert right custom function (its4you_if, its4you_ifnumber, its4you_isnull) into <tr> which you want to show/hide.
For example:
[CUSTOMFUNCTION|its4you_isnull|param1|whatToReturn1|whatToReturn2|CUSTOMFUNCTION]
Now replace please:
- param1 with $TOTALDISCOUNT$
- whatToReturn1 with #HIDETR#
- whatToReturn2 leave empty
Finally, your function with #HIDETR# is:
[CUSTOMFUNCTION|its4you_isnull|$TOTALDISCOUNT$|#HIDETR#||CUSTOMFUNCTION]
9.12.6 its4you_productPosition
This function was added in version 4.74 of PDF Maker.
It makes sure that product numbering always starts from 1, instead of 2 or higher. The function uses the same conditions as the HIDETR function. Since HIDETR hides table rows and can disrupt the numbering, using its4you_productPosition corrects the sequence so that numbering always starts at 1.
[CUSTOMFUNCTION|its4you_productPosition|param1|comparator|param2|CUSTOMFUNCTION]
Example
Let’s say we use the HIDETR function to hide products where the discount is 0.00:
(Note: the value depends on your system formatting — it could be 0, 0.00, or another format. This is just an example.)
[CUSTOMFUNCTION|its4you_if|$PRODUCTSTOTALAFTERDISCOUNT$|=|0,00|#HIDETR#||CUSTOMFUNCTION]
In this case, if the first product (out of 4) has a discount of 0.00, it will be hidden by HIDETR.
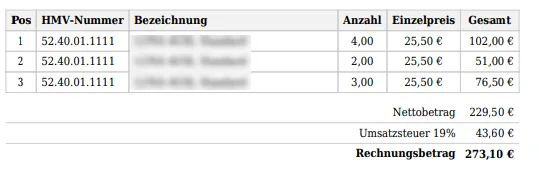
As a result, the numbering of the remaining products would incorrectly start from 2.
By using our custom function its4you_productPosition, the numbering is corrected so that it properly starts from 1.:
We use the function:
[CUSTOMFUNCTION|its4you_productPosition|$PRODUCTSTOTALAFTERDISCOUNT$|=|0,00|CUSTOMFUNCTION]
Here:
-
param1 → replaced with $PRODUCTSTOTALAFTERDISCOUNT$
-
comparator → replaced with =
-
param2 → replaced with 0,00
In this example, the condition checks whether the product discount equals 0,00.
9.12.7 its4you_groupByProducts
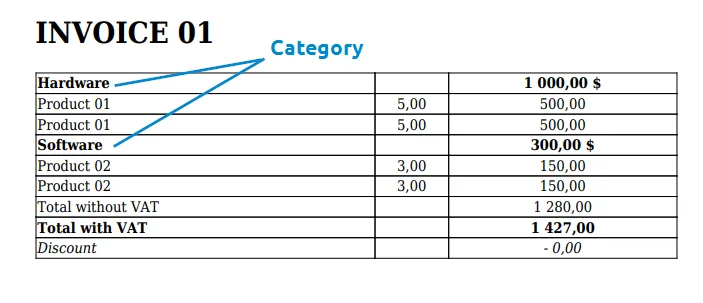
This custom function allows you to insert table to it and adjust table items by category via HEADERS.
Total SUM for each category can be also used.
As an example we have used Products with categories Software and Hardware see table below.
[CUSTOMFUNCTION|its4you_groupByProducts|table|CUSTOMFUNCTION]
table must be replaced with your table content
then we grouped item by Category using :GROUP_BY_HEADER:$PRODUCTS_PRODUCTCATEGORY$$SERVICES_SERVICECATEGORY$
also we added Product total UM to header
:SUM_HEADER:$PRODUCTTOTAL$ $
Below you can find our example where we grouped products by categories Software and Hardware, then we have also shown total for each category.

9.12.8 qrCodeFromData
This function was added in version 4.68 of PDF Maker on 18.11.2024.
This function allows you to generate a QR code and its data, where the data will be displayed line by line. It is possible to load static text from templates, as well as variables for specific modules.
[CUSTOMFUNCTION|qrCodeFromData|CUSTOMFUNCTION]
Example in Invoice module:
[CUSTOMFUNCTION|qrCodeFromData|$INVOICE_SUBJECT$|$INVOICE_INVOICEDATE$|$TOTAL$|CUSTOMFUNCTION]
Result after scan will be:
Subject
Invoice Date
Total
9.12.9 getTemplateId function
Syntax
[CUSTOMFUNCTION|getTemplateId|CUSTOMFUNCTION]
Description
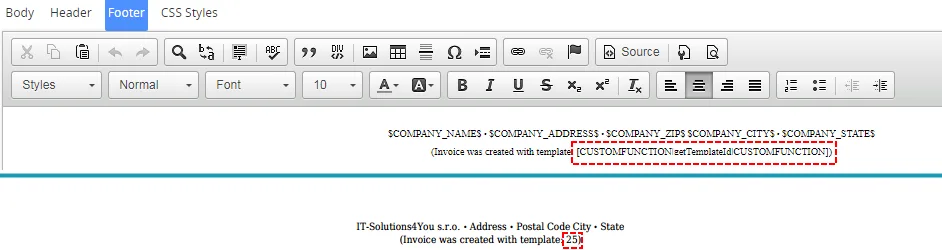
This function returns id of current template.
Parameters
This function is without additional parameters.
Usage
Just insert function into your template:
[CUSTOMFUNCTION|getTemplateId|CUSTOMFUNCTION]
9.12.10 its4you_RelatedList
This function is available from PDF Maker version 4.71 and higher.
It also works with Email Maker from version 4.62 and higher.
This function operates similarly to a related block but in reverse. While related blocks can display child records from a parent, they cannot display parent records from a child. This is where this function becomes useful.
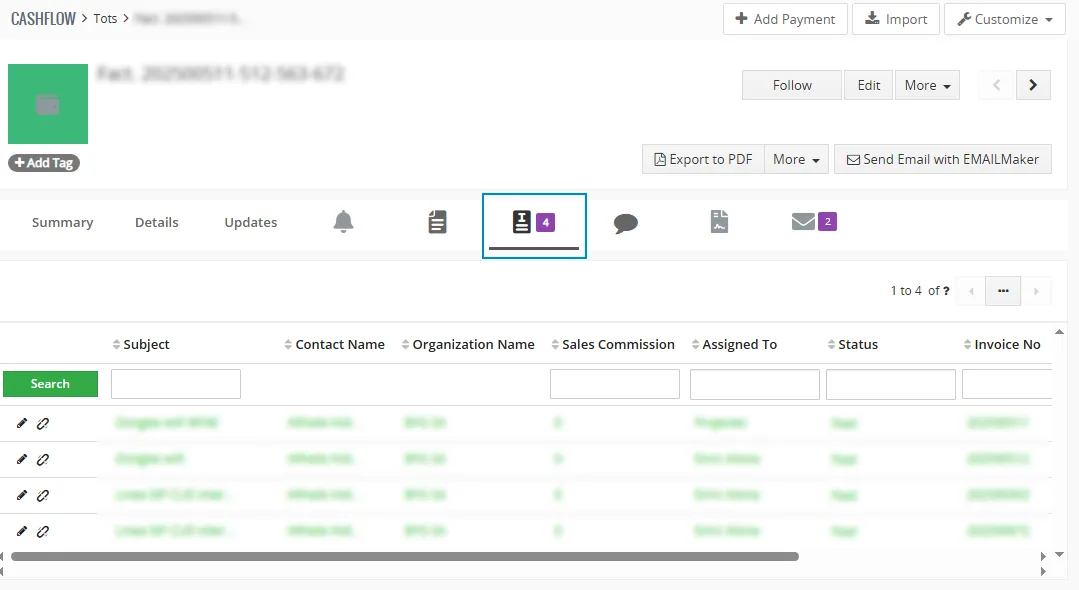
For example, with standard related blocks, we can display Cashflow payments for an Invoice, but not the other way around. With this function, we can display Invoices related to a Cashflow payment directly within the Cashflow module.
Let’s illustrate this with an example.
Default function:
[CUSTOMFUNCTION|its4you_RelatedList|recordId|relateModuleName|relatedFieldNames|CUSTOMFUNCTION]
Adjusted function:
[CUSTOMFUNCTION|its4you_RelatedList|$CASHFLOW4YOU_CRMID$|Invoice|invoice_no,invoicedate,subject,hdnGrandTotal|CUSTOMFUNCTION]
Explanation of parameters:
-
recordId – The record ID of the module for which we are generating the template. In this case, it’s a Cashflow record, so we use the variable
$CASHFLOW4YOU_CRMID$. -
relateModuleName – The module from which we want to retrieve and display records. In this case, it’s Invoices, so we use
Invoice. -
relatedFieldNames – The field names to be displayed as table columns. For this demonstration, we used:
invoice_no, invoicedate, subject, hdnGrandTotal.
Note:
This function does not use template variables for fields to display; instead, it uses field names directly. To find the exact field names, you can use the following URL after your CRM domain:
yourCRMURLhere/index.php?module=PDFMaker&view=FieldNames
The result after export will be a table of related Invoices for the selected Cashflow record.
Exported PDF:
9.12.11 its4you_getContactImage function
Syntax
[CUSTOMFUNCTION|its4you_getContactImage|id|width|height|CUSTOMFUNCTION]
Description
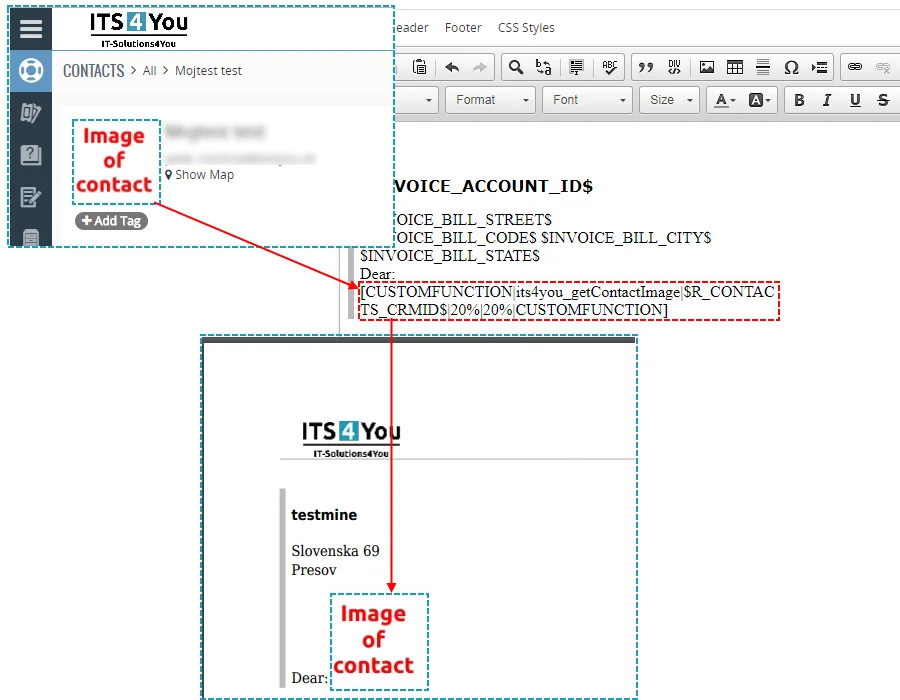
This function returns image of contact.
Parameters
- id
- contact id
- width
- width of returned image (10%, 100px)
- height
- height of returned image (10%, 100px)
Usage
Do you want to insert image of contact related to Invoice.
Please provide following steps:
First you need to place function into template.
[CUSTOMFUNCTION|its4you_getContactImage|id|width|height|CUSTOMFUNCTION]
Now replace please:
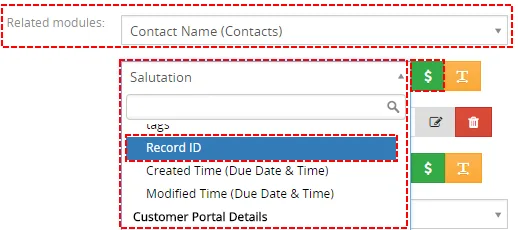
- id with id of contact(in our case it is $R_CONTACTS_CRMID$)
Contact ID - width with for example 20%
- height with for example 20%
Finally, your function is:
[CUSTOMFUNCTION|its4you_getContactImage|$R_CONTACTS_CRMID$|20%|20%|CUSTOMFUNCTION]
9.12.12 its4you_formatNumberToPDF function
Syntax
[CUSTOMFUNCTION|its4you_formatNumberToPDF|value|CUSTOMFUNCTION]
Description
This function returns formatted value and also is used by other functions.
Parameters
- value
- integer that you want to format (example: 123456.78)
Usage
Do you want to format integer number to format of PDF Maker numbers?
First you need to place function into template.
[CUSTOMFUNCTION|its4you_formatNumberToPDF|value|CUSTOMFUNCTION]
Now please replace:
- value with your number (123456.78)
Finally, your function is:
[CUSTOMFUNCTION|its4you_formatNumberToPDF|123456.78|CUSTOMFUNCTION]

9.12.13 its4you_formatNumberFromPDF function
Syntax
[CUSTOMFUNCTION|its4you_formatNumberFromPDF|value|CUSTOMFUNCTION]
Description
This function returns converted value into integer and is used by other functions.
Parameters
- value
- formatted value that you want to convert in to integer (1.452,76)
Usage
Do you want to format integer number to format of PDF Maker numbers?
First you need to place function into template.
[CUSTOMFUNCTION|its4you_formatNumberFromPDF|value|CUSTOMFUNCTION]
Now please replace:
- value with $TOTAL$ (1.452,76)
Finally, your function is:
[CUSTOMFUNCTION|its4you_formatNumberFromPDF|$TOTAL$|CUSTOMFUNCTION]

9.12.14 its4you_multiplication function
Syntax
[CUSTOMFUNCTION|its4you_multiplication|CUSTOMFUNCTION]
Description
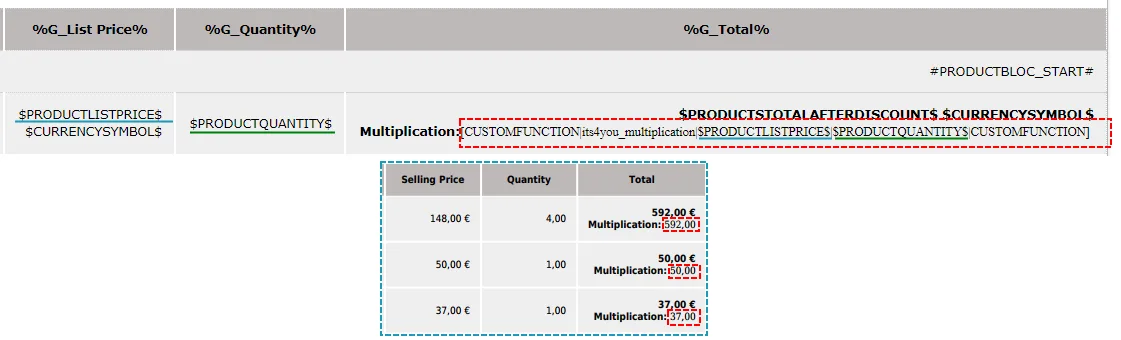
This function returns multiplication of all input values: arg1*arg2*…*argN.
Parameters
- arg1
- first argument to multiplication
- …
- …
- argN
- Nth argument to multiplication
Usage
Do you want to multiplication some fields/numbers from your record?
First you need to place function into template.
[CUSTOMFUNCTION|its4you_multiplication|CUSTOMFUNCTION]
Now please add arguments to sum and separate it with |:
- arg1 is $PRODUCTQUANTITY$
- arg2 is $PRODUCTLISTPRICE$
Finally, your function is:
[CUSTOMFUNCTION|its4you_multiplication|$PRODUCTLISTPRICE$|$PRODUCTQUANTITY$|CUSTOMFUNCTION]
9.12.15 its4you_deduct function
Syntax
[CUSTOMFUNCTION|its4you_deduct|CUSTOMFUNCTION]
Description
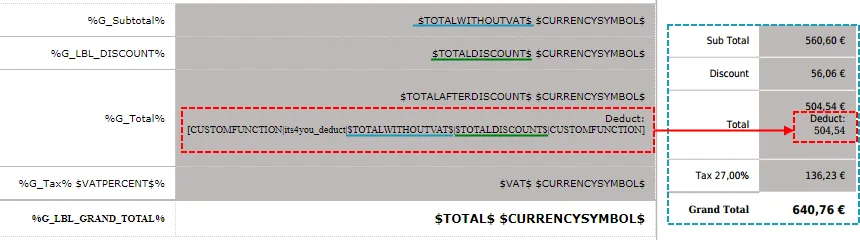
This function returns deducted value arg1-arg2-…-argN (all following values are deducted from the first one).
Parameters
- arg1
- first argument to deduct (all following values are deducted from the this one)
- …
- …
- argN
- Nth argument to deduct
Usage
Do you want to deduct one field from other?
First you need to place function into template.
[CUSTOMFUNCTION|its4you_deduct|CUSTOMFUNCTION]
Now please add arguments to sum and separate it with |:
- arg1 is $TOTALWITHOUTVAT$
- arg2 is $TOTALDISCOUNT$
Finally, your function is:
[CUSTOMFUNCTION|its4you_deduct|$TOTALWITHOUTVAT$|$TOTALDISCOUNT$|CUSTOMFUNCTION]
9.12.16 its4you_sum function
Syntax
[CUSTOMFUNCTION|its4you_sum|CUSTOMFUNCTION]
Description
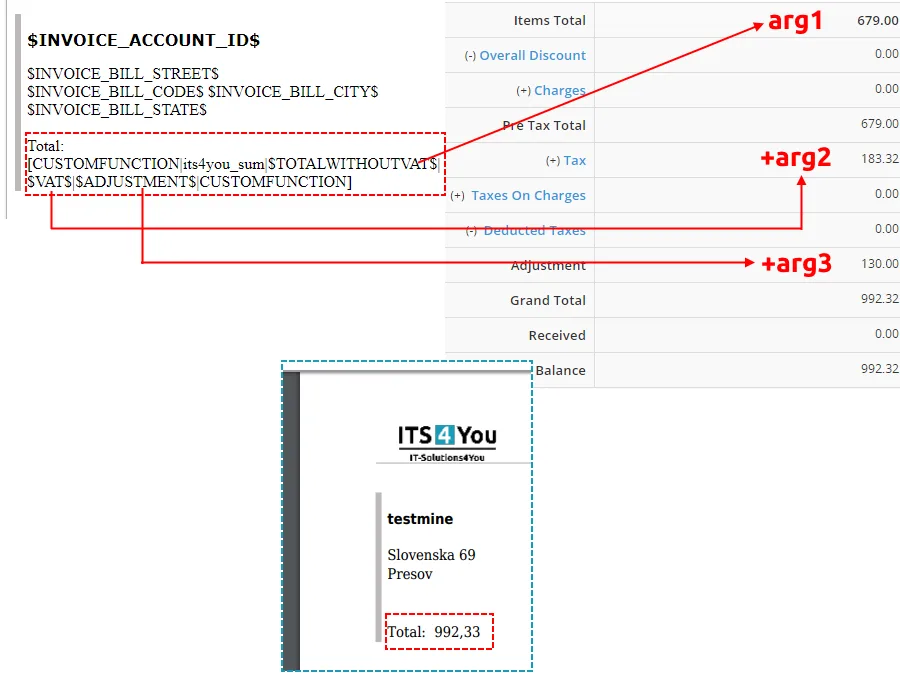
This function returns sum of input values: arg1+arg2+…+argN. Function is inserted without arguments by default but you can add arguments and separate it with |.
Parameters
- arg1
- first argument to sum
- …
- …
- argN
- Nth argument to sum
Usage
Do you want to sum some of fields from record?
First you need to place function into template.
[CUSTOMFUNCTION|its4you_sum|CUSTOMFUNCTION]
Now please add arguments to sum and separate it with |:
- arg1 is $TOTALWITHOUTVAT$
- arg2 is $VAT$
- arg3 is $ADJUSTMENT$
Finally, your function is:
[CUSTOMFUNCTION|its4you_sum|$TOTALWITHOUTVAT$|$VAT$|$ADJUSTMENT$|CUSTOMFUNCTION]
Youtube video for this Custom Function (click on Youtube Icon):

9.12.17 its4you_divide function
Syntax
[CUSTOMFUNCTION|its4you_divide|CUSTOMFUNCTION]
Description
This function returns divided value arg1/arg2/…/argN.
Parameters
- arg1
- first argument to multiplication
- …
- …
- argN
- Nth argument to multiplication
Usage
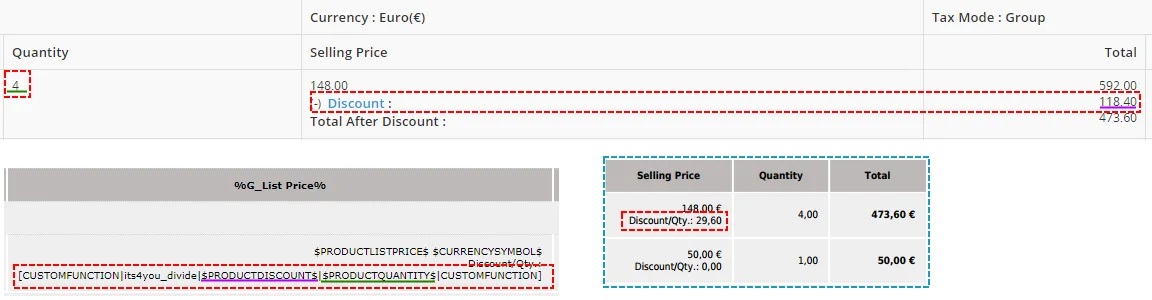
Do you want to show product discount for 1 product?
First you need to place function into template.
[CUSTOMFUNCTION|its4you_divide|CUSTOMFUNCTION]
Now please add arguments to sum and separate it with |:
- arg1 is $PRODUCTDISCOUNT$
- arg2 is $PRODUCTQUANTITY$
Finally, your function is:
[CUSTOMFUNCTION|its4you_divide|$PRODUCTDISCOUNT$|$PRODUCTQUANTITY$|CUSTOMFUNCTION]
9.12.18 its4you_NumberFormat function
Syntax
[CUSTOMFUNCTION|its4you_NumberFormat|number|decimals|new_decimal_point|new_thousands_sep|CUSTOMFUNCTION]
Description
The its4you_NumberFormat function converts numbers or PDF Maker variables to the required number format.
You can add decimals, remove decimals, change the decimal separator, or change the thousands separator.
For example, it can display:
1,00
as:
1
It can also be used for values with thousands separators, for example:
1,000.00
as:
1,000
For PDF Maker templates, we recommend using its4you_NumberFormat instead of the native PHP number_format function.
The native PHP function expects a clean float value and may read already formatted CRM values incorrectly.
Parameters
| Parameter | Description | Example value |
|---|---|---|
| its4you_NumberFormat | Name of the PDF Maker custom function. This value must always stay unchanged. | its4you_NumberFormat |
| number | Number, field variable, or PDF Maker variable that should be formatted. For example, if you want to change the quantity number format, use the product quantity variable. | $PRODUCTQUANTITY$ |
| decimals | Number of decimal places that should be displayed. | 0, 2, 5 |
| new_decimal_point | Symbol used as the decimal separator in the output value. | . or , |
| new_thousands_sep | Symbol used as the thousands separator in the output value. To use a space as the thousands separator, use sp. If you do not want to use a thousands separator, leave this parameter empty. | ,, ., sp |
Basic usage example
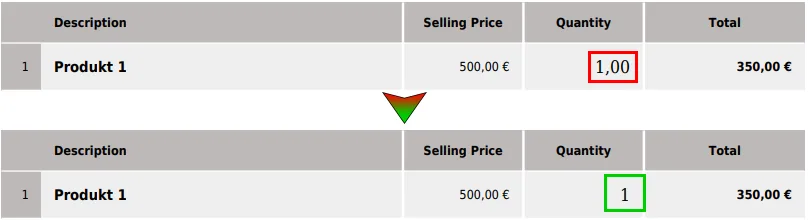
The following example shows how to change the product quantity format from:
1,00
to:
1
First, place the function into the PDF Maker template.
[CUSTOMFUNCTION|its4you_NumberFormat|number|decimals|new_decimal_point|new_thousands_sep|CUSTOMFUNCTION]

Then modify the parameters:
- replace number with $PRODUCTQUANTITY$
- replace decimals with 0
- replace new_decimal_point with 0
- remove new_thousands_sep
Final function:
[CUSTOMFUNCTION|its4you_NumberFormat|$PRODUCTQUANTITY$|0|0|CUSTOMFUNCTION]

Result when you export or preview:
Quantity with thousands separator
If the quantity contains thousands and you want to remove decimal places but keep a comma as the thousands separator, use this function:
[CUSTOMFUNCTION|its4you_NumberFormat|$PRODUCTQUANTITY$|0|.|,|CUSTOMFUNCTION]
Example input:
1,000.00
Example output:
1,000
Quantity without thousands separator
If you want to remove decimal places and also remove the thousands separator, leave the thousands separator parameter empty.
[CUSTOMFUNCTION|its4you_NumberFormat|$PRODUCTQUANTITY$|0|.||CUSTOMFUNCTION]
Example input:
1,000.00
Example output:
1000
Quantity with space as thousands separator
To use a space as the thousands separator, use sp as the last parameter.
[CUSTOMFUNCTION|its4you_NumberFormat|$PRODUCTQUANTITY$|0|,|sp|CUSTOMFUNCTION]
Example output:
1 000
Decimal field example
To format a decimal field with two decimal places, comma as the decimal separator, and dot as the thousands separator, use:
[CUSTOMFUNCTION|its4you_NumberFormat|$INVOICE_CF_1725$|2|,|.|CUSTOMFUNCTION]
Example output:
1.000,50
Currency field example
When formatting a currency field, use the currency:: prefix before the variable.
[CUSTOMFUNCTION|its4you_NumberFormat|currency::$INVOICE_CF_1731$|2|,|.|CUSTOMFUNCTION]
Example output:
1.000,50
Total value example
The same rule applies to total values. If the value is a currency value, use the currency:: prefix.
[CUSTOMFUNCTION|its4you_NumberFormat|currency::$TOTAL$|2|,|.|CUSTOMFUNCTION]
Currency values without prefix
If the value is used as a normal numeric value and currency formatting is not enabled, the currency:: prefix is not required.
[CUSTOMFUNCTION|its4you_NumberFormat|$INVOICE_CF_1731$|2|,|.|CUSTOMFUNCTION]
[CUSTOMFUNCTION|its4you_NumberFormat|$TOTAL$|2|,|.|CUSTOMFUNCTION]
Important note about currency values
| Case | Recommended usage |
|---|---|
| Currency formatting is enabled or the value comes from a currency field | [CUSTOMFUNCTION|its4you_NumberFormat|currency::$TOTAL$|2|,|.|CUSTOMFUNCTION] |
| Normal numeric value without currency formatting | [CUSTOMFUNCTION|its4you_NumberFormat|$TOTAL$|2|,|.|CUSTOMFUNCTION] |
Important note about PHP number_format
The native PHP number_format function expects a clean float value.
A clean float value uses a dot as the decimal separator and does not contain thousands separators or currency symbols.
Correct clean float value example:
123123.123
If the input value already contains thousands separators, currency symbols, or another formatted structure, the native PHP function may interpret the value incorrectly.
For example, this value:
1,005
can be interpreted only as:
1
For this reason, we recommend using:
[CUSTOMFUNCTION|its4you_NumberFormat|number|decimals|new_decimal_point|new_thousands_sep|CUSTOMFUNCTION]
instead of:
[CUSTOMFUNCTION|number_format|number|decimals|new_decimal_point|new_thousands_sep|CUSTOMFUNCTION]
Recommended examples
| Use case | Function | Example result |
|---|---|---|
| Quantity from 1,00 to 1, as shown in the screenshots | [CUSTOMFUNCTION|its4you_NumberFormat|$PRODUCTQUANTITY$|0|0|CUSTOMFUNCTION] | 1 |
| Quantity without decimals, comma as thousands separator | [CUSTOMFUNCTION|its4you_NumberFormat|$PRODUCTQUANTITY$|0|.|,|CUSTOMFUNCTION] | 1,000 |
| Quantity without decimals, no thousands separator | [CUSTOMFUNCTION|its4you_NumberFormat|$PRODUCTQUANTITY$|0|.||CUSTOMFUNCTION] | 1000 |
| Quantity without decimals, space as thousands separator | [CUSTOMFUNCTION|its4you_NumberFormat|$PRODUCTQUANTITY$|0|,|sp|CUSTOMFUNCTION] | 1 000 |
| Decimal field with two decimal places | [CUSTOMFUNCTION|its4you_NumberFormat|$INVOICE_CF_1725$|2|,|.|CUSTOMFUNCTION] | 1.000,50 |
| Currency field with two decimal places | [CUSTOMFUNCTION|its4you_NumberFormat|currency::$INVOICE_CF_1731$|2|,|.|CUSTOMFUNCTION] | 1.000,50 |
| Total value with currency formatting | [CUSTOMFUNCTION|its4you_NumberFormat|currency::$TOTAL$|2|,|.|CUSTOMFUNCTION] | 1.000,50 |
Summary
Use its4you_NumberFormat when you need to format numeric values in PDF Maker templates.
The screenshots above show the basic quantity example, where 1,00 is changed to 1.
For values with thousands separators, use the updated examples from the recommended examples table.
Use the currency:: prefix for currency fields and totals when currency formatting is enabled.
Avoid the native PHP number_format function for already formatted CRM values, because it can read values with thousands separators incorrectly.
9.12.19 convert_number_to_words function
Syntax
[CUSTOMFUNCTION|convert_number_to_words|number|CUSTOMFUNCTION]
Description
This function will convert numbers to words. Can be used on any number which you can add manually to function or can be used with variables from PDF Maker.
Parameters
convert_number_to_words
a parameter which needs to always stay in a custom function, you don’t need to change it or remove it
number
a number which you want to convert. This parameter can be manually replaced with any number you want, or you can replace it with variable. For example: $TOTAL$
Usage
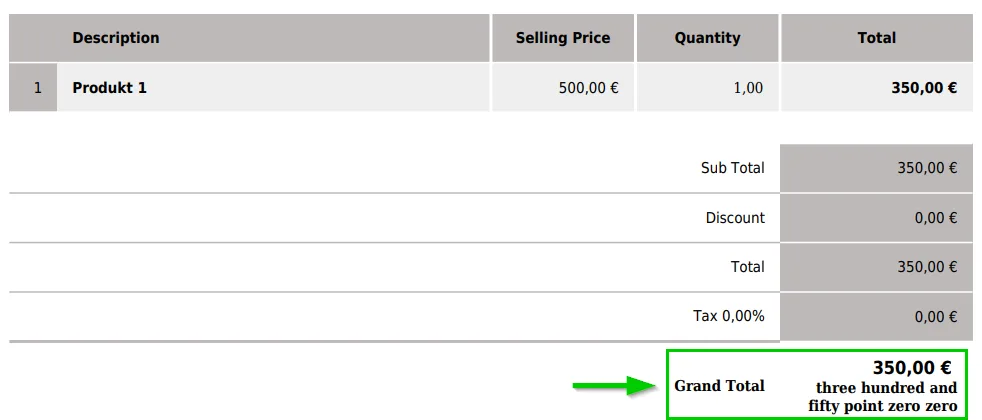
Do you also want in your invoice show total as words? Example: 350,00 € —> three hundred and fifty point zero zero
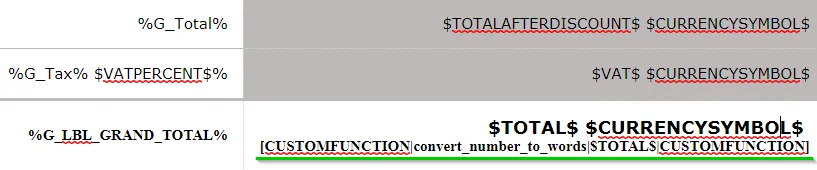
First you need to place function into template.
[CUSTOMFUNCTION|convert_number_to_words|number|CUSTOMFUNCTION]
Then modify Parameter:
- replace number with: $TOTAL$
Finally, your function is:
[CUSTOMFUNCTION|convert_number_to_words|$TOTAL$|CUSTOMFUNCTION]
Result when you export or preview:
9.12.19.1 Function with Currency format
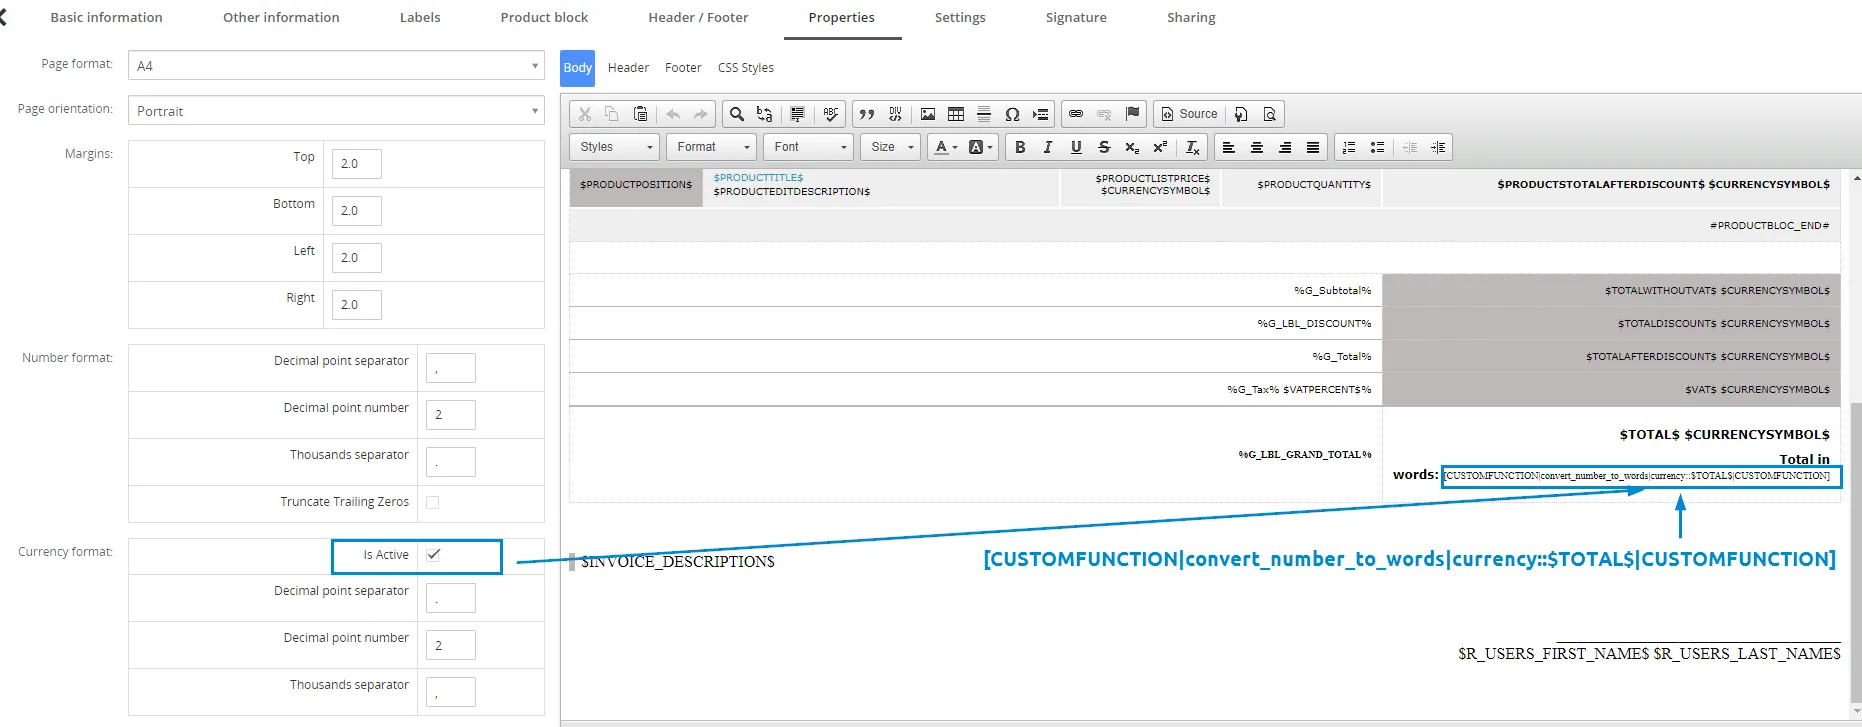
If users want to use Curreny Format from the template’s Properties setting (is Active = Yes), they must use the definition in the function by adding currency::
It should look like this:
[CUSTOMFUNCTION|convert_number_to_words|currency::$TOTAL$|CUSTOMFUNCTION]
9.13 Template for Header/Footer
It is useful functionality that allows you create Header/Footer template and use it in PDF template. Then if you need to provide any change in Header or Footer you just provide changes in Header/Footer template and this changes will be applied in all PDF templates where you use Header/Footer template.
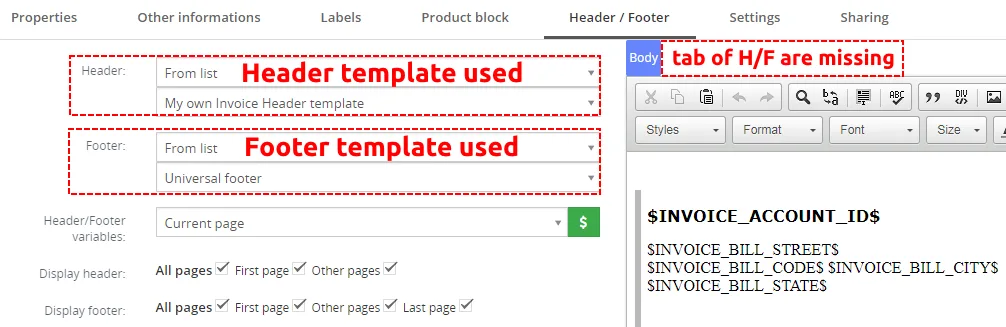
You can still use Header or Footer in PDF template. If you do not use Header/Footer template in PDF template EditView you can see tabs Header/Footer and this custom Header/Footer is used for creation of PDF file.

Also you can create and select Header or (and) Footer template for your PDF template and then this (these) Header/Footer template is used for creation of PDF file. If you add Header/Footer template to your PDF template there is no tab of Header/Footer in EditView of PDF template visible anymore.


If you use Header and Footer template then only Body tab is visible in EditView of PDF template.
How to use Header/Footer template
There is few simple steps how to start using Header/Footer template functionality. Please see following steps:
- First at all you need to create your Header/Footer template (Create the simple Header/Footer template)
- Then your template is available in ListView of Header/Footer (ListView of Header/Footer)
- Open your PDF template and select Header/Footer tab
- Choose Header or (and) Footer template for your PDF Maker template from list of Headers/Footers (Header/Footer)
- Now you can generate PDF file with your Header/Footer template
- If you need to provide changes in header you do not need edit all PDF templates just your Header or Footer template
Need help with PDF Maker?
Our support team answers questions about installation, templates and settings.