
The editing of the pdf templates in the PDF Maker is easy and is provided inside editing area in the EditView. Before you start the creation of the new template, you have to decide whether the new PDF template will be based on primary module or not. So two kinds of PDF templates exists:
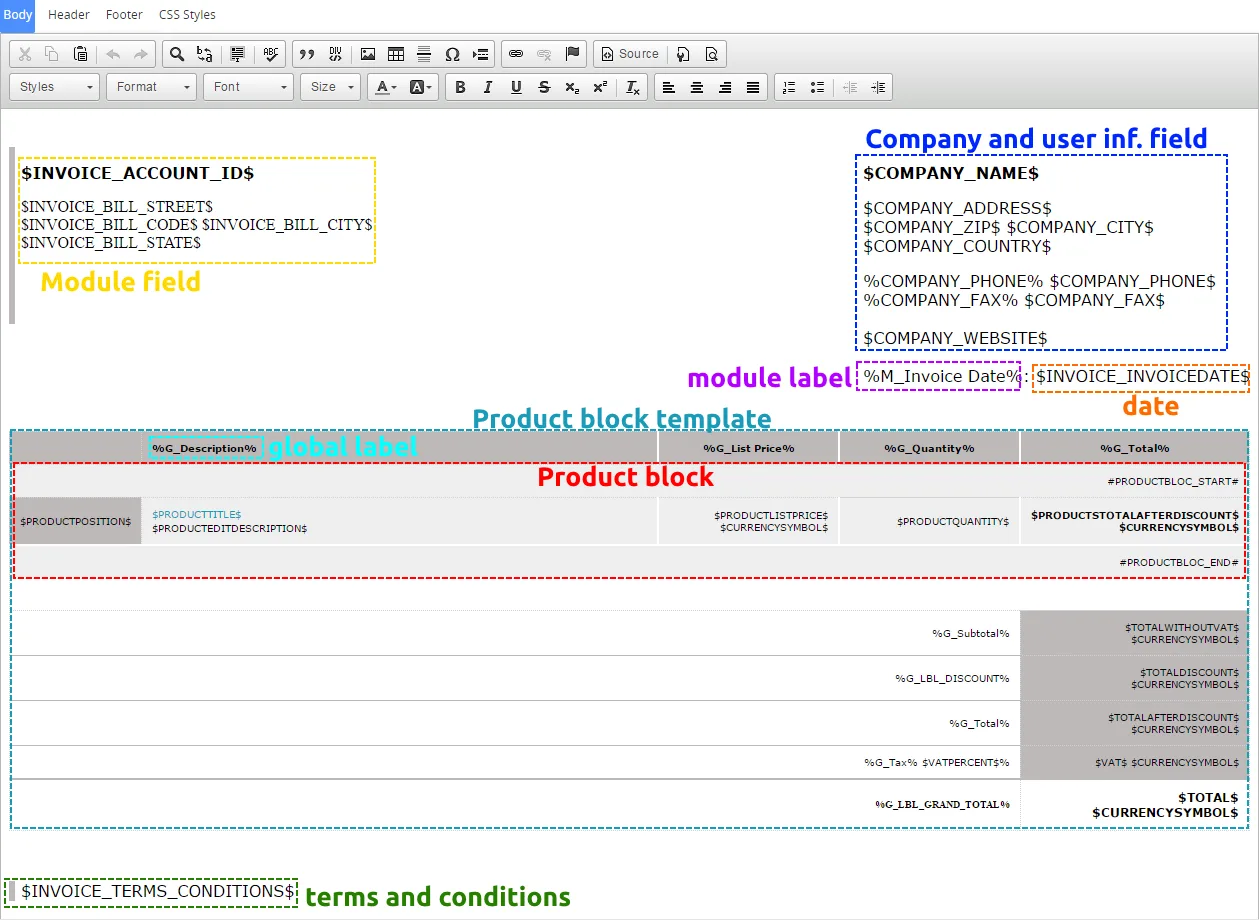
As can be seen in the picture below, in order to have useful pdf template you can combine: your own text, module fields or related module fields, images, tables, barcodes, labels, products block templates, related blocks, etc… Just click inside the editing area below the Body/Header/Footer tabs and start typing your text. You can continue with adding additional fields. Body/Header/Footer tabs allows you to change formatting of your text and other inserted fields using a lot of toolbars. Just select the text/field and click on any icon of the tool like font, color, bold, italic, alignment etc.
6.1 Inserting images
mages can improve the design of your documents. CKEditor is used inside the PDF Maker and it allows you to add images into your documents in an easy and intuitive way.
So, if you would like to insert image please provide following steps:
- Press the button
 on the toolbar.
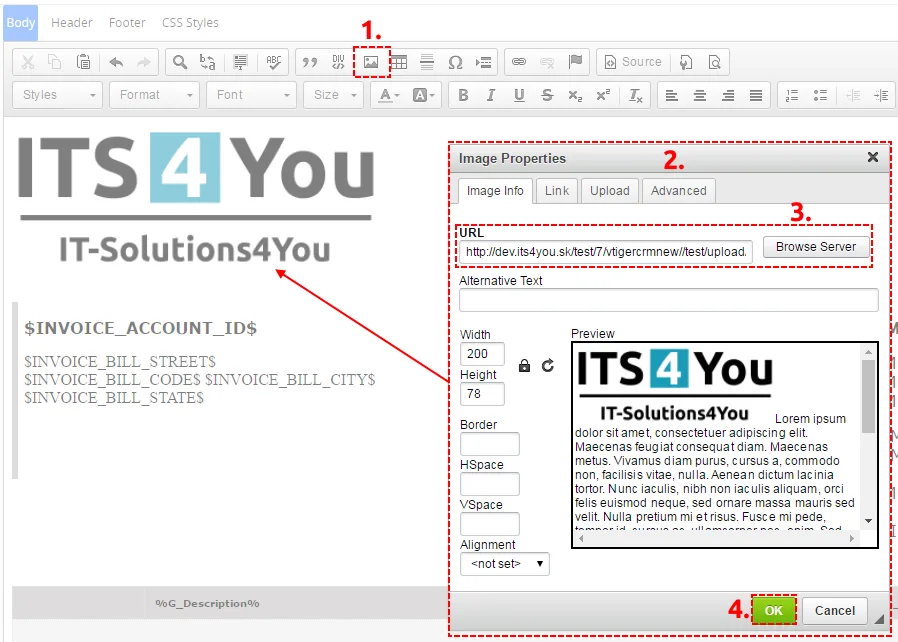
Insert Image - A pop-up window called “Image Properties” will appear. It includes four tabs that group image options.
- Define the URL address of the image. You may also use the [Browse Server] in order to browse the files. Set up other properties of the image.
- Click [Ok] to add image into Templates.
For more info visit following site: http://docs.cksource.com/CKEditor_3.x/Users_Guide/Rich_Text/Images
6.2 Creating tables
The tables are inseparable component of many documents. Similarly to images, tables can be inserted into
your templates in few simple steps:
- Press the insert/edit table button
 on the toolbar. After that a popup window called “Table
Properties” will appear.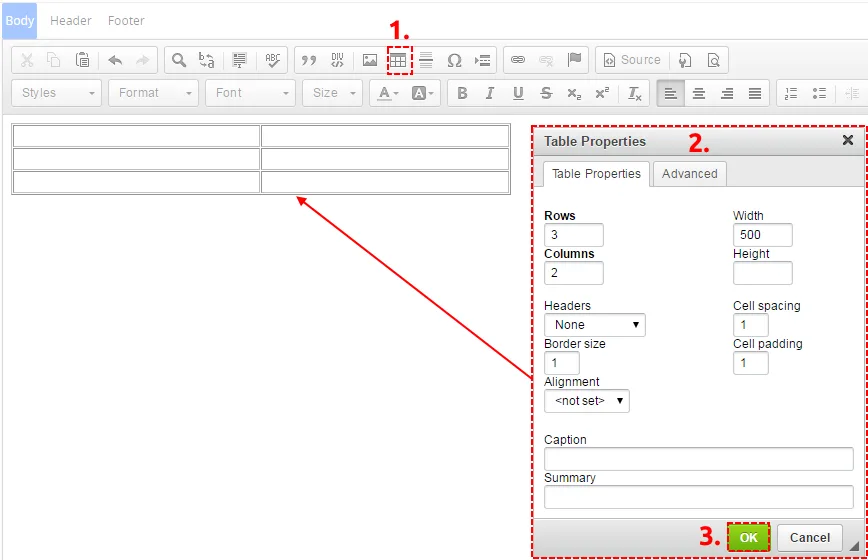
Creating tables - Set the basic table properties like number of columns and rows, width, height, etc.
- Click on [Ok] button.
After that the table is inserted into the template and you can write some text, insert all available fields from
chosen and related Modules or add some images into the new table. You can also make some design
adjustments like bold text, underline, etc.
For more info visit following site: http://docs.cksource.com/CKEditor_3.x/Users_Guide/Rich_Text/Tables
6.3 Inserting barcodes and QR codes
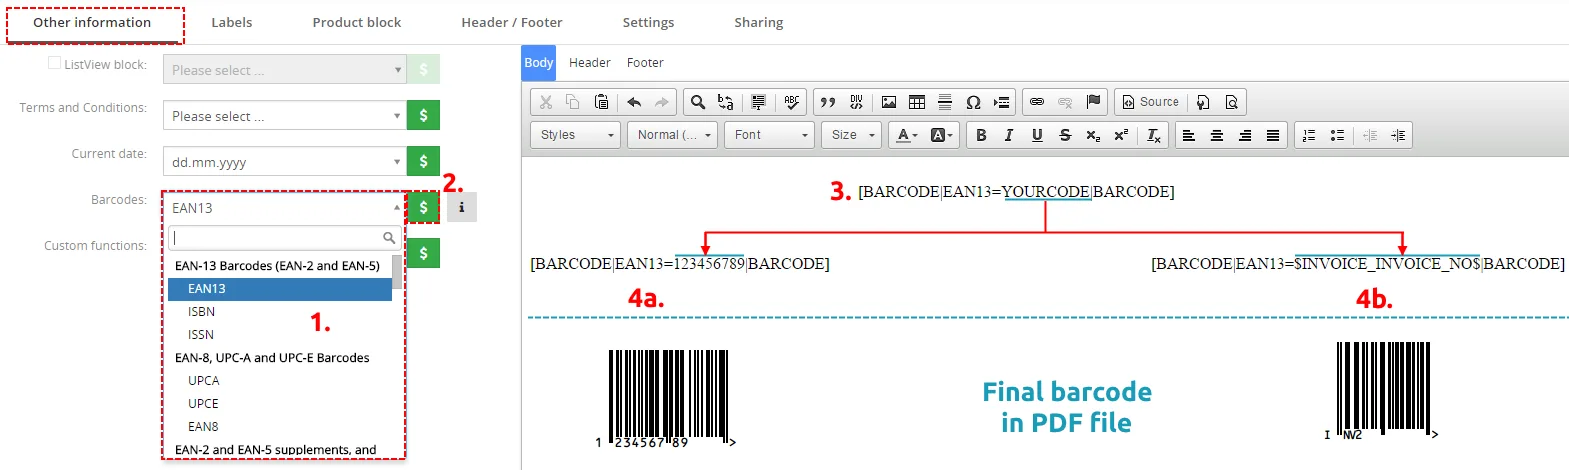
There is a “Barcodes, QR code” field in the Other information tab. Barcodes are divided into group.
Detailed description of the barcodes can be found in the attached document (just click on  )
In order to insert the barcode into the template please provide following steps:
- Choose your barcode type.
- Click on
 button.
- Barcode is inserted into template.
- Replace “YOURCODE” with static number/string (4a) for making the barcode or you can use the
variables from the actual template (4b).
How to insert QR code shows next picture:
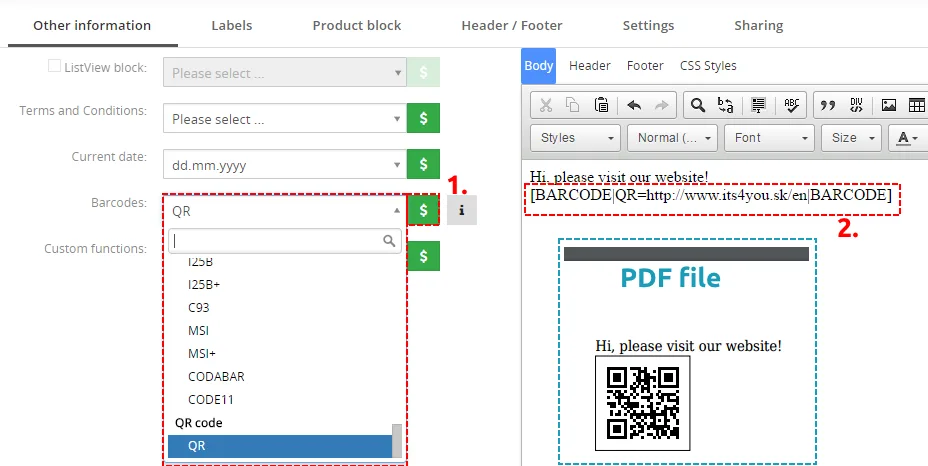
- In Other information tab please select QR field from “Barcodes, QR code” and click on button.
- In inserted part [BARCODE|QR=YOURCODE|BARCODE] replace “YOURCODE” with your QR code
value.
QR Code removing border
By default, the QR code comes with a border. This border is generated by the MPDF library, which we are using for PDF Maker.
To remove the border, go to the following folder:pdfmaker/resources/mpdf/qrcode/
Open the file qrcode.class.php and change:
private $disable_border = false;
to
private $disable_border = true;
6.3.1 Formatting barcodes and QR codes
The inserted barcodes or QR codes can be formatted using:
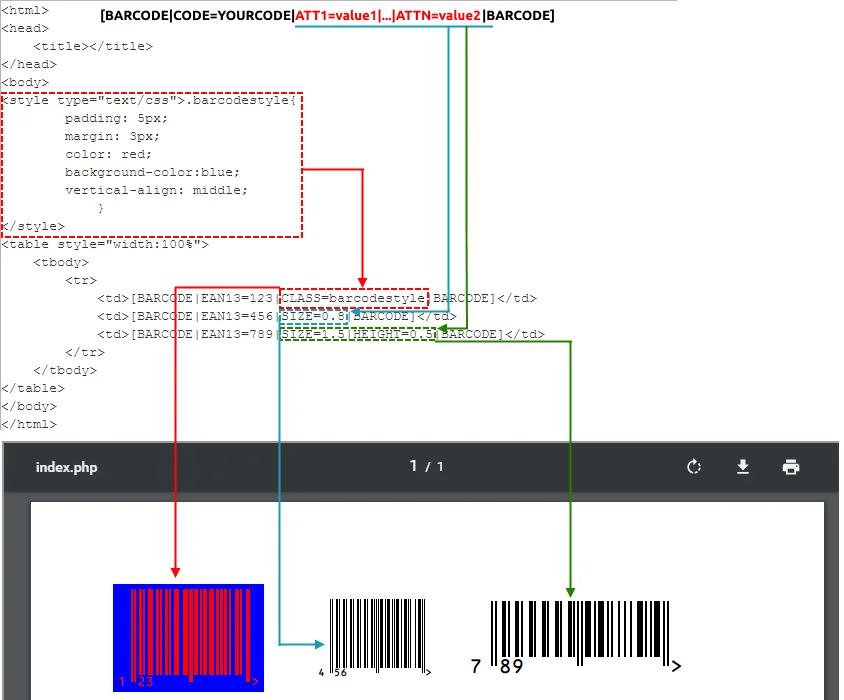
- additional attributes – add one or more supported attributes into barcode/QR syntax like
[BARCODE|CODE=YOURCODE|ATT1=value1|…|ATTN=valueN|BARCODE]
Example:
- Cascading Style Sheets (CSS) – define CSS style within PDF template and put it into barcode/QR
syntax like: [BARCODE|CODE=YOURCODE|CLASS=name_of_style|BARCODE]
Example:
You are able to change colors, sizes and other styles with barcodes. See on the image down below:
Please refer to mPDF library manual, barcode part for the details:
https://mpdf.github.io/reference/html-control-tags/barcode.html
6.3.2 Change color for QR codes
Create QR codes with a custom foreground and background color directly in your PDF Maker templates. You can encode fixed text, a URL, or a field value from the current CRM record.
Required updates
Complete these steps before using colored QR codes:
- Update PDF Maker to version 4.86 or later.
- Open PDF Maker → Customize → Extensions.
- Click Install next to MPDF to update it.
- Clear your browser cache and reload the CRM page. Use Ctrl+F5 to force a refresh.
Both the PDF Maker update and the MPDF update are required for this feature to work.
Insert a QR code
- Open PDF Maker → PDF Templates.
- Create a new template or edit an existing one.
- In the editor, open Other → Barcodes.
- Select QR as the barcode type.
- Click the button for inserting the barcode into the template.
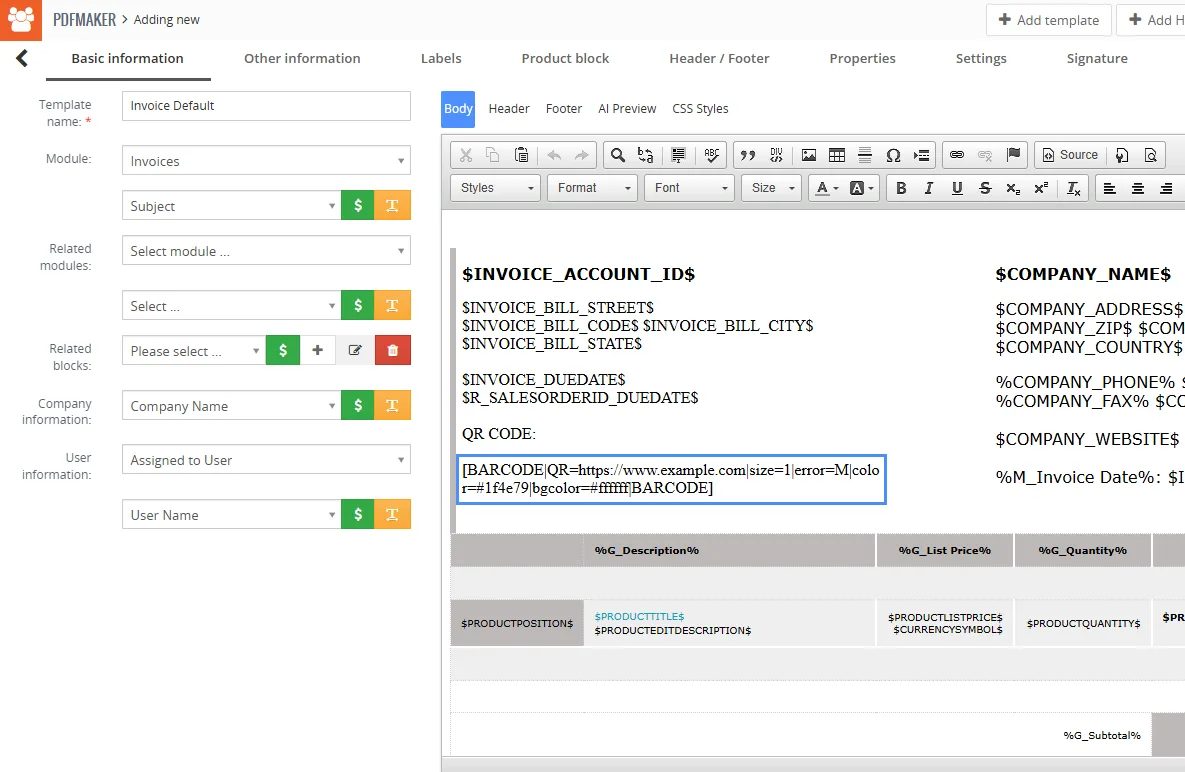
The following placeholder is inserted into your template:
[BARCODE|QR=YOURCODE|size=1|error=L|color=#000000|bgcolor=#ffffff|BARCODE]
Replace YOURCODE with the content you want the QR code to contain. For example, use the following code to encode a website URL with dark blue squares on a white background:
[BARCODE|QR=https://www.example.com|size=1|error=M|color=#1f4e79|bgcolor=#ffffff|BARCODE]
Configure the parameters
| Parameter | Purpose | Example |
|---|---|---|
| QR | The content encoded in the QR code. Enter fixed text, a URL, or a field variable inserted through the PDF Maker editor. | QR=https://www.example.com |
| size | Controls the QR code size. A value of 1 produces a code approximately 25 × 25 mm. | size=1 |
| error | Sets the error correction level. Supported values are L, M, Q, and H. | error=M |
| color | Sets the foreground color of the QR squares using a hexadecimal color code. | color=#1f4e79 |
| bgcolor | Sets the QR code background color using a hexadecimal color code. | bgcolor=#ffffff |
In the example, #1f4e79 is dark blue, #000000 is black, and #ffffff is white.
Use a CRM field value
You can insert a field variable from the PDF Maker editor as the value after QR=. When the PDF is generated, the variable is replaced with the corresponding value from the current record.
- Insert the QR code placeholder into the template.
- Replace YOURCODE with the required field variable using the editor’s field selection tools.
- Keep the remaining barcode syntax and parameters intact.
- Save the template and generate a PDF for a record containing a value in that field.
- Scan the QR code and check that it contains the expected record value.
Update an existing QR code
You do not need to insert an existing QR code again. Add color and bgcolor to its placeholder before the closing |BARCODE].
For example:
[BARCODE|QR=ORIGINAL_CONTENT|color=#000000|bgcolor=#ffffff|BARCODE]
Keep your original content or field variable in place of ORIGINAL_CONTENT. Preserve any existing size and error correction parameters.
Preview and test
- Save the template.
- Run Preview or export a PDF.
- Check the QR code’s colors and size in the generated document.
- Scan the QR code with a mobile phone.
- Verify that the scanned content or destination is correct.
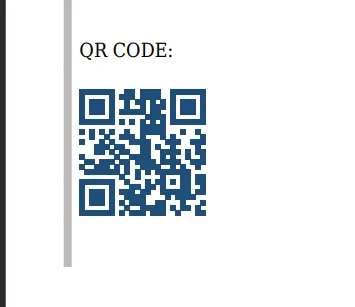
Use a dark foreground on a light background to keep the QR code easy to scan. Test the final PDF and, if it will be printed, test a printed copy as well.
Troubleshooting
- The editor inserts the old placeholder format: clear your browser cache and reload the page using Ctrl+F5. The browser may still be using an older cached JavaScript file.
- The colors are not applied: confirm that PDF Maker is updated to version 4.86 or later and that MPDF has been updated through PDF Maker → Customize → Extensions. Check the color and bgcolor parameters.
- The QR code is difficult to scan: use a darker foreground and a lighter background, check its size, and test the generated PDF again.
- The encoded record value is incorrect or missing: check the inserted field variable and verify that the current CRM record contains the expected value.
6.3.3 Custom barcodes
This feature was added in version 4.26 of PDF Maker.
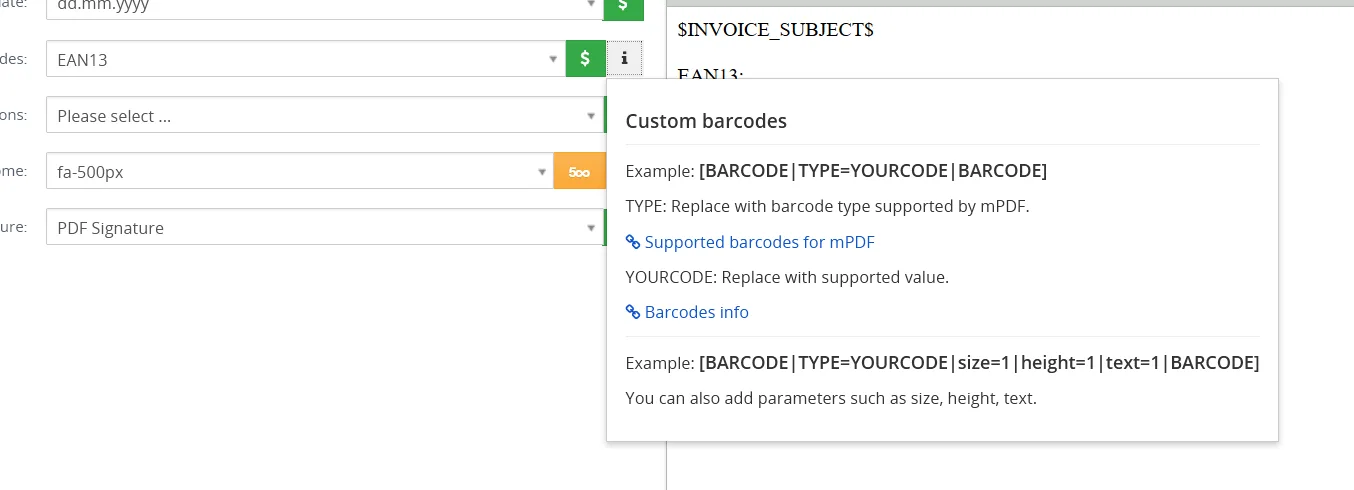
Custom barcodes
Example: [BARCODE|TYPE=YOURCODE|BARCODE]
TYPE: Replace with barcode type supported by mPDF.
YOURCODE: Replace with supported value.
Example: [BARCODE|TYPE=YOURCODE|size=1|height=1|text=1|BARCODE]
You can also add parameters such as size, height, text.
6.4 Inserting Labels
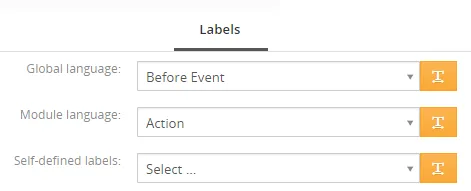
The intention of the labels is saving time and effort for creating pdf templates. Using labels provides an easy and flexible way to prepare pdf files / or just parts of pdf files in different languages without necessity to create separate pdf template per each language. As it was described in chapter 5.3.3, labels can be inserted into templates via Labels tab. In order to insert any global related label, module related label or self-defined label just click on Labels tab, select from dropdown list any label and click on [Insert into template] button.
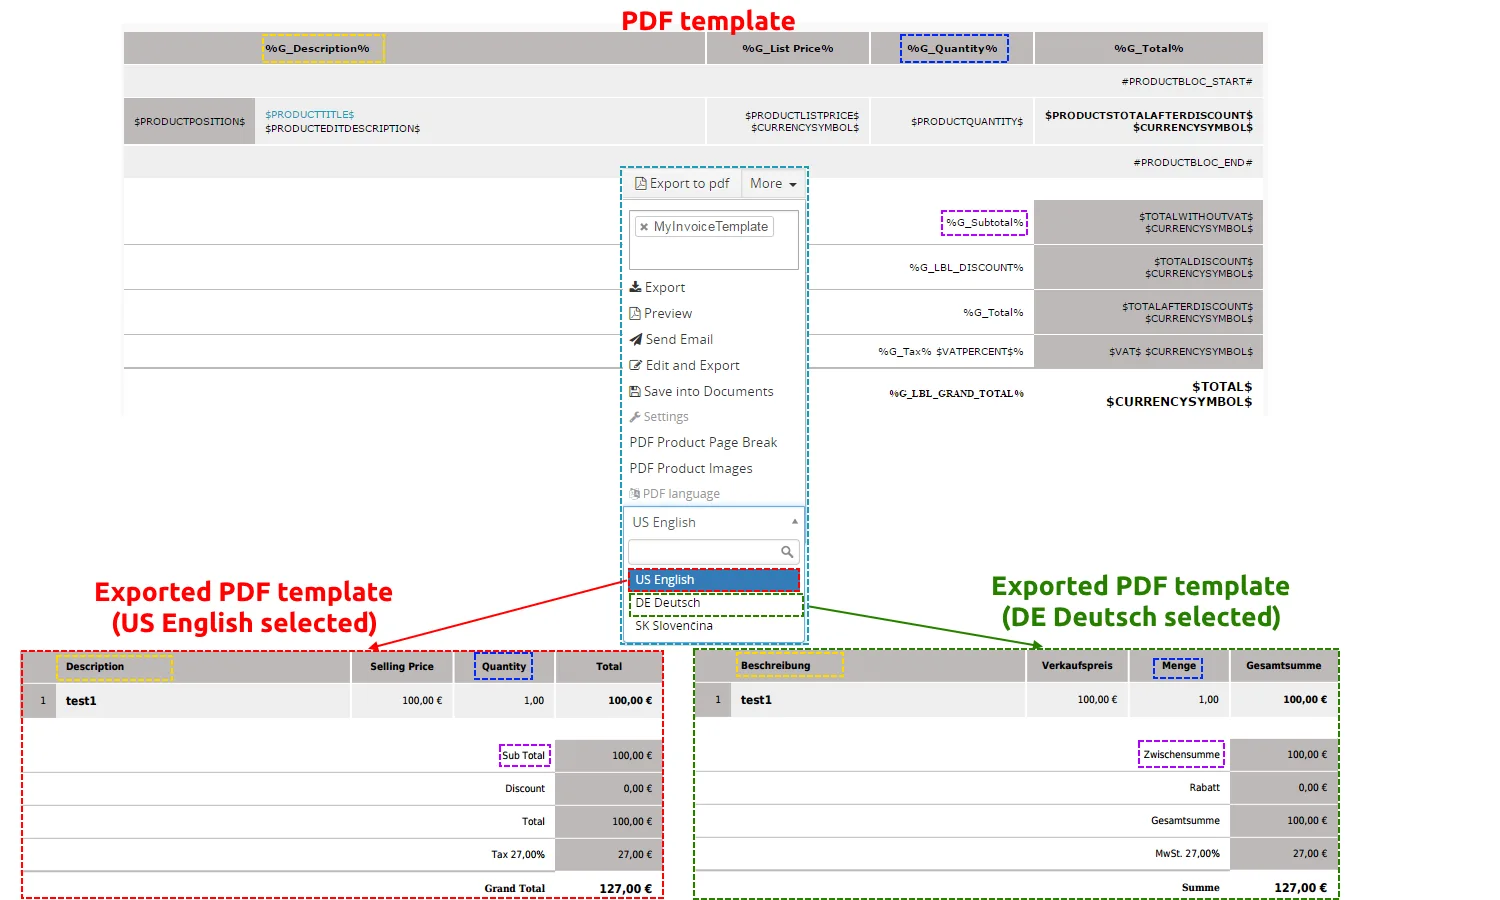
Please refer to example below used for invoice pdf template. Instead of having two (or more) templates the labels are used as much as possible. For example the label %G_Phone% used in the template will be replaced in final pdf file in german language as “Telefon” and in final pdf file in English language as “Phone” automatically based on your language selection. So it is not necessary to create duplicate templates for another language, just use labels and select language before exporting into pdf. The global labels use notation %G_*****%, module labels use %M_*****% and self-defined labels use notation %C_*****%.
If the global and module related labels are not sufficient for you, it is possible to define self-defined labels. In order to define self-defined please follow instructions described in the chapter 9.2.
6.5 Using a product blocks
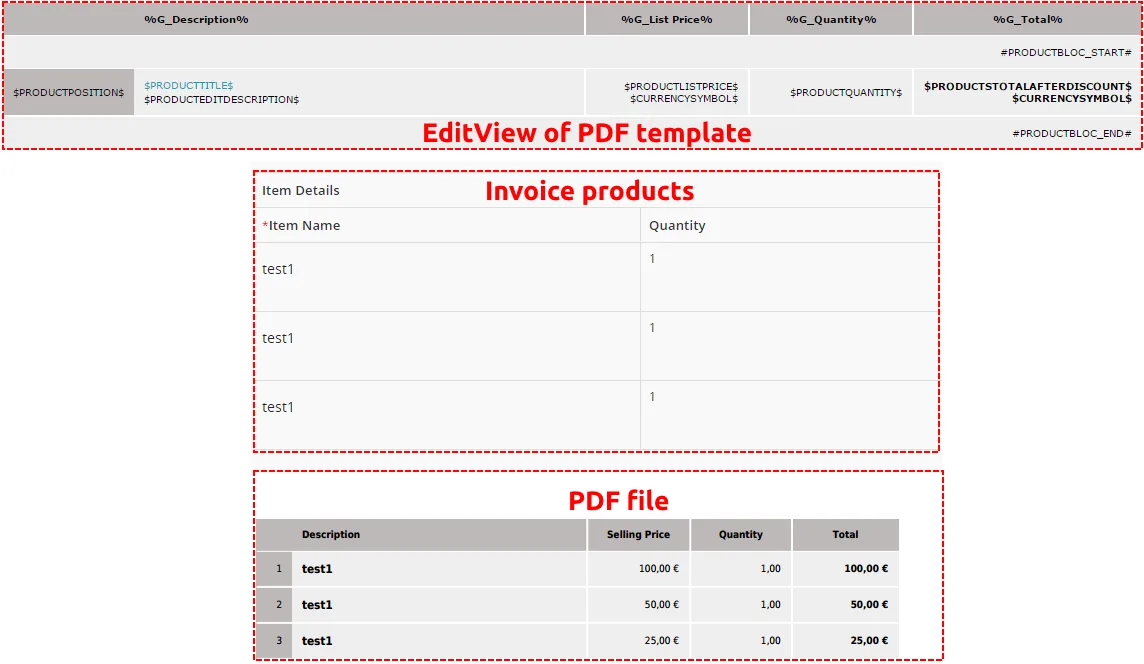
The product blocks are simple but powerful parts of your PDF templates. They are used to display all products/services from modules Invoices, Quotes, Sales Order and Purchase Order in your PDF files regardless of the number of products/services for particular record. Below you can find simple example where invoice contains three products which are automatically seen in the final PDF exported file. You don’t need to create template for three rows in the table, just define start and stop of the product block and product fields according to your needs. Next chapter describes how to create your own product block. In addition, we also introduced some default product block templates as well as tool for managing them (9.3).
6.5.1 Create new product block in EditView
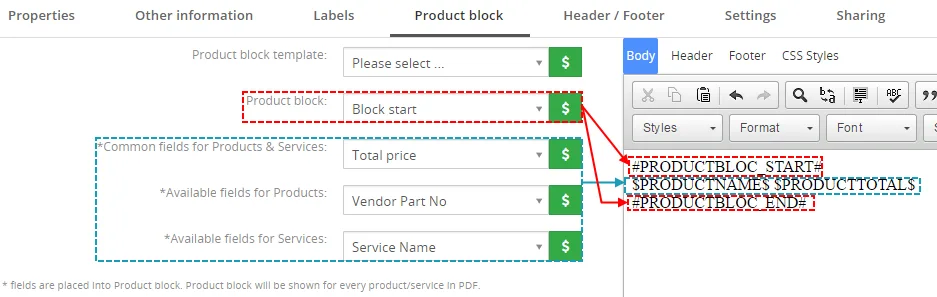
You can find Product block tab in EditView which allows inserting, editing and creating of product blocks. In case that product block templates are not sufficient for you, it is easy to create your own product block:
- Go to Product block tab and insert product block start variable (#PRODUCTBLOC_START#) and
product block end (#PRODUCTBLOC_END#). - Add all necessary product/service fields according to your needs between (#PRODUCTBLOC_START#)
and (#PRODUCTBLOC_END#) and provide formatting if needed.
6.5.2 Insert and edit product block template
There are already created product block templates which you can insert from product block tab and later edit if needed. These templates are available only for modules Invoices, Quotes, Sales Order and Purchase Order that displays product block. The product block templates created within product block tool (9.3) can be added in the same way. You can simply add the whole product block template into your template by:
- Go to Product block tab.
- Select product block template.
- Click on button.
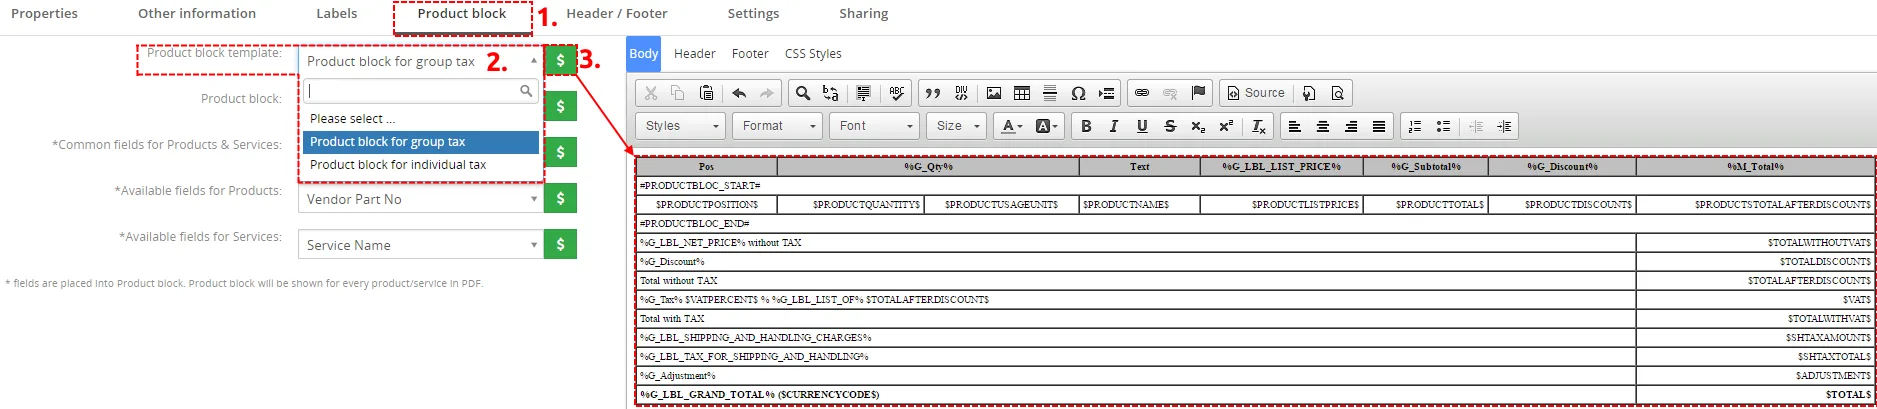
When the product block template is inserted you can modify it according to your needs. For example you can add new cells / rows / columns, change font, change the background color, etc. You can edit layout like a table or you can add some new variables / labels as well.
6.5.3 Separate block for Products and for Services
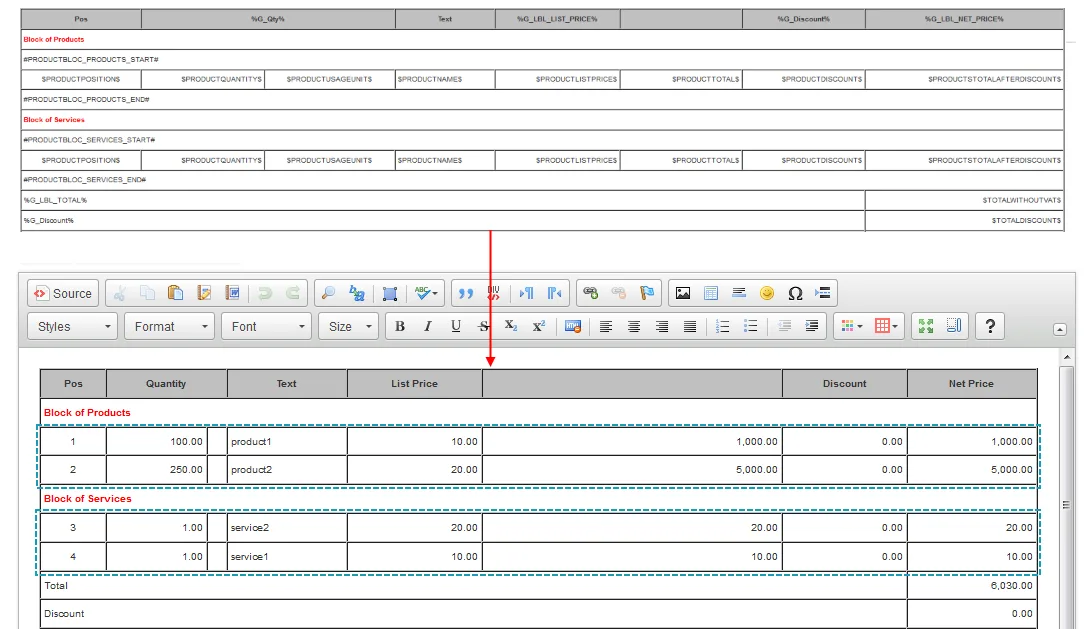
There is also the option to create a separate Block for Products and for Services. To create separate Block please provide following steps:
- Go to Product block tab and insert product block start variable (#PRODUCTBLOC_PRODUCTS_START# or #PRODUCTBLOC_SERVICES_START#) and product block end (#PRODUCTBLOC_ PRODUCTS_END# or #PRODUCTBLOC_ SERVICES_END#).
- Add all necessary product/service fields according to your needs between (#PRODUCTBLOC_PRODUCTS_START# or #PRODUCTBLOC_SERVICES_START#) and (#PRODUCTBLOC_PRODUCTS_END# or #PRODUCTBLOC_SERVICES_END#) and provide formatting if needed.
6.5.4 Duplicates handling block
There is also an option to create blocks which will handle duplicate records.
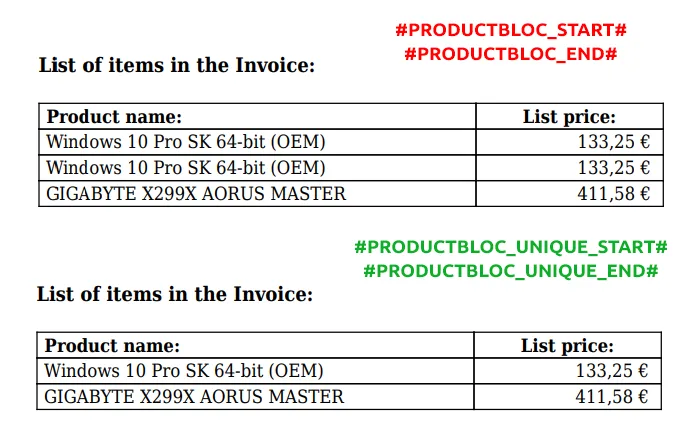
What does it mean? It means that duplicated records will be shown just one time in the list/table.
It can be used if you need to create a list of products in the invoice, if some products have the same name, they will be displayed only once.
For this you need to use variables:
- #PRODUCTBLOC_UNIQUE_START#
- #PRODUCTBLOC_UNIQUE_END#
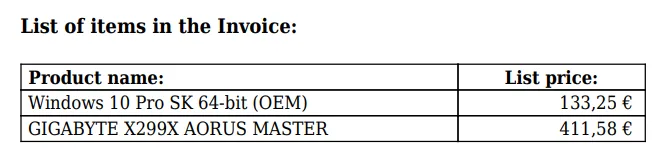
In our Invoice we have:
- 2 x : Windows 10 Pro SK 64-bit (OEM)
- 1 x : GIGABYTE X299X AORUS MASTER

To create Duplicates handling block please provide following steps:
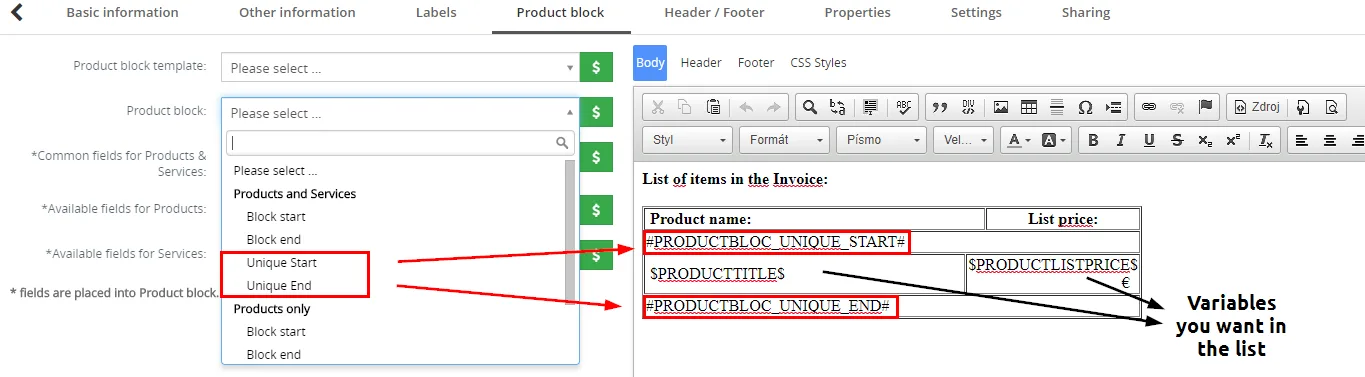
- Go to Product block tab.
- From the Product block list add variables:
#PRODUCTBLOC_UNIQUE_START# and #PRODUCTBLOC_UNIQUE_END# - Between these variables, use other variables you like to show in the list.
- Provide additional edit steps and save the template.
Next, go to your Record and Export or Preview the template. Results in our case will be:
Comparison between (#PRODUCTBLOC_START#/END#) and (#PRODUCTBLOC_UNIQUE_START#/END#)
6.6.1 Create the related block
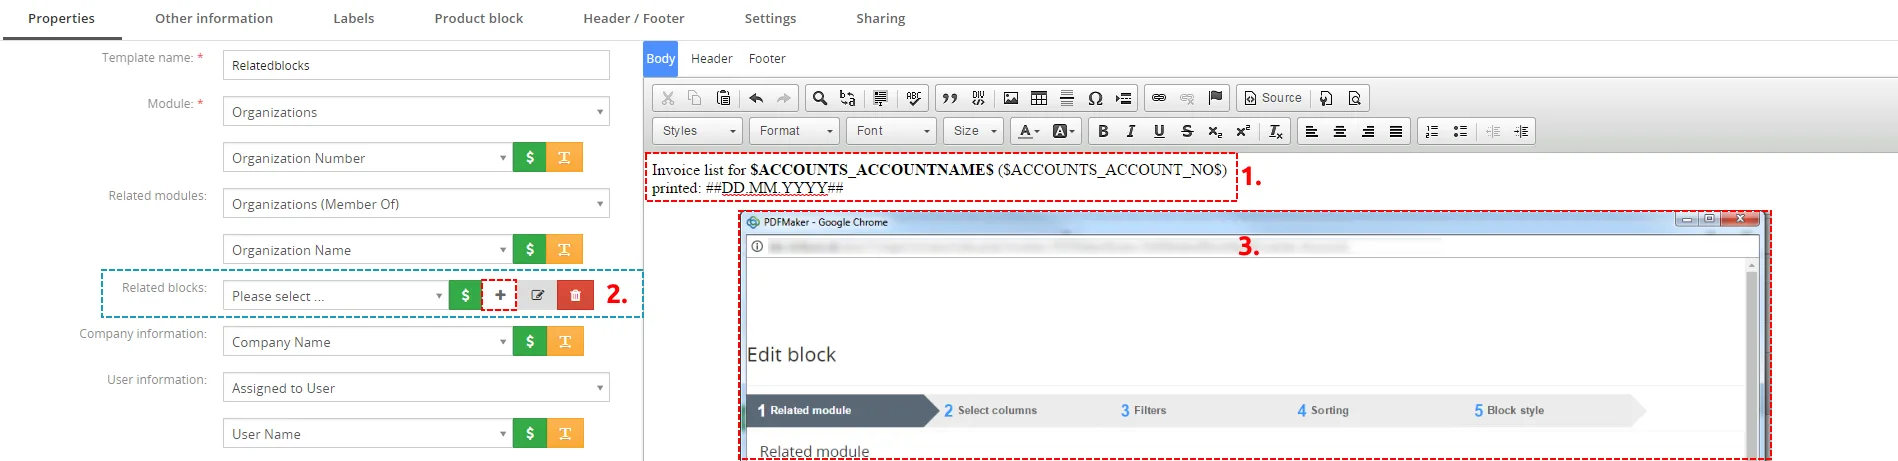
As you can see in the picture below, you can simply insert, create, edit or delete related blocks using buttons in Properties tab. How to create related block will be shown on example based on “Organizations” module. Let’s suppose that we would like to create simple PDF template based on module “Organizations”, and we need to list all invoices for particular organization which were created within last 90 days. In order to do it:
- Create new template based on Organizations module and put your variables/text into the body of the template.
- Go to the Properties tab and click on
 button.
- Edit block window will appear on the screen.
- Start creation of the related block
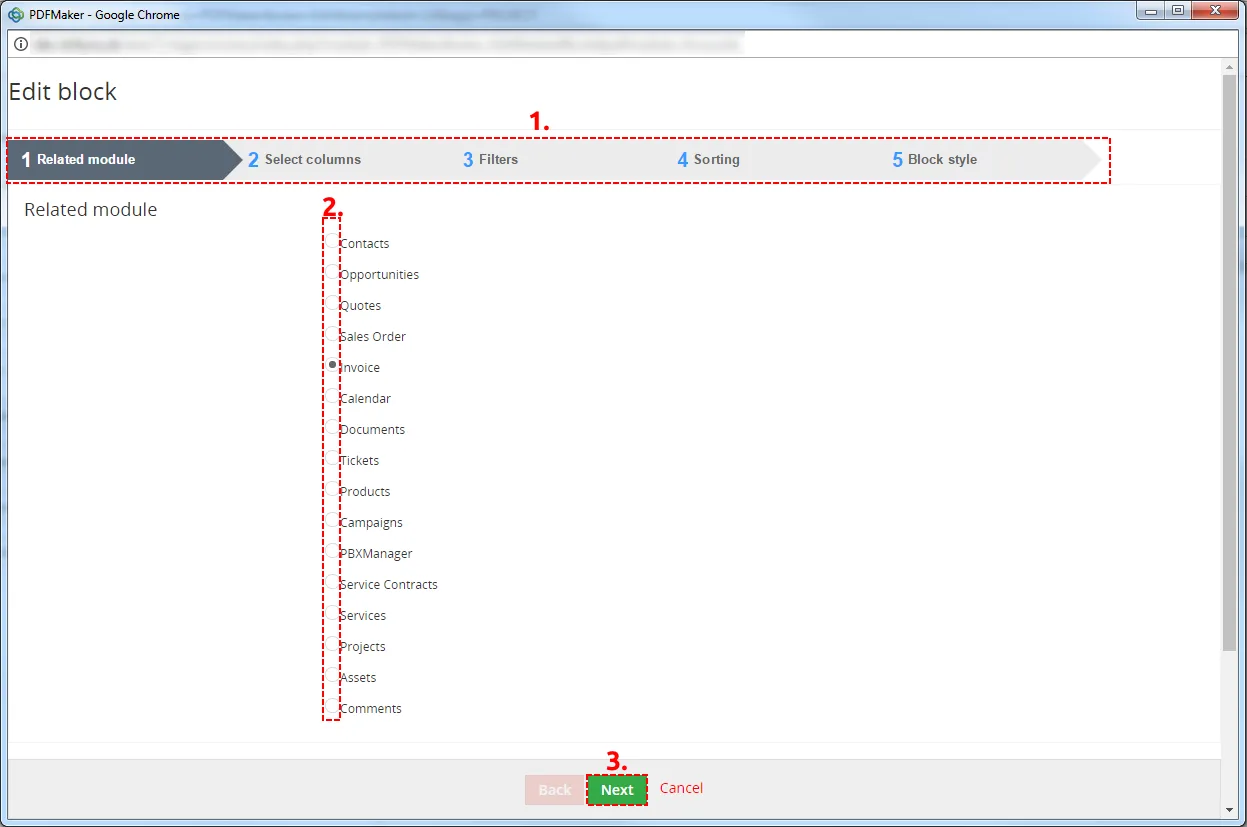
As you can see in the next picture, 5 steps are necessary to create the related block. In this window also all related entity modules for primary module are shown. First step is to select one related module from the available list (1.). Please select “Invoice” and click on  button.
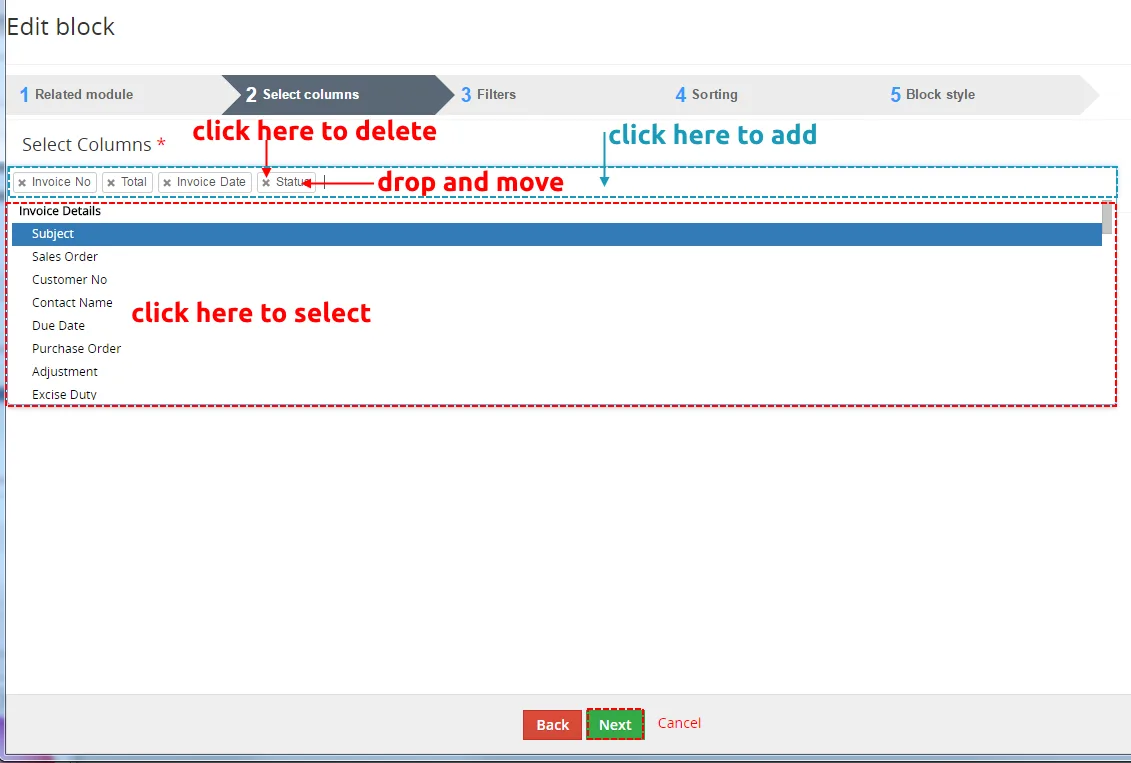
Second step is to select the fields to show in generated PDF template. These fields can be selected from the related modules. It is possible to change an order of the fields and delete it if necessary. Click on to continue.
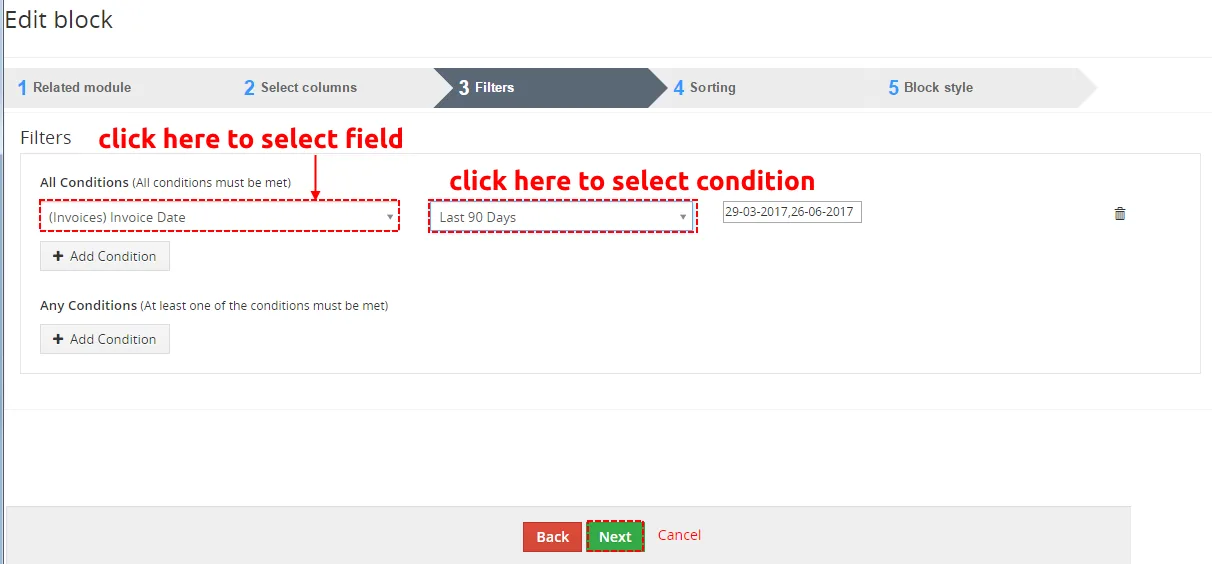
In step 3, we can specify the conditions to filter the results in the template. We can specify conditions in standard or advanced filters. The standard filters have fields like Date & Time fields whereas advanced filters have all the fields from the selected modules where the comparator and condition can be chosen based on type of the selected field.
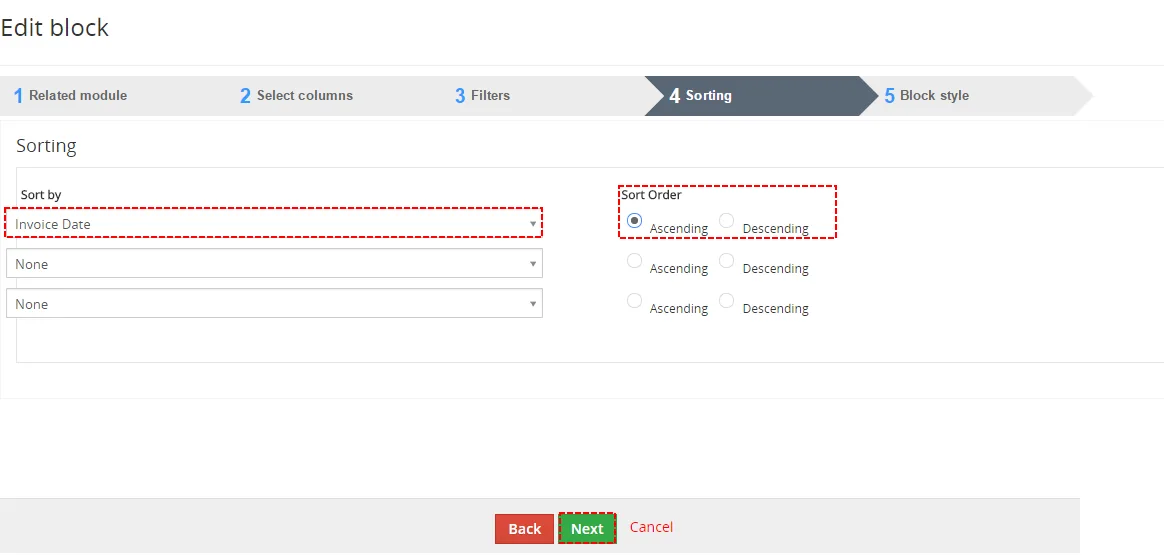
Within step 4 define fields used for sorting and type of sorting, i.e. ascending or descending sorting. You can define more fields for sorting. Continue to final step via button .
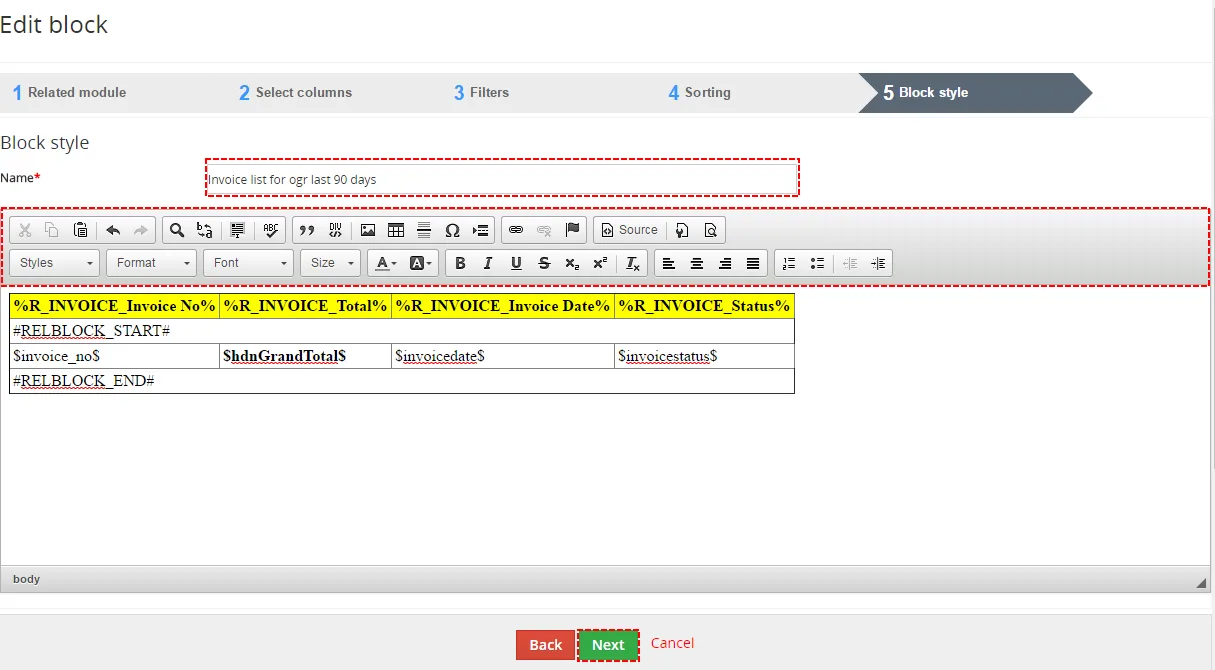
As can be seen in the next picture, related block in form of table is created. Please, write the Name (1.), in CKEditor area (2.) provide some layout/design changes if necessary and click the button to finish.
6.6.2 Insert related block
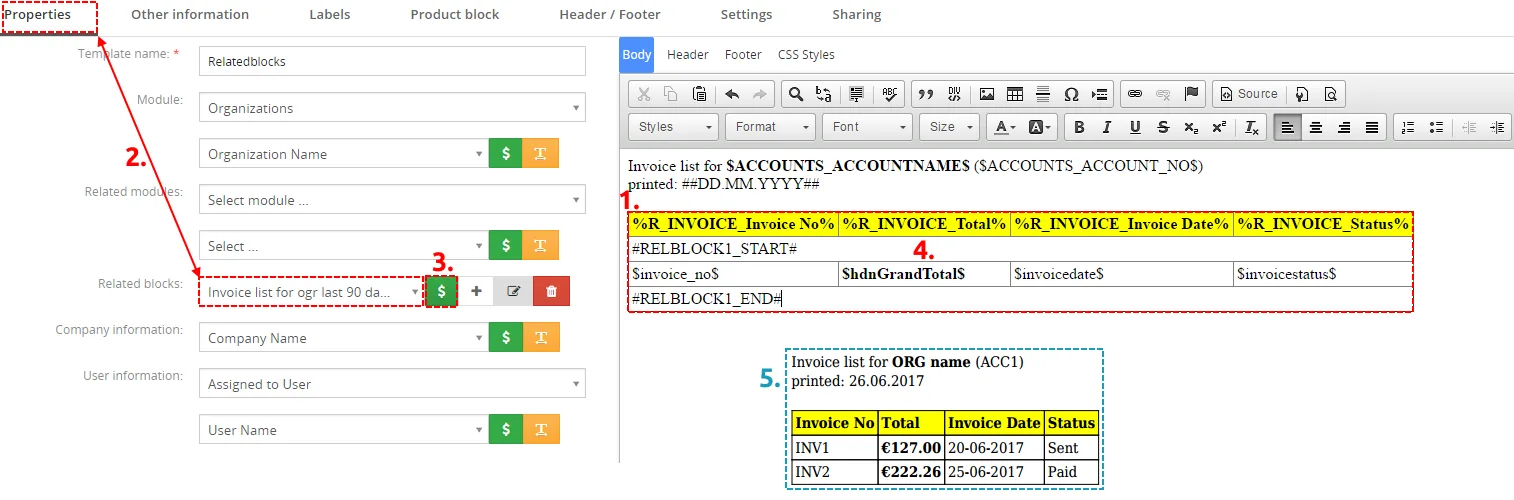
If the related block is created you can continue with editing your template. In order to insert related block
provide following actions:
- Click to editing area where would you like to have related block.
- Using dropdown list select your related block.
- Click on button.
- Related block is inserted. You can continue with editing of the related block if necessary.
- Example of the final PDF document is shown below.
6.6.3 Edit related block
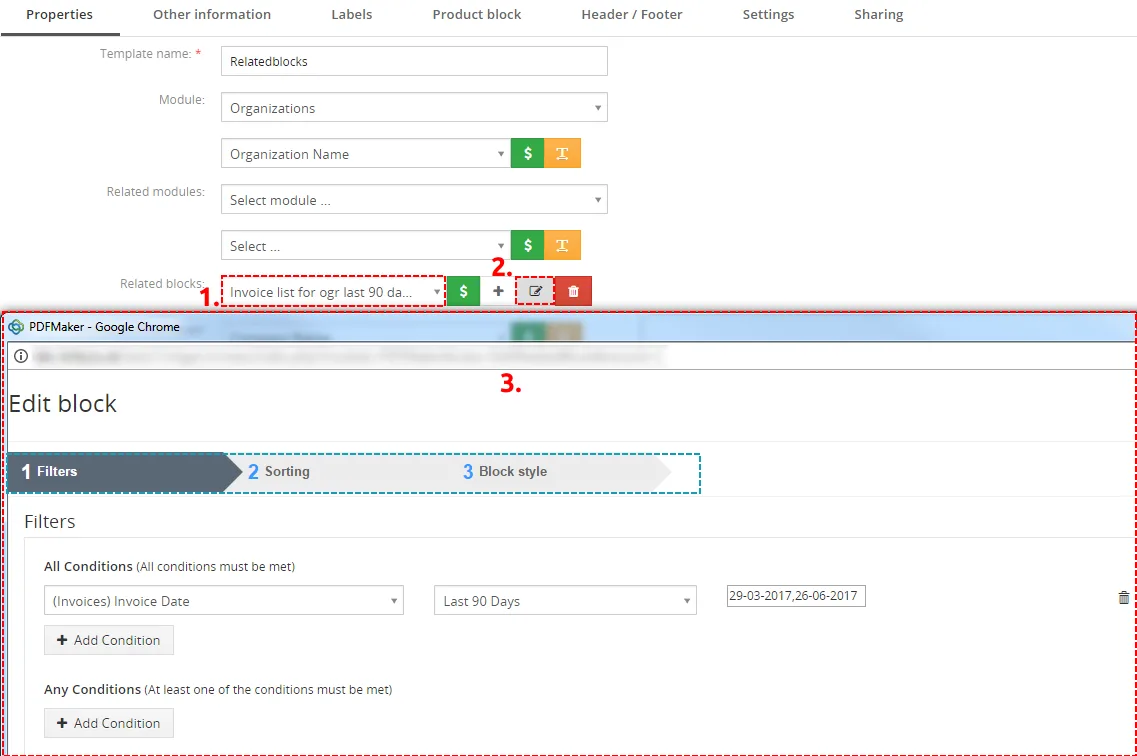
In order to edit already existing related block, just select it (1.) in the Properties tab and click on  button.
6.6.4 Delete related block
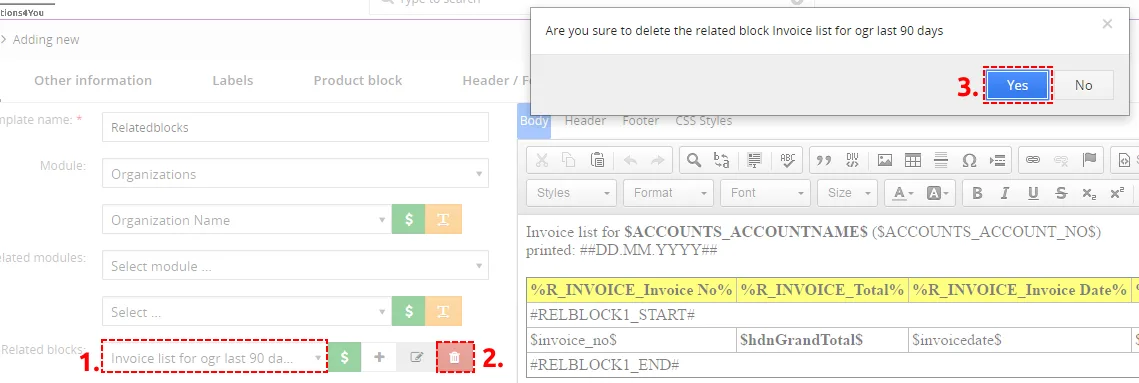
Please provide following simple steps in order to delete related block. Select the related block (Properties
tab) using dropdown list (1.), click on  button (2) and finally confirm deletion (3).
6.7 Using List view block
In case you need a PDF file which consists of the several records and some related fields you can use List view block. Within this block you can simply set which fields of the records you would like to have. Please refer to below picture which shows a simple example of the PDF file consists of the list of invoices and related few fields (invoice number, invoice date, status etc.) and how to prepare it
Firstly, in the PDF Maker Edit view:
- Go to Other infromation tab and select the “Block start” and click .
- Insert fields you would like to have in ListView block ($s-invoice-invoice_no$..).
- Insert “Block end” using button .

Provide additional edit steps and save the template. When the template is ready you can use it within List view (ONLY!) to prepare mail using following steps:
- Go to List view of particular module and select 1 to N records.
- Click on
 and select PDF Export.
- Select List view block template (language) and click on
 .
- Final PDF file with correspondent List view block is created.
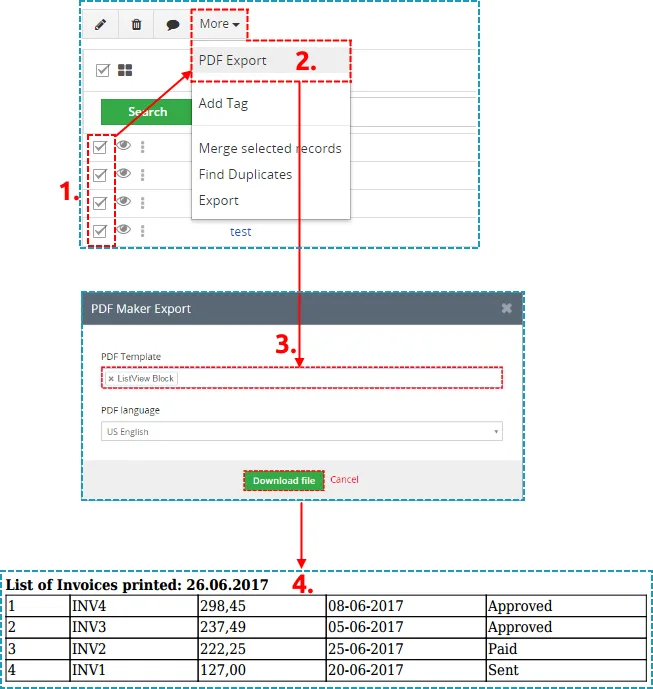
6.7.1 List view group by "x"
Since PDF Maker version 4.5, you can also group list view records by “values/variables”.
It is working via added a variable to the template: [LISTVIEWGROUPBY|Group by label|LISTVIEWGROUPBY]
- Group by label = is replaced with the text you want or variable in our example it will be “PRODUCTS_PRODUCTCATEGORY$”
For example: Products module, group products by Category.
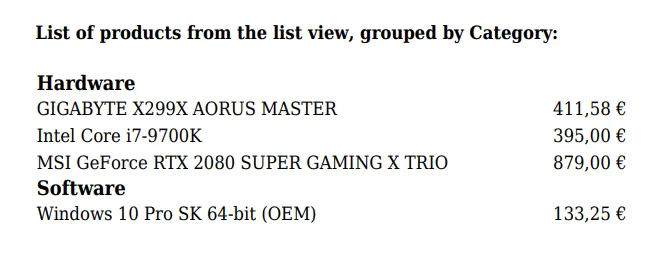
On the image below you see records where 1 record has a Software category and 3 records with Hardware category.

Firstly, in the PDF Maker Edit view:
- Go to Other information and select the “Block start” and click .
- Next, select the “Group by label” and click .
- Replace the text “Group by label” with your variable, in our case it is: PRODUCTS_PRODUCTCATEGORY$
- Select other variables you want to show in the list.
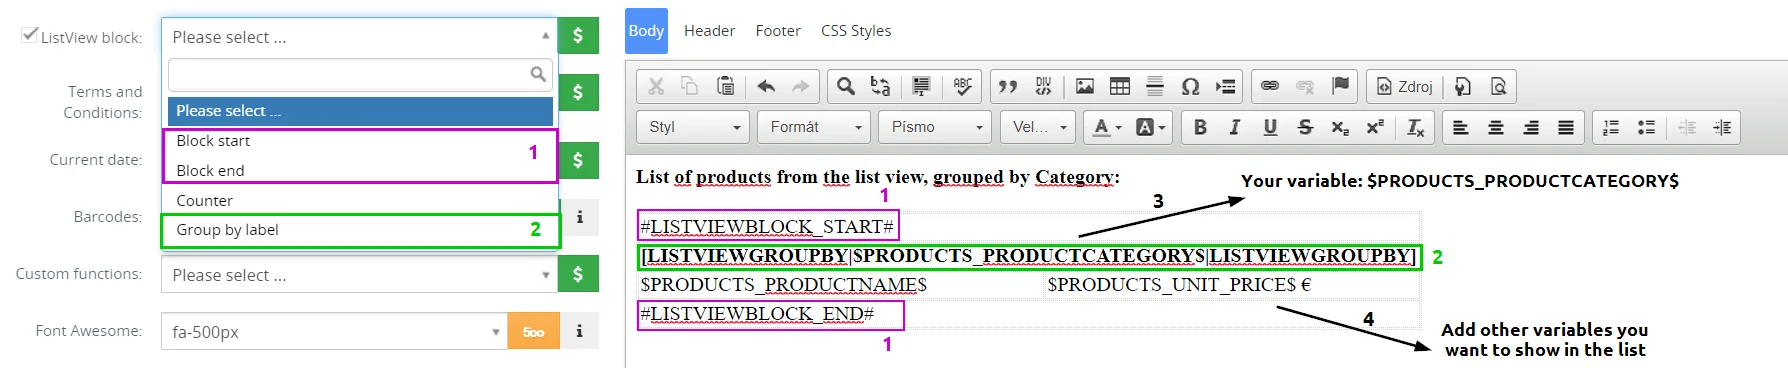
Provide additional edit steps and save the template. When the template is ready you can use it within List view (ONLY!).
The result will be:
6.8 Mapping product block with vtiger form
Below picture shows how you can find and use variables during preparation of the PDF template. Although variables have same or similar name you can not mix them if you would like to have correct PDF document.
Please take it into account during preparation of the templates and see short description in following Tables.
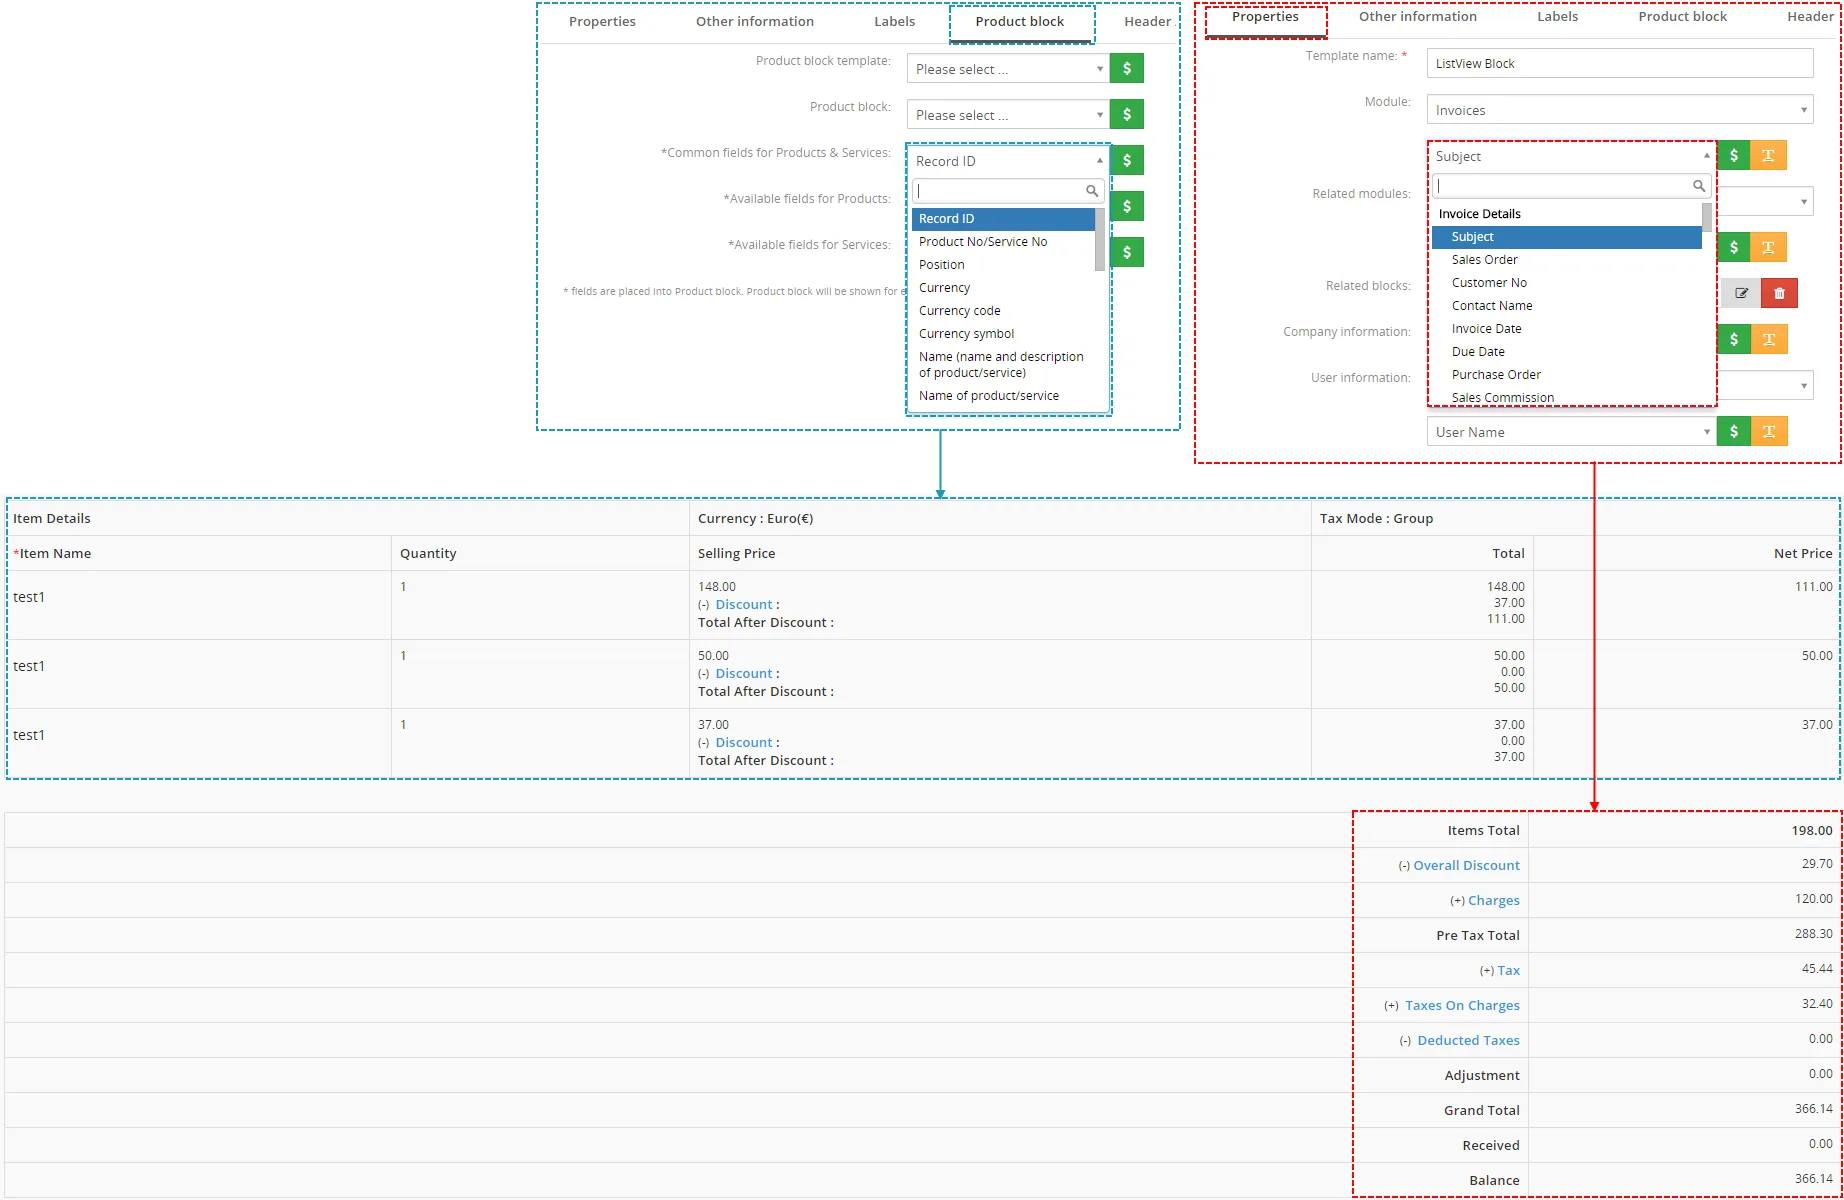
| Name | Description |
|---|---|
| Currency | Euro, Dollar |
| Currency symbol | €, $ |
| Currency code | EUR, USD |
| Subtotal | Price without TAX before discount, by Tax Mode: group = Net Total |
| Total discount | Final Discount amount |
| Total discount (%) | Final Discount in % |
| Total without TAX | Total price without TAX after discount |
| TAX | Total TAX amount |
| TAX (%) | Total TAX in % |
| TAX block | This is useful for some countries, that need to have the detail amount of TAX |
| Charge block | This is useful if you require to have additional charges applied |
| Total with TAX | Total price with TAX |
| Shipping & Handling taxes | Final taxes for Shipping & Handling |
| Shipping & Handling amount | Final amount for Shipping & Handling |
| Adjustment | Adjustment from vtiger form |
| Grand Total | Grand Total from vtiger form |
PDF Maker Other information tab
| Name | Description |
|---|---|
| Record ID | Record ID |
| Product No / Service No | Number of product / service |
| Position | Number of position (1,2,3, …) |
| Currency | Euro, Dollar |
| Currency code | EUR, USD |
| Currency symbol | €, $ |
| Name | Name and description of the product or service |
| Name of product/service | Only the name of the product or service |
| Description of product/service | Description of the product/service from module Product/Service |
| Comment for product/ service | Comment for products/service from Invoice/SO/PO/Q form |
| Quantity | Quantity defined in Invoice/SO/PO/Q |
| Unit | Unit of product/service from module Product/Service |
| List price | List Price from Invoice/SO/PO/Q |
| Total price | List price x Unit |
| Discount | Discount amount for each product/service |
| Discount (%) | Discount in % for each product/service |
| Total after discount | Total price after discount without TAX |
| TAX | TAX amount for each product/service |
| TAX (%) | TAX in % for each product/service |
| Total price with TAX | Total price with TAX for each product/service |
Mapping values for product block template item available in Invoices, Quotes, Sales Orders and Purchase Orders
6.8.1 Tax block
Tax block is a useful feature of PDF Maker if you need see all taxes you are using in your Invoices, Quotes and other modules which are using item details blocks.
You can manage your taxes in Vtiger CRM settings under INVENTORY – Tax management.
How to add Tax block to your PDF Maker template
- Go to your module for example we can use Invoice module
- Set the tax you need
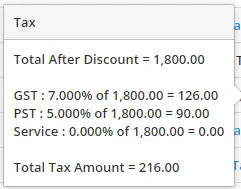
- If tax is added to your Invoice then go to your PDF Maker template
- In the template edit window add tax block via module variables
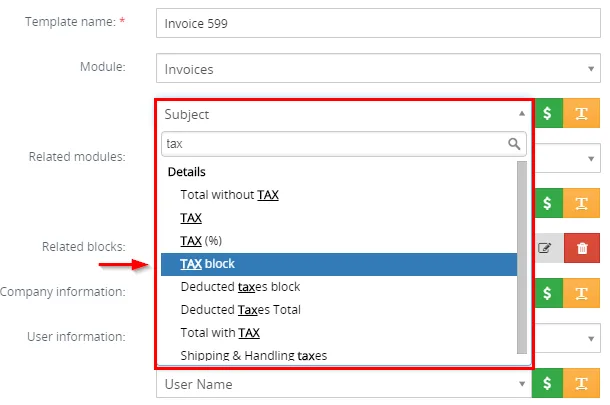
- The tax block is added to your template now and you can see block like this:

You can change the style of tax block if you know HTML and CSS via source code of template or remove, add columns (for example, many customers are removing Sum columns). - Tax block was added to the template and this is the Export final preview of Invoice:
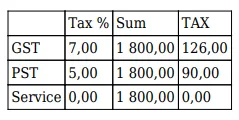
6.8.2 Charges block
Charges block is a useful feature of PDF Maker if you need have additional charges for your Invoices, Quotes and other modules which are using item details block.
You can manage your Charges in Vtiger CRM settings under INVENTORY – Tax management – Charges (& its taxes) tab.
How to add Charge block to your PDF Maker template
- Go to your module for example we can use Invoice module
- Set the charges you need (You can do this in Tax management too)
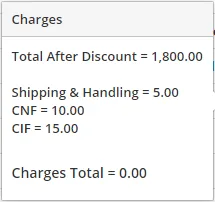
- If charges are added to your Invoice then go to your PDF Maker template
- In the template edit window add charge block via module variables
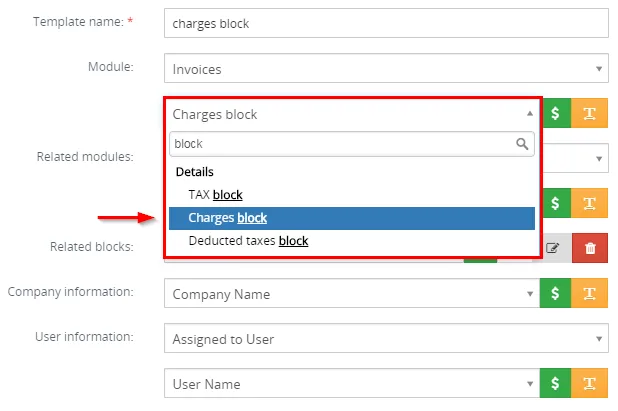
- The charges block is added to your template now and you can see block like this:
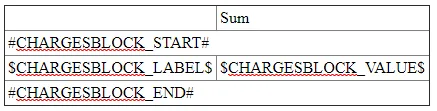
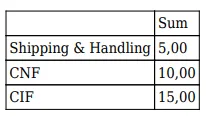
You can change the style of charge block if you know HTML and CSS via source code of template or remove, add columns (for example, many customers are removing Sum columns or changing the columns title). - Charges block was added to the template and this is the Export final preview of Invoice with Charges block:
6.9 Template settings
6.9.1 File name
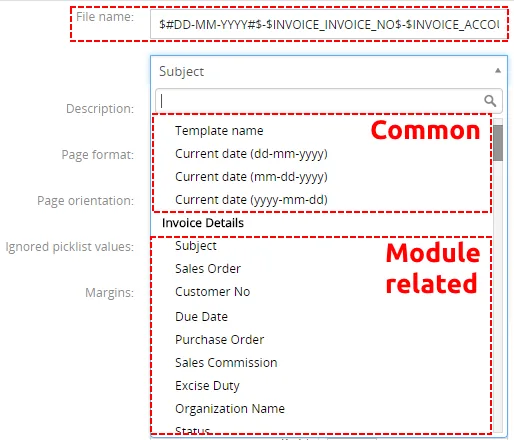
In Settings tab of PDF Maker you can find “File name” definition. This setup gives you the opportunity to set the name of generated PDF files according to your needs. You can combine strings, modules variables and some standard variables like Template name, Current date. File name will be used by saving PDF file into Documents and by sending PDF as attachment too. Dropdown list for file name depends on primary module as can be seen on the below image.
6.9.2 Status
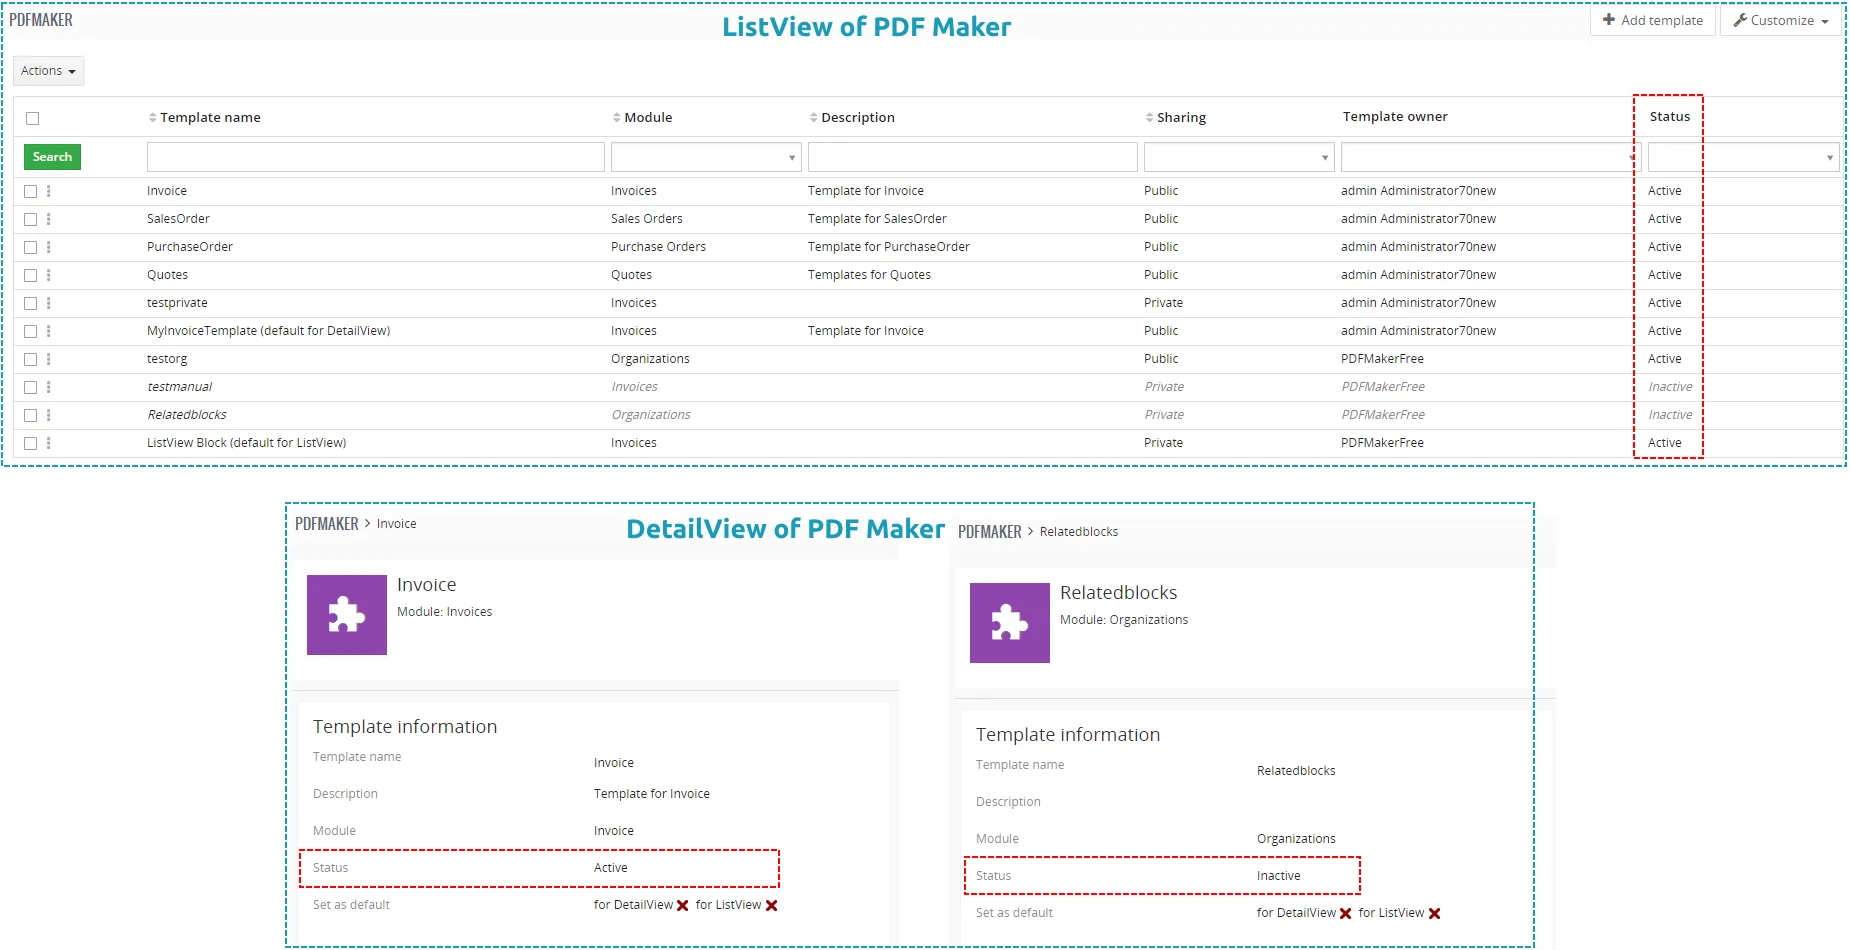
You can set status as active or inactive for each template. Please take into account that this can be set separately per logged user, it means this setting is not global. The inactive templates will not appear in the list of available templates in the PDF maker block. You can find status of existing templates in:
- ListView – “Status” column
- DetailView – Template information
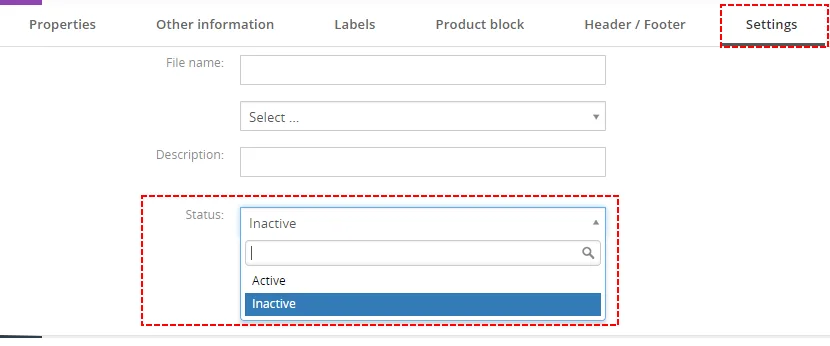
To set PDF template as active / inactive you need to use Settings tab in EditView and select status from listbox.
6.9.3 Set as default
The particular PDF Template can be set as default by a logged user, it means this setting is not global. This default template is specific to that user and to that module. It means that different users can set their own default templates for each module separately. It is possible to define template as default for DetailView and default for ListView separately. You can find whether the template is set as default or not in:
- ListView – the template default for DetailView is marked with text “(default for DetailView)”, template default for ListView is marked with text “(default for ListView)”. If the template is default for DetailView as well as for ListView, then in the template name column text “(default)” is written.
- DetailView – Properties tab
- PDF Maker block – the default template is highlighted and automatically selected in PDF Maker block. PDF template is also highlighted and selected in case that only one PDF template exists for module.

To set PDF template as default you need to use Settings tab in EditView – check/uncheck the checkboxes to change this setting separately for EditView and ListView.
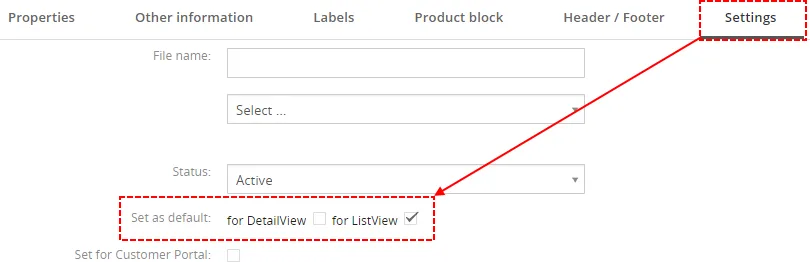
Please take into account that templates using ListView block cannot be in parallel set as default for DetailView. The checkbox “for DetailView” in “Settings” tab is automatically inactive if you check checkbox “ListView block” in “Properties” tab

6.9.4 Watermark
Since PDF Maker 700.5.0,there is very useful functionality to set Watermark available. You can use image as well as text.
Text also should be static or dynamic based on module or related modules variables.
To set Watermark please provide following steps:
- Open your template in EditView and open Propertiestab
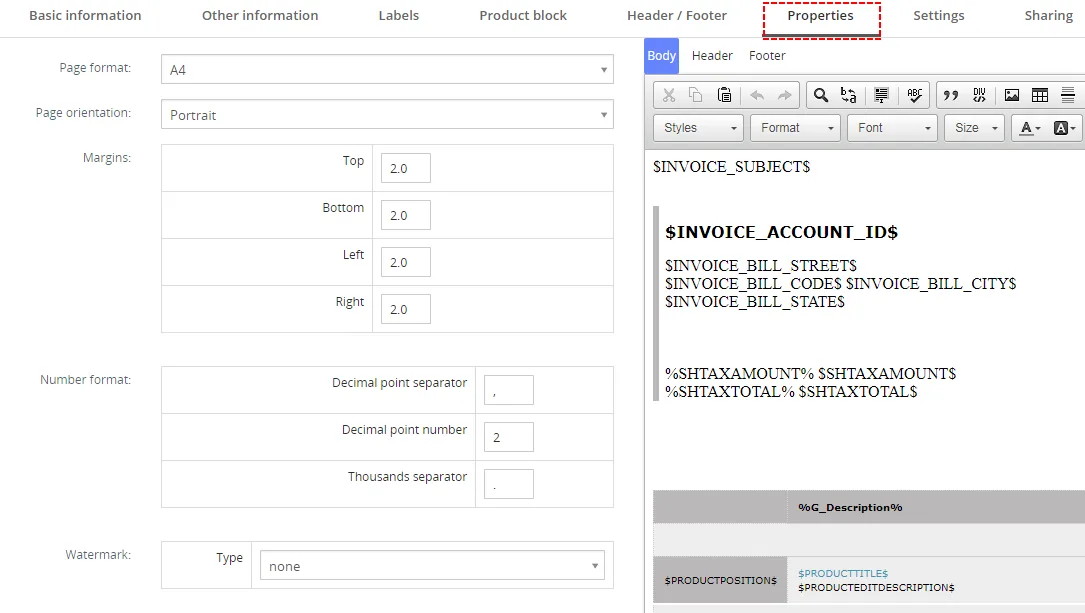
Watermark – PDF Maker Vtiger 7 - Now choose image or text
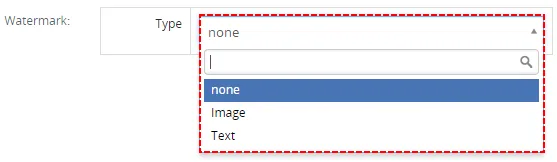
Watermark type – PDF Maker Vtiger 7 - If you select image, please upload your image and set Alpha (The Alpha property specifies the opacity/transparency of an element).
Default Alpha is 0.1 and possible values are from 0.1 to 1.0.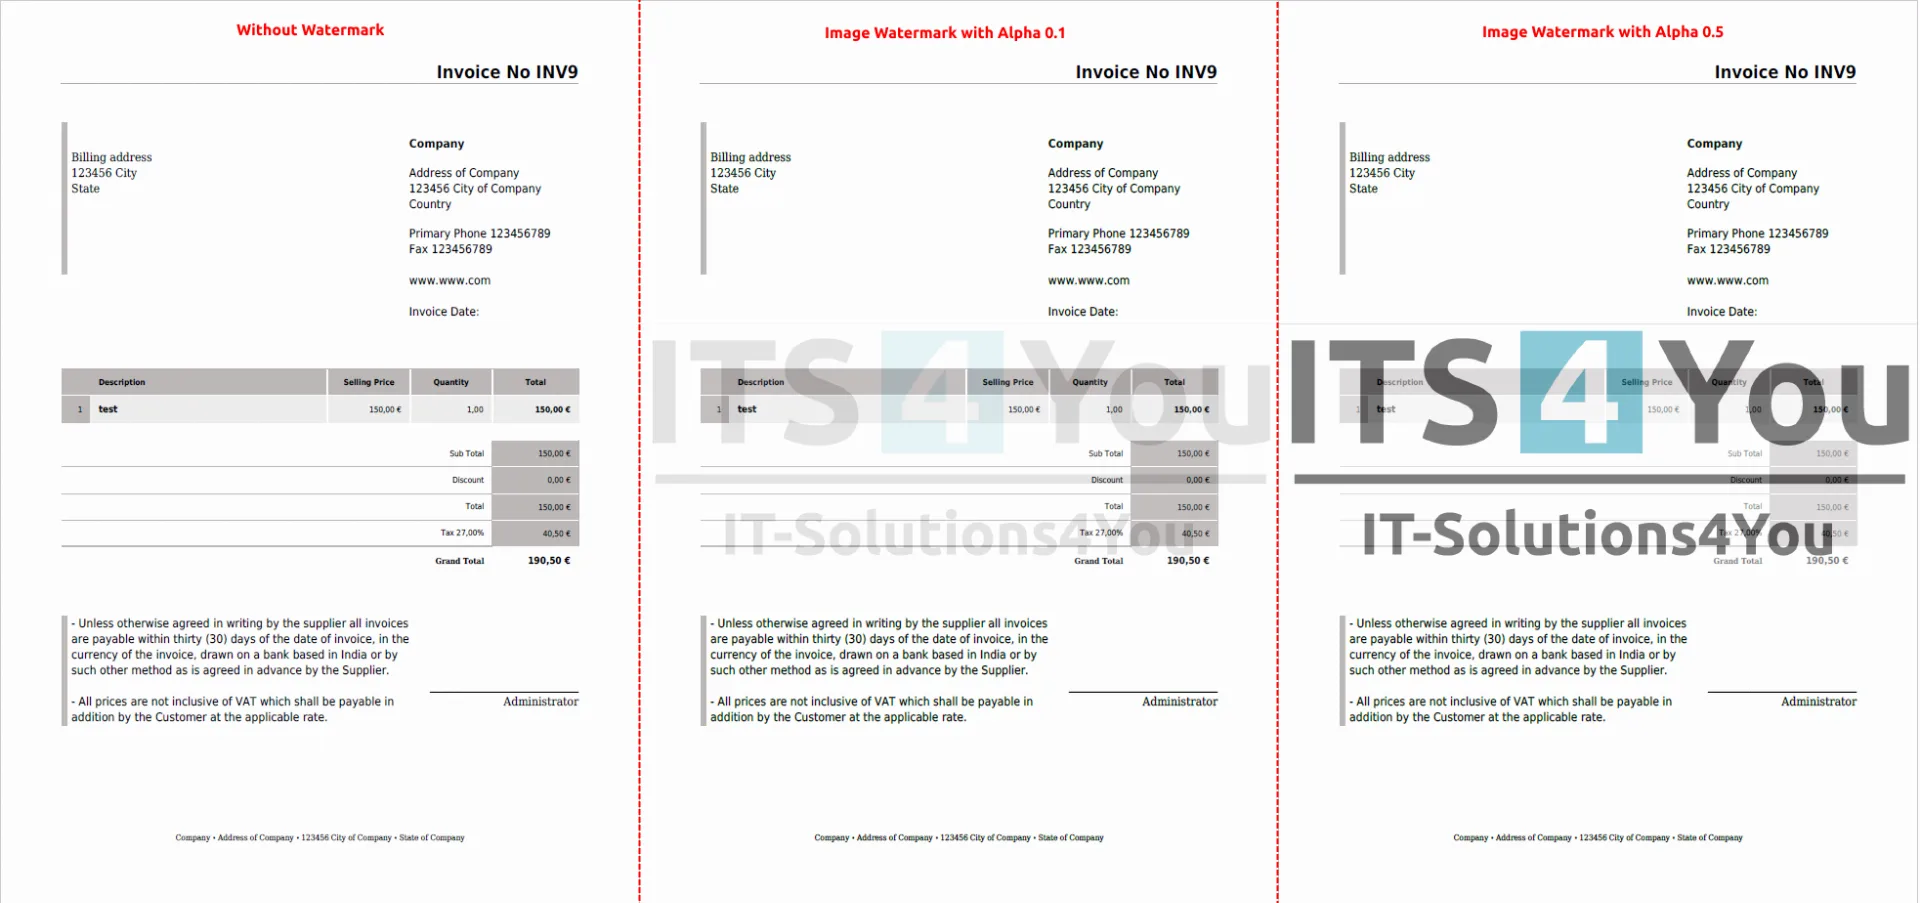
Image Watermark – PDF Maker Vtiger 7 - If you select text you can set static text or dynamic based on values of module or related modules.
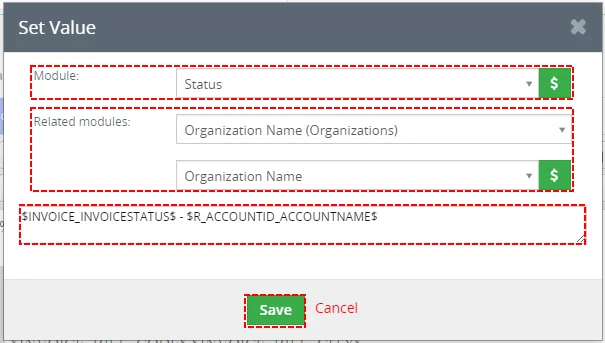
Watermark text setting – PDF Maker Vtiger 7 And also you can set Alpha property.
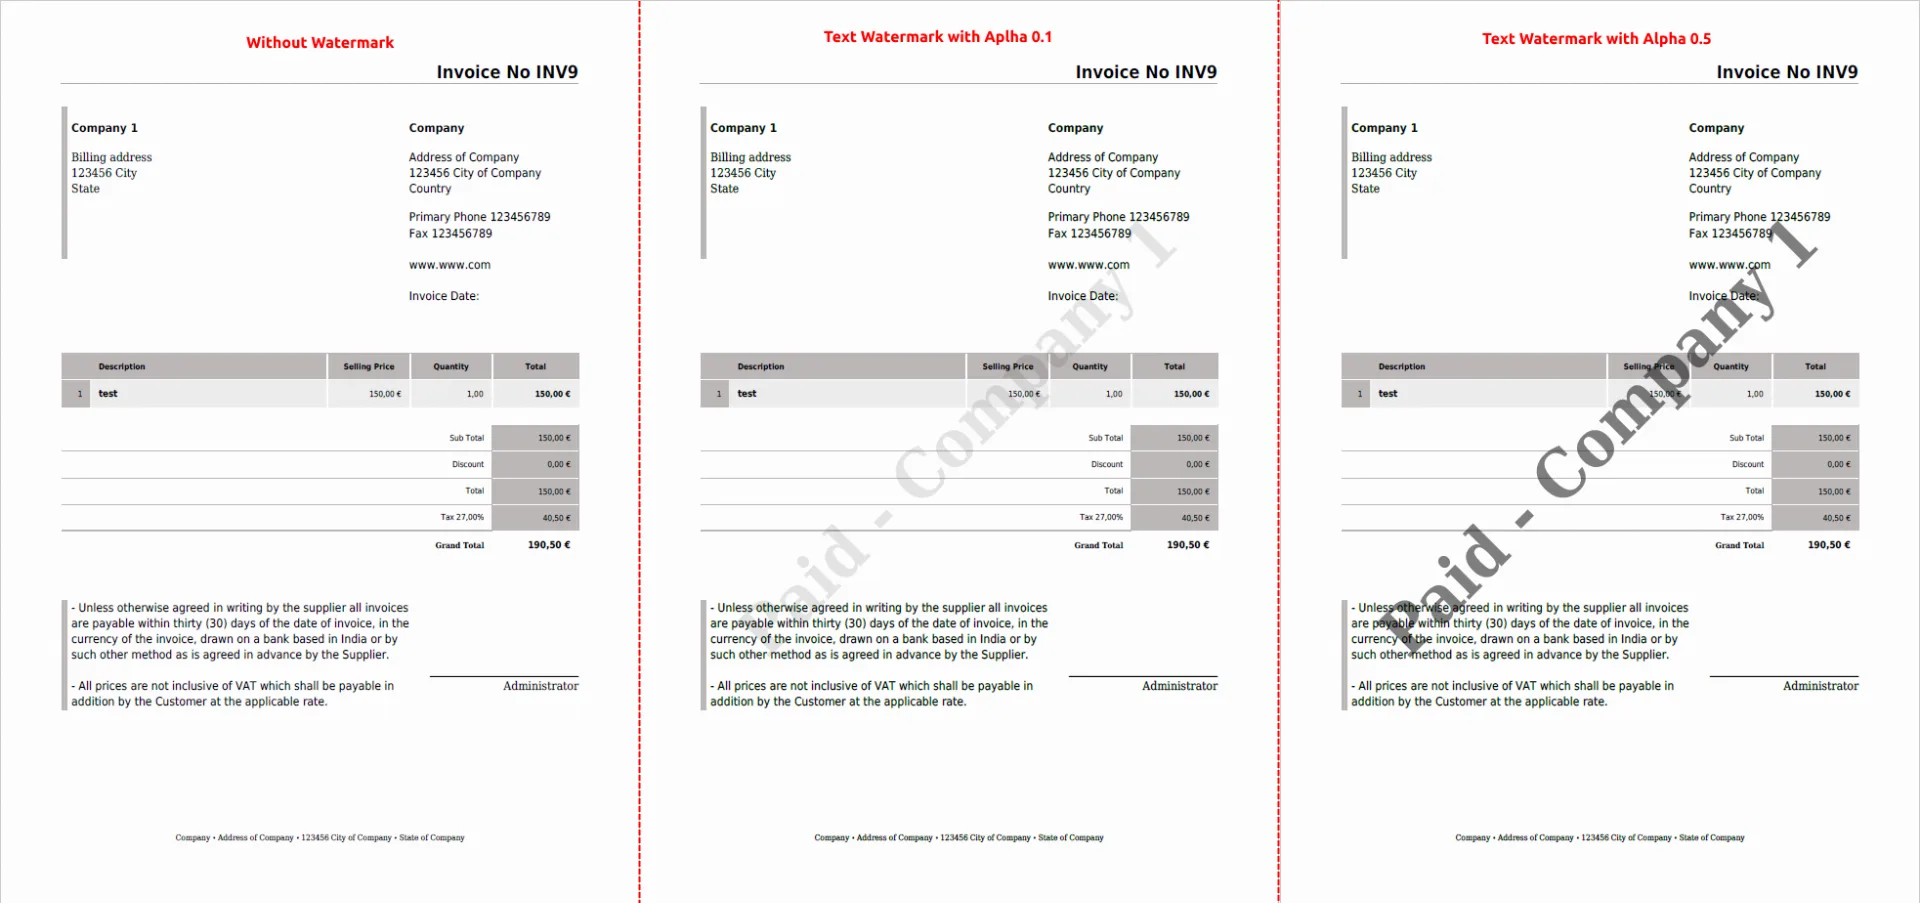
Watermark text – PDF Maker Vtiger 7
- If you select image, please upload your image and set Alpha (The Alpha property specifies the opacity/transparency of an element).
6.9.5 PDF Password
Since PDF Maker 700.5.0, there is also other very useful functionality to lock your PDF File with password. You can use static or dynamic password based on module or related modules variables.
To lock your PDF file please provide following steps:
- Open your template in EditView and open Settingstab
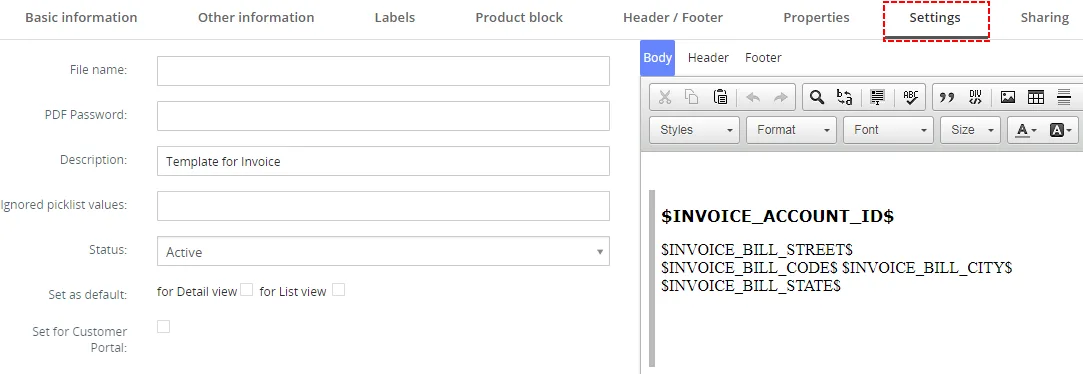
PDF password – PDF Maker Vtiger 7 - You can set static password or dynamic password based on values of module or related modules.
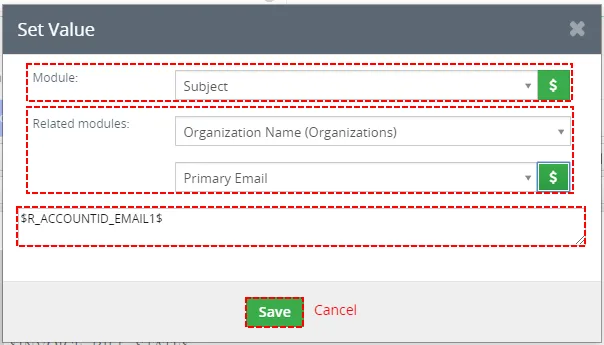
PDF password – PDF Maker Vtiger 7 For example, there is primary mail of Organization used like Password.
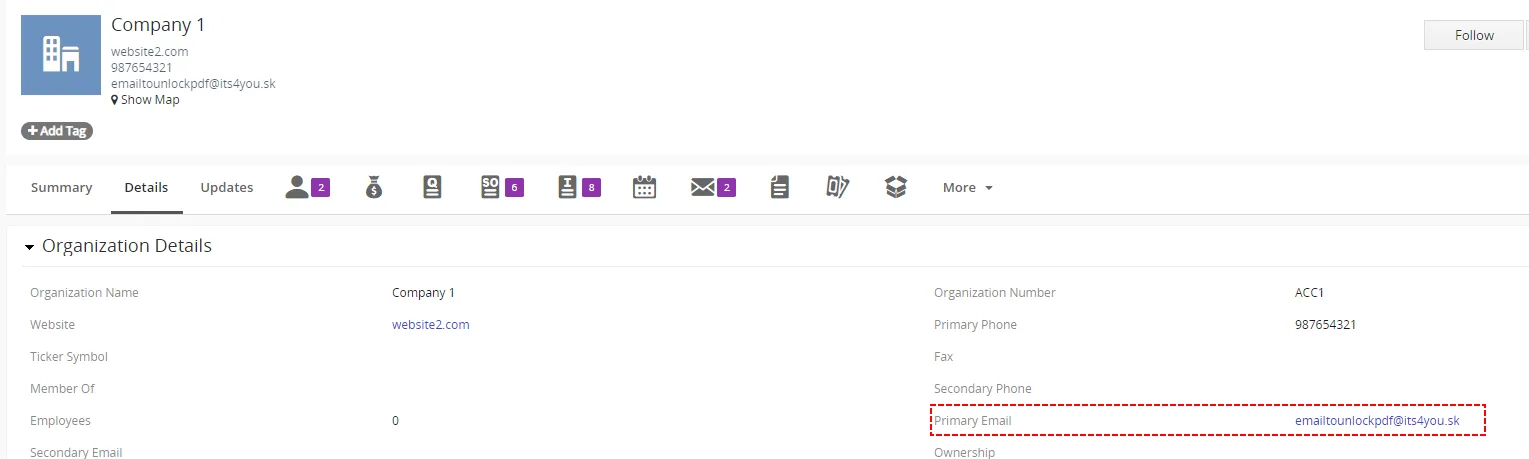
Organization mail like PDF password – PDF Maker Vtiger 7 To open your PDF file you need use Primary email of related Organization.
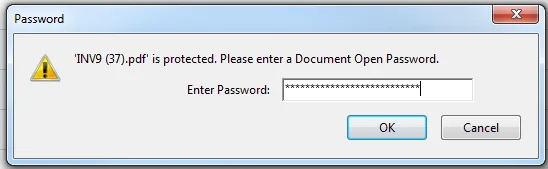
Organization mail like PDF password – PDF Maker Vtiger 7
Need help with PDF Maker?
Our support team answers questions about installation, templates and settings.