

1.Introduction
Custom Login Page for Vtiger CRM allows administrators to replace the default Vtiger login screen with a branded login page.
You can customize the logo, background, colors, layout, welcome text, visual text and footer directly from a visual editor without coding.
The extension is useful when you want your CRM login screen to match your company identity and provide a more professional first impression to users.
Main areas covered in this documentation:
- Installing Custom Login Page
- Activating the license
- Opening the Custom Login Page settings
- Creating a new login page template
- Choosing the login page layout
- Changing logo, background, colors and texts
- Saving a template as draft
- Setting a template as active
- Restoring the default Vtiger login page
- Managing existing login page templates
Custom Login Page is designed for Vtiger CRM 8.x.
2.How to Activate License Key
License Activation
After purchasing a license, you need to validate it through the Installer.
If you do not have the Installer installed yet, please follow the instructions in the Installer Installation section first.
Then follow next steps to validate license key:
In the Installer, click the ![]() button and enter your license key and confirm via Validate button.
button and enter your license key and confirm via Validate button.
After successful activation of the extension, it will appear in the list of available extensions.
2.1.License Settings
All our modules are using Installer to manage licenses. Please check our Installer pages for more information.
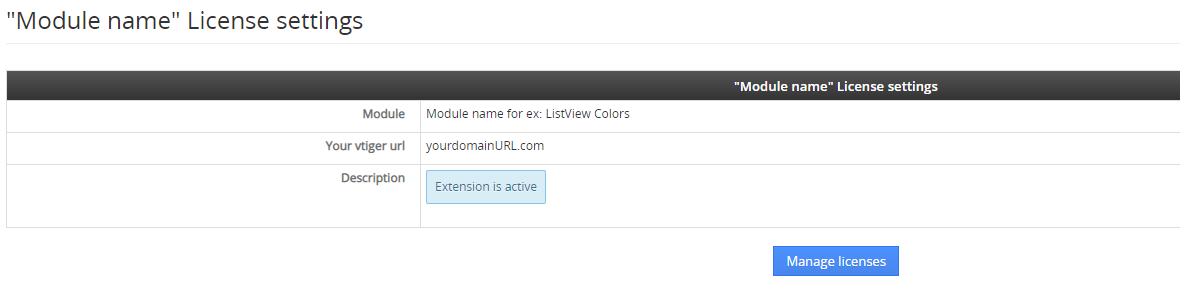
You can access the License settings like its shown below:
(there can be more options from the pick-list, depends on the module)
After accessing the License window you can see screen bellow with following information:
- Module name, Your Vtiger domain URL
- Description, if license is activate or not:
 – your license is currently active,
 – your license is not active and you need active it via Installer.
 – the Installer FREE extension is missing on your CRM.
To activate or manage license, click on the ![]() button.
button.
2.2.Deactivate license
If you want to deactivate your license, please provide following steps:
- Go to your Installer, by a click on Notifications Icon
 and then on the button
or via Main Menu – Settings – CRM Settings – Extensions – ITS4YouInstaller - The following screen will appear (see below):

Installer – deactivation of license You can deactivate license by click on the button

![]() Note: The module will be deactivated but not uninstalled and license will be removed from the Activated Licenses tab.
Note: The module will be deactivated but not uninstalled and license will be removed from the Activated Licenses tab.
2.3.Reactivate license
To reactivate a license after deactivation, you need to follow the same process as you activated it first time:
- Click on the
 button and enter your license key.

- Confirm with
 button.
When the license was activated you can see module available in the List of Modules below.
3.How to install Custom Login Page
There are currently two options how to install extension:
- (Recommended) Using our Free extension Installer
(Please visit the Installer page for more info) - Manually installation using a .zip file
(You still need to have Installer in order to activate license)
The Installer is required for the proper operation and license validation of our extensions.
After purchasing a license, you can find the Installer in your order email or download it from your My Account portal.
If you are an existing customer and already have the Installer installed, you only need to activate your license.
After that, the purchased Extension will appear in the list of available extensions for installation.
⚠️ Uninstalling Extension will remove all saved Settings!
3.1.Installation via Installer (default)
Make sure you have Installer installed, you can download Installer via My Acount Dashboard after purchasing License Key, or it will be send to your Email.
To install extension, click the ![]() button next to the Extension you have purchased and confirm the installation process. During the installation, and also during future updates, the Changelog may be displayed so you can review the latest changes before continuing.
button next to the Extension you have purchased and confirm the installation process. During the installation, and also during future updates, the Changelog may be displayed so you can review the latest changes before continuing.

After the license is successfully activated and the extension is installed, you can continue with the next steps to use the extension.
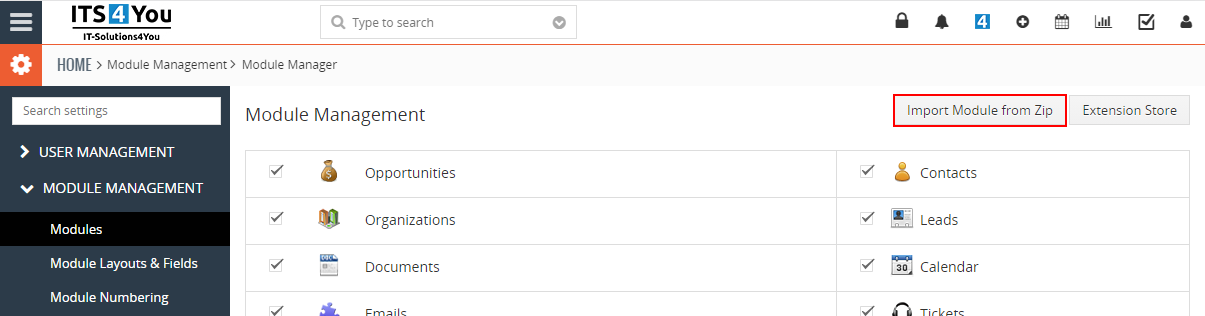
3.2.Manual installation
There is also a way to install / update the extension manually in some scenarios:
- Manual installation or update of the extension can be requested if you contact our support because you are facing some issues with extension.
- Standard way of installation and update is using our Installer. In some rare cases we can send you .zip file to update the extension manually.
Installation can be done via Module Manager by clicking on the button ![]() and selecting the .zip file.
and selecting the .zip file.
4.Custom Login Page in Vtiger CRM
Custom Login Page allows you to create and manage login page templates for your Vtiger CRM.
A template is a saved login page design. It can include your company logo, background image, custom colors, welcome text, headline, description, and footer text.
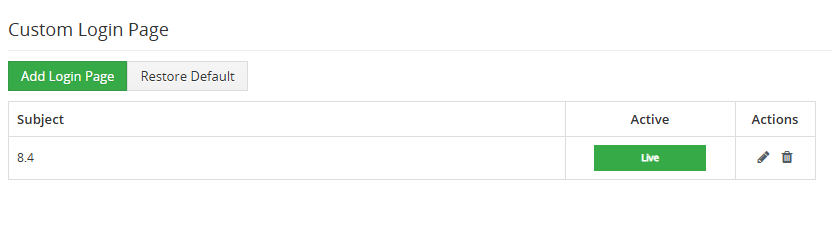
You can create multiple templates and decide which one should be used on the real CRM login page. Only one template can be active at a time.
The active template is marked with the Live badge.
4.1.Opening Custom Login Page
After installation, you can open the extension directly from CRM Settings.
Go to:
Settings → Extensions → Custom Login Page
The Custom Login Page screen displays a list of created login page templates. The first time you open it, the list may be empty.
If you see a warning about the image folder, click Create folder or ask your CRM administrator to check the folder permissions. This is required before uploading logo or background images.

4.2.Creating a Login Page
Creating a new login page template is simple.
Start by clicking the Add Login Page button.
After clicking the button, the editor will open. In the editor, you can prepare the complete login page design.
Basic steps:
- Enter a template name in the Subject field.
- Select the layout.
- Upload or choose a logo.
- Select a background image, background color, or gradient.
- Edit the heading and description text.
- Edit the welcome text above the login form.
- Choose colors.
- Add footer text if needed.
- Click Save or Save and set as active.
Save keeps the template as a draft.
Save and set as active applies the template to the real CRM login page.

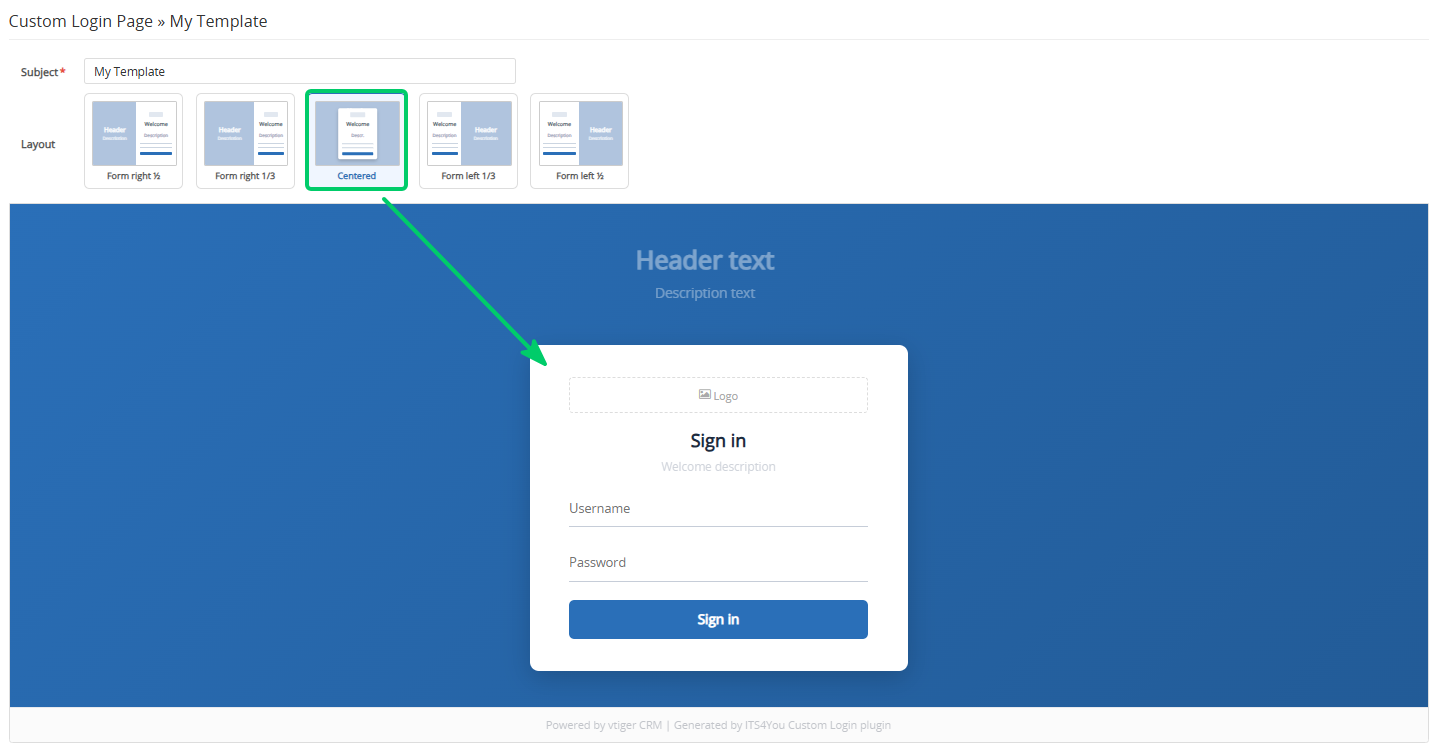
4.2.1.Choosing a Layout
The layout defines where the login form and the visual part of the page are displayed.
| Layout | Description |
|---|---|
| Form left 1/2 | The screen is split into two equal parts. The login form is displayed on the left side. |
| Form right 1/2 | The screen is split into two equal parts. The login form is displayed on the right side. |
| Form left 1/3 | The login form uses a smaller part of the screen on the left side, while the visual area is larger. |
| Form right 1/3 | The login form uses a smaller part of the screen on the right side, while the visual area is larger. |
| Centered | The login form is displayed as a centered card over the background. |
Click a layout card to select it. The preview updates immediately, so you can quickly compare different layouts.
4.2.2.Visual Editor
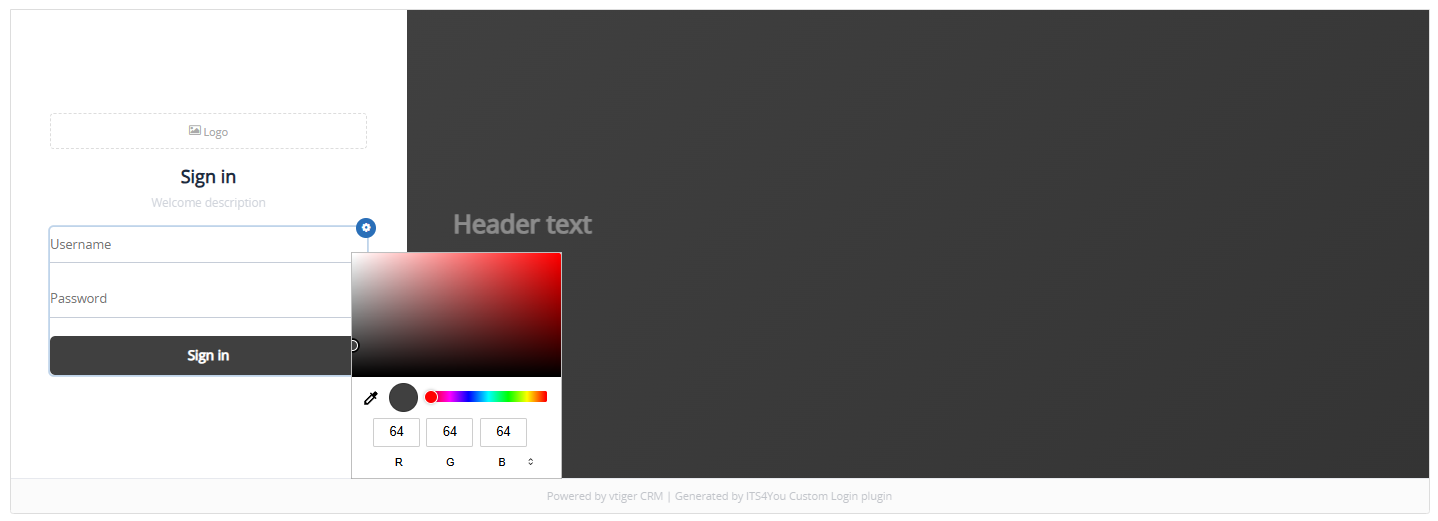
The visual editor allows you to design the login page directly in the preview. Most elements can be edited by clicking them or by using the settings icon.
You can edit the following parts of the login page:
| Element | What you can change |
|---|---|
| Logo | Upload a new logo, choose an existing logo, and adjust the logo size. |
| Background | Use an image, solid color, or gradient as the page background. |
| Overlay | Darken the background image to improve text readability. |
| Header text | Edit the main text displayed on the visual side of the login page. |
| Description text | Edit the smaller text displayed under the header text. |
| Welcome text | Edit the heading displayed above the login form. |
| Welcome description | Edit the short text displayed below the welcome heading. |
| Accent Color | Change the color of the sign in button, links, and focused fields. |
| Footer | Add the company name, copyright text, or leave the footer empty. |
Recommended background image size is 1920 × 1080 px.
4.2.3.Save and Set as Active
When your login page design is ready, you can either save it as a draft or apply it immediately.
| Button | Result |
|---|---|
| Save | Saves the template, but does not apply it to the real login page. |
| Save and set as active | Saves the template and applies it to the real CRM login page. |
When a template is active, it is marked with the Live badge. Only one template can be active at a time.
If you edit and save the active template, the real login page is updated immediately.
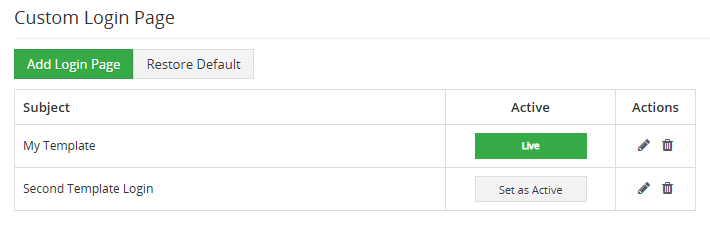
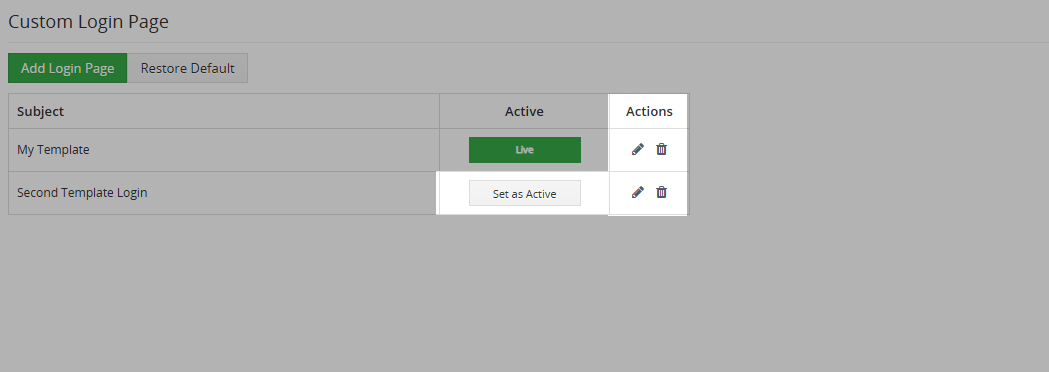
4.2.4.Managing Templates
The template list allows you to manage all created login page templates.
Available actions:
| Action | Description |
|---|---|
| Edit | Opens the selected template in the visual editor. |
| Set as active | Makes the selected template visible on the real CRM login page. |
| Delete | Removes the selected template. |
Before deleting a template, make sure that you no longer need it. If the template uses images shared with another template, the system may show a warning before deletion.
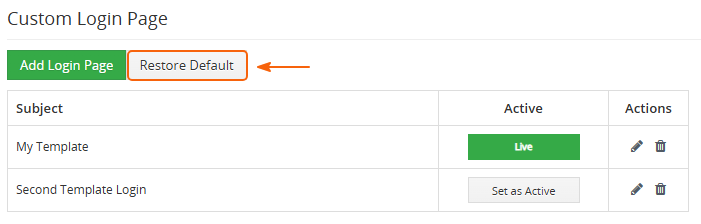
4.2.5.Restore Default Login Page
Restore Default, allows you to return to the standard Vtiger login page.
This action does not delete your saved templates. It only disables the currently active custom login page. You can activate any saved template again later.
Use the Restore Default button when:
- You want to temporarily use the original Vtiger login page.
- You are testing a new design and want to revert quickly.
- You do not want any custom template to be active.
5.Additional features
Additional features
Custom Login Page includes several useful features that help you work with login page templates faster.
| Feature | Description |
|---|---|
| Multiple templates | Create several login page designs and switch between them when needed. |
| Live template | The active login page template is clearly marked with the Live badge. |
| Choose existing image | Reuse a logo or background image that was already uploaded for another template. |
| Image overlay | Darken the background image so the visual text remains readable. |
| Logo size control | Adjust the logo size directly in the visual editor. |
| Restore Default | Use the Restore Default button to return to the original Vtiger login page without deleting saved templates. |
| Folder warning | The extension warns you if the image folder is missing or does not have write permissions. |
6.Settings
Custom Login Page settings can be accessed from the Extensions list view in Installer.

In Settings, you can find:
- Integration: opens the configuration for custom login pages.
- Module Requirements: allows you to check whether all required components are available for the module, such as custom links, event handlers, and other required settings.
- License Settings: shows whether the license is currently active.
- Upgrade: updates the extension when a newer version is available.
- Uninstall: removes the extension from your CRM.
6.1.How to update Custom Login Page
The upgrade of the module is initiated via our Installer or manually.
Updating via Installer (recommended):
- open the Installer in the CRM
- in the Modules tab find your installed module and you should see the
 button available
 - If the new version is available, you will be notified via Installer Notifications icon
Updating manually:
Updating module manually is sometimes required when our support team sends you .zip package, if you are having some issues or there is any update or customization available.
Otherwise, we always recommend to use update via Installer.
Update can be done via Module Manager by clicking on the button ![]() and selecting the .zip file.
and selecting the .zip file.
6.2.Uninstall
If you need to remove the Extension from your Vtiger, you have two options:
- Uninstall via Installer.
- Manually by going to module Settings and choosing the Uninstall option.
6.2.1.Uninstall via Installer
You have also option to remove the module via Installer window by accessing the Settings – Uninstall window:
- Go to your Installer, by a click on Notifications Icon and then on the button ,
or via Main Menu – Settings – CRM Settings – Extensions – ITS4YouInstaller - Find the module you need to uninstall in the Modules tab
- Via
 pick list button choose the Uninstall option, you will be redirected to the Uninstall window.
 - Click on
 button

- Confirm uninstall with
 button
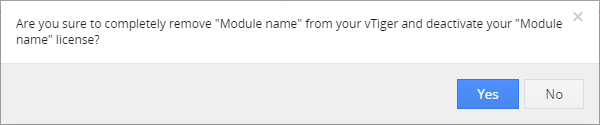
Now, the module has been removed from your Vtiger and your license has been deactivated. To use this module again, you need to provide installation and validation steps (see Installation chapter).
6.2.2.Manual Uninstall
There is also an option to remove the extension from Vtiger CRM manually.
To uninstall the extension, follow these steps:
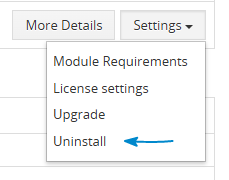
- Go to Installer and find the extension in the list view. In the Settings dropdown, select Uninstall. Available options in the Settings dropdown may differ depending on the extension.
Extension Uninstall - Click the button.
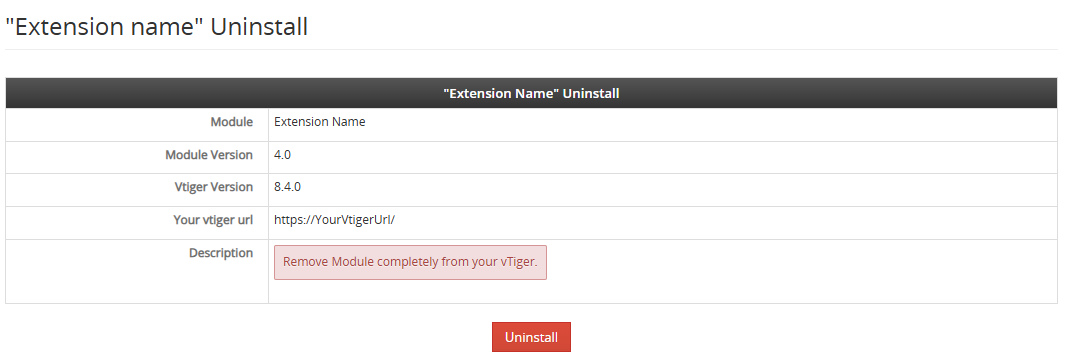
Confirm the uninstall action by clicking the
 button.
The extension is now removed from your Vtiger CRM and the license is deactivated.
To use the extension again, you need to install it and validate the license again.