

1.Introduction
This manual provides practical instructions for using the Module Builder for Vtiger CRM.
It explains how CRM administrators can create and configure custom modules directly inside Vtiger CRM without preparing module files manually. The documentation focuses on module setup, field configuration, relationships, menu placement, list view settings, export options, and typical usage examples.
Module Builder is useful when standard CRM modules are not enough and your CRM needs additional structured data areas for a specific business process, internal workflow, or customer requirement.
For a full product overview, commercial information, screenshots, and extension benefits, please visit the main Module Builder product page.
Main areas covered in this documentation:
• Creating custom modules in Vtiger CRM
• Defining module prefix, module name and numbering prefix
• Assigning modules to the correct parent menu
• Selecting module icons for better CRM navigation
• Adding custom fields and organizing module layouts
• Creating 1 relationships between created modules
• Creating N relationships between created modules
• Managing list view columns for better record visibility
• Exporting created modules for use in another CRM installation
• Reviewing created module structure before final use
2.How to Activate License Key
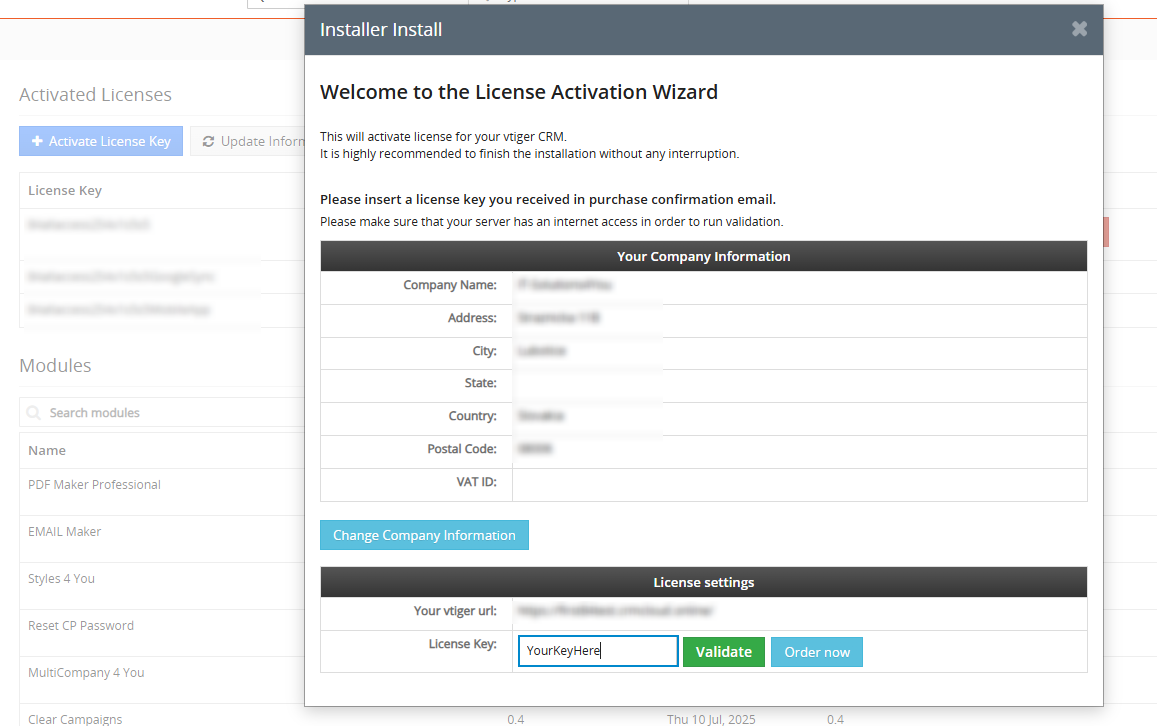
License Activation
After purchasing a license, you need to validate it through the Installer.
If you do not have the Installer installed yet, please follow the instructions in the Installer Installation section first.
Then follow next steps to validate license key:
In the Installer, click the  button and enter your license key and confirm via Validate button.
After successful activation, the Module Builder will appear in the list of available extensions.
2.1.License Settings
All our modules are using Installer to manage licenses. Please check our Installer pages for more information.
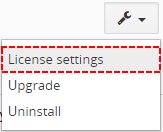
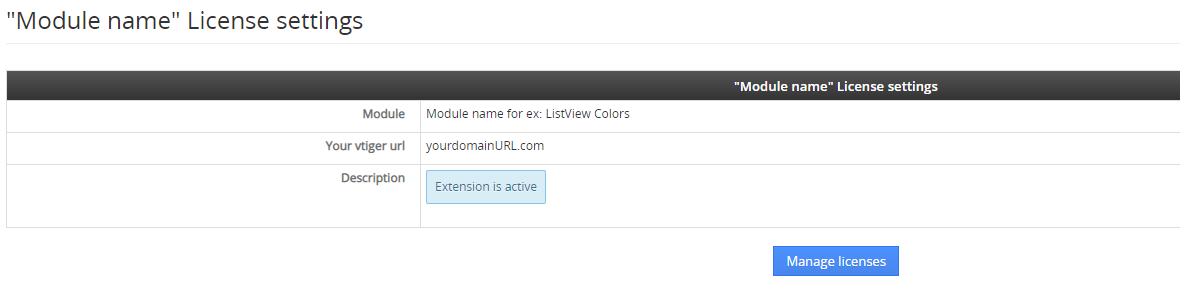
You can access the License settings like its shown below:
(there can be more options from the pick-list, depends on the module)
After accessing the License window you can see screen bellow with following information:
- Module name, Your Vtiger domain URL
- Description, if license is activate or not:
 – your license is currently active,
 – your license is not active and you need active it via Installer.
 – the Installer FREE extension is missing on your CRM.
To activate or manage license, click on the  button.
2.2.Deactivate license
If you want to deactivate your license, please provide following steps:
- Go to your Installer, by a click on Notifications Icon
 and then on the button
or via Main Menu – Settings – CRM Settings – Extensions – ITS4YouInstaller - The following screen will appear (see below):

Installer – deactivation of license You can deactivate license by click on the button

 Note: The module will be deactivated but not uninstalled and license will be removed from the Activated Licenses tab.
2.3.Reactivate license
To reactivate a license after deactivation, you need to follow the same process as you activated it first time:
- Click on the button and enter your license key.

- Confirm with
 button.
When the license was activated you can see module available in the List of Modules below.
3.How to install Module Builder
There are currently two options how to install extension:
- (Recommended) Using our Free extension Installer
(Please visit the Installer page for more info) - Manually installation using a .zip file
(You still need to have Installer in order to activate license)
The Installer is required for the proper operation and license validation of our extensions.
After purchasing a license, you can find the Installer in your order email or download it from your My Account portal.
If you are an existing customer and already have the Installer installed, you only need to activate your license.
After that, Module Builder will appear in the list of available extensions for installation.
⚠️ Uninstalling Module Builder Extension will remove all saved Settings!
3.1.Installation via Installer (default)
Make sure you have Installer installed, you can download Installer via My Acount Dashboard after purchasing License Key, or it will be send to your Email.
To install extension, click the  button next to the Module Builder and confirm the installation process. During the installation, and also during future updates, the Changelog may be displayed so you can review the latest changes before continuing.

After the license is successfully activated and the Module Builder is installed, you can continue with the next steps to Create New Modules.
3.2.Manual installation
There is also a way to install / update the extension manually in some scenarios:
- Manual installation or update of the extension can be requested if you contact our support because you are facing some issues with extension.
- Standard way of installation and update is using our Installer. In some rare cases we can send you .zip file to update the extension manually.
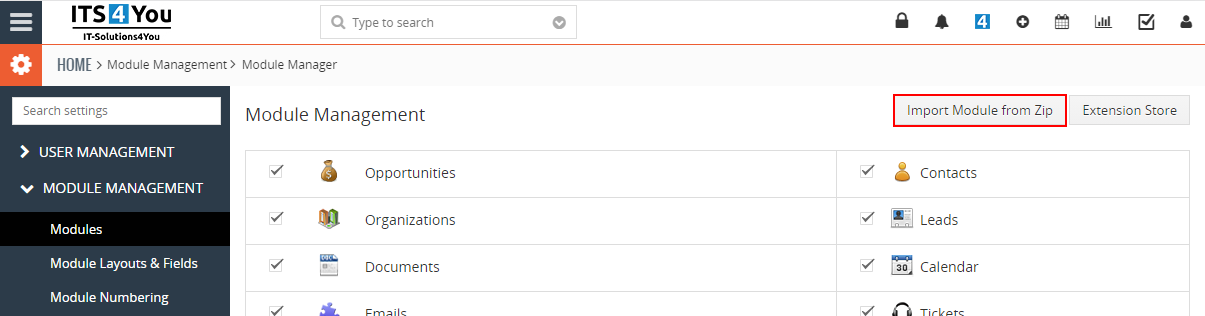
Installation can be done via Module Manager by clicking on the button  and selecting the .zip file.
4.Module Builder in Vtiger CRM
Accessing Module Builder
After successful installation and license validation, you can access Module Builder directly from your CRM settings.
Go to CRM Settings, open Module Management, and select Module Builder.
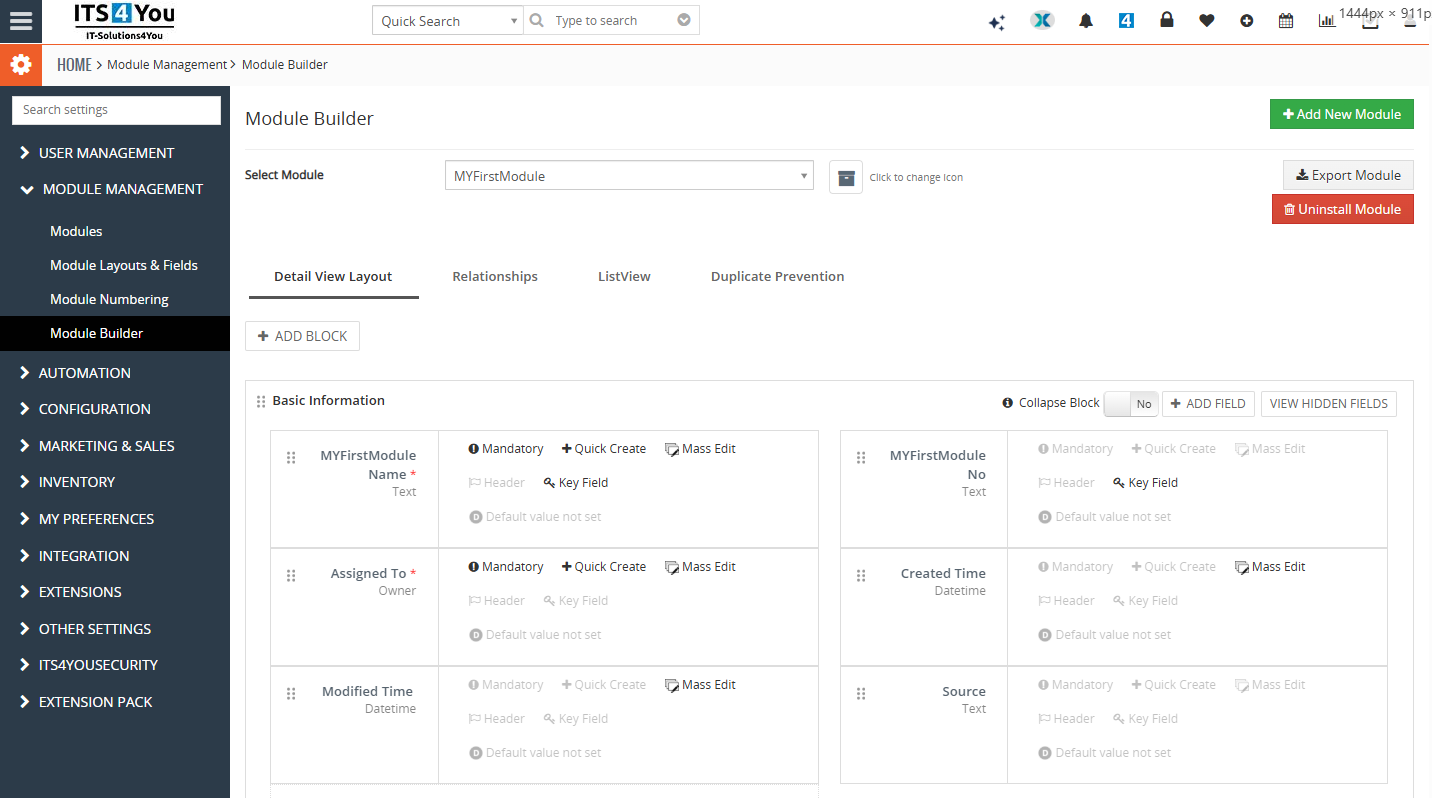
The Module Builder layout will appear, and you can start creating a new module or manage modules that already exist in your CRM.
Below you can see a preview of Module Builder and also a video showing how Module Builder works. In the next sections, we will explain each part in detail and show you how to create and manage modules step by step.
Module Builder video preview
4.1.How to Create Custom Module
How to Create Custom Module
Creating a custom module is simple. You can start by clicking the + Add New Module button in Module Builder.
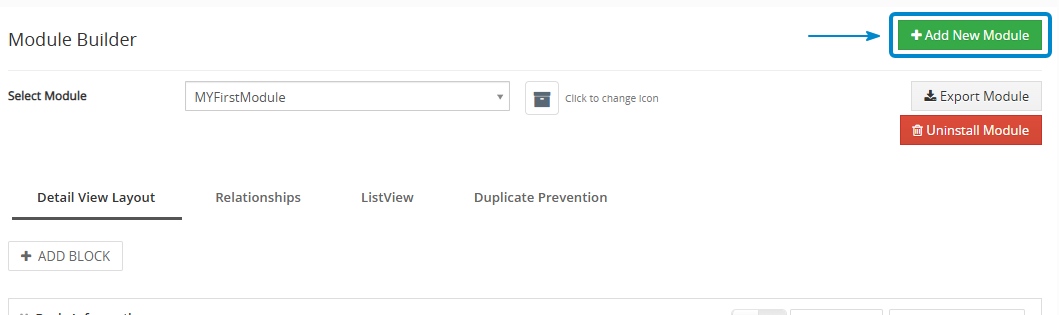
After clicking the button, the Add New Module window will appear. In this window, you need to fill in the required module information:
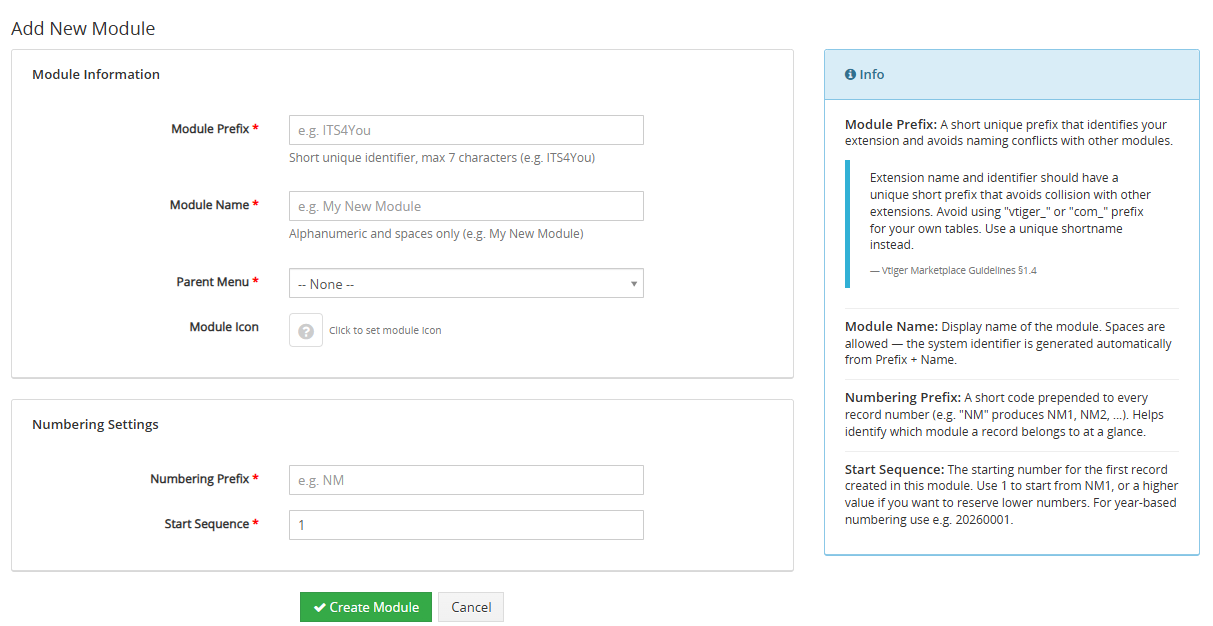
| Field | Description |
|---|---|
| Module Prefix | A short and unique prefix that identifies your extension and helps avoid naming conflicts with other modules. |
| Module Name | The display name of the module. Spaces are allowed. The system identifier is generated automatically from the module prefix and module name. |
| Parent Menu | Select the menu section where the module should be displayed in your CRM. |
| Module Icon | Click the icon field to see available icons. Choose the icon you want to use and confirm the selection. You can also change the module icon later. |
| Numbering Prefix | A short code added before every record number. For example, if you use NM, the created records will be numbered as NM1, NM2, and so on. This helps users quickly identify which module a record belongs to. |
| Start Sequence | The starting number for the first record created in this module. Use 1 if you want to start from NM1, or use a higher value if you want to reserve lower numbers. For year based numbering, you can use a value such as 20260001. |
After all required information is filled in, click the Create Module button to create the new custom module.
Once the module is created, the Module Builder screen will display the currently selected module together with additional actions.
You can now start adding new fields or blocks to the module by using the Add Field or Add Block buttons.
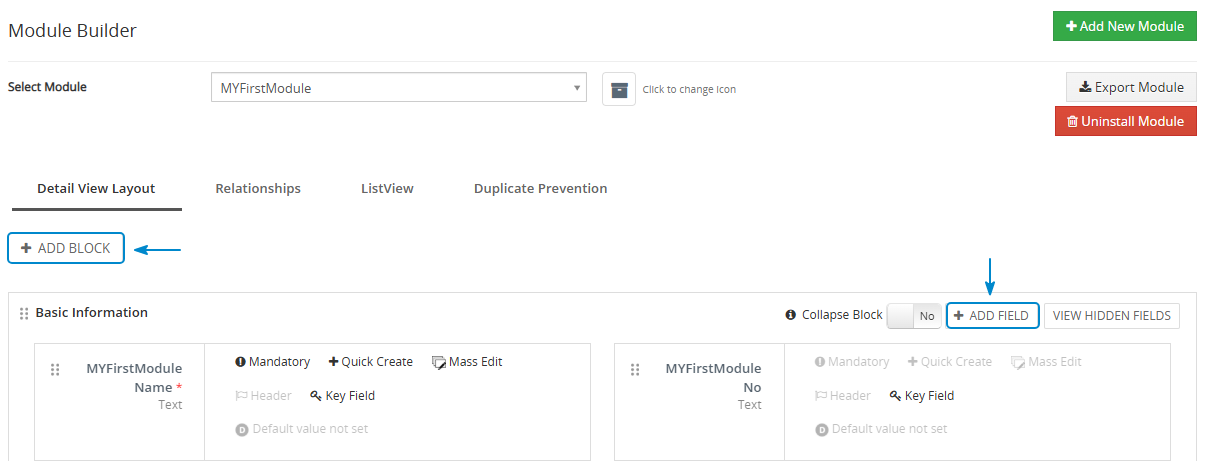
4.1.1.Add Fields to Custom Module
Add Fields
After creating a module, you can start adding new fields to it. Fields can be added directly inside the selected block by clicking the + Add Field
button.
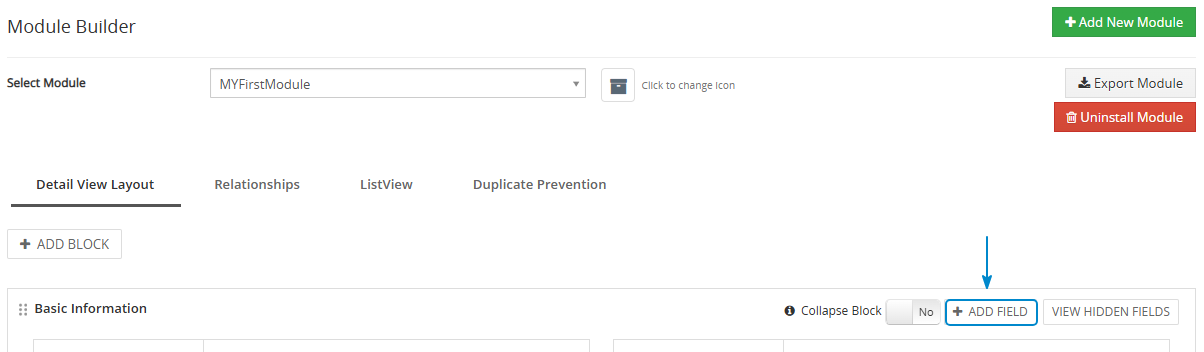
After clicking the + Add Field
button, the Create Custom Field window will open. In this window, you can select the field type, enter the field label, define additional options, and save the new field.
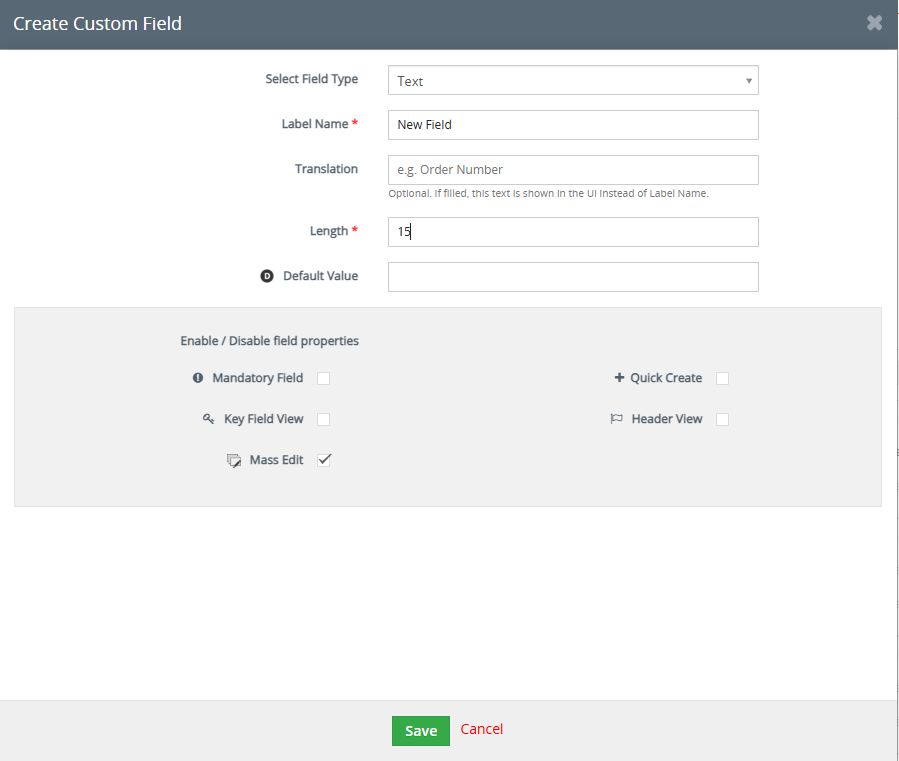
Create Custom Field options
| Option | Description |
|---|---|
| Select Field Type | Select the type of field you want to create, such as text, number, date, email, checkbox, picklist, relation, and others. |
| Label Name | Enter the field name that will be used as the main label of the field. Use alphanumeric characters and spaces only. |
| Translation | Optional text shown in the user interface instead of the label name. This is useful if you want to display a more user friendly field name. |
| Length | Define the maximum length of the field value. This option is mainly used for text based fields. |
| Default Value | Enter a default value that should be automatically filled when a new record is created. |
| Mandatory Field | Enable this option if the field must be filled before the record can be saved. |
| Quick Create | Enable this option if the field should be available in the Quick Create form. |
| Key Field View | Enable this option if the field should be shown as an important key field in the record view. |
| Header View | Enable this option if the field should be displayed in the header area of the record detail view. |
| Mass Edit | Enable this option if users should be able to update this field for multiple records at once. |
Available field types
Module Builder supports several field types. Select the field type according to the kind of data you want to store in the custom module.
| Field Type | Description |
|---|---|
| Text | Standard text input for short text values. |
| Decimal | Number field that supports decimal values. |
| Integer | Number field for whole numbers without decimals. |
| Percent | Field for percentage values. |
| Currency | Field for monetary values. |
| Date | Date field for storing calendar dates. |
| Field for email addresses. | |
| Phone | Field for phone numbers. |
| Picklist | Dropdown field where users select one value from predefined options. |
| URL | Field for website links or other URLs. |
| Checkbox | Yes or no field used for simple true or false values. |
| Text Area | Larger text field for longer notes or descriptions. |
| Multi Select Combo Box | Field where users can select multiple values from predefined options. |
| Skype | Field for storing a Skype contact value. |
| Time | Field for storing time values. |
| Relation | Field used to connect the current module with another CRM module. |
Choose the field type, enter the field label, and fill in the additional options required for the selected field type.
When everything is configured, click the Save
button to create the new field.
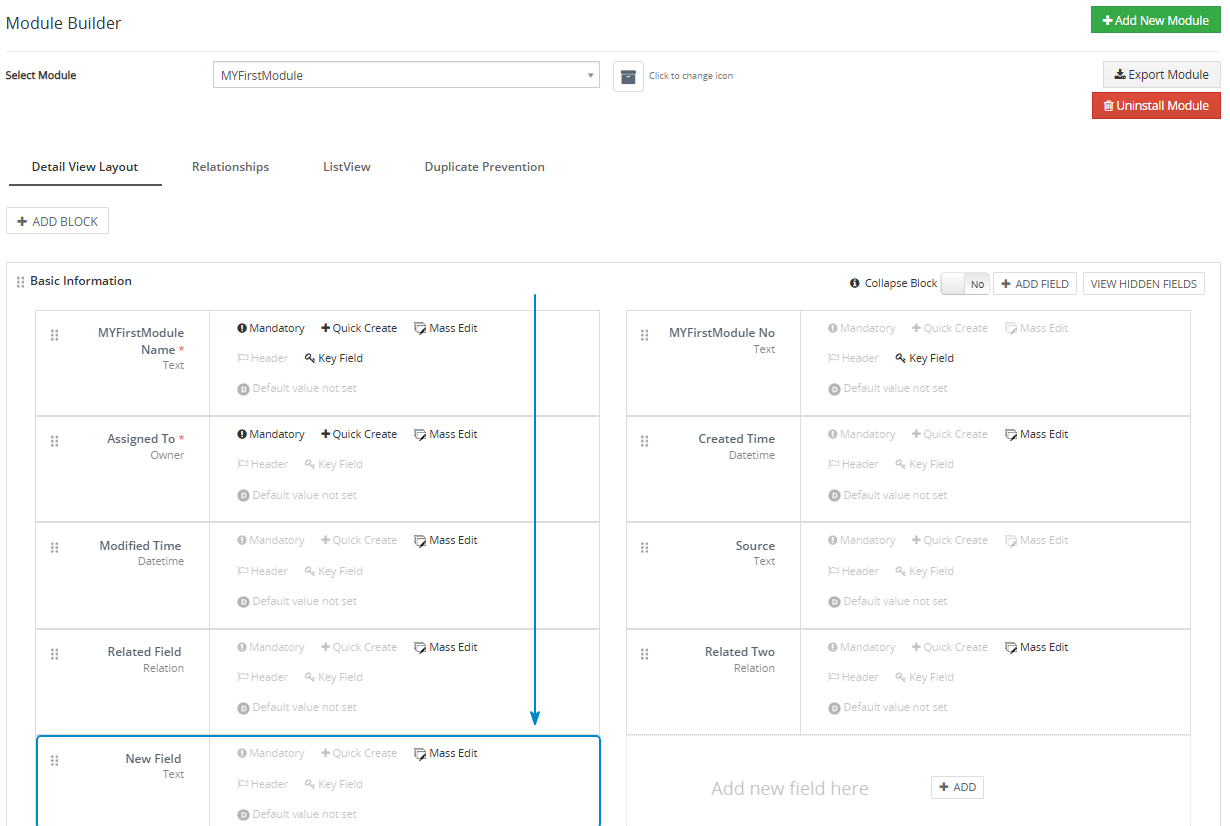
After saving, the new field will be created and displayed in the selected module block inside Module Builder.
4.1.2.Add Blocks to Custom Module
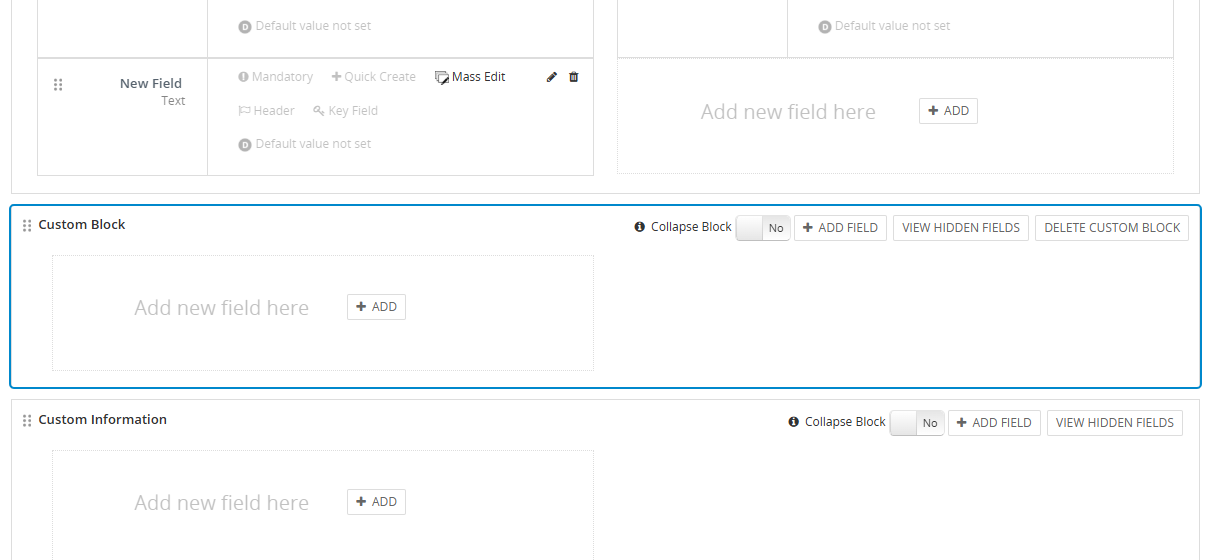
If you need to organize fields into more sections, you can add a new block by clicking the + Add Block button.
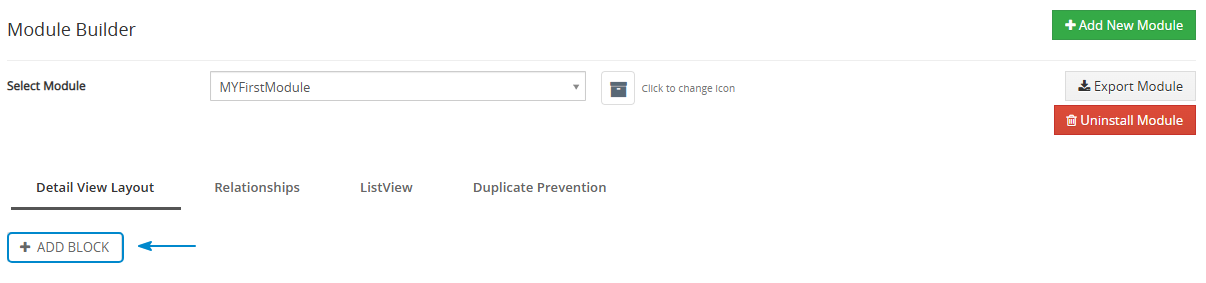
After clicking the + Add Block button, a new window will open. In this window, you can define the new block settings.
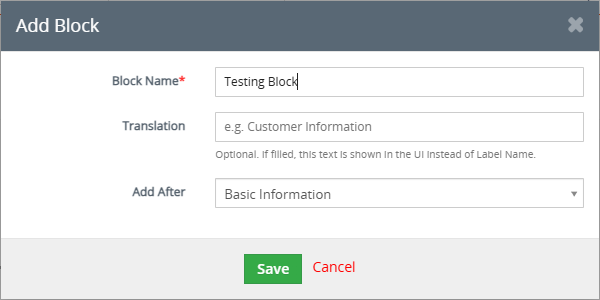
Add Block options
| Option | Description |
|---|---|
| Block Name | Enter the name of the block. This name will be used to identify the block in the module layout. |
| Translation | Optional text shown in the user interface instead of the block name. This is useful if you want to display a more user friendly block title. |
| Add After | Select where the new block should be placed in the module layout. |
After filling in the required information, click the Save button to create the new block.
Once the block is created, you can manage it directly in the Module Builder layout. You can set the block as a collapsed block in Detail View, move it higher or lower in the module layout, and add new fields to it using the + Add Field button.
If inactive fields exist for the selected block, you can display them by clicking the View Hidden Fields button.
5.Additional features in Module Builder
Module Builder includes several additional features that help you manage, extend, and customize your custom modules more efficiently.
These features are useful when you want to reuse created modules, improve module presentation, or connect modules together inside your CRM.
Export Module
The Export Module feature allows you to export a custom module created with Module Builder. This is useful if you want to move the module to another CRM installation, create a backup of the module structure, or prepare the module for further use.
- Select the module you want to export.
- Click the Export Module button. The module will be downloaded as a ZIP file.

Icons for Custom Modules
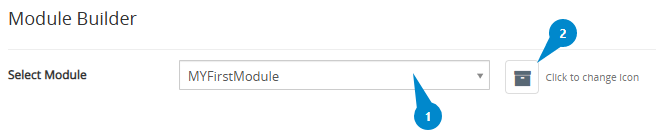
Module Builder allows you to define icons for your custom modules. Custom icons make modules easier to recognize in the CRM menu and improve the overall user experience.
You can choose an icon that best represents the purpose of the module, making the CRM interface clearer and more organized for users.
- Select the module from the list.
- Click the icon next to the module to change it.
- Choose the new icon and confirm the change using the Save button.
Relations between modules
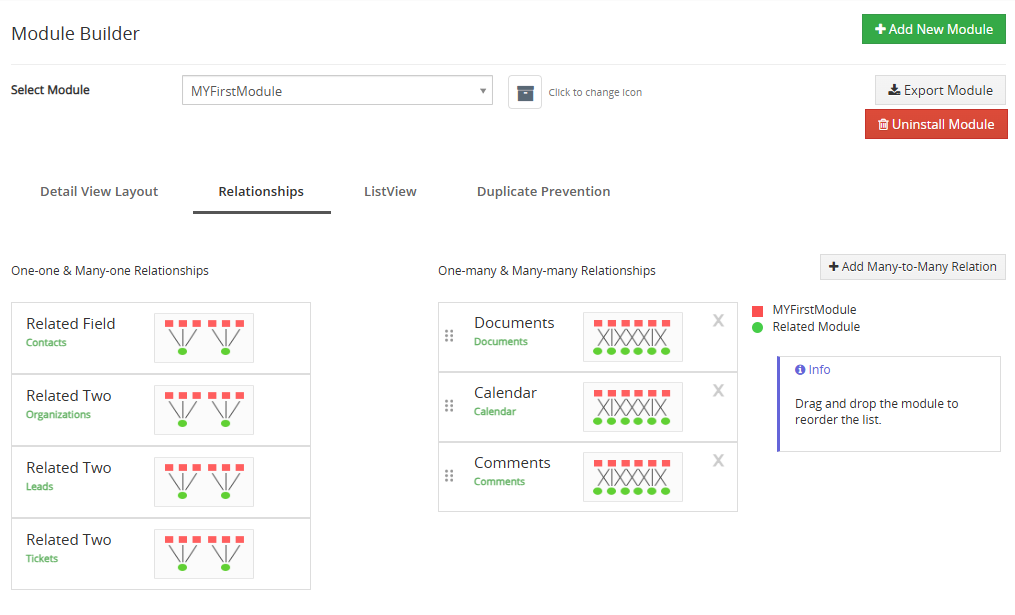
Module Builder supports creating relations between modules. This allows you to connect records from different modules and build a more complete CRM data structure.
Relations are useful when your custom module needs to be linked with another module, for example when one record should be connected with related records from another part of the CRM.
You can create relations between custom modules or connect a custom module with existing CRM modules. This helps users work with related data directly from the module detail view.
6.Settings
Module Builder Settings can be accessed via the list view in the Installer list of Extensions.

In the Settings, you can find:
- Integration – will take you to modules Creation window
- Module Requirements – check if the all Requirements are met for your module (like Custom links, Event handlers, etc..,)
- License settings – see if a license is currently active
- Upgrade – updates extension if needed
- Uninstall – remove extension from your CRM
6.1.How to update Module Builder
The upgrade of the module is initiated via our Installer or manually.
Updating via Installer (recommended):
- open the Installer in the CRM
- in the Modules tab find your installed module and you should see the
 button available
 - If the new version is available, you will be notified via Installer Notifications icon
Updating manually:
Updating module manually is sometimes required when our support team sends you .zip package, if you are having some issues or there is any update or customization available.
Otherwise, we always recommend to use update via Installer.
Update can be done via Module Manager by clicking on the button and selecting the .zip file.
6.2.Uninstall
Safe Uninstall Protection
Prevent uninstalling a main module while related modules still exist to help protect CRM data.
Module Builder includes protection logic for related modules. The main module cannot be uninstalled while related modules still exist, which helps prevent accidental removal of module structures that are connected to other CRM data.
If you need to remove the Module Builder Main Plugin from your Vtiger, you have two options:
- Uninstall Main Module Builder via Installer.
- Manually by going to module Settings and choosing the Uninstall option.
6.2.1.How to Uninstall related modules
How to uninstall related modules
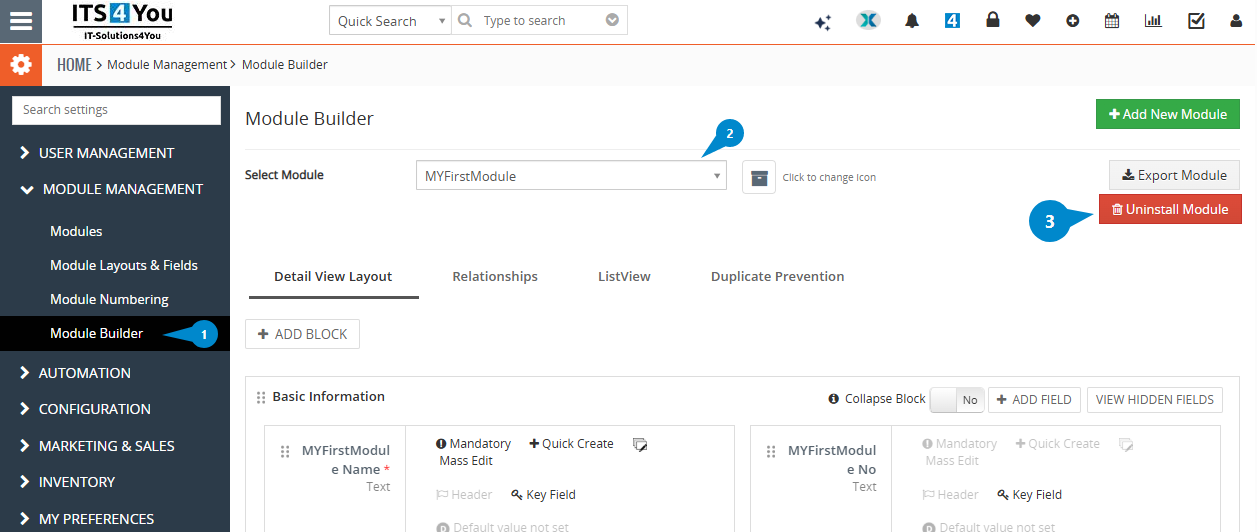
If the module you want to remove is connected to other modules, you need to uninstall the related modules first.
To uninstall a related module, go to Module Builder, find and select the module you want to remove, and click the Uninstall Module button next to it.
After all related modules are removed, you can continue with uninstalling the main module.
- Open Module Builder.
- Select the related module you want to remove.
- Click the Uninstall Module button next to the selected module.
- Repeat the process for all related modules.
- Uninstall the main module after related modules are removed.
6.2.2.Uninstall via Installer
You have also option to remove the module via Installer window by accessing the Settings – Uninstall window:
- Go to your Installer, by a click on Notifications Icon and then on the button ,
or via Main Menu – Settings – CRM Settings – Extensions – ITS4YouInstaller - Find the module you need to uninstall in the Modules tab
- Via
 pick list button choose the Uninstall option, you will be redirected to the Uninstall window.
 - Click on
 button

- Confirm uninstall with
 button
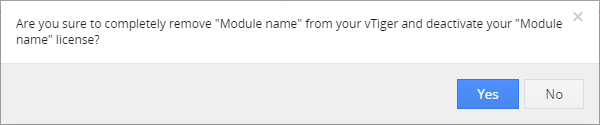
Now, the module has been removed from your Vtiger and your license has been deactivated. To use this module again, you need to provide installation and validation steps (see Installation chapter).
6.2.3.Manual Uninstall
There is also available option to remove Extension from your Vtiger manually.
To uninstall please provide following steps:
- Go to the Installer and find Module builder extension in list view, via button Settings select Uninstall.
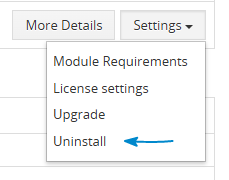
Extension Uninstall - Click on button.
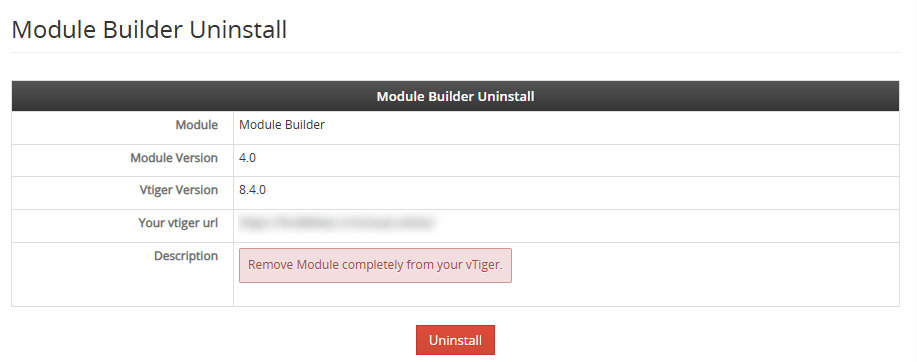 Confirm uninstall with
  button.
Now, Extension is removed from your Vtiger and your license is deactivated.
To use Vtiger Module Builder again, you need to provide installation and validation steps again.